Red Sea REEFER 900 G2+ Le manuel du propriétaire
- Taper
- Le manuel du propriétaire

REEFER™ G2+
Series
Operation Manual
ENG DE FR


ENG
DE
FR
1-11
12-23
24-35

Register your new system and enjoy a free,
extended 1-year warranty on the aquarium
glass, in addition to the standard 2-year
system warranty*:

ENG
Operation Manual
This product is protected under Community Design 003003474, US Serial No 29/555,022 and Chinese Design Application. No. 201630060633.1
Red Sea REEFER™ G2+ SERIES
Reef-Ready systems for advanced hobbyists

2
Red Sea REEFER™™ G2+ Series
REEFER™ Operation Manual
Safety ...................................................................................4
Location ................................................................................5
Assembly ..............................................................................6
Overview of the REEFER™ water management system .......8
Operation .............................................................................9
Maintenance ............................................................ ..............10
Warranty ..............................................................................11

3
ENG
Congratulations on your purchase of the
Red Sea REEFER™ reef system.
Red Sea’s REEFER™ Systems provide advanced hobbyists with a solid
foundation for building a fully featured reef or marine aquarium. The
REEFER™ Series combines a contemporary, rimless, ultra-clear glass
aquarium with a stylish cabinet and a comprehensive water management
system, including a professional sump with Red Sea’s unique silent down-
flow system and the ReefATO+ automatic top-up.
Incorporating technologies originally developed for Red Sea’s all-in-
one MAX® coral reef systems, the REEFER™ series is designed for ease
of operation while enabling hobbyists to install an unlimited choice
of lighting, filtration, circulation and controllers to create a uniquely
customized system.
This manual complements the graphic assembly manuals and contains
installation and operational instructions for all of the REEFER™ series
aquariums.
We hope that you enjoy your REEFER™ and your reef.
To benefit from product update information and exclusive special offers to registered
REEFER™ owners, please register your REEFER™ on-line at redseafish.com

4
Red Sea REEFER™™ G2+ Series
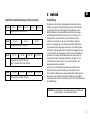
1 Safety
Please read and follow all safety instructions.
If the external cable Is damaged, It shall be replaced by the
manufacturer.
To avoid the possibility of the appliance plug or receptacle getting wet,
position the aquarium stand and tank to one side of a wall mounted
receptacle to prevent water from dripping onto the receptacle or plug.
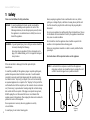
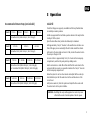
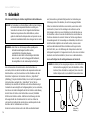
You should create a “drip loop” (see Figure 1) for each cord connecting
an aquarium appliance to a receptacle. The “drip loop” is that part of the
cord below the level of the receptacle, or the connector. Use an extension
cord, if necessary, to prevent water traveling along the cord and coming
into contact with the receptacle. If the plug or receptacle does get wet,
DO NOT unplug the cord. Disconnect the fuse or circuit breaker that
supplies power to the appliance. Then unplug the device and examine for
presence of water in the receptacle.
Close supervision is necessary when any appliance is used by
or near children.
To avoid injury, do not contact moving parts.
Always unplug an appliance from an outlet when not in use, before
putting on or taking off parts, and before cleaning. Never pull the cord
itself to remove the plug from the outlet. Grasp the plug and pull to
disconnect.
Do not use an appliance for anything other than its intended use. The use
of attachments not recommended or sold by the appliance manufacturer
may cause an unsafe condition.
Do not install or store the appliance where it will be exposed to the
weather or to temperatures below freezing point.
Make sure an appliance mounted on a tank is securely installed before
operating it.
Read and observe all the important notices on the appliance.
NOTE: A cord rated for less amperes or watts than the appliance
rating may overheat. Care should be taken to arrange the cord
so that it cannot be tripped over or pulled accidental.
DANGER: To avoid possible electric shock, special care should be
taken when handling a wet aquarium. For each of the
following situations, do not attempt repairs yourself; return
the appliance to an authorized service facility for service or
discard the appliance.
WARNING: To guard against injury, basic safety precautions should be
observed, including the following:
Do not operate any appliance if it has a damaged cord or
plug, if it is malfunctioning, or if it is dropped or damaged
in any manner.
Drip Loop
figure 1

5
ENG
2 Location
The first step in setting up the REEFER™ is to choose a suitable location.
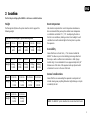
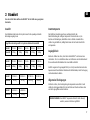
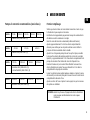
Weight
The flooring directly below the system must be rated to support the
following weight:
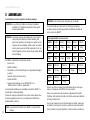
Approximate total weight of system including water
Model 170 G2+ 200 G2+ 250 G2+ 300 G2+ 350 G2+
Weight 275Kg/
607lb
315kg/
695lb
380Kg/
840lb
470kg/
1035lb
530kg/
1170lb
Model 425 G2+ 525 G2+ 625 G2+ 750 G2+ 900 G2+
Weight 690kg/
1520lb
850kg/
1875lb
930kg/
2060lb
1110kg/
2460lb
1300kg/
2870lb
Model P-350 G2+ P-500 G2+ PS-700 G2+ PS-950 G2+
Weight 550 kg/
1213lb
761 kg/
1678lb
1087 kg/
2397lb
1460 kg /
3219lb
Model S-850 G2+ S-1000 G2+
Weight 1210kg/
2675lb
1465kg/
3240lb NOTE: The REEEFER™ system should not be moved when full of water.
Room temperature
Site selection is important for correct temperature maintenance.
We recommended that you keep the ambient room temperature
a comfortable and stable 22°C / 72°F. Avoid placing the tank in
front of an air conditioner, heating vents or direct sunlight. A well
ventilated room with moderate light is the best place to position
the aquarium.
Accessibility
Ensure that there is at least 10cm / 4” of clearance behind the
REEFER™ to allow easy access for installing/removing cables from
the sump as well as sufficient air circulation for a chiller (larger
models only). It is recommended to leave approximately 60cm/24”
between one of the sides of the aquarium and any adjacent walls
or furniture for access to the rear of the tank.
General considerations
Ensure that the area surrounding the aquarium is waterproof and
consider moving away anything that water might damage or may be
corroded by the salt.

6
Red Sea REEFER™™ G2+ Series
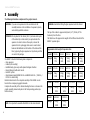
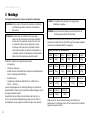
3 Assembly
The following information complements the graphic manuals.
The REEFER™ includes the following main components:
• Glass aquarium
• Cabinet (self-assembly)
• ReefMat Ready glass sump with optional Refugium chamber
• Internal Piping kit with outlet nozzle
• ReefATO+ system
• Glass Extension Sump (REEFER 900 G2+ and REEFER-S 850 G2+ / 1000 G2+ /
PS-950 G2+ models only)
Detailed instructions for the complete assembly of the REEFER™ can be
found in the accompanying graphic manuals.
Complete the assembly of the cabinet including the doors as shown in the
graphic assembly manual and place in the final operating position (see
location above).
The top of the cabinet is approximately 86cm/34” ( 100cm/40” for
Peninsula ) from the floor.
The table shows the approximate weights of the different models of the
REEFER™ aquarium glass.
Approximate total weight of Aquarium Glass
Model 170 G2+ 200 G2+ 250 G2+ 300 G2+ 350 G2+
Weight 35Kg/
77lb
40kg/
88lb
55Kg/
122lb
58kg/
128lb
64kg/
140lb
Model 425 G2+ 525 G2+ 625 G2+ 750 G2+ 900 G2+
Weight 95kg/
210lb
125kg/
275lb
155kg/
340lb
195kg/
430lb
225kg/
500lb
Model P-350 G2+ P-500 G2+ PS-700 G2+ PS-950 G2+
Weight 101 kg/
223lb
121 kg/
267lb
206 kg/
454lb
251 kg/
553lb
Model S-850 G2+ S-1000 G2+
Weight 226Kg/
500lb
258Kg/
570lb
WARNING: If you are not experienced in the construction of self-
assembly furniture or the installation of aquarium systems,
seek suitably qualified assistance.
ATTENTION: The top board of the cabinet (Part C) and some other parts
of the cabinet (in certain models) are packed under the
aquarium. In order to retrieve these parts, remove the
aquarium from its packaging. Make sure to avoid contact
between the Bulkheads on the bottom of the tank and the
floor, by placing the glass aquarium on Styrofoam parts that
are used in the package.
WARNING: Read before lifting the glass aquarium onto the cabinet.
NOTE: It is important to assemble the REEFER™ in the order indicated.

7
ENG
Ensure that you have the correct number of people to lift the aquarium
according to its weight and size.
Ensure that anyone lifting the aquarium is physically suitable for such an
operation and has been instructed in the correct methods of lifting heavy
objects.
Once the aquarium is correctly aligned with the cabinet, check that the
cabinet has not moved. If necessary readjust the position of the cabinet.
For units with adjustable legs: Using a spirit level on the top surface of the
glass tank, adjust the height of the legs to level the aquarium. Make sure
that all legs are touching the floor.
Before placing the glass sump in the cabinet make sure that the cabinet
doors are correctly aligned (see instructions in the cabinet assembly
manual). With the doors properly aligned, rotate the front section of the
push opener to the correct extension so that the doors will pop open when
pushed.
Overflow box pipes: Make sure that that the O-rings are in position on the
threaded connectors before assembly. To ensure correct assembly, firmly
hold the threaded connectors from inside the cabinet and tighten well by
hand. Do not use tools. Avoid unscrewing the pipes from the overflow box
once assembled as the locking mechanism that prevents counter-rotation
will be less effective.
Sump pipes: Make sure that the O-rings are in position on the connectors
before assembly. After assembly check that the securing nut is holding the
pipe in position. Do not use tools and do not overtighten.
Overflow Box Cover: The overflow box cover reduces noise from the water
fall of the surface skimmer. If you wish to use the rear wall of the overflow
box for mounting equipment such as lighting, break out the section of the
cover as shown in the graphic manual. After breaking out the removable
section, smooth the remaining edge with a file or sandpaper.
ReefATO+: Install the ReefATO+ sensor and tube holder in the pump
chamber of the sump as instructed in the additional manual and select a
suitable place for mounting the controller and other components provided
with it.
The ReefATO+ has many smart features so it is recommended to review
the manual to properly understand how to use them.
After initial installation make sure that the Auto-fill is switched off until the
REEFER system is filled to its normal operating level with saltwater.
The REEFER G2+ systems do not include a reservoir for the top-off water.

8
Red Sea REEFER™™ G2+ Series
4 Overview of the REEFER™
water management system
Surface Skimmer / Overflow Box
Surface water from the aquarium flows via the removable comb sections
of the surface skimmer into the overflow box that houses the dual
intakes of the silent-flow downpipe system and the outlet nozzle of the
sump return pump. The silent-flow downpipe system includes a flow-
regulated main downpipe and a secondary overflow bypass pipe. An
external pipe is placed over the main downpipe to ensure positive water
motion throughout the entire height of the overflow box.
The fine adjustment flow valve on the main downpipe enables the water
level in the overflow box to be maintained at a constant height between
the intakes of the main and bypass pipes, which ensures positive surface
skimming while eliminating all noise from the water flow to the sump.
An incorrect setting of the flow valve will be accompanied by the sound
of the water returning to the sump and is an indication that the flow
valve needs adjusting.
Sump
Water from the flow-regulated main downpipe and the secondary
overflow bypass pipe enter a compact reception chamber in the sump.
Care should be taken in the choice of any filter media placed in the
reception chamber as the turbulent flow conditions from the downpipe
could cause a constant discharge of fine media particles.
The water then flows through the 225 micron filter bags or cups before
entering the constant-height main reactor or skimmer chamber. If the
filter bags are not cleaned frequently enough and become blocked, the
water will bypass the filter bags without affecting the overall operation
of the sump.
To install a ReefMat or other roller filter, remove the filter-bag tray and
slide out the removable divider wall.
The optional refugium wall divides the sump chamber into 2 sections. The
water level in the front (refugium) section is set by the combs at the top
of the wall. The water level in the rear (skimmer) section is set by the
height of the pump chamber inlet gate that should be set according to
the requirements of your skimmer.
A bubble trap labyrinth with coarse sponge, at the inlet of the pump
compartment, will prevent bubbles from the skimmer being returned to
the aquarium.
Any loss of water due to evaporation will cause a drop in the water level
in the pump compartment of the sump. Maintaining a constant water
height in the pump compartment is essential for the stability of the entire
water management system by ensuring a constant head pressure on the
intake of the main pump.
The ReefATO+ supplied with the system will automatically replace the
water lost to evaporation and will maintain the water level in the pump
compartment at a stable constant level.

9
ENG
Recommended Return Pump (not included)
Model 170 G2+ 200 G2+ 250 G2+ 300 G2+ 350 G2+
1x ReefRun 5500 (2000-5500 lph / 530-1450 gph)
Model 425 G2+ 525 G2+ 625 G2+
1x ReefRun 7000 (3000-7000 lph / 800-1900 gph)
Model 750 G2+ P-350 G2+ P-500 G2+ PS-700 G2+
2x ReefRun 5500 (2000-5500 lph / 530-1450 gph)
or 1x ReefRun7000 (3000-7000 lph / 800-1900 gph)
Model S-850 G2+ 900 G2+ PS-950 G2+ S-1000 G2+
2x ReefRun 7000 (3000-7000 lph / 800-1900 gph)
5 Operation
Initial Fill
Check that all pipes are properly assembled and that any flexible tubes
are suitably secured in position.
Install any equipment that will take up water volume in the sump before
starting to fill the system.
Open the main flow valve (rotate anti-clockwise) to maximum.
Add approximately 15cm/6” of water to the overflow box to make sure
that all the pipe joins are watertight. Check for leaks inside the cabinet.
Add water to the main tank and once it is full, monitor the water level in
the sump as it begins to fill.
As soon as there is approximately 15cm/6” of water in the main pump
compartment, switch on the pump and stop adding water.
Switch on skimmers or other filters that will affect the water level in the
sump and add more water as required to maintain the 15cm/6” of water
in the main pump compartment.
Allow the system to run for a few minutes and adjust the flow valve (as
described below) so that the water level in the overflow box is at the
correct level.
Add/remove water to/from the system and adjust the flow valve until
the water levels in the system stabilise.
WARNING: Overfilling the sump with equipment or water may cause
a flood in the event of an interruption of electric power.

10
Red Sea REEFER™™ G2+ Series
Main downpipe valve adjustment
To raise the water level in the overflow box, rotate the valve clockwise.To
lower the water level in the overflow box, rotate the valve counter clockwise.
The main downpipe flow valve provides a very fine control of the flow
rate however after making adjustments it takes the system a few
minutes to stabilize at the new setting.
Once you have established the approximate setting for the valve make
very small adjustments and wait for a few minutes each time. It may
take a number of occasional adjustments to reach a stable level. When
set properly this system removes all of the noise of water flowing down
to the sump.
ReefATO+
When the water volume and flow in the system has stabilized, check that
the ReefATO+ sensor and tubing are correctly installed and that the ATO
pump is fully submerged in water in your top-off reservoir.
Before activating the Auto-fill from the ReefBeat App, you can check
the water level in the pump chamber relative to the sensor by using the
"Check sump water level" feature.
If the water level is below the the sensor, you may wish to add some
more salt water to the system before activating the Auto-fill.
Power-out test
After completing the initial set up and after adding any new equipment
to the sump, make any adjustments necessary to the main valve to
stabilise the system and perform a “power-out” test to check that water
does not rise above the rim of the sump.
6 Maintenance
For continuous smooth operation of the water management system make
regular checks of the following:
• Water level in the overflow box - adjust the flow valve as required
• Water level in the reservoir – top up with RO water as required
• Check that the ReefATO+ sensor is free from algae or calcium
deposits
• Micron Filter Bags – check that water is flowing through the bags
and clean/replace as required
• Surface skimmer combs – remove any deposits that reduce water flow
• Pump outlet nozzle – check for blockages and build-up of algae
Micron Filter bags
It is recommended to have at least 3 sets of filter bags.
There are a few options for cleaning the filter bags:
Quick and effective – Spray the outside of the bags with a powerful
water jet such as a garden hose to back-flush the detritus from the
Polyester bag.
More thorough – soak the bags in bleach or diluted vinegar for 24 hours
prior to spraying as above. Rinse well to remove all chemicals before
returning to sump.
The filter bags can also be put in a cold wash in a washing machine with regular
detergent or with vinegar (may require approval from a higher authority).

11
ENG
Warranty
Red Sea Aquarium Products Limited Warranty.
Thank you for purchasing a Red Sea Aquarium System (hereinafter “the
Product”).
Red Sea Aquatics (UK) Ltd. (hereinafter “Red Sea”) warrants the product
against manufacturer’s defects in material and workmanship for 24
months from your date of purchase. If you register your product, Red
Sea will provide you with an additional 12 months of warranty on the
glass aquarium only (but not on any other components of the Product).
In jurisdictions where warranty terms conditioned on registration are
prohibited by law, registration is not required, and you shall receive the
additional 12 months warranty on the glass aquarium even if you do not
register.
You can register your Product at www.redseafish.com
The warranty provided by Red Sea is NOT TRANSFERABLE AND IS
LIMITED TO THE ORIGINAL PURCHASER. If the Product is eligible under
this warranty, Red Sea will either repair the Product free of charge (not
including shipping costs) with new or refurbished parts or replace the
Product with a new or refurbished Product at Red Sea’s sole discretion.
This warranty DOES NOT COVER normal wear and tear, or items that
have a limited natural life or are consumable, such as, but not limited to
impellers, sponges, filter socks, and “O” rings. It also DOES NOT COVER
damage which occurs in shipment and/or failures or defects resulting
from use outside the normal, and/or natural disasters, accidents, power
line surges, neglect, improper installation, operation or maintenance,
servicing of the Product conducted by anyone other than an authorized
Red Sea service center, or failure to use or assemble the Product in
accordance with any instructions provided (in the Product manual or
otherwise) or the technical and/or safety standards of the country in
which the Product is used. Additionally, any modification of the Product
other than by an authorized Red Sea service center will invalidate this
warranty.
In order to effect this warranty, please contact your local service center.
For your convenience, details of authorized service centers can be found
on Red Sea’s website. Proof of purchase will be required before warranty
performance is rendered.
The sole and exclusive remedy against Red Sea shall be for the repair
or replacement of the Product as provided above. NO OTHER REMEDY
(including but not limited to, incidental or consequential damages for
lost profits, lost sales, or any other incidental or consequential loss) shall
be available. Some jurisdictions do not allow the exclusion of incidental
or consequential damage, so the above limitation may not apply to
you. To the full extent allowed by applicable law, in no event shall Red
Sea be liable for any loss or damage to aquatic life, and/or damage to
other property and/or individuals resulting from the use of the Product
or arising out of any breach of this warranty. All implied warranties are
excluded to the full extent allowed by applicable law, and to the extent
that they may not be excluded, are limited to the applicable warranty
period set forth above. Some jurisdictions do not allow limitations on how
long an implied warranty or condition lasts, so this limitation may not
apply to you. The express warranties made in this warranty are exclusive
and may not be altered, enlarged, or changed by any distributor, dealer,
or other person, whatsoever.

12
Red Sea REEFER™™ G2+ Series
Registrieren Sie Ihr neues System und genießen
Sie zusätzlich zur standardmäßigen 2-Jahres-
Systemgarantie eine kostenlose, erweiterte
1-Jahres-Garantie auf das Aquarienglas*:

13
ENG
DE
Red Sea REEFER™ G2+ SERIE
Innovative rahmenlose Riffsysteme für alle
anspruchsvollen Aquarianer
Dieses Produkt ist im Rahmen des gemeinschaftlichen Entwurfs 003003474, US-Serien-Nr. 29 / 555,022
und chinesischer Entwurfs-Anmeldung Nr. 201630060633.1 geschützt
Bedienungsanleitung

14
Red Sea REEFER™™ G2+ Series
REEFER™ Bedienungshandbuch
Sicherheit .............................................................................16
Standort .................................................................. ..............17
Montage ...............................................................................18
Übersicht zum Wassermanagementsystem des REEFER™...20
Betrieb ..................................................................................21
Wartung ................................................................................22
Garantie .................................................................................23

15
ENG
DE
Herzlichen Glückwunsch zu Ihrem Kauf des
Red Sea REEFER™ Riffsystems.
Die REEFER™-Systeme von Red Sea bieten fortgeschrittenen Hobbyisten
eine solide Grundlage für den Bau eines voll ausgestatteten Riff- oder
Meerwasseraquariums. Die REEFER™-Serie kombiniert ein modernes,
randloses, ultraklares Glasaquarium mit einem eleganten Gehäuse und
einem umfassenden Wassermanagementsystem, einschließlich eines
professionellen Technikbeckens mit Red Seas einzigartigem geräuschlosem
Down-Flow-System und der automatischen Nachfüllung ReefATO+.
Einschließlich der Technologien, die eigens für die “All-In-One” MAX®
Korallenriffsysteme von Red Sea entwickelt wurden, wurde die REEFER™
Serie für eine einfache Handhabung konzipiert, die es dem erfahrenen
Aquarianer ermöglicht, aus einer unbegrenzten Komponentenvielfalt
Beleuchtung, Filterung, Strömung und Steuerungseinheiten zu wählen und
sich so sein individuelles, einzigartiges System zusammen zu stellen.
Dieses Handbuch enthält Anleitungen zum Aufbau und Betrieb aller
Aquarien der Baureihe Red Sea REEFER™.
Wir hoffen, dass Sie an Ihrem REEFER™ viel Freude haben.
Um in den Genuss von Informationen zu Produkt-Updates und exklusiven
Sonderangeboten für registrierte REEFER™-Besitzer zu kommen, registrieren Sie
bitte Ihr REEFER™ online unter redseafish.com

16
Red Sea REEFER™™ G2+ Series
1 Sicherheit
Bitte lesen und befolgen Sie alle hier aufgeführten Sicherheitshinweise.
Um ein Nasswerden des Gerätesteckers oder der Steckdose zu
vermeiden, stellen Sie Gestell und Becken des Aquariums neben einer
Wandsteckdose so auf, dass kein Wasser auf die Steckdose oder den
Netzstecker tropfen kann. Der Benutzer sollte eine „Tropfschleife“
(Abbildung 1) für jedes Netzkabel bilden, das ein Gerät des Aquariums
mit der Steckdose verbindet. Die „Tropfschleife“ ist der Teil des
Netzkabels, der unterhalb der Steckdose oder der Anschlussdose liegt.
Vermeiden Sie wenn möglich ein Verlängerungskabel, um zu vermeiden,
dass Wasser am Kabel entlangläuft und mit der Steckdose in Berührung
kommt. Wenn der Stecker oder die Steckdose nass wird, Netzkabel
NICHT aus der Steckdose ziehen. Schalten Sie die Sicherung oder den
Sicherungsschalter des Stromkreises für das Gerät aus. Ziehen Sie
erst danach das Netzkabel des Gerätes heraus und überprüfen Sie die
Steckdose auf das Vorhandensein von Wasser.
Wenn das Gerät von Kindern oder in der Nähe von Kindern benutzt
wird, müssen diese gut beaufsichtigt werden. Zur Vermeidung von
Verletzungen keine Teile berühren, die sich in Bewegung befinden.
Ziehen Sie immer den Netzstecker eines Gerätes, wenn dieses nicht
in Gebrauch ist, bevor Sie Teile anbringen oder entfernen und vor
dem Reinigen. Ziehen Sie nie am Netzkabel, um den Netzstecker aus
der Steckdose zu lösen. Fassen Sie den Netzstecker an und ziehen sie
ihn heraus. Benutzen Sie ein Gerät immer nur für den vorgesehenen
Verwendungszweck. Die Verwendung von Anbauteilen, die nicht vom
Gerätehersteller empfohlen oder verkauft werden, kann zu einem
unsicheren Betriebszustand führen. Installieren oder lagern Sie das
Gerät nicht dort, wo es der Witterung oder Temperaturen unter dem
Gefrierpunkt ausgesetzt ist. Vergewissern Sie sich, dass ein an ein Becken
montiertes Gerät sicher installiert ist, bevor Sie es in Betrieb nehmen.
Lesen und befolgen Sie alle wichtigen Hinweise auf dem Gerät.
HINWEIS: Ein Kabel, das für eine geringere Ampere- oder Wattzahl als
die des Gerätes ausgelegt ist, kann sich überhitzen. Achten
Sie darauf, dass das Kabel so verlegt wird, dass man nicht
darüber stolpern oder es versehentlich herausziehen kann.
GEFAHR: Zur Vermeidung von Stromschlägen sollten Sie beim Umgang
mit einem nassen Aquarium besonders vorsichtig sein.
Versuchen Sie in keiner der im Folgenden beschriebenen
Situationen Reparaturen selber durchzuführen, sondern
geben Sie elektronische Komponenten zur Reparatur an eine
autorisierte Kundendienststelle oder entsorgen Sie das Gerät.
WARNUNG: Zum Schutz vor Verletzungen sollten grundlegende
Sicherheitsvorkehrungen beachtet werden,
einschließlich der folgenden Hinweise:
Betreiben Sie kein Gerät mit beschädigtem Netzkabel
oder ein Gerät, das nicht ordnungsgemäß funktioniert,
heruntergefallen ist oder anderweitig beschädigt ist.
Tropfschleife
Abbildung 1
La page est en cours de chargement...
La page est en cours de chargement...
La page est en cours de chargement...
La page est en cours de chargement...
La page est en cours de chargement...
La page est en cours de chargement...
La page est en cours de chargement...
La page est en cours de chargement...
La page est en cours de chargement...
La page est en cours de chargement...
La page est en cours de chargement...
La page est en cours de chargement...
La page est en cours de chargement...
La page est en cours de chargement...
La page est en cours de chargement...
La page est en cours de chargement...
La page est en cours de chargement...
La page est en cours de chargement...
La page est en cours de chargement...
La page est en cours de chargement...
-
 1
1
-
 2
2
-
 3
3
-
 4
4
-
 5
5
-
 6
6
-
 7
7
-
 8
8
-
 9
9
-
 10
10
-
 11
11
-
 12
12
-
 13
13
-
 14
14
-
 15
15
-
 16
16
-
 17
17
-
 18
18
-
 19
19
-
 20
20
-
 21
21
-
 22
22
-
 23
23
-
 24
24
-
 25
25
-
 26
26
-
 27
27
-
 28
28
-
 29
29
-
 30
30
-
 31
31
-
 32
32
-
 33
33
-
 34
34
-
 35
35
-
 36
36
-
 37
37
-
 38
38
-
 39
39
-
 40
40


Red Sea REEFER 900 G2+ Le manuel du propriétaire
- Taper
- Le manuel du propriétaire
dans d''autres langues
Documents connexes
-
Red Sea REEFER 300 G2 Le manuel du propriétaire
-
Red Sea ReefRun Manuel utilisateur
-
 Red Sea 212158 RSK 300 Reefer Internal Protein Skimmer Manuel utilisateur
-
 Red Sea REEFER DC Skimmer 300 Le manuel du propriétaire
-
 Red Sea REEFER DC Skimmer 300 Le manuel du propriétaire
-
 Red Sea ReefMat 500 Manuel utilisateur
-
 Red Sea ReefATO+ Le manuel du propriétaire
-
Red Sea MAX E-260 Le manuel du propriétaire
-
 Red Sea MAX NANO Cube Le manuel du propriétaire
-
Red Sea 7029 Manuel utilisateur