Razer Raiju Ultimate RZ06-0260 Manuel utilisateur
- Taper
- Manuel utilisateur

Date: 23 July 2018
USER MANUAL FOR GAMING CONTROLLER
RZ06-0260

FOR GAMERS. BY GAMERS.
™
1
PACKAGE CONTENTS / SYSTEM REQUIREMENTS
PACKAGE CONTENTS
Gaming controller (Model: RZ06-0260)
USB to Micro-USB cable
Carrying case
Tilting D-pad module
2 thumbstick modules
Important Product Information Guide
SYSTEM REQUIREMENTS
PRODUCT REQUIREMENTS
PlayStation®4 / PC (Windows 7 or higher) / Mobile device (iOS or Android)
A free USB port or Bluetooth connectivity
MOBILE APP REQUIREMENTS
iOS or Android mobile device with Bluetooth compatibility
Internet connection
85 MB of free storage space for iOS
20 MB of free storage space for Android

FOR GAMERS. BY GAMERS.
™
2
REGISTRATION / TECHNICAL SUPPORT
REGISTRATION
Register your product online at razerid.razer.com/warranty to get real-time information on your
product’s warranty status.
If you haven’t registered for a Razer ID yet, register now at razerid.razer.com to get a wide range of
Razer benefits.
TECHNICAL SUPPORT
1 year limited manufacturer’s warranty.
Free online technical support at support.razer.com.
Your product’s serial number
can be found here.

FOR GAMERS. BY GAMERS.
™
3
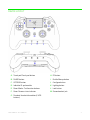
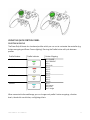
DEVICE LAYOUT
A. Touch pad/Touch pad button
B. SHARE button
C. OPTIONS button
D. Individual D-pad module
E. Razer Mecha-Tactile action buttons
F. Razer Chroma status indicator
G. Standard thumbstick modules (L3/R3
buttons)
H. PS button
I. Profile/Remap button
J. Configure button
K. Lighting button
L. Lock button
M. Stereo headset jack

FOR GAMERS. BY GAMERS.
™
4
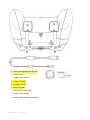
N. Multi-Function Buttons (M1-M4)
O. Mode switch
P. Trigger stop switches
Q. Triggers (L2/R2)
R. Bumpers (L1/R1)
S. Micro-USB port
T. USB to Micro-USB cable
U. Tilting D-pad module
V. Long/convex thumbstick modules

FOR GAMERS. BY GAMERS.
™
5
SETTING UP YOUR RAZER RAIJU ULTIMATE
CHARGING YOUR RAZER RAIJU ULTIMATE
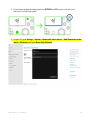
For first time activation, please plug your controller to a powered USB port or use wired mode. It
takes approximately 4 hours to fully charge your Razer Raiju Ultimate.
Low power Charged
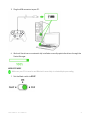
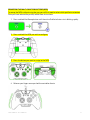
CONNECTING TO YOUR PLAYSTATION®4 CONSOLE
WIRED MODE
1. Set the Mode switch to USB.
2. Plug the micro-USB connector to your Razer Raiju Ultimate.

FOR GAMERS. BY GAMERS.
™
6
3. Plug the USB connector of your Razer Raiju Ultimate to your PlayStation®4 console.
4. Press the PS button and your Razer Raiju Ultimate is ready to go.
WIRELESS MODE
Make sure your gaming console is turned on before proceeding.
1. Set the Mode switch to PS4 BT.
2. Activate pairing mode by holding both the SHARE and PS buttons until the status indicator
starts blinking rapidly.

FOR GAMERS. BY GAMERS.
™
7
3. On your PS4, go to Settings > Devices > Bluetooth Devices and select Razer Raiju
Ultimate.
4. Choose Yes when asked to register the Bluetooth device.

FOR GAMERS. BY GAMERS.
™
8
5. Wait until the status indicator stops blinking and your Razer Raiju Ultimate is ready to go.
Pairing mode can be cancelled by holding the PS button until the controller is turned off. Pairing
mode will automatically stop if it does not pair with a device after 60 seconds.
CONNECTING TO YOUR PC
WIRED MODE
1. Set the Mode switch to USB.
2. Plug the micro USB connector to your Razer Raiju Ultimate.

FOR GAMERS. BY GAMERS.
™
9
3. Plug the USB connector to your PC.
4. Wait until the drivers are automatically installed or manually update the drivers through the
Device Manager.
WIRELESS MODE
Make sure your PC is turned on and Bluetooth connectivity is activated before proceeding.
1. Set the Mode switch to PC BT.

FOR GAMERS. BY GAMERS.
™
10
2. Activate pairing mode by holding both the OPTIONS and PS buttons until the status
indicator starts blinking rapidly.
3. On your PC, go to Settings > Devices > Bluetooth & other devices > Add Bluetooth or other
device > Bluetooth and select Razer Raiju Ultimate.

FOR GAMERS. BY GAMERS.
™
11
4. Click Done to close the confirmation screen and your Razer Raiju Ultimate is ready to go.
Pairing mode can be cancelled by holding the PS button until the controller is turned off. Pairing
mode will automatically stop if it does not pair with a device after 60 seconds.

FOR GAMERS. BY GAMERS.
™
12
USING YOUR RAZER RAIJU ULTIMATE
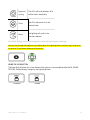
USING THE TRIGGER STOP SWITCHES
The Trigger Stops allows you to activate the Left and Right Triggers faster by shortening their
travel distance and reducing their response time (Active Hair Trigger Mode). To enable the Trigger
Stops, simply slide the switches outwards; and to disable the Trigger Stops, slide the switches
inwards.
Enabled Disabled
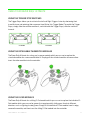
USING THE DETACHABLE THUMBSTICK MODULES
The Razer Raiju Ultimate has a long and a convex module which you can use to replace the
standard modules for a more comfortable fit. Simply pull the standard modules to remove then
insert the other modules into the controller.
USING THE D-PAD MODULES
The Razer Raiju Ultimate has a tilting D-Pad module which you can use to replace the individual D-
Pad module which you can use for games that require quickly sliding your thumb in different
directions such as fighting/arcade games. Simply lift the individual D-Pad module from its edge,
remove the module, and then insert the tilting D-Pad module into the controller.

FOR GAMERS. BY GAMERS.
™
13
USING THE QUICK CONTROL PANEL
SELECTING A PROFILE
The Razer Raiju Ultimate has 4 onboard profiles which you can use to customize the controller (e.g.
button remapping and Razer Chroma lighting). Pressing the Profile button will cycle between
profiles.
Profile Number
Profile Indicator
Button Mapping
Profile 1
M1-SQUARE
M2-TRIANGLE
M3-X
M4-Circle
Profile 2
M1
-
L1
M2-R1
M3-L1
M4-R1
Profile 3
M1-L1
M2-R1
M3-L2
M4-R2
Profile 4
M1-X
M2-Square
M3-Circle
M4-Triangle
When connected to the mobile app, you can change each profile’s button mappings, vibration
levels, thumbstick sensitivities, and lighting effects.

FOR GAMERS. BY GAMERS.
™
14
REMAPPING THE MULTI-FUNCTION BUTTONS (MFB)
To remap the MFBs without using the app, you will first need to select which profile to customize.
After you have selected the profile, follow these instructions:
1. Press and hold the Remap button until the active Profile Indicator starts blinking rapidly.
2. Press and hold the MFB you wish to configure.
3. Press the button you want to assign to the MFB.
4. Release your fingers once you feel the controller vibrate.

FOR GAMERS. BY GAMERS.
™
15
Note: The PS button cannot be remapped to the MFB instead, it will remove the current mapping. When
connected to the mobile app, you can change each profile’s button mappings, vibration levels, thumbstick
sensitivities, and lighting effects.
USING THE CONFIGURE BUTTON
The Razer Raiju Ultimate has a Configure button which you can use to connect/disconnect with the
mobile app.
Connected Disconnected
When connected to the mobile app, you can change your controller’s button mappings, vibration
levels, and thumbstick sensitivities.
USING THE LIGHTING BUTTON
The Lighting button allows you to select different Chroma lighting effects on-the fly. You can cycle
lighting effects by pressing the Lighting button repeatedly or select a specific lighting effect by
holding down the Lighting button and pressing the D-pad left/right to choose the lighting effect.
Listed here are the lighting effects and their short description:
Name Description
Breathing
The lighting fades in and out of
the selected color(s)
Immersive
The LEDs will light up when the
controller vibrates.
Reactive
The LEDs will light up when a
button is pressed and will fade off
after a specified period of time.

FOR GAMERS. BY GAMERS.
™
16
Spectrum
cycling
The LEDs will cycle between 16.8
million colors indefinitely
Static
The LEDs will remain lit in the
selected color
Wave
The lighting will scroll in the
direction selected
Note: Other settings such as color and pattern can be adjusted using the mobile app.
You can also change the brightness by holding down the Lighting button and pressing D-pad up to
increase or D-pad down to decrease luminosity.
USING THE LOCK BUTTON
The Razer Raiju Ultimate has a Lock button which you can use to enable/disable the PS, SHARE,
OPTIONS, Profile/Remap, Configure, and Lighting buttons.
Unlocked Locked

FOR GAMERS. BY GAMERS.
™
17
CONFIGURING YOUR RAZER RAIJU ULTIMATE VIA MOBILE APP
1. Download the mobile app on your mobile device.
2. Launch the app and follow the onscreen instructions.
Congratulations, you are now ready to use your Razer Raiju Ultimate. Have fun!
FCC Statement
This equipment has been tested and found to comply with the limits for a Class B digital device,
pursuant to part 15 of the FCC Rules. These limits
are
designed to provide reasonable
protection against harmful interference in a residential installation. This equipment generates
uses and can radiate radio frequency energy and, if not installed and used in accordance with
the instructions, may cause harmful interference to radio communications. However, there is
no guarantee that interference will not occur in a particular installation. If this equipment does
cause harmful interference to radio or television reception, which can be determined by turning
the equipment off and on, the user is encouraged to try to correct the interference by one or
more of the following measures:
—Reorient or relocate the receiving antenna.
—Increase the separation between the equipment and receiver.
—Connect the equipment into an outlet on a circuit different from that to which the receiver is
connected.
—Consult the dealer or an experienced radio/TV technician for help.
FCC Radiation Exposure Statement
This device complies with FCC radiation exposure limits set forth for an uncontrolled
environment and it also complies with Part 15 of the FCC RF Rules. This equipment must not
be co-located or operating in conjunction with any other antenna or transmitter. End-users and
installers must be provide with antenna installation instructions and consider removing the
no-collocation statement.
This device complies with Part 15 of the FCC Rules. Operation is subject to the
following two conditions: (1) this device may not cause harmful interference, and (2)
this device must accept any interference received, including interference that may
cause undesired operation.

FOR GAMERS. BY GAMERS.
™
18
Caution!
Any changes or modifications not expressly approved by the party responsible for
compliance could void the user's authority to operate the equipment.
Canada Statement
This device complies with Industry Canada’s licence-exempt RSSs. Operation is subject to the
following two conditions:
(1) This device may not cause interference; and
(2) This device must accept any interference, including interference that may cause undesired
operation of the device.
Le présent appareil est conforme aux CNR d’Industrie Canada applicables aux appareils radio
exempts de licence. L’exploitation est autorisée aux deux conditions suivantes :
(1) l’appareil ne doit pas produire de brouillage;
(2) l’utilisateur de l’appareil doit accepter tout brouillage radioélectrique subi, même si le
brouillage est susceptible d’en compromettre le fonctionnement.
The device meets the exemption from the routine evaluation limits in section 2.5 of RSS 102
and compliance with RSS-102 RF exposure, users can obtain Canadian information on RF
exposure and compliance.
Le dispositif rencontre l'exemption des limites courantes d'évaluation dans la section 2.5 de
RSS 102 et la conformité à l'exposition de RSS-102 rf, utilisateurs peut obtenir l'information
canadienne sur l'exposition et la conformité de rf.
-
 1
1
-
 2
2
-
 3
3
-
 4
4
-
 5
5
-
 6
6
-
 7
7
-
 8
8
-
 9
9
-
 10
10
-
 11
11
-
 12
12
-
 13
13
-
 14
14
-
 15
15
-
 16
16
-
 17
17
-
 18
18
-
 19
19


Razer Raiju Ultimate RZ06-0260 Manuel utilisateur
- Taper
- Manuel utilisateur
dans d''autres langues
Documents connexes
-
Razer RZ04-0322 Gaming Headset Manuel utilisateur
-
Razer RZ01-0399 Mode d'emploi
-
-
Razer RZ010342 GAMING MOUSE Manuel utilisateur
-
-
-
Razer RZ04-0269 Gaming Headset Manuel utilisateur
-
-
-
Autres documents
-
8Bitdo Lite SE Manuel utilisateur
-
8Bitdo Lite 2 Manuel utilisateur
-
Scosche 142RHY20GR Rhythm+ 2.0 Waterproof Armband Heart Rate Monitor Mode d'emploi
-
Logic3 NW806 Manuel utilisateur
-
Microsoft HABU Le manuel du propriétaire
-
Asus Personal Computer CM1740 Manuel utilisateur
-
Asus Essentio_CM1730 Le manuel du propriétaire