LG LBC20514TT/00 Le manuel du propriétaire
- Catégorie
- Réfrigérateurs-congélateurs
- Taper
- Le manuel du propriétaire

BOTTOM FREEZER
REFRIGERATOR
Owner's Manual
Please read this guide thoroughly
before operating and keep it handy for
reference at all times.
NGELA'
EUR
EUR
EUR
ntier avant de mettre
a portee de la
_nt.
R
OR
antes de
como referencia
RBC20512"*
_, LDC22720"*
P/No. MFL61944108

visit our web site http:l/www.lgservice.com
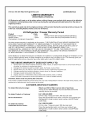
LIMITE D WARRANTY
United States of America
LG Electronics
LG Electronics will repair or at its option replace, without charge, your product which proves to be defective
in material or workmanship under normal use during the warranty period listed below from the date of
original purchase.
This warranty is good only to the original purchaser of the product during the warranty period as long as it is
in the U.S. including Alaska, Hawaii, and U.S. Territories.
LG Refrigerator / Freezer Warranty Period
Product Parts Labor
Refrigerator / Freezer 1 year 1 year [In-Home Service (Except Model GR-051 )]
Sealed System 7 years 1 year [In-Home Service (Except Model GR-051 )]
(Compressor, Condenser, Evaporator)
No other express warranty is applicable to this product. THE DURATION OF ANY IMPLIED WARRANTIES.
INCLUDING THE IMPLIED WARRANTY OF MERCHANTABILITY, IS LIMITED TO THE DURATION OF
THE EXPRESS WARRANTY HEREIN. LG ELECTRONICS SHALL NOT BE LIABLE FOR THE LOSS OF
USE OF THE PRODUCT, INCONVlENCE, LOSS ORANY OTHER DAMAGES, DIRECT OR
CONSEQUENTIAL, ARISING OUT OF THE USE OF OR INABILITY TO USE, THIS PRODUCT OR FOR
ANY BREACH OF ANY EXPRESS OR IMPLIED WARRANTY, INCLUDING THE IMPLIED WARRANTY
OF MERCHANTABILITY APPLICABLE TO THIS PRODUCT.
Some States do not allow the exclusion or limitation of incidental or consequential damages or limitations on how
long an implied warranty lasts; so these limitations or exclusions may not apply to you. This warranty gives you
specific legal rights and you may also have other rights which vary from state to state.
THE ABOVE WARRANTY DOES NOT APPLY TO:
1. Service trips to your home to deliver and pickup, install, instruct, or replace housefuses or correct house wiring or
plumbing, or correction of unauthorized repairs.
2. Damage tothe product caused by accident, pests, fire, floods, or acts of God.
3. Repairs when your LG product is used in other than normal, single-family householduse.
4. Damage resulting from accident, alteration, misuse, abuse, or improper installation.
5. Damagescaused during and/or after delivery.
6. Display,discount, or refurbished units purchased with scratches, dents, or defects.
Proofof purchase is required and must be providedto LG in order to validate warranty.
Therefore, these costs are paid by the consumer.
Ifthe product is installedoutside the normalservicearea, any costof transportation involvedin the repairof the product,or the
replacementof defective parts, shall be borne by the owner.
CUSTOMER ASSISTANCE NUMBERS:
To obtain Warranty Coverage:
To obtain Product or Customer
Service Assistance:
To obtain the nearest
Authorized Service Center:
Retain your Bill of Sale to prove date of purchase.
A Copy of your Sales Receipt must be submitted at the time
warranty service is provided.
Call 1-800-243-0000
(24 hrs a day, 7 days per week, 365 days per year)
Press the appropriate menu option, and have your product type
(Refrigerator), model number, serial number, and ZIP/Postal
Code ready.
Call 1-800-243-0000
(24 hrs a day, 7 days per week, 365 days per year)
Press the appropriate option, and have your product type
(Refrigerator), model number, serial number, and ZIP/Postal
Code ready.
2

Visite nuestro sitio web http:l/www.lgservice.com
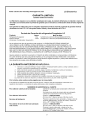
GARANT[A LIMITADA
Estados Unidos de America
LG Electronics
LG Electronics reparara o en su defecto reemplazara sin cargo, el producto defectuoso en material o mano de
obra bajo uso normal durante el periodo de garantia que se menciona a continuacion desde la fecha original de
compra.
Esta garantia es valida solo para el comprador original del producto durante el periodo de garantia mientras
permanezca en los E.E.U.U. Incluyendo Alaska, Hawaii y otros territorios de E.E.U.U.
Periodo de Garantia del refrigerador/Congelador LG
Producto _ Mano de Obra
Refrigerador/Congelador 1a_o 1a_o[Servicioadomicitio (ExceptoModeloGR-051)]
Sistema Setlado 7aSos 1aSo[Servicioa domicilio(ExceptoModeloGR-051)]
(Compresor, Condensador, Evaporador)
No se aplicara otro tipo de garantia a este producto. LA DURACION DE OTRAS GARANTIAS,
INCLUYENDO LA DE COMPRA, ESTAN LIMITADAS A LA DURAClON DE ESTA GARANTIA. LG
ELECTRONICS NO SE HACE RESPONSABLE POR LA PERDIDA EN EL USO DEL PRODUCTO,
POR INCONVENIENClA O CUALQUIER OTRO DANO DIRECTO O CONSECUENTE QUE PROVENGA
DEL USO Y/O NO USO DE ESTE PRODUCTO O POR ALGUNA VIOLAClON ALAS GARANTIAS
IMPLEMENTADAS INCLUYENDO LA GARANTIA DE COMPRAAPLICADAA ESTE PRODUCTO.
Algunos estados no permiten la exclusi6n o limitaci6n de dafios incidentales o consecuenciates o limitaciones
en cuanto al tiempo que dura una garantia implicita; por Ioque atgunas de estas limitaciones o exclusiones
pueden no apticarse a usted. Esta garantia le otorga derechos legales especificos y usted puede ademas tener
otros derechos los cuales varian de Estado a Estado.
LA GARANTIA ANTERIOR NO APLICA A •
1. Servicio a su casa para entregar, recoger, instalar o reemplazar fusibles caseros, corregir cableado casero o
plomerfa correcci6n de reparaciones no autorizadas.
2. Da_o al producto causado por accidente, plagas, incendios, inundaciones o actos por naturaleza.
3. Reparaciones cuando su producto LG sea usado diferente a Io normal.
4. Da_o resultante de accidente, alteraci6n, mal uso o instalaci6n inadecuada.
5. Da_os causados durante y despu6s de la entrega.
6. Reemplazo, descuento o restauraci6n de unidades compradas con rayones, abolladuras o defectos.
La prueba de la compra se requiere y se debe proporcionar a LG para validar la garantia.
Por Io tanto, estos costos seran pagados por el consumidor.
Si el producto es instalado fuera del _rea normal de servicio, cualquier costo de transportaci6n relacionado en la
reparaci6n del producto, o el reemplazo de partes defectuosas, ser_n cargados al propietario.
NUMEROS DE ASISTENCIA AL CLIENTE:
Para obtener cobertura de la Garantia: Conserve su factura para comprobar la fecha de
Para obtener informacion:
Servicio de Asistencia:
Paraobtener el Centro deServicio Autorizado
mas cercano:
compra.
Una copia de su recibo de compra debe ser entregada
cuando sete proporcione et servicio de garantia.
Llame al 1-800-243-0000
(24 hrs al dia, 7 dias por semana, 365 dias al aSo)
Presione la opci6n de men6 apropiado, y tenga su tipo de
producto (Refrigerador), n6mero de modelo, n6mero de
serie, y ZIP / C6digo Postal listos.
Llame al 1-800-243-0000
(24 hrs al dia, 7 dias por semana, 365 dias at aSo)
Presione la opci6n adecuada, y tenga su tipo de
producto(Refrigerador), n6mero de modelo, n6mero
de serie, y ZIP/c6digo Postal listos.
3

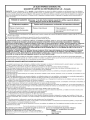
LG ELECTRONICS CANADA, INC.
GARANTIE LIMITI_E DU RI_FRIGI_RATEUR LG - Canada
GARANTIE : Si votre refrig6rateur LG (le _ produit _) s'avere defectueux en raison d'un defaut de materiau ou de fabrication Iors d'une utilisation
normale a domicile, pendant la periode de garantie specifi6e ci-apres, LG Canada reparera ou remplacera a sa discretion le produit sur reception de
la preuve d'achat originale foumie par le detaillant. Cette garantie n'est offerte qu'a I'acheteur original du produit chez un detaillant et ne s'applique
qu'a un produit distribue au Canada par LG Canada ou par un distributeur canadien autorise. La garantie ne s'applique qu'aux produits situes et
utilises au Canada.
PI_RIODE DE GARANTIE : (Remarque : Si la date d'achat originale nepeut _tre vdrifide, la garantie ddbutera
soixante (60) jours suivant la date de fabrication.)
Rdfrigdrateur/congdlateur Systeme scelld (compresseur, condensateur et dvaporateur seulement)
Pieces et main-d'oeuvre Pieces et main-d'oeuvre Pieces seulement
(pieces internes fonctionnelles (Lesconsommateurs devront payer pour la
seulement) main-d'oeuvre)
O Les produits et pi_,ces de remplacement sont garantis pour la portion restante de la periode de garantie originale ou quatre-vingt-dix (90), selon la
periode la plus Iongue.
O Les produits et pieces de remplacement peuvent _tre neufs ou remanufactures.
O Le centre de service autoris 6 LG garantit les reparations pendant trente (30) jours.
LA RESPONSABILITI_ DE LG CANADA SE LIMITE A LA GARANTIE CI-DESSUS. SAUF TEL QU'IL EST EXPLIClTEMENT INDIQUI_ Cl-
DESSUS, LG CANADA NE FOURNIT AUCUNE AUTRE GARANTIE ET REJETTE TOUTES LES AUTRES GARANTIES ET CONDITIONS
EXPLIClTES OU IMPLIClTES A L'I_GARD DU PRODUlT, CE QUl INCLUT, SANS TOUTEFOIS S'Y LIMITER, TOUTE GARANTIE ET CONDITION
IMPLIClTE DE QUALITI_ MARCHANDE OU DE CONVENANCE A UN USAGE PARTICULIER ETAUCUNE DI_CLARATION NE LIERA LG
CANADA. LG CANADA N'AUTORISE PERSONNE A CRI_ER NI A ASSUMER AUCUNE AUTRE PROVISION POUR GARANTIES EN RELATION
AVEC CE PRODUlT. Sl UNE GARANTIE OU CONDITION IMPLIClTE EST REQUlSE PAR LA LOI, SA PI_RIODE SE LIMITE A CELLE DE LA
GARANTIE EXPLIClTE SUSMENTIONNI_E.
LG CANADA, LE FABRICANT ET LE DISTRIBUTEUR NE POURRONT Ir=TRETENUS RESPONSABLES D'AUCUN DOMMAGE ACCESSOIRE,
CONSI_CUTIF, SPI_ClAL, DIRECT OU INDIRECT, D'AUCUNE PERTE D'ACHALANDAGE OU DE PROFITS, D'AUCUN DOMMAGE PUNITIF,
EXEMPLAIRE OU AUTRE, DIRECTEMENT OU INDIRECTEMENT ATTRIBUABLE A TOUTE VIOLATION CONTRACTUELLE, FONDAMENTALE
OU AUTRE, OU A UNE ACTION, UNE OMISSION, UN DI_LIT OU TOUTE AUTRE CHOSE.
La presente garantie vous confere des droits legaux specifiques. Vous pourriez disposer d'autres droits, suivant les lois provinciales applicables.
Toute clause de la presente garantie qui invalide ou modifie une condition ou garantie implicite aux termes d'une Ioi provinciale est dissociable si elle
entre en conflit avec la Ioi provinciale, et ce, sans affecter les autres clauses de la garantie.
LA PRE_SENTE GARANTIE LIMITI_E NE COUVRE PAS CE QUI SLUT:
1. Un appel de service pour livrer, ramasser ou installer le produit; renseigner un client sur le fonctionnement du produit; reparer ou remplacer des
fusibles ou rectifier le c_blange; ou corriger une reparation ou installation non autorisee.
2. La defaillance du produit durant une panne ou interruption de courant ou en raison d'un service electrique inadequat.
3. Des dommages occasionnes par la fuite ou le bris de conduites d'eau, le gel de conduites d'eau, des tuyaux de drainage restreints, une
alimentation en eau inadequate ou interrompue ou une alimentation en air inadequate.
4. Des dommages attribuables a I'utilisation du produit dans une atmosphere corrosive ou contraire aux instructions specifi6es dans le mannuel
d'utilisation de produit.
5. Des dommages au produit causes par un accident, des animaux nuisibles ou des vermines, la foundre, le vent, un incendie, une inondation ou une
catastrophe naturelle.
6. Les dommages attribuables a une mauvaise utilisation, une utilisation abusive ou a une installation, une reparation ou un entretien inapproprie du
produit. Les reparations inappropriees incluent I'utilisation de pieces ni aprouvees ni recommandees par LG Canada.
7. La deterioration ou la defaillance du produit causee par une modification ou un changement non autorise ou une utilisation autre que celle prevue,
ou resultant d' une fuite d'eau occasionee par une mauvaise installation.
8. La deterioration ou la defaillance du produit causee par un courant ou un voltage electrique incorrect, une utilisation commerciale ou industrielle, ou
I'utilisation d'accessoires, d'elements ou de produits nettoyants non approuves par LG Canada.
9. Les dommages causes par le transport et la manipulation, notamment les egratignures, les bosses, les ecaillures et / ou tout autre dommage a la
finition du produit a moins que ces dommages ne soient attribuables a des defauts de materiaux ou de fabrication et qu'ils ne soient signales dans un
delai d'une (1) semaine de la livraison.
10. Des dommages ou des pieces manquantes a tout produit expose, deballe, solde ou remis a neuf.
11. Des produits don't le numero de serie original a ete retire, modifie ou ne peut _tre facilement determine. Le modele et le numero de serie, ainsi
que le regu de vente original du detaillant, sont requis pour valider la garantie.
12. L'augmentation des coots et de la consommation des services publics.
13. Le remplacement des ampoules electriques, des filtres et de toute piece non durable.
14. Les reparations requises si le produit ne sert pas a une utilisation domestique normale et habiyuelle (y compris, sans toutefois s'y limiter, une
utilisation commerciale, dans un bureau ou un centre recreatif) ou est utilise contrairement aux instructions specifiees dans le manuel d'utilisation du
produit.
15. Les coots associes a I'enlevement du produit de votre residence aux fins de reparation.
16. L'enlevement et la reinstallation du produit, s'il est installe a un endroit inaccesible ou contrairement aux instructions publiees, y compris dans le
manuel d'utilisation et le manuel d'installation du produit.
17. Les accesoires du produit, tel que les balconnets, les tiroirs, les poignees, les tablettes, etc. Sont egalement exclues les pieces non incluses
initialement avec le produit.
Tousles coots associes aux circonstances exclues ci-dessus seront assemes par le consommateur.
Pour obtenir tous les details sur la garantie et acceder au service a la I_crivez vos renseignements de garantie ci-dessous:
clientele, telephonez-nous ou visitez notre site Web: Renseignements sur I'enregistrement du produit:
Composez le 1-888-542-2623 (24 h sur 24, 365 jours par annee) et. Modele:
Selectionnez I'option de menu appropriee, ou visitez notre site Web au: Numero de serie:
Ii:_://,w_%_%_lf_>_ Date d'achat:
4

LG ELECTRONICS CANADA, INC.
LG REFRIGERATOR LIMITED WARRANTY - Canada
WARRANTY: Should your LG Refrigerator ("Product") fail due to a defect in material or workmanship under normal home use during the warranty
period set forth below, LG Canada will at its option repair or replace the Product upon receipt of proof of original retail purchase. This warranty is
valid only to the original retail purchaser of the product and applies only to a Product distributed in Canada by LG Canada or an authorized
Canadian distributor thereof. The warranty only applies to Products located and used within Canada.
WARRANTY PERIOD: (Note: If the original date of purchase can n_t be verified, the warranty will begin sixty
(60) days from the date of manufacture).
Refrigerator/Freezer Sealed System (Compressor, Condenser, and Evaporator only)
Parts and Labor
(internal/functional parts only)
Parts and Labor
Parts only
(Consumerwill be charged for labor)
O Replacement products and parts are warranted for the remaining portion of the original warranty period or ninety (90) days, whichever is greater.
O Replacement products and parts may be new or remanufactured.
O LG Authorized Service Center warranties their repair work for thirty (30) days.
LG CANADA'S SOLE LIABILITY IS LIMITED TO THE WARRANTY SET OUT ABOVE. EXCEPT AS EXPRESSLY PROVIDED ABOVE, LG
CANADA MAKES NO AND HEREBY DISCLAIMS ALL OTHER WARRANTIES AND CONDITIONS RESPECTING THE PRODUCT, WHETHER
EXPRESS OR IMPLIED, INCLUDING, BUT NOT LIMITED TO, ANY IMPLIED WARRANTY OR CONDITION OF MERCHANTABILITY
OR FITNESS FOR A PARTICULAR PURPOSE, AND NO REPRESENTATIONS SHALL BE BINDING ON LG CANADA. LG CANADA DOES
NOT AUTHORIZE ANY PERSON TO CREATE OR ASSUME FOR IT ANY OTHER WARRANTY OBLIGATION OR LIABILITY IN CONNECTION
WITH THE PRODUCT. TO THE EXTENT THAT ANY WARRANTY OR CONDITION IS IMPLIED BY LAW, IT IS LIMITED TO THE EXPRESS
WARRANTY PERIOD ABOVE. LG CANADA, THE MANUFACTURER OR DISTRIBUTOR SHALL NOT BE LIABLE FOR ANY INCIDENTAL,
CONSEQUENTIAL, SPECIAL, DIRECT OR INDIRECT DAMAGES, LOSS OF GOODWILL, LOST PROFITS, PUNITIVE OR EXEMPLARY
DAMAGES OR ANY OTHER DAMAGE, WHETHER ARISING DIRECTLY OR INDIRECTLY FROM ANY CONTRACTUAL BREACH,
FUNDAMENTAL OR OTHERWISE, OR FROM ANYACTS OR OMISSIONS, TORT, OR OTHERWISE.
This warranty gives you specific legal rights. You may have other rights which may vary from province to province depending on applicable
provincial laws. Any term of this warranty that negates or varies any implied condition or warranty under provincial law is severable where
it conflicts with provincial law without affecthg the remainder of this warranty's terms.
THIS LIMITED WARRANTY DOES NOT COVER:
1. Service trips to deliver, pick up, or install the product; instructing a customer on operation of the product; repair or replacement of fuses or
correction of wiring, or correction of unauthorized repairs/installation.
2. Failure of the product to perform during power failures and interruptions or inadequate electrical service.
3. Damage caused by leaky or broken water pipes, frozen water pipes, restricted drain lines, inadequate or interrupted water supply or inadequate
supply of air.
4. Damage resulting from operating the Product in a corrosive atmosphere or contrary to the instructions outlined in the Product owner's manual.
5. Damage to the Product caused by accidents, pests and vermin, lightning, wind, fire, floods, or acts of God.
6. Damage resulting from the misuse, abuse, improper installation, repair, or maintenance of the Product. Improper repair includes use of parts not
approved or specified by LG Canada.
7. Damage or product failure caused by unauthorized modification or alteration, or use for other than its intended purpose, or resulting from any
water leakage due to improper installation.
8. Damage or Product failure caused by incorrect electrical current, voltage, commercial or industrial use, or use of accessories, components, or
cleaning products that are not approved by LG Canada.
9. Damage caused by transportation and handling, including scratches, dents, chips, and/or other damage to the finish of your product, unless
such damage results from defects in materials or workmanship and is reported within one (1) week of delivery.
10. Damage or missing items to any display, open box, discounted, or refurbished Product.
11. Products with original serial numbers that have been removed, altered, or cannot be readily determined. Model and Serial numbers, along with
original retail sales receipt, are required for warranty validation.
12. Increases in utility costs and additional utility expenses.
• Replacement of light bulbs, filters, or any consumable parts.
• Repairs when your Product is used in other than normal and usual household use (including, without limitation, commercial use, in offices or
recreational facilities) or contrary to the instructions outlined in the Product owner's manual.
15. Costs associated with removal of the Product from your home for repairs.
16. The removal and reinstallation of the Product if it is installed in an inaccessible location or is not installed in accordance with published
installation instructions, including the Product owner's and installation manuals.
• Accessories to the Product such as door bins, drawers, handles, shelves, etc. Also excluded are parts besides those that were originally included
with the Product.
All costs associated with the above excluded circumstances shall be borne by the consumer.
For complete warranty details and customer assistance,
please call or visit our website:
Call 1-888-542-2623 (24 hours a day, 365 days a year) and
select the appropriate option from the menu, or visit our website
at
Write your warranty information below:
Product Registration Information:
Model:
Serial Number:
Date of Purchase:
5

Warranty (USA)
Warranty (Canada)
English Version
French Version
Spanish Version
Safety Instructions
Grounding Requirements
Parts and Features
Refrigerator Installation
Unpacking Your Refrigerator
Installation
Base Grille
Removing, Reversing and Replacing
Your Refrigerator Doors
For Drawer Models
For Swing Models
Door Closing and Alignment
Using Your Refrigerator
Ensuring Proper Air Circulation
Multi Flow
Door Alarm
Setting the Controls
Adjusting Control Settings
Food Storage Guide
Storing Frozen Food
Refrigerator Shelves
Chef Fresh / Snack Pan
2-3
4-5
6
38
70
7-8
8
9-11
12-19
12
12
12
13-19
13
17
19
22 -29
2O
2O
2O
20 -21
21
22
22
23
24
Crisper Humidity Control
Optibin Crisper
Crisper cover with lattice on inner surface
Door Racks
Design-A-Door
Dairy Bin
Ice Bin
DuraBase
DuraBase Divider
Guide-Out Drawer Basket
Tilting Door
Wire Durabase
Freezer Shelf
Care and Cleaning
General Cleaning Tips
Outside
Inside Walls
Door Liner and Gaskets
Plastic Parts
Condenser Coils
Light Bulb Replacement
Power Interruptions
When you go on vacation
About the Custom Cube Icemaker
Connecting the Water Line
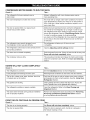
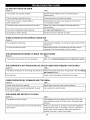
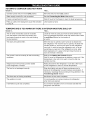
Troubleshooting Guide
24
24
25
25
25
26
26
26
26
27
27
27
27
28 -29
28
28
28
28
28
28
28 -29
29
29
30
31 -33
34 -37
6

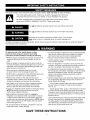
This guide contains many important safety messages. Always read and obey all safety messages.
This is the safety alert symbol. It alerts you to safety messages that inform you
of hazards that can kill or hurt you or others, or cause damage to the product.
All safety messages will be preceded by the safety alert symbol and the hazard
signal word DANGER, WARNING, CAUTION. These words mean:
You will be killed or seriously injured if you don't follow instructions.
You can be killed or seriously injured if you don't follow instructions.
Indicates an imminently hazardous situation which, if not avoided,
may result in minor or moderate injury, or product damage only.
All safety messages will identify the hazard, tell you how to reduce the chance of injury and tell you what can happen if
the instructions are not followed.
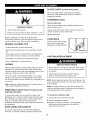
To reduce the risk offire, electric shock, or injury
to persons when using your product, basic safety
precautions should be followed, including the following:
• NEVER unplug your refrigerator by pulling on the power cord.
Always grip the plug firmly and pull itstraight out from the
outlet.
• Repairor replace immediately all electric service cords that
havebecome frayed or otherwise damaged. Do not usea cord
that shows cracks or abrasion damage along its length or at
eitherthe plug or connector end.
•When movingyour refrigeratorawayfrom the watt,
be careful notto roll over or damage the powercord.
• DO NOT store or use gasoline or other flammable vapors and
liquids in the vicinity of this or any other appliance.
• DO NOT allow children to climb, stand or hang on the
refrigerator doors or shelves in the refrigerator.They could
damage the refrigerator and seriously injure themselves.
• Keep fingers out of "pinch point" areas; clearances between
the doors and cabinet are necessarily small. Be careful
when you open the doors when children are in the area.
• Unplugyour refrigerator before cleaning or making any repairs.
NOTE:We strongly recommendthat any servicing be
performed by a qualified individual.
• Beforereplacing a burned-out light bulb, unplug the
refrigerator or turn off power at the circuit breaker or fuse box
in order to avoid contact with a live wirefilament. (Aburned-
out light bulb may breakwhen being replaced.) NOTE: Setting
eitheror both controls to the OFF position does not remove
powerto the light circuit.
• Do not store bottles in the freezer compartment - they may
break when frozen, causing damage.
• For personal safety,this appliance must be properly grounded.
Have the wall outlet and the circuit checked bya qualified
electrician to make surethe outlet is properly grounded.
• Readall instructions before using thisappliance.
• Usethisappliance only for itsintended purpose as described
in this useand care guide.
• After your refrigerator is in operation, do not touch the cold
surfaces in the freezer compartment when hands are damp or
wet. Skin may adhere to the extremely cold surfaces.
• In refrigeratorswith automatic icemakers,avoid contact with
the moving parts of the ejector mechanism, or with the heating
element that releases the cubes. DO NOT place fingers or
handson the automatic icemaking mechanism while the
refrigerator is plugged in.
• DO NOTrefreeze frozen foods which have thawed completely.
The United States Department of Agriculture in Home and
Garden Bulletin No. 69 says:
"...Youmay safely refreezefrozen foods that have thawed if
they still contain ice crystals or ifthey are still cold below
40 °F (4 °C)."
"...Thawed ground meats, poultry,or fish that have any off-odor
or off-color should not be refrozen and should notbe eaten.
Thawed ice cream should be discarded. If the odor or colorof
any food is poor or questionable, get rid of it. The food may be
dangerous to eat."
"Even partial thawing and refreezing reduces the eatingquality
of foods, particularlyfruits, vegetables and prepared foods.
The eating quality of red meats isaffected less than that of
many other foods. Use refrozen foods as soon as possible to
save as much of their quality as you can."
SAVE THESE INSTRUCTIONS
7

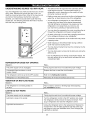
This appliance is not intended for use by persons (including children) with reduce physical, sensory or mental capabilities,
or lack of experience and knowledge, unless they have been given supervision or instruction concerning use of the
appliance by person responsible for their safety. Children should be supervised to ensure that they do not play with the
appliance.
Child entrapment and suffocation are not problems of
the past. Junked or abandoned refrigerators are still
dangerous.., even if they will sit for "just a few days". If
you are getting rid of your old refrigerator, please follow
the instructions at right to help prevent accidents.
BEFORE YOU THROW AWAY
YOUR OLD REFRIGERATOR
OR FREEZER
• Take off the doors.
• Leave the shelves in place so that
children may not easily climb inside.
Your old refrigerator may have a cooling system that used
CFC's (chlorofluorocarbons). CFC's are believed to harm
stratospheric ozone.
If you are throwing away your old refrigerator, make sure
the CFC refrigerant is removed for proper disposal by a
qualified servicer. If you intentionally release this CFC
refrigerant, you can be subject to fines and imprisonment
under provisions of environmental legislation.
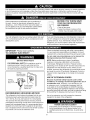
IMPORTANT: Please read carefully.
TO CONNECT ELECTRICITY
Electrical Shock Hazard
FOR PERSONAL SAFETY, this appliance must be
properly grounded. Have the wall outlet and the
circuit checked by a qualified electrician to make sure
the outlet is properly grounded.
3-prong
grounding
plug
3-prong
grounding type
wall receptacle _ _f_-_
Ensure proper
ground exists
before use.
RECOMMENDED GROUNDING METHOD
The refrigerator should always be plugged into its own
individual properly grounded electrical outlet rated for
115 V, 60 Hz, AC only, and fused at 15 or20 amperes.
This provides the best performance and also prevents
overloading house wiring circuits which could cause a fire
hazard from overheated wires. It is recommended that a
separate circuit serving only this appliance be provided.
Use a receptacle which cannot be turned off with a switch
or pull chain. Do not use an extension cord.
Where a standard two-prong wall outlet is encountered,
it is your personal responsibility and obligation to have it
replaced with a properly grounded three-prong wall outlet.
Do not, under any circumstances, cut or remove the
third (ground) prong from the power cord.
NOTE: Before performing any type of installation,
cleaning, or removing a light bulb, turn the control
(Thermostat, Refrigerator Control or Freezer Control,
depending on the model) to OFF and then disconnect the
refrigerator from the electrical source. When you are
finished, reconnect the refrigerator to the electrical source
and reset the control (Thermostat, Refrigerator Control or
Freezer Control, depending on the model) to the desired
setting.
USE OF EXTENSION CORDS
Because of potential safety hazards under certain
Conditions, we strongly recommend against the use of
an extension cord. However, ifyou still elect to use
an extension cord, it is absolutely necessary that it be
a UL-listed (in the United States) or ACNOR (Canada),
3-wire grounding type appliance extension cord having a
grounding type plug and outlet, and that the electrical rating
of the cord be 15 amperes (minimum) and 120 volts.
Use of an extension cord will increase the clearance
needed for the back of the refrigerator.
POWER CORD REPLACEMENT
If the power cord is damaged, it must be replaced
by the manufacturer, by our service center or by
qualified personal by LG Electronics, to avoid some
risk.
8

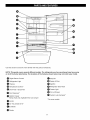
Use this section to become more familiar with the parts and features.
NOTE: This guide covers several different models. The refrigerator you have purchased may have some
or all of the items listed below. The locations of the features shown below may not match your model.
O Digital Sensor Control
_1 Refrigerator Light
_1 Shelves
O Temperature Control*
O Chef Fresh / Snack Pan
O Can Dispenser*
O Optibin Crisper
Keeps fruits and vegetable fresh and crisper
i_ Ice Bin
O Ice Tray (Inside of H)*
ODurabase
O Dairy Bin
O Design-A-Door
O Egg Box
Refrigerator Door Rack
Freezer Light
O Pull out Drawer
_ Custom cube Icemaker*
*On some models
O Divider

0
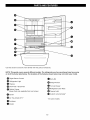
Use this section to become more familiar with the parts and features.
NOTE: This guide covers several different models. The refrigerator you have purchased may have some
or all of the items listed below. The locations of the features shown below may not match your model.
O Digital Sensor Control
O Refrigerator Light
Shelves
OChef Fresh / Snack Pan
O Optibin Crisper
Keeps fruits and vegetable fresh and crisper
O Ice Bin
Ice Tray (Inside of F)*
l_Durabase
O Divider
O Dairy Bin
_1 Design-A-Door
O Pull out Drawer
1_ Refrigerator Door Rack
O Freezer Light
t_1 Custom cube Icemaker*
*On some models
10

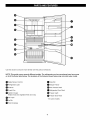
Use this section to become more familiar with the parts and features.
NOTE: This guide covers several different models. The refrigerator you have purchased may have some
or all of the items listed below. The locations of the features shown below may not match your model.
O Digital Sensor Control
O Refrigerator Light
Shelves
O Snack Pan
Optibin Crisper
Keeps fruits and vegetable fresh and crisp
O Ice Trays*
O Ice Bin
Q Wire Durabase
O Dairy Bin
O Design-A-Door
OWire Freezer Shelf
O Refrigerator Door Rack
Freezer Light
Freezer Door Rack
*On some models
11

Excessive Weight Hazard
Use two or more people to move and install
refrigerator.
Failure to do so can result in back or other injury.
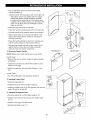
UNPACKING YOUR REFRIGERATOR
Remove tape and any temporary labels from your
refrigerator before using. Do not remove any warning-
type labels, the model and serial number label, or the
Tech Sheet that is attached to back wall of the refrigerator.
To remove any remaining tape or glue, rub the area
briskly with your thumb. Tape or glue residue can also be
easily removed by rubbing a small amount of liquid dish
soap over the adhesive with your fingers. Wipe with warm
water and dry.
Do not use sharp instruments, rubbing alcohol, flammable
fluids or abrasive cleaners to remove tape or glue. These
products can damage the surface of your refrigerator. For
more information, see the Important Safety Instructions
section.
Refrigerator shelves are installed in the shipping position.
Please reinstall shelves according to your individual
storage needs.
When Moving Your Refrigerator:
Your refrigerator is heavy. When moving the
refrigerator for cleaning or service, be sure to protect
the floor. Always pull the refrigerator straight out when
moving it. Do not wiggle or walk the refrigerator when
trying to move it, as floor damage could occur.
Explosion Hazard
Keep flammable materials and vapors, such as
gasoline, away from refrigerator.
Failure to do so can result in death, explosion or fire.
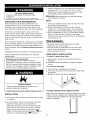
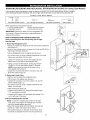
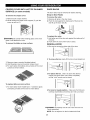
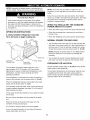
INSTALLATION
1. Avoid placing the unit near heat sources, direct sunlight,
or moisture.
2. To avoid vibration, the unit must be level. If required,
adjust the leveling screws to compensate for
unevenness of the floor. The front should be slightly
higher than the rear to aid in door closing. Leveling
screws can be turned easily by tipping the cabinet
slightly. Turn the leveling screws clockwise (,,m._) to
raise the unit, counterclockwise (_ml_ to lower it.
3. Install this appliance in an area where the temperature
is between 55 °F (13 °C) and 110°F (43 °C.)If the
temperature around the appliance is too low or high,
cooling ability may be adversely affected.
[] CAUTION: Avoid placing the unit near heat sources,
direct sunlight or moisture.
A proper distance from adjacent items
Please keep the refrigerator at a proper distance from other
things. Too small a distance from adjacent items may result
in lowered freezing capability and increased electricity
charge consumption.
i
(508 cm) 2" 4,- ,,_
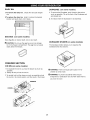
NEXT
1. Clean your refrigerator thoroughly and wipe off all dust
accumulated during shipping.
2. Install accessories such as ice cube bin, drawers,
shelves, etc., in their proper places. They are packed
together to prevent possible damage during shipment.
3. Let your refrigerator run for 2 or 3 hours before putting
food in it. Check the flow of cold air in the freezer
compartment to ensure proper cooling. Your refrigerator
is now ready for use.
[]WARNING:
• Be careful when you work with hinge, base grille,
stopper etc. You may be injured.
• Do not put hands or metal sticks into air vents, base
grille or bottom of refrigerator. You may be injured or
receive an electrical shock.
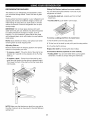
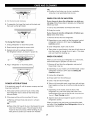
BASE GRILLE INSTALLATION
To install or replace Base Grille:
1. Remove the 2 screws from the bottom front part of
refrigerator.
2. Place Base Grille into position and insert and tighten
screws.
To remove the base grille
1. Open the doors. (Refrigerator and Freezer)
2. Once doors are open, remove screws from Base Grille
and remove.
3. Reattach screws to the base of refrigerator.
12

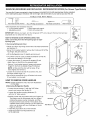
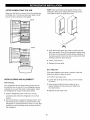
REMOVING,REVERSING AND REPLACING REFRIGERATOR DOORS (For Drawer Type Models)
You may find it more convenient to have the doors converted from the left-opening type (factory installed)
to the right-opening type. Directions refer to the right side as the side on your right as you face the unit
TOOLS YOU MAY NEED
I _ lOmm
J_l 1/4 in 1/4 in /
3/8 in _===_ 3/32 in /
Hex head socket wrench No. 2 Phillips screwdriver Flat head screwdriver Allen wrench J
Other Important and necessary tools are:
• 1/4 inch socket wrench • 10mm open-end wrench
• Adjustable wrench • Flat 2-inch putty knife
IMPORTANT: Before you begin, turn the refrigerator OFF and unplug it. Remove food and any
adjustable door or utility bins from doors.
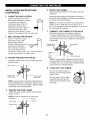
HOW TO REVERSE DOOR OPENING DIRECT ION
(when converting from the left=opening type to right=
opening type)
1. Removing Refrigerator Door
•Gently pry off the Top Hinge Cover with a flat head screwdriver
and remove (1).
• Using 10 mm socket wrench, remove the 3 bolts and lift off the
Top Hinge. Set parts aside (2).
•Lift the Refrigerator door (3) slightly and remove it.
• Pry off the cover (4) using a slotted screwdriver to find the
hole screw and attach it on the right.
• Loosen the screws (5), remove the stopper (6) and
attach them on the left (on the opposite side).
• Using a 1/4-inchsocket wrench, loosen and remove
Hinge Pin (8) from the Middle Hinge Pin Bracket.
NOTE: At this point the door will be loose, lift up
door slightly and remove it.
• Loosen the 2 screws (9) and the 2 screws (10), and
lift off the middle hinge (11).
• Use a flat tip screwdriver to pry off bottom hole cover
(7) and attach it on the right.
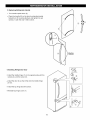
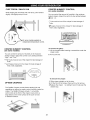
HOW TO REMOVE DOOR HANDLES
NOTE: Handle appearance may vary from illustrations
on this page
2.Removing Refrigerator Handle
• Loosen the set screws (1) with the 3/32" Allen
wrench and remove the handle (2).
• Loosen the handle mounting fasteners (3)
with the 1/4" Allen wrench.
• Carefully loosen the plug buttons with your fingers (4).
The buttons can be unscrewed with your fingers,
rotating the pieces counter clockwise, and then
the piece will be loose and fall. The buttons were
installed without some pressure, for this reason the
action can be done with your forefinger or thumb
finger or with both.
• Install the plug buttons (4) on the left side.
• Install the handle mounting fasteners (3)
on the right side.
Set Screw
Alien Wrench
Mounting
Fasteners
13

3. Replacing Refrigerator Handle
• Turn handle upside down (5)
• Place the handle (2) on the door by adjusting handle
footprints to fit mounting fastners and tighten the set
screws (1) with the 3/32 "Allen wrench.
/
/
/
®
_/) Mounting
Fasteners
4.Installing Refrigerator Door
• Install the middle hinge (1) on the opposite side with the
screws (2), and the screw (3).
• Install the door (4) so that it fits onto the middle hinge
pin (5).
• Install the top hinge (6) with screws.
• Reinstall top hinge cover (7).
14

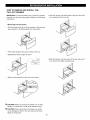
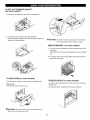
HOW TO REMOVE AND INSTALL THE
PULL OUT DRAWER
IMPORTANT: To avoid possible injury, product or property
damage, you will need two people to perform the following
instructions.
1.Removing Pull out Drawer
• Pull the drawer open to full lower extension. Remove the
lower basket (1) by lifting basket from rail system.
• Press both hangers with yours thumbs to lift it up.
• Separate the left and right rail cover
• Remove the screws(2) of the rail on both sides.
• With both hands, hold both sides of the door and pull it
up to separate it from the rails.
/
• With both hands, hold the center of the bar and push it
in to let both rails fitted simultaneously.
[] CAUTION: When you remove the drawer, do not hold
handle. If it comes off, it could cause personal injury.
[] CAUTION: When laying down the drawer, be careful
not to damage the floor or hurt your feet by the sharp
edges on hinge side.
15

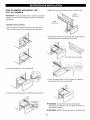
HOW TO REMOVE AND INSTALL THE
PULL OUT DRAWER
IMPORTANT: To avoid possible injur or product or property
damage, you will need two people to perform the following
instructions.
2.Installing Pull out Drawer
• With both hands, hold the center of the bar and pull it
out to let both rails out to full extension simultaneously.
• Make sure you have a right rail cover for each side.
Left
Rail cover
Right
Rail cover
• Align the top holes of the rail cover with the top holes of
the door supports to assemble the rail cover.
Verify the hole's assembly
• Hook door supports (1) into rail tabes (2).
• Lower door into final position and tighten the screws (3)
• With the drawer pulled out to full extension, insert the
lower basket (4) in the rail assembly.
J
[] WARNING: To prevent accidental child and pet
entrapment or suffocation risk. DO NOT allow them to
play inside of drawer.
[] WARNING: DO NOT step or sit down on Freezer Door.
16

REMOVING,REVERSING AND REPLACING REFRIGERATOR DOORS (For Swing Type Models)
You may find it more convenient to have the doors converted from the left-opening type (factory installed)
to the right-opening type. Directions refer to the right side as the side on your right as you face the unit
TOOLS YOU MAY NEED
,1/4 in
1/4 in
3/8 in _ 3/32 in
Hex head socket wrench No. 2 Phillips screwdriver Flat head screwdriver Allen wrench
Other Important and necessary tools are:
• 1/4 inch socket wrench •10mm open-end wrench
• Adjustable wrench • Flat 2-inch putty knife
IMPORTANT: Before you begin, turn the refrigerator OFF
and unplug it. Remove food and any adjustable door or
utility bins from doors.
HOWTO REVERSE DOOR OPENING DIRECTION
(when converting from the left-opening type to right-
opening type)
1. Removing Refrigerator Door
• Gently pry off the Top Hinge Cover with a flat head screwdriver
and remove (1).
•Using 10 mm socket wrench, remove the 3 bolts and lift off the
Top Hinge. Set parts aside (2).
• Lift the Refrigerator door (3) slightly and remove it.
• Pry off the cover (4) using a slotted screwdriver to find the
hole screw and attach it on the right.
• Loosen the screws (5), remove the stopper (6) and
attach them on the left (on the opposite side).
• Using a 1/4-inchsocket wrench, loosen and remove
Hinge Pin (7) from the Middle Hinge Pin Bracket.
NOTE: At this point the door will be loose, lift up
door slightly and remove it.
• Loosen the 2 screws (9) and the 2 screws (10), and
lift offthe middle hinge (11).
2. Removing Freezer Door
• Before, remove totally the refrigerator door.
• Lift the door (10) slightly and remove it.
• Loosen the 2 screws (11), the 2 screws (12), and lift
off the middle hinge (13).
• Pry off the cover (9) using a slotted screwdriver and
attach it on the right.
• Take off the base grille (14).
• Loosen the 2 screws (16), remove the bottom hinge
(17), and attach on the left.
• Loosen the 2 screws (18) and attach the stopper (19)
on the left side of the base.
®
®
®
3.Removing Refrigerator Handle
NOTE: To assist in installing the handle on the right
side, place a small piece of masking tape near the
top of the handle before removing.
• Grasp the handle tightly with both hands and slide the
handle up (1)(this may require some force).
•The keyhole slots (2) on the back of the handle allow
the handle to separate from the mounting screws (3).
on door
\®
Keyhote slots
on back of
handle
17

• Use an adjustable wrench to remove the handle
mounting screws (3).
• Carefully loosen the plug buttons with your fingers (4).
The buttons can be unscrewed with your fingers,
rotating the pieces counter clockwise, and then
the piece will be loose and fall. The buttons were
installed without some pressure, for this reason the
action can be done with your forefinger or thumb
finger or with both.
• Install the plug buttons (4) on left side.
• Install the handle mounting screw (3) on the right side
• Hold the handle so the masking tape is at the bottom.
•Align keyhole slots (2) on the top and bottom of the
back of the handle with the screws (3) mounted on
the front of the door.
• Press the handle against the door front, making sure
that the screws (3) go into the keyhole slots (2).
• Grasping the handle with both hands, press it firmly
against the front of the door and slide the handle
down (6). This may require some force.
4. Removing Freezer Handle
NOTE: Before start, check handle type in your model.
Handle Type 1
•Remove the cap (1) and the 2 caps (2) using a slotted
screwdriver.
•Loosen the 2 screws (3), take off the handle (4), and
install it on the right.
•Attach the caps you removed earlier [figures (1) and
(2)].
Handle Type 2
•For this handle type is not neccesary remove it.
5. Installing
•Install the
•Install the
•Install the
screw (5)
Freezer Door
base grille (1).
door (3) onto the bottom hinge pin.
middle hinge (4) on the opposite side with the
and the screws (9).
6. Installing Refrigerator Door
washer (6) on the middle hinge pin (7).
door (8) so that it fits onto the middle hinge
•Place the
•Install the
pin (7).
•Install the
top hinge (10)with screws.
• Reinstall top hinge cover (1 1).
Handle type 1 Handle type 2
18

AFTER COMPLETING THE JOB
Make sure that the four corners of the door gasket are
not folded over. To ensure a good seal, apply a small
amount of silicon grease on the gasket.
NOTE: Having someone push against the top of the
refrigerator takes some weight off the leveling screws.
This makes it easier to adjust the screws.
Corner
.
=
5.
Open both doors again and check to make sure that
they close easily. If not, tilt the refrigerator slightly more
to the rear by turning both leveling screws clockwise. It
may take several more turns, and you should turn both
leveling screws the same amount.
Check, using a level.
Replace the base grille.
DOOR CLOSING AND ALIGNMENT
Door Closing
Your refrigerator has two front leveling screws one on
the right and one on the left. If your refrigerator seems
unsteady or you want the doors to close easier, adjust
the refrigerator tilt using the instructions below:
1. Plug the refrigerator power cord into a 3-prong
grounded outlet. Move the refrigerator into its final
position.
2. Use a screwdriver to adjust the leveling screws. Turn
the leveling screw clockwise to raise that side of the
refrigerator or counterclockwise to lower it. It may take
several turns of the leveling screw to adjust the tilt of
the refrigerator.
Door Alignment
If the space between your doors is uneven, follow the
instructions below to align the doors:
1. Pry off the top hinge cover.
2. Loosen the top hinge screws using a 10 mm socket
or wrench.
.
Have someone hold the door in place or put a
spacer between the doors while you tighten the
top hinge screws.
4. Replace the top hinge cover.
19

ENSURING PROPER AIR CIRCULATION
In order to ensure proper temperatures, air must flow
between the refrigerator and freezer sections. As shown
in the illustration below, cool air enters through the bottom
of the freezer section and moves up. Most of the air then
flows through the freezer section vents and recirculates
under the freezer floor. The rest of the air enters the
refrigerator section through the top vent.
MULTI FLOW
• The cooling fan operates more powerful and effective
than in normal operation. This is specially noticeable
when new food is placed in the refrigerator compartment.
• Ifwater or foreign substances enter the cool air vent
while cleaning, efficiency will be lowered. In addition, if
gasket is damaged, efficiency may be lowered because
of escaping cool air.
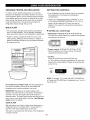
SETTING THE CONTROLS
Your refrigerator has two controls that let you regulate
the temperature in the freezer and refrigerator
compartments.
Initially set the REFRIGERATOR CONTROL at 37 °F
(3 °C) and the FREEZER CONTROL at 0 °F (-18 °C).
Leave it at this setting for 24 hours (one day) to
stabilize. Then adjust the compartment temperature
as desired.
I_ Identify your control type
• Refrigerator control:32 °F to 47 °F (0 °C to 8 °C)
The lower the number setting, the colder the refrigerator
compartment will become.
ICE PLUS
_........... _"
Do not block any of these vents with food packages. If
the vents are blocked, airflow will be interrupted and
temperature and moisture problems may occur.
IMPORTANT: Because air circulates between both
sections, any odors formed in one section will transfer to
the other. You must thoroughly clean both sections to
eliminate odors. To prevent odor transfer and drying out of
food, wrap or cover foods tightly. (See the Food Storage
Guide section for details.)
DOORALARM
With this feature you'll listen a alarm when the freezer or
refrigerator door is not closed within 1 minute after it is
opened. These tones repeat every 30 seconds.
The alarm is cancelled when the freezer or the refrigerator
is closed correctly.
37 °F IS RECOMMENDED
Freezer control: -6 °F to 9 °F (-21 °C to -13 °C)
When the setting is at a lower number, the freezer
compartment becomes colder.
Ice Plus:
Press the Ice Plus key and the LED will turn
on. This function will remain activated for 24 hours and
intensify the cooling speed of freezer and increase the
amount of ice.
ICE PLUS
0° F IS RECOMMENDED
NOTE: To change °F/°C press and HOLD COLDER key
o f freezer and COLDER key of refrigerator over 1 sec. at
the same time.
2O
La page charge ...
La page charge ...
La page charge ...
La page charge ...
La page charge ...
La page charge ...
La page charge ...
La page charge ...
La page charge ...
La page charge ...
La page charge ...
La page charge ...
La page charge ...
La page charge ...
La page charge ...
La page charge ...
La page charge ...
La page charge ...
-
 1
1
-
 2
2
-
 3
3
-
 4
4
-
 5
5
-
 6
6
-
 7
7
-
 8
8
-
 9
9
-
 10
10
-
 11
11
-
 12
12
-
 13
13
-
 14
14
-
 15
15
-
 16
16
-
 17
17
-
 18
18
-
 19
19
-
 20
20
-
 21
21
-
 22
22
-
 23
23
-
 24
24
-
 25
25
-
 26
26
-
 27
27
-
 28
28
-
 29
29
-
 30
30
-
 31
31
-
 32
32
-
 33
33
-
 34
34
-
 35
35
-
 36
36
-
 37
37
-
 38
38


LG LBC20514TT/00 Le manuel du propriétaire
- Catégorie
- Réfrigérateurs-congélateurs
- Taper
- Le manuel du propriétaire
dans d''autres langues
- English: LG LBC20514TT/00 Owner's manual
Documents connexes
-
LG LDN20718SW Le manuel du propriétaire
-
LG LTNS16121V/01 Le manuel du propriétaire
-
LG LTNS16121V Le manuel du propriétaire
-
LG LDC20778ST Le manuel du propriétaire
-
LG LTNC11121V Le manuel du propriétaire
-
LG LTNC11131V Le manuel du propriétaire
-
LG LTNC11131V Le manuel du propriétaire
-
LG GM-L237MTGL Le manuel du propriétaire
-
-
Autres documents
-
GE TBI18JIBWW Mode d'emploi
-
-
Haier HRB10N2 Manuel utilisateur
-
-
-
-
Summit FFBF284SSIM Manuel utilisateur
-
Summit FFBF283SS Le manuel du propriétaire
-
Sears Refrigerator Manuel utilisateur
-
Whirlpool URB551WNGZ Mode d'emploi