Cosori 18-IN-1 MULTIKOKER Manuel utilisateur
- Catégorie
- Cuiseurs à riz
- Taper
- Manuel utilisateur

EN
1
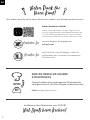
(We hope you love your new rice cooker as much as we do)
On behalf of all of us at COSORI,
Our helpful, in-house chefs are ready to assist
you with any questions you might have!
CONTACT OUR CHEFS
Email: [email protected]
Thank you for
your purchase!
Happy cking!
explore our digital recipe gallery
cosori.com
enjoy weekly, featured recipes
made exclusively by our in-house chefs
Get Creative with COSORI
Download the free VeSync app to access original
recipes and video tutorials from the COSORI chefs,
interact with our online community, and more!

EN
2
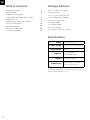
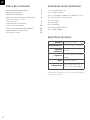
Table of Contents Package Contents
Specifications
Model CRC-R501-KEU
Power Supply AC 220–240V, 50/60Hz
Rated Power 970W
Capacity 5 L / 10 cup*
(uncooked rice)
Weight 4.45 kg / 9.81 lb
Dimensions 31.2 x 26.9 x 23.4 cm /
12.3 x 10.6 x 9.2 in
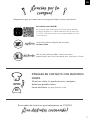
1 x 5.0-Litre Rice Cooker
1 x Inner Pot
1 x 3.0-Litre Steam Basket
1 x Standing Rice Paddle
1 x Measuring Cup
1 x Soup Ladle
1 x Recipe Book
1 x User Manual
1 x Quick Reference Guide
Package Contents
Specifications
Important Safeguards
Getting To Know Your Rice Cooker
Before First Use
Cooking with Your Rice Cooker
Care & Maintenance
Troubleshooting
Warranty Information
Customer Support
*using the included rice measuring cup, which is
approximately 180 mL / 6.1 oz.
2
2
3
6
6
7
13
14
15
15

EN
3
IMPORTANT SAFEGUARDS
Follow basic safety precautions when using your rice cooker.
Read all instructions.
Key Safety Points
General Safety
• Do not touch hot surfaces.
• Do not touch the steam vent or
the area near the steam vent while
cooking or in Keep Warm mode.
Donot cover the area with a cloth.
• Always use heat-resistant gloves,
pads, or oven mitts when moving the
rice cooker, handling hot materials,
and when placing items in or
removing items from the rice cooker,
including the inner pot, steam
basket, and accessories.
• Never use the rice cooker without
the inner pot in place.
• To protect against electric shock,
donot immerse the rice cooker,
cord, or plug in water or liquid.
• Do not use the rice cooker in water
or under running water.
• Unplug when not in use and before
cleaning. Allow to cool before putting
on or taking o parts, and before
cleaning or storage.
• Do not put food, liquid, or foreign
objects on the heating plate.
• Ensure the heating plate is clean and
the underside of the inner pot is dry
before inserting the inner pot.
• Close supervision is necessary when
the rice cooker is used by or near
children.
• Children should be supervised to
ensure that they do not play with the
rice cooker.
• Do not allow children to clean or
perform maintenance on the rice
cooker.
• Do not use your rice cooker if it
is damaged, not working, or if the
cord or plug is damaged. Contact
Customer Support (see page 15).
• Using accessories or replacement
parts not recommended by COSORI
may cause injuries.
• Do not use outdoors.
• Do not place the rice cooker or any
of its parts on or near hot gas or
electric burners, or in a heated oven.
• Do not use the included accessories
and inner pot in a microwave, on a
stove or grill, or in an oven.
• Be extremely cautious when moving
the rice cooker or inner pot if it
contains hot oil or other hot liquids.
• The rice cooker is not intended to
be operated by means of an external
timer or separate remote-control
system.
• This appliance can be used by
children aged from 8 years and
above and persons with reduced
physical, sensory or mental
capabilities or lack of experience
and knowledge if they have been
given supervision or instruction
concerning use of the appliance in a
safe way and understand the hazards
involved.
READ AND SAVE THESE
INSTRUCTIONS

EN
4
While Cooking
• CAUTION: Risk of electric shock.
Cook only in the removable inner
pot. Do not put any liquid directly on
the heating plate of the rice cooker.
• Use on a flat, stable, heat-resistant
surface away from heat sources or
liquids.
• The removable inner pot is extremely
hot during use and can be heavy
when full of ingredients.
• Be careful when handling the inner
pot or steam basket when it contains
hot food, hot oil, or other hot liquids.
• Place hot accessories on a heat-
resistant surface or potholder.
• Do not place anything on top of
your rice cooker while it is operating.
Donot store anything inside your
rice cooker other than recommended
accessories.
• Do not touch the metal portion
of the lid, hot surfaces, or any
accessories during or immediately
after cooking because they will be
hot.
• Do not place paper, cardboard, or
plastic into your rice cooker, or any
Power & Cord
• This rice cooker uses a short
power-supply cord to reduce the
risk of being pulled on by children,
entangling, or tripping.
• To turn the rice cooker o, tap
CANCEL to stop cooking, then
unplug. To unplug, grasp the plug
and pull from the outlet. Never pull
from the power cord.
• Do not spill water or liquid on the
prongs of the plug.
• Do not use with an extension cord.
This rice cooker is intended for
countertop use only.
• Do not let the power cord hang over
the edge of a table or counter or
touch hot surfaces.
• The cord should be arranged so that
it will not drape over the countertop
or tabletop where it can be pulled
on by children or tripped over
unintentionally.
• Never use an outlet below the
counter when plugging in your rice
cooker.
• Avoid spillage on the supply cord
connector.
materials which may catch fire or
melt.
• Do not use this rice cooker for deep
frying with oil.
• Do not block any ventilation
openings. Hot steam is released
through openings. Keep your hands
and face clear of openings.
• Do not leave the rice cooker
unattended while in use.
• The heating plate is subject to
residual heat after use.
• Children shall not play with the
appliance. Cleaning and user
maintenance shall not be made by
children unless they are older than 8
and supervised. Keep the appliance
and its cord out of reach of children
less than 8 years.
• Only use as directed in this manual.
Do not use for any purpose other
than its intended use.
• Not for commercial use. Household
use only.
Note: See Care & Maintenance for instructions on
how to clean accessories (page 13).

EN
5
• Keep the rice cooker and its cord out
of reach of children.
• Your rice cooker should only be used
with 220–240V, 50/60Hz electrical
systems. Do not plug into another
type of outlet.
Electromagnetic Fields (EMF)
SAVE THESE
INSTRUCTIONS
This rice cooker complies with all
standards regarding electromagnetic
fields (EMF). If handled properly and
according to the instructions in this
user manual, the appliance is safe
to use based on scientific evidence
available today.
• If the power supply cord is damaged,
it must be replaced by Arovast
Corporation or similarly qualified
persons in order to avoid an electric
or fire hazard. Please contact
Customer Support (page 15).
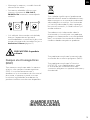
This symbol means the product
must not be discarded as household
waste, and should be delivered to
an appropriate collection facility for
recycling. Proper disposal and recycling
helps protect natural resources, human
health and the environment.
For more information on disposal and
recycling of this product, contact your
local municipality, disposal service,
or the shop where you bought this
product.
This product is RoHS compliant.
This product is in compliance
with Directive 2011/65/EU, and its
amendments, on the restriction of the
use of certain hazardous substances in
electrical and electronic equipment.
CAUTION: Hot surface.
220–240V, 50/60Hz 120 V, 60 Hz

EN
6
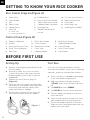
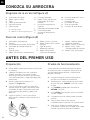
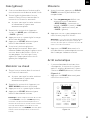
Control Panel(Figure B)
a. Progress Indicators
b. Display
c. Increase/Decrease Time
d. Delay Timer Indicator
e. Rice Type
f. White Rice Button
g. Grains Button
h. Brown Rice Button
i. Grain Type
j. Cooking Modes
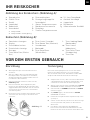
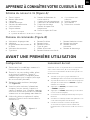
GETTING TO KNOW YOUR RICE COOKER
Rice Cooker Diagram(Figure A)
a. Steam Vent
b. Open Button
c. Lid
d. Power Cord
e. Control Panel
f. Inner Lid
g. Radiator Plate
h. Inner Lid Release Button
i. Top Temperature Sensor
j. Condensation Collectors
k. Heating Plate
l. Bottom Temperature
Sensor
m. 3.0-Litre Steam Basket
n. Nonstick Inner Pot
o. Soup Ladle
p. Measuring Cup
q. Standing Rice Paddle
1. Steam Cap
2. Steam Cap Release
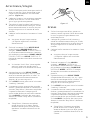
BEFORE FIRST USE
1. Remove all packaging around and inside
the rice cooker.
2. Place on a stable, level, heat-resistant
surface. Keep away from areas that can
be damaged by steam (such as walls or
cupboards).
3. Remove the inner lid (see page 13).
[
Figure 1.1
]
4. Wash the inner lid, steam cap, inner pot,
steam basket, rice paddle, soup ladle, and
measuring cup with hot, soapy water
and a non-abrasive sponge.
5. Dry the parts and reinstall the inner lid.
Place the inner pot in the rice cooker.
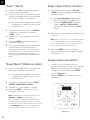
1. Make sure there is no food or packaging
in the rice cooker and plug it in.
2. Add water to the inner pot up to the
“STEAM” water level marking. Close the
lid.
3. Tap MODE to select “STEAM”.
4. Tap START to start the Steam function.
5. The rice cooker will beep several times
when finished.
6. Open the lid, carefully remove the inner
pot, and discard the remaining water.
7. Let the rice cooker cool for 15 minutes.
Wipe the inner lid and outside of the rice
cooker with a dry cloth.
Setting Up Test Run
A test run will help you become familiar
with your rice cooker, make sure it’s working
correctly, and clean it of possible residues.
k. Keep Warm Button
l. Cooking Mode Button
m. Cancel Button
n. Delay Timer Button
o. Start Button
Figure 1.1
21

EN
7
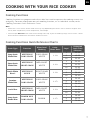
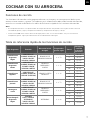
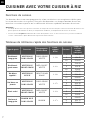
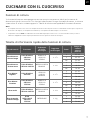
COOKING WITH YOUR RICE COOKER
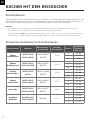
Cooking Functions
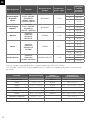
Cooking Functions Quick Reference Charts
Note:
• Cook time is an estimate. Actual cook time may vary depending on factors such as amount of grain and
water, room temperature, water temperature, and voltage.
• The inner pot does not have water level markings for 1 cup. If you are cooking 1 cup, use the “Grain : Water
Ratio” column to determine the correct amount of water.
Cooking functions are programmed with an ideal time and temperature for cooking certain rice
and grains. For more information on each cooking function, see its individual section, or the
Cooking Functions Quick Reference Charts.
Grain Type Function Water Level
Marking
Grain :
Water Ratio Cups*
Estimated
Cook Time
(Minutes)
Long Grain
White Rice
WHITE RICE
LONG GRAIN
LONG GRAIN
WHITE 1 : 1¼
1 35–45
5 45–55
10 55–65
Short Grain
White Rice
WHITE RICE
SHORT GRAIN
MED/SHORT
WHITE 1 : 1¼
1 32–42
5 41–51
10 51–61
Quick White
Rice**
WHITE RICE
QUICK
SHORT GRAIN
WHITE 1 : 1¼
1 27–37
5 39–49
10 50–60
Jasmine
White Rice
WHITE RICE
LONG GRAIN
LONG GRAIN
WHITE 1 : 1¼
1 35–45
5 40–50
10 50–60
Sushi Rice WHITE RICE
SHORT GRAIN
MED/SHORT
WHITE 1 : 1¼
1 32–42
5 41–51
10 51–61
Long Grain
Brown Rice
BROWN RICE
LONG GRAIN BROWN 1 : 1¼
1 59–69
4 65–75
8 72–82
316
316
316
8
8
38

EN
8
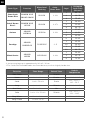
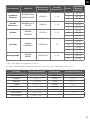
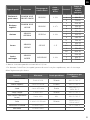
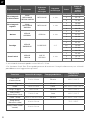
*1 rice measuring cup is approximately 180 mL / 6.1 oz.
**The Quick Rice function cooks rice faster but may result inslightly harder rice.
Function Time Range Default Time Default
Temperature
Slow Cook 5 min–24 hr 30 min 100°C / 212°F
Steam 1 min–1 hr 10 min 100°C / 212°F
Sauté 1 min–30 min 5 min 145°–155°C /
293°–311°F
Soup 1 min–4 hr 30 min 100°C / 212°F
Jam/Sauce 5 min–2 hr 1 hr 100°C / 212°F
Cake 1 min–1 hr 30 min 50 min 110°–120°C /
230°–248°F
Keep Warm 10 min–24 hr 70°C / 158°F
Delay Timer 10 min–24 hr
Grain Type Function Water Level
Marking
Grain :
Water Ratio Cups*
Estimated
Cook Time
(Minutes)
Short Grain
Brown Rice
BROWN RICE
SHORT GRAIN BROWN 1 : 1¼
1 60–70
4 66–76
8 73–83
Quick Brown
Rice**
BROWN RICE
QUICK BROWN 1 : 1¼
1 50–60
4 55–65
8 60–70
Quinoa GRAINS
QUINOA QUINOA 1 : 1¼
1 37–47
3 42–52
6 46–56
Porridge GRAINS
PORRIDGE PORRIDGE 1 : 5
½ 35–45
1 45–55
1½ 50–60
2 55–65
2½ 60–70
Mixed Grains GRAINS
MIXED MIXGRAIN 1 : 1¼
1 59–69
3 65–75
6 72–82
38

EN
9
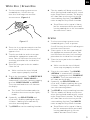
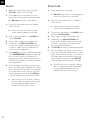
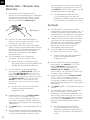
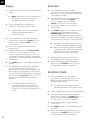
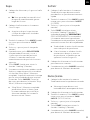
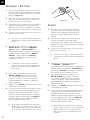
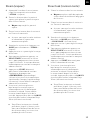
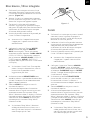
White Rice / Brown Rice
1. Use the measuring cup to measure
uncooked rice. Overfill the cup,
then level it o to get an accurate
measurement. [
Figure 2.1
]
a. Make sure that the inner lid and
steam cap are properly installed.
a. The Quick Rice function cooks rice
faster but the texture may be slightly
harder.
a. Keep Warm can last up to 24 hours,
but we recommend that you avoid
leaving cooked rice in the rice cooker
for more than 5 hours.
2. Place rice in a separate container or fine
mesh sieve. Wash rice until the water
appears clear.
3. Transfer washed rice to the inner pot
and add the appropriate amount of
water. You can reference the water level
markings printed on the inside of the
inner pot.
4. Place the inner pot in the rice cooker.
Close the lid.
5. Plug in the rice cooker. Tap WHITE RICE
or BROWN RICE. “LONG GRAIN” is
automatically selected. Continue tapping
to select “SHORT GRAIN” or “QUICK”.
The estimated cook time will show on
the display.
6. Optionally, tap DELAY TIMER and
use +and to delay cooking for up to
24hours. Cooking will automatically
start after counting down.
7. Tap START to start the cooking function.
Grains
1. Use the measuring cup to measure
uncooked grains, such as quinoa.
Overfill the cup, then level it o to get an
accurate measurement.
2. Places grains in the inner pot and add
the appropriate amount of water. You
can reference the water level markings
printed on the inside of the inner pot.
3. Place the inner pot in the rice cooker.
Close the lid.
a. Make sure that the inner lid and
steam cap are properly installed.
a. Keep Warm can last up to 24 hours,
but we recommend that you avoid
leaving cooked grain in the rice
cooker for more than 3 hours.
4. Plug in the rice cooker. Tap GRAINS.
“QUINOA” is automatically selected.
Continue tapping to select “PORRIDGE”
or “MIXED”. The estimated cook time
will show on the display.
5. Optionally, tap DELAY TIMER and
use +and to delay cooking for up to
24hours. Cooking will automatically
start after counting down.
6. Tap START to start the cooking function.
7. The rice cooker will beep several times
when finished and automatically switch
to the Keep Warm function. The display
will show how much time has passed
since cooking finished. Tap CANCEL
twice to stop the Keep Warm function.
8. The rice cooker will beep several times
when finished and automatically switch
to the Keep Warm function. The display
will show how much time has passed
since cooking finished. Tap CANCEL
twice to stop the Keep Warm function.
Figure 2.1

EN
10
Steam
1. Add water to the inner pot up to the
“STEAM” water level marking.
2. Place food in the steam basket, then
place the steam basket in the inner pot.
a. Do not overfill the steam basket.
a. Make sure that the inner lid and
steam cap are properly installed.
a. Keep Warm can last up to 24 hours,
but we recommend that you avoid
leaving cooked food in the rice
cooker for more than 3 hours.
3. Place the inner pot in the rice cooker.
Close the lid.
4. Plug in the rice cooker. Tap MODE to
select “STEAM”.
5. Tap + and to adjust the cook time.
6. Optionally, tap DELAY TIMER and
use +and to delay cooking for up to
24hours. Cooking will automatically
start after counting down.
7. Tap START to start the cooking function.
The“PREHEATING” progress indicator
will turn on and the rice cooker will
begin preheating. When preheating is
finished, the display will show the timer
counting down.
8. The rice cooker will beep several times
when finished and automatically switch
to the Keep Warm function. The display
will show how much time has passed
since cooking finished. Tap CANCEL
twice to stop the Keep Warm function.
Slow Cook
1. Place food in the inner pot.
a. Do not fill past the 10-cup long grain
white rice water level marking.
a. Make sure that the inner lid and
steam cap are properly installed.
a. Keep Warm can last up to 24 hours,
but we recommend that you avoid
leaving cooked food in the rice
cooker for more than 3 hours.
2. Place the inner pot in the rice cooker.
Close the lid.
3. Plug in the rice cooker. Tap MODE twice
to select “SLOW COOK”.
4. Tap + and to adjust the cook time.
5. Optionally, tap DELAY TIMER and
use +and to delay cooking for up to
24hours. Cooking will automatically
start after counting down.
6. Tap START to start the cooking function.
7. The rice cooker will beep several times
when finished and automatically switch
to the Keep Warm function. The display
will show how much time has passed
since cooking finished. Tap CANCEL
twice to stop the Keep Warm function.

EN
11
Soup
1. Place food and water in the inner pot.
a. Make sure that the inner lid and
steam cap are properly installed.
a. Keep Warm can last up to 24 hours,
but we recommend that you avoid
leaving cooked food in the rice
cooker for more than 3 hours.
a. Do not fill past the 10-cup long grain
white rice water level marking.
2. Place the inner pot in the rice cooker.
Close the lid.
3. Plug in the rice cooker. Tap MODE three
times to select “SOUP”.
4. Tap +and to adjust the cook time.
5. Optionally, tap DELAY TIMER and
use +and to delay cooking for up to
24hours. Cooking will automatically
start after counting down.
6. Tap START to start the cooking function.
7. The rice cooker will beep several times
when finished and automatically switch
to the Keep Warm function. The display
will show how much time has passed
since cooking finished. Tap CANCEL
twice to stop the Keep Warm function.
Jam/Sauce
1. Place the inner pot in the rice cooker.
You can cook with the lid open or closed.
a. Keep the lid open if you are making
jams or fruit compotes.
2. Place food in the inner pot.
3. Plug in the rice cooker. Tap MODE five
times to select “JAM/SAUCE”.
4. Tap +and to adjust the cook time.
5. Tap START to start the cooking function.
6. When finished, tap CANCEL to stop the
cooking function.
Sauté
1. Place the inner pot in the rice cooker.
You can leave the lid open or close the
lid for faster preheating.
2. Plug in the rice cooker. Tap MODE four
times to select “SAUTE”.
3. Tap +and to adjust the cook time.
4. Tap START to start the cooking function.
The”PREHEATING” progress indicator
will turn on and the rice cooker will
begin preheating. When preheating is
finished, the display will show the timer
counting down.
a. You can add oil to the inner pot
before or after preheating.
b. If food is added to the inner pot
before preheating finishes, the
countdown may not appear.
5. Place food in the inner pot to begin
cooking.
6. When finished, tap CANCEL to stop the
cooking function.

EN
12
Keep Warm
1. Place the inner pot in the rice cooker.
Close the lid.
a. Make sure that the inner lid and
steam cap are properly installed.
2. Plug in the rice cooker. Tap KEEP WARM.
3. Tap +and to adjust the time.
4. Tap START to start the cooking function.
Note: After every cooking function (except
“SAUTE” and “CAKE”), the rice cooker will
automatically switch to the Keep Warm
function. The display will show how much
time has passed since cooking finished.
Tap CANCEL twice to stop the Keep Warm
function.
Cake
1. Evenly grease the inner pot with butter
or oil.
2. Pour the cake batter into the inner pot.
Place the inner pot in the rice cooker.
Close the lid.
a. Make sure that the inner lid and
steam cap are properly installed.
3. Plug in the rice cooker. Tap MODE six
times to select “CAKE”.
4. Tap +and to adjust the baking time.
5. Tap START to start the cooking function.
6. The rice cooker will beep several times
when finished. We recommend poking
the cake with a toothpick and checking if
it comes out clean. If not, repeat steps to
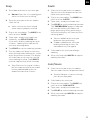
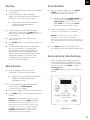
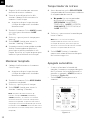
bake the cake longer. Auto Off
• If no cooking function is selected, the
rice cooker will turn o after 15 minutes
of no operation. The display will turn
o and START will be illuminated.
[
Figure2.2
]
• Tap START to use the rice cooker.
Delay Timer
1. Before cooking, tap DELAY TIMER to set
a delay timer.
a. You cannot set a delay timer in
“KEEPWARM”, “SAUTE”, “JAM/
SAUCE”, or “CAKE” functions.
2. Tap +and to delay cooking for up to
24 hours.
Note: This is not a delayed start. The delay
timer takes cook time into account, so food will
finish cooking when the delay timer ends.
3. Tap START and cooking will
automatically start after counting down.
Figure 2.2

EN
13
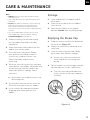
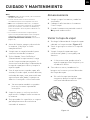
CARE & MAINTENANCE
Note:
• Always clean the inner pot and accessories
after every use.
• The inner pot has a nonstick coating for easy
cleaning.
• Do not use abrasive cleaners, metal scouring
pads, or metal utensils on any part of the
rice cooker, including inner pot and other
accessories. These will scratch or damage their
surfaces.
• This rice cooker does not contain any user-
serviceable parts. For any repairs, contact
Customer Support (see page 15).
1. Before cleaning, turn o and unplug
the rice cooker and allow it to cool
completely.
2. Wipe the outside and inside of the rice
cooker with a moist cloth.
3. Press the Inner Lid Release Button,
then pull the inner lid to remove it.
Ifnecessary, undo the Steam Cap
Release to empty and clean the
steamcap.
4. Wash the inner lid, steam cap, inner pot,
steam basket, rice paddle, soup ladle, and
measuring cup with hot, soapy water
and a non-abrasive sponge. Soak if
necessary.
a. Accessories are also dishwasher-safe
on the top rack.
a. If necessary, you can remove the
steam cap for easy cleaning and
drying.
a. Turn the inner lid upside down to
make sure the steam cap is properly
installed.
5. Dry the parts and reinstall the inner lid.
Place the inner pot in the rice cooker.
6. Let all surfaces dry completely before
plugging in or turning on the rice
cooker.
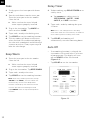
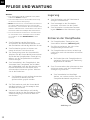
Emptying the Steam Cap
Storage
1. Undo the Steam Cap Release located on
the inner lid. [
Figure2.3
]
2. Empty the water that is collected in the
steam cap.
3. Clean the steam cap with hot, soapy
water and a non-abrasive sponge.
1. Clean and dry the rice cooker and all
accessories.
2. Place the inner pot in the rice cooker.
Close the lid.
3. Store the rice cooker in an upright
position. Do not store anything on top.
4. To reassemble, insert the hinges into the
slot and close the Steam Cap Release.
Figure 2.3

EN
14
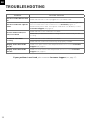
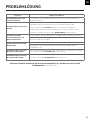
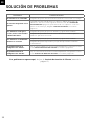
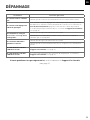
Problem Possible Solution
The rice cooker will not turn
on. Make sure the rice cooker is plugged into a powered outlet.
The rice cooker has a plastic
smell.
Any rice cooker may have a plastic smell from the manufacturing process.
This is normal. Follow the instructions for a Test Run (page 6) to
decrease the plastic smell. If the plastic smell does not decrease, contact
Customer Support (see page 15).
Food is undercooked, too
soft, or too hard.
Make sure the food to water ratio is correct.
Make sure you select the correct cooking function for the food you are
cooking.
Food boils over while
cooking.
Make sure the food to water ratio is correct.
Make sure the inner lid and steam cap are properly installed.
Display shows Error Code
“E1\E3”.
There is an open circuit in the temperature monitor. Contact Customer
Support (see page 15).
Display shows Error Code
“E2\E4”.
There is a short circuit in the temperature monitor. Contact Customer
Support (see page 15).
TROUBLESHOOTING
If your problem is not listed, please contact Customer Support (see page 15).

EN
15
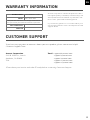
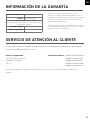
WARRANTY INFORMATION
Product Name 5.0-Litre Rice Cooker
Model CRC-R501-KEU
For your own reference, we strongly recommend
that you record your order ID and date of purchase.
Date of Purchase
Order ID
Arovast Corporation warrants all products to be of
the highest quality in material, craftsmanship, and
service, eective from the date of purchase to the
end of the 2-year limited warranty period.
If you have any questions or concerns about your
new product, please contact our helpful Customer
Support Team.
CUSTOMER SUPPORT
If you have any questions or concerns about your new product, please contact our helpful
Customer Support Team.
*Please have your invoice and order ID ready before contacting Customer Support.
Arovast Corporation
1202 N. Miller St., Suite A
Anaheim, CA 92806
USA
Email: [email protected]

1
DE
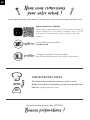
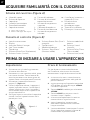
(Wir hoen, dass Ihnen Ihr neuer Reiskocher genauso viel Freude bereitet wie uns.)
Im Namen aller Mitarbeiter von COSORI
Unsere hilfsbereiten hauseigenen Küchenchefs
sind gerne bereit, alle Ihre Fragen zu beantworten!
KONTAKTIEREN SIE UNSERE
KÜCHENCHEFS
E-Mail: [email protected]
Vielen Dank für
Ihren Kauf!
Viel Spaß beim Kochen!
Entdecken Sie unsere digitale Rezeptgalerie
cosori.com
Genießen Sie wöchentlich neue Rezepte, exklusiv
vorbereitet von unseren hauseigenen
Küchenchefs
Kreativ werden mit COSORI
Laden Sie die kostenlose VeSync-App herunter,
um auf Originalrezepte und Videoanleitungen der
COSORI-Köche zuzugreifen, mit unserer Online-
Community in Kontakt zu treten und vieles mehr!

2
DE
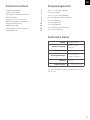
Inhaltsverzeichnis Verpackungsinhalt
Technische Daten
Modell CRC-R501-KEU
Stromversorgung AC 220–240V,
50/60Hz
Nennleistung 970W
Fassungsvermögen 5l / 10Tassen*
(ungekochter Reis)
Gewicht 4,45kg
Abmessungen 31,2 x 26,9 x 23,4cm
1 x 5,0-Liter-Reiskocher
1 x Innentopf
1 x 3,0-Liter-Dampfkorb
1 x Selbststehender Reislöel
1 x Messbecher
1 x Suppenkelle
1 x Rezeptbuch
1 x Bedienungsanleitung
1 x Kurzanleitung
Verpackungsinhalt
Technische Daten
Wichtige Sicherheitshinweise
Ihr Reiskocher
Vor dem ersten Gebrauch
Kochen mit dem Reiskocher
Pflege und Wartung
Problemlösung
Informationen zur Garantie
Kundendienst
*Mit dem beiliegenden Reis-Messbecher, der etwa
180ml fasst.
2
2
3
6
6
7
13
14
15
15

3
DE
WICHTIGE SICHERHEITSHINWEISE
Beachten Sie die grundlegenden Sicherheitsvorkehrungen bei der Verwendung
Ihres Reiskochers. Lesen Sie sämtliche Anweisungen.
Wesentliche Sicherheitshinweise
Allgemeine Sicherheit
• Heiße Oberflächen nicht berühren.
• Während des Kochens oder im
Warmhaltemodus nicht den Dampfauslass
oder den Bereich in der Nähe des
Dampfauslasses berühren. Diesen Bereich
nicht mit einem Tuch abdecken.
• Immer hitzebeständige Handschuhe,
Pads oder Ofenhandschuhe verwenden,
wenn Sie den Reiskocher bewegen, heiße
Materialien anfassen und Gegenstände
in den Reiskocher legen oder aus dem
Reiskocher nehmen, einschließlich des
Innentopfs, des Dampfkorbs und des
Zubehörs.
• Den Reiskocher niemals ohne den
Innentopf verwenden.
• Als Schutz vor einem elektrischen Schlag
niemals den Reiskocher, das Kabel oder
den Netzstecker in Wasser oder andere
Flüssigkeiten tauchen.
• Den Reiskocher nicht in Wasser eintauchen
oder unter fließendes Wasser halten.
• Den Stecker vor der Reinigung und wenn
das Gerät nicht benutzt wird abziehen.
Lassen Sie das Gerät abkühlen, bevor Sie
Teile anbringen oder entfernen und vor
der Reinigung sowie Lagerung.
• Keine Lebensmittel, Flüssigkeiten oder
Fremdkörper auf die Heizplatte legen.
• Sicherstellen, dass die Heizplatte sauber
und die Unterseite des Innentopfes trocken
ist, bevor der Innentopf eingesetzt wird.
• Kinder nicht unbeaufsichtigt in der Nähe
des Reiskochers lassen.
• Kinder müssen beaufsichtigt werden, um
sicherzustellen, dass sie nicht mit dem
Reiskocher spielen.
• Kindern nicht erlauben, den Reiskocher
zu reinigen oder Wartungsarbeiten daran
durchzuführen.
• Den Reiskocher nicht benutzen, wenn
er beschädigt ist oder nicht korrekt
funktioniert, oder wenn das Kabel oder
der Netzstecker beschädigt ist. Wenden
Sie sich an unseren Kundendienst (siehe
Seite 15).
• Die Verwendung von Zubehör oder
Ersatzteilen, die nicht von COSORI
empfohlen werden, kann zu Verletzungen
führen.
• Benutzen Sie das Gerät nicht im Freien.
• Stellen Sie weder den Reiskocher noch
einzelne Geräteteile auf eine Herdplatte, in
die Nähe von Gas- oder Elektrobrennern
oder in einen erhitzten Ofen.
• Das mitgelieferte Zubehör und den
Innentopf nicht in der Mikrowelle, auf
einem Herd oder Grill oder im Backofen
verwenden.
• Beim Bewegen des Reiskochers oder
des Innentopfs besonders vorsichtig
vorgehen, wenn sie heißes Öl oder andere
heiße Flüssigkeiten enthalten.
• Dieser Reiskocher ist nicht für den Betrieb
mit einer externen Zeitschaltuhr oder
einem separaten Fernbedienungssystem
vorgesehen.
• Dieses Gerät kann von Kindern ab
8Jahren und darüber sowie von Personen
mit verringerten physischen, sensorischen
oder mentalen Fähigkeiten oder Mangel
an Erfahrung und Wissen benutzt werden,
wenn sie beaufsichtigt oder bezüglich
des sicheren Gebrauchs des Geräts
unterwiesen wurden und die daraus
resultierenden Gefahren verstehen.
DIESE ANLEITUNG LESEN UND
SORGFÄLTIG AUFBEWAHREN

4
DE
Beim Kochen
• ACHTUNG: Gefahr eines Stromschlags.
Nur im herausnehmbaren Innentopf
kochen. Flüssigkeit darf nicht direkt auf
die Heizplatte des Reiskochers gelangen.
• Das Gerät auf einer flachen, stabilen,
hitzebeständigen Oberfläche verwenden,
die sich nicht in der Nähe von
Wärmequellen oder Flüssigkeiten befindet.
• Der herausnehmbare Innentopf ist
während des Gebrauchs extrem heiß und
kann schwer sein, wenn er mit Zutaten
gefüllt ist.
• Beim Umgang mit dem Innentopf oder
dem Dampfkorb vorsichtig vorgehen,
wenn dieser heiße Speisen, heißes Öl
oder andere heiße Flüssigkeiten enthält.
• Heißes Zubehör nur auf eine
hitzebeständige Unterlage oder einen
Topflappen stellen.
• Keine Gegenstände auf der Oberseite des
Reiskochers lagern, während er in Betrieb
ist. Keine Gegenstände, außer dem
empfohlenen Zubehör, im Reiskocher
aufbewahren.
• Während oder unmittelbar nach dem
Kochen nicht den Metallteil des Deckels,
Oberflächen oder Zubehörteile berühren,
da diese noch heiß sind.
• Kein/e Papier, Pappe, nicht
hitzebeständigen Kunststo oder andere
Stromversorgung und Kabel
• Dieser Reiskocher besitzt ein kurzes
Netzkabel, um die Gefahr zu verringern,
dass Kinder daran ziehen, sich darin
verheddern oder darüber stolpern.
• Zum Ausschalten des Reiskochers tippen
Sie auf CANCEL ABBRECHEN, um den
Kochvorgang zu beenden, und ziehen Sie
dann den Netzstecker. Zum Trennen des
Netzkabels den Stecker direkt anfassen
und aus der Steckdose herauszuziehen.
Niemals am Netzkabel ziehen.
• Auf die Stifte des Steckers dürfen kein/e
Wasser oder Flüssigkeiten gelangen.
• Nicht mit einem Verlängerungskabel
verwenden. Dieser Reiskocher ist nur für
die Verwendung auf einer Arbeitsplatte
vorgesehen.
• Das Kabel nicht über die Seite eines
Tischs oder einer Theke hängen lassen.
Das Kabel darf nicht mit heißen Flächen
in Berührung kommen.
• Das Kabel muss so verlegt werden, dass es
nicht über eine Arbeits- oder Tischplatte
hängt, wo Kinder daran ziehen oder
unbeabsichtigt darüber stolpern können.
• Verwenden Sie niemals eine Steckdose
unter der Arbeitsplatte für den
Stromanschluss des Reiskochers.
• Achten Sie darauf, dass keine Flüssigkeit
an den Stecker des Netzkabels gelangt.
Materialien, die sich entzünden oder
schmelzen können, in den Reiskocher
legen.
• Diesen Reiskocher nicht zum Frittieren
mit Öl verwenden.
• Keine der Lüftungsönungen blockieren.
Aus den Önungen tritt heißer Dampf
aus. Halten Sie Ihre Hände und Ihr
Gesicht von den Önungen fern.
• Den Reiskocher nicht unbeaufsichtigt
lassen, während er in Betrieb ist.
• Die Heizplatte weist nach dem Gebrauch
eine Restwärme auf.
• Kinder dürfen nicht mit dem Gerät spielen.
Die Reinigung und Wartung darf nicht
von Kindern vorgenommen werden, es
sei denn, sie sind älter als 8Jahre und
werden beaufsichtigt. Den Reiskocher und
sein Kabel außerhalb der Reichweite von
Kindern unter 8Jahren halten.
• Nur verwenden wie in diesem Handbuch
beschrieben. Den Reiskocher nur für den
vorgesehenen Zweck verwenden.
• Nicht für den kommerziellen Gebrauch.
Nur für den Hausgebrauch.
Hinweis: Siehe Pflege und Wartung für
Anweisungen zur Reinigung des Zubehörs
(Seite 13).

5
DE
• Den Reiskocher und sein Kabel außerhalb
der Reichweite von Kindern aufbewahren.
• Der Reiskocher darf nur an Stromnetzen
mit 220–240V, 50/60Hz betrieben
werden. Der Reiskocher darf nicht an
andere Steckdosentypen angeschlossen
werden.
Elektromagnetische Felder
(EMF)
DIESE
ANLEITUNG BITTE
AUFBEWAHREN
Dieser Reiskocher erfüllt alle Normen
hinsichtlich elektromagnetischer Felder
(EMF). Bei sachgemäßer Handhabung
gemäß den Anweisungen in dieser
Bedienungsanleitung ist das Gerät auf
Grundlage der derzeit verfügbaren
wissenschaftlichen Erkenntnisse
bediensicher.
• Wenn das Netzkabel beschädigt ist,
muss es von der Arovast Corporation
oder einer einem qualifizierten Fachmann
ersetzt werden, um Gefahren durch
Stromschlag oder Brand zu vermeiden.
Bitte kontaktieren Sie den Kundendienst
(Seite 15).
Dieses Symbol bedeutet, dass das Produkt
nicht als Hausmüll entsorgt werden darf
und zum Recycling an eine geeignete
Sammelstelle geliefert werden sollte.
Die ordnungsgemäße Entsorgung und
das Recycling tragen zum Schutz der
natürlichen Ressourcen, der menschlichen
Gesundheit und der Umwelt bei.
Weitere Informationen zur Entsorgung und
zum Recycling dieses Produkts erhalten
Sie von Ihrer örtlichen Gemeinde, dem
Entsorgungsdienst oder dem Geschäft, in
dem Sie dieses Produkt gekauft haben.
Dieses Produkt ist RoHS-konform.
Dieses Produkt erfüllt die Anforderungen
der Richtlinie 2011/65/EU und ihrer
Novellierungen zur Beschränkung der
Verwendung bestimmter gefährlicher Stoe
in Elektro- und Elektronikgeräten.
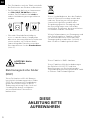
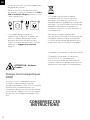
ACHTUNG: Heiße
Oberfläche.
220–240V, 50/60Hz 120 V, 60 Hz
La page est en cours de chargement...
La page est en cours de chargement...
La page est en cours de chargement...
La page est en cours de chargement...
La page est en cours de chargement...
La page est en cours de chargement...
La page est en cours de chargement...
La page est en cours de chargement...
La page est en cours de chargement...
La page est en cours de chargement...
La page est en cours de chargement...
La page est en cours de chargement...
La page est en cours de chargement...
La page est en cours de chargement...
La page est en cours de chargement...
La page est en cours de chargement...
La page est en cours de chargement...
La page est en cours de chargement...
La page est en cours de chargement...
La page est en cours de chargement...
La page est en cours de chargement...
La page est en cours de chargement...
La page est en cours de chargement...
La page est en cours de chargement...
La page est en cours de chargement...
La page est en cours de chargement...
La page est en cours de chargement...
La page est en cours de chargement...
La page est en cours de chargement...
La page est en cours de chargement...
La page est en cours de chargement...
La page est en cours de chargement...
La page est en cours de chargement...
La page est en cours de chargement...
La page est en cours de chargement...
La page est en cours de chargement...
La page est en cours de chargement...
La page est en cours de chargement...
La page est en cours de chargement...
La page est en cours de chargement...
La page est en cours de chargement...
La page est en cours de chargement...
La page est en cours de chargement...
La page est en cours de chargement...
La page est en cours de chargement...
La page est en cours de chargement...
La page est en cours de chargement...
La page est en cours de chargement...
La page est en cours de chargement...
La page est en cours de chargement...
La page est en cours de chargement...
La page est en cours de chargement...
La page est en cours de chargement...
La page est en cours de chargement...
La page est en cours de chargement...
-
 1
1
-
 2
2
-
 3
3
-
 4
4
-
 5
5
-
 6
6
-
 7
7
-
 8
8
-
 9
9
-
 10
10
-
 11
11
-
 12
12
-
 13
13
-
 14
14
-
 15
15
-
 16
16
-
 17
17
-
 18
18
-
 19
19
-
 20
20
-
 21
21
-
 22
22
-
 23
23
-
 24
24
-
 25
25
-
 26
26
-
 27
27
-
 28
28
-
 29
29
-
 30
30
-
 31
31
-
 32
32
-
 33
33
-
 34
34
-
 35
35
-
 36
36
-
 37
37
-
 38
38
-
 39
39
-
 40
40
-
 41
41
-
 42
42
-
 43
43
-
 44
44
-
 45
45
-
 46
46
-
 47
47
-
 48
48
-
 49
49
-
 50
50
-
 51
51
-
 52
52
-
 53
53
-
 54
54
-
 55
55
-
 56
56
-
 57
57
-
 58
58
-
 59
59
-
 60
60
-
 61
61
-
 62
62
-
 63
63
-
 64
64
-
 65
65
-
 66
66
-
 67
67
-
 68
68
-
 69
69
-
 70
70
-
 71
71
-
 72
72
-
 73
73
-
 74
74
-
 75
75


Cosori 18-IN-1 MULTIKOKER Manuel utilisateur
- Catégorie
- Cuiseurs à riz
- Taper
- Manuel utilisateur
dans d''autres langues
Autres documents
-
NutriBullet Everygrain Cooker Mode d'emploi
-
Zojirushi NS-WSC10 Le manuel du propriétaire
-
Zojirushi NS-TSQ18 Manuel utilisateur
-
Fagor 670041930 Manuel utilisateur
-
 Zavor ZSESE01 Manuel utilisateur
-
-
Tiger JBA-B18U Manuel utilisateur
-
 Tiger Products Co., Ltd JKJ-G10U Manuel utilisateur
-
Panasonic SR-MS102 Le manuel du propriétaire
-
Klarstein 53045211 Le manuel du propriétaire

