Toro Flex-Force Power System 6.0Ah 60V MAX Battery Pack Manuel utilisateur
- Taper
- Manuel utilisateur
Ce manuel convient également à
- Flex-Force Power System 10.0Ah 60V Pro Battery Pack
- Flex-Force Power System 2.0Ah 60V MAX Battery Pack
- Flex-Force Power System 2.5Ah 60V MAX Battery Pack
- Flex-Force Power System 4.0Ah 60V MAX Battery Pack
- Flex-Force Power System 5.0Ah 60V MAX Battery Pack
- Flex-Force Power System 60V MAX Battery Charger
- Flex-Force Power System 7.5Ah 60V MAX Battery Pack

Form No. 3455-208 Rev B
Flex-Force Power System™ 60V MAX Battery Packs
and Chargers
66810 , 88602 , 88605 , 88610 , 88620 , 88625 , 88640 , 88650 , 88660 , 88675
Baterías y cargadores 60 V MAX con Flex-Force
Power System™
66810 , 88602 , 88605 , 88610 , 88620 , 88625 , 88640 , 88650 , 88660 , 88675
Batteries et chargeurs Flex-Force Power System™
60 V MAX
66810 , 88602 , 88605 , 88610 , 88620 , 88625 , 88640 , 88650 , 88660 , 88675
www .T oro.com.
*3455-208*


Form No. 3455-204 Rev B
Flex-Force Power System
®
60V
MAX Battery Packs and Chargers
Model No. 66810 —Serial No. 323000001 and Up
Model No. 88602 —Serial No. 323000001 and Up
Model No. 88605 —Serial No. 323000001 and Up
Model No. 88610 —Serial No. 323000001 and Up
Model No. 88620 —Serial No. 323000001 and Up
Model No. 88625 —Serial No. 323000001 and Up
Model No. 88640 —Serial No. 323000001 and Up
Model No. 88650 —Serial No. 323000001 and Up
Model No. 88660 —Serial No. 323000001 and Up
Model No. 88675 —Serial No. 323000001 and Up
Register at www .T oro.com.
Original Instructions (EN)
*3455-204*

W ARNING
CALIFORNIA
Proposition 65 W arning
The power cord on this product contains
lead, a chemical known to the State
of California to cause birth defects
or other reproductive harm. W ash
hands after handling.
Use of this product may cause exposure
to chemicals known to the State of
California to cause cancer , birth defects,
or other reproductive harm.
Introduction
These chargers and battery packs are intended to
be used by homeowners and professional operators.
These battery packs are designed to be charged only
by Flex-Force 60V lithium-ion battery chargers. These
chargers are designed to charge only Flex-Force 60V
lithium-ion battery packs. They are not designed to
charge any other batteries. Using these products for
purposes other than their intended use could prove
dangerous to you and bystanders.
Read this information carefully to learn how to operate
and maintain your product properly and to avoid
injury and product damage. Y ou are responsible for
operating the product properly and safely .
V isit www .T oro.com for more information, including
safety tips, training materials, accessory information,
help nding a dealer , or to register your product.
Whenever you need service, genuine the
manufacturer parts, or additional information, contact
an Authorized Service Dealer or the manufacturer
Customer Service and have the model and serial
numbers of your product ready . Figure 1 identies
the location of the model and serial numbers on the
product. W rite the numbers in the space provided.
Important: W ith your mobile device, you can
scan the QR code on the serial number decal (if
equipped) to access warranty , parts, and other
product information.
g397296
Figure 1
1. Model and serial number location.
Model No.
Serial No.
© 2024—The T oro® Company
81 1 1 L yndale A venue South
Bloomington, MN 55420
2
Contact us at www .T oro.com.
Printed in China
All Rights Reserved

Safety-Alert Symbol
The safety-alert symbol ( Figure 2 ) shown in this
manual and on the machine identies important safety
messages that you must follow to prevent accidents.
g000502
Figure 2
Safety-alert symbol
The safety-alert symbol appears above information
that alerts you to unsafe actions or situations and
is followed by the word DANGER ,W ARNING , or
CAUTION .
DANGER indicates an imminently hazardous situation
which, if not avoided, will result in death or serious
injury .
W ARNING indicates a potentially hazardous situation
which, if not avoided, could result in death or serious
injury .
CAUTION indicates a potentially hazardous situation
which, if not avoided, may result in minor or moderate
injury .
This manual uses two other words to highlight
information. Important calls attention to special
mechanical information and Note emphasizes general
information worthy of special attention.
Battery Pack
Model
Certied Combinations
66810
This battery is third-party certied
for use with all Flex-Force powered
tools and chargers.
88620
This battery is third-party certied
for use with all Flex-Force powered
tools and chargers.
88625
This battery is third-party certied
for use with all Flex-Force powered
tools and chargers.
88640
This battery is third-party certied
for use with all Flex-Force powered
tools and chargers.
88650
This battery is third-party certied
for use with all Flex-Force powered
tools and chargers.
88660
This battery is third-party certied
for use with all Flex-Force powered
tools and chargers.
88675
This battery is third-party certied
for use with all Flex-Force powered
tools and chargers.
Safety
IMPORT ANT SAFETY
INSTRUCTIONS
1. SA VE THESE INSTRUCTIONS—This manual
contains important safety and operating
instructions for Flex-Force 60V lithium-ion
battery packs and Flex-Force 60V lithium-ion
battery chargers.
2. Before using the battery charger or battery pack,
read all the instructions and cautionary markings
on the battery charger , battery pack, and product
using the battery pack.
3. CAUTION—T o reduce risk of injury , charge
Flex-Force 60V lithium-ion battery packs with
Flex-Force 60V lithium-ion battery chargers
only . Other brands of battery packs may burst,
causing personal injury and damage.
4. W ARNING—Plugging the battery charger into
an outlet that is not 120V can cause a re or
electric shock. Do not plug the battery charger
into an outlet other than 120V . For a dif ferent
style of connection, use an attachment plug
adapter of the proper conguration for the power
outlet if needed.
5. These devices comply with Part 15 of the FCC
rules. Operation is subject to the following
2 conditions: (1) These devices may not
cause harmful interference; and (2) these
devices must accept any interference received,
including interference that may cause undesired
operation.
3

I. T raining
1. Do not allow children or untrained people to
operate or service this device. Allow only people
who are responsible, trained, familiar with the
instructions, and physically capable to operate
or service the device.
2. Do not allow children to use or play with the
battery pack or battery charger; local regulations
may restrict the age of the operator .
II. Preparation
1. Use appliances only with specically designated
battery packs. Using other types of battery
packs may create a risk of injury and/or re.
2. Do not use a damaged or modied battery pack
or battery charger . It may exhibit unpredictable
behavior , resulting in re, explosion, or risk of
injury .
3. If the supply cord to the battery charger is
damaged, contact an Authorized Service Dealer
to replace it.
III. Operation
1. Charge the battery pack with only the battery
charger specied by T oro. A charger suitable for
1 type of battery pack may create a risk of re
when used with another battery pack.
2. Charge the battery pack in a well-ventilated area
only .
3. Follow all charging instructions and do
not charge the battery pack outside of the
temperature range specied in the instructions.
Otherwise, you may damage the battery pack
and increase the risk of re.
4. Under abusive conditions, the battery pack may
eject liquid; avoid contact. If you accidently
come into contact with the liquid, ush with
water . If the liquid contacts your eyes, seek
medical help. Liquid ejected from the battery
pack may cause irritation or burns.
5. Do not expose a battery pack or tool to re or
excessive temperature. Exposure to re or
temperature above 130°C (265°F) may cause
explosion.
6. CAUTION—A mistreated battery pack may
present a risk of re, explosion, or chemical
burn.
•Do not disassemble the battery pack.
•Replace the battery pack with a genuine
Flex-Force battery pack only; using another
type of battery pack may cause a re or risk
of injury .
•Keep battery packs out of the reach of
children and in the original packaging until
you are ready to use them.
IV . Maintenance and Storage
1. Do not allow children to clean or maintain the
battery charger .
2. When the battery pack is not in use, keep it
away from metal objects such as paper clips,
coins, keys, nails, and screws that can make a
connection from 1 terminal to another . Shorting
the battery terminals may cause burns or a re.
3. Do not attempt to repair the battery pack or
battery charger . Have an Authorized Service
Dealer perform service on the battery pack or
battery charger using identical replacement parts
to ensure that the product is safely maintained.
4. Check with local codes for possible special
battery disposal instructions.
SA VE THESE
INSTRUCTIONS
4

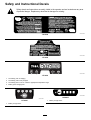
Safety and Instructional Decals
Safety decals and instructions are easily visible to the operator and are located near any area
of potential danger . Replace any decal that is damaged or missing.
decal144-3096
144-3096
decal137-9462
137-9462
decal137-9463
137-9463
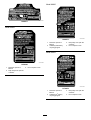
1. The battery pack is charging.
2. The battery pack is fully charged.
3. The battery pack is over or under the appropriate temperature range.
4. Battery pack charging fault
decal137-9461
137-9461
1. Battery charge status
decal145-8265
145-8265
1. Battery charge status
5

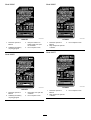
decal140-8471
140-8471
Model 66810
decal145-8260
145-8260
1. Read the Operator ’ s
Manual .
3. Do not expose to rain.
2. Keep away from open re
or ames.
Model 88620
decal140-8475
140-8475
1. Read the Operator ’ s
Manual .
3. Keep away from open re
or ames.
2. Call2Recycle® battery
recycling program
4. Do not expose to rain.
Model 88625
decal137-9454
137-9454
1. Read the Operator ’ s
Manual .
3. Keep away from open re
or ames.
2. Call2Recycle
®
battery
recycling program
4. Do not expose to rain.
6

Model 88640
decal140-2155
140-2155
1. Read the Operator ’ s
Manual .
3. Keep the Lithium Ion
battery away from open
re or ames.
2. Call2Recycle
®
battery
recycling program
4. Do not expose to rain.
Model 88650
decal145-1479
145-1479
1. Read the Operator ’ s
Manual .
3. Keep away from open re
or ames.
2. Call2Recycle
®
battery
recycling program
4. Do not expose to rain.
Model 88660
decal137-9455
137-9455
1. Read the Operator ’ s
Manual .
3. Do not expose to rain.
2. Keep away from open re
or ames.
Model 88675
decal137-9456
137-9456
1. Read the Operator ’ s
Manual .
3. Do not expose to rain.
2. Keep away from open re
or ames.
7

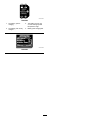
decal144-3094
144-3094
1. The battery pack is
charging.
3. The battery pack is over
or under the appropriate
temperature range.
2. The battery pack is fully
charged.
4. Battery pack charging fault
decal144-3098
144-3098
8

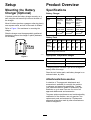
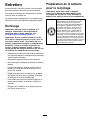
Setup
Mounting the Battery
Charger (Optional)
If desired, mount the battery charger securely on a
wall using the wall-mount key holes on the back of
the charger .
Mount it indoors (such as a garage or other dry place),
near a power outlet, and out of the reach of children.
Refer to Figure 3 for assistance in mounting the
charger .
Slide the charger over the appropriately positioned
hardware to secure the charger in place (hardware
not included).
g290534
Figure 3
Product Overview
Specications
Battery Charger
Model 88602 88605 88610
T ype 60V MAX
Lithium-Ion
Battery
Charger
60V MAX
Lithium-Ion
Battery Rapid
Charger
Adapter
60V MAX
Lithium-Ion
Battery
Charger
Input
120V AC
~2.0A, 60Hz
120V AC
~5.0A, 60Hz
120V AC
~2.0A, 60Hz
Output 60V DC
2.0A MAX
60V DC
5.5A MAX
60V DC
1.0A MAX
Battery Pack
Model 88620 88625 88640 88650 88660 88675 66810
2.0
Ah
2.5
Ah
4.0
Ah
5.0
Ah
6.0
Ah
7.5
Ah
10.0
AhBattery
pack
capacity
108
Wh
135
Wh
216
Wh
270
Wh
324
Wh
405
Wh
540
Wh
Battery manufacturer rating = 60V maximum and 54V nominal.
Actual voltage varies with load.
Appropriate T emperature Ranges
Charge battery pack at 5°C (41°F) to 40°C (104°F)*
Use battery pack at
-30°C (-22°F) to 49°C (120°F)
Store battery pack/charger at 5°C (41°F) to 40°C (104°F)*
*Charging time will increase if you do not charge the
battery within this range.
Store the tool, battery pack, and battery charger in an
enclosed clean, dry area.
Attachments/Accessories
A selection of T oro approved attachments and
accessories is available for use with the machine
to enhance and expand its capabilities. Contact
your Authorized Service Dealer or authorized T oro
distributor or go to www .T oro.com for a list of all
approved attachments and accessories.
T o ensure optimum performance and continued safety
certication of the machine, use only genuine T oro
replacement parts and accessories. Replacement
parts and accessories made by other manufacturers
could be dangerous.
9

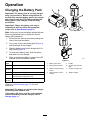
Operation
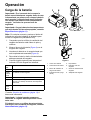
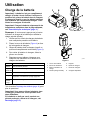
Charging the Battery Pack
Important: The battery pack is not fully charged
when you purchase it. Before using the tool for
the rst time, place the battery pack in the charger
and charge it until the LED display indicates the
battery pack is fully charged. Read all safety
precautions.
Important: Charge the battery pack only in
temperatures that are within the appropriate
range; refer to Specications ( page 9 ) .
Note: At any time, press the battery-charge-indicator
button on the battery pack to display the current
charge (LED indicators).
1. Ensure that the vents on the battery charger are
clear of any dust and debris.
2. Line up the cavity in the battery pack ( Figure 4 )
with the tongue on the charger .
3. Slide the battery pack into the charger until it is
fully seated ( Figure 4 ).
4. T o remove the battery pack, slide the battery
backward out of the charger .
5. Refer to the following table to interpret the LED
indicator light on the battery charger .
Indicator
light
Indicates
Of f
No battery pack inserted
Green
blinking
Battery pack is charging
Green
Battery pack is charged
Red
Battery pack and/or battery charger is over or under
the appropriate temperature range
Red
blinking
Battery pack charging fault*
*Refer to T roubleshooting ( page 12 ) for more
information.
Important: The battery can be left on the charger
for short periods between uses.
If the battery will not be used for longer periods,
remove the battery from the charger; refer to
Storage ( page 1 1 ) .
g473274
g473698
Figure 4
1. Battery pack cavity 5. Handle
2. Battery pack terminals
6. Charger LED indicator
light
3. Battery-charge-indicator
button
7. Charger venting areas
4. LED indicators (current
charge)
8. Adapter charger
10

Maintenance
Maintenance and servicing are not required under
normal conditions.
When you clean the surface of the equipment, wipe it
only with a dry cloth.
Do not disassemble the equipment; if it is damaged,
contact your Authorized Service Dealer .
Storage
Important: Store the tool, battery pack, and
charger only in temperatures that are within the
appropriate range; refer to Specications ( page 9 ) .
Important: If you are storing the battery pack
for the off-season, charge it until 2 or 3 LED
indicators turn green on the battery . Do not store
a fully charged or fully depleted battery . When
you are ready to use the machine again, charge
the battery pack until the left indicator light turns
green on the charger or all 4 LED indicators turn
green on the battery .
•Disconnect the product from the power supply (i.e.,
remove the battery pack) and check for damage
after use.
•Clean all foreign material from the product.
•Do not store the charger with the battery pack
installed.
•When not in use, store the tool, battery pack, and
battery charger out of the reach of children.
•Keep the tool, battery pack, and battery charger
away from corrosive agents, such as garden
chemicals and de-icing salts.
•T o reduce the risk of serious personal injury , do
not store the battery pack outside or in vehicles.
•Store the tool, battery pack, and battery charger
in an enclosed clean, dry area.
Preparing the Battery Pack
for Recycling
Important: Upon removal, cover the terminals of
the battery pack with heavy-duty adhesive tape.
Do not attempt to destroy or disassemble the
battery pack or remove any of its components.
Lithium-ion battery packs labeled with the
Call2Recycle seal can be recycled at any
participating retailer or battery recycling
facility in the Call2Recycle program (US
and Canada only). T o locate a participating
retailer or facility closest to you, please call
1-800-822-8837 or visit www .call2recycle.org.
If you cannot locate a participating retailer or
facility nearby , or if your rechargeable battery
is not labeled with the Call2Recycle seal,
please contact your local municipality for more
information on how to responsibly recycle the
battery . If you are located outside of the US
and Canada, please contact your authorized
T oro distributor .
1 1

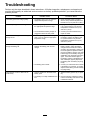
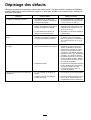
T roubleshooting
Perform only the steps described in these instructions. All further inspection, maintenance, and repair work
must be performed by an authorized service center or a similarly qualied specialist if you cannot solve the
problem yourself.
Problem
Possible Cause Corrective Action
The battery pack loses charge quickly . 1. The battery pack is over or under the
appropriate temperature range.
1. Move the battery pack to a place
where it is dry and the temperature is
between 5°C (41°F) and 40°C (104°F).
1. The battery charger is over or under
the appropriate temperature range.
1. Unplug the battery charger and move
it to a place where it is dry and the
temperature is between 5°C (41°F)
and 40°C (104°F).
The battery charger is not working.
2. The outlet that the battery charger is
plugged into does not have power .
2. Contact your licensed electrician to
repair the outlet.
The LED indicator light on the battery
charger is red.
1. The battery charger and/or battery
pack is over or under the appropriate
temperature range.
1. Unplug the battery charger and move
the battery charger and battery pack
to a place where it is dry and the
temperature is between 5°C (41°F)
and 40°C (104°F).
1. There is an error in the communication
between the battery pack and the
charger .
1. Remove the battery pack from the
battery charger , unplug the battery
charger from the outlet, and wait 10
seconds. Plug the battery charger into
the outlet again and place the battery
pack on the battery charger . If the LED
indicator light on the battery charger is
still blinking red, repeat this procedure
again. If the LED indicator light on
the battery charger is still blinking red
after 2 attempts, properly dispose of
the battery pack at a battery recycling
facility .
The LED indicator light on the battery
charger is blinking red.
2. The battery pack is weak.
2. Contact your authorized service dealer
if the battery is in warranty , or properly
dispose of the battery pack at a battery
recycling facility .
1. There is moisture on the leads of the
battery pack.
1. Allow the battery pack to dry or wipe it
dry .
The tool does not run or does not run
continuously .
2. The battery is not fully installed into the
tool.
2. Remove and then replace the battery
into the tool making sure that it is fully
installed and latched.
12

Notes:

California Proposition 65 W arning Information
What is this warning?
Y ou may see a product for sale that has a warning label like the following:
W ARNING: Cancer and Reproductive Harm—www .p65W arnings.ca.gov .
What is Prop 65?
Prop 65 applies to any company operating in California, selling products in California, or manufacturing products that may be sold in or brought into
California. It mandates that the Governor of California maintain and publish a list of chemicals known to cause cancer , birth defects, and/or other
reproductive harm. The list, which is updated annually , includes hundreds of chemicals found in many everyday items. The purpose of Prop 65 is to
inform the public about exposure to these chemicals.
Prop 65 does not ban the sale of products containing these chemicals but instead requires warnings on any product, product packaging, or literature with
the product. Moreover , a Prop 65 warning does not mean that a product is in violation of any product safety standards or requirements. In fact, the
California government has claried that a Prop 65 warning “is not the same as a regulatory decision that a product is ‘safe’ or ‘unsafe.’” Many of these
chemicals have been used in everyday products for years without documented harm. For more information, go to https://oag.ca.gov/prop65/faqs-view-all .
A Prop 65 warning means that a company has either (1) evaluated the exposure and has concluded that it exceeds the “no signicant risk level”; or (2)
has chosen to provide a warning based on its understanding about the presence of a listed chemical without attempting to evaluate the exposure.
Does this law apply everywhere?
Prop 65 warnings are required under California law only . These warnings are seen throughout California in a wide range of settings, including but not
limited to restaurants, grocery stores, hotels, schools, and hospitals, and on a wide variety of products. Additionally , some online and mail order
retailers provide Prop 65 warnings on their websites or in catalogs.
How do the California warnings compare to federal limits?
Prop 65 standards are often more stringent than federal and international standards. There are various substances that require a Prop 65 warning
at levels that are far lower than federal action limits. For example, the Prop 65 standard for warnings for lead is 0.5 μg/day , which is well below
the federal and international standards.
Why don’t all similar products carry the warning?
•Products sold in California require Prop 65 labelling while similar products sold elsewhere do not.
•A company involved in a Prop 65 lawsuit reaching a settlement may be required to use Prop 65 warnings for its products, but other companies
making similar products may have no such requirement.
•The enforcement of Prop 65 is inconsistent.
•Companies may elect not to provide warnings because they conclude that they are not required to do so under Prop 65; a lack of warnings for a
product does not mean that the product is free of listed chemicals at similar levels.
Why does the manufacturer include this warning?
the manufacturer has chosen to provide consumers with as much information as possible so that they can make informed decisions about the products
they buy and use. the manufacturer provides warnings in certain cases based on its knowledge of the presence of one or more listed chemicals without
evaluating the level of exposure, as not all the listed chemicals provide exposure limit requirements. While the exposure from the manufacturer products
may be negligible or well within the “no signicant risk” range, out of an abundance of caution, the manufacturer has elected to provide the Prop 65
warnings. Moreover , if the manufacturer does not provide these warnings, it could be sued by the State of California or by private parties seeking to
enforce Prop 65 and subject to substantial penalties.
Rev A

Form No. 3455 - 205 Rev B
Baterías y cargadores Flex - Force
Power System
®
60V MAX
Nº de modelo 66810 —Nº de serie 323000001 y superiores
Nº de modelo 88602 —Nº de serie 323000001 y superiores
Nº de modelo 88605 —Nº de serie 323000001 y superiores
Nº de modelo 88610 —Nº de serie 323000001 y superiores
Nº de modelo 88620 —Nº de serie 323000001 y superiores
Nº de modelo 88625 —Nº de serie 323000001 y superiores
Nº de modelo 88640 —Nº de serie 323000001 y superiores
Nº de modelo 88650 —Nº de serie 323000001 y superiores
Nº de modelo 88660 —Nº de serie 323000001 y superiores
Nº de modelo 88675 —Nº de serie 323000001 y superiores
Registre su producto en www .T oro.com.T raducción del original (ES)
*3455 - 205*

ADVERTENCIA
CALIFORNIA
Advertencia de la Propuesta 65
El cable eléctrico de este producto
contiene plomo, que el Estado de
California sabe que causa defectos
congénitos u otros peligros para la
reproducción. Lávese las manos después
de manejar el material.
El uso de este producto puede provocar la
exposición a sustancias químicas que el
Estado de California considera causantes
de cáncer , defectos congénitos u otros
trastornos del sistema reproductor .
Introducción
Estos cargadores y baterías están diseñados para serusados por usuarios domésticos y por operadoresprofesionales. Estas baterías están diseñadas paraser cargadas únicamente con cargadores de bateríasde ion litio Flex - Force 60V . Estos cargadores estándiseñados para cargar únicamente baterías de ion litioFlex - Force 60V . No están diseñados para cargar otrasbaterías. El uso de estos productos para propósitosdiferentes a los previstos puede ser peligroso parausted y para otras personas.
Lea este manual detenidamente para aprender autilizar y mantener correctamente su producto, ypara evitar lesiones y daños al producto. Usted esresponsable de utilizar el producto de forma correctay segura.
V isite www .T oro.com para obtener más información,incluidos consejos de seguridad, materiales deformación, información sobre accesorios, ayudapara encontrar a un distribuidor o para registrar suproducto.
Si necesita asistencia técnica, piezas genuinasdel fabricante o información adicional, póngase encontacto con un Servicio Técnico Autorizado o con elServicio de atención al cliente del fabricante y tenga amano el número de serie y de modelo del producto.Figura 1 identica la ubicación de los números demodelo y serie en el producto. Escriba los númerosen el espacio provisto.
Importante: Con su dispositivo móvil, puede
escanear el código QR de la pegatina del número
de serie (en su caso) para acceder a información
sobre la garantía, las piezas, y otra información
sobre el producto.
g397296
Figura 1
1. Ubicación de los números de modelo y de serie.
Nº de modelo
Nº de serie
© 2024—The T oro® Company
81 1 1 L yndale A venue South
Bloomington, MN 55420
2
Póngase en contacto con nosotros en www .T oro.com.
Impreso en China
Reservados todos los derechos

Símbolo de alerta de
seguridad
El símbolo de alerta de seguridad ( Figura 2 ) queaparece en este manual y en la máquina identicamensajes de seguridad importantes que usted debeobservar para evitar accidentes.
g000502
Figura 2
Símbolo de alerta de seguridad
El símbolo de alerta de seguridad aparece encima deinformación que le alerta ante acciones o situacionesinseguras, y va seguido de la palabra PELIGRO ,ADVERTENCIA , o CUIDADO .
PELIGRO : Indica una situación peligrosa inminente,que si no se evita, causará la muerte o lesionesgraves.
ADVERTENCIA indica una situación potencialmentepeligrosa que si no se evita, podría causar la muerteo lesiones graves.
CUIDADO : Indica una situación potencialmentepeligrosa que si no se evita, podría causar lesionesmenores o moderadas.
Este manual utiliza dos palabras más para resaltarinformación. Importante llama la atención sobreinformación mecánica especial, y Nota resaltainformación general que merece una atenciónespecial.
Batería
Modelo
Combinaciones certicadas
66810
Esta batería está certicada porterceros para su uso con todaslas herramientas y cargadoresFlex - Force.
88620
Esta batería está certicada porterceros para su uso con todaslas herramientas y cargadoresFlex - Force.
88625
Esta batería está certicada porterceros para su uso con todaslas herramientas y cargadoresFlex - Force.
88640
Esta batería está certicada porterceros para su uso con todaslas herramientas y cargadoresFlex - Force.
88650
Esta batería está certicada porterceros para su uso con todaslas herramientas y cargadoresFlex - Force.
88660
Esta batería está certicada porterceros para su uso con todaslas herramientas y cargadoresFlex - Force.
88675
Esta batería está certicada porterceros para su uso con todaslas herramientas y cargadoresFlex - Force.
3

Seguridad
INSTRUCCIONES
DE SEGURIDAD
IMPORT ANTES
1. GUARDE EST AS INSTRUCCIONES – estemanual contiene importantes instrucciones deseguridad y uso de las baterías de ion litio de60 V Flex - Force y de los cargadores de bateríasde ion litio de 60 V Flex - Force.
2. Antes de utilizar el cargador de baterías o labatería, lea todas las instrucciones y símbolosde advertencia que guran en el cargador debaterías, en la batería y en el producto queutiliza la batería.
3. CUIDADO – para reducir el riesgo de lesiones,cargue las baterías de ion litio de 60 VFlex - Force únicamente con los cargadores debaterías de ion litio de 60 V Flex - Force. Otrasmarcas de batería pueden reventar y causarlesiones personales y daños materiales.
4. ADVER TENCIA – si se enchufa el cargador enuna toma de corriente que no sea de 120 voltios,puede causar un incendio o una descargaeléctrica. No conecte el cargador de baterías auna toma de corriente que no sea de 120V . Paraotros tipos de conexión, utilice un adaptador enel enchufe del accesorio del tipo correcto parala toma de corriente, si es necesario.
5. Estos dispositivos cumplen la Parte 15 delas normas FCC. El uso está sujeto a las 2condiciones siguientes: (1) Estos dispositivosno pueden causar interferencias dañinas; y(2) estos dispositivos deben aceptar cualquierinterferencia recibida, incluyendo interferenciasque puedan causar un funcionamiento nodeseado.
I. Formación
1. No permita que este dispositivo sea utilizadoo mantenido por niños o por personas queno hayan recibido la formación adecuada.Sólo permita que manejen o mantengan eldispositivo personas responsables, formadas,familiarizadas con las instrucciones yfísicamente capaces de utilizar la máquina.
2. No deje que los niños utilicen o jueguen con labatería o el cargador de baterías; la normativalocal puede restringir la edad del operador .
II. Preparación
1. Utilice los aparatos únicamente con las bateríasespecícas indicadas. El uso de otros tipos debatería puede crear un riesgo de lesiones y/oincendio.
2. No utilice baterías o cargadores de bateríasdañados o modicados. Podrían mostrar uncomportamiento impredecible con resultado deincendio, explosión o riesgo de lesiones.
3. Si el cable de alimentación del cargador de labatería está dañado, póngase en contacto conun Servicio Técnico Autorizado para cambiarlo.
III. Operación
1. Cargue la batería únicamente con el cargadorde la batería especicado por T oro. Un cargadordiseñado para un tipo de batería puede crear unriesgo de incendio si se utiliza con otra batería.
2. Cargue la batería únicamente en una zona bienventilada.
3. Siga todas las instrucciones de carga y nocargue la batería si la temperatura está fueradel intervalo especicado en las instrucciones.Podría dañar la batería y aumentar el riesgo deincendio.
4. En condiciones abusivas, la batería puedeexpulsar líquido; evite el contacto. En caso deun contacto accidental con el líquido, enjuaguecon agua. Si el líquido entra en contacto consus ojos, busque ayuda médica. El líquidoexpulsado de la batería puede causar irritacióno quemaduras.
5. No exponga la batería o el cargador al fuego o atemperaturas excesivas. La exposición al fuegoo a temperaturas superiores a los 130 °C (265°F) puede causar una explosión.
6. CUIDADO – una batería maltratada puederepresentar un riesgo de incendio, explosión oquemadura química.
•No desmonte la batería.
•Sustituya la batería únicamente por unabatería Flex - Force genuina; el uso de otrotipo de batería podría provocar un incendio oun riesgo de lesión.
•Mantenga las baterías fuera del alcance delos niños y en el embalaje original hasta suuso.
4
La page est en cours de chargement...
La page est en cours de chargement...
La page est en cours de chargement...
La page est en cours de chargement...
La page est en cours de chargement...
La page est en cours de chargement...
La page est en cours de chargement...
La page est en cours de chargement...
La page est en cours de chargement...
La page est en cours de chargement...
La page est en cours de chargement...
La page est en cours de chargement...
La page est en cours de chargement...
La page est en cours de chargement...
La page est en cours de chargement...
La page est en cours de chargement...
La page est en cours de chargement...
La page est en cours de chargement...
La page est en cours de chargement...
La page est en cours de chargement...
La page est en cours de chargement...
La page est en cours de chargement...
La page est en cours de chargement...
La page est en cours de chargement...
La page est en cours de chargement...
La page est en cours de chargement...
La page est en cours de chargement...
La page est en cours de chargement...
-
 1
1
-
 2
2
-
 3
3
-
 4
4
-
 5
5
-
 6
6
-
 7
7
-
 8
8
-
 9
9
-
 10
10
-
 11
11
-
 12
12
-
 13
13
-
 14
14
-
 15
15
-
 16
16
-
 17
17
-
 18
18
-
 19
19
-
 20
20
-
 21
21
-
 22
22
-
 23
23
-
 24
24
-
 25
25
-
 26
26
-
 27
27
-
 28
28
-
 29
29
-
 30
30
-
 31
31
-
 32
32
-
 33
33
-
 34
34
-
 35
35
-
 36
36
-
 37
37
-
 38
38
-
 39
39
-
 40
40
-
 41
41
-
 42
42
-
 43
43
-
 44
44
-
 45
45
-
 46
46
-
 47
47
-
 48
48


Toro Flex-Force Power System 6.0Ah 60V MAX Battery Pack Manuel utilisateur
- Taper
- Manuel utilisateur
- Ce manuel convient également à
-
- Flex-Force Power System 10.0Ah 60V Pro Battery Pack
- Flex-Force Power System 2.0Ah 60V MAX Battery Pack
- Flex-Force Power System 2.5Ah 60V MAX Battery Pack
- Flex-Force Power System 4.0Ah 60V MAX Battery Pack
- Flex-Force Power System 5.0Ah 60V MAX Battery Pack
- Flex-Force Power System 60V MAX Battery Charger
- Flex-Force Power System 7.5Ah 60V MAX Battery Pack
dans d''autres langues
Documents connexes
-
Toro Flex-Force Power System 2.5Ah 60V MAX Battery Pack Manuel utilisateur
-
Toro Flex-Force Power System 60V MAX Axial Blower Manuel utilisateur
-
-
-
Toro Flex-Force Power System 60V Stick Edger Manuel utilisateur
-
Toro Flex-Force Power System 60V Pole Saw Manuel utilisateur
-
-
-
-
Toro Flex-Force Power System 11in or 13in 60V MAX String Trimmer Manuel utilisateur