Hatco KGRDG Series Le manuel du propriétaire
- Taper
- Le manuel du propriétaire

P/N 07.04.957.00 © 2020 Hatco Corporation
Do not operate this equipment unless you
have read and understood the contents
of this manual! Failure to follow the
instructions contained in this manual
may result in serious injury or death.
This manual contains important safety
information concerning the maintenance,
use, and operation of this product. If
you’re unable to understand the contents
of this manual, please bring it to the
attention of your supervisor. Keep this
manual in a safe location for future
reference.
English = p 2
WARNING
No opere este equipo al menos que haya
leído y comprendido el contenido de este
manual! Cualquier falla en el seguimiento
de las instrucciones contenidas en
este manual puede resultar en un serio
lesión o muerte. Este manual contiene
importante información sobre seguridad
concerniente al mantenimiento, uso y
operación de este producto. Si usted
no puede entender el contenido de
este manual por favor pregunte a su
supervisor. Almacenar este manual en
una localización segura para la referencia
futura.
ADVERTENCIA
Ne pas utiliser cet équipement sans avoir
lu et compris le contenu de ce manuel ! Le
non-respect des instructions contenues
dans ce manuel peut entraîner de
graves blessures ou la mort. Ce manuel
contient des informations importantes
concernant l’entretien, l’utilisation et le
fonctionnement de ce produit. Si vous ne
comprenez pas le contenu de ce manuel,
veuillez le signaler à votre supérieur.
Conservez ce manuel dans un endroit
sûr pour pouvoir vous y référer plus tard.
Français = p 15
AVERTISSEMENT
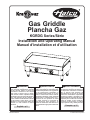
Gas Griddle
Plancha Gaz
KGRDG Series/Série
Installation and Operating Manual
Manuel d’installation et d’utilisation

2
Form No. KGRDGM-0120
English
INTRODUCTION
Gas Griddles cook a wide variety of food product in a small
footprint for commercial kitchens. Two cooking zones with
dedicated controls enable operators to cook food product
with different temperature requirements on the same griddle
surface. Two U-shaped burners provide exceptional heat
distribution over the entire griddle for even and fast cooking.
Gas Griddles are products of extensive research and field
testing. The materials used were selected for maximum
durability, attractive appearance, and optimum performance.
Every unit is inspected and tested thoroughly prior to shipment.
This manual provides installation, safety, and operating
instructions for Gas Griddles. Hatco recommends all
installation, operating, and safety instructions appearing in this
manual be read prior to installation or operation of a unit.
Safety information that appears in this manual is identified by
the following signal word panels:
WARNING
WARNING indicates a hazardous situation which, if not
avoided, could result in death or serious injury.
CAUTION
CAUTION indicates a hazardous situation which, if not
avoided, could result in minor or moderate injury.
NOTICE
NOTICE is used to address practices not related to
personal injury.
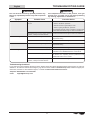
Important Owner Information ..............................................2
Introduction ...........................................................................2
Important Safety Information ..............................................3
Model Description ................................................................4
Model Designation ...............................................................4
Specifications .......................................................................5
Rating Charts .......................................................................5
Dimensions .......................................................................... 5
Installation .............................................................................6
General ................................................................................ 6
Connecting the Gas Supply .................................................7
Operation ...............................................................................8
General ................................................................................ 8
Control Panel .......................................................................8
Lighting the Burners ............................................................8
Operating the Unit ...............................................................9
Maintenance ........................................................................10
General .............................................................................. 10
Daily Cleaning ...................................................................10
Converting Between Fuels ................................................ 11
Changing the Ignition Battery ............................................ 12
Safety Thermocouple ........................................................12
Ignition Spark Plug ............................................................12
Troubleshooting Guide ......................................................13
Limited Warranty ................................................................14
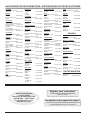
Authorized Parts Distributors ...........................Back Cover
IMPORTANT OWNER INFORMATION
Record the model number, serial number, voltage, and
purchase date of the unit in the spaces below (specification
label located on the back the unit). Please have this information
available when calling Hatco for service assistance.
Model No. ________________________________________
Serial No. _________________________________________
Voltage ___________________________________________
Date of Purchase ___________________________________
Register your unit!
Completing online warranty registration will prevent delay in
obtaining warranty coverage. Access the Hatco website at
www.hatcocorp.com, select the Support pull-down menu,
and click on “Warranty”.
Business
Hours: 7:00 to 5:00 Monday–Friday,
Central Time (CT)
(Summer Hours — June to September:
7:00 to 5:00 Monday–Thursday
7:00 to 4:00 Friday)
Telephone: 800-558-0607; 414-671-6350
E-mail: [email protected]
24 Hour 7 Day Parts and Service
Assistance available in the United States
and Canada by calling 800-558-0607.
Additional information can be found by visiting our web site at
www.hatcocorp.com.
CONTENTS

Form No. KGRDGM-0120
3
English
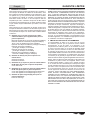
IMPORTANT SAFETY INFORMATION
Read the following important safety information before using this equipment to avoid serious
injury or death and to avoid damage to equipment or property.
WARNING
FIRE OR EXPLOSION HAZARD:
• This unit is designed to be used with propane or natural
gas. Contact a qualified installer to determine and
perform proper gas connections.
• Unit must be installed by qualified, trained gas
equipment installers. Installation must conform to all
local plumbing and gasfitting codes. Installation by
unqualified personnel will void the unit warranty and
may lead to fire or explosion causing property damage,
personal injury, or death. Check with local plumbing
inspectors for proper procedures and codes.
• In the absence of local plumbing and gasfitting codes,
installation must conform with National Fuel Gas Code
ANSI Z223.1/NFPA 54 or National Gas and Propane
Installation Code CSA B149.1, as applicable.
• The gas used with this unit must be the type specified
on the specification plate on this unit. To avoid personal
injury or damage to the unit, never use any other than
the specified gas.
• Unit must be connected to gas supply using a moveable
gas connector that complies with current and local
standards and codes.
• Inspect moveable gas connector regularly. Replace
immediately if any signs of wear are present.
• Verify moveable gas connector has not exceeded its
expiration date. Replace immediately if expired.
• Do not twist moveable gas connector.
• Keep moveable gas connector away from hot
appliances and surfaces.
• The unit and its gas connections must be leak tested
before placing unit in operation. Use soapy water or
commercially available fluid for leak test. DO NOT use
open flame to test for leaks.
• The unit and its individual gas shut-off valve must be
disconnected and isolated from the gas supply piping
system during any pressure testing of the system at
test pressures in excess of 1/2 psi (3.5 kPa.).
• This unit must be isolated from the gas supply piping
system by closing its individual gas shut-off valve
during any pressure testing of gas supply piping
system at test pressures equal to or less than 1/2 psi
(3.5 kPa).
• Locateunitaminimumof39″(100cm)fromcombustible
surfaces. If safe distances are not maintained,
discoloration or combustion could occur.
• Do not install unit above or around combustible
surfaces. Discoloration or combustion could occur.
Unit must be installed in non-combustible surroundings
only.
• Do not obstruct air ventilation openings on unit. Unit
combustion or malfunction may occur.
• Do not store or use gasoline or other flammable vapors
or liquids in the vicinity of this or any other appliance.
WARNING
FIRE OR EXPLOSION HAZARD:
• If the information in these instructions is not followed
exactly, fire or explosion may result causing property
damage, personal injury, or death
• This unit must be serviced by qualified personnel only.
Service by unqualified personnel may lead to explosion
or burn.
• Use only Genuine Hatco Replacement Parts when
service is required. Failure to use Genuine Hatco
Replacement Parts will void all warranties and may
subject operators of the equipment to hazardous
conditions. Genuine Hatco Replacement Parts are
specified to operate safely in the environments in
which they are used. Some aftermarket or generic
replacement parts do not have the characteristics that
will allow them to operate safely in Hatco equipment.
Unit must be installed in location with sufficient ventilation
to prevent buildup of unsafe levels of noxious fumes.
Unit must be installed on a fixed worktop. Do not install on
a moveable cart.
Turn Temperature Controls to OFF position, close gas
shut-off valve, and allow unit to cool before performing
any cleaning, adjustments, or maintenance.
Unit is not weatherproof.
Do not steam clean or use excessive water on unit.
This unit is not “jet-proof” construction. Do not use jet-
clean spray to clean this unit.
DO NOT submerge or saturate with water. Unit is not
waterproof. Do not operate if unit has been submerged or
saturated with water.
Do not allow liquids to spill into unit.
Make sure all operators have been instructed on the safe
and proper use of the unit.
This unit is not intended for use by children or persons
with reduced physical, sensory, or mental capabilities.
Ensure proper supervision of children and keep them away
from the unit.
Never leave unit unattended during use.
Always turn off individual gas shut-off valve when unit is
not in use.
Do not make any modifications to unit. Personal injury and
damage to unit may occur.
Do not use unit for any purpose other than for which it is
designed.
This unit has no “user-serviceable” parts. If service
is required on this unit, contact an Authorized Hatco
Service Agent or contact the Hatco Service Department at
800-558-0607 or 414-671-6350.

4
Form No. KGRDGM-0120
English
IMPORTANT SAFETY INFORMATION
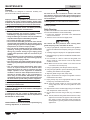
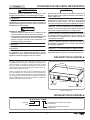
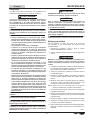
MODEL DESIGNATION
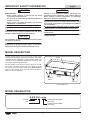
MODEL DESCRIPTION
The Gas Griddle consists of an easy-to-clean, stainless steel
frame and a rectangular, stainless steel griddle. The griddle
is divided into two, individually-controlled cooking zones. The
controls include an adjustable Temperature Control for each
zone and an electronic ignition button.
All Gas Griddles come from the factory setup for use with
natural gas. Conversion components are included to convert
the units for use with propane. Refer to the MAINTENANCE
section of this manual, and contact an Authorized Service
Agent or Hatco for assistance.
K G R D G - xxxx
Griddle
Gas
Cooking Surface Depth
(in inches)
Cooking Surface Width
(in inches)
Temperature
Control
Ignition
Button
Griddle
Drip Tray
Model KGRDG-2513
CAUTION
BURN HAZARD:
• Some exterior surfaces on unit will get hot. Avoid
unnecessary contact with unit.
• Do not come in contact with griddle during operation.
Griddle is very hot.
• Allow unit to cool before performing any cleaning,
adjustments, or maintenance.
Do not operate unit without installing supplied legs.
Never operate unit without drip tray installed.
Locate unit at proper counter height in an area that is
convenient for use. Location should be level and strong
enough to support weight of unit and contents.
NOTICE
Allow adequate ventilation around base of unit for proper
air supply to gas burner.
Do not locate unit in an area subject to excessive
temperatures or grease from grills, fryers, etc. Excessive
temperatures and grease could cause damage to unit.
NOTICE
Damage to any countertop material caused by heat
generated from this equipment is not covered under the
Hatco warranty. Contact manufacturer of countertop
material for application information.
For frame of unit, use non-abrasive cleaners and cloths
only. Abrasive cleaners and cloths could scratch finish of
unit, marring its appearance and making it susceptible to
soil accumulation.
Do not use harsh chemicals such as bleach, cleaners
containing bleach, or oven cleaners to clean this unit.
This unit is intended for commercial use only—NOT for
household use.
Clean unit daily to avoid malfunctions and maintain
sanitary operation.

Form No. KGRDGM-0120
5
English
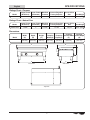
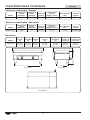
Model
Width
(A)
Depth
(B)
Height
(C)
Footprint
Width (D)
Footprint
Depth (E)
Cooking
Surface Width
(F)
Cooking
Surface Depth
(G)
KGRDG-2513 27-9/16
(699 mm)
17-1/16
(433 mm)
11-3/4
(298 mm)
24-1/16
(611 mm)
11-1/2
(291 mm)
25-7/16
(646 mm)
13-15/16
(354 mm)
Model
Burner Power
(BTU/Hour)
Burner Power
(Kilowatts)
Manifold
Pressure
Pressure Regulator
Factory Setpoint
Burner Orifice
Size Unit Weight
KGRDG-2513 13648 4 7 In WC 7 In WC 120 m 49 lbs. (22 kg)
Model
Burner Power
(BTU/Hour)
Burner Power
(Kilowatts)
Manifold
Pressure
Pressure Regulator
Factory Setpoint
Burner Orifice
Size Unit Weight
KGRDG-2513 13648 4 10.9 In WC 10.9 In WC 85 m 49 lbs. (22 kg)
SPECIFICATIONS
C
G
BA
F
D E
Front View Side View
Top View
Dimensions
Ratings Chart—Propane
Ratings Chart—Natural Gas

6
Form No. KGRDGM-0120
English
INSTALLATION
General
Gas Griddles are shipped with most components installed and
ready for operation. Care should be taken when unpacking
the shipping carton to avoid damage to the unit. The following
installation procedure must be performed before operating the
unit.
WARNING
FIRE OR EXPLOSION HAZARD:
• This unit is designed to be used with propane or natural
gas. Contact a qualified installer to determine and
perform proper gas connections.
• Unit must be installed by qualified, trained gas
equipment installers. Installation must conform to all
local plumbing and gasfitting codes. Installation by
unqualified personnel will void the unit warranty and
may lead to fire or explosion causing property damage,
personal injury, or death. Check with local plumbing
inspectors for proper procedures and codes.
• In the absence of local plumbing and gasfitting codes,
installation must conform with National Fuel Gas Code
ANSI Z223.1/NFPA 54 or National Gas and Propane
Installation Code CSA B149.1, as applicable.
• The gas used with this unit must be the type specified
on the specification plate on this unit. To avoid personal
injury or damage to the unit, never use any other than
the specified gas.
• Unit must be connected to gas supply using a moveable
gas connector that complies with current and local
standards and codes.
• Do not twist moveable gas connector.
• Keep moveable gas connector away from hot
appliances and surfaces.
• The unit and its gas connections must be leak tested
before placing unit in operation. Use soapy water or
commercially available fluid for leak test. DO NOT use
open flame to test for leaks.
• Locateunitaminimumof39″(100cm)fromcombustible
surfaces. If safe distances are not maintained,
discoloration or combustion could occur.
• Do not install unit above or around combustible
surfaces. Discoloration or combustion could occur.
Unit must be installed in non-combustible surroundings
only.
• Do not obstruct air ventilation openings on unit. Unit
combustion or malfunction may occur.
• If the information in these instructions is not followed
exactly, fire or explosion may result causing property
damage, personal injury, or death
Unit must be installed in location with sufficient ventilation
to prevent buildup of unsafe levels of noxious fumes.
Unit must be installed on a fixed worktop. Do not install on
a moveable cart.
Unit is not weatherproof.
1. Inspect the shipping carton for obvious signs of transit
damage. If damaged, inform the freight company
immediately. CAUTION! Stop! Do not attempt to use
unit if damaged. Contact Hatco for assistance.
2. Remove the unit and any loose components/accessories
from the shipping carton. The following loose components
are included in every Gas Griddle:
• Legs
• Drip Tray
• Propane Conversion Components
• Pressure Regulator
• Gas Shut-Off Valve
NOTE: To prevent delay in obtaining warranty coverage,
complete online warranty registration. See the
IMPORTANT OWNER INFORMATION section for
details.
3. Remove tape and protective packaging from all surfaces
of the unit.
• Make sure to remove all protective film from the stainless
steel surfaces.
4. Inspect the unit for freight damage such as dents in
housing or broken knobs. If damaged, inform the freight
company immediately.
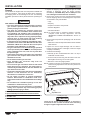
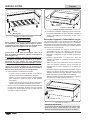
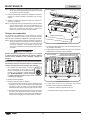
5. Install the included legs.
a. Carefully tip the unit backwards and rest it on top of
cardboard on a flat surface.
b. At each corner, thread a leg into the bottom of the unit.
Hand-tighten until snug. Do not over-tighten.
c. Return the unit to the upright position.
NOTE: The feet on the legs are adjustable for leveling the unit.
Make leveling adjustments once the unit is placed in its
final position.
Leg
Adjustable Foot
Installing the Legs
CAUTION
Locate unit at proper counter height in an area that is
convenient for use. Location should be level and strong
enough to support weight of unit and contents.

Form No. KGRDGM-0120
7
English
NOTICE
Allow adequate ventilation around base of unit for proper
air supply to gas burner.
Do not locate unit in an area subject to excessive
temperatures or grease from grills, fryers, etc. Excessive
temperatures and grease could cause damage to unit.
Damage to any countertop material caused by heat
generated from this equipment is not covered under the
Hatco warranty. Contact manufacturer of countertop
material for application information.
6. Place the unit in the desired location.
• Make sure the unit is at the proper counter height in an
area convenient for use.
• Make sure the countertop is level and strong enough to
support the weight of the unit and food product.
• Make sure all the feet on the bottom of the unit are
positioned securely on the countertop.
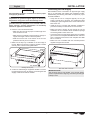
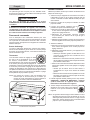
7. Make sure the drip tray is installed on the front edge of
the unit. Make sure the peg on each tray handle is seated
securely in the notches on the griddle frame.
Notch
Tray Handle
Peg
Drip Tray
Installing the Drip Tray
8. Contact an authorized gas equipment installer to connect
the gas supply line to the unit. Review “Connecting the Gas
Supply” in this section with the installer.
INSTALLATION
Connecting the Gas Supply
Gas Griddles must be connected to an approved gas supply
line by an authorized and certified gas equipment installer.
Understanding the following information is required for proper
and safe installation.
• Verify that the unit is configured properly for the gas
supply—natural gas or propane. The specification label
indicating the gas configuration of the unit is located on the
back of the unit.
• Install the unit in a location with sufficient ventilation to
prevent the buildup of unsafe levels of noxious fumes.
• Make sure there is proper air flow around the unit for
combustion air. Do not obstruct the air ventilation openings
around the griddle or frame of the unit.
• Connect the unit to the gas supply piping using a moveable
gas connector that complies with ANSI Z21.69 / CSA 6.16
and a quick-disconnect device that complies with ANSI
Z21.41 / CSA 6.9.
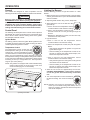
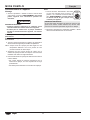
• Make sure unit is installed with the included pressure
regulator and gas shut-off valve.
3/8″ NPT Fitting
Pressure
Regulator
Rear View, Gas Connection
IMPORTANT NOTE
After shutting down a Gas Griddle, a five minute waiting
period is required before relighting. This allows potential gas
buildup to clear.

8
Form No. KGRDGM-0120
English
OPERATION
General
Gas Griddles are designed for ease of operation. Use the
following information and procedures to operate a Gas Griddle.
WARNING
Read all safety messages in the IMPORTANT SAFETY
INFORMATION section before operating this equipment.
Improper installation, operation, or maintenance of this
equipment may result in property damage, serious injury,
or death. Do not operate or service this equipment before
reading and understanding the contents of this manual!
Control Panel
The following are descriptions of the controls used to operate a
Gas Griddle. All controls are located on the control panel at the
front of the unit. Each of the two cooking zones on the griddle
has dedicated, identical controls.
Ignition Button
The battery powered, electronic Ignition Button ignites the two
U-shaped gas burners below the griddle. Pushing the button
creates a spark that ignites the burners.
Temperature Control
The Temperature Control controls the gas
flow/temperature setting of its corresponding
cooking zone. Turn the Temperature Control
counterclockwise to increase the temperature
setting. Turn the Temperature Control clockwise to decrease
the temperature setting. The temperature settings are indicated
on the control as a small flame icon followed by a series of dots
increasing in size up to a large flame icon. The temperature
range is up to 570°F (300°C).
NOTE: Gas griddles are equipped with a heat-activated safety
thermocouple that will cut off gas supply to the unit if
the burner flame(s) goes out accidentally.
Cooking
Zone
Cooking
Zone
Temperature
Control
Ignition
Button
Operating the Griddle
Lighting the Burners
Use the following procedure to light the burners on a Gas
Griddle.
1. Make sure the unit is connected properly to the gas supply
and the gas shutoff valve is open. See the INSTALLATION
section for details.
2. Wipe the griddle surface using a clean, damp cloth.
Maximum
3. When lighting the unit for the first time after
gas hook-up:
a. Push in and turn the Temperature Controls
counterclockwise to their maximum setting.
b. Hold in the Temperature Controls for five
seconds to flush air from the gas tubing through the
burners.
c. Release the Temperature Controls, and turn them fully
clockwise to the “Off” position.
4. Light the burners.
a. Push in and turn the left Temperature Control
counterclockwise to its maximum setting.
b. Hold in the Temperature Control; then push the Ignition
Button.
• Verify that the left burner has ignited. If not, push the
Ignition Button again.
• Continue holding in the Temperature Control for ten
seconds to activate the safety thermocouple, then
release the Temperature Control.
c. Push in and turn the right Temperature Control
counterclockwise to its maximum setting.
• Verify that the right burner has ignited. It will ignite off
of the flame from the left burner.
• Continue holding in the Temperature Control for ten
seconds to activate the safety thermocouple, then
release the Temperature Control.
5. Allow the unit to heat for approximately five minutes.
CAUTION: BURN HAZARD— Some exterior surfaces
on unit will get hot. Avoid unnecessary contact with
unit.
Minimum
6. Turn each Temperature Control clockwise to
its minimum setting. The unit is now ready for
use.
NOTE: Standard and approved manufacturing oils may
smoke up to 30 minutes during initial startup. This is a
temporary condition. Operate unit without food product
until smoke dissipates.

Form No. KGRDGM-0120
9
English
OPERATION
Operating the Unit
Startup
1. Perform the “Lighting a Burner” procedure in this section,
if necessary. WARNING! Never leave unit unattended
during use.
CAUTION
BURN HAZARD:
• Some exterior surfaces on unit will get hot. Avoid
unnecessary contact with unit.
• Do not come in contact with griddle during operation.
Griddle is very hot.
Do not operate unit without installing supplied legs.
Never operate unit without drip tray installed.
2. Turn each Temperature Control to the desired temperature
setting, and allow the unit to preheat fully.
NOTE: Each zone on the griddle can be set to a different
temperature setting. This allows the cooking of different
food product at the same time.
3. Apply a light coating of cooking oil onto the surface of the
griddle using a heat resistant, food-safe pad or brush.
4. Place food on the griddle, and cook as desired.
• Never cut food directly on the griddle surface. This will
cause deep scratches on the griddle.
• Do not leave utensils sitting on the grill surface.
Shutdown
“Off”
1. Turn both Temperature Controls fully clockwise
to the “Off” position, and close the gas shut-off
valve. WARNING! Always close gas shut-off
valve when unit is not in use.
IMPORTANT NOTE
After shutting down a Gas Griddle, a five minute waiting
period is required before relighting. This allows potential gas
buildup to clear.
2. Perform the “Daily Cleaning” procedure in the Maintenance
section of this manual.

10
Form No. KGRDGM-0120
English
MAINTENANCE
General
Gas Griddles are designed for maximum durability and
performance with minimum maintenance.
WARNING
Improper installation, operation, or maintenance of this
equipment may result in property damage, serious injury,
or death. Do not operate or service this equipment before
reading and understanding the contents of this manual!
Turn Temperature Controls to OFF position, close gas
shut-off valve, and allow unit to cool before performing
any cleaning, adjustments, or maintenance.
FIRE OR EXPLOSION HAZARD:
• Inspect moveable gas connector regularly. Replace
immediately if any signs of wear are present.
• Verify moveable gas connector has not exceeded its
expiration date. Replace immediately if expired.
• Do not twist moveable gas connector.
• The unit and its individual gas shut-off valve must be
disconnected and isolated from the gas supply piping
system during any pressure testing of the system at
test pressures in excess of 1/2 psi (3.5 kPa.).
• This unit must be isolated from the gas supply piping
system by closing its individual gas shut-off valve
during any pressure testing of gas supply piping
system at test pressures equal to or less than 1/2 psi
(3.5 kPa).
• If the information in these instructions is not followed
exactly, fire or explosion may result causing property
damage, personal injury, or death
• This unit must be serviced by qualified personnel only.
Service by unqualified personnel may lead to explosion
or burn.
• Use only Genuine Hatco Replacement Parts when
service is required. Failure to use Genuine Hatco
Replacement Parts will void all warranties and may
subject operators of the equipment to hazardous
conditions. Genuine Hatco Replacement Parts are
specified to operate safely in the environments in
which they are used. Some aftermarket or generic
replacement parts do not have the characteristics that
will allow them to operate safely in Hatco equipment.
Do not steam clean or use excessive water on unit.
This unit is not “jet-proof” construction. Do not use jet-
clean spray to clean this unit.
DO NOT submerge or saturate with water. Unit is not
waterproof. Do not operate if unit has been submerged or
saturated with water.
This unit has no “user-serviceable” parts. If service
is required on this unit, contact an Authorized Hatco
Service Agent or contact the Hatco Service Department at
800-558-0607 or 414-671-6350.
CAUTION
BURN HAZARD: Allow unit to cool before performing any
cleaning, adjustments, or maintenance.
NOTICE
For frame of unit, use non-abrasive cleaners and cloths
only. Abrasive cleaners and cloths could scratch finish of
unit, marring its appearance and making it susceptible to
soil accumulation.
Do not use harsh chemicals such as bleach, cleaners
containing bleach, or oven cleaners to clean this unit.
Clean unit daily to avoid malfunctions and maintain
sanitary operation.
Daily Cleaning
To preserve the finish of the unit as well as maintain performance,
it is recommended that the unit be cleaned daily.
1. Perform the “Shutdown” procedure in the OPERATION
section of this manual.
2. Allow the unit to cool until it is slightly warm.
CAUTION
Use caution and wear protection when cleaning warm
griddle. Drip tray, water, and steam will be hot.
3. Using a rigid spatula, scrape the surface of the griddle to
remove all residual food and liquid, pushing it into the drip
tray.
4. Carefully, empty the drip tray into an appropriate waste bin.
5. Reinstall the drip tray. Refer to the INSTALLATION section
for details.
6. Put cool water or a few ice cubes onto the griddle, and
allow to soak for a few minutes. This will help release
cooked-on residue.
NOTE: Make sure the amount of water or ice cubes used will
not overflow out of the drip tray.
7. Using a rigid spatula, push all liquid into the drip tray.
8. Using the rigid spatula to push an abrasive pad, scrub all
remaining food residue from the griddle.
9. Wipe the griddle using a clean, damp cloth.
10. Apply a small amount of vinegar to the griddle to remove
residual flavors and odors.
11. Empty the drip tray into an appropriate waste bin. Clean
the drip tray, and reinstall onto the unit.
NOTE: Clean the griddle surface as soon as possible after
cooking salty foods. Salt left on the griddle will cause
corrosion.
12. Wipe the frame of the unit thoroughly using a non-abrasive
cloth dampened in warm water only.
13. Dry the frame of the unit using a clean, dry, non-abrasive
cloth.
NOTE: The new, stainless steel griddle surface will have a shiny
appearance. Scratches will appear on the surface after
time, which is normal. Eventually, these scratches will
blend together to give the griddle a brushed, weathered
appearance.

Form No. KGRDGM-0120
11
English
MAINTENANCE
Converting Between Fuels
Conversion of a unit between natural gas and propane requires
replacement of the orifice. This procedure must be performed
by an authorized and certified gas equipment installer.
NOTE: After converting from one type of fuel to another, the
spring in the pressure regulator must be changed
to correspond with the gas pressure. A Spring Kit is
included with the unit that contains a spring, installation
instructions, and a spring identification label.
WARNING
Turn Temperature Controls to OFF position, close gas
shut-off valve, and allow unit to cool before performing any
cleaning, adjustments, or maintenance.
FIRE OR EXPLOSION HAZARD: This unit must be serviced
by qualified personnel only. Service by unqualified
personnel may lead to explosion or burn.
“Off”
1. If the unit already has been installed, turn both
Temperature Controls fully clockwise to the
“Off” position, and close the gas shut-off valve.
WARNING! Always close gas shut-off valve
when unit is not in use.
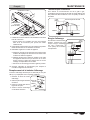
2. Remove the drip tray.
3. Remove the griddle from the frame of the unit.
a. Using a 10 mm socket wrench, loosen, but don’t remove,
the two hex head mounting screws that secure the
griddle to the frame. One is located directly underneath
each side of the griddle, near the center.
b. Carefully lift the griddle up and off of the frame, and lean
it against the back of the frame. Make sure the attached
thermocouple wires on each side of the griddle do not
get pinched or broken.
Griddle
Drip Tray
Mounting
Screw
Locator
Screw
Slot
Removing the Griddle
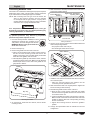
4. On each burner, loosen but don’t remove, the two burner
mounting screws.
5. Slide each burner assembly toward the front of the unit to
expose the installed orifices.
Front of Unit
Burner Mounting
Screws
Slide
burners
toward
front of
unit.
Right burner slid forward,
exposing orifice.
Sliding the Burners
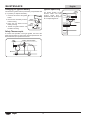
6. Using a 10 mm wrench, remove both installed orifices and
their corresponding washers.
• The propane orifice size is
• The natural gas orifice size is
Orifice
Air gap between
5/32″ – 3/16″
(4–5 mm)
Air gap between
5/32″ – 3/16″
(4–5 mm)
Orifice Washer
Replacing an Orifice
7. Install the new orifices and washers that were included in
the conversion pack.
• Place the removed orifices and washers into the
conversion pack for potential future use.
8. Slide each burner back to its original position. Tighten the
burner mounting screws securely.
9. Reinstall the griddle onto the frame of the unit.
a. Align the long, locator screws underneath the middle
front and rear of the griddle with the front and rear slots
on the frame of the unit.
b. Lower the griddle into position onto the frame of the unit.
Make sure the screw holes underneath each side of the
griddle are aligned with their corresponding mounting
screws on the frame.
c. Tighten the mounting screws to secure the griddle in
position.
10. Change the specification label to indicate the new fuel
configuration.

12
Form No. KGRDGM-0120
English
Changing the Ignition Battery
The electronic ignition button is powered by a replaceable LR6
(1.5 V) battery. To replace the battery:
LR6
(1.5 V)
Battery
Button
Housing
Ignition
Button
1. Unscrew and remove the ignition
button.
2. Remove the old battery from the
button housing.
3. Place the new batter into the
battery housing.
4. Thread the ignition button onto
the button housing.
Safety Thermocouple
To ensure safe operation of the gas griddle, the end of the
safety thermocouple on each burner must be positioned in the
5/64″
(2 mm)
Safety Thermocouple
Burner
MAINTENANCE
Ignition Spark Plug
Burne
r
Spark
Plug
3/16″
(5 mm)
For proper ignition of the
burners, make sure each
ignition spark plug is
its corresponding burner.

Form No. KGRDGM-0120
13
English
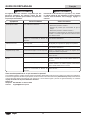
Symptom Probable Cause Corrective Action
Unit turned “On”, but no heat. Safety thermostat shut down unit after flame
went out.
Refer to the OPERATION section of this manual:
• Perform “Shutdown” procedure.
• Wait five minutes for gas buildup to clear.
• Perfom “Lighting the Burners” procedure.
If unit still does not heat, perform “Shutdown” procedure and
contact Authorized Service Agent or Hatco for assistance.
Temperature Control, burner system, pressure
regulator, or safety thermostat defective.
Contact Authorized Service Agent or Hatco for assistance.
Unit not hot enough. Temperature Control setting too low. Turn Temperature Control counterclockwise to increase the
temperature setting.
Temperature Control not calibrated properly. Contact Authorized Service Agent or Hatco for assistance.
Unit too hot. Temperature Control setting too high. Turn Temperature Control clockwise to decrease the
temperature setting.
Temperature Control not calibrated properly. Contact Authorized Service Agent or Hatco for assistance.
Unit not working at all. Unit not turned on. Review the “Lighting the Burners” and “Operating the Unit”
prodedures in the OPERATION section of this manual.
Gas shutoff valve in closed position. Open the gas shutoff valve, and perform the the “Lighting
the Burners” and “Operating the Unit” prodedures in the
OPERATION section of this manual.
Temperature Control, burner system, pressure
regulator, or safety thermostat defective.
Contact Authorized Service Agent or Hatco for assistance.
TROUBLESHOOTING GUIDE
WARNING
This unit must be serviced by qualified personnel only.
Service by unqualified personnel may lead to explosion
or burn.
WARNING
Turn Temperature Controls to OFF position, close gas
shut-off valve, and allow unit to cool before performing
any cleaning, adjustments, or maintenance.
Troubleshooting Questions?
If you continue to have problems resolving an issue, please contact the nearest Authorized Hatco Service Agency or Hatco for
assistance. To locate the nearest Service Agency, log onto the Hatco website at www.hatcocorp.com, select the Support pull-
down menu, and click on “Find A Service Agent”; or contact the Hatco Parts and Service Team at:
Telephone: 800-558-0607 or 414-671-6350
e-mail: [email protected]

14
Form No. KGRDGM-0120
English
LIMITED WARRANTY
1. PRODUCT WARRANTY
Hatco warrants the products that it manufactures (the “Products”)
to be free from defects in materials and workmanship, under
normal use and service, for a period of one (1) year from the
date of purchase when installed and maintained in accordance
with Hatco’s written instructions or 18 months from the date
of shipment from Hatco. Buyer must establish the Product’s
purchase date by registering the Product with Hatco or by other
means satisfactory to Hatco in its sole discretion.
Hatco warrants the following Product components to be free
from defects in materials and workmanship from the date of
purchase (subject to the foregoing conditions) for the period(s)
of time and on the conditions listed below:
a) One (1) Year Parts and Labor PLUS One (1) Additional
Year Parts-Only Warranty:
Conveyor Toaster Elements (metal sheathed)
Drawer Warmer Elements (metal sheathed)
Drawer Warmer Drawer Rollers and Slides
Strip Heater Elements (metal sheathed)
Display Warmer Elements (metal sheathed air heating)
Holding Cabinet Elements (metal sheathed air heating)
Heated Well Elements — HW and HWB Series
(metal sheathed)
b) Two (2) Year Parts and Labor Warranty:
Induction Ranges
Induction Warmers
c) One (1) Year Parts and Labor PLUS Four (4) Years
Parts-Only Warranty:
3CS and FR Tanks
d) One (1) Year Parts and Labor PLUS Nine (9) Years
Parts-Only Warranty on:
Electric Booster Heater Tanks
Gas Booster Heater Tanks
e) Ninety (90) Day Parts-Only Warranty:
Replacement Parts
THE FOREGOING WARRANTIES ARE EXCLUSIVE AND
IN LIEU OF ANY OTHER WARRANTY, EXPRESSED OR
IMPLIED, INCLUDING BUT NOT LIMITED TO ANY IMPLIED
WARRANTY OF MERCHANTABILITY OR FITNESS FOR
A PARTICULAR PURPOSE OR PATENT OR OTHER
INTELLECTUAL PROPERTY RIGHT INFRINGEMENT.
Without limiting the generality of the foregoing, SUCH
WARRANTIES DO NOT COVER: Coated incandescent light
bulbs, fluorescent lights, heat lamp bulbs, coated halogen light
bulbs, halogen heat lamp bulbs, xenon light bulbs, LED light
tubes, glass components, and fuses; Product failure in booster
tank, fin tube heat exchanger, or other water heating equipment
caused by liming, sediment buildup, chemical attack, or
freezing; or Product misuse, tampering or misapplication,
improper installation, or application of improper voltage.
2. LIMITATION OF REMEDIES AND DAMAGES
Hatco’s liability and Buyer’s exclusive remedy hereunder will
be limited solely, at Hatco’s option, to repair or replacement
using new or refurbished parts or Product by Hatco or a Hatco-
authorized service agency (other than where Buyer is located
outside of the United States, Canada, United Kingdom, or
Australia, in which case Hatco’s liability and Buyer’s exclusive
remedy hereunder will be limited solely to replacement of part
under warranty) with respect to any claim made within the
applicable warranty period referred to above. Hatco reserves
the right to accept or reject any such claim in whole or in part. In
the context of this Limited Warranty, “refurbished” means a part
or Product that has been returned to its original specifications
by Hatco or a Hatco-authorized service agency. Hatco will not
accept the return of any Product without prior written approval
from Hatco, and all such approved returns shall be made
at Buyer’s sole expense. HATCO WILL NOT BE LIABLE,
UNDER ANY CIRCUMSTANCES, FOR CONSEQUENTIAL
OR INCIDENTAL DAMAGES, INCLUDING BUT NOT LIMITED
TO LABOR COSTS OR LOST PROFITS RESULTING FROM
THE USE OF OR INABILITY TO USE THE PRODUCTS OR
FROM THE PRODUCTS BEING INCORPORATED IN OR
BECOMING A COMPONENT OF ANY OTHER PRODUCT
OR GOODS.

Français
Formulaire n° KGRDGM-0120
15
SOMMAIRE
INTRODUCTION
Les planchas gaz permettent de cuire une grande variété
d’aliments dans un espace restreint pour les cuisines
commerciales. Les deux zones de cuisson avec commandes
dédiées permettent aux utilisateurs de cuire des aliments
avec des exigences de température différentes sur la même
plaque. Deux brûleurs en forme de U assurent une répartition
exceptionnelle de la chaleur sur toute la plaque pour une
cuisson rapide et uniforme.
Les planchas gaz sont issues de recherches avancées et
de tests intensifs sur le terrain. Les matériaux utilisés ont
été sélectionnés afin de garantir une durée de vie maximale,
un design attractif et des performances optimales. Chaque
appareil est inspecté et testé minutieusement avant d’être
expédié.
Ce manuel fournit les instructions concernant l’installation, la
sécurité et le fonctionnement des planchas gaz. Hatco vous
recommande de lire l’ensemble des instructions d’installation,
de sécurité et d’utilisation fournies dans ce manuel avant
d’installer et d’utiliser l’appareil.
Les consignes de sécurité qui apparaissent dans ce manuel
sont identifiées par les mots indicateurs suivants :
AVERTISSEMENT
AVERTISSEMENT indique une situation dangereuse qui,
si elle n’est pas évitée, peut provoquer la mort ou des
blessures graves.
ATTENTION
ATTENTION indique une situation dangereuse qui, si elle
n’est pas évitée, peut provoquer des blessures légères ou
moyennes.
AVIS
AVIS est utilisé pour des questions sans rapport avec des
blessures corporelles.
Informations Importantes pour le Propriétaire ................15
Introduction .........................................................................15
Consignes de Sécurité Importantes ................................. 16
Description du Modèle .......................................................17
Désignation du Modèle ...................................................... 17
Caractéristiques Techniques ............................................18
Tableaux de classification ..................................................18
Dimensions ........................................................................ 18
Installation ...........................................................................19
Généralités ........................................................................19
Raccorder l’appareil à l’alimentation en gaz .....................20
Mode d’emploi ....................................................................21
Généralités ........................................................................21
Panneau de commande ....................................................21
Allumer le brûleur ..............................................................21
Fonctionnement de l’appareil ............................................22
Maintenance ........................................................................23
Généralités ........................................................................23
Nettoyage quotidien ...........................................................23
Changer de combustible ...................................................24
Remplacement de la batterie d’allumage .......................... 25
Thermocouple de sécurité ................................................. 25
Bougie d’allumage ............................................................. 25
Guide de Dépannage ..........................................................26
Garantie Limitée .................................................................27
Autorisés Distributeurs de Pièces ........Couverture Arrière
INFORMATIONS IMPORTANTES POUR LE PROPRIÉTAIRE
Notez le numéro de modèle, le numéro de série, la tension
et la date d’achat de l’appareil dans les espaces ci-dessous
(étiquette des caractéristiques techniques située au dos de
l’appareil). Veuillez avoir cette information à portée de la main
si vous appelez Hatco pour assistance.
Modèle No. ______________________________________
Numéro de série __________________________________
Voltage _________________________________________
Date d’achat _____________________________________
Enregistrez votre appareil!
Remplissez la garantie en ligne pour éviter les retards
pour faire jouer la garantie. Accédez au site Web Hatco
www.hatcocorp.com, sélectionnez le menu déroulant
Support (Assistance), puis cliquez sur « Warranty » (Garantie).
Horaires
ouvrables : 7h00 à 17h00 du lundi au vendredi
Heure du Centre (CT)
(Horaires d’été—juin à septembre:
7h00 à 17h00 du lundi au jeudi
7h00 à 16h00 le vendredi)
Téléphone: 800-558-0607; 414-671-6350
Courriel: [email protected]
Service d'assistance et de pièces de
rechange disponible 7j/7, 24h/24 aux
États-Unis et au Canada en composant
le 800-558-0607.
Des renseignements supplémentaires sont disponibles sur
notre site Web à www.hatcocorp.com.

Français
16
Formulaire n° KGRDGM-0120
CONSIGNES DE SÉCURITÉ IMPORTANTES
Lisez les consignes de sécurité importante suivante avant d’utiliser cet équipement pour éviter
des dommages ou la mort sérieux et pour éviter d’endommager l’équipement ou la propriété.
AVERTISSEMENT
RISQUE D’INCENDIE OU D’EXPLOSION :
• Cet appareil est conçu pour être utilisé avec du propane
ou du gaz naturel. Contactez un installateur qualifié
pour déterminer et effectuer les raccordements de gaz
appropriés.
• L’appareil doit être installé par un installateur
d’appareils à gaz qualifié et formé. L’installation doit
être conforme à tous les codes locaux de plomberie
et d’installation au gaz. Toute installation effectuée par
une personne non qualifiée annulera la garantie de
l’appareil et peut causer un incendie ou une explosion,
ce qui peut endommager l’appareil et entraîner
des blessures graves, voire mortelles. Vérifiez les
procédures et les normes à suivre auprès de vos
inspecteurs locaux en matière de plomberie.
• En l’absence de codes locaux de plomberie et d’installation
du gaz, l’installation doit être conforme au National
Fuel Gas Code (Code national du gaz combustible)
ANSI Z223.1/NFPA 54 ou au National Gas and Propane
Installation Code (Code national d’installation du gaz et
du propane) CSA B149.1, selon le cas.
• Le gaz utilisé avec cet appareil doit correspondre au
type indiqué sur la plaque signalétique. Pour éviter
toute blessure corporelle ou d’endommager l’appareil,
n’utilisez jamais d’autre gaz que celui indiqué.
• L’appareil doit être raccordé à l’alimentation en gaz
à l’aide d’un connecteur de gaz mobile conforme aux
normes locales et aux codes locaux en vigueur.
• Vérifiez régulièrement le raccord de gaz mobile.
Remplacez-le immédiatement en cas de signes d’usure.
• Vérifiez que la date de validité du connecteur de
gaz flexible n’est pas dépassée. Remplacez-le
immédiatement si la date n’est plus valide.
• Ne tordez pas le connecteur de gaz mobile.
• Tenez le connecteur de gaz mobile éloigné des
appareils et des surfaces chaudes.
• L’appareil et les raccords de gaz doivent faire l’objet
d’un test d’étanchéité avant leur mise en service.
Utilisez de l’eau savonneuse ou un liquide en vente
dans le commerce pour vérifier l’étanchéité de l’appareil.
N’utilisez PAS de flamme nue pour vérifier l’étanchéité.
• L’appareil et le robinet d’arrêt du gaz individuelle doivent
être débranchés et isolés du système de tuyauterie
d’alimentation en gaz pendant tout essai de pression du
système à des pressions supérieures à 3,5 kPa (1/2 psi).
• Fermez le robinet d’arrêt du gaz individuel pour isoler
l’appareil du système de tuyauterie d’alimentation en
gaz pendant tout essai de pression de ce système à
des pressions supérieures à 3,5 kPa (1/2 psi).
• Placezl’appareilàaumoins100cm(39″)dessurfaces
combustibles. Si ces distances de sécurité ne sont pas
respectées, une décoloration ou une combustion peut
se produire.
• N’installez pas l’appareil au-dessus de surfaces
combustibles ou à leur proximité. Une décoloration
ou une combustion pourraient survenir. L’appareil doit
uniquement être installé dans un environnement non
combustible.
AVERTISSEMENT
RISQUE D’INCENDIE OU D’EXPLOSION :
• N’obstruez pas les ouvertures de ventilation d’air de
l’appareil. Cela pourrait provoquer une combustion ou
une défaillance de l’appareil.
• Ne conservez pas ou n’utilisez pas d’essence ou
d’autres vapeurs ou liquides inflammables à proximité
de ces plaques ou de tout autre appareil.
• Si les consignes fournies dans ce manuel ne sont
pas scrupuleusement respectées, un incendie ou une
explosion risqueraient d’endommager l’appareil et vous
pourriez subir des blessures graves, voire mortelles.
• Cet appareil doit être entretenu uniquement par des
personnes qualifiées. Un entretien réalisé par des
personnes non qualifiées peut entraîner des explosions
ou provoquer des brûlures.
• Utilisez exclusivement des pièces de rechange d’origine
Hatco lorsque cela est nécessaire. L’utilisation de toute
autre pièce de rechange entraînera l’annulation de toutes
les garanties et pourrait exposer les utilisateurs à des
situations dangereuses. Les pièces de rechange d’origine
Hatco sont conçues pour fonctionner de manière sûre
et adaptée dans l’environnement dans lequel elles sont
utilisées. Certaines pièces de rechange génériques ne
disposent pas de caractéristiques leur permettant de
fonctionner en toute sécurité dans des appareils Hatco.
L’appareil doit être installé dans un endroit suffisamment
aéré pour éviter l’accumulation de fumées nocives et
dangereuses.
L’appareil doit être installé sur un plan de travail fixe. Ne
pas installer sur un chariot mobile.
Positionnez les thermostats sur la position (« 0 »), fermez
le robinet d’arrêt du gaz individuel et laissez l’appareil
refroidir avant d’effectuer tout nettoyage, réglage ou
entretien.
L’appareil n’est pas résistant aux intempéries.
Ne pas nettoyer à la vapeur ni utiliser trop d’eau sur
l’appareil.
Cet appareil n’est pas étanche aux jets. Ne pas utiliser de
jet sous pression pour nettoyer l’appareil.
NE PAS immerger l’appareil ni le saturer d’eau. L’appareil
n’est pas étanche à l’eau. Ne pas le faire fonctionner s’il a
été immergé ou saturé d’eau.
Ne renversez pas de liquides dans l’appareil.
Assurez-vous que tous les opérateurs ont été formés à
l’utilisation sûre et correcte de l’appareil.
Cet appareil ne doit pas être utilisé par des enfants ou des
personnes avec des capacités physiques, sensorielles ou
mentales diminuées. Assurez-vous que les enfants sont
bien surveillés et tenez-les à l’écart de l’appareil.
Ne laissez jamais l’appareil sans surveillance pendant son
utilisation.
Fermez toujours le robinet d’arrêt du gaz individuel lorsque
vous n’utilisez pas l’appareil.

Français
Formulaire n° KGRDGM-0120
17
CONSIGNES DE SÉCURITÉ IMPORTANTES
DÉSIGNATION DU MODÈLE
DESCRIPTION DU MODÈLE
La plaque de cuisson à gaz comprend un cadre en acier
inoxydable facile à nettoyer et une plaque rectangulaire en
acier inoxydable. La plaque de cuisson est divisée en deux
zones de cuisson à commande individuelle. Les commandes
comprennent un thermostat réglable pour chaque zone et un
bouton d’allumage électronique.
Toutes les plaques de cuisson à gaz sont fabriquées en usine
pour être utilisées avec du gaz naturel. Des composants de
conversion sont inclus pour permettre de convertir les appareils
afin qu’ils puissent être utilisés avec du propane. Consultez la
section ENTRETIEN de ce manuel et contactez un réparateur
agréé ou Hatco pour obtenir de l’aide.
K G R D G - xxxx
Plancha
Gaz
Profondeur de la surface de cuisson
(en pouces)
Largeur de la surface de cuisson
(en pouces)
Thermostat
Bouton
d’allumage
Plaque
Plateau d’écoulement
Modèle KGRDG-2513
AVERTISSEMENT
N’apportez aucune modification à l’appareil. Vous
risqueriez de vous blesser et d’endommager l’appareil.
N’utilisez pas l’appareil pour des fins autres que celles qui
ont été prévues.
Cet appareil ne contient aucune pièce réparable par
l’utilisateur. Si cet appareil doit être réparé, contacter un
réparateur Hatco agréé ou le Service après-vente Hatco au
800-558-0607 ou 414-671-6350.
ATTENTION
DANGER DE BRÛLURE :
• Certaines surfaces extérieures de l’appareil seront
chaudes. Évitez tout contact inutile avec l’appareil.
• N’entrez pas en contact avec la plaque chauffante pendant
le fonctionnement de l’appareil, elle est très chaude.
• Laissez l’appareil refroidir avant d’effectuer tout
nettoyage, réglage ou entretien.
Ne faites pas fonctionner l’appareil sans avoir installé les
pieds fournis.
N’utilisez jamais l’appareil avant d’avoir installé le plateau
d’écoulement.
Placez l’appareil sur un plan de travail dont la hauteur
est appropriée, à un emplacement pratique à utiliser.
L’emplacement choisi doit être de niveau et solide afin de
supporter le poids de l’appareil et de son contenu.
AVIS
Assurez-vous d’avoir assez de ventilation autour de la
base de l’appareil pour pouvoir alimenter correctement le
brûleur à gaz en air.
Ne placez pas l’appareil dans une zone soumise à des
températures excessives ou exposée à de la graisse
provenant de grils, poêles, etc. Des températures
excessives et la graisse risquent d’endommager l’appareil.
Les dommages à toute partie du comptoir pouvant être
causés par la chaleur générée par cet équipement ne
sont pas couverts par la garantie de Hatco. Contactez le
fabricant du comptoir pour plus de renseignements.
Pour le châssis de l’appareil, utilisez des chiffons et
produits nettoyants non abrasifs uniquement. Les chiffons
et nettoyant abrasifs pourraient rayer la finition de
l’unité, altérant son apparence et la rendant vulnérable à
l’accumulation de saleté.
L’utilisation de produits chimiques agressifs tels que l’eau
de javel, les produits nettoyants contenant de la javel, ou
les produits de nettoyage pour les fours sont proscrits
pour nettoyer l’appareil.
Cet appareil est réservé à un usage professionnel
uniquement — il ne convient PAS à un usage personnel.
Nettoyez l’unité quotidiennement pour éviter les
dysfonctionnements et assurer un fonctionnement sain.

Français
18
Formulaire n° KGRDGM-0120
Modéle
Puissance du
brûleur
BTU/heure
Puissance du
brûleur
(kilowatts)
Pression du
collecteur
Régulateur de
pression
Réglages d’usine
Orifice du brûleur
Taille
Poids de
l’appareil
KGRDG-2513 13648 4 7 In WC 7 In WC 120 m 22 kg (49 lbs.)
Modéle
Puissance du
brûleur
BTU/heure
Puissance du
brûleur
(kilowatts)
Pression du
collecteur
Régulateur de
pression
Réglages d’usine
Orifice du brûleur
Taille
Poids de
l’appareil
KGRDG-2513 13648 4 10.9 In WC 10.9 In WC 85 m 22 kg (49 lbs.)
CARACTÉRISTIQUES TECHNIQUES
Modéle
Largeur
(A)
Profondeur
(B)
Hauteur
(C)
Encombrement
Largeur
(D)
Encombrement
Profondeur
(E)
Largeur de
la surface de
cuisson (F)
Profondeur de
la surface de
cuisson (G)
KGRDG-2513 699 mm
27-9/16)
433 mm
(17-1/16)
298 mm
(11-3/4)
611 mm
(24-1/16)
291 mm
(11-1/2)
646 mm
(25-7/16)
354 mm
(13-15/16)
C
G
BA
F
D E
Vue de face Vue de côté
Vue du dessus
Dimensions
Tableaux de classification—Propane
Tableaux de classification—Gaz naturel

Français
Formulaire n° KGRDGM-0120
19
INSTALLATION
Généralités
Lorsque les planchas gaz sont expédiées, la plupart des
éléments sont installés et prêts à l’emploi. Veillez à ne pas
endommager l’appareil lors du déballage du carton d’expédition.
La procédure d’installation suivante doit être suivie avant
d’utiliser l’appareil.
AVERTISSEMENT
RISQUE D’INCENDIE OU D’EXPLOSION :
• Cet appareil est conçu pour être utilisé avec du propane
ou du gaz naturel. Contactez un installateur qualifié
pour déterminer et effectuer les raccordements de gaz
appropriés.
• L’appareil doit être installé par un installateur d’appareils
à gaz qualifié et formé. L’installation doit être conforme
à tous les codes locaux de plomberie et d’installation
au gaz. Toute installation effectuée par une personne
non qualifiée annulera la garantie de l’appareil et peut
causer un incendie ou une explosion, ce qui peut
endommager l’appareil et entraîner des blessures
graves, voire mortelles. Vérifiez les procédures et les
normes à suivre auprès de vos inspecteurs locaux en
matière de plomberie.
• En l’absence de codes locaux de plomberie et d’installation
du gaz, l’installation doit être conforme au National
Fuel Gas Code (Code national du gaz combustible)
ANSI Z223.1/NFPA 54 ou au National Gas and Propane
Installation Code (Code national d’installation du gaz et
du propane) CSA B149.1, selon le cas.
• Le gaz utilisé avec cet appareil doit correspondre au
type indiqué sur la plaque signalétique. Pour éviter
toute blessure corporelle ou d’endommager l’appareil,
n’utilisez jamais d’autre gaz que celui indiqué.
• L’appareil doit être raccordé à l’alimentation en gaz
à l’aide d’un connecteur de gaz mobile conforme aux
normes locales et aux codes locaux en vigueur.
• Ne tordez pas le connecteur de gaz mobile.
• Tenez le connecteur de gaz mobile éloigné des appareils
et des surfaces chaudes.
• L’appareil et les raccords de gaz doivent faire l’objet
d’un test d’étanchéité avant leur mise en service.
Utilisez de l’eau savonneuse ou un liquide en vente dans
le commerce pour vérifier l’étanchéité de l’appareil.
N’utilisez PAS de flamme nue pour vérifier l’étanchéité.
• Placezl’appareilàaumoins100cm(39″)dessurfaces
combustibles. Si ces distances de sécurité ne sont pas
respectées, une décoloration ou une combustion peut
se produire.
• N’installez pas l’appareil au-dessus de surfaces
combustibles ou à leur proximité. Une décoloration
ou une combustion pourraient survenir. L’appareil doit
uniquement être installé dans un environnement non
combustible.
• N’obstruez pas les ouvertures de ventilation d’air de
l’appareil. Cela pourrait provoquer une combustion ou
une défaillance de l’appareil.
• Si les consignes fournies dans ce manuel ne sont
pas scrupuleusement respectées, un incendie ou une
explosion risqueraient d’endommager l’appareil et vous
pourriez subir des blessures graves, voire mortelles.
L’appareil doit être installé dans un endroit suffisamment
aéré pour éviter l’accumulation de fumées nocives et
dangereuses.
AVERTISSEMENT
L’appareil doit être installé sur un plan de travail fixe. Ne
pas installer sur un chariot mobile.
L’appareil n’est pas résistant aux intempéries.
1. Vérifiez que le carton d’expédition ne présente pas de
défauts visibles à l’œil nu dus au transport. En cas de
dommages, prévenez immédiatement la société de
transport. ATTENTION! Arrêter! N’essayez pas d’utiliser
l’appareil s’il est endommagé. Contactez Hatco pour
obtenir une assistance.
2. Retirez l’appareil et tous les composants/accessoires
indépendants du carton d’expédition. Les composants
indépendants suivants sont inclus avec chaque plancha
gaz :
• Pieds
• Plateau d’écoulemen
• Composants de conversion du propane
• Régulateur de pression
• Vanne d’arrêt de gaz
NOTA: Pour éviter des retards dans l’obtention de la couverture
de la garantie, complétez l’enregistrement en ligne
de votre garantie. Lisez la section INFORMATIONS
IMPORTANTES POUR LE PROPRIETAIRE pour plus
de détails.
3. Retirez le ruban et l’emballage de protection de toutes les
surfaces de l’appareil.
• Assurez-vous de retirer l’ensemble des films protecteurs
recouvrant les surfaces en acier inoxydable.
4. Vérifiez la présence ou non de dommages dus au transport,
tels que des bosses sur le boîtier ou des boutons cassés.
En cas de dommages, prévenez immédiatement la société
de transport.
5. Installez les pieds inclus.
a. Basculez doucement l’appareil vers l’arrière et placez-le
sur un carton posé sur une surface plane.
b. Vissez un pied dans chaque angle, sur le bas de
l’appareil. Serrez à la main jusqu’à ce qu’ils soient bien
en place. Ne serrez pas trop.
c. Remettez l’appareil à l’endroit.
NOTA: Les pieds sont réglables pour mettre à niveau l’appareil.
Effectuez les réglages de mise à niveau une fois que
l’appareil est placé dans sa position finale.

Français
20
Formulaire n° KGRDGM-0120
Pied
Pied réglable
Installation du plateau d’écoulement
ATTENTION
Placez l’appareil sur un plan de travail dont la hauteur
est appropriée, à un emplacement pratique à utiliser.
L’emplacement choisi doit être de niveau et solide afin de
supporter le poids de l’appareil et de son contenu.
AVIS
Assurez-vous d’avoir assez de ventilation autour de la
base de l’appareil pour pouvoir alimenter correctement le
brûleur à gaz en air.
Ne placez pas l’appareil dans une zone soumise à des
températures excessives ou exposée à de la graisse
provenant de grils, poêles, etc. Des températures
excessives et la graisse risquent d’endommager l’appareil.
Les dommages à toute partie du comptoir pouvant être
causés par la chaleur générée par cet équipement ne
sont pas couverts par la garantie de Hatco. Contactez le
fabricant du comptoir pour plus de renseignements.
6. Placez l’appareil à l’emplacement souhaité.
• Assurez-vous que l’unité est placée à une hauteur
appropriée dans une zone facilitant son utilisation.
• Veillez à ce que le comptoir soit plat et assez résistant
pour supporter le poids de l’unité et des produits
alimentaires.
• Veuillez vous assurer que tous les pieds en dessous de
l’appareil sont fermement positionnés sur le comptoir.
7. Assurez-vous que le plateau d’écoulement est installé sur
le bord avant de l’appareil. Assurez-vous que l’ergot de
la poignée de chaque plateau est bien en place dans les
encoches du cadre de la plaque.
Encoche
Poignée du plateau
Ergot
Plateau
d’écoulement
Installation du plateau d’écoulement
8. Contactez un installateur d’appareils à gaz pour raccorder
la conduite d’alimentation en gaz à l’appareil. Consultez la
section « Raccordement de l’alimentation en gaz » avec
l’installateur.
Raccorder l’appareil à l’alimentation en gaz
Les plaques de cuisson à gaz doivent être raccordées à une
conduite d’alimentation en gaz approuvée par un installateur
d’équipement à gaz autorisé et certifié. Il est nécessaire de bien
comprendre les informations suivantes pour installer l’appareil
correctement et en toute sécurité.
• Vérifiez que l’appareil est configuré correctement pour
l’alimentation en gaz, qu’il s’agisse de gaz naturel ou
de propane. L’étiquette des caractéristiques du produit
indiquant la configuration du gaz est située à l’arrière de
l’appareil.
• Installez l’appareil dans un endroit avec assez de
ventilation pour éviter l’accumulation de fumées nocives et
dangereuses.
• Veillez à ce que l’air de combustion circule correctement
autour de l’appareil. N’obstruez pas les ouvertures de
ventilation de la plaque chauffante ou du châssis de
l’appareil.
• Raccordez l’appareil à la tuyauterie d’alimentation en gaz à
l’aide d’un connecteur de gaz mobile conforme à la norme
ANSI Z21.69/CSA 6.16 et d’un dispositif à déconnexion
rapide conforme à la norme ANSI Z21.41/CSA 6.9.
• Assurez-vous que l’appareil est installé avec le régulateur
de pression et la vanne d’arrêt de gaz inclus.
Raccord NPT de 3/8″
Régulateur
de pression
Vue arrière, raccord de gaz
REMARQUE IMPORTANTE
Si vous avez besoin de rallumer la plaque de cuisson à gaz
après l’avoir éteinte, veuillez attendre cinq minutes. Cela
permet à l’accumulation potentielle de gaz de se dissiper.
INSTALLATION
La page est en cours de chargement...
La page est en cours de chargement...
La page est en cours de chargement...
La page est en cours de chargement...
La page est en cours de chargement...
La page est en cours de chargement...
La page est en cours de chargement...
La page est en cours de chargement...
-
 1
1
-
 2
2
-
 3
3
-
 4
4
-
 5
5
-
 6
6
-
 7
7
-
 8
8
-
 9
9
-
 10
10
-
 11
11
-
 12
12
-
 13
13
-
 14
14
-
 15
15
-
 16
16
-
 17
17
-
 18
18
-
 19
19
-
 20
20
-
 21
21
-
 22
22
-
 23
23
-
 24
24
-
 25
25
-
 26
26
-
 27
27
-
 28
28


Hatco KGRDG Series Le manuel du propriétaire
- Taper
- Le manuel du propriétaire
dans d''autres langues
- English: Hatco KGRDG Series Owner's manual
Documents connexes
Autres documents
-
CONTINENTAL EDISON CEPL46N Manuel utilisateur
-
Southbend S36 Series Le manuel du propriétaire
-
Fire Magic E660I0T3P Guide d'installation
-
-
Wells Manufacturing HDG2430G Mode d'emploi
-
-
Casselin CPAST700 Manuel utilisateur