Bionaire BCH6151 Manuel utilisateur
- Catégorie
- Chauffe-eau
- Taper
- Manuel utilisateur
Ce manuel convient également à

off, but still plugged in to an AC outlet, only the room
temperature will be visible.
3. When not in “Auto” mode, only the room temperature
will be displayed from 30-99 Fahrenheit or 0-39
Celsius.
4. When the heater is in “Auto” mode and the heating
element has been turned off after reaching the set
temperature, the fan will continue to run for 25
seconds.
Auto Shut Off Programmable Timer Instructions:
1. While your heater is in the ON mode, press the Timer
Button ( ) and the numbers will start flashing on the
right of the display. pressing the ( ) or ( ) buttons
to go from 0-24 to set the number of hours you want
your heater to run before shutting off.
2. Two seconds after releasing the Timer Button ( ), the
LCD will return to the previous setting and a small clock
will appear to indicate the timer is set.
3. If the Timer Button ( ) is pressed while the heater is
running, the time remaining is shown and can be
changed by pressing the ( ) or ( ) buttons.
4. You can turn off the timer by pressing the Timer Button
( ) back to zero, let the heater run to the end of the
programmed period or by turning the heater OFF using
the Mode Button ( ).
Auto On Programmable Timer Instructions:
1. When your heater is OFF, press the Timer Set button
and the numbers will start flashing on the right of the
display. Press the ( ) or ( ) buttons to go from 0-24
to set the number of hours that you want your heater to
turn On.
2. At the specified time, the heater will turn on to an
automatic setting of Auto High at 75 Fahrenheit or 24
Celsius. and will remain on for 2 hours.
3. When the heater turns On, the power light will appear
and a small clock will appear on the display to signal
the timer is activated.
4. You can turn off the timer by pressing the Timer Button
( ) back to zero, let the heater run to the end of the
programmed period or by pressing the Mode Button
( ) before the timer runs out.
OSCILLATION INSTRUCTIONS
1. Select the desired temperature and mode settings and
press the Oscillation Button ( ) to the ON position.
2. To stop oscillation, press the Oscillation Button ( )
again.
3. Please do not manually turn the heater on the base; it
is designed to turn only by motorized oscillation.
1 YEAR LIMITED WARRANTY
Sunbeam Products, Inc. doing business as Jarden
Consumer Solutions or if in Canada, Sunbeam
Corporation (Canada) Limited doing business as Jarden
Consumer Solutions (collectively “JCS”) warrants that for a
period of one year from the date of purchase, this product
will be free from defects in material and workmanship.
JCS, at its option, will repair or replace this product or any
component of the product found to be defective during the
warranty period. Replacement will be made with a new or
remanufactured product or component. If the product is
no longer available, replacement may be made with a
similar product of equal or greater value. This is your
exclusive warranty. Do NOT attempt to repair or adjust any
electrical or mechanical functions on this product. Doing
so will void this warranty.
This warranty is valid for the original retail purchaser from the
date of initial retail purchase and is not transferable. Keep
the original sales receipt. Proof of purchase is required to
obtain warranty performance. JCS dealers, service centers,
or retail stores selling JCS products do not have the right to
alter, modify or any way change the terms and conditions of
this warranty.
This warranty does not cover normal wear of parts or
damage resulting from any of the following: negligent use or
misuse of the product, use on improper voltage or current,
use contrary to the operating instructions, disassembly, repair
or alteration by anyone other than JCS or an authorized JCS
service center. Further, the warranty does not cover: Acts of
God, such as fire, flood, hurricanes and tornadoes.
What are the limits on JCS’s Liability?
JCS shall not be liable for any incidental or consequential
damages caused by the breach of any express, implied or
statutory warranty or condition.
Except to the extent prohibited by applicable law, any
implied warranty or condition of merchantability or fitness
for a particular purpose is limited in duration to the dura-
tion of the above warranty.
JCS disclaims all other warranties, conditions or represen-
tations, express, implied, statutory or otherwise.
JCS shall not be liable for any damages of any kind result-
ing from the purchase, use or misuse of, or inability to use
the product including incidental, special, consequential or
similar damages or loss of profits, or for any breach of
contract, fundamental or otherwise, or for any claim
brought against purchaser by any other party.
Some provinces, states or jurisdictions do not allow the
exclusion or limitation of incidental or consequential dam-
ages or limitations on how long an implied warranty lasts,
so the above limitations or exclusion may not apply to you.
This warranty gives you specific legal rights, and you may
also have other rights that vary from province to province,
state to state or jurisdiction to jurisdiction.
How to Obtain Warranty Service
In the U.S.A.
If you have any question regarding this warranty or would
like to obtain warranty service, please call 1-800-253-2764
and a convenient service center address will be provided
to you.
In Canada
If you have any question regarding this warranty or would
like to obtain warranty service, please call 1-800-253-2764
and a convenient service center address will be provided
to you.
In the U.S.A., this warranty is offered by Sunbeam
Products, Inc. doing business Jarden Consumer Solutions
located in Boca Raton, Florida 33431. In Canada, this war-
ranty is offered by Sunbeam Corporation (Canada) Limited
doing business as Jarden Consumer Solutions, located at
20 B Hereford Street, Brampton, Ontario L6Y 0M1. If you
have any other problem or claim in connection with this
product, please write our Consumer Service Department.
PLEASE DO NOT RETURN THIS PRODUCT TO ANY
OF THESE ADDRESSES OR TO THE PLACE OF
PURCHASE.
© 2008 Sunbeam Products, Inc. doing business as
Jarden Consumer Solutions. All Rights Reserved.
Distributed by Sunbeam Products, Inc. doing business as
Jarden Consumer Solutions, Boca Raton,
Florida 33431
.
BCH6151CN08EFM2 Printed in China
14.To prevent a possible fire, DO NOT block air intakes or
exhaust in any manner. DO NOT use on soft surfaces,
like a bed, where openings may become blocked.
15.To disconnect heater, turn controls to OFF, then remove
plug from outlet.
16.Avoid the use of an extension cord because the
extension cord may overheat and cause a risk of fire.
However, if you have to use an extension cord, the
cord shall be No. 14 AWG minimum size and rated not
less than 1875 watts.
17.If the heater will not operate, see specific instructions
on Auto Safety Shut-off.
18.DO NOT attempt to repair or adjust any electrical or
mechanical functions on this unit. Doing so will void
your warranty. The inside of the unit contains no user
serviceable parts. All servicing should be performed by
qualified personnel only.
19.Discontinue use if plug or outlet is hot. It is
recommended that the outlet be replaced if plug or
outlet is hot to touch.
PLEASE SAVE THESE
INSTRUCTIONS
CONSUMER SAFETY INFORMATION
THIS APPLIANCE HAS A POLARIZED
AC PLUG (one blade is wider than the
other). To reduce the risk of electric
shock, this plug is intended to fit in a
polarized outlet only one way. If the plug
does not fit fully in the outlet, reverse the
plug. If it still does not fit, contact a
qualified electrician to install the proper outlet.
CAUTION: TO PREVENT ELECTRIC SHOCK, MATCH
WIDE BLADE OF PLUG TO WIDE SLOT, FULLY INSERT.
DO NOT ATTEMPT TO MODIFY THIS PLUG OR
DEFEAT THIS SAFETY FEATURE IN ANY WAY.
PLEASE READ AND SAVE
THESE IMPORTANT SAFETY
INSTRUCTIONS
TECHNICAL SPECIFICATIONS
• Wattage: 1500W (+5% -10%)
• Working voltage: 120V AC/60Hz
AUTO SAFETY SHUT-OFF WITH INSTANT TIP
OVER PROTECTION
This heater is equipped with a patented, technologically-
advanced safety system that requires the user to reset
the heater if there is a potential overheat situation. When
HEATER SAFETY
PLEASE READ AND SAVE
THESE IMPORTANT SAFETY
INSTRUCTIONS
When using electrical appliances, basic safety
precautions should always be followed to reduce the risk
of fire, electric shock, and injury to persons, including the
following:
1. Read all instructions before using the appliance.
2. To avoid fire or shock hazard, plug the appliance
directly into a 120V AC electrical outlet.
3. The heater is hot when in use. To avoid burns, DO NOT
let bare skin touch hot surfaces. If provided, use
handles when moving this heater. Keep combustible
materials, such as furniture, pillows, bedding, papers,
clothes, and curtains at least 3 ft (0.9 m) from the front
of the heater and keep them away from the sides and
rear.
4. DO NOT run cord under carpeting. DO NOT cover cord
with throw rugs, runners, or the like. Arrange cord away
from traffic area and where it will not be tripped over.
5. This heater is not intended for use in bathrooms,
laundry areas and similar indoor location. NEVER locate
heater where it may fall into a bathtub or other water
container.
6. Extreme caution is necessary when any heater is used
by, or near children or invalids, and whenever the
heater is left operating and unattended.
7. Always unplug the heater when not in use.
8. When unplugging, be sure to pull by the plug and not
the cord.
9. DO NOT insert or allow foreign objects to enter any
ventilation or exhaust opening as this may cause an
electric shock or fire, or damage the heater.
10.DO NOT operate heater with a damaged cord or plug,
or after the heater malfunctions, has been dropped or
damaged in any manner. Return appliance to
manufacturer for examination, electrical or mechanical
adjustment, or repair.
11.A heater has hot and arcing or sparking parts inside.
DO NOT use it in areas where gasoline, paint, or
flammable liquids are used or stored.
12.Use appliance only for intended household use as
described in this manual. Any other use not
recommended by the manufacturer may cause fire,
electric shock, or injury to persons. The use of
attachments not recommended or sold by the
manufacturer may cause hazards.
13.DO NOT use outdoors.
a potential overheat temperature is reached, the system
will automatically shut the heater off. It can only resume
operation when the user resets the unit. For specific reset
instructions please refer to the unit.
To Reset the Heater:
1. Unplug the heater and wait 30 minutes for the unit to
cool down.
2. After the 30 minutes, plug the unit in again and operate
normally.
Tip Over Shut-Off:
If the unit is tipped over in any direction, it will instantly
shut off. To reset, simply place the heater in an upright
position and it will operate normally.
PRE-OPERATING INSTRUCTIONS
1. Carefully remove your heater from the box. Please save
the carton for off-season storage.
2. Make sure the unit is in the OFF position before
plugging the heater into the outlet.
3. Place heater on firm level surface.
4. Avoid overloading your circuit by not using other high
wattage appliances in the same outlet. At 1500 Watts,
this unit draws 12.5 Amps.
NOTE: The power light will illuminate when the heater is
turned on.
DIGITAL THERMOSTAT
Your heater is equipped with a Digital Thermostat that allows
you to set your heater to your precise comfort level.
Mode Instructions:
1. Press the Mode Button ( ) to turn heater On and it
will automatically set to High. Press ( ) to select Low
setting. Press the Mode Button ( ) again for “Auto Hi”
or “Auto Lo.”
2. While in “Auto” mode, pressing the ( ) or ( )
buttons will adjust the set temperature within a range of
55-85 Fahrenheit or 13-30 Celsius. The LCD display on
your heater will display both room and the set
temperature while in “Auto” mode. When the heater is
REMOTE CONTROL INSTRUCTIONS
Before operation, insert 2 “AAA” batteries (not included)
into the back of the remote control.
• Do not mix old and new batteries.
• Do not mix alkaline, standard (carbon-zinc), or
rechargeable (nickel-cadmium) batteries.
The remote control for this unit has the capability of
operating all control panel functions. Please note this
remote control will not work through walls.
POWER: To turn the unit on press the Mode/On Button.
To turn the unit off press the Mode/On Button and scroll
to OFF.
MODES: To scroll through the various modes LO, HI, AL
and AH press the Mode/On Button until you reach your
desired setting.
OSCILLATION: To start oscillation, press the Oscillation
Button ( ) once. To stop oscillation press the Oscillation
Button ( ) again.
TEMPERATURE: To increase the temperature setting,
press the Temp Up Button ( ). To decrease the
temperature setting that you desire press the Temp Down
Button ( ).
Timer: To activate the timer from the remote control,
press the button marked Timer. From there you can
press the Temp Up ( ) or Temp Down ( ) Button,
which will give you the ability to program the heater to
turn on or off in 1 hour increments, up to 24 hours. For
more information see the programmable timer
instructions above.
CLEANING/MAINTENANCE
During Season Care:
1. Always unplug the heater before cleaning.
2. Clean the unit with a soft cloth moistened with a mild
soap solution.
3. NEVER use abrasive or flammable solvents to clean the
unit.
4. After cleaning, be sure to completely dry the unit with a
cloth or towel.
After Season Care:
1. Store heater in a cool, dry location.
2. The manufacturer recommends that you store the unit
in its original carton.
*TIP: Over time, dust may accumulate on the front grills.
This can be removed by wiping the unit with a damp
cloth. Always unplug unit and allow to cool prior to
cleaning.
TROUBLESHOOTING
If your heater fails to operate:
• UNPLUG THE UNIT
• Make sure the electrical outlet or circuit breaker is
working.
• Check for obstructions. If you find an obstruction turn
the heater OFF, and unplug the unit. Carefully remove
the obstruction and follow the reset instructions.
• The temperature may be set too low. Adjust the
thermostat until the heater restarts.
Please DO NOT attempt to open or repair the heater.
Please see the Warranty for Service Instructions.
Digital Triple
Ceramic
Heater
MODEL BCH6151-CN
If you have any questions regarding your product or
would like to learn more about other Bionaire
®
products,
please contact our Consumer Service Department at
1-800-253-2764 or visit our website at www.bionaire.com.
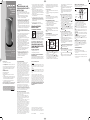
Mode
Button
Timer
Button
Temp/Timer
Up Button
Temp/Timer
Down Button
Fig 1
Oscillation
Button
Remote Sensor Led
Fig 2
Temp Up
Button
Temp Down
Button
Mode/On
Button
Timer Button
Oscillation
Button
Read instructions before operating.
Retain for future reference.
Instruction Leaflet
INFO-LINE
If after having read this leaflet, you have any
questions or comments on your heater,
call 1-800-253-2764 in North America.
127671/9100020009457
☎
BCH6151-CN_08EFM2.qxd :127671 5/26/08 4:45 PM Page 1

sélectionne le réglage bas. Presser Mode « » de
nouveau le règle à « Auto HI » ou « Auto LO ».
2. Au mode « Auto », presser les boutons « » ou « »
règle la température entre 55 et 85 degrés Fahrenheit
ou 13 et 30 degrés Celsius. Lorsque le radiateur est
réglé au mode « Auto », l’afficheur ACL indique la
température ambiante ainsi que la température choisie.
Si le radiateur est branché sur courant alternatif mais ne
chauffe pas, seule la température ambiante est visible.
3. Lorsque le radiateur n’est pas réglé au mode « Auto »,
seule la température ambiante est affichée : de 30 à
99 degrés Fahrenheit ou de 0 à 39 degrés Celsius.
4. Lorsque le radiateur est réglé au mode « Auto » et que
l’élément s’est éteint après avoir atteint la température
sélectionnée, le ventilateur continue à tourner pendant
25 secondes.
Instructions de programmation de la minuterie pour
la hors tension automatique :
1. Lorsque le radiateur est au mode de fonctionnement,
presser le bouton de la minuterie « » fait clignoter les
chiffres à droite de l’afficheur et presser les boutons
« » ou « » fait défiler les heures de 0 à 24 pour
sélectionner la durée du fonctionnement avant la mise
hors tension automatique du radiateur.
2. Deux secondes après que vous relâchiez le bouton de
la minuterie « », l’afficheur à ACL revient à son
réglage précédent et une petite horloge apparaît, signe
que la durée du fonctionnement est réglée.
3. Quand le radiateur fonctionne, presser le bouton de la
minuterie « » fait afficher le temps restant ; vous
pouvez le modifier avec les boutons « » ou « ».
4. Vous pouvez arrêter la minuterie en appuyant sur le
bouton de la minuterie « » et ainsi la remettre à zéro,
attendre que la durée programmée soit écoulée ou
ÉTEINDRE le radiateur avec le bouton de mode « ».
Instructions de programmation de la minuterie pour
la mise en marche automatique :
1. Lorsque le radiateur est ÉTEINT, presser le bouton de
la minuterie fait clignoter les chiffres à droite de
l’afficheur ; appuyer sur le bouton « » ou « » les fait
alors défiler de 0 à 24 et permet de choisir l’heure à
laquelle le radiateur se mettra en marche.
NE tentez PAS d’ouvrir ou de réparer le radiateur.
Consultez la garantie pour connaître les instructions
relatives au service.
GARANTIE LIMITÉE DE 1 AN
Sunbeam Products, Inc. faisant affaires sous le nom de Jarden
Consumer Solutions ou, si au Canada, Sunbeam Corporation
(Canada) Limited faisant affaires sous le nom de Jarden
Consumer Solutions (collectivement « JCS ») garantit que pour
une période d’un an à partir de la date d’achat, ce produit sera
exempt de défauts de pièces et de main-d’oeuvre. JCS, à sa
discrétion, réparera ou remplacera ce produit ou tout composant
du produit déclaré défectueux pendant la période de garantie. Le
produit ou composant de remplacement sera soit neuf soit
réusiné. Si le produit n’est plus disponible, il sera remplacé par un
produit similaire de valeur égale ou supérieure. Il s’agit de votre
garantie exclusive. N’essayez PAS de réparer ou d’ajuster toute
fonction électrique ou mécanique de ce produit, cela annulera
cette garantie.
Cette garantie est valide pour l’acheteur initial du produit à la date
d’achat initiale et ne peut être transférée. Conservez votre facture
d’achat originale. Les détaillants et les centres de service JCS ou
les magasins de détail vendant les produits JCS n’ont pas le droit
d’altérer, de modifier ou de changer de toute autre manière les
termes et les conditions de cette garantie.
Cette garantie ne couvre pas l’usure normale des pièces ou les
dommages résultant de toute cause suivante : utilisation
négligente ou mauvaise utilisation du produit, utilisation d’un
voltage ou d’un courant incorrects, utilisation contraire aux
instructions d’utilisation, démontage, réparation ou altération par
quiconque autre que JCS ou un centre de service autorisé de
JCS. En outre, la garantie ne couvre pas : les catastrophes
naturelles comme les feux, les inondations, les ouragans et les
tornades.
Quelles sont les limites de la responsabilité de JCS?
JCS ne sera pas tenu responsable de tout dommage
conséquent ou accessoire causé par la violation de toute
garantie ou condition expresse, implicite ou réglementaire.
Sauf si cela est interdit par les lois en vigueur, toute
garantie ou condition implicite de valeur marchande ou
adéquation à un usage particulier est limitée en durée à la
durée de la garantie énoncée ci-dessus.
JCS exclut toute autre garantie, condition ou
représentation, expresse, implicite, réglementaire ou autre.
JCS ne sera pas tenu responsable de tout dommage de
toute sorte résultant de l’achat, de l’usage ou du mauvais
usage, ou de l’incapacité à utiliser le produit y compris les
dommages ou les pertes de profits conséquents,
accessoires, particuliers ou similaires, ou pour toute
violation de contrat, fondamentale ou autre, ou pour toute
réclamation portée à l’encontre de l’acheteur par toute
autre partie.
Certaines provinces, états ou juridictions ne permettent
pas d’exclusion ou de limitation pour des dommages
conséquents ou accessoires ou de limitations sur la durée
de la garantie implicite, de ce fait les limitations ou
exclusions ci-dessus peuvent ne pas s’appliquer à votre
cas.
Cette garantie vous donne des droits juridiques particuliers
et vous pouvez également disposer d’autres droits
pouvant varier d’une province à l’autre, d’un état à l’autre
ou d’une juridiction à l’autre.
Comment obtenir le service prévu par la garantie
Aux É.U.
Si vous avez des questions concernant cette garantie ou si
vous souhaitez obtenir le service aux termes de la garantie,
veuillez appeler au
1-800-253-2764
et l’adresse d’un centre
de service approprié vous sera fournie.
Au Canada
Si vous avez des questions concernant cette garantie ou si
vous souhaitez obtenir le service aux termes de la garantie,
veuillez appeler au
1-800-253-2764
et l’adresse d’un centre
de service approprié vous sera fournie.
Aux É.U., cette garantie est offerte par Sunbeam Products,
Inc. faisant affaires sous le nom de Jarden Consumer
Solutions, situé à Boca Raton, Floride 33431. Au Canada,
cette garantie est offerte par Sunbeam Corporation
(Canada) Limited faisant affaires sous le nom de Jarden
Consumer Solutions, situé au 20 B Hereford Street,
Brampton, Ontario L6Y 0M1. Pour tout autre problème ou
réclamation en relation avec ce produit, veuillez écrire à
notre département du Service à la clientèle.
VEUILLEZ NE PAS RETOURNER CE PRODUIT À
AUCUNE DE CES ADRESSES OU À
L’ÉTABLISSEMENT D’ACHAT.
© 2008 Sunbeam Products, Inc. faisant affaires sous le
nom de Jarden Consumer Solutions. Tous droits réservés.
Distribué par Sunbeam Products, Inc. faisant affaires sous
le nom de Jarden Consumer Solutions, Boca Raton,
Floride 33431
.
BCH6151CN08EFM2 Imprimé en Chine
12.Cet appareil ne doit servir qu’aux fins domestiques
pour lesquelles il a été conçu décrites dans ce guide.
Tout autre usage non recommandé par le fabricant
risque de causer un incendie, des chocs électriques ou
des blessures. Toute utilisation d’accessoires non
recommandés ou non vendus par le fabricant pourrait
être dangereuse.
13.N'utilisez PAS cet appareil à l'extérieur.
14.Afin d’éviter un incendie, NE bloquez PAS les
ouvertures d’admission ou de sortie d’air. NE placez
PAS l’appareil sur une surface molle, comme un lit, où
les ouvertures risquent d’être bloquées.
15.Avant de débrancher l’appareil, placez les commandes
à la position d’arrêt « OFF » et débranchez-le ensuite
de la prise de courant.
16.Évitez d’utiliser une rallonge puisque celle-ci peut
surchauffer et provoquer un incendie. Toutefois, si vous
devez utiliser une rallonge, celle-ci doit être de calibre
n° 14 AWG au minimum et supporter une puissance
nominale de 1875 watts.
17.Si le radiateur ne fonctionne pas, consultez les
instructions spécifiques intitulées « Arrêt automatique
de sécurité ».
18.NE tentez PAS de réparer ou d’ajuster les fonctions
électriques ou mécaniques de cet appareil. Cette action
entraînera l’annulation de la garantie. Il n’y a aucune
pièce qui peut être réparée par l’utilisateur à l’intérieur
de cet appareil. Toute réparation doit être effectuée par
un personnel qualifié.
19.Arrêtez l’appareil et ne l’utilisez plus si la fiche ou la
prise de courant est chaude. Nous vous
recommandons de faire remplacer la prise de courant
si la fiche ou la prise est chaude au toucher.
VEUILLEZ CONSERVER
CES DIRECTIVES
INFORMATION DE SÉCURITÉ DU CONSOMMATEUR
CET APPAREIL EST DOTÉ D'UN
CORDON À FICHE POLARISÉE (une
lame est plus large que l'autre). Afin de
réduire les risques d'électrocution, cette
fiche ne s'insère que d'un seul sens
dans la prise électrique. Si la fiche ne
s'insère pas dans la prise, retournez la
fiche. Si elle ne s'adapte toujours pas, contactez un
électricien qualifié afin d'installer la prise appropriée.
ATTENTION: POUR ÉVITER LES CHOCS
ÉLECTRIQUES, INTRODUIRE LA LAME LA PLUS LARGE
DE LA FICHE DANS LA BORNE CORRESPONDANTE
DE LA PRISE ET POUSSER JUSQU, AU FOND.
NE CONTOURNEZ PAS CE DISPOSITIF DE SÉCURITÉ
ET N'ALTÉREZ LA FICHE D'AUCUNE FAÇON.
CONSIGNES DE SÉCURITÉ POUR RADIATEURS
VEUILLEZ LIRE ET CONSERVER
CES INSTRUCTIONS
IMPORTANTES
Lors de l’utilisation d’un appareil électrique, il faut
toujours respecter les mesures de sécurité de base, y
compris celles stipulées ci-dessous, afin de réduire le
risque d'incendie, de choc électrique et de blessure :
1. Lisez toutes les instructions avant d'utiliser l'appareil.
2. Afin d'éviter le risque d'incendie ou de choc électrique,
branchez l'appareil directement dans une prise de
courant 120 volts CA.
3. Le radiateur est chaud lorsqu’il est en fonction. Afin
d’éviter toute brûlure, NE touchez PAS les surfaces
chaudes avec la peau nue. Si l’appareil est doté de
poignées, utilisez-les pour le déplacer. Gardez les
articles combustibles, tels que les meubles, oreillers,
draps de lit, papiers, vêtements et rideaux, à une
distance d’au moins 0,9 m (3 pi) de tous les côtés du
radiateur.
4. NE placez PAS le cordon sous une moquette. NE
couvrez PAS le cordon avec une carpette, un tapis de
couloir ou un autre genre de tapis. Placez le cordon loin
des endroits passants où il ne fera pas trébucher
personne.
5. Ce radiateur n’est pas conçu pour être utilisé dans une
salle de bain, une salle de lavage ou tout endroit
intérieur semblable. NE placez JAMAIS le radiateur à un
endroit où il peut tomber dans une baignoire ou autre
contenant d’eau.
6. Il faut surveiller de près l’utilisation de tout radiateur à
proximité d’enfants, par des enfants ou par une
personne handicapée, et il faut agir avec prudence
lorsqu’il doit être laissé en marche sans surveillance.
7. Débranchez toujours le radiateur lorsqu’il n’est pas
utilisé.
8. Lorsque vous débranchez l’appareil, tirez la fiche et non
le cordon.
9. N’insérez aucun objet étranger dans les ouvertures
d’aération ou de sortie d’air puisque cela pourrait
causer des chocs électriques ou un incendie, et même
endommager le radiateur.
10.N'utilisez PAS l’appareil si le cordon ou la fiche sont
endommagés, si l’appareil ne fonctionne pas de
manière appropriée, ou bien s’il a été échappé ou
endommagé de quelque façon. Retournez l'appareil au
fabricant pour une vérification, une réparation ou un
réglage électrique ou mécanique.
11.L’intérieur d’un radiateur comporte des pièces chaudes
ainsi que des pièces produisant des arcs électriques ou
des étincelles. NE vous en servez PAS à des endroits
où de l’essence, de la peinture ou des liquides
inflammables sont entreposés ou utilisés.
VEUILLEZ LIRE ET CONSERVER
CES INSTRUCTIONS
IMPORTANTES
SPÉCIFICATIONS TECHNIQUES
Puissance en watts :1500 W (+5% -10%)
Tension de service :120 V CA/60 Hz
ARRÊT DE SÉCURITÉ AUTOMATIQUE AVEC
PROTECTION SUITE À UN RENVERSEMENT
Ce radiateur est doté d’un système de sécurité breveté et
de technologie d’avant-garde. Ce système exige que
l’utilisateur réinitialise le radiateur si une situation de
surchauffe potentielle existe. Si le radiateur atteint une
température de surchauffe potentielle, le système arrête
automatiquement l’appareil. Il ne peut reprendre le
fonctionnement qu’après la réinitialisation par l’utilisateur.
Pour des instructions spécifiques sur la réinitialisation,
veuillez voir l’appareil.
Réinitialisation du radiateur :
1. Débranchez le radiateur et laissez-le refroidir pendant
30 minutes.
2. Une fois les 30 minutes écoulées, rebranchez l’appareil
et faites-le fonctionner comme à l’ordinaire.
Arrêt suite à un renversement
Le radiateur s’éteindra instantanément s’il bascule dans
n’importe quelle direction. Il suffit de le remettre d’aplomb
pour le réinitialiser. il s’arrête automatiquement. Pour
réinitialiser l’appareil, il suffit de le remettre debout et son
fonctionnement normal reprendra.
INSTRUCTIONS AVANT L’UTILISATION
1. Retirez le radiateur de la boîte avec soin. Veuillez
conserver la boîte pour l’entreposage hors saison.
2. Assurez-vous que le radiateur soit réglé à OFF (arrêt)
avant de le brancher sur la prise de courant.
3. Placez le radiateur sur une surface solide et de niveau.
4. Évitez de surcharger le circuit électrique en branchant
d’autres appareils haute puissance sur le même circuit.
Cet appareil tire un courant de 12,5 A à 1 500 watts.
REMARQUE : Le témoin lumineux d’alimentation
s’allume lorsque le radiateur est mis en marche.
THERMOSTAT NUMÉRIQUE
Votre radiateur est doté d’un thermostat numérique qui
vous permet de le régler à votre niveau de confort préféré.
Mode d’emploi :
1. Presser le bouton Mode « » allume le radiateur et le
règle automatiquement au réglage haut. Presser « »
2. À l’heure choisie, le radiateur s’allumera au réglage
auto matique « Auto HI », à 75 degrés Fahrenheit ou
24 degrés Celsius, et fonctionnera pendant 2 heures.
3. À la mise en marche du radiateur, le voyant de mise
sous tension apparaîtra et une petite horloge
s’affichera, signe que la minuterie est activée.
4. Vous pouvez arrêter la minuterie en appuyant sur son
bouton « » pour ainsi la remettre à zéro, attendre que
la durée programmée soit écoulée ou bien presser le
bouton de mode « ».
INSTRUCTIONS POUR L’OSCILLATION
1. Sélectionnez les réglages de température et de mode
désirés et appuyez sur le Bouton d’oscillation « ».
2. Pour arrêter l’oscillation, appuyez une nouvelle fois sur
le Bouton d’oscillation « ».
3. Ne tournez pas l’appareil sur la base à la main. Il a été
conçu pour tourner par oscillation motorisée
seulement.
INSTRUCTIONS POUR LA TÉLÉCOMMANDE
1. Avant d’utiliser la télécommande, insérez 2 piles AAA
(non incluses) dans le compartiment arrière.
• N’utilisez pas simultanément des piles usées avec des
piles neuves.
• N’utilisez pas simultanément des piles alcalines,
standard (carbone-zinc) ou rechargeables (nickel-
cadmium).
La télécommande de cet appareil peut contrôler toutes
les fonctions du panneau de commande. Notez que la
télécommande ne fonctionne pas à travers les murs.
ALIMENTATION : Pour mettre la chaufferette en
marche, appuyez sur Mode/On, pour l’arrêter, appuyez
sur le bouton Mode/On et faites défiler jusqu’à OFF.
MODES : Pour faire défiler les différents modes, soit LO,
HI, AL et AH, appuyez sur le Bouton de mode jusqu’à ce
que vous atteigniez le mode désiré.
OSCILLATION : Pour lancer l’oscillation, appuyez une
fois sur le Bouton d’oscillation « ». Pour arrêter
l’oscillation, appuyez une nouvelle fois sur ce Bouton
d’oscillation « ».
TEMPÉRATURE : Pour augmenter la température de
consigne, appuyez sur le Bouton d’augmentation de la
température « ». Pour diminuer la température de
consigne, appuyez sur le Bouton de réduction de la
température « ».
MINUTERIE : Pour activer la minuterie au moyen de la
télécommande, appuyez sur le Bouton « Timer ». Vous
pouvez ensuite appuyer sur les Boutons d’augmentation
« » et de réduction « » de la température, vous
permettant ainsi de régler, par incréments de 1 heure, la
mise en fonction et hors fonction du radiateur, jusqu’à 24
heures à l’avance. Pour de plus amples renseignements,
veuillez consulter la section plus haut sur la minuterie
programmable.
Un porte-télécommande est incorporé dans le radiateur
pour votre commodité.
NETTOYAGE/ENTRETIEN
Entretien lors de la saison d’utilisation :
1. Débranchez toujours le radiateur avant le nettoyage.
2. Nettoyez l’appareil à l’aide d’un chiffon doux, humecté
d’une solution de savon doux.
3. N’utilisez JAMAIS des produits abrasifs ou des solvants
inflammables pour nettoyer l’appareil.
4. Après le nettoyage, séchez l’appareil avec un chiffon ou
une serviette.
Entretien après la saison d’utilisation :
1. Rangez le radiateur dans un endroit frais et sec.
2. Le fabricant vous recommande d’entreposer l’appareil
dans sa boîte d’origine.
* Conseil : Après un certain temps, de la poussière peut
s’accumuler sur les grilles avant. Vous pouvez enlever la
poussière avec un chiffon humecté. Débranchez
toujours l’appareil et laissez-le refroidir avant de le
nettoyer.
DÉPANNAGE
Si votre radiateur ne fonctionne pas :
• DÉBRANCHEZ L’APPAREIL.
• Assurez-vous que la prise électrique et le disjoncteur
fonctionnent de manière appropriée.
• Vérifiez s’il y a des obstructions. Si vous découvrez une
obstruction, mettez le radiateur hors fonction et
débranchez l’appareil. Enlevez l’obstruction avec soin
et suivez les instructions de réinitialisation.
• Il se peut que la température soit réglée à un niveau
trop bas. Réglez le thermostat jusqu’à ce que le
radiateur se mette en marche.
Radiateur
numérique à
trois éléments
céramique
MODÈLE
BCH6151-CN
Si vous avez des questions sur le produit ou que vous
voulez en savoir plus sur d’autres produits Bionaire
MD
,
veuillez vous adresser à notre Service client au
1-800-253-2764. Vous pouvez aussi vous rendre sur notre
site Web, à www.bionaire.com.
Lisez les instructions avant d’utiliser l’appareil.
Conservez-les pour référence future.
Guide d’utilisation
☎
LIGNE DE RENSEIGNEMENTS
Si, après avoir lu ce guide, vous avez des
questions ou des commentaires concernant
votre radiateur, veuillez nous téléphoner au
1-800-253-2764 en Amérique du Nord.
127671/9100020009457
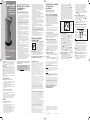
Bouton
de mode
Bouton
de la
minuterie
Bouton «plus»
température/
minuterie
Bouton «moins»
température/
minuterie
Fig. 1
Bouton
d’oscillation
DEL de détecteur de télécommande
Fig. 2
Bouton
«plus» de
température
Bouton
«moins» de
température
Bouton
Mode/On
Bouton de
la minuterie
Bouton
d’oscillation
BCH6151-CN_08EFM2.qxd :127671 5/26/08 4:45 PM Page 2
-
 1
1
-
 2
2


Bionaire BCH6151 Manuel utilisateur
- Catégorie
- Chauffe-eau
- Taper
- Manuel utilisateur
- Ce manuel convient également à
dans d''autres langues
- English: Bionaire BCH6151 User manual
Documents connexes
-
Bionaire BCH3620CN08EFM1 Manuel utilisateur
-
-
-
-
-
-
-
-