La page est en cours de chargement...

2
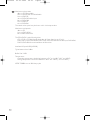
Contents - Inhalt - Table des matières
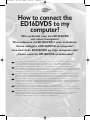
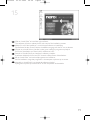
How to connect the ED16DVDS to my computer? 5
How to disconnect the ED16DVDS without shutting down the computer? 23
How to capture video from a digital DV-camcorder? 27
How to make a video disc? 37
How to watch video? 45
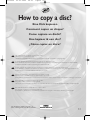
How to copy a disc? 51
How to make a Data disc? 57
How to make an Audio disc? 65
How to find warranty information? 73
FAQ, Frequently Asked Questions 77
Specifications 91
Safety Precautions 98
Wie verbindet man den ED16DVDS mit einen Computer? 5
Wie kann man die Verbindung zum ED16DVDS trennen,
ohne den Computer herunterzufahren? 23
Videos von einem digitalen DV-Camcorder aufnehmen 27
Wie erstellt man eine Video Disk? 37
Wie kann man sich Videos ansehen? 45
Eine Disk kopieren 51
Eine Daten-Disk erstellen 57
Erstellen einer Audio-Disk 65
Wie findet man Garantie-Informationen? 73
FAQ, Häufig gestellte Fragen 80
Technische Daten 93
Safety Precautions 98
Raccordement du ED16DVDS à mon ordinateur 5
Comment débrancher l’ED16DVDS sans arrêter l’ordinateur? 23
Comment acquérir les images vidéo d’une caméra numérique DV ? 27
Comment créer un disque vidéo? 37
Comment regarder des vidéos ? 45
Comment copier un disque? 51
Comment créer un disque de données? 57
Comment créer un disque audio? 65
Comment trouver les informations relatives à la garantie? 73
FAQ, Questions fréquentes 82
Caractéristiques techniques 94
Safety Precautions 98
UK
D
F
ED16DVDS 03-01-2005 08:58 Pagina 2
La page est en cours de chargement...
La page est en cours de chargement...

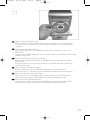
5
How to connect the
ED16DVDS to my
computer?
Wie verbindet man den ED16DVDS
mit einen Computer?
Raccordement du ED16DVDS à mon ordinateur
Come collegare il ED16DVDS al computer?
Hoe sluit ik de ED16DVDS op mijn computer aan?
¿Cómo conectar ED16DVDS al ordenador?
UK
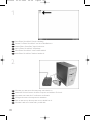
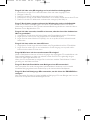
The next pages show how to connect your new ED16DVDS to a computer. Since there are many brands and types of
computers available, the next photographs show only examples on how your ED16DVDS could be installed.
For specific information on your computer, please refer to your computer manual or contact your local dealer.
D
Auf den nächsten Seiten wird erläutert, wie Sie Ihren neuen ED16DVDS mit einem Computer verbinden können.
Da Computer von vielen Herstellern in verschiedenen Ausführungen und Typen angeboten werden,zeigen die nachstehenden
Fotos nur Beispiele für eine mögliche Installation Ihres ED16DVDS.Für spezielle Informationen zu Ihrem Computer schlagen Sie
in Ihrem Computer-Handbuch nach oder erkundigen Sie sich bei Ihrem Fachhändler vor Ort.
F
Les pages qui suivent décrivent le raccordement de votre nouveau ED16DVDS à un ordinateur.Du fait de la diversité des
marques et des types d’ordinateur, les photographies suivantes ne montrent que quelques exemples d’installation de votre
ED16DVDS.Pour plus de détails sur votre ordinateur, consultez le manuel qui l’accompagne ou contactez votre revendeur.
I
Nelle seguenti pagine viene spiegato come collegare il vostro nuovo ED16DVDS ad un computer.
Data l'ampia gamma di marche e modelli di computer disponibile sul mercato, le seguenti fotografie vanno considerate come
un esempio di possibile installazione del ED16DVDS. Per ottenere informazioni specifiche per il tipo di computer utilizzato,
consultate la guida utente del sistema o contattate il vostro rivenditore.
NL
De volgende pagina's geven aan hoe u uw nieuwe ED16DVDS op een computer aansluit.
Er zijn zo veel typen computers dat de foto's alleen voorbeelden kunnen aangeven van het monteren van uw ED16DVDS.
Raadpleeg de handleiding van uw computer of neem contact op met uw leverancier voor meer informatie over uw computer.
E
En las páginas siguientes se muestra cómo conectar la nueva ED16DVDS a un ordenador.
Debido a que hay muchas marcas y tipos de ordenadores en el mercado, las fotografías siguientes muestran únicamente
algunos ejemplos de instalación de ED16DVDS. Para obtener información específica acerca de su ordenador,
consulte el manual del ordenador o póngase en contacto con su distribuidor local.
ED16DVDS 03-01-2005 08:58 Pagina 5

6
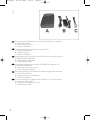
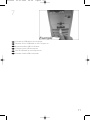
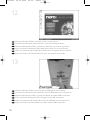
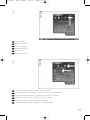
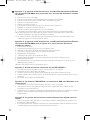
You will find a ED16DVDS device and following cables in the retail box
A: ED16DVDS device.
B: Power supply (2 parts).
C: HiSpeed USB Cable.
Der Verpackungskarton enthält die folgenden Teile:
A: ED16DVDS Laufwerk.
B: Netzteil (2 Teile).
C: HiSpeed USB-Kabel.
L’emballage contient un périphérique ED16DVDS et les câbles suivants :
A : Périphérique ED16DVDS
B : Alimentation (2 éléments)
C : Câble USB haut débit
La confezione include una periferica ED16DVDS ed i seguenti cavi
A: Periferica ED16DVDS.
B: Alimentatore (2 componenti).
C: Cavo USB ad alta velocità.
De retailverpakking van de ED16DVDS bevat de volgende onderdelen:
A: ED16DVDS-eenheid.
B: Voedingseenheid (2 onderdelen)
C: HiSpeed USB-kabel.
En la caja encontrará un dispositivo ED16DVDS y los siguientes cables
A: Dispositivo ED16DVDS.
B: Fuente de alimentación (2 piezas).
C: Cable HiSpeed USB.
E
NL
I
F
D
UK
1
ED16DVDS 03-01-2005 08:58 Pagina 6

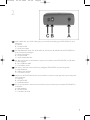
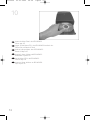
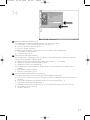
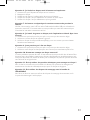
At the back side, you will find the plugs you need for connecting your ED16DVDS to your
computer.
A: Power.
B: HiSpeed USB.
C: Audio connector.
Auf der Rückseite finden Sie die Anschlüsse, die Sie zum Anschließen Ihres ED16DVDS an
Ihren Computer benötigen.
A: Stromversorgung.
B: HiSpeed USB.
C: Audio-Steckverbinder.
Au dos se trouvent les connecteurs requis pour brancher votre ED16DVDS à l’ordinateur.
A : Alimentation
B : Port USB haut débit
C : Connecteur audio
Sul retro, si trovano le connessioni per collegare l'ED16DVDS al vostro computer.
A: Alimentazione.
B: USB ad alta velocità.
C: Connettore audio.
Achter op de ED16DVDS vindt u de connectors waarmee u het apparaat op uw computer
kunt aansluiten.
A: Voeding.
B: HiSpeed USB.
C: Audioconnector.
En la parte posterior encontrará las conexiones que necesita para conectar ED16DVDS al
ordenador.
A: Alimentación.
B: HiSpeed USB.
C: Conector de audio.
E
NL
I
F
D
UK
7
2
ED16DVDS 03-01-2005 08:58 Pagina 7

8
3
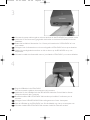
Connect the power cables together and connect them to the ED16DVDS and a power outlet.
Verbinden Sie die Stromversorgungskabel miteinander und mit dem ED16DVDS und einer
Steckdose.
Raccordez les câbles d’alimentation l’un à l’autre puis branchez-les à l’ED16DVDS et à une
prise secteur.
Collegate i cavi di alimentazione tra loro e collegateli tra l'ED16DVDS ed una presa elettrica.
Verbind de voedingskabels met elkaar en sluit ze daarna op de ED16DVDS en op een
stopcontact.
Conecte los cables de alimentación entre sí y conéctelos a ED16DVDS y a una toma eléctrica.
E
NL
I
F
D
UK
Plug the USB cable in the ED16DVDS.
Do not connect the cable to the computer at this moment.
Verbinden Sie das USB-Kabel mit dem ED16DVDS.Verbinden Sie das Kabel zu diesem
Zeitpunkt nicht mit dem Computer.
Branchez le câble USB à l’ED16DVDS. Ne branchez pas le câble à l’ordinateur pour le
moment.
Collegate il cavo USB all'ED16DVDS. Non collegate ancora il cavo al computer.
Sluit de USB-kabel op de ED16DVDS aan. Sluit dit kabeltje nog niet op uw computer aan.
Conecte el cable USB a ED16DVDS. No conecte el cable al ordenador todavía.
E
NL
I
F
D
UK
4
ED16DVDS 03-01-2005 08:58 Pagina 8

9
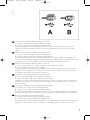
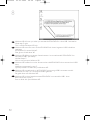
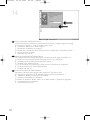
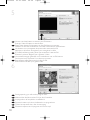
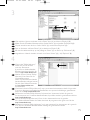
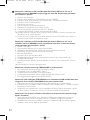
Search for the HiSpeed USB connector on your PC.
A: Logo for the preferred HiSpeed USB or connector.
B: Logo for the alternative LowSpeed USB connector.
When connected to LowSpeed USB (or USB 1.x), speeds are limited (4x writing and 6x
reading on CD, 0,7x reading on DVD) and it is not possible to write on DVD or to watch
video.
Suchen Sie den HiSpeed USB-Anschluss an Ihrem PC.
A: Logo für den bevorzugten HiSpeed USB-Anschluss.
B: Logo für den alternativen LowSpeed USB-Anschluss.
Wenn eine Verbindung mit dem LowSpeed USB-Anschluss (oder USB 1.x) hergestellt wird,
sind die Geschwindigkeiten begrenzt (4 fach Schreiben und 6fach Lesen von CD, 0,7 fach Lesen
von DVD) und ist es nicht möglich, auf DVD zu schreiben oder Videos zu sehen.
Repérez le connecteur USB haut débit de votre PC.
A : Logo représentant le port USB haut débit ou le connecteur principal
B : Logo représentant le connecteur USB 1.x
Lorsque le câble est connecté au port USB bas débit (USB 1.x), la vitesse est limitée (4x en
écriture et 6x en lecture pour les CD, 0,7x en lecture pour les DVD), et il n’est pas possible
d’enregistrer des DVD ni de regarder des vidéos.
Individuate il connettore USB ad alta velocità sul PC.
A: Logo connettore USB ad alta velocità (preferibile).
B: Logo connettore USB a bassa velocità (in alternativa).
Utilizzando una connessione USB a bassa velocità (o USB 1.x), le velocità sono limitate (4x in
scrittura e 6x in lettura su CD, 0,7x in lettura su DVD) e non è possibile scrivere su DVD né
guardare video.
Zoek op uw computer naar de HiSpeed USB-connector.
A: Symbool voor snelle HiSpeed USB-connector.
B: Symbool voor tragere LowSpeed USB-connector.
Bij een LowSpeed USB-verbinding (versie USB 1.x) zijn de snelheden beperkt (4x schrijven en
6x lezen bij CD, 0,7x lezen van DVD) en kunt u niet op een DVD schrijven of video afspelen.
Busque el conector HiSpeed USB en el PC.
A: Logotipo del conector HiSpeed USB preferente.
B: Logotipo del conector LowSpeed USB alternativo.
Con la conexión a LowSpeed USB (o USB 1.x), las velocidades están limitadas (escritura a 4x y
lectura a 6x en CD, lectura a 0,7x en DVD) y no es posible grabar en DVD ni ver vídeo.
E
NL
I
F
D
UK
5
ED16DVDS 03-01-2005 08:58 Pagina 9
La page est en cours de chargement...
La page est en cours de chargement...

12
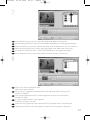
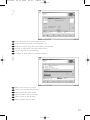
Windows XP will warn you when you connect the ED16DVDS to a slow USB 1 connection.
Check step 5 again.
This is valid for Windows XP only.
Windows XP warnt Sie, wenn Sie das ED16DVDS mit einem langsamen USB 1-Anschluss
verbinden.
Kontrollieren Sie erneut Schritt 5.
Dies gilt nur für Windows XP.
Windows XP affiche un message d'avertissement si vous avez branché l'ED16DVDS à un
connecteur USB 1 (bas débit).
Vérifiez l’étape 5.
Cela ne vaut que pour Windows XP.
Windows XP emetterà un avviso alla connessione dell'ED16DVDS ad una connessione USB 1
lenta.
Verificate nuovamente il punto 5.
Questa procedura è valida solo per Windows XP.
Windows XP waarschuwt als u de ED16DVDS op een trage USB 1-connector aansluit.
Controleer via stap 5 of u de juiste connector gebruikt.
Dit geldt alleen voor Windows XP.
Windows XP le avisará cuando conecte ED16DVDS a una conexión USB 1 lenta.
Revise de nuevo el paso 5.
Esto es válido sólo para Windows XP.
E
NL
I
F
D
UK
8
ED16DVDS 03-01-2005 08:58 Pagina 12
La page est en cours de chargement...
La page est en cours de chargement...

15
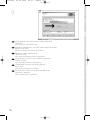
Windows 98 Second Edition only!
Insert the Nero disc in the CDROM device of your computer, not in the ED16DVDS.
If you do not have a CD-ROM on your computer, please refer to the Frequently Asked
Questions.
Nur Windows 98 Second Edition!
Legen Sie die Nero-CD in das CDROM-Laufwerk Ihres Computers ein, nicht in das
ED16DVDS.
Wenn Sie kein CDROM-Laufwerk in Ihrem Computer haben, sehen Sie bitte bei den häufig
gestellten Fragen nach.
Windows 98 Deuxième Édition uniquement !
Insérez le disque Nero dans le lecteur de CD-ROM de votre ordinateur, et non dans
l’ED16DVDS.
Si votre ordinateur n’est pas équipé d’un lecteur de CD-ROM, consultez la section des
Questions fréquentes.
Solo per Windows 98 Second Edition!
Inserite il disco Nero nell'unità CDROM del computer, non nell'ED16DVDS.
Se nel computer non è installata un'unità CD-ROM, consultate le Domonde frequenti.
Alleen voor Windows 98 Tweede Edition!
Leg de Nero-disc in het CD-ROM-station van uw computer, niet in de ED16DVDS.
Heeft uw computer geen CD-ROM-station, kijk dan bij “Vaak gestelde vragen”.
Sólo para Windows 98 Second Edition
Inserte el disco de Nero en la unidad de CDROM del ordenador, no en ED16DVDS.
Si el ordenador no tiene CD-ROM, consulte la sección Preguntas frecuentes.
E
NL
I
F
D
UK
11
ED16DVDS 03-01-2005 08:58 Pagina 15
La page est en cours de chargement...

17
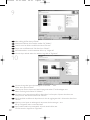
Windows 98 Second Edition only!
The “Add New Hardware Wizard” will pop up. Follow these steps:
A. Click “Next” in “The wizard searches for new drivers…:”.
B. Choose “Search for the best drivers…”
C. Choose “Specify a location”.
D. Browse to the directory “Philips drivers” on the Nero disc and click Next.
E. The drivers will be installed.
F. Continue with step 15.
Nur Windows 98 Second Edition!
Der Assistent zum Hinzufügen neuer Hardware (“Add New Hardware Wizard”) erscheint.
Führen Sie die folgenden Schritte durch:
A. Klicken Sie bei “Der Assistent sucht nach neuen Treibern…:” auf “Weiter” .
B. Wählen Sie “Suche nach den besten Treibern…”
C. Wählen Sie “Einen Ort spezifizieren”.
D. Durchsuchen Sie das Verzeichnis “Philips drivers” auf der Nero-CD und klicken Sie auf
“Weiter”.
E. Die Treiber werden installiert.
F. Fahren Sie mit Schritt 15 fort.
Windows 98 Deuxième Édition uniquement !
L’Assistant Ajout de nouveau matériel apparaît. Procédez comme suit :
A. Cliquez sur « Suivant » lorsque le message « L’Assistant recherche de nouveaux pilotes… »
apparaît.
B. Choisissez « Rechercher le meilleur pilote pour votre périphérique… ».
C. Choisissez « Emplacement spécifique ».
D. Accédez au répertoire « Philips drivers » sur le disque Nero puis cliquez sur Suivant.
E. Les pilotes sont alors installés.
F. Passez à l’étape 15.
F
D
UK
14
ED16DVDS 03-01-2005 08:58 Pagina 17
La page est en cours de chargement...

19
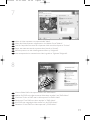
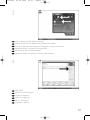
Click on “Install Suite” to install the main software.
The software will ask to reboot the PC at the end of the installation process.
Klicken Sie auf “Suite installieren”, um die Haupt-Software zu installieren.
Die Software fordert Sie am Ende des Installationsvorgangs auf, den PC neu zu booten.
Cliquez sur « Install Suite » (installer la suite) pour installer le programme principal.
À la fin de l’installation, vous êtes invité à redémarrer le PC.
Fate clic su "Installa Suite" per installare il software principale.
Il software richiederà di riavviare il PC al termine del processo d'installazione.
Klik op “Install Suite” om het hoofdprogramma te installeren.
Na het installeren vraagt het programma u de computer opnieuw op te starten.
Haga clic en “Install Suite” para instalar el software principal.
El programa le pedirá que reinicie el PC al final del proceso de instalación.
E
NL
I
F
D
UK
15
ED16DVDS 03-01-2005 08:58 Pagina 19

Remember the typenumber of your ED16DVDS, which is located on the sticker on the
bottom of the device.
This model number will allow you to find easily information and updates on the Philips website:
www.philips.com/support
Merken Sie sich die Modellnummer Ihres ED16DVDS – sie befindet sich auf dem Aufkleber am
Boden des Geräts.
Mit Hilfe dieser Modellnummer können Sie auf einfache Weise Informationen und Updates auf
der Philips Website finden: www.philips.com/support
N’oubliez pas la référence du modèle de votre ED16DVDS ; elle est indiquée sur l’autocollant
situé en dessous du périphérique.
Ce numéro vous permettra de retrouver facilement des informations et des mises à jour sur le
site web de Philips : www.philips.com/support
Annotate il numero di modello dell'ED16DVDS, situato sull'etichetta applicata sul fondo della
periferica.
Questo numero è utile per rintracciare agevolmente informazioni ed aggiornamenti sul sito
Web Philips: www.philips.com/support
Onthoud het typenummer van uw ED16DVDS. U vindt dit nummer op een sticker onder op
het product.
Met dit nummer kunt u gemakkelijk extra informatie en updates vinden op de site van Philips:
www.philips.com/support
Recuerde el número de tipo de ED16DVDS, que figura en la etiqueta de la parte inferior del
dispositivo.
Este número de modelo le permite buscar información y actualizaciones fácilmente en el sitio
web de Philips: www.philips.com/support
E
NL
I
F
D
UK
16
20
ED16DVDS 03-01-2005 08:58 Pagina 20
La page est en cours de chargement...
La page est en cours de chargement...
La page est en cours de chargement...

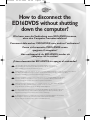
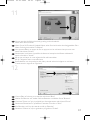
Click on “Safely remove USB…”.
Klicken Sie auf “USB auf sichere Weise entfernen…”.
Cliquez sur « Safely remove USB » (Retirer un périphérique USB en toute sécurité…).
Fate clic su “Rimozione sicura USB…”.
Klik op “USB veilig verwijderen…”.
Haga clic en “Quitar hardware con seguridad…”.
E
NL
I
F
D
UK
2
To disconnect the ED16DVDS without shutting down your computer, click on this symbol.
Um die Verbindung zum ED16DVDS zu trennen, ohne den Computer herunterzufahren,
klicken Sie auf dieses Symbol.
Pour déconnecter l’ED16DVDS sans arrêter l’ordinateur, cliquez sur cette icône.
Per disconnettere l'ED16DVDS senza spegnere il computer, fate clic su questo simbolo.
Klik op dit pictogram als u de ED16DVDS wilt ontkoppelen zonder uw computer uit te zetten.
Para desconectar ED16DVDS sin apagar el ordenador, haga clic en este símbolo.
E
NL
I
F
D
UK
1
24
ED16DVDS 03-01-2005 08:58 Pagina 24

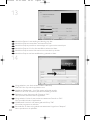
When this popup appears, you may disconnect the ED16DVDS
Wenn diese Anzeige erscheint, können Sie die Verbindung zum ED16DVDS trennen.
Lorsque ce message apparaît, vous pouvez déconnecter l’ED16DVDS.
Quando compare questo messaggio potete scollegare l'ED16DVDS
Als dit venster verschijnt, kunt u de ED16DVDS ontkoppelen.
Cuando aparezca esta pantalla, puede desconectar ED16DVDS
E
NL
I
F
D
UK
25
3
ED16DVDS 03-01-2005 08:58 Pagina 25
La page est en cours de chargement...

27
How to capture video from
a digital DV-camcorder?
Videos von einem digitalen DV-Camcorder aufnehmen
Comment acquérir les images vidéo
d’une caméra numérique DV ?
Come registrare un video da una DV-camcorder digitale?
Hoe kopieer ik de opnames van
een digitale DV-camcorder naar mijn computer?
¿Cómo capturar secuencias de vídeo
de una videocámara digital DV?
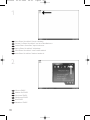
The application software used here is:
Nero Vision Express from Ahead Software
UK
This manual shows an example on how to capture video from a digital DV-camcorder which is connected via FireWire
(IEEE1394) to the computer.This product is for personal use only.
Unauthorized duplication and distribution of copyrighted materials is a violation of copyright law.
D
In diesem Handbuch wird an einem Beispiel gezeigt, wie ein Video von einem digitalen DV-Camcorder aufgenommen wird,der über
FireWire (IEEE1394) an den Computer angeschlossen ist. Dieses Produkt ist nur für den persönlichen Gebrauch.Die ungenehmigte
Vervielfältigung und der Vertrieb von urheberrechtlich geschützten Materialien stellt eine Verletzung des Urheberrechts dar.
F
Ce manuel illustre la procédure d’acquisition d’images vidéo à partir d’une caméra numérique DV connectée à l’ordinateur par
le biais d’un port FireWire (IEEE1394).Ce produit est à usage personnel exclusivement.
Toute duplication et diffusion non autorisée de matières soumises au droit d’auteur et de copie (copyright) constituent une
violation de la loi sur les droits d’auteur et de copie (copyright).
I
Questo manuale mostra un esempio di come registrare un video da una DV-camcorder digitale connessa al computer via
FireWire (IEEE1394). Questo prodotto è destinato ad un uso esclusivamente personale.
La duplicazione e la distribuzione di materiali protetti dal diritto d'autore rappresentano una violazione della legge sul copyright.
NL
Deze handleiding beschrijft het kopiëren van opnames gemaakt met een digitale DV-camcorder naar de computer via een
FireWire-aansluiting (IEEE1394). Dit product is alleen bedoeld voor eigen gebruik.
Het zonder toestemming vermenigvuldigen en verspreiden van auteursrechtelijk beschermd materiaal is wettelijk verboden.
E
Este manual muestra un ejemplo que explica cómo capturar una secuencia de vídeo de una videocámara digital DV conectada
al ordenador mediante el puerto FireWire (IEEE1394). Este producto es para uso personal exclusivamente.
La duplicación y distribución no autorizada de materiales con copyright es una violación de las leyes del copyright.
ED16DVDS 03-01-2005 08:58 Pagina 27
La page est en cours de chargement...
La page est en cours de chargement...

30
5
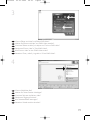
You can use these buttons to control your DV-camera.
Press the "record" button to record video.
Diese Tasten können Sie benutzen, um Ihre DV-Kamera zu steuern.
Drücken Sie die Taste "Aufnehmen", um Video-informationen aufzunehmen.
Ces boutons vous permettent de commander votre caméra DV.
Appuyez sur le bouton "Enregistrer" pour enregistrer la vidéo.
E' possibile utilizzare questi pulsanti per controllare la camera-DV.
Premere il pulsante "Registra" per registrare il video.
U kunt deze knoppen gebruiken voor het bedienen van uw DV-camera.
Druk op de knop "Opnemen" om video op te nemen.
Estos botones permiten controlar la cámara DV.
Pulse el botón "Grabar" para grabar vídeo.
E
NL
I
F
D
UK
6
During capturing, you will see the progress here.
Während der Aufnahme sehen Sie hier den Fortschritt.
La progression de l’acquisition est affichée ici.
Durante la cattura qui viene visualizzata la sua progressione.
Tijdens het opnemen ziet u hier de voortgang.
Durante la captura, verá el progreso de la misma aquí.
E
NL
I
F
D
UK
ED16DVDS 03-01-2005 08:58 Pagina 30

7
8
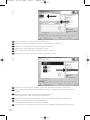
Choose "Make DVD with captured video" and "DVD-Video".
Wählen Sie "DVD mit aufgenommenen Videodaten erstellen" und "DVD-Video".
Choisissez "Créer un DVD avec la vidéo capturée" et "DVD-Vidéo".
Selezionare "Crea DVD con video acquisito" e "DVD-Video".
Kies "DVD met vastgelegde video maken" en dan "DVD-Video".
Seleccione "Crear DVD con vídeo capturado" y "DVD-Vídeo".
E
NL
I
F
D
UK
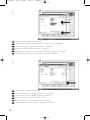
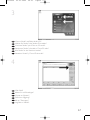
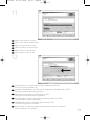
When all video sequences are captured, click "Next".
Wenn alle Videosequenzen aufgenommen sind, klicken Sie auf "Weiter".
Une fois l’acquisition de toutes les séquences vidéo terminée, cliquez sur "Suivant".
Dopo aver catturato tutte le sequenze video, fare clic su "Avanti".
Na het opnemen van alle videofragmenten klikt u op "Volgende".
Una vez capturadas las secuencias de vídeo, haga clic en "Siguiente"."Volgende".
E
NL
I
F
D
UK
31
ED16DVDS 03-01-2005 08:58 Pagina 31

32
9
10
In the Edit Movie screen, you can add transitions, texts, … and you can trim the recorded
video.When done, click "Next".
Auf der Anzeige Edit Movie können Sie Übergänge,Texte, … hinzufügen und die aufgezeich-
neten Videoinformationen schneiden.Wenn Sie fertig sind, klicken Sie auf "Weiter".
L’écran Edit Movie vous permet d'ajouter des transitions, du texte, etc., ainsi que de couper les
enregistrements effectués. Lorsque vous avez terminé, cliquez sur "Suivant".
Nello schermo Edit Movie, è possibile aggiungere transizioni, testi ... ed anche tagliare il video
registrato.Al termine, fare clic su "Avanti".
In het scherm "Edit Movie" kunt u overgangen, tekst enz. toevoegen en de opgenomen video
verfraaien. Klik op "Volgende" zodra u tevreden bent.
En la pantalla Edit Movie puede añadir transiciones, textos, etc., así como recortar el vídeo
grabado. Cuando termine, haga clic en "Siguiente".
E
NL
I
F
D
UK
The captured movies are shown here.You can edit them by choosing "Edit Movie".
Hier werden die aufgenommenen Filme gezeigt. Sie können sie editieren, indem Sie "Edit
Movie" wählen.
Les séquences disponibles sont répertoriées ici.Vous pouvez les monter en choisissant "Edit
Movie".
Qui sono visualizzati i filmati catturati. E' possibile modificarli selezionando "Edit Movie".
Hier ziet u de vastgelegde films. U kunt die bewerken door "Edit Movie" te kiezen.
Los vídeos capturados se muestran aquí. Puede editarlos seleccionando "Edit Movie".
E
NL
I
F
D
UK
ED16DVDS 03-01-2005 08:58 Pagina 32

33
11
12
After editing all files, click "Next".
Nach dem Editieren aller Dateien klicken Sie auf "Weiter".
Une fois tous les fichiers modifiés, cliquez sur "Suivant".
Dopo aver modificato tutti i file, fare clic su "Avanti".
Na het bewerken van alle bestanden klikt u op "Volgende".
Cuando haya editado todos los archivos, haga clic en "Siguiente".
E
NL
I
F
D
UK
You can change the layout, the background, add titles,… here.
When done, click "Next".
Hier können Sie das Layout und den Hintergrund ändern,Titel hinzufügen, usw.
Wenn Sie fertig sind, klicken Sie auf "Weiter".
Cet écran vous permet de modifier la disposition, l'arrière-plan, d'ajouter des titres, etc.
Lorsque vous avez terminé, cliquez sur "Suivant".
Qui è possibile modificare la disposizione, lo sfondo, aggiungere titoli....Al termine,
fare clic su "Avanti".
Hier kunt u de layout en achtergrond aanpassen, titels toevoegen ... enz.
Klik op "Volgende" zodra u tevreden bent.
Aquí puede cambiar la presentación, el fondo, añadir títulos, etc.
Cuando termine, haga clic en "Siguiente".
E
NL
I
F
D
UK
ED16DVDS 03-01-2005 08:59 Pagina 33

34
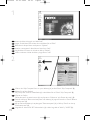
14
13
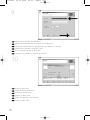
Choose "Burn to", choose your recorder and click "Burn".
Wählen Sie "Brennen auf", wählen Sie Ihren Recorder und klicken Sie auf "Brennen".
Choisissez "Graver vers" puis le périphérique d’enregistrement et cliquez sur "Graver".
Selezionare "Masterizza Su", specificare il recorder e fare clic su "Scrivi".
Kies "Branden naar", kies de recorder en klik op "Branden".
Seleccione "Grabar en", elija su grabadora y haga clic en "Grabar".
E
NL
I
F
D
UK
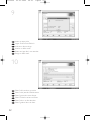
You can preview the finished movie by pressing on the thumbnails.
When done, click "Next".
Wenn Sie auf die Thumbnail-Symbole klicken, sehen Sie eine Vorschau des fertigen Films.
Wenn Sie fertig sind, klicken Sie auf "Weiter".
Vous pouvez afficher un aperçu du film en appuyant sur les miniatures.Lorsque vous avez
terminé, cliquez sur "Suivant".
Selezionando le miniature è possibile visualizzare un'anteprima del filmato realizzato.Al
termine, fare clic su "Avanti".
Klik op een miniatuur als u een afgeronde film wilt beoordelen.
Klik op "Volgende" zodra u tevreden bent.
Puede obtener una vista preliminar del vídeo pulsando sobre las imágenes en miniatura.
Cuando termine, haga clic en "Siguiente".
E
NL
I
F
D
UK
ED16DVDS 03-01-2005 08:59 Pagina 34

16
15
NeroVision Express is transcoding and burning your disc.
NeroVision Express transcodiert und brennt Ihre Disk.
NeroVision Express procède au transcodage et à la gravure de votre disque.
NeroVision Express è in fase di trascodifica e scrittura del disco.
NeroVision Express zet de informatie om en brandt die op de disc.
NeroVision Express está transcodificando y grabando el disco.
E
NL
I
F
D
UK
35
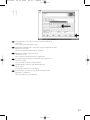
Congratulations, your disc has been written successfully. Click "OK".
You may exit the application now.
Herzlichen Glückwunsch – Ihre Disk wurde erfolgreich erstellt. Klicken Sie auf "OK".
Sie können jetzt die Anwendung verlassen.
Félicitations, votre disque est prêt. Cliquez sur "OK".
Vous pouvez maintenant fermer l’application.
Congratulazioni, il disco è stato scritto correttamente. Fare clic su "OK".
Ora è possibile chiudere l'applicazione.
Gefeliciteerd! Uw disc is met succes gebrand. Klik op "OK".
U kunt het programma nu afsluiten.
Enhorabuena, su disco se ha grabado correctamente. Haga clic en "Aceptar".
Ahora puede cerrar la aplicación.
E
NL
I
F
D
UK
ED16DVDS 03-01-2005 08:59 Pagina 35
La page est en cours de chargement...
La page est en cours de chargement...
La page est en cours de chargement...
La page est en cours de chargement...
La page est en cours de chargement...
La page est en cours de chargement...
La page est en cours de chargement...
La page est en cours de chargement...
La page est en cours de chargement...
La page est en cours de chargement...
La page est en cours de chargement...
La page est en cours de chargement...
La page est en cours de chargement...
La page est en cours de chargement...
La page est en cours de chargement...
La page est en cours de chargement...
La page est en cours de chargement...
La page est en cours de chargement...
La page est en cours de chargement...
La page est en cours de chargement...
La page est en cours de chargement...
La page est en cours de chargement...
La page est en cours de chargement...
La page est en cours de chargement...
La page est en cours de chargement...
La page est en cours de chargement...
La page est en cours de chargement...
La page est en cours de chargement...
La page est en cours de chargement...
La page est en cours de chargement...
La page est en cours de chargement...
La page est en cours de chargement...
La page est en cours de chargement...
La page est en cours de chargement...
La page est en cours de chargement...
La page est en cours de chargement...
La page est en cours de chargement...
La page est en cours de chargement...
La page est en cours de chargement...
La page est en cours de chargement...
La page est en cours de chargement...
La page est en cours de chargement...
La page est en cours de chargement...
La page est en cours de chargement...
La page est en cours de chargement...
La page est en cours de chargement...
La page est en cours de chargement...
La page est en cours de chargement...
La page est en cours de chargement...
La page est en cours de chargement...
La page est en cours de chargement...
La page est en cours de chargement...
La page est en cours de chargement...
La page est en cours de chargement...
La page est en cours de chargement...
La page est en cours de chargement...
La page est en cours de chargement...
La page est en cours de chargement...
La page est en cours de chargement...
La page est en cours de chargement...
La page est en cours de chargement...
La page est en cours de chargement...
La page est en cours de chargement...
La page est en cours de chargement...
La page est en cours de chargement...
-
 1
1
-
 2
2
-
 3
3
-
 4
4
-
 5
5
-
 6
6
-
 7
7
-
 8
8
-
 9
9
-
 10
10
-
 11
11
-
 12
12
-
 13
13
-
 14
14
-
 15
15
-
 16
16
-
 17
17
-
 18
18
-
 19
19
-
 20
20
-
 21
21
-
 22
22
-
 23
23
-
 24
24
-
 25
25
-
 26
26
-
 27
27
-
 28
28
-
 29
29
-
 30
30
-
 31
31
-
 32
32
-
 33
33
-
 34
34
-
 35
35
-
 36
36
-
 37
37
-
 38
38
-
 39
39
-
 40
40
-
 41
41
-
 42
42
-
 43
43
-
 44
44
-
 45
45
-
 46
46
-
 47
47
-
 48
48
-
 49
49
-
 50
50
-
 51
51
-
 52
52
-
 53
53
-
 54
54
-
 55
55
-
 56
56
-
 57
57
-
 58
58
-
 59
59
-
 60
60
-
 61
61
-
 62
62
-
 63
63
-
 64
64
-
 65
65
-
 66
66
-
 67
67
-
 68
68
-
 69
69
-
 70
70
-
 71
71
-
 72
72
-
 73
73
-
 74
74
-
 75
75
-
 76
76
-
 77
77
-
 78
78
-
 79
79
-
 80
80
-
 81
81
-
 82
82
-
 83
83
-
 84
84
-
 85
85
-
 86
86
-
 87
87
-
 88
88
-
 89
89
-
 90
90
-
 91
91
-
 92
92
-
 93
93
-
 94
94
-
 95
95
-
 96
96
-
 97
97
-
 98
98
-
 99
99
-
 100
100


dans d''autres langues
- italiano: Philips ED16DVDSK/00 Manuale utente
- English: Philips ED16DVDSK/00 User manual
- español: Philips ED16DVDSK/00 Manual de usuario
- Deutsch: Philips ED16DVDSK/00 Benutzerhandbuch
- Nederlands: Philips ED16DVDSK/00 Handleiding
Documents connexes
-
Philips ED16DVDRK/00 Manuel utilisateur
-
-
-
-
Philips SPD3100CC-00 Manuel utilisateur
-
-
-
Philips SPD4002CC/12 Manuel utilisateur
-
-
Philips SPD3800CC/12 Manuel utilisateur