AT&T AT T DECT 6.0 expansion handset use Manuel utilisateur
- Catégorie
- Téléphones
- Taper
- Manuel utilisateur
Ce manuel convient également à

User’s manual
CL80119
DECT 6.0 expansion handset
for use with AT&T models
CL82219/CL82229/CL82319/
CL82419/CL83519

Congratulations
on your purchase of this AT&T product. Before using this AT&T
product, please read the Important safety information section on
pages pages 22-24 of this manual. For complete instructions,
please refer to the manual provided with your CL82219/CL82229/
CL82319/CL82419/CL83519 telephone. You can also visit our website at
www.telephones.att.com or call 1 (800) 222-3111. In Canada,
dial 1 (866) 288-4268.
This telephone meets the California Energy Commission regulations
for energy consumption. Your telephone is set up to comply with the
energy-conserving standards right out of the box. No further action is
necessary.
Model number: CL80119
Type: DECT 6.0 expansion handset
Serial number:
Purchase date:
Place of purchase:
Both the model and serial numbers of your AT&T product can be
found on the bottom of the telephone base.
Save your sales receipt and original packaging in case it is necessary
to return your telephone for warranty service.
©
2019 Advanced American Telephones. All Rights Reserved. AT&T and
the AT&T logo are trademarks of AT&T Intellectual Property licensed to
Advanced American Telephones, San Antonio, TX 78219. Printed in China.
The ENERGY STAR® program (www.energystar.gov) recognizes and
encourages the use of products that save energy and help protect
our environment. We are proud to supply this product with an
ENERGY STAR® qualied power adapter meeting the latest energy
eciency guidelines.
T
Compatible with
Hearing
Ai
d T-Coil
TIA
-1083
Telephones identied with this logo have reduced noise and
interference when used with most T-coil equipped hearing aids and
cochlear implants. The TIA-1083 Compliant Logo is a trademark of
the Telecommunications Industry Association. Used under license.

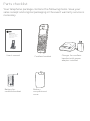
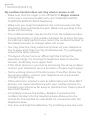
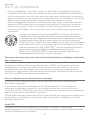
Your telephone package contains the following items. Save your
sales receipt and original packaging in the event warranty service is
necessary.
Battery for
cordless handset
Cordless handset
Charger for cordless
handset with power
adapter installed
Battery
compartment
cover
User’s manual
User’s manual
CL80119
DECT 6.0 expansion handset
for use with AT&T models
CL82219/CL82229/CL82319/
CL82419/CL83519
Parts checklist
THIS SIDE UP / CE CÔTÉ VERS LE HAUT
Battery Pack / Bloc-piles :
BT183342/BT283342 (2.4V 400mAh Ni-MH)
WARNING / AVERTISSEMENT :
DO NOT BURN OR PUNCTURE BATTERIES.
NE PAS INCINÉRER OU PERCER LES PILES.
Made in China / Fabriqué en chine CR1535

User’s manual
CL80119
DECT 6.0 expansion handset
for use with AT&T models
CL82219/CL82229/CL82319/CL82419/
CL83519
Table of contents
Getting started
Installation ............................................................................................................................. 1
Quick reference guide ..................................................................................................2
Charger installation .........................................................................................................6
Battery installation and charging ..........................................................................7
Registration and deregistration
Adding and registering handsets ........................................................................ 10
Deregistering handsets ..............................................................................................12
Appendix
Troubleshooting...............................................................................................................13
Maintenance .......................................................................................................................21
Important safety information ............................................................................... 22
Safety information .................................................................................................... 22
Especially about cordless telephones .......................................................... 23
Precautions for users of implanted cardiac pacemakers ..............24
Pacemaker patients .................................................................................................24
ECO mode .......................................................................................................................24
Especially about telephone answering systems...................................24
For C-UL compliance ....................................................................................................25
Mesures de sécurité importantes ..................................................................25
FCC Part 68 and ACTA ................................................................................................. 29
FCC Part 15 ...........................................................................................................................31
California Energy Commission battery charging testing
instructions .................................................................................................................... 32
Limited warranty ............................................................................................................ 33
Technical specications .............................................................................................36
DECT 6.0 digital technology ................................................................................36
Telephone operating range ................................................................................36
Redening long range coverage and clarity ............................................36
HD audio ...........................................................................................................................36
Simulated full-duplex handset speakerphone ......................................36

Getting started
1
See pages 7-9
for easy instructions.
You must install and
charge the battery before
using the telephone.
STOP!
Installation
Your product may be shipped with a protective sticker covering the
handset display - remove it before use.
For customer service or product information, visit our website at
www.telephones.att.com or call 1 (800) 222-3111.
In Canada, dial 1 (866) 288-4268.
Avoid placing the telephone base and the charger too close to:
Communication devices such as television sets, VCRs, or other
cordless telephones.
Excessive heat sources.
Noise sources such as a window with trac outside, motors,
microwave ovens, refrigerators, or uorescent lighting.
Excessive dust sources such as a workshop or garage.
Excessive moisture.
Extremely low temperature.
Mechanical vibration or shock such as on top of a washing
machine or workbench.

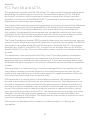
2
Getting started
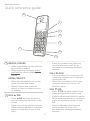
REDIAL/PAUSE
Press repeatedly to view the last
ten numbers dialed.
While entering numbers, press
and hold to insert a dialing
pause .
MENU/SELECT
When the handset is not in use,
press to show the menu.
While in the menu, press to
select an item or save an entry
or setting.
VOL DIR
Press DIR to show directory
entries when the handset is not
in use.
Press to scroll up while in menus.
While entering names or numbers,
press to move the cursor to the
right.
Quick reference guide
1
2
1
3
2
4
5
8
6
7
Press to increase the listening
volume when on a call, or to
increase the message playback
volume.
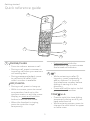
CALL BLOCK
Press to block the incoming call
when the telephone is ringing or
during the call .
When the handset is not in use,
press to show the Smart call
blocker menu.
VOL CID
Press CID to show caller ID log
when the handset is not in use .
Press to scroll down while in menus.
While entering names or numbers,
press to move the cursor to the
le.
Press to decrease the listening
volume when on a call, or to
decrease the message playback
volume.

Getting started
3
PHONE/FLASH
Press to make or answer a call.
During a call, press to answer an
incoming call when you receive a
call waiting alert.
During message playback, press
to call back the caller if the
caller’s number is available.
OFF/CANCEL
During a call, press to hang up.
While in a menu, press to cancel
an operation, back up to the
previous menu, or exit the menu
display; or press and hold this
button to exit to idle mode.
When the handset is ringing,
press to mute the ringer
temporarily.
Quick reference guide
4
3
1
3
2
4
5
8
6
7
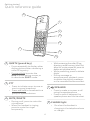
Press and hold while the
telephone is not in use to erase
the missed call indicator.
1
While reviewing a caller ID
log entry, press repeatedly to
add or remove 1 in front of
the telephone number before
dialing or saving it in the
directory.
Press and hold to set or to dial
your voicemail number.
TONE /a>A
Press to switch to tone dialing
temporarily during a call if you
have pulse service.
While entering names, press to
change the next letter to upper
or lower case.

4
Getting started
Quick reference guide
4
1
3
2
4
5
8
6
7
QUIET# (pound key)
Press repeatedly to display other
dialing options when reviewing a
caller ID log entry.
Press and hold to enter the
QUIET mode setting screen, or
to deactivate QUIET mode.
PTT
Press to initiate a one-to-one or
one-to-group broadcast.
Press and hold to broadcast to a
group of system devices.
MUTE/DELETE
During a call, press to mute the
microphone.
When the handset is ringing,
press to mute the ringer
temporarily.
While reviewing the caller ID log,
directory, redial memory, block list,
allow list, or star name list, press to
delete an individual entry.
While predialing, press to delete
digits.
During message or
announcement playback, press
to delete the playing message
or the recorded announcement.
/SPEAKER
Press to make or answer a call
using the speakerphone.
Press to switch between the
speakerphone and the handset.
CHARGE light
On when the handset is
charging in the telephone base
or charger.
5
6
7
8

Getting started
5
Quick reference guide
For complete instructions, refer to the manual provided with your
CL82219/CL82229/CL82319/CL82419/CL83519 telephone system. If
you are unable to nd your manual, go to
www.telephones.att.com/manuals to read and/or download
the manual.
Main menu
Play messages
Answering sys
Smart call blk
Directory
Caller ID log
Intercom
Ringers
Set date/time
Settings
Using menus:
Press MENU/SELECT to show the menu.
Press CID or DIR to scroll through menu items.
Press MENU/SELECT to conrm or save changes to a highlighted
menu item.
Press to cancel an operation, back up to the
previous menu, or exit the menu display.
The > symbol highlights
a menu item.
>Play messages
Answering sys
Main menu

6
Getting started
IMPORTANT INFORMATION
1. Use only the power adapter supplied with this product. To order a replacement
power adapter, visit our website at www.telephones.att.com or
call 1 (800) 222-3111. In Canada, dial 1 (866) 288-4268.
2. The power adapter is intended to be correctly oriented in a vertical or oor
mount position. The prongs are not designed to hold the plug in place if it is
plugged into a ceiling, under-the-table or cabinet outlet.
Install the charger, as shown below.
Charger installation
Plug the power adapter
into an electrical outlet not
controlled by a wall switch.

Getting started
7
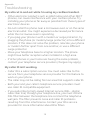
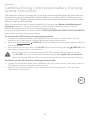
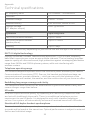
Install the battery, as shown on page 8. Once you have installed
the battery, the screen indicates the battery status (see the
following table). If necessary, place the handset in the telephone
base or charger to charge the battery. For best performance, keep
the handset in the telephone base or charger when not in use. The
battery is fully charged aer 10 hours of continuous charging. See
the table on page 36 for battery operating times.
If the screen shows Place in charger and ashes, you need to
charge the handset without interruption for at least 30 minutes to
give the handset enough charge to use the telephone for a short
time. The following table summarizes the battery charge indicators
and actions to take.
Battery indicators Battery status Action
The screen is blank, or
shows Put in charger
and (ashing).
Battery has no or
very little charge. The
handset cannot be
used.
Charge without interruption
(at least 30 minutes).
The screen shows
Low battery and
(ashing).
Battery has enough
charge to be used for a
short time.
Charge without interruption
(at least 30 minutes).
The screen shows
HANDSET X.
Battery is charged. To keep the battery
charged, place it in the
telephone base or charger
when not in use.
Note: If you are on a phone call in low battery mode, you hear four short beeps every minute.
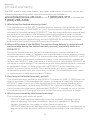
Battery installation and charging

8
Getting started
Battery installation and charging
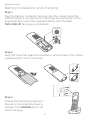
Step 1
Plug the battery connector securely into the socket inside the
handset battery compartment, matching the orientation of the
engraved label. Insert the supplied battery with the label
THIS SIDE UP facing up, as indicated.
Step 3
Charge the handset by placing it
face up in the telephone base or
charger. The CHARGE light is on
when charging.
Step 2
Align the cover at against the battery compartment, then slide it
upwards until it clicks into place.
THIS SIDE UP / CE CÔTÉ VERS LE HAUT
Battery Pack / Bloc-piles :
BT183342/BT283342 (2.4V 400mAh Ni-MH)
WARNING / AVERTISSEMENT :
DO NOT BURN OR PUNCTURE BATTERIES.
NE PAS INCINÉRER OU PERCER LES PILES.
Made in China / Fabriqué en chine CR1349
THIS SIDE UP

Getting started
9
IMPORTANT INFORMATION
1. Use only the supplied rechargeable battery or replacement battery
(model BT183342/BT283342). To order, visit our website at
www.telephones.att.com or call 1 (800) 222-3111.
In Canada, dial 1 (866) 288-4268.
2. If you do not use the handset for a long time, disconnect and remove
the battery to prevent possible leakage.
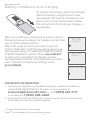
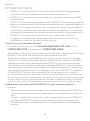
Aer you install your telephone or power returns
following a power outage, the handset will prompt
you to set the date and time.
Aer that, it will prompt if you want to set up
Smart call blocker* and the answering system via
voice guides (only for CL82219/CL82229/CL82319/
CL82419 telephone system). Press MENU/SELECT
to start when prompted. For details, see the
corresponding sections in the telephone system’s
user’s manual. To skip these settings, press
OFF/CANCEL.
Battery installation and charging
To replace the battery, press the tab and
slide the battery compartment cover
downwards. Li out the old battery and
disconnect it from the handset. Follow
the instructions to install and charge a
new battery.
SET DATE
MM/DD/YY
SET TIME
HH:MM --
Setup Ans sys?
* Includes licenced Qaltel
TM
technology.
Qaltel
TM
is a trademark of Truecall Group Limited.

10
Registration and deregistration
Before using a new CL80119 handset, you must register it with the
telephone base rst. The telephone system can support up to 12
handsets.
The handsets provided with your telephone system are already
registered as HANDSET 1, and so forth. Additional handsets
registered to the telephone system are assigned in sequential
order they are registered (up to HANDSET 12).
You must register each handset separately. When rst purchased, all
expansion handsets show To register HS, see manual.
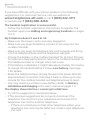
Register a handset to your telephone base for AT&T models
CL82219/CL82229/CL82319/CL82419/CL83519
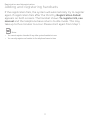
1. Before you begin registration, make sure the handset is out of the
telephone base or charger and shows To register HS, see manual.
2. Put the handset you wish to register on the telephone base cradle.
3. The IN USE light on the telephone base turns on. The handset
shows Registering... Please wait. When the registration is
successful, the handset shows HANDSET X Registered
(HANDSET represents the handset name, X represents the hand-
set number) and you hear a confirmation tone. The IN USE light
turns off. The handset is now registered with the telephone base.
For registration, put the handset on the
telephone base, not the handset charger.
Adding and registering handsets

Registration and deregistration
11
If the registration fails, the system will automatically try to register
again. If registration fails aer the third try, Registration Failed
appears on both screens. The handset shows To register HS, see
manual and the telephone base returns to idle mode. This may
take up to ve minutes to occur. Please start again from Step 1.
Notes:
You cannot register a handset if any other system handset is in use.
You can only register one handset to the telephone base at a time.
Adding and registering handsets

12
Registration and deregistration
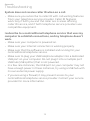
You may need to deregister your handsets if:
You have 12 registered handsets and need to replace a handset.
-OR-
You wish to change the designated handset number of your
registered handsets.
You must rst deregister ALL the handsets, and then register each
handset you wish to use again, one at a time.
Please read carefully through all the instructions on this page
before beginning the deregistration process.
Deregister all handsets from your telephone base for AT&T
models CL82219/CL82229/CL82319/CL82419/CL83519
In addition to the cordless handsets, this operation will also
deregister all cordless headsets and speakerphones registered to
your telephone base.
1. Press and hold /FIND HS on the telephone base for about 10
seconds until the IN USE light on the telephone base turns on
and starts to flash. Then, release the button.
2. Immediately press /FIND HS again. You must press the key
while the IN USE light is still flashing. The IN USE light flashes for
approximately five seconds.
3. The deregistration takes about 10 seconds to complete. If the
deregistration is successful, all handsets display To register HS,
see manual.
4. To register the handset(s) to the telephone base again, follow
the registration instructions on pages 10-11.
Notes:
If the deregistration fails, you may need to reset the system and try again. To reset, unplug the power
from the telephone base and plug it back in.
You cannot deregister the handset(s) if any other system handset is in use.
Even if the battery is depleted, you can still deregister the handset by following the steps mentioned on
the previous page. After the handset is charged for at least ten minutes, the screen shows To register
HS, see manual.
Deregistering handsets

Appendix
13
If you have diculty with your phone, please try the following
suggestions. For Customer Service, visit our website at
www.telephones.att.com or call 1 (800) 222-3111.
In Canada, dial 1 (866) 288-4268.
The handset registration is unsuccessful.
Follow the handset registration instructions to register the
handset again (see Adding and registering handsets on pages
10-11).
My telephone doesn’t work at all.
Make sure the power cord is securely plugged in.
Make sure you plug the battery connector securely into the
cordless handset.
Make sure you plug the telephone line cord securely and rmly
into the telephone base and the telephone wall jack.
Charge the battery in the cordless handset for at least 10 hours.
For optimum daily performance, return the cordless handset to
the telephone base or charger when not in use.
If the battery is depleted, it might take approximately 30 minutes
to charge the handset before it shows Low battery. See page
7 for details.
Reset the telephone base. Unplug the electrical power. Wait for
approximately 15 seconds, then plug it back in. Allow up to one
minute for the cordless handset and telephone base to reset.
You may need to purchase a new battery. Refer to Battery
installation and charging in this user’s manual on pages 7- 9.
The display shows No line. I cannot get a dial tone.
Try all the suggestions mentioned above.
If the previous suggestions do not work, disconnect the
telephone line cord from your telephone and connect the
telephone line cord to another telephone.
If there is no dial tone on that other telephone either, your
telephone line cord may be defective. Install a new telephone
line cord.
Troubleshooting

14
Appendix
If changing the telephone line cord does not help, the wall jack
(or the wiring to this wall jack) may be defective. Try using
a dierent wall jack in your home to connect your CL82219/
CL82229/CL82319/CL82419/CL83519 telephone, or contact your
telephone service provider (charges may apply).
I cannot dial out.
Try all the suggestions mentioned above.
Make sure you have a dial tone before dialing. The cordless
handset might take a second or two to nd the telephone base
and produce a dial tone. This is normal. Wait an extra second
before dialing.
Eliminate any background noise. Noise from a television, radio or
other appliances might cause the phone to not dial out properly.
If you cannot eliminate the background noise, try muting the
cordless handset before dialing, or dialing from another room
with less background noise.
If other phones in your home are having the same problem,
contact your telephone service provider (charges might apply).
My cordless handset isn’t performing normally.
Make sure you plug the power cord securely into the telephone
base. Plug the power adapter into a dierent, working electrical
outlet without a wall switch.
Move the cordless handset closer to the telephone base. You
might have moved out of range.
Reset the telephone base. Unplug the electrical power. Wait for
15 seconds, then plug it back in. Allow up to one minute for the
cordless handset and telephone base to reset.
Other electronic products such as HAM radios and other DECT
phones, can cause interference with your cordless phone. Try
installing your phone as far away as possible from these types of
electronic devices.
Troubleshooting

Appendix
15
Other electronic products such as HAM radios and other DECT
phones, can cause interference with your cordless phone. Try
installing your phone as far away as possible from these types of
electronic devices.
Out of range OR No pwr at base appears on my cordless handset.
Ensure you plug the telephone base in properly and the power is on.
Place the cordless handset in the telephone base for one minute
to allow the cordless handset and base to synchronize.
Move the cordless handset closer to the telephone base. You
might have moved out of range.
Reset the telephone base. Unplug the electrical power. Wait for
15 seconds, then plug it back in. Allow up to one minute for the
cordless handset and telephone base to reset.
Other electronic products such as HAM radios and other DECT
phones, can cause interference with your cordless phone. Try
installing your phone as far away as possible from these types of
electronic devices.
The batteries do not hold a charge.
If the cordless handset is in the telephone base or charger and
the charge light is not on, refer to The charge light is o (page
20) in this Troubleshooting guide.
Charge the battery in the cordless handset for at least 10 hours.
For optimum daily performance, return the cordless handset to
the telephone base or charger when not in use.
If the battery is depleted, it might take approximately 30 minutes to
charge the handset before it shows Low battery. Refer to the table
on page 7 for details.
You might need to purchase a new battery. Refer to Battery
installation and charging in this user’s manual on pages 7- 9.
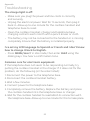
I hear other calls while using my phone.
Disconnect the telephone base from the telephone jack, and
plug in a different telephone. If you still hear other calls, call
your telephone service provider.
Troubleshooting

16
Appendix
I get noise, static, or weak signals even when I’m near the
telephone base.
If you subscribe to high-speed Internet service (DSL - digital
subscriber line) through your telephone line, you must install a
DSL lter between the telephone line cord and the telephone
wall jack. The lter prevents noise and caller ID problems as
a result of DSL interference. Please contact your DSL service
provider for more information about DSL lters.
You may be able to improve the performance of your cordless
phone by installing your new telephone base as far as possible
from any other existing cordless telephone system that may
already be installed.
Other electronic products such as HAM radios and other DECT
phones, can cause interference with your cordless phone. Try
installing your phone as far away as possible from these types of
electronic devices.
Do not install this phone near a microwave oven or on the same
electrical outlet. You might experience decreased performance
while the microwave oven is operating.
If you plug your phone in with a modem or a surge protector,
plug the phone (or modem/surge protector) into a dierent
location. If this does not solve the problem, relocate your phone
or modem farther apart from one another, or use a dierent
surge protector.
Move your phone to a higher location. The phone might have
better reception in a high area.
If the other phones in your home are having the same problem,
contact your telephone service provider (charges may apply).
I experience poor sound quality when using the speakerphone.
For increased sound quality while using the speakerphone, place
the handset on a at surface with the dialing keys facing up.
Troubleshooting
La page charge ...
La page charge ...
La page charge ...
La page charge ...
La page charge ...
La page charge ...
La page charge ...
La page charge ...
La page charge ...
La page charge ...
La page charge ...
La page charge ...
La page charge ...
La page charge ...
La page charge ...
La page charge ...
La page charge ...
La page charge ...
La page charge ...
La page charge ...
La page charge ...
-
 1
1
-
 2
2
-
 3
3
-
 4
4
-
 5
5
-
 6
6
-
 7
7
-
 8
8
-
 9
9
-
 10
10
-
 11
11
-
 12
12
-
 13
13
-
 14
14
-
 15
15
-
 16
16
-
 17
17
-
 18
18
-
 19
19
-
 20
20
-
 21
21
-
 22
22
-
 23
23
-
 24
24
-
 25
25
-
 26
26
-
 27
27
-
 28
28
-
 29
29
-
 30
30
-
 31
31
-
 32
32
-
 33
33
-
 34
34
-
 35
35
-
 36
36
-
 37
37
-
 38
38
-
 39
39
-
 40
40
-
 41
41


AT&T AT T DECT 6.0 expansion handset use Manuel utilisateur
- Catégorie
- Téléphones
- Taper
- Manuel utilisateur
- Ce manuel convient également à