Toro 22in Recycler Lawn Mower Manuel utilisateur
- Catégorie
- Tondeuses à gazon
- Taper
- Manuel utilisateur

FormNo.3408-837RevA
22inRecycler®LawnMower
withSmartStow®
20340
CortacéspedRecycler®de56
cm(22")conSmartStow®
20340
TondeuseRecycler®de56cm
(22po)avecSmartStow®
20340
www.T oro.com.
*3408-837*A


CV
FormNo.3408-834RevA
22inRecycler
®
LawnMowerwithSmartStow
®
ModelNo.20340—SerialNo.400000000andUp
Operator'sManual
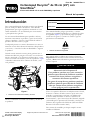
Introduction
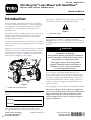
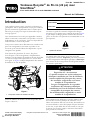
Thisrotary-blade,walk-behindlawnmowerisintendedto
beusedbyresidentialhomeowners.Itisdesignedprimarily
forcuttinggrassonwell-maintainedlawnsonresidential
properties.Itisnotdesignedforcuttingbrushorfor
agriculturaluses.
Readthisinformationcarefullytolearnhowtooperateand
maintainyourproductproperlyandtoavoidinjuryand
productdamage.Youareresponsibleforoperatingthe
productproperlyandsafely.
YoumaycontactTorodirectlyatwww.Toro.comforproduct
andaccessoryinformation,helpndingadealer,ortoregister
yourproduct.
Wheneveryouneedservice,genuineToroparts,oradditional
information,contactanAuthorizedServiceDealerorToro
CustomerServiceandhavethemodelandserialnumbersof
yourproductready.Figure1identiesthelocationofthe
modelandserialnumbersontheproduct.
g185958
Figure1
1.Modelandserialnumberplate
Writetheproductmodelandserialnumbersinthespace
below:
ModelNo.
SerialNo.
Thismanualidentiespotentialhazardsandhassafety
messagesidentiedbythesafety-alertsymbol(Figure2),
whichsignalsahazardthatmaycauseseriousinjuryordeath
ifyoudonotfollowtherecommendedprecautions.
g000502
Figure2
1.Safety-alertsymbol
Thismanualuses2wordstohighlightinformation.
Importantcallsattentiontospecialmechanicalinformation
andNoteemphasizesgeneralinformationworthyofspecial
attention.
WARNING
CALIFORNIA
Proposition65Warning
Thisproductcontainsachemicalorchemicals
knowntotheStateofCaliforniatocausecancer,
birthdefects,orreproductiveharm.
Theengineexhaustfromthisproduct
containschemicalsknowntotheStateof
Californiatocausecancer,birthdefects,
orotherreproductiveharm.
ItisaviolationofCaliforniaPublicResourceCode
Section4442or4443touseoroperatetheengineonany
forest-covered,brush-covered,orgrass-coveredlandunless
theengineisequippedwithasparkarrester,asdenedin
Section4442,maintainedineffectiveworkingorderorthe
engineisconstructed,equipped,andmaintainedforthe
preventionofre.
ThissparkignitionsystemcomplieswithCanadianICES-002.
Theenclosed
Engine Owner's Man ual
issuppliedfor
informationregardingtheUSEnvironmentalProtection
Agency(EPA)andtheCaliforniaEmissionControl
Regulationofemissionsystems,maintenance,and
warranty.Replacementsmaybeorderedthroughthe
enginemanufacturer.
©2016—TheToro®Company
8111LyndaleAvenueSouth
Bloomington,MN55420
Registeratwww.T oro.com.
OriginalInstructions(EN)
PrintedintheUSA
AllRightsReserved
*3408-834*A

NetTorque:Thegrossornettorqueofthisenginewas
laboratoryratedbytheenginemanufacturerinaccordance
withtheSocietyofAutomotiveEngineers(SAE)J1940.
Asconguredtomeetsafety,emission,andoperating
requirements,theactualenginetorqueonthisclassofmower
willbesignicantlylower.Gotowww.Toro.comtoview
specicationsonyourmowermodel.
Contents
Introduction..................................................................1
Safety...........................................................................2
GeneralSafety.........................................................2
SafetyandInstructionalDecals.................................3
Setup............................................................................4
1UnfoldingtheHandle............................................4
2InstallingtheRecoil-starterRopeintheRope
Guide.................................................................5
3FillingtheEnginewithOil......................................5
4AssemblingtheGrassBag......................................6
ProductOverview..........................................................7
Operation.....................................................................8
BeforeOperation.......................................................8
BeforeOperationSafety...........................................8
Attachments/Accessories.........................................8
FillingtheFuelTank................................................8
CheckingtheEngine-OilLevel..................................9
AdjustingtheCuttingHeight....................................9
DuringOperation......................................................9
DuringOperatingSafety...........................................9
StartingtheEngine.................................................10
UsingtheSelf-PropelDrive.....................................10
ShuttingOfftheEngine..........................................11
RecyclingtheClippings...........................................11
BaggingtheClippings.............................................11
Side-DischargingtheClippings.................................12
StoringtheMachineintheVertical-Stow
Position.............................................................12
OperatingTips......................................................13
AfterOperation........................................................14
AfterOperatingSafety............................................14
CleaningtheMachine..............................................14
FoldingtheHandle.................................................14
Maintenance.................................................................16
RecommendedMaintenanceSchedule(s)......................16
MaintenanceSafety.................................................16
PreparingforMaintenance.......................................16
ServicingtheAirFilter............................................17
ChangingtheEngineOil.........................................17
ReplacingtheBlade................................................18
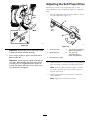
AdjustingtheSelf-PropelDrive................................19
Storage........................................................................20
PreparingtheMachineforStorage............................20
RemovetheMachinefromStorage............................20
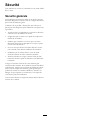
Safety
ThismachinehasbeendesignedinaccordancewithANSI
B71.1-2012.
GeneralSafety
Thisproductiscapableofamputatinghandsandfeetand
ofthrowingobjects.Alwaysfollowallsafetyinstructionsto
avoidseriouspersonalinjury.
Usingthisproductforpurposesotherthanitsintendeduse
couldprovedangeroustoyouandbystanders.
•ReadandunderstandthecontentsofthisOperator’sManual
beforestartingtheengine.
•Donotputyourhandsorfeetnearmovingcomponents
ofthemachine.
•Donotoperatethemachinewithoutallguardsandother
safetyprotectivedevicesinplaceandworkingonthe
machine.
•Keepclearofanydischargeopening.Keepbystandersa
safedistanceawayfromthemachine.
•Keepchildrenoutoftheoperatingarea.Neverallow
childrentooperatethemachine.
•Stopthemachineandshutofftheenginebeforeservicing,
fueling,oruncloggingthemachine.
Improperlyusingormaintainingthismachinecanresult
ininjury.Toreducethepotentialforinjury,complywith
thesesafetyinstructionsandalwayspayattentiontothe
safety-alertsymbol,whichmeansCaution,Warning,or
Danger—personalsafetyinstruction.Failuretocomplywith
theseinstructionsmayresultinpersonalinjuryordeath.
Youcanndadditionalitemsofsafetyinformationintheir
respectivesectionsthroughoutthismanual.
2

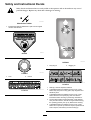
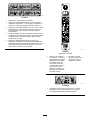
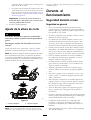
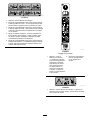
SafetyandInstructionalDecals
Safetydecalsandinstructionsareeasilyvisibletotheoperatorandarelocatednearanyareaof
potentialdanger.Replaceanydecalthatisdamagedormissing.
decaloemmarkt
Manufacturer'sMark
1.Indicatesthebladeisidentiedasapartfromtheoriginal
machinemanufacturer.
decal94-8072
94-8072
decal112-8867
112-8867
1.Lock2.Unlock
decal117-2718
117-2718
decal125-5026
125-5026
1.Recyclingon2.Baggingon
decal131-4514b
131-4514
1.Warning—readtheOperator'sManual.
2.Cutting/dismembermenthazardofhandorfoot,mower
blade—stayawayfrommovingparts;keepallguardsand
shieldsinplace.
3.Cutting/dismembermenthazardofhandorfoot,mower
blade—disconnectthespark-plugwireandreadthe
instructionsbeforeservicingorperformingmaintenance.
4.Thrownobjecthazard—keepbystandersasafedistance
awayfromthemachine;shutofftheenginebeforeleaving
theoperatingposition;pickupanydebrisbeforemowing.
5.Cutting/dismembermenthazardofhandorfoot,mower
blade—donotoperateupanddownslopes;operatesideto
sideonslopes;lookbehindyouwhenbackingup.
3

decal132-4470
132-4470
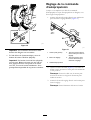
TractionAdjustment
1.Attention;readthe
Operator'sManual—1)
Loosentheknobbyturning
itcounterclockwise;2)Pull
thecable(s)awayfrom
theenginetodecrease
thetraction,orpushthe
cable(s)towardtheengine
toincreasethetraction;
3)Tightentheknobby
turningitclockwise.
2.ScantheQRcodefor
moreinformationon
tractionadjustment.
decal133-8198
133-8198
1.Warning—readtheOperator'sManual;1)Addfueluptothe
indicatedlevel.2)Tipthemowerforwardforstorage.
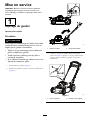
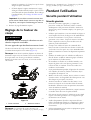
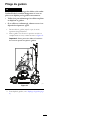
Setup
Important:Removeanddiscardtheprotectiveplastic
sheetthatcoverstheengineandanyotherplasticor
wrappingonthemachine.
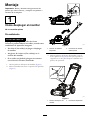
1
UnfoldingtheHandle
NoPartsRequired
Procedure
WARNING
Unfoldingthehandleimproperlycandamagethe
cables,causinganunsafeoperatingcondition.
•Donotdamagethecable(s)whenfoldingor
unfoldingthehandle.
•Ensurethatthecable(s)areroutedtotheoutside
ofthehandle.
•Ifacableisdamaged,contactanAuthorized
ServiceDealer.
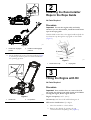
1.Disengagethehandlelocks(Figure3).
2.Movethehandlerearwardtotheoperatingposition
(Figure3).
4

g188439
Figure3
1.Handlelockengaged
position
2.Handlelockdisengaged
positions
3.Setthehandlelockinoneofthetwopositions(Figure
4)untilthepinclicksinplacetolockthehandleinto
theoperatingposition.
g185991
Figure4
1.Handlelock2.Pinpositions
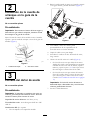
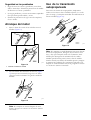
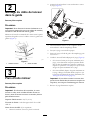
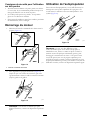
2
InstallingtheRecoil-starter
RopeintheRopeGuide
NoPartsRequired
Procedure
Important:Tostarttheenginesafelyandeasily
wheneveryouusethemachine,installtherecoil-starter
ropeintheropeguide.
Holdtheblade-controlbartotheupperhandleandpullthe
recoil-starterropethroughtheropeguideonthehandle
(Figure5).
g003251
Figure5
1.Recoil-starterrope2.Ropeguide
3
FillingtheEnginewithOil
NoPartsRequired
Procedure
Important:Yourmachinedoesnotcomewithoilin
theengine,butitdoescomewithabottleofoil.Before
startingtheengine,lltheenginewithoil.
Engineoilcapacity:0.47L(16oz)
Oilviscosity:SAE30orSAE10W-30detergentoil
APIserviceclassication:SJorhigher
1.Movethemachinetoalevelsurface.
2.Removethedipstickbyrotatingthecap
counterclockwiseandpullingitout(Figure6).
5

g186245
Figure6
3.Carefullypourabout3/4oftheenginecapacityofoil
intotheoil-lltube.
4.Wipethedipstickcleanwithacleancloth.
5.Insertthedipstickintotheoil-lltube,thenremove
thedipstick.
6.Readtheoillevelonthedipstick(Figure6).
•IftheoillevelisbelowtheAddmarkonthe
dipstick,carefullypourasmallamountofoilinto
theoil-lltube,wait3minutes,andrepeatsteps3
through5untiltheoillevelonthedipstickisatthe
Fullmarkonthedipstick.
•IftheoillevelisabovetheFullmarkonthe
dipstick,draintheexcessoiluntiltheoillevelisat
theFullmarkonthedipstick;refertoChanging
theEngineOil(page17).
Important:Iftheoillevelintheengineistoo
lowortoohighandyouruntheengine,youmay
damagetheengine.
7.Installthedipsticksecurely.
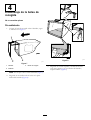
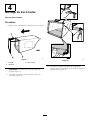
4
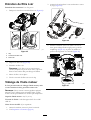
AssemblingtheGrassBag
NoPartsRequired
Procedure
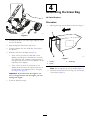
1.SlipthegrassbagovertheframeasshowninFigure7.
g027257
1
2
3
g027257
Figure7
1.Handle
3.Grassbag
2.Frame
Note:Donotslipthebagoverthehandle(Figure7).
2.Hookthebottomchannelofthebagontothebottom
oftheframe(Figure8).
6

g027258
g027258
Figure8
3.Hookthetopandsidechannelsofthebagontothetop
andsidesoftheframe,respectively(Figure8).
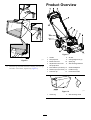
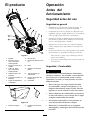
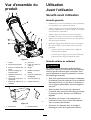
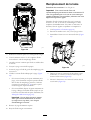
ProductOverview
g188325
Figure9
1.Handle
8.Airlter
2.Self-propelbar9.Cutting-heightlever(4)
3.Blade-controlbar
10.Sparkplug
4.Adjustmentknobforthe
self-propeldrive
11.Side-dischargedeector
5.Reardeector(notshown)12.Oil-lltube/dipstick
6.Washoutport(notshown)13.Handlelock(2)
7.Fuel-tankcap14.Recoil-starthandle
g036586
Figure10
1.Grassbag2.Side-dischargechute
7

Operation
BeforeOperation
BeforeOperationSafety
GeneralSafety
•Becomefamiliarwiththesafeoperationoftheequipment,
operatorcontrols,andsafetysigns.
•Checkthatallguardsandsafetydevices,suchasdeectors
and/orgrasscatcher,areinplaceandworkingproperly.
•Alwaysinspectthemachinetoensurethattheblades,
bladebolts,andcuttingassemblyarenotwornor
damaged.
•Inspecttheareawhereyouwillusethemachineand
removeallobjectsthatthemachinecouldthrow .
•Adjustingthecuttingheightmaybringyouintocontact
withthemovingblade,causingseriousinjury.
–Shutofftheengineandwaitforallmovingpartsto
stop.
–Donotputyourngersunderthehousingwhen
adjustingthecuttingheight.
FuelSafety
DANGER
Fuelisextremelyammableandhighlyexplosive.
Areorexplosionfromfuelcanburnyouand
othersandcandamageproperty.
•Topreventastaticchargefromignitingthefuel,
placethecontainerand/ormachinedirectlyon
thegroundbeforelling,notinavehicleoron
anobject.
•Fillthefueltankoutdoors,inanopenarea,when
theengineiscold.Wipeupanyfuelthatspills.
•Donothandlefuelwhensmokingoraroundan
openameorsparks.
•Storefuelinanapprovedcontainerandkeepit
outofthereachofchildren.
WARNING
Fuelisharmfulorfatalifswallowed.Long-term
exposuretovaporscancauseseriousinjuryand
illness.
•Avoidprolongedbreathingofvapors.
•Keepyourhandsandfaceawayfromthenozzle
andthefuel-tankopening.
•Keepfuelawayfromyoureyesandskin.
Attachments/Accessories
AselectionofToroapprovedattachmentsandaccessoriesis
availableforusewiththemachinetoenhanceandexpand
itscapabilities.ContactyourAuthorizedServiceDealeror
Distributororgotowww .Toro.comforalistofallapproved
attachmentsandaccessories.
Tobestprotectyourinvestmentandmaintainoptimal
performanceofyourToroequipment,countonTorogenuine
parts.Whenitcomestoreliability,Torodeliversreplacement
partsdesignedtotheexactengineeringspecicationofour
equipment.Forpeaceofmind,insistonTorogenuineparts.
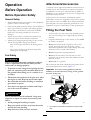
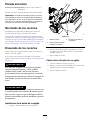
FillingtheFuelTank
•Forbestresults,useonlyclean,fresh,unleadedgasoline
withanoctaneratingof87orhigher((R+M)/2rating
method).
•Oxygenatedfuelwithupto10%ethanolor15%MTBE
byvolumeisacceptable.
•Donotuseethanolblendsofgasoline,suchasE15
orE85,withmorethan10%ethanolbyvolume.
Performanceproblemsand/orenginedamagemayresult,
whichmaynotbecoveredunderwarranty.
•Donotusegasolinecontainingmethanol.
•Donotstorefueleitherinthefueltankorinfuel
containersoverthewinterunlessfuelstabilizerhasbeen
addedtothefuel.
•Donotaddoiltogasoline.
Fillthefueltankwithfreshunleadedregulargasolinefroma
majorname-brandservicestation(Figure11).
Important:Toreducestartingproblems,addfuel
stabilizertothefuelallseason,mixingitwithgasoline
lessthan30daysold.
g188348
Figure11
1.Donotllthefueltankabovethebottomofthefueltank
neck.
8

CheckingtheEngine-OilLevel
ServiceInterval:Beforeeachuseordaily
1.Movethemachinetoalevelsurface.
2.Removethedipstick,wipethedipstickendwithaclean
cloth,andinsertitintotheoil-lltube(Figure12).
g186245
Figure12
3.Removethedipstickandreadtheoillevelonthe
dipstickend(Figure12).
•IftheoilisbelowtheAddmarkonthedipstick,
slowlypourasmallamountofoilintotheoil-ll
tube,wait3minutes,andthenrepeatsteps3
through5untiltheoillevelisattheFullmarkon
thedipstick.
•IftheoilisabovetheFullmarkonthedipstick,
draintheexcessoiluntiltheoillevelisattheFull
markonthedipstick.Todraintheexcessoil,refer
toChangingtheEngineOil(page17).
Important:Iftheoillevelinthecrankcaseistoo
lowortoohighandyouruntheengine,youmay
damagetheengine.
4.Installthedipsticksecurely.
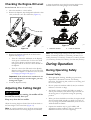
AdjustingtheCuttingHeight
CAUTION
Iftheenginehasbeenrunning,themuferwillbe
hotandcanseverelyburnyou.
Keepawayfromthehotmufer.
Adjustthecuttingheightasdesired.Setthefrontwheelsto
thesameheightastherearwheels(Figure13).
Note:Toraisethemachine,movethefrontcutting-height
leversrearwardandtherearcutting-heightleversforward;
tolowerthemachine,movethefrontcutting-heightlevers
forwardandtherearcutting-heightleversrearward.
g186259
Figure13
1.Raisethemachine2.Lowerthemachine
Note:Thecutting-heightsettingsare25mm(1inch);35
mm(1-3/8inches);44mm(1-3/4inches);54mm(2-1/8
inches);64mm(2-1/2inches);73mm(2-7/8inches);83mm
(3-1/4inches);92mm(3-5/8inches);and102mm(4inches).
DuringOperation
DuringOperatingSafety
GeneralSafety
•Wearappropriateclothing,includingeyeprotection;
slip-resistant,substantialfootwear;andhearing
protection.Tiebacklonghair,securelooseclothing,and
donotwearjewelry.
•Donotoperatethemachinewhileill,tired,orunderthe
inuenceofalcoholordrugs.
•Thebladeissharp;contactingthebladecanresultin
seriouspersonalinjury.Shutofftheengineandwaitfor
allmovingpartstostopbeforeleavingtheoperating
position.
•Whenyoureleasetheblade-controlbar,theengineshould
shutoffandthebladeshouldstopwithin3seconds.If
not,stopusingyourmachineimmediatelyandcontactan
AuthorizedServiceDealer.
•Operatethemachineonlyingoodvisibilityand
appropriateweatherconditions.Donotoperatethe
machinewhenthereistheriskoflightning.
9

•Wetgrassorleavescancauseseriousinjuryifyouslipand
contacttheblade.Avoidmowinginwetconditions.
•Useextremecarewhenapproachingblindcorners,
shrubs,trees,orotherobjectsthatmayblockyourview .
•Watchforholes,ruts,bumps,rocks,orotherhidden
objects.Uneventerraincouldcauseaslip-and-fall
accident.
•Stopthemachineandinspectthebladesafterstrikingan
objectorifthereisanabnormalvibrationinthemachine.
Makeallnecessaryrepairsbeforeresumingoperation.
•Beforeleavingtheoperatingposition,shutofftheengine,
andwaitforallmovingpartstostop.
•Iftheenginehasbeenrunningthemuferwillbehotand
canseverelyburnyou.Keepawayfromthehotmufer.
•Checkthegrasscatchercomponentsandthedischarge
guardfrequentlyandreplacethemwiththemanufacturer’s
recommendedpartswhennecessary.
•UseaccessoriesandattachmentsapprovedbytheThe
Toro®Companyonly.
SlopeSafety
•Mowacrossthefaceofslopes;neverupanddown.Use
extremecautionwhenchangingdirectiononslopes.
•Donotmowonexcessivelysteepslopes.Poorfooting
couldcauseaslip-and-fallaccident.
•Mowwithcautionneardrop-offs,ditches,or
embankments.
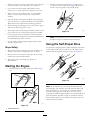
StartingtheEngine
1.Holdtheblade-controlbaragainstthehandle(Figure
14).
g009546
Figure14
1.Blade-controlbar
2.Pulltherecoil-starthandle(Figure15)lightlyuntil
youfeelresistance,thenpullitsharply,andallowitto
returntotheropeguideonthehandleslowly.
g009548
Figure15
Note:Ifthemachinedoesnotstartafterseveral
attempts,contactanAuthorizedServiceDealer.
UsingtheSelf-PropelDrive
Tooperatetheself-propeldrive,simplywalkwithyourhands
ontheupperhandleandyourelbowsatyoursides,andthe
machinewillautomaticallykeeppacewithyou(Figure16).
g009549
Figure16
Note:Ifthemachinedoesnotfreelyrollbackwardafter
self-propelling,stopwalking,holdyourhandsinplace,and
allowthemachinetorollacoupleofcentimeters(inches)
forwardtodisengagethewheeldrive.Youcanalsotry
reachingjustundertheupperhandletothemetalhandleand
pushthemachineforwardacoupleofcentimeters(inches).
Ifthemachinestilldoesnotrollbackwardeasily,contactan
AuthorizedServiceDealer.
10

ShuttingOfftheEngine
ServiceInterval:Beforeeachuseordaily
Toshutofftheengine,releasetheblade-controlbar.
Important:Whenyoureleasetheblade-controlbar,
boththeengineandbladeshouldstopwithin3seconds.
Iftheydonotstopproperly,stopusingyourmachine
immediatelyandcontactanAuthorizedServiceDealer.
RecyclingtheClippings
Yourmachinecomesfromthefactoryreadytorecyclethe
grassandleafclippingsbackintothelawn.
Ifthegrassbagisonthemachine,removeit;referto
RemovingtheGrassBag(page11)beforerecyclingthe
clippings.Iftheside-dischargechuteisonthemachine,
removeit;refertoRemovingtheSide-DischargeChute(page
12)beforerecyclingtheclippings.
BaggingtheClippings
Usethegrassbagwhenyouwanttocollectgrassandleaf
clippingsfromthelawn.
Iftheside-dischargechuteisonthemachine,removeit;refer
toRemovingtheSide-DischargeChute(page12).
WARNING
Aworngrassbagcouldallowsmallstonesand
othersimilardebristobethrowntowardyouor
bystanders,resultinginseriouspersonalinjuryor
death.
Checkthegrassbagfrequently.Ifitisdamaged,
installanewTororeplacementbag.
WARNING
Thebladeissharp;contactingthebladecanresult
inseriouspersonalinjury.
Shutofftheengineandwaitforallmovingpartsto
stopbeforeleavingtheoperatingposition.
InstallingtheGrassBag
1.Raiseandholdupthereardeector(Figure17).
g188382
Figure17
1.Reardeector3.Grassbagpin(2)
2.Notch(leftsidenotchnot
shown)
2.Installthegrassbag,ensuringthatthepinsonthebag
restinthenotchesonthehandle(Figure17).
3.Lowerthereardeector.
RemovingtheGrassBag
1.Liftupthereardeector(Figure14).
2.Liftthegrass-baghandleoutfromthenotchesonthe
handleandremovethebagfromthemachine.
3.Closethereardeector.
11

Side-Dischargingthe
Clippings
Usesidedischargingforcuttingverytallgrass.
Ifthegrassbagisonthemachine,removeit;referto
RemovingtheGrassBag(page11).
InstallingtheSide-DischargeChute
Liftupthesidedeectorandinstalltheside-dischargechute
(Figure18).
g188384
Figure18
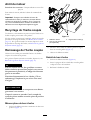
RemovingtheSide-DischargeChute
Toremovetheside-dischargechute,liftupthesidedeector,
removetheside-dischargechute,andlowertheside-discharge
deector.
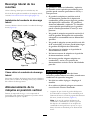
StoringtheMachineinthe
Vertical-StowPosition
Duringthemowingseasonorintheoff-season,youcanstore
yourmachineintheverticalpositiontominimizestorage
space.
DANGER
Gasolineisextremelyammableandexplosive.A
reorexplosionfromgasolinecanburnyouand
others.
•Storingthemachineintheverticalposition
whenthereistoomuchgasolineinthefueltank
maycausegasolinetoleakfromthefueltank.
Gasolineisextremelyammableandexplosive.
Areorexplosionfromgasolinecanburnyou
andothers.
•Storethemachineintheverticalpositiononly
whenthelevelofgasolineinthefueltankis
nohigherthanwhatisrecommendedinthis
Operator’ s Man ual
.
•Donotstorethemachineinapositionthatis
beyondthevertical(90°)position;otherwise,
gasolinemayescapefromthefueltank.
•Donottransportthemachineinthevertical-stow
position.
•Donotattempttostartthemachineinthe
vertical-stowposition.
•Donotattempttostoreanymachinewithfuel
andoilinthevertical-stowpositionthatisnot
designedforthatpurpose.
WARNING
Foldingorunfoldingthehandleimproperlycan
damagethecables,causinganunsafeoperating
condition.
•Donotdamagethecableswhenfoldingor
unfoldingthehandle.
•Ifacableisdamaged,contactanAuthorized
ServiceDealer.
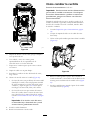
1.Ensurethatthelevelofgasolineinthefueltankis
nohigherthanwhatisrecommendedbytheengine
manufacturer;refertotheenginemanufacturer’sdecal
ontheengine(Figure19).
Note:Ifthereisthelevelofgasolineinthefueltankis
toohigh,drainthegasolinefromthefueltankintoan
approvedfuelcontaineruntilitisatorbelowthelevel
recommendedbytheenginemanufacturer.
decal133-8198
Figure19
12

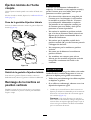
2.Ensurethatthecutting-heightsettingonthemachine
is35mm(1-3/8inches)orhigher;ifitisnot,lowerit;
refertoAdjustingtheCuttingHeight(page9).
3.Disengagethehandlelocks(Figure20).
g186012
Figure20
1.Handlelockengaged
position
2.Handlelockdisengaged
positions
4.Foldthehandlefullyforward(Figure20).
Important:Routethecablestotheoutsideofthe
handleknobsasyoufoldthehandle.
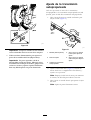
5.Engagethehandlelocks.
6.Liftthefrontofthemachinebythehandleandmove
itintoastoragespace(Figure21).
g186013
Figure21
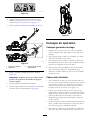
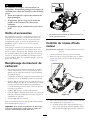
OperatingTips
GeneralMowingTips
•Inspecttheareawhereyouwillusethemachineand
removeallobjectsthatthemachinecouldthrow .
•Avoidstrikingsolidobjectswiththeblade.Never
deliberatelymowoveranyobject.
•Ifthemachinestrikesanobjectorstartstovibrate,
immediatelyshutofftheengine,disconnectthewirefrom
thesparkplug,andexaminethemachinefordamage.
•Forbestperformance,installanewbladebeforethe
cuttingseasonbegins.
•ReplacethebladewhennecessarywithaToro
replacementblade.
CuttingGrass
•Cutonlyaboutathirdofthegrassbladeatatime.Donot
cutbelowthe54mm(2-1/8inch)settingunlessthegrass
issparseoritislatefallwhengrassgrowthbeginstoslow
down.RefertoAdjustingtheCuttingHeight(page9).
•Whencuttinggrassover15cm(6inches)tall,mowatthe
highestcuttingheightsettingandwalkslower;thenmow
againatalowersettingforthebestlawnappearance.If
thegrassistoolong,themachinemayplugandcause
theenginetostall.
•Wetgrassandleavestendtoclumpontheyardandcan
causethemachinetoplugortheenginetostall.Avoid
mowinginwetconditions.
•Beawareofapotentialrehazardinverydryconditions,
followalllocalrewarnings,andkeepthemachinefree
ofdrygrassandleafdebris.
•Alternatethemowingdirection.Thishelpsdispersethe
clippingsoverthelawnforevenfertilization.
•Ifthenishedlawnappearanceisunsatisfactory,try1
ormoreofthefollowing:
–Replacethebladeorhaveitsharpened.
–Walkataslowerpacewhilemowing.
–Raisethecuttingheightonyourmachine.
–Cutthegrassmorefrequently.
–Overlapcuttingswathsinsteadofcuttingafullswath
witheachpass.
CuttingLeaves
•Aftercuttingthelawn,ensurethathalfofthelawnshows
throughthecutleafcover.Youmayneedtomakemore
thanasinglepassovertheleaves.
•Iftherearemorethan13cm(5inches)ofleavesonthe
lawn,setthefrontcuttingheight1or2notcheshigher
thantherearcuttingheight.
•Slowdownyourmowingspeedifthemachinedoesnot
cuttheleavesnelyenough.
13

AfterOperation
AfterOperatingSafety
GeneralSafety
•Cleangrassanddebrisfromthemachinetohelpprevent
res.Cleanupoilorfuelspills.
•Allowtheenginetocoolbeforestoringthemachinein
anyenclosure.
•Neverstorethemachineorfuelcontainerwherethereis
anopename,spark,orpilotlight,suchasonawater
heateroronotherappliances.
HaulingSafety
•Usecarewhenloadingorunloadingthemachineintoa
trailerortruck.
•Usefull-widthrampsforloadingthemachineintoa
trailerortruck.Donotexceeda15°anglebetweenthe
rampandthetrailerortruck.
•Tiethemachinedownsecurelyusingstraps,chains,cable,
orropes.Bothfrontandrearstrapsshouldbedirected
downandoutwardfromthemachine.
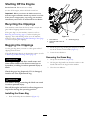
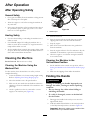
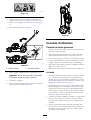
CleaningtheMachine
ServiceInterval:Beforeeachuseordaily
CleaningtheMachineUsingthe
WashoutPort
Forbestresults,cleanthemachinesoonafteryouhave
completedmowing.
1.Lowerthemachinetoitslowestcutting-heightsetting.
RefertoAdjustingtheCuttingHeight(page9).
2.Movethemachineontoaatpavedsurface.
3.Washouttheareaunderthereardeectorwherethe
clippingsgofromtheundersideofthemachinetothe
grassbag.
4.Attachagardenhosethatisconnectedtoawater
supplytothewashoutport(Figure22).
g186136
Figure22
1.Washoutport
5.Turnthewateron.
6.Starttheengineandrunituntiltherearenomore
clippingsthatcomeoutfromunderthemachine.
7.Stoptheengine.
8.Shutoffthewateranddisconnectthegardenhose
fromthemachine.
9.Starttheengineandrunitforafewminutestodrythe
undersideofthemachinetopreventitfromrusting.
10.Allowtheenginetocoolbeforestoringthemachine
inanenclosedarea.
CleaningtheMachineinthe
Vertical-stowPosition
1.Setthemachineinthevertical-stowposition;referto
StoringtheMachineintheVertical-StowPosition(page
12).
2.Washouttheclippingsfromunderthemachine.
FoldingtheHandle
WARNING
Foldingorunfoldingthehandleimproperlycan
damagethecables,causinganunsafeoperating
condition.
•Donotdamagethecableswhenfoldingor
unfoldingthehandle.
•Ifacableisdamaged,contactanAuthorized
ServiceDealer.
1.Disengagethehandlelocksuntilyoucanmovethe
upperhandlefreely.
2.Foldthehandleforwardeithertotheverticalposition
orthefullyforwardpositionasshowninFigure23.
Important:Routethecablestotheoutsideofthe
handlelocksasyoufoldthehandle.
14


Maintenance
Note:Determinetheleftandrightsidesofthemachinefromthenormaloperatingposition.
ReplacementpartsareavailablefromanAuthorizedService
Dealeroratwww.torodealer.com(UScustomersonly).
RecommendedMaintenanceSchedule(s)
MaintenanceService
Interval
MaintenanceProcedure
Beforeeachuseordaily
•Checktheengine-oillevelandaddoilasneeded.
•Ensurethattheenginestopswithin3secondsafterreleasingtheblade-controlbar.
•Cleangrassclippingsanddirtfromunderthemachine.
Beforestorage
•Emptythefueltankbeforerepairsasdirectedandbeforeannualstorage.
Yearly
•Cleantheaircoolingsystem;cleanitmorefrequentlyindustyoperatingconditions.
Refertoyourengineowner'smanual.
•Servicetheairlter;serviceitmorefrequentlyindustyoperatingconditions.
•Replacethebladeorhaveitsharpened(morefrequentlyiftheedgedullsquickly).
•Refertoyourengineowner'smanualforanyadditionalyearlymaintenance
procedures.
Important:Refertoyourenginemanualforadditionalmaintenanceprocedures.
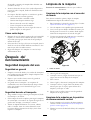
MaintenanceSafety
•Disconnectthespark-plugwirefromthesparkplug
beforeperforminganymaintenanceprocedure.
•Wearglovesandeyeprotectionwhenservicingthe
machine.
•Thebladeissharp;contactingthebladecanresultin
seriouspersonalinjury.Weargloveswhenservicingthe
blade.
•Nevertamperwithsafetydevices.Checktheirproper
operationregularly.
•Tippingthemachinemaycausethefueltoleak.Fuelis
ammableandexplosive,andcancausepersonalinjury.
Runtheenginedrytoremovethefuelwithahandpump;
neversiphonthefuel.
PreparingforMaintenance
1.Shutofftheengineandwaitforallmovingpartsto
stop.
2.Disconnectthespark-plugwirefromthesparkplug
(Figure24).
g186014
Figure24
1.Spark-plugwire
3.Afterperformingthemaintenanceprocedure(s),
connectthespark-plugwiretothesparkplug.
Important:Beforetippingthemachinetochange
theoilorreplacetheblade,allowthefueltankto
rundrythroughnormalusage.Ifyoumusttip
themachinepriortorunningoutoffuel,usea
handfuelpumptoremovethefuel.Alwaystipthe
machineontoitsside,withthedipstickdown.
16

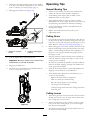
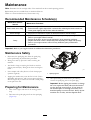
ServicingtheAirFilter
ServiceInterval:Yearly
1.Unclipthetopoftheair-ltercover(Figure25).
g186256
Figure25
1.Clip
2.Air-ltercover
3.Airlter
2.Removetheairlter(Figure25).
3.Inspecttheairlter.
Note:Iftheairlterisexcessivelydirty,replaceitwith
anewlter.Otherwise,gentlytaptheairlterona
hardsurfacetoloosendebris.
4.Installtheairlter.
5.Usethecliptoinstalltheair-ltercover.
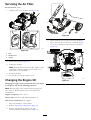
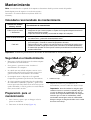
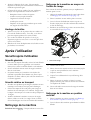
ChangingtheEngineOil
Changingtheengineoilisnotrequired,butifyoudesire
tochangetheoil,usethefollowingprocedure.
Note:Runtheengineafewminutesbeforechangingthe
oiltowarmit.Warmoilowsbetterandcarriesmore
contaminants.
Engineoilcapacity:0.47L(16oz)
Oilviscosity:SAE30orSAE10W-30detergentoil
APIserviceclassication:SJorhigher
1.Movethemachinetoalevelsurface.
2.RefertoPreparingforMaintenance(page16).
3.Removethedipstickbyrotatingthecap
counterclockwiseandpullingitout(Figure26).
g186245
Figure26
4.Tipthemachineontoitsside(sothattheairlteris
up)todraintheusedoilfromtheoil-lltube(Figure
27)orsetthemachineinthevertical-stowposition
(Figure28).
g186039
Figure27
17

g186134
Figure28
5.Afterdrainingtheusedoil,returnthemachinetothe
operatingposition.
6.Carefullypourabout3/4oftheenginecapacityofoil
intotheoil-lltube.
7.Waitabout3minutesfortheoiltosettleintheengine.
8.Wipethedipstickcleanwithacleancloth.
9.Insertthedipstickintotheoil-lltube,thenremove
thedipstick.
10.Readtheoillevelonthedipstick(Figure26).
•IftheoillevelisbelowtheAddmarkonthe
dipstick,carefullypourasmallamountofoilinto
theoil-lltube,wait3minutes,andrepeatsteps
8through10untiltheoillevelisattheFullmark
onthedipstick.
•IftheoillevelisabovetheFullmarkonthe
dipstick,draintheexcessoiluntiltheoillevelisat
theFullmarkonthedipstick;refertoChanging
theEngineOil(page17).
Important:Iftheoillevelintheengineistoo
lowortoohighandyouruntheengine,you
maydamagetheengine.
11.Installthedipsticksecurely.
12.Recycletheusedoilproperly.
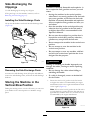
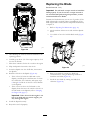
ReplacingtheBlade
ServiceInterval:Yearly
Important:
Y ou will need a torque wr ench to install the
blade pr oper l y
.Ifyoudonothaveatorquewrenchor
areuncomfortableperformingthisprocedure,contact
anAuthorizedServiceDealer.
Examinethebladewheneveryourunoutofgasoline.Ifthe
bladeisdamagedorcracked,replaceitimmediately.Ifthe
bladeedgeisdullornicked,haveitsharpenedandbalanced,
orreplaceit.
1.RefertoPreparingforMaintenance(page16).
2.Tipthemachineeitherontoitssidewiththedipstick
down.
3.Useablockofwoodtoholdthebladesteady(Figure
29).
g024442
Figure29
4.Removethebladebyturningthebladebolt
counterclockwise,savingallmountinghardwareto
installthenewblade(Figure29).
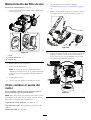
5.Installthenewbladebyturningthebladebolt
clockwise(Figure30).
18
La page est en cours de chargement...
La page est en cours de chargement...
La page est en cours de chargement...
La page est en cours de chargement...
La page est en cours de chargement...
La page est en cours de chargement...
La page est en cours de chargement...
La page est en cours de chargement...
La page est en cours de chargement...
La page est en cours de chargement...
La page est en cours de chargement...
La page est en cours de chargement...
La page est en cours de chargement...
La page est en cours de chargement...
La page est en cours de chargement...
La page est en cours de chargement...
La page est en cours de chargement...
La page est en cours de chargement...
La page est en cours de chargement...
La page est en cours de chargement...
La page est en cours de chargement...
La page est en cours de chargement...
La page est en cours de chargement...
La page est en cours de chargement...
La page est en cours de chargement...
La page est en cours de chargement...
La page est en cours de chargement...
La page est en cours de chargement...
La page est en cours de chargement...
La page est en cours de chargement...
La page est en cours de chargement...
La page est en cours de chargement...
La page est en cours de chargement...
La page est en cours de chargement...
La page est en cours de chargement...
La page est en cours de chargement...
La page est en cours de chargement...
La page est en cours de chargement...
La page est en cours de chargement...
La page est en cours de chargement...
La page est en cours de chargement...
La page est en cours de chargement...
La page est en cours de chargement...
La page est en cours de chargement...
La page est en cours de chargement...
La page est en cours de chargement...
La page est en cours de chargement...
La page est en cours de chargement...
La page est en cours de chargement...
La page est en cours de chargement...
La page est en cours de chargement...
La page est en cours de chargement...
-
 1
1
-
 2
2
-
 3
3
-
 4
4
-
 5
5
-
 6
6
-
 7
7
-
 8
8
-
 9
9
-
 10
10
-
 11
11
-
 12
12
-
 13
13
-
 14
14
-
 15
15
-
 16
16
-
 17
17
-
 18
18
-
 19
19
-
 20
20
-
 21
21
-
 22
22
-
 23
23
-
 24
24
-
 25
25
-
 26
26
-
 27
27
-
 28
28
-
 29
29
-
 30
30
-
 31
31
-
 32
32
-
 33
33
-
 34
34
-
 35
35
-
 36
36
-
 37
37
-
 38
38
-
 39
39
-
 40
40
-
 41
41
-
 42
42
-
 43
43
-
 44
44
-
 45
45
-
 46
46
-
 47
47
-
 48
48
-
 49
49
-
 50
50
-
 51
51
-
 52
52
-
 53
53
-
 54
54
-
 55
55
-
 56
56
-
 57
57
-
 58
58
-
 59
59
-
 60
60
-
 61
61
-
 62
62
-
 63
63
-
 64
64
-
 65
65
-
 66
66
-
 67
67
-
 68
68
-
 69
69
-
 70
70
-
 71
71
-
 72
72


Toro 22in Recycler Lawn Mower Manuel utilisateur
- Catégorie
- Tondeuses à gazon
- Taper
- Manuel utilisateur
dans d''autres langues
Documents connexes
-
Toro 22in Recycler Lawn Mower Manuel utilisateur
-
-
-
-
-
Toro 55cm Recycler Lawn Mower Manuel utilisateur
-
-
-
-