LG LT18S2100S Manuel utilisateur
- Catégorie
- Frigos
- Taper
- Manuel utilisateur
Ce manuel convient également à

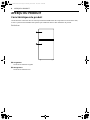
OWNER'S MANUAL
TOP FREEZER
REFRIGERATOR
Read this owner's manual thoroughly before operating the
appliance and keep it handy for reference at all times.
ENGLISH
LT18S2100* / LT18S1100*
MFL72095801
Rev.00_121823
www.lg.com
Copyright © 2023 LG Electronics Inc. All Rights Reserved.
Scan to see the online manual.
en-us_main.book.book Page 1 Monday, December 18, 2023 1:46 PM

TABLE OF CONTENTS
2
3 IMPORTANT SAFETY
INSTRUCTIONS
3 READ ALL INSTRUCTIONS BEFORE USE
3WARNING
6CAUTION
8 PRODUCT OVERVIEW
8 Product Features
11 INSTALLATION
11 Before Installing
12 Choosing the Proper Location
13 Removing/Assembling Doors
15 Reversing Doors and Leveling
20 Connecting Refrigerator to Water Supply
22 Turning on the Power
23 OPERATION
23 Before Use
24 Control Panel
24 Automatic Icemaker
26 Storing Food
27 Drawer
27 Refrigerator Shelves
28 Door Bins
29 MAINTENANCE
29 Cleaning
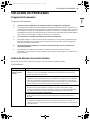
30 TROUBLESHOOTING
30 FAQs
30 Before Calling for Service
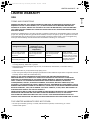
35 LIMITED WARRANTY
35 USA
39 CANADA
en-us_main.book.book Page 2 Monday, December 18, 2023 1:46 PM

3IMPORTANT SAFETY INSTRUCTIONS
ENGLISH
IMPORTANT SAFETY INSTRUCTIONS
READ ALL INSTRUCTIONS BEFORE USE
Safety Messages
Your safety and the safety of others are very important.
We have provided many important safety messages in this manual and on your appliance. Always read and
follow all safety messages.
All safety messages will tell you what the potential hazard is, tell you how to reduce the chance of injury,
and tell you what may happen if the instructions are not followed.
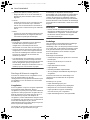
WARNING
WARNING
• To reduce the risk of explosion, fire, death, electric shock, scalding or injury to persons when using this
product, follow basic precautions, including the following:
Installation
• To reduce the risk of injury to persons, adhere to all industry recommended safety procedures including
the use of long-sleeved gloves and safety glasses.
• Never attempt to operate this appliance if it is damaged, malfunctioning, partially disassembled, or has
missing or broken parts, including a damaged cord or plug.
• Only connect this product to a dedicated grounded electrical outlet rated for use with this product (115
V, 60 Hz, AC only). It is the user’s responsibility to replace a standard 2-prong wall outlet with a standard
3-prong wall outlet.
• Do not use an outlet that can be turned off with a switch. Do not use an extension cord.
• The appliance must be positioned for easy access to a power source.
• When moving the refrigerator, be careful not to roll over or damage the power cord.
• Contact an authorized service center when installing or relocating the refrigerator.
• Do not, under any circumstances, cut or remove the third (ground) prong from the power cord.
• Keep packing materials out of the reach of children. Packaging material can be dangerous for children.
There is a risk of suffocation.
• Do not install the refrigerator in a damp or dusty place where insulation on electrical parts may
deteriorate.
• Do not place the refrigerator in direct sunlight or expose it to the heat from heating appliances such as
stoves or heaters.
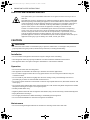
This is the safety alert symbol.
This symbol alerts you to potential hazards that can kill or injure you and others. All safety messages
will follow the safety alert symbol and either the word WARNING or CAUTION.
These words mean:
WARNING
You may be killed or seriously injured if you do not follow instructions.
CAUTION
You may be injured or cause damage to the product if you do not follow instructions.
en-us_main.book.book Page 3 Monday, December 18, 2023 1:46 PM

4IMPORTANT SAFETY INSTRUCTIONS
• Do not bend or pinch the power cord excessively or place heavy objects on it.
• When positioning the appliance, ensure the supply cord is not trapped or damaged.
• Do not locate multiple portable socket-outlets or portable power supplies at the rear of the appliance.
Operation
• This appliance is intended to be used in household and similar applications such as:
- staff kitchen areas in shops, offices and other working environments;
- farm houses and by clients in hotels, motels and other residential type environments;
- bed and breakfast type environments;
- catering and similar non-retail applications.
• This appliance is not intended for use by persons (including children) with reduced physical, sensory or
mental capabilities, or lack of experience and knowledge, unless they have been given supervision or
instruction concerning use of the appliance by a person responsible for their safety.
• This product is not to be used for special purposes such as the storage of medicine or test materials or
for use on ships, etc.
• DO NOT allow children to climb, stand, or hang on the refrigerator doors or on the shelves in the
refrigerator. They could damage the refrigerator and seriously injure themselves.
• Do not allow children to climb into the refrigerator. They could be trapped and suffocated.
• Children should be supervised to ensure that they do not play with the refrigerator.
• Keep fingers out of pinch point areas; clearances between the doors and cabinets are necessarily small.
Be careful opening or closing doors or drawers when children or others are nearby.
• Stand far enough away when opening doors or drawers to avoid hitting and injuring your feet.
• Do not touch frozen food or the metal parts in the freezer compartment with wet or damp hands. Doing
so may cause frostbite.
• Do not refreeze frozen food that has thawed completely. Doing so may result in a serious health hazard.
• Do not use an adapter plug or plug the power plug into a multi-outlet extension cord.
• If the supply cord is damaged, it must be replaced by the manufacturer or its service agent or a similarly
qualified person in order to avoid a hazard.
• Do not operate the refrigerator or touch the power cord with wet hands.
• Do not modify or extend the power cord.
• Do not use an uncertified power outlet. Do not plug the appliance into a damaged wall outlet.
• Do not put hands, feet or other objects into the air vents or bottom of the refrigerator. Doing so could
result in personal injury or electric shock.
• In the event of a gas leak (propane/LPG), ensure the area is adequately ventilated and contact an
authorized service center before resuming use. Do not touch the refrigerator or power cord of the
refrigerator.
• Disconnect the power cord immediately and contact an authorized service center if there is a strange
noise, odor, or smoke coming from the appliance.
• Do not use any fuse (such as copper, steel wire, etc.) other than a standard fuse.
• Do not put animals inside the appliance.
• Do not place heavy or fragile objects, liquid filled containers, combustible substances, or flammable
objects (such as candles and lamps) on the appliance.
• If connected to a circuit protected by fuses, use time delay fuse.
• Keep ventilation openings, in the appliance enclosure or in the built-in structure, clear of obstruction.
• Do not use mechanical devices or other means to accelerate the defrosting process, other than those
recommended by the manufacturer.
en-us_main.book.book Page 4 Monday, December 18, 2023 1:46 PM

5IMPORTANT SAFETY INSTRUCTIONS
ENGLISH
• Do not use electrical appliances inside the food storage compartments of the appliance, unless they are
of the type recommended by the manufacturer.
• Do not store explosive substances such as aerosol cans with a flammable propellant in this appliance.
• Do not damage the refrigerant circuit.
• This appliance incorporates an earth connection for functional purposes.
• Connect to potable water supply only.
- If connected to a water supply, connect to a potable water supply only.
• Fill with potable water only.
- If using an icemaker or dispenser water tank, make sure to fill it with potable water only.
Maintenance
• Do not use a hair dryer to dry the inside of the refrigerator.
• Do not light a candle to remove odors in the refrigerator.
• In the event of a refrigerant leak, move flammable objects away from the refrigerator. Ensure the area is
adequately ventilated and contact an authorized service center.
• Keep flammable materials and vapors, such as gasoline, away from the refrigerator.
• Unplug the power plug before cleaning or repairing the refrigerator.
• The refrigerator and freezer compartment lights are interior LED lighting, and service should be
performed by a qualified technician.
• Unplug the power plug immediately in the event of a blackout or thunderstorm.
• Turn the power off if water or dust penetrates into the refrigerator. Call a service agent.
• Do not store glass containers or soda in the freezer compartment. Contents may expand when frozen,
break the container and cause injury.
• Do not store, disassemble or repair the appliance yourself or allow unqualified personnel to do so.
Disposal
• Risk of child entrapment. Junked or abandoned refrigerators are dangerous, even if they are sitting for
only a few days. When disposing of the refrigerator, remove the packing materials from the door or take
off the doors but leave the shelves in place so that children may not easily climb inside.
• If disposing of a refrigerator, make sure the refrigerant and insulation foam are removed for proper
disposal by a qualified servicer. If you release the refrigerant or throw away the insulation foam, you
may be fined or imprisoned in accordance with the relevant environmental law. Insulation foam contains
flammable blowing gas.
• When discarding the appliance, remove the door gasket while leaving the shelves and bins in place, and
keep children away from the appliance.
Grounding Instructions
• Improper connection of the equipment-grounding conductor can result in a risk of electric shock. Check
with a qualified electrician or service personnel if you are in doubt whether the appliance is properly
grounded. Do not modify the plug provided with the appliance; if it will not fit the outlet, have a proper
outlet installed by a qualified electrician.
• Have a certified electrician check the wall outlet and wiring for proper grounding.
• Never unplug the appliance by pulling on the power cord. Always grip the plug firmly and pull straight
out from the outlet. Failure to do so may damage the power cord, resulting in a risk of fire and electric
shock.
en-us_main.book.book Page 5 Monday, December 18, 2023 1:46 PM

6IMPORTANT SAFETY INSTRUCTIONS
Risk of Fire and Flammable Materials
CAUTION
CAUTION
• To reduce the risk of minor or moderate injury to persons, malfunction, or damage to the product or
property when using this product, follow basic precautions, including the following:
Installation
• Do not install the refrigerator where there may be a danger of the unit falling.
• The refrigerator must be properly installed in accordance with the Installation Instructions.
• This appliance does not require changes in installation or use based on altitude.
Operation
• Do not use aerosols near the refrigerator.
• This appliance is intended to be used only in domestic and similar applications.
• Do not strike or apply excessive force to any glass surface. Do not touch glass surfaces if they are
cracked or broken.
• Do not overfill or pack items too tightly into door bins. Doing so may cause damage to the bin or
personal injury if items are removed with excessive force.
• Do not store glass containers in the freezer. Contents may expand when frozen, break the container and
cause injury.
• Do not clean glass shelves with warm water while they are cold. Shelves may break if exposed to sudden
temperature changes or impact. You may be injured.
• Fill with potable water only.
• Regularly detach and wash the storage bins and shelves; they can become easily contaminated by food.
• Empty bin before removing it.
• Do not apply excessive force while detaching or assembling the storage bins.
• Do not use the dishwasher to clean the storage bins and shelves.
Maintenance
• Do not use strong detergents like wax or thinners for cleaning. Clean with a soft cloth.
This symbol alerts you to flammable materials that can ignite and cause a fire if you do not
take care.
This appliance contains a small amount of isobutane refrigerant (R600a), which is combustible.
When transporting and installing the appliance, care should be taken to ensure that no parts
of the refrigerating circuit are damaged. Refrigerant squirting out of the pipes could ignite or
cause an eye injury. If a leak is detected, avoid any naked flames or potential sources of
ignition and air out the room in which the appliance is standing for several minutes.
In order to avoid the creation of a flammable gas air mixture if a leak in the refrigerating
circuit occurs, the size of the room in which the appliance may be sited depends on the
amount of refrigerant used. The room must be 10.8 square feet (1 square meter) in size for
every 8g of R600a refrigerant inside the appliance. The amount of refrigerant in your
particular appliance is shown on the identification plate inside the appliance. Never start up an
appliance showing any signs of damage. If in doubt, consult your dealer.
en-us_main.book.book Page 6 Monday, December 18, 2023 1:46 PM

7IMPORTANT SAFETY INSTRUCTIONS
ENGLISH
SAVE THESE INSTRUCTIONS
• Remove foreign objects (such as dust and water) off the prongs of the power plug and contact areas. Do
not use a wet or damp cloth when cleaning the plug.
• Do not spray water directly on the inside or outside of the refrigerator.
• Do not clean glass shelves or covers with warm water when they are cold. They may break if exposed to
sudden temperature changes.
en-us_main.book.book Page 7 Monday, December 18, 2023 1:46 PM

8PRODUCT OVERVIEW
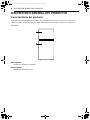
PRODUCT OVERVIEW
Product Features
The images in this guide may be different from the actual components and accessories, which are subject
to change by the manufacturer without prior notice for product improvement purposes.
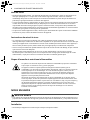
Exterior
aFreezer
Frozen food compartment
bRefrigerator
Fresh food compartment
en-us_main.book.book Page 8 Monday, December 18, 2023 1:46 PM

9PRODUCT OVERVIEW
ENGLISH
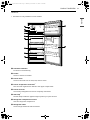
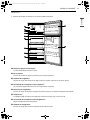
Interior
† This feature is only available on some models.
aAutomatic Icemaker†
Produces ice automatically.
bIce Bin†
Stores ice from the icemaker.
cFreezer Shelf
Stores frozen food such as meat, fish, and ice cream.
dFreezer Temperature Controller†
This controller regulates the airflow to the upper compartment.
eFreezer Door Bin
Store small packaged frozen food or frequently used foods.
fLED Lamp†
The LED lamps inside the appliance light up when you open the door.
gRefrigerator Temperature Control†
Sets the refrigerator temperature.
hRefrigerator Shelf
Stores refrigerated foods and fresh foods.
en-us_main.book.book Page 9 Monday, December 18, 2023 1:46 PM

10 PRODUCT OVERVIEW
Store foods with higher moisture content at the front of the shelf.
The shelf height can be adjusted by inserting the shelf in another groove at a different height.
iBottom Shelf
Stores refrigerated foods and fresh foods.
jRefrigerator Drawer
Stores fruits and vegetables.
kRefrigerator Door Bin†
Stores chilled food, drinks, or condiments.
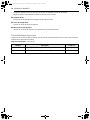
Product Specifications
The appearance and specifications listed in this manual may vary due to constant product improvements.
Electrical requirements : 115 V, 60 Hz
Model Description Net weight
LT18S2100* Standard-depth, top freezer refrigerator 161 lb (73 kg)
LT18S1100* Standard-depth, top freezer refrigerator 161 lb (73 kg)
en-us_main.book.book Page 10 Monday, December 18, 2023 1:46 PM

11INSTALLATION
ENGLISH
INSTALLATION
Before Installing
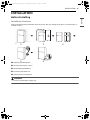
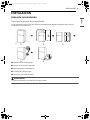
Installation Overview
Please read the following installation instructions first after purchasing this product or transporting it to
another location.
aUnpacking the Refrigerator
bChoosing the Proper Location
cDisassembling/Assembling
dConnecting the Water Line
eLeveling and Door Alignment
WARNING
• Connect to potable water supply only.
en-us_main.book.book Page 11 Monday, December 18, 2023 1:46 PM

12 INSTALLATION
Unpacking the Refrigerator
WARNING
• Use two or more people to move and install the
refrigerator. Failure to do so can result in back
injury or other injury.
• The refrigerator is heavy. Protect the floor when
moving the refrigerator for cleaning or service.
Always pull the refrigerator straight out when
moving it. Do not wiggle or walk the refrigerator
when trying to move it, as floor damage could
occur.
• Keep flammable materials and vapors, such as
gasoline, away from the refrigerator. Failure to
do so can result in fire, explosion, or death.
NOTE
• Remove tape and any temporary labels from
your refrigerator before using. Do not remove
any warning labels, the model and serial number
label, or the Tech Sheet that is located under the
front of the refrigerator.
• To remove any remaining tape or glue, rub the
area briskly with your thumb. Tape or glue
residue can also be easily removed by rubbing a
small amount of liquid dish soap over the
adhesive with your fingers. Wipe with warm
water and dry.
• Do not use sharp instruments, rubbing alcohol,
flammable fluids, or abrasive cleaners to remove
tape or glue. These products can damage the
surface of the refrigerator.
• Reinstall or adjust shelves as needed.
Refrigerator shelves are installed in the shipping
position. Reinstall shelves according to your
individual storage needs.
Choosing the Proper
Location
Water
The refrigerator must be located where a water
supply can be connected for the automatic
icemaker.
NOTE
• The water pressure must be 20 - 125 psi (138 -
862 kPa). If the refrigerator is installed in an area
with low water pressure (below 20 psi or 138
kPa), you can install a booster pump to
compensate for the low pressure.
Electricity
Use an individual, grounded outlet:115 Volts, 60
Hz, AC, 15 amps minimum.
WARNING
• Do not overload house wiring and cause a fire
hazard by plugging in multiple appliances in the
same outlet with the refrigerator.
• To reduce the risk of electric shock, do not install
the refrigerator in a wet or damp area.
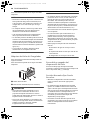
Flooring
To avoid noise and vibration, the unit must be
installed and leveled on a solidly constructed floor.
If required, adjust the leveling legs to compensate
for the unevenness of the floor.
NOTE
• Installing on carpeting, soft tile surfaces, a
platform or weakly supported structure is not
recommended.
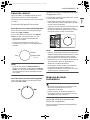
Ambient Temperature
Install this appliance in an area where the
temperature is between 38 °F (3 °C) and 110 °F (43
°C).
If the temperature around the appliance is too low
or high, cooling ability may be adversely affected.
The internal temperatures could be affected by the
location of the appliance, the ambient
temperature, the frequency of door opening and
other factors.
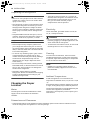
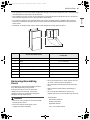
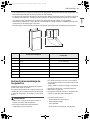
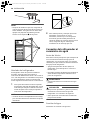
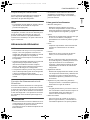
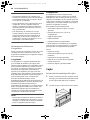
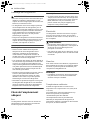
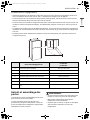
Dimensions and Clearances
• Check the dimensions of the appliance and the installation path to ensure there is sufficient room to
move the refrigerator through doors or narrow openings.
en-us_main.book.book Page 12 Monday, December 18, 2023 1:46 PM

13INSTALLATION
ENGLISH
• If an opening is too narrow to fit the refrigerator through, remove the refrigerator doors. See Removing/
Assembling Doors and Drawers in this manual.
• The installation location chosen for the refrigerator should allow space behind the unit for connections
and airflow and space in front to open the doors and drawers.
• Too small of a distance from adjacent items may result in lowered freezing capability and increased
electricity consumption charges. Allow at least 2 inches (50 mm) between the back of the refrigerator
and the wall.
• Remember to allow enough room in front of the refrigerator to fully open the doors.
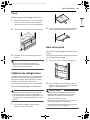
Removing/Assembling
Doors
The method for removing/assembling the door
may differ depending on the model.
If the entrance door is too narrow for the
refrigerator to pass through, remove the
refrigerator doors and move the refrigerator
sideways through the doorway.
WARNING
• Use two or more people to remove and install
the refrigerator doors.
• Disconnect the electrical supply to the
refrigerator before installing.
• Do not put hands, feet or other objects into the
air vents or bottom of the refrigerator.
• Be careful when handling the hinge and hinge
lever.
• Remove food and bins before detaching the
doors.
• Do not hold the handle when removing or
replacing the doors as the handle may come off.
• Tools Needed
- Flat-head screwdriver
- Phillips screwdriver
- Adjustable wrench
- 1/4 in. Hex socket wrench
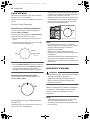
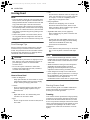
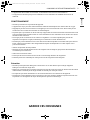
-Dimensions/Clearances LT18S2100*
LT18S1100*
A Depth without Handle 33 1/2“ (851 mm)
B Width 27 1/2" (700 mm)
C Height to Top of Case 64" (1625 mm)
D Height to Top of Hinge 65" (1650 mm)
E Back Clearance 2" (50 mm)
F Depth without Door 29 1/2" (750 mm)
G Depth (Total with Door Open 90°) 58" (1474 mm)
A
F
E
B
CDG
en-us_main.book.book Page 13 Monday, December 18, 2023 1:46 PM

14 INSTALLATION
- 3/8 in. Hex socket wrench
- 10 mm Hex socket wrench
- 1/4 in. Hex Key Wrench
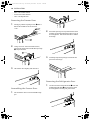
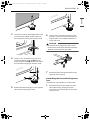
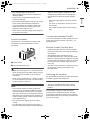
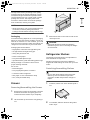
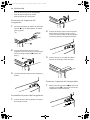
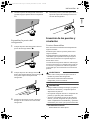
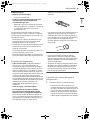
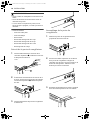
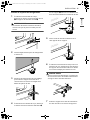
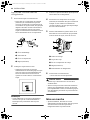
Removing the Freezer Door
1 Gently pry off the top hinge cover a with a
flat-head screwdriver and remove it.
2 Using 10 mm or 3/8 inch socket wrench,
remove the three bolts and lift the top hinge
b. Set parts aside.
3 Lift freezer door slightly and remove it.
Assembling the Freezer Door
1 Set the freezer door onto the middle hinge
pin.
2 Place the top hinge on top of the freezer door
and line up the hinge with the holes on top of
the refrigerator. Use the three bolts to fasten
the hinge.
3 Carefully snap the top hinge cover back into
place over the hinge.
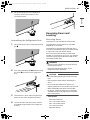
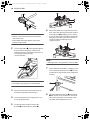
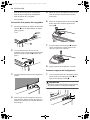
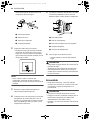
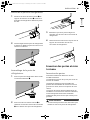
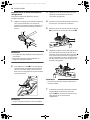
Removing the Refrigerator Door
1 Loosen and remove the two bolts a from the
middle hinge bracket b and remove it from
the refrigerator housing. Set parts aside.
en-us_main.book.book Page 14 Monday, December 18, 2023 1:46 PM

15INSTALLATION
ENGLISH
2 Lift up the refrigerator door slightly and
remove it. Set the door aside on a non-
scratching surface.
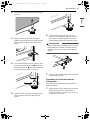
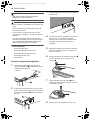
Assembling the Refrigerator Door
1 Set the refrigerator door on the bottom hinge
pin a.
2 Place the middle hinge pin b inside the hinge
pin sleeve c on the top of the refrigerator
door.
3 Hold the door in place and line up the hinge
with the holes in the refrigerator housing.
4 Use the two bolts and the screw to reattach
the middle hinge bracket to the refrigerator
housing.
Reversing Doors and
Leveling
Reversing Doors
This feature is only available on some models.
The method for reversing the door may differ
depending on the model.
The appliance is designed with reversible doors
that can be assembled to open from either the left
or right side to suit your kitchen design.
Door reversal must be done by an authorized
installer or service person. If it is not, any damage
caused by improperly installed doors will not be
covered by the warranty.
WARNING
• Use two or more people to remove and install
the refrigerator doors.
• Disconnect the electrical supply to the
refrigerator before installing.
CAUTION
• Be careful when handling the hinge and hinge
lever.
• Remove food and bins before detaching the
doors.
• Do not hold the handle when removing or
replacing the doors as the handle may come off.
• When reassembling the bottom and middle
hinge pins, make sure the pins are completely
assembled and securely tightened to avoid the
door coming loose.
•Tools Needed
- Flat-head screwdriver
- 1/4 in. Hex socket wrench
- 3/8 in. Hex socket wrench
- 1.4 in. Hex key wrench
- Adjustable wrench
en-us_main.book.book Page 15 Monday, December 18, 2023 1:46 PM

16 INSTALLATION
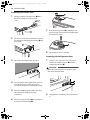
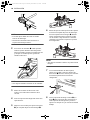
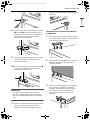
Removing the Freezer Door
1 Gently pry off the top hinge cover a with a
flat-head screwdriver and remove it.
2 Use 10 mm or 3/8 inch socket wrench, remove
the three bolts and lift off the top hinge b. Set
parts aside.
3 Lift freezer door slightly and remove it.
4 Turn the freezer door upside down on a non-
scratching surface. Loosen the screw to
remove the hinge lever and hinge pin sleeve.
5 Move the middle hinge bracket to the other
side of the door, keeping the same
orientation.
6 Move the hinge pin sleeve c into the hole on
the left side of the bracket d.
7 Reverse the hinge lever e by flipping it over.
Place it on top of the bracket and tighten both
down with the screw.
8 Set the freezer door to the side.
Removing the Refrigerator Door
1 Using a 1/4 in. socket wrench, loosen and
remove the middle hinge pin a from the
middle hinge bracket b.
CAUTION
• When lifting the hinge pin, be careful that the
door does not fall forward.
2 Slightly lift the refrigerator door and remove
it.
en-us_main.book.book Page 16 Monday, December 18, 2023 1:46 PM

17INSTALLATION
ENGLISH
3 Loosen the 2 bolts and the Phillips head screw
and remove the middle hinge bracket from
the refrigerator housing. Set the parts aside.
4 Using a 1/4 in. socket wrench, loosen and
remove the bottom hinge pin d from the
bottom hinge bracket e. Remove the washer
from the bottom hinge pin and set it aside.
5 Reattach the bottom hinge pin to the opposite
side of the bottom hinge bracket.
6 Using a 3/8 in. socket wrench with a 2-inch
extension, loosen the 2 bolts on the bottom
hinge bracket. Use a Phillips screwdriver to
loosen the screw.
CAUTION
• Be careful that the refrigerator does not fall
forward if the model purchased has the leveler
attached to the bottom hinge bracket.
7 Remove the bottom hinge bracket from the
right side of the housing.
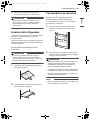
Assembling the Reversed Refrigerator
Door
This feature is only available on some models.
1 Move the bottom hinge bracket to the left
side of the housing, keeping the same
orientation, and reattach with the two bolts
and one screw.
en-us_main.book.book Page 17 Monday, December 18, 2023 1:46 PM

18 INSTALLATION
NOTE
• The flat screw must be placed on the exterior
side of the hinge.
• Disassemble the leveler before moving the
bottom hinge bracket.
2 To move the leveler a to the opposite side, lift
the front of the refrigerator. Remove the
leveler by turning it clockwise and attach it to
the opposite side by turning it
counterclockwise.
NOTE
• The leveler is only present on some models.
3 Move the decorative screws to the holes on
the bottom right side of the housing.
4 Turn the refrigerator door upside down on a
non-scratching surface.
5 Loosen the three screws to remove the
bracket b and the hinge pin sleeve c .
6 Move the bracket to the opposite side of the
door and insert the hinge pin sleeve. Reverse
the hinge lever d by flipping it over. Place it
on top of the bracket, and tighten both down
with the screw. Then insert the remaining 2
screws to tighten the bracket to the
refrigerator door.
NOTE
• The hinge lever is only present on some models.
7 With a flat-head screwdriver, carefully pry off
and remove the decorative cover e over the
screw holes on the left side of the refrigerator
housing.
8 Flip the middle hinge bracket f. (The flange
g will now be on top.) Position it on the left
side of the refrigerator and reattach it with
two bolts and a Phillips-head screw.
en-us_main.book.book Page 18 Monday, December 18, 2023 1:46 PM

19INSTALLATION
ENGLISH
9 Place the refrigerator door down over the
bottom hinge pin on the bottom hinge
bracket.
10 Reattach the middle hinge pin h to the
middle hinge bracket with a 1/4 in. socket
wrench.
NOTE
• The bracket has been flipped, but the middle
hinge pin stays in the same orientation with its
hexagonal end facing upward.
11 Insert the decorative screw into the outer hole
on the right side of the housing. Attach the
decorative cover on the right side. Cover is
force-fitted.
Assembling the Reversed Freezer Door
1 Pry off the decorative cover on the top left
side of the refrigerator to uncover the screw
holes.
2 Place the freezer door down over the middle
hinge pin on the middle hinge bracket.
3 Place the top hinge on top of the freezer door
and line up the top hinge with the holes on
top of the refrigerator. Use the three bolts to
attach the hinge.
4 Force-fit the top hinge cover over the top
hinge.
5 Insert the decorative cover on the top right of
the cabinet to cover the holes. Cover is force-
fitted.
en-us_main.book.book Page 19 Monday, December 18, 2023 1:46 PM

20 INSTALLATION
NOTE
• After changing doors, make sure that the
corners of the door gaskets are not folded over.
To ensure a good seal, apply a small amount of
silicon grease on the corners a of the gaskets.
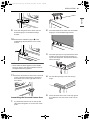
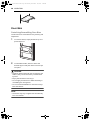
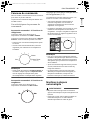
Leveling the Refrigerator
The refrigerator has two front leveling legs. Adjust
the legs to alter the tilt from front-to-back or side-
to side. If the refrigerator seems unsteady or the
doors do not close easily, adjust the refrigerator’s
tilt, using the instructions below:
1 Turn the leveling leg to the left to raise that
side of the refrigerator or to the right to lower
it. It may take several turns of the leveling leg
to adjust the tilt of the refrigerator.
NOTE
• A flare nut wrench works best, but an open-end
wrench will suffice. Do not over-tighten.
2 Open both doors, and check to make sure
that they close easily. If the doors do not close
easily, tilt the refrigerator slightly more to the
rear by turning both leveling legs to the left. It
may take several more turns, and be sure to
turn both leveling legs the same amount.
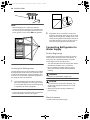
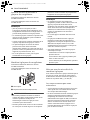
Connecting Refrigerator to
Water Supply
Before Beginning
These instructions assume you have an existing
water supply connection for the refrigerator. If
necessary, call a qualified plumber to install a
water supply line for the refrigerator.
• Turn the icemaker OFF if the refrigerator will be
used before the water line is connected.
• Do not install the icemaker tubing in areas
where the ambient temperatures fall below
freezing.
WARNING
• Connect to potable water supply only.
CAUTION
• To prevent burns and product damage, only
connect the refrigerator water line to a cold
water supply.
• Wear eye protection during installation to
prevent injury.
Water Pressure
You will need a cold water supply.
en-us_main.book.book Page 20 Monday, December 18, 2023 1:46 PM
La page est en cours de chargement...
La page est en cours de chargement...
La page est en cours de chargement...
La page est en cours de chargement...
La page est en cours de chargement...
La page est en cours de chargement...
La page est en cours de chargement...
La page est en cours de chargement...
La page est en cours de chargement...
La page est en cours de chargement...
La page est en cours de chargement...
La page est en cours de chargement...
La page est en cours de chargement...
La page est en cours de chargement...
La page est en cours de chargement...
La page est en cours de chargement...
La page est en cours de chargement...
La page est en cours de chargement...
La page est en cours de chargement...
La page est en cours de chargement...
La page est en cours de chargement...
La page est en cours de chargement...
La page est en cours de chargement...
La page est en cours de chargement...
La page est en cours de chargement...
La page est en cours de chargement...
La page est en cours de chargement...
La page est en cours de chargement...
La page est en cours de chargement...
La page est en cours de chargement...
La page est en cours de chargement...
La page est en cours de chargement...
La page est en cours de chargement...
La page est en cours de chargement...
La page est en cours de chargement...
La page est en cours de chargement...
La page est en cours de chargement...
La page est en cours de chargement...
La page est en cours de chargement...
La page est en cours de chargement...
La page est en cours de chargement...
La page est en cours de chargement...
La page est en cours de chargement...
La page est en cours de chargement...
La page est en cours de chargement...
La page est en cours de chargement...
La page est en cours de chargement...
La page est en cours de chargement...
La page est en cours de chargement...
La page est en cours de chargement...
La page est en cours de chargement...
La page est en cours de chargement...
La page est en cours de chargement...
La page est en cours de chargement...
La page est en cours de chargement...
La page est en cours de chargement...
La page est en cours de chargement...
La page est en cours de chargement...
La page est en cours de chargement...
La page est en cours de chargement...
La page est en cours de chargement...
La page est en cours de chargement...
La page est en cours de chargement...
La page est en cours de chargement...
La page est en cours de chargement...
La page est en cours de chargement...
La page est en cours de chargement...
La page est en cours de chargement...
La page est en cours de chargement...
La page est en cours de chargement...
La page est en cours de chargement...
La page est en cours de chargement...
La page est en cours de chargement...
La page est en cours de chargement...
La page est en cours de chargement...
La page est en cours de chargement...
La page est en cours de chargement...
La page est en cours de chargement...
La page est en cours de chargement...
La page est en cours de chargement...
La page est en cours de chargement...
La page est en cours de chargement...
La page est en cours de chargement...
La page est en cours de chargement...
La page est en cours de chargement...
La page est en cours de chargement...
La page est en cours de chargement...
La page est en cours de chargement...
La page est en cours de chargement...
La page est en cours de chargement...
La page est en cours de chargement...
La page est en cours de chargement...
La page est en cours de chargement...
La page est en cours de chargement...
La page est en cours de chargement...
La page est en cours de chargement...
La page est en cours de chargement...
La page est en cours de chargement...
La page est en cours de chargement...
La page est en cours de chargement...
La page est en cours de chargement...
La page est en cours de chargement...
La page est en cours de chargement...
La page est en cours de chargement...
La page est en cours de chargement...
La page est en cours de chargement...
La page est en cours de chargement...
La page est en cours de chargement...
La page est en cours de chargement...
La page est en cours de chargement...
La page est en cours de chargement...
La page est en cours de chargement...
-
 1
1
-
 2
2
-
 3
3
-
 4
4
-
 5
5
-
 6
6
-
 7
7
-
 8
8
-
 9
9
-
 10
10
-
 11
11
-
 12
12
-
 13
13
-
 14
14
-
 15
15
-
 16
16
-
 17
17
-
 18
18
-
 19
19
-
 20
20
-
 21
21
-
 22
22
-
 23
23
-
 24
24
-
 25
25
-
 26
26
-
 27
27
-
 28
28
-
 29
29
-
 30
30
-
 31
31
-
 32
32
-
 33
33
-
 34
34
-
 35
35
-
 36
36
-
 37
37
-
 38
38
-
 39
39
-
 40
40
-
 41
41
-
 42
42
-
 43
43
-
 44
44
-
 45
45
-
 46
46
-
 47
47
-
 48
48
-
 49
49
-
 50
50
-
 51
51
-
 52
52
-
 53
53
-
 54
54
-
 55
55
-
 56
56
-
 57
57
-
 58
58
-
 59
59
-
 60
60
-
 61
61
-
 62
62
-
 63
63
-
 64
64
-
 65
65
-
 66
66
-
 67
67
-
 68
68
-
 69
69
-
 70
70
-
 71
71
-
 72
72
-
 73
73
-
 74
74
-
 75
75
-
 76
76
-
 77
77
-
 78
78
-
 79
79
-
 80
80
-
 81
81
-
 82
82
-
 83
83
-
 84
84
-
 85
85
-
 86
86
-
 87
87
-
 88
88
-
 89
89
-
 90
90
-
 91
91
-
 92
92
-
 93
93
-
 94
94
-
 95
95
-
 96
96
-
 97
97
-
 98
98
-
 99
99
-
 100
100
-
 101
101
-
 102
102
-
 103
103
-
 104
104
-
 105
105
-
 106
106
-
 107
107
-
 108
108
-
 109
109
-
 110
110
-
 111
111
-
 112
112
-
 113
113
-
 114
114
-
 115
115
-
 116
116
-
 117
117
-
 118
118
-
 119
119
-
 120
120
-
 121
121
-
 122
122
-
 123
123
-
 124
124
-
 125
125
-
 126
126
-
 127
127
-
 128
128
-
 129
129
-
 130
130
-
 131
131
-
 132
132


LG LT18S2100S Manuel utilisateur
- Catégorie
- Frigos
- Taper
- Manuel utilisateur
- Ce manuel convient également à
dans d''autres langues
- English: LG LT18S2100S User manual
- español: LG LT18S2100S Manual de usuario
Documents connexes
Autres documents
-
Yes SRFB27W3 Manuel utilisateur
-
-
-
-
Signature Kitchen Suite SKSCR3001P Le manuel du propriétaire
-
-