Signature Kitchen Suite SKSCW181RP Le manuel du propriétaire
- Catégorie
- Frigos
- Taper
- Le manuel du propriétaire

OWNER'S MANUAL
BUILT-IN REFRIGERATOR
Read this owner's manual thoroughly before operating the appliance and keep
it handy for reference at all times.
ENGLISH
SKSCW181**, SKSCW241**
MFL70339817
Rev.08_062923
www.signaturekitchensuite.com
Copyright © 2019-2023 Signature Kitchen Suite. All Rights Reserved.
Scan to see the online manual.
en-us_main.book.book Page 1 Thursday, June 29, 2023 9:24 AM

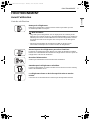
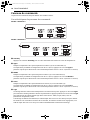
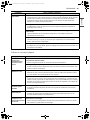
TABLE OF CONTENTS
2
3 IMPORTANT SAFETY
INSTRUCTIONS
3 READ ALL INSTRUCTIONS BEFORE USE
3WARNING
5CAUTION
7 OPERATION
7Before Use
8 Product Features
10 Control Panel
12 Sabbath Mode
12 Storing Wine
14 Storage Racks
16 SMART FUNCTIONS
16 LG ThinQ Application
18 Smart Diagnosis
20 MAINTENANCE
20 Cleaning
21 TROUBLESHOOTING
21 FAQs
21 Before Calling for Service
25 LIMITED WARRANTY
25 USA
27 Canada
en-us_main.book.book Page 2 Thursday, June 29, 2023 9:24 AM

3IMPORTANT SAFETY INSTRUCTIONS
ENGLISH
IMPORTANT SAFETY INSTRUCTIONS
READ ALL INSTRUCTIONS BEFORE USE
Safety Messages
Your safety and the safety of others are very important.
We have provided many important safety messages in this manual and on your appliance. Always read and
follow all safety messages.
All safety messages will tell you what the potential hazard is, tell you how to reduce the chance of injury,
and tell you what may happen if the instructions are not followed.
WARNING
WARNING
• To reduce the risk of explosion, fire, death, electric shock, scalding or injury to persons when using this
product, follow basic precautions, including the following:
Installation
• To avoid a hazard due to instability of the appliance, it must be fixed in accordance with the instructions.
Operation
• This appliance is intended to be used in household and similar applications such as:
- staff kitchen areas in shops, offices and other working environments;
- farm houses and by clients in hotels, motels and other residential type environments;
- bed and breakfast type environments;
- catering and similar non-retail applications.
• This appliance is not intended for use by persons (including children) with reduced physical, sensory or
mental capabilities, or lack of experience and knowledge, unless they have been given supervision or
instruction concerning use of the appliance by a person responsible for their safety.
• This product is not to be used for special purposes such as the storage of medicine or test materials or
for use on ships, etc.
• DO NOT allow children to climb, stand, or hang on the refrigerator doors or on the shelves in the
refrigerator. They could damage the refrigerator and seriously injure themselves.
• Do not allow children to climb into the refrigerator. They could be trapped and suffocated.
• Children should be supervised to ensure that they do not play with the refrigerator.
This is the safety alert symbol.
This symbol alerts you to potential hazards that can kill or injure you and others. All safety messages
will follow the safety alert symbol and either the word WARNING or CAUTION.
These words mean:
WARNING
You may be killed or seriously injured if you do not follow instructions.
CAUTION
You may be injured or cause damage to the product if you do not follow instructions.
en-us_main.book.book Page 3 Thursday, June 29, 2023 9:24 AM

4IMPORTANT SAFETY INSTRUCTIONS
• Keep fingers out of pinch point areas; clearances between the doors and cabinets are necessarily small.
Be careful closing doors when children are nearby.
• Do not use an adapter plug or plug the power plug into a multi-outlet extension cord.
• If the supply cord is damaged, it must be replaced by the manufacturer or its service agent or a similarly
qualified person in order to avoid a hazard.
• Do not operate the refrigerator or touch the power cord with wet hands.
• Do not modify or extend the power cord.
• Do not use an uncertified power outlet. Do not plug the appliance into a damaged wall outlet.
• Do not put hands, feet or other objects into the air vents or bottom of the refrigerator. Doing so could
result in personal injury or electric shock.
• In the event of a gas leak (propane/LPG), ensure the area is adequately ventilated and contact an
authorized service center before resuming use. Do not touch the refrigerator or power button of the
refrigerator.
• Turn off power to the appliance immediately and contact an authorized service center if there is a
strange noise, odor, or smoke coming from the appliance.
• Do not use any fuse (such as copper, steel wire, etc.) other than a standard fuse.
• Do not place or use an electrical appliance inside the refrigerator, unless it is of a type recommended by
the manufacturer.
• Do not put animals inside the appliance.
• Do not place heavy or fragile objects, liquid filled containers, combustible substances, or flammable
objects (such as candles and lamps) on the appliance.
• If connected to a circuit protected by fuses, use time delay fuse.
• Keep ventilation openings, in the appliance enclosure or in the built-in structure, clear of obstruction.
• Do not use mechanical devices or other means to accelerate the defrosting process, other than those
recommended by the manufacturer.
• Do not use electrical appliances inside the food storage compartments of the appliance, unless they are
of a type recommended by the manufacturer.
• Do not store explosive substances such as aerosol cans with a flammable propellant in this appliance.
• Do not damage the refrigerant circuit.
• An individual properly grounded branch circuit or circuit breaker must be used in case of a required
disconnect after installation.
• This appliance incorporates an earth connection for functional purposes.
Maintenance
• Do not use a hair dryer to dry the inside of the refrigerator.
• Do not light a candle to remove odors in the refrigerator.
• In the event of a refrigerant leak, move flammable objects away from the refrigerator. Ensure the area is
adequately ventilated and contact an authorized service center.
• Keep flammable materials and vapors, such as gasoline, away from the refrigerator.
• This appliance is intended to be used in household and similar applications such as staff kitchen areas in
shops, offices and other working environments; farm houses and by clients in hotels, motels and other
residential type environments; bed and breakfast type environments; catering and similar non-retail
applications.
• Turn off power before cleaning or repairing the refrigerator.
• The refrigerator compartment lights are interior LED lighting, and service should be performed by a
qualified technician.
• Turn off power immediately in the event of a blackout or thunderstorm.
en-us_main.book.book Page 4 Thursday, June 29, 2023 9:24 AM

5IMPORTANT SAFETY INSTRUCTIONS
ENGLISH
• Turn the power off if water or dust penetrates into the refrigerator. Call a service agent.
• Do not store, disassemble or repair the appliance yourself or allow unqualified personnel to do so.
• Do not store explosive substances such as aerosol cans with a flammable propellant in this appliance.
• If the electrical supply cord is damaged, it must only be replaced by the manufacturer or its service agent
or a similar qualified person in order to avoid a hazard.
• Do not use mechanical devices or other means to accelerate the defrosting process, other than those
recommended by the manufacturer.
Disposal
• Risk of child entrapment. Junked or abandoned refrigerators are dangerous, even if they are sitting for
only a few days. When disposing of the refrigerator, remove the packing materials from the door or take
off the doors but leave the shelves in place so that children may not easily climb inside.
• If disposing of a refrigerator, make sure the refrigerant and insulation foam are removed for proper
disposal by a qualified servicer. If you release the refrigerant or throw away the insulation foam, you
may be fined or imprisoned in accordance with the relevant environmental law. Insulation foam contains
flammable blowing gas.
• When discarding the appliance, remove the door gasket while leaving the racks in place, and keep
children away from the appliance.
Grounding Instructions
• Improper connection of the equipment-grounding conductor can result in a risk of electric shock. Check
with a qualified electrician or service personnel if you are in doubt whether the appliance is properly
grounded. Do not modify the plug provided with the appliance; if it will not fit the outlet, have a proper
outlet installed by a qualified electrician.
• Have a certified electrician check the wall outlet and wiring for proper grounding.
Risk of Fire and Flammable Materials
CAUTION
CAUTION
• To reduce the risk of minor or moderate injury to persons, malfunction, or damage to the product or
property when using this product, follow basic precautions, including the following:
Installation
• Do not install the refrigerator where there may be a danger of the unit falling.
This appliance contains a small amount of isobutane refrigerant (R600a), which is combustible.
When transporting and installing the appliance, care should be taken to ensure that no parts
of the refrigerating circuit are damaged. Refrigerant squirting out of the pipes could ignite or
cause an eye injury. If a leak is detected, avoid any naked flames or potential sources of
ignition and air out the room in which the appliance is standing for several minutes.
In order to avoid the creation of a flammable gas air mixture if a leak in the refrigerating
circuit occurs, the size of the room in which the appliance may be sited depends on the
amount of refrigerant used. The room must be 10.8 square feet (1 square meter) in size for
every 8g of R600a refrigerant inside the appliance. The amount of refrigerant in your
particular appliance is shown on the identification plate inside the appliance. Never start up an
appliance showing any signs of damage. If in doubt, consult your dealer.
en-us_main.book.book Page 5 Thursday, June 29, 2023 9:24 AM

6IMPORTANT SAFETY INSTRUCTIONS
SAVE THESE INSTRUCTIONS
• The refrigerator must be properly installed in accordance with the Installation Instructions.
• This appliance does not require changes in installation or use based on altitude.
Operation
• Do not use aerosols near the refrigerator.
• This appliance is intended to be used only in domestic and similar applications.
• Do not strike or apply excessive force to any glass surface. Do not touch glass surfaces if they are
cracked or broken.
• Do not overfill the appliance with wine bottles. Doing so may cause personal injury or property damage.
Maintenance
• Do not use strong detergents like wax or thinners for cleaning. Clean with a soft cloth.
• Remove foreign objects (such as dust and water) off the prongs of the power plug and contact areas. Do
not use a wet or damp cloth when cleaning the plug.
• Do not spray water directly on the inside or outside of the appliance.
• Do not clean glass shelves or covers with warm water when they are cold. They may break if exposed to
sudden temperature changes.
en-us_main.book.book Page 6 Thursday, June 29, 2023 9:24 AM

7OPERATION
ENGLISH
OPERATION
Before Use
Checklist
Clean the refrigerator.
Clean the refrigerator thoroughly and wipe off all dust that accumulated
during shipping.
CAUTION
• Do not scratch the refrigerator with a sharp object or use a detergent that
contains alcohol, a flammable liquid or an abrasive when removing any
tape or adhesive from the refrigerator. Remove adhesive residue by wiping
it off with your thumb or dish detergent.
• Do not peel off the model or serial number label or the technical
information on the rear surface of the refrigerator.
Open refrigerator door to ventilate the interior.
The inside of the refrigerator may smell like plastic at first. Remove any
adhesive tape from inside the refrigerator and open the refrigerator door for
ventilation.
Connect the power supply.
Check if the power supply is connected before use.
Wait for the refrigerator to cool.
Allow the refrigerator to run for at least two to three hours before storing
wine bottles in it.
The refrigerator makes a loud noise after initial operation.
This is normal. The volume will decrease as the temperature decreases.
en-us_main.book.book Page 7 Thursday, June 29, 2023 9:24 AM

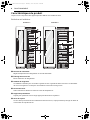
8OPERATION
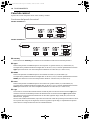
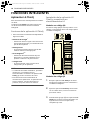
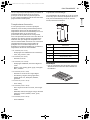
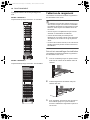
Product Features
The appearance or components of the appliance may differ from model to model.
Exterior and Interior
aControl Panel
Sets the refrigerator temperature and controls the humidity function.
bLED Interior Lighting
Lights up the inside of the refrigerator.
cStorage Rack
Racks slide out to help you keep wines organized and easy to find. Stores wine bottles on their sides for
best long-term storage.
dZone Divider
Helps maintain separate temperature zones.
ePresentation Stand
Adjusts to display wine at proper angle to prevent oxidation.
fDoor Glass
The door glass has a UV resistant coating to help prolong the storage time and quality of wine.
A
C
A
B
C
SKSCW181** SKSCW241**
en-us_main.book.book Page 8 Thursday, June 29, 2023 9:24 AM

9OPERATION
ENGLISH
NOTE
•A: Upper, B: Middle, C: Lower
- The temperature of each zone can be controlled separately. Set the temperature for best long-term
storage or for convenient serving.
• The door alarm will sound every 30 seconds if the door remains open longer than one minute.
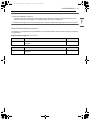
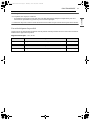
Product Specifications
The appearance and specifications listed in this manual may vary due to constant product improvements.
Electrical requirements: 115 V, 60 Hz
Model Description Net weight
SKSCW181** Built-in, 18” Wine Storage Column Refrigerator 306 lb (139 kg)
Model Description Net weight
SKSCW241** Built-in, 24” Wine Storage Column Refrigerator 357 lb (162 kg)
en-us_main.book.book Page 9 Thursday, June 29, 2023 9:24 AM

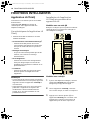
10 OPERATION
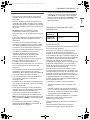
Control Panel
The actual control panel may differ from model to model.
Control Panel Features
Model: SKSCW181**
Model: SKSCW241**
aHumidity
Press the Humidity button to raise humidity in all temperature zones.
bUpper
Indicates the set temperature of the upper zone in Celsius (°C) or Fahrenheit (°F).
The default refrigerator temperature is 55 °F (13 °C). Press the Upper button repeatedly to select a new
set temperature from 41 °F to 64 °F (5 °C to 18 °C).
cMiddle
Indicates the set temperature of the middle zone in Celsius (°C) or Fahrenheit (°F).
The default refrigerator temperature is 55 °F (13 °C). Press the Middle button repeatedly to select a
new set temperature from 41 °F to 64 °F (5 °C to 18 °C).
dLower
Indicates the set temperature of the lower zone in Celsius (°C) or Fahrenheit (°F).
The default refrigerator temperature is 55 °F (13 °C). Press the Lower button repeatedly to select a new
set temperature from 41 °F to 64 °F (5 °C to 18 °C).
eLight
The interior lighting turns on automatically when the door is opened. Press the Light button to keep
the lights on for presentation purposes. Press Light button repeatedly to select lighting options in the
following order: low, medium, high, presentation zone only, off.
If the lighting is turned on manually, tapping twice on the door glass will turn the lights on high. After
10 seconds, the lights return to the low setting, or simply tap twice on the glass to dim the lights
immediately.
fWi-Fi
The Wi-Fi button, when used with the LG ThinQ app, allows the refrigerator to connect to a home Wi-Fi
network. Refer to Smart Functions for information on the initial setup of the application.
en-us_main.book.book Page 10 Thursday, June 29, 2023 9:24 AM

11OPERATION
ENGLISH
The f icon shows the status of the refrigerator’s network connection. The icon illuminates when the
refrigerator is connected to the Wi-Fi network.
Press and hold the Wi-Fi button for 3 seconds to connect to the network. The f icon blinks while the
connection is being made, then turns on once the connection is successfully made.
gPOWER
This turns the power on and off. Press the POWER button for 3 seconds or longer. The control panel
lights, and the power is on.
Turn off the power when you are not using the appliance. When you press the POWER button to turn
off the appliance, the appliance is no longer operating. Turn it off only when you are not using the
appliance.
CAUTION
Display Mode (For Store Use Only)
• The Display Mode disables all cooling in the refrigerator to conserve energy while on display in a retail
store. When activated, OF is displayed on the control panel and the display remains on for 20 seconds.
• To deactivate / activate:
- With the refrigerator door open, press and hold the Upper and Humidity buttons at the same time for
five seconds. The control panel beeps and the temperature settings display to confirm that Display
Mode is deactivated. Use the same procedure to activate Display Mode.
NOTE
• When the refrigerator is in the Power Saving Mode, the display remains off until a door is opened or a
button is pressed. Once on, the display remains on for 20 seconds.
• The control panel automatically turns off for energy saving.
• If there is any finger or skin contacts to the control panel while cleaning it, the button function may
operate.
• This appliance incorporates an earth connection for functional purposes only.
en-us_main.book.book Page 11 Thursday, June 29, 2023 9:24 AM

12 OPERATION
Sabbath Mode
This feature is only available on some models.
Using the Sabbath Mode
Sabbath mode is used on the Jewish Sabbath and
Holidays.
• To turn Sabbath mode on, touch the display to
activate it, then press and hold the Upper and
POWER buttons for 3 seconds until sb appears in
the display.
• To turn Sabbath mode off manually, press and
hold the Upper and POWER buttons for 3
seconds.
NOTE
• Sabbath mode automatically turns off after 96
hours.
• Once turned on, Sabbath mode is maintained
even after a power outage.
• Selecting Sabbath mode automatically turns off
the Light and Alarm functions.
• The interior display stays on during Sabbath
mode, but only sb and the Upper and POWER
buttons are displayed.
• The refrigerator temperature setting remains at
the last temperature set and cannot be changed
until Sabbath mode is turned off.
Storing Wine
CAUTION
• Do not overfill or pack items too tightly onto
storage racks. Doing so may cause damage to
the rack or personal injury if items are removed
with excessive force.
NOTE
• If you are leaving home for a short period, like a
short vacation, the appliance should be left on.
• If you are leaving the appliance turned off for an
extended period, remove all contents and turn
off the power. Clean the interior, and leave the
door and drawers open or slightly ajar to
prevent fungi from growing in the appliance.
• If the appliance is kept in a hot and humid place,
frequent opening of the door may cause
condensation to form. Wipe off the
condensation with a clean cloth or a paper towel.
• If the wine compartment door is opened and
closed too often, warm air may penetrate the
appliance and raise its temperature. This can
increase the running costs of the unit and
shorten the storage life of stored wines.
• Do not install the wine cooler near heat sources
or where it will be exposed to direct sunlight.
Wine Storage Tips
• If you are leaving home for a short period, like a
short vacation, the refrigerator should be left on.
• If you are leaving the refrigerator turned off for
an extended period, remove all wine bottles and
turn off the power. Clean the interior, and leave
the door open to prevent fungi from growing in
the refrigerator.
• If the refrigerator is kept in a hot and humid
place, frequent opening of the door may cause
condensation to form. Wipe off the
condensation with a clean cloth or a paper towel.
• If the refrigerator door is opened or closed too
often, warm air may penetrate the refrigerator
and raise its temperature. This can increase the
running costs of the unit and shorten the
storage life of wines.
• Do not install the refrigerator near heat sources
or where it will be exposed to direct sunlight.
CAUTION
• Do not overfill or pack items too tightly onto
storage racks. Doing so may cause damage to
the rack or personal injury if items are removed
with excessive force.
Storage Temperature
In general, all wine should be stored at a
temperature range of 53 °F to 57 °F (12 °C to 14
°C). For this reason, the default temperature
setting for all zones is 55 °F (13 °C). If planning to
store wines for longer than 6 months, set the
zone’s temperature within this range and leave it.
Serving Temperature
If you plan to serve a wine within a few weeks, you
may want to set one zone to store the wine at its
recommended serving temperature. This does not
preserve the quality of the wine as well long-term,
but allows you to serve the wine without having to
chill it or let it stand to bring it to the correct
serving temperature. Serve wines kept at serving
temperature within a few months. Check the label
en-us_main.book.book Page 12 Thursday, June 29, 2023 9:24 AM

13OPERATION
ENGLISH
or consult a guide for the recommended serving
temperature for specific wines.
• 41 °F to 45 °F (5 °C to 7°C)
- Non-vintage Champagne and Sparkling Wines
- Cava, Asti, Prosecco, Sekt
• 43 °F to 46 °F (6 °C to 8°C)
- Sweet White Wines
• 45 °F to 50 °F (7 °C to 10°C)
- Vintage Champagne, Light White and Rosé
Wines
- Muscat, Rosé, Riesling, Pinot Grigio, Sauvignon
Blanc, Semillon
• 50 °F to 55 °F (10 °C to 13°C)
- Full-Bodied White Wines and Light Red Wines
- Chardonnay, Viognier, White Burgundy,
Chablis, Pinot Noir, Beaujolais, Barbera,
Grenache
• 54 °F to 61 °F (12 °C to 16 °C)
- Tawny Port
• 58 °F to 64 °F (14 °C to 18 °C)
- Medium- or Full-Bodied Red Wines, Aged Reds
- Zinfandel, Chianti, Red Burgundy, Cabernet
Sauvignon, Merlot, Malbec, Shiraz, Syrah,
Bordeaux
• 64 °F to 68 °F (18 °C to 20 °C)
- Vintage Port
Storage Capacity
The wine storage compartment of this product is
designed to store only wine, so it is not
recommended for storing other liquor, beverages
or foods.
NOTE
• Stagger the fronts and backs of the bottles on
the racks for safer storage.
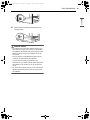
List Dimension
AΦ 1 3/32" (Φ 27.5 mm)
B 2 1/2" (63 mm)
A
B
C
D
E
C 6 1/4" (158.5 mm)
DΦ 3" (Φ 76.1 mm)
E 11 27/32" (300.5 mm)
en-us_main.book.book Page 13 Thursday, June 29, 2023 9:24 AM

14 OPERATION
Wine Storage Compartment
Model: SKSCW181**
Max. storage capacity: 71 bottles
Model: SKSCW241**
Max. storage capacity: 113 bottles
Storage Racks
The sliding racks help keep bottles organized and
easy to reach.
CAUTION
• The storage racks are heavy. Always use two
hands when removing or assembling the racks
to avoid product damage or personal injury.
Always empty racks before removing them.
• Always open the door completely before
removing or assembling the racks.
• As a natural product, the wood used for the
racks can vary in color and grain, including the
presence of knots.
• Due to the nature of the wood, spilled wine and
other liquids may stain or discolor the racks.
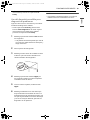
Removing/Assembling Racks
The sliding racks help keep bottles organized and
easy to reach.
1 Pull the rack out until it stops. Empty all
contents out of the rack before removing it.
2 Lift the empty rack slightly to remove it from
the rails.
3 To assemble, push in the rack support rails
until they stop. Angle the storage rack into the
space and set it on the rails.
en-us_main.book.book Page 14 Thursday, June 29, 2023 9:24 AM

15OPERATION
ENGLISH
4 Slide the assembled rack into the
compartment.
CAUTION
• The storage racks are heavy. Always use two
hands when removing or assembling the racks
to avoid product damage or personal injury.
Always empty racks before removing them.
• Always open the door completely before
removing or assembling the racks.
• As a natural product, the wood used for the
racks can vary in color and grain, including the
presence of knots.
• Due to the nature of the wood, spilled wine and
other liquids may stain or discolor the racks.
en-us_main.book.book Page 15 Thursday, June 29, 2023 9:24 AM

16 SMART FUNCTIONS
SMART FUNCTIONS
LG ThinQ Application
This feature is only available on models with Wi-Fi.
The LG ThinQ application allows you to
communicate with the appliance using a
smartphone.
LG ThinQ Application Features
† This feature is only available on some models.
•Energy Monitoring†
- This feature keeps track of the refrigerator’s
power consumption and the number of door
openings.
•Push Messages
- If the door remains open for more than ten
minutes, you will receive a push message.
•Smart DiagnosisTM
- This function provides useful information for
diagnosing and solving issues with the
appliance based on the pattern of use.
•Settings
- Allows you to set various options on the
refrigerator and in the application.
NOTE
• If you change your wireless router, Internet
service provider, or password, delete the
connected appliance from the LG ThinQ
application and connect it again.
• This information is current at the time of
publication. The application is subject to change
for product improvement purposes without
notice to users.
Installing LG ThinQ Application and
Connecting an LG Appliance
Models with QR Code
Scan the QR code attached to the product using
the camera or a QR code reader application on
your smartphone.
Models without QR Code
1 Search for and install the LG ThinQ
application from the Google Play Store or
Apple App Store on a smartphone.
2 Run the LG ThinQ application and sign in with
your existing account or create an LG account
to sign in.
3 Touch the add (~) button on the LG ThinQ
application to connect your LG appliance.
Follow the instructions in the application to
complete the process.
NOTE
• To verify the Wi-Fi connection, check that the Wi-
Fi indicator on the control panel is lit.
en-us_main.book.book Page 16 Thursday, June 29, 2023 9:24 AM

17SMART FUNCTIONS
ENGLISH
• The appliance supports 2.4 GHz Wi-Fi networks
only. To check your network frequency, contact
your Internet service provider or refer to your
wireless router manual.
•LG ThinQ is not responsible for any network
connection problems or any faults, malfunctions,
or errors caused by network connection.
• The surrounding wireless environment can
make the wireless network service run slowly.
• If the distance between the appliance and the
wireless router is too far, the signal becomes
weak. It may take a long time to connect or fail
to install the application.
• If the appliance is having trouble connecting to
the Wi-Fi network, it may be too far from the
router. Purchase a Wi-Fi repeater (range
extender) to improve the Wi-Fi signal strength.
• The network connection may not work properly
depending on the Internet service provider.
• The Wi-Fi may not connect or the connection
may be interrupted because of the home
network environment.
• If the appliance cannot be connected due to
problems with the wireless signal transmission,
unplug the appliance and wait about a minute
before trying again.
• If the firewall on your wireless router is enabled,
disable the firewall or add an exception to it.
• The wireless network name (SSID) should be a
combination of English letters and numbers. (Do
not use special characters.)
• Smartphone user interface (UI) may vary
depending on the mobile operating system (OS)
and the manufacturer.
• If the security protocol of the router is set to
WEP, network setup may fail. Change the
security protocol (WPA2 is recommended), and
connect the product again.
• To disable the Wi-Fi function, press and hold the
Wi-Fi button for 3 seconds. The Wi-Fi indicator
will be turned off.
• To reconnect the appliance or add another user,
press and hold the Wi-Fi button for 3 seconds to
temporarily turn it off. Run the LG ThinQ
application and follow the instructions in the
application to connect the appliance.
Wireless LAN Module Specifications
FCC Notice
The following notice covers the transmitter
module contained in this product.
This equipment has been tested and found to
comply with the limits for a Class B digital device,
pursuant to Part 15 of the FCC Rules and also Part
18 of the FCC Rules. These limits are designed to
provide reasonable protection against harmful
interference in a residential installation. This
equipment generates, uses, and can radiate radio
frequency energy and, if not installed and used in
accordance with the instructions, may cause
harmful interference to radio communications.
However, there is no guarantee that interference
will not occur in a particular installation. If this
equipment does cause harmful interference to
radio or television reception, which can be
determined by turning the equipment off and on,
the user is encouraged to try to correct the
interference by one or more of the following
measures:
• Reorient or relocate the receiving antenna.
• Increase the separation between the equipment
and the receiver.
• Connect the equipment into an outlet on a
circuit different from that to which the receiver is
connected.
• Consult the dealer or an experienced radio/TV
technician for help.
This device complies with part 15 and part 18 of
the FCC Rules. Operation is subject to the following
two conditions:
(1) This device may not cause harmful interference
and
(2) This device must accept any interference
received, including interference that may cause
undesired operation.
Any changes or modifications in construction of
this device which are not expressly approved by
the party responsible for compliance could void
the user’s authority to operate the equipment.
The manufacturer is not responsible for any radio
or TV interference caused by unauthorized
modification to this device. It is the responsibility
of the user to correct such interference.
Frequency
Range
2412 - 2462 MHz
Output Power
(Max)
< 30 dBm
en-us_main.book.book Page 17 Thursday, June 29, 2023 9:24 AM

18 SMART FUNCTIONS
FCC RF Radiation Exposure
Statement
This equipment complies with FCC radiation
exposure limits set forth for an uncontrolled
environment. This transmitter must not be co-
located or operating in conjunction with any other
antenna or transmitter.
This equipment should be installed and operated
with a minimum distance of 20 cm (7.8 inches)
between the antenna and your body. Users must
follow the specific operating instructions for
satisfying RF exposure compliance.
Industry Canada Statement
This device contains licence-exempt transmitter(s)/
receiver(s) that comply with Innovation, Science
and Economic Development Canada’s licence-
exempt RSS(s). Operation is subject to the
following two conditions:
(1) This device may not cause interference.
(2) This device must accept any interference,
including interference that may cause undesired
operation of the device.
IC Radiation Exposure Statement
This equipment complies with IC radiation
exposure limits set forth for an uncontrolled
environment.
This equipment should be installed and operated
with a minimum distance of 20 cm (7.8 inches)
between the antenna and your body.
NOTE
• THE MANUFACTURER IS NOT RESPONSIBLE FOR
ANY RADIO OR TV INTERFERENCE CAUSED BY
UNAUTHORIZED MODIFICATIONS TO THIS
EQUIPMENT. SUCH MODIFICATIONS COULD
VOID THE USER’S AUTHORITY TO OPERATE THE
EQUIPMENT.
Open Source Software Notice
Information
To obtain the source code that is contained in this
product, under GPL, LGPL, MPL, and other open
source licenses that have the obligation to disclose
source code, and to access all referred license
terms, copyright notices and other relevant
documents, please visit https://
opensource.lge.com.
SIGNATURE KITCHEN SUITE will also provide open
source code to you on CD-ROM for a charge
covering the cost of performing such distribution
(such as the cost of media, shipping, and handling)
upon email request to openso[email protected].
This offer is valid to anyone in receipt of this
information for a period of three years after our
last shipment of this product.
Smart Diagnosis
Use this feature to help you diagnose and solve
problems with your appliance.
NOTE
• For reasons not attributable to LGE’s negligence,
the service may not operate due to external
factors such as, but not limited to, Wi-Fi
unavailability, Wi-Fi disconnection, local app
store policy, or app unavailability.
• The feature may be subject to change without
prior notice and may have a different form
depending on where you are located.
Using LG ThinQ to Diagnose Issues
If you experience a problem with your Wi-Fi
equipped appliance, it can transmit
troubleshooting data to a smartphone using the
LG ThinQ application.
• Launch the LG ThinQ application and select the
Smart Diagnosis feature in the menu. Follow
the instructions provided in the LG ThinQ
application.
Using Audible Diagnosis to
Diagnose Issues
Follow the instructions below to use the audible
diagnosis method.
• Launch the LG ThinQ application and select the
Smart Diagnosis feature in the menu. Follow
the instructions for audible diagnosis provided
in the LG ThinQ application.
1 Hold the Lock button for three seconds.
• If the display has been locked for over five
minutes, you must deactivate the lock and
then reactivate it.
2 Open the refrigerator door.
en-us_main.book.book Page 18 Thursday, June 29, 2023 9:24 AM

19SMART FUNCTIONS
ENGLISH
3 Hold the mouthpiece of your phone in front of
the speaker that is located on the filter cover
of the refrigerator.
4 Press and hold the Upper button for three
seconds while continuing to hold your phone
to the speaker.
5 After you hear three beeps, release the Upper
button.
6 Keep the phone in place until the tone
transmission has finished. The display will
count down the time. Once the countdown is
over and the tones have stopped, the
diagnosis will be displayed in the application.
NOTE
• For best results, do not move the phone while
the tones are being transmitted.
en-us_main.book.book Page 19 Thursday, June 29, 2023 9:24 AM

20 MAINTENANCE
MAINTENANCE
Cleaning
WARNING
• Use non-flammable cleaner. Failure to do so can
result in fire, explosion, or death.
CAUTION
• Do not use an abrasive cloth or sponge when
cleaning the interior and exterior of the
refrigerator.
• Do not place your hand on the bottom surface of
the refrigerator when opening and closing the
doors.
General Cleaning Tips
• The refrigerator defrost automatically; however,
clean both sections once a month to prevent
odors.
• Wipe up spills immediately.
• Unplug the refrigerator or disconnect power
before cleaning.
• Remove all removable parts, such as racks.
• Use a clean sponge or soft cloth and a mild
detergent in warm water. Do not use abrasive or
harsh cleaners.
• Hand wash, rinse and dry all surfaces
thoroughly.
• When cleaning the inside or outside of the
appliance, do not wipe it with a rough brush,
toothpaste, or flammable materials. Do not use
cleaning agents containing flammable
substances.
- Doing so may cause discoloration or damage
to the appliance.
- Flammable substances: alcohol (ethanol,
methanol, isopropyl alcohol, isobutyl alcohol,
etc.), thinner, bleach, benzene, flammable
liquids, abrasives, etc.
Inside Walls
To help remove odors, wash the inside of the
refrigerator with a mixture of baking soda and
warm water. Mix 2 tablespoons of baking soda to 1
quart of water (26 g soda to 1 liter water). Be sure
the baking soda is completely dissolved so it does
not scratch the surfaces of the refrigerator.
Door Liners and Gaskets
Use a clean sponge or soft cloth and a mild
detergent in warm water. Do not use cleaning
waxes, concentrated detergents, bleaches, or
cleaners containing petroleum on plastic
refrigerator parts.
Storage Racks and Plastic Parts
(Covers and Panels)
Use a clean sponge or soft cloth and a mild
detergent in warm water. Do not use glass
cleaners, abrasive cleansers, or flammable fluids.
These can scratch or damage the material.
en-us_main.book.book Page 20 Thursday, June 29, 2023 9:24 AM
La page est en cours de chargement...
La page est en cours de chargement...
La page est en cours de chargement...
La page est en cours de chargement...
La page est en cours de chargement...
La page est en cours de chargement...
La page est en cours de chargement...
La page est en cours de chargement...
La page est en cours de chargement...
La page est en cours de chargement...
La page est en cours de chargement...
La page est en cours de chargement...
La page est en cours de chargement...
La page est en cours de chargement...
La page est en cours de chargement...
La page est en cours de chargement...
La page est en cours de chargement...
La page est en cours de chargement...
La page est en cours de chargement...
La page est en cours de chargement...
La page est en cours de chargement...
La page est en cours de chargement...
La page est en cours de chargement...
La page est en cours de chargement...
La page est en cours de chargement...
La page est en cours de chargement...
La page est en cours de chargement...
La page est en cours de chargement...
La page est en cours de chargement...
La page est en cours de chargement...
La page est en cours de chargement...
La page est en cours de chargement...
La page est en cours de chargement...
La page est en cours de chargement...
La page est en cours de chargement...
La page est en cours de chargement...
La page est en cours de chargement...
La page est en cours de chargement...
La page est en cours de chargement...
La page est en cours de chargement...
La page est en cours de chargement...
La page est en cours de chargement...
La page est en cours de chargement...
La page est en cours de chargement...
La page est en cours de chargement...
La page est en cours de chargement...
La page est en cours de chargement...
La page est en cours de chargement...
La page est en cours de chargement...
La page est en cours de chargement...
La page est en cours de chargement...
La page est en cours de chargement...
La page est en cours de chargement...
La page est en cours de chargement...
La page est en cours de chargement...
La page est en cours de chargement...
La page est en cours de chargement...
La page est en cours de chargement...
La page est en cours de chargement...
La page est en cours de chargement...
La page est en cours de chargement...
La page est en cours de chargement...
La page est en cours de chargement...
La page est en cours de chargement...
La page est en cours de chargement...
La page est en cours de chargement...
La page est en cours de chargement...
La page est en cours de chargement...
La page est en cours de chargement...
La page est en cours de chargement...
La page est en cours de chargement...
La page est en cours de chargement...
-
 1
1
-
 2
2
-
 3
3
-
 4
4
-
 5
5
-
 6
6
-
 7
7
-
 8
8
-
 9
9
-
 10
10
-
 11
11
-
 12
12
-
 13
13
-
 14
14
-
 15
15
-
 16
16
-
 17
17
-
 18
18
-
 19
19
-
 20
20
-
 21
21
-
 22
22
-
 23
23
-
 24
24
-
 25
25
-
 26
26
-
 27
27
-
 28
28
-
 29
29
-
 30
30
-
 31
31
-
 32
32
-
 33
33
-
 34
34
-
 35
35
-
 36
36
-
 37
37
-
 38
38
-
 39
39
-
 40
40
-
 41
41
-
 42
42
-
 43
43
-
 44
44
-
 45
45
-
 46
46
-
 47
47
-
 48
48
-
 49
49
-
 50
50
-
 51
51
-
 52
52
-
 53
53
-
 54
54
-
 55
55
-
 56
56
-
 57
57
-
 58
58
-
 59
59
-
 60
60
-
 61
61
-
 62
62
-
 63
63
-
 64
64
-
 65
65
-
 66
66
-
 67
67
-
 68
68
-
 69
69
-
 70
70
-
 71
71
-
 72
72
-
 73
73
-
 74
74
-
 75
75
-
 76
76
-
 77
77
-
 78
78
-
 79
79
-
 80
80
-
 81
81
-
 82
82
-
 83
83
-
 84
84
-
 85
85
-
 86
86
-
 87
87
-
 88
88
-
 89
89
-
 90
90
-
 91
91
-
 92
92


Signature Kitchen Suite SKSCW181RP Le manuel du propriétaire
- Catégorie
- Frigos
- Taper
- Le manuel du propriétaire
dans d''autres langues
Documents connexes
Autres documents
-
LG LT18S2100S Manuel utilisateur
-
LG LFXS28968D Le manuel du propriétaire
-
Yes SRFB27W3 Manuel utilisateur
-
-
Yes LRMDC2306S Le manuel du propriétaire
-
LG STUDIO SRFVC2406S Le manuel du propriétaire
-
LG WM6700HBA Le manuel du propriétaire
-
LG STUDIO SDWD24P3 Le manuel du propriétaire
-
LG SIGNATURE URETC1408N Manuel utilisateur