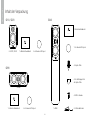
Q Acoustics 5000 Series Manuel utilisateur
- Catégorie
- Haut-parleurs de la barre de son
- Taper
- Manuel utilisateur

5000 Series
OWNER’S MANUAL
ENGLISH EN
DEUTSCH DE
ESPAÑOL ES
FRANÇAIS FR
ITALIANO IT
NEDERLANDS NL
PORTUGUESE PT
SVENSKA SE
POLSKIE PL
РУССКИЙ RU
簡 ZH


3
ENGLISH (EN)
Contents
Important Safety Information and Warnings ........................................................................................................................................... 4
Introduction ............................................................................................................................................................................................. 5
Package Contents ................................................................................................................................................................................... 6
Preparation .............................................................................................................................................................................................. 7
Positioning ............................................................................................................................................................................................... 8
Connections ............................................................................................................................................................................................ 9
Running In ............................................................................................................................................................................................. 10
Aftercare ................................................................................................................................................................................................ 10
Warranty ................................................................................................................................................................................................ 10
Accessories ........................................................................................................................................................................................... 11
Specications ........................................................................................................................................................................................ 12

4
ENGLISH (EN)
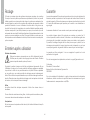
Important Safety Information and Warnings
1. Safety Information and Warnings
Before making any connections to your loudspeakers make sure that all
units in your sound system are switched off at the mains.
When switching on your sound system or changing input sources, set the
main volume control at a low level. Turn up the level gradually.
NEVER play your sound system at full volume. The position of the volume
control is deceptive and does not indicate the power level of the system.
Using very high volume settings may damage your hearing.
1.1. Instructions
Read and understand these instructions before you use your loudspeakers.
If damage is caused by failure to follow these instructions, the warranty will
not apply. Please keep these instructions in a safe place.
2. Unpacking your loudspeakers
Unpack the loudspeakers fully. Lift the loudspeakers from the
cartons by holding the cabinets. Do not use the protective bags
to lift them. The 5040 loudspeakers are heavy - get assistance
to lift them.
When manoeuvring loudspeakers, do not drag them across the oor as
this may cause damage - lift each loudspeaker before moving it.
Check the loudspeaker carefully. If any items are damaged or missing,
report this to your retailer as soon as possible.
Retain the packaging for future transport. If you dispose of the packaging,
please do so following all recycling regulations in your area.
3. Installation
• Only use the accessories supplied with the product.
• If you play your loudspeakers without their grilles tted, be careful to
protect the drive units from damage.
• DO NOT dismantle the loudspeaker. You will invalidate the warranty.
• DO NOT connect your loudspeaker terminals to the mains supply.
• Do NOT expose your loudspeakers to excessive cold, heat, humidity
or sunlight.
• The use of this apparatus is indicated for tropical and/or moderate
climates.
3.1. Moisture
• To reduce the risk of re or electric shock, this apparatus should not be
exposed to rain, moisture, dripping or splashing.
• Do not use this apparatus near water.
3.2. Servicing
Refer all servicing to qualied service personnel. Servicing is required
when the apparatus has been damaged in any way, liquid has been spilled
or objects have fallen into the apparatus, the apparatus has been exposed
to rain or moisture, does not operate normally, or has been dropped.
4. Symbols used on this product
Hazard Warning Symbol
The ‘exclamation mark’ calls attention to features for which
you should read this manual closely to prevent operation and
maintenance problems.
Waste Electrical and Electronic Equipment Symbol
This symbol indicates that when the unit is to be discarded, it
must be separated from other household-type waste and sent
to separate collection facilities for recovery and recycling of
electrical and electronic equipment.
Please make sure you are familiar with your local rules on the separate
collection of electrical and electronic products.

5
ENGLISH (EN)
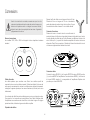
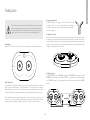
Introduction
Thank you for purchasing Q Acoustics 5000 loudspeakers.
This manual is intended to take you through the setup and installation of the 5000 Series. It will help provide a trouble free setup and ensure optimum
performance from the product. The 5000 Series is a range of loudspeakers designed to meet the highest expectations of dedicated 2-channel
audiophiles and discerning movie enthusiasts.
The manual covers:
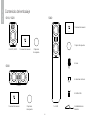
5010: Compact bookshelf loudspeaker with a 110mm (4.5 inches) bass driver.
5020: Bookshelf loudspeaker with a 125mm (5.0 inches) bass driver.
5040: Floorstander loudspeaker with two 125mm (5.0 inches) bass drivers.
5090: Centre loudspeaker with two 110mm (4.5 inches) bass drivers
Please read the instructions, important safety information and warnings carefully before installation and use, to ensure the safe and satisfactory
operation of this product.
We hope you enjoy the Q Acoustics experience.

6
ENGLISH (EN)
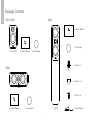
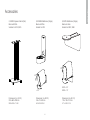
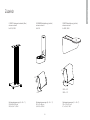
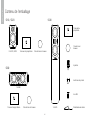
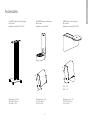
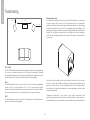
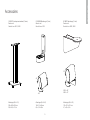
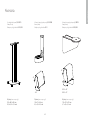
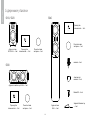
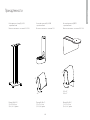
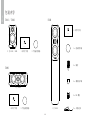
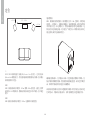
Package Contents
2 x Foam bung
1 x Foam bung
2 x 5010 / 5020
Q
A
C
O
U
S
T
I
C
S
H
I
G
H
F
R
E
Q
U
E
N
C
Y
D
E
-
C
O
U
P
L
E
R
1 x Owners Manual
5000 Series
OWNER’S MANUA L
1 x Owners Manual
5000 Series
OWNER’S MANUA L
5000 Series
OWNER’S MANUA L
1 x Owners Manual
2 x Foam bung
Q
A
C
O
U
S
T
I
C
S
H
I
G
H
F
R
E
Q
U
E
N
C
Y
D
E
-
C
O
U
P
L
E
R
4 x Spike cover
4 x M5 Screw
4 x Spike feet
50405010 / 5020
1 x 5040
1 x 5090
5090
Q
A
C
O
U
S
T
I
C
S
H
I
G
H
F
R
E
Q
U
E
N
C
Y
D
E
-
C
O
U
P
L
E
R
2 x Rear Stabiliser

7
ENGLISH (EN)
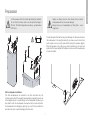
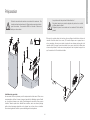
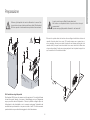
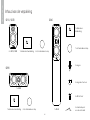
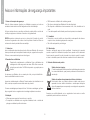
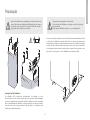
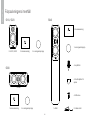
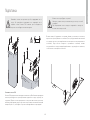
Preparation
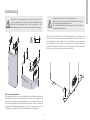
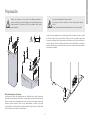
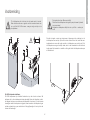
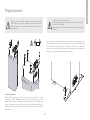
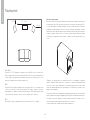
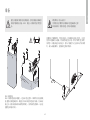
5040 Loudspeaker Installation
The 5040 loudspeakers are intended to be oor mounted only. We
recommend you attach the support base during the unpacking process as
in the diagram above, to avoid damage to the loudspeaker. However, you
may attach it after the loudspeaker is unpacked, but you should protect
the loudspeaker from damage by placing it on a soft cloth or similar. You
must also take care to avoid damaging the drive units.
Lift the speakers from the cartons by holding the cabinets.
Do not touch the driver units or use the protective bags to
lift them. The 5040 loudspeakers are heavy - get assistance
to lift them.
Thread the spikes tted with locking nuts half way into the base and return
the loudspeaker to the upright position (If you have a wood or stone oor
push a spike cover over each spike before turning the speaker upright).
When the speaker is the right way up, insert the Allen key into each rear
spike from the top and adjust all the spikes in and out until the loudspeaker
is level and stable.
Spikes are sharp. Exercise care! Never place a spiked
loudspeaker where it can cause damage!
Always move your loudspeakers by lifting them - never
drag them!

8
ENGLISH (EN)
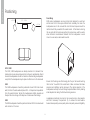
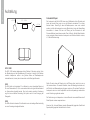
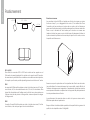
Positioning
5010 / 5020
The 5010 / 5020 loudspeakers are ideally mounted on Q Acoustic oor
stands and can also be wall mounted on Q Acoustic wall brackets. Stand
mounted loudspeakers should be treated as oorstanding loudspeakers
except that the loudspeaker may be placed a little closer to the back wall.
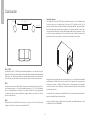
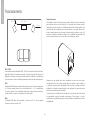
5040
The 5040 loudspeakers should be positioned at least 0.2m from a back
wall, 0.5m from the side walls and placed 2.0 – 4.0 m apart and equidistant
from the seated listener. Turning the loudspeakers slightly inwards will
sharpen the stereo image at the expense of a narrower sound stage.
5090
The 5090 loudspeaker should be positioned at least 0.2m from a back wall
and central to a TV screen.
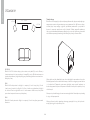
Foam Bung
5000 series loudspeakers are rear ported and designed to work best
with at least 0.2m of free space behind them. Generally, the closer the
loudspeakers are to the rear wall the more the bass frequencies will be
reinforced until they overwhelm the overall sound. In this instance closing
the rear port with the foam bung will tend to reduce bass, which is useful
when domestic circumstances demand that the loudspeaker is used
closer to a rear wall, as when wall mounted.
Ensure that the bungs are tted snugly into the port but avoid inserting
them too far. You will nd the overall level of bass is reduced but bass
extension and denition will be increased. The optimal position of the
loudspeakers will only be found through experimentation and by making
small adjustments during the rst few listening sessions.
Loudspeaker positioning in a room is not an exact science. Even experts
will nd it necessary to experiment. Try to achieve the best balance
between bass quantity versus quality and vocal quality versus intelligibility.
>0.2 m 2.0 - 4.0 m
>0.5 m

9
ENGLISH (EN)
Before making any connections to your loudspeakers
make sure that all active units in your system are switched
off at the mains. When switching on your sound system or
changing input sources, set the main volume control at a
low level. Turn up the level gradually.
Preparing cables
Split the cable to a depth of about 40mm. Bare the wire to
a depth of 10mm and twist the ends to gather any stray
wires. Crop the cable leaving 7mm of bare wire exposed.
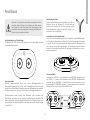
Connecting a terminal
Unscrew the terminal anticlockwise to expose the mounting hole in the
base of the terminal column. Insert the bare end of the cable into the
hole. Retighten the terminal fully hand tight. Make sure there are no stray
wires which could touch adjacent terminals. In the EU it is against safety
regulations to use 4mm loudspeaker plugs.
Stereo Connections
Connect the RED (+) terminal of the RIGHT loudspeaker to the RED,
Positive (+) terminal on the RIGHT channel of the amplier. Connect the
BLACK (–) terminal of the loudspeaker to the matching BLACK, Negative
(–) terminal of the amplier. Repeat this procedure for the LEFT channel.
Connections
Terminals and Connectors
The 5010, 5020, 5040 and 5090 have standard two terminal crossovers.
Loudspeaker Cables
Specialist loudspeaker cables will offer a higher standard of reproduction
than general purpose ‘bell’ or ‘zip’ wire. Use cable with generous amounts
of copper for the front and centre channels. Thin cables reduce the bass
and restrict the dynamic range. Surround (rear) channels are less critical.
Speaker cable has a stripe or tracer along one core. By convention this is
connected to the positive terminals. The cables connecting the amplier
to the front loudspeakers should ideally be the same length. Never join
cables - use complete lengths.
AMPLIFIER
+
-
+
-

10
ENGLISH (EN)
In common with many types of complex mechanical systems the 5000
loudspeakers will not deliver their optimum performance until they have
been in use for a certain initial running-in period. The correct performance
of a loudspeaker depends in part on the compliance of the suspension
materials used during manufacture and these will only attain their long
term steady state once they are operating at the temperature and modulus
of elasticity specied during the design phase. It can take several days for
a loudspeaker which has been stored in a cold warehouse to nally reach
room temperature and so we recommend at least 24 hours of normal
use for the drive units to loosen up sufciently for them to perform as the
designer intended.
Running In
Cabinet Care
Clean cabinets only with a lightly dampened cloth. Do not use
solvent based cleaning materials. Never use abrasives of any
kind.
The cabinet surfaces will usually only require light dusting. Should an
aerosol or other cleaner be used, apply the cleaner onto the cloth rst
and not directly onto the product. Test a small area rst, as some cleaning
products may damage the nish. Avoid products that are abrasive, or
contain acid or alkaline agents. Do not use any cleaning materials on the
drive units and avoid touching them as damage may result.
Grilles
Grilles should only be cleaned using a soft brush when necessary.
If using the the loudspeakers with the grilles removed, remember to
replace them if pets or children are present.
Drive Units
Do not touch the drive units as they are easily damaged when exposed.
Aftercare
Q Acoustics passive loudspeaker products are warranted free of defects
in materials and workmanship for a period of 4 years from the date of
purchase. During the warranty period Q Acoustics will, at its option, repair
or replace any product found to be faulty after inspection by the company
or its appointed distributor or agent.
Misuse and fair wear and tear are not covered by warranty.
Goods for repair should in the rst instance be returned to the supplying
retailer. If this is not possible contact Q Acoustics or their appointed
distributor for your area to determine the correct warranty procedure. If
possible the original packaging should be used to return the product as
damage sustained during transit to the repair centre is not covered by the
warranty. The warranty does not in any way affect your legal rights.
Warranty can be extended to 5 years by registering your product at
qacoustics.co.uk/register.
For service information contact: [email protected]
Q Acoustics
Woodside 2, Dunmow Road
Bishops Stortford, Hertfordshire, UK
CM23 5RG
For any additional information not contained within this manual, support
questions and/or requests, please visit our on-line Knowledge Base Portal
at: www.qacoustics.co.uk/FAQs
Warranty

11
ENGLISH (EN)
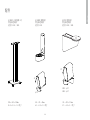
Accessories
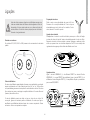
Q 3000FSi Speaker Stands (Pair)
Black and White
Suitable for 5010 / 5020
Dimensions (H x W X D):
250 x 682 x 290 mm
26.9 x 9.8 x 11.4 in
45°
±35°
Q 3000WB Wall Bracket (Single)
Black and White
Suitable for 5010
Dimensions (H x W X D):
165 x 70 x 99 mm
6.5 x 2.8 x 3.9 in
30°
Q WB75 Wall Bracket (Single)
Black and white
Suitable for 5020 / 5090
Dimensions (H x W X D):
119 x 102 x 231 mm
4.7 x 4.0 x 9.1 in
5020: ±35°
5090: ±10°

12
ENGLISH (EN)
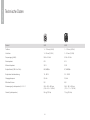
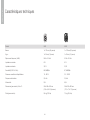
Specications
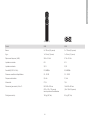
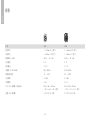
Product 5010 5020
Bass unit: 1 x 110 mm (4.5 in) 1 x 125 mm (5.0 in)
Treble unit: 1 x 25 mm (1.0 in) 1 x 25 mm (1.0 in)
Frequency Response (-6dB): 56 Hz – 30 kHz 53 Hz – 30 kHz
Nominal Impedance: 6 Ω 6 Ω
Minimum Impedance: 3.3 Ω 3.3 Ω
Sensitivity (2.83V @ 1kHz): 86.3 dB/W/m 87.8 dB/W/m
Recommended amplier power: 15 – 90 W 25 – 100 W
Crossover Frequency: 2.5 kHz 2.5 kHz
Effective volume: 5.0 L 6.8 L
Dimensions (per speaker) HxWxD: 264 x 160 x 263 mm
(10.4 x 6.3 x 10.4 in)
284 x 180 x 293 mm
(11.2 x 7.1 x 11.5 in)
Weight (per speaker): 5.6 kg (12.3 lbs) 7.0 kg (15.4 lbs)

13
ENGLISH (EN)
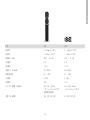
Product 5040 5090
Bass unit: 2 x 125 mm (5.0 in) 2 x 110 mm (4.5 in)
Treble unit: 1 x 25 mm (1.0 in) 1 x 25 mm (1.0 in)
Frequency Response (-6dB): 39 Hz – 30 kHz 57 Hz – 30 kHz
Nominal Impedance: 6 Ω 6 Ω
Minimum Impedance: 3.0 Ω 3.2 Ω
Sensitivity (2.83V @ 1kHz): 91.5 dB/W/m 90.5 dB/W/m
Recommended amplier power: 25 – 150 W 25 – 150 W
Crossover Frequency: 2.5 kHz 2.1 kHz
Effective volume: 27.0 L 7.8 L
Dimensions (per speaker) HxWxD: 967 x 361 x 293 mm
(38.1 x 14.2 x 11.5 in)
inc. spikes & stabiliser
164 x 430 x 243 mm
(6.5 x 16.9 x 9.6 in)
Weight (per speaker): 18.0 kg (39.7 lbs) 8.5 kg (18.7 lbs)


15
DEUTSCH (DE)
Inhaltsverzeichnis
Wichtige Sicherheits- und Warnhinweise ............................................................................................................................................................................. 16
Einführung ............................................................................................................................................................................................................................17
Inhalt der Verpackung ..........................................................................................................................................................................................................18
Vorbereitung .........................................................................................................................................................................................................................19
Aufstellung ............................................................................................................................................................................................................................20
Anschlüsse ...........................................................................................................................................................................................................................21
Inbetriebnahme ....................................................................................................................................................................................................................22
Pegehinweise .....................................................................................................................................................................................................................22
Garantie ................................................................................................................................................................................................................................ 22
Zubehör ................................................................................................................................................................................................................................23
Technische Daten ................................................................................................................................................................................................................. 24

16
DEUTSCH (DE)
Wichtige Sicherheits- und Warnhinweise
1. Sicherheits- und Warnhinweise
Bevor Sie Ihre Lautsprecher anschließen, vergewissern Sie sich, dass alle Einheiten
Ihres Soundsystems vom Netz getrennt sind.
Stellen Sie beim Einschalten Ihres Soundsystems oder beim Wechseln der
Eingangsquellen eine niedrige Lautstärke ein. Erhöhen Sie die Lautstärke allmählich.
Betreiben Sie Ihr Soundsystem NIEMALS bei voller Lautstärke. Die Position des
Lautstärkereglers spiegelt nicht das eigentliche Leistungsniveau des Systems wider.
Sehr hohe Lautstärken können Ihr Gehör schädigen.
1.1. Anleitung
Lesen Sie diese Anleitung sorgfältig durch, bevor Sie Ihre Lautsprecher benutzen.
Schäden infolge der Nichtbeachtung dieser Anleitung fallen nicht unter die Garantie.
Diese Anleitung bitte an einem sicheren Platz aufbewahren.
2. Auspacken der Lautsprecher
Entfernen Sie die gesamte Verpackung der Lautsprecher. Halten Sie die
Lautsprecher beim Herausheben aus den Kartons am Gehäuse fest und
heben Sie sie nicht an den Schutzhüllen an. Die 5040-Lautsprecher sind
schwer. Holen Sie sich Hilfe zum Anheben.
Schleifen Sie die Lautsprecher nicht über den Boden, da sie dadurch beschädigt
werden können. Heben Sie zum Bewegen den jeweiligen Lautsprecher an.
Prüfen Sie die Lautsprecher sorgfältig. Teilen Sie Ihrem Händler unverzüglich mit,
wenn Teile beschädigt sind oder fehlen.
Bewahren Sie die Verpackung für zukünftige Transporte auf. Beachten Sie bei einer
Entsorgung der Verpackung die örtlichen Bestimmungen zur Wiederverwertung.
3. Installation
• Benutzen Sie nur das mit dem Produkt mitgelieferte Zubehör.
• Wenn Sie Ihre Lautsprecher ohne Gitter nutzen, achten Sie darauf, dass die
Schallwandler vor Beschädigungen geschützt sind.
• Nehmen Sie den Lautsprecher NICHT auseinander. Dadurch erlischt die Garantie.
• Schließen Sie die Lautsprecheranschlussklemmen NICHT an das Stromnetz an.
• Setzen Sie Ihre Lautsprecher nicht übermäßiger Kälte, Hitze, Feuchtigkeit oder
dem Sonnenlicht aus.
• Dieses Gerät ist für den Gebrauch in tropischem oder gemäßigtem Klima
vorgesehen.
3.1. Feuchtigkeit
• Um das Risiko von Feuer oder Stromschlag zu verringern, darf dieses Gerät nicht
Regen, Feuchtigkeit und Tropf- oder Spritzwasser ausgesetzt werden.
• Verwenden Sie dieses Gerät nicht in der Nähe von Wasser.
3.2. Wartung
Wartungsarbeiten nur von qualiziertem Fachpersonal durchführen lassen. Eine
Wartung ist dann erforderlich, wenn das Gerät in irgendeiner Weise beschädigt
wurde, Flüssigkeit oder Gegenstände in das Gerät gelangt sind, das Gerät Regen
oder Feuchtigkeit ausgesetzt war, nicht normal funktioniert oder heruntergefallen ist.
4. Symbole, die auf diesem Produkt verwendet werden
Warnzeichen
Das „Ausrufezeichen“ weist auf Funktionen hin, für die Sie dieses
Handbuch aufmerksam lesen sollten, um Bedienungs- und
Wartungsfehler zu vermeiden.
Symbol für Elektro- und Elektronik-Altgeräte
Dieses Symbol zeigt an, dass das Gerät nicht mit dem Haushaltsmüll
entsorgt werden darf, sondern an eine entsprechende Sammelstelle zur
Wiederverwertung von Elektro- und Elektronik-Altgeräten abgegeben
werden muss.
Bitte stellen Sie sicher, dass Sie mit Ihren örtlichen Bestimmungen zur Entsorgung
von Elektro- und Elektronik-Geräten vertraut sind.

17
DEUTSCH (DE)
Einführung
Vielen Dank, dass Sie sich für die 5000-Lautsprecher von Q Acoustics entschieden haben.
Dieses Handbuch soll Sie durch die Einrichtung und Montage der Reihe 5000 führen. Es wird Ihnen beim problemlosen Aufbau helfen, damit das Produkt seine
optimale Leistung entfalten kann. Die Reihe 5000 ist eine Lautsprecherserie, die speziell für die hohen Anforderungen passionierter Zweikanalton-Musikliebhaber und
anspruchsvoller Filmenthusiasten entwickelt wurde.
Inhalt des Handbuchs:
5010: Kompakte Regallautsprecher mit einem 110-mm-Tieftöner (4,5 Zoll)
5020: Regallautsprecher mit einem 125-mm-Tieftöner (5,0 Zoll)
5040: Standlautsprecher mit zwei 125-mm-Tieftönern (5,0 Zoll)
5090: Centerlautsprecher mit zwei 110-mm-Tieftönern (4,5 Zoll)
Bitte lesen Sie vor der Einrichtung und Verwendung diese Anleitung sowie die wichtigen Sicherheits- und Warnhinweise aufmerksam durch, um einen sicheren und
zufriedenstellenden Betrieb dieses Produkts zu gewährleisten.
Wir wünschen Ihnen viel Freude mit Q Acoustics.

18
DEUTSCH (DE)
Inhalt der Verpackung
2 x 5010 / 5020
Q
A
C
O
U
S
T
I
C
S
H
I
G
H
F
R
E
Q
U
E
N
C
Y
D
E
-
C
O
U
P
L
E
R
5000 Series
OWNER’S MANUA L
5000 Series
OWNER’S MANUA L
5000 Series
OWNER’S MANUA L
Q
A
C
O
U
S
T
I
C
S
H
I
G
H
F
R
E
Q
U
E
N
C
Y
D
E
-
C
O
U
P
L
E
R
4 x Spike-Füße
50405010 / 5020
1 x 5040
1 x 5090
5090
Q
A
C
O
U
S
T
I
C
S
H
I
G
H
F
R
E
Q
U
E
N
C
Y
D
E
-
C
O
U
P
L
E
R
2 x Rückstabilisator
4 x Schutzkappen für
die Spike-Füße
2 x Schaumstoffstöpsel
1 x Benutzerhandbuch
2 x Schaumstoffstöpsel
1 x Benutzerhandbuch
1 x Schaumstoffstöpsel
4 x M5-Schraube
1 x Benutzerhandbuch

19
DEUTSCH (DE)
5040 Lautsprecherinstallation
Die Lautsprecher 5040 sind nur für das Aufstellen auf dem Fußboden ausgelegt. Wir
empfehlen, den Standsockel beim Auspacken zu montieren, wie im Diagramm oben
dargestellt, um eine Beschädigung des Lautsprechers zu vermeiden. Sie können ihn
auch nach dem Auspacken des Lautsprechers anbringen, sollten dann aber den
Lautsprecher vor Beschädigung schützen, indem Sie ihn auf einem weichen Tuch
o. Ä. absetzen. Achten Sie darauf, die Schallwandler nicht zu beschädigen.
Vorbereitung
Schieben Sie die Spike-Füße mit den Sicherungsmuttern bis zur Hälfte in den
Sockel und stellen Sie den Lautsprecher wieder aufrecht auf. (Falls Sie einen Holz-
oder Steinfußboden haben, stecken Sie vor dem Aufrichten des Lautsprechers
die Schutzkappen auf die Spike-Füße.) Schieben Sie bei aufrecht stehendem
Lautsprecher den Inbus-Schlüssel von oben in die hinteren Spike-Füße und stellen
Sie sie so ein, dass der Lautsprecher eben und stabil steht.
Heben Sie die Lautsprecher aus den Kartons. Halten Sie sie
dabei am Gehäuse fest, berühren Sie nicht die Schallwandler und
heben Sie die Lautsprecher nicht an den Schutzhüllen an. Die
5040-Lautsprecher sind schwer. Holen Sie sich Hilfe zum Anheben.
Die Spike-Füße sind spitz. Gehen Sie mit Vorsicht vor.
Stellen Sie einen Lautsprecher mit Spike-Füßen niemals dort auf,
wo er Beschädigungen verursachen kann.
Heben Sie die Lautsprecher beim Transport immer an, schleifen Sie
sie niemals über den Boden.

20
DEUTSCH (DE)
Schaumstoffstöpsel
Die Lautsprecher der Reihe 5000 haben einen Reexkanal auf der Rückseite und
bieten den besten Klang, wenn sie an der Rückseite mindestens 20 cm freien
Abstand haben. Generell gilt, dass die Bassfrequenzen umso mehr verstärkt
werden, je dichter die Lautsprecher vor einer Wand stehen, bis sie den Gesamtklang
überschatten. In diesem Fall kann die Öffnung auf der Rückseite mit dem
Schaumstoffstöpsel verschlossen werden. Das ist hilfreich, falls die Räumlichkeiten
einen geringeren Abstand zwischen Lautsprecher und Wand erforderlich machen,
z. B. bei der Wandmontage.
Stellen Sie sicher dass die Stöpsel gut in der Öffnung sitzen, jedoch ohne sie zu
tief hineinzuschieben. Sie werden feststellen, dass der Basspegel reduziert wird,
die Denition und Basserweiterung hingegen zunehmen. Die optimale Position der
Lautsprecher kann nur durch Ausprobieren und kleine Anpassungen während der
ersten Hörsitzungen gefunden werden.
Die Positionierung von Lautsprechern in einem Raum ist keine exakte Wissenschaft.
Selbst Experten müssen experimentieren.
Versuchen Sie, die beste Balance zwischen Bassquantität gegenüber Qualität und
Sprachqualität gegenüber Verständlichkeit zu nden.
5010 / 5020
Die 5010 / 5020 werden idealerweise auf den Ständern Q Acoustics montiert. Auch
die Wandmontage mit der Wandhalterung Q Acoustics ist möglich. Auf Ständern
montierte Lautsprecher sollten in der gleichen Weise wie Standlautsprecher
behandelt werden, können jedoch etwas näher an die Wand gestellt werden.
5040
Die 5040 sollten mit mindestens 20 cm Abstand zu einer rückwärtigen Wand und
50 cm zu Seitenwänden 2,0–4,0 m voneinander entfernt und in gleich weitem Abstand
zur Hörerposition aufgestellt werden. Eine leicht einwärts gerichtete Orientierung
sorgt für einen schärferen Stereoklang, führt jedoch auch zu einer Einengung der
Klangquelle.
5090
Der 5090 sollte mit mindestens 20 cm Abstand zu einer rückwärtigen Wand und mittig
zu einem Fernsehgerät aufgestellt werden.
Aufstellung
>0,2 m 2,0 - 4,0 m
>0,5 m
La page est en cours de chargement...
La page est en cours de chargement...
La page est en cours de chargement...
La page est en cours de chargement...
La page est en cours de chargement...
La page est en cours de chargement...
La page est en cours de chargement...
La page est en cours de chargement...
La page est en cours de chargement...
La page est en cours de chargement...
La page est en cours de chargement...
La page est en cours de chargement...
La page est en cours de chargement...
La page est en cours de chargement...
La page est en cours de chargement...
La page est en cours de chargement...
La page est en cours de chargement...
La page est en cours de chargement...
La page est en cours de chargement...
La page est en cours de chargement...
La page est en cours de chargement...
La page est en cours de chargement...
La page est en cours de chargement...
La page est en cours de chargement...
La page est en cours de chargement...
La page est en cours de chargement...
La page est en cours de chargement...
La page est en cours de chargement...
La page est en cours de chargement...
La page est en cours de chargement...
La page est en cours de chargement...
La page est en cours de chargement...
La page est en cours de chargement...
La page est en cours de chargement...
La page est en cours de chargement...
La page est en cours de chargement...
La page est en cours de chargement...
La page est en cours de chargement...
La page est en cours de chargement...
La page est en cours de chargement...
La page est en cours de chargement...
La page est en cours de chargement...
La page est en cours de chargement...
La page est en cours de chargement...
La page est en cours de chargement...
La page est en cours de chargement...
La page est en cours de chargement...
La page est en cours de chargement...
La page est en cours de chargement...
La page est en cours de chargement...
La page est en cours de chargement...
La page est en cours de chargement...
La page est en cours de chargement...
La page est en cours de chargement...
La page est en cours de chargement...
La page est en cours de chargement...
La page est en cours de chargement...
La page est en cours de chargement...
La page est en cours de chargement...
La page est en cours de chargement...
La page est en cours de chargement...
La page est en cours de chargement...
La page est en cours de chargement...
La page est en cours de chargement...
La page est en cours de chargement...
La page est en cours de chargement...
La page est en cours de chargement...
La page est en cours de chargement...
La page est en cours de chargement...
La page est en cours de chargement...
La page est en cours de chargement...
La page est en cours de chargement...
La page est en cours de chargement...
La page est en cours de chargement...
La page est en cours de chargement...
La page est en cours de chargement...
La page est en cours de chargement...
La page est en cours de chargement...
La page est en cours de chargement...
La page est en cours de chargement...
La page est en cours de chargement...
La page est en cours de chargement...
La page est en cours de chargement...
La page est en cours de chargement...
La page est en cours de chargement...
La page est en cours de chargement...
La page est en cours de chargement...
La page est en cours de chargement...
La page est en cours de chargement...
La page est en cours de chargement...
La page est en cours de chargement...
La page est en cours de chargement...
La page est en cours de chargement...
La page est en cours de chargement...
La page est en cours de chargement...
La page est en cours de chargement...
La page est en cours de chargement...
La page est en cours de chargement...
La page est en cours de chargement...
La page est en cours de chargement...
La page est en cours de chargement...
La page est en cours de chargement...
La page est en cours de chargement...
La page est en cours de chargement...
La page est en cours de chargement...
La page est en cours de chargement...
La page est en cours de chargement...
La page est en cours de chargement...
La page est en cours de chargement...
La page est en cours de chargement...
La page est en cours de chargement...
La page est en cours de chargement...
La page est en cours de chargement...
La page est en cours de chargement...
-
 1
1
-
 2
2
-
 3
3
-
 4
4
-
 5
5
-
 6
6
-
 7
7
-
 8
8
-
 9
9
-
 10
10
-
 11
11
-
 12
12
-
 13
13
-
 14
14
-
 15
15
-
 16
16
-
 17
17
-
 18
18
-
 19
19
-
 20
20
-
 21
21
-
 22
22
-
 23
23
-
 24
24
-
 25
25
-
 26
26
-
 27
27
-
 28
28
-
 29
29
-
 30
30
-
 31
31
-
 32
32
-
 33
33
-
 34
34
-
 35
35
-
 36
36
-
 37
37
-
 38
38
-
 39
39
-
 40
40
-
 41
41
-
 42
42
-
 43
43
-
 44
44
-
 45
45
-
 46
46
-
 47
47
-
 48
48
-
 49
49
-
 50
50
-
 51
51
-
 52
52
-
 53
53
-
 54
54
-
 55
55
-
 56
56
-
 57
57
-
 58
58
-
 59
59
-
 60
60
-
 61
61
-
 62
62
-
 63
63
-
 64
64
-
 65
65
-
 66
66
-
 67
67
-
 68
68
-
 69
69
-
 70
70
-
 71
71
-
 72
72
-
 73
73
-
 74
74
-
 75
75
-
 76
76
-
 77
77
-
 78
78
-
 79
79
-
 80
80
-
 81
81
-
 82
82
-
 83
83
-
 84
84
-
 85
85
-
 86
86
-
 87
87
-
 88
88
-
 89
89
-
 90
90
-
 91
91
-
 92
92
-
 93
93
-
 94
94
-
 95
95
-
 96
96
-
 97
97
-
 98
98
-
 99
99
-
 100
100
-
 101
101
-
 102
102
-
 103
103
-
 104
104
-
 105
105
-
 106
106
-
 107
107
-
 108
108
-
 109
109
-
 110
110
-
 111
111
-
 112
112
-
 113
113
-
 114
114
-
 115
115
-
 116
116
-
 117
117
-
 118
118
-
 119
119
-
 120
120
-
 121
121
-
 122
122
-
 123
123
-
 124
124
-
 125
125
-
 126
126
-
 127
127
-
 128
128
-
 129
129
-
 130
130
-
 131
131
-
 132
132
-
 133
133
-
 134
134


Q Acoustics 5000 Series Manuel utilisateur
- Catégorie
- Haut-parleurs de la barre de son
- Taper
- Manuel utilisateur
dans d''autres langues
- español: Q Acoustics 5000 Series Manual de usuario
- português: Q Acoustics 5000 Series Manual do usuário
Documents connexes
Autres documents
-
 ACOUSTICS Concept 30 Standmount Speaker Le manuel du propriétaire
-
ACOUSTICS FS75 Le manuel du propriétaire
-
Mission M3I Le manuel du propriétaire
-
Genelec 6010B Studio Monitor Mode d'emploi
-
Q-ACOUSTICS 1000I Le manuel du propriétaire
-
Polk Audio RT1000P Manuel utilisateur
-
-
Dali OPTICON 5 Le manuel du propriétaire
-
Dali EPICON 8 spécification
-
JBL XTI 10C Le manuel du propriétaire
