Joovy 220301 Manuel utilisateur
- Catégorie
- Poussettes
- Taper
- Manuel utilisateur

Instruction Manual
Manuel d’Instructions
Manual de Instrucciones
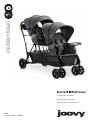
OPEN & ASSEMBLE
330X
© Joovy 2022 • 220301

2

Table of Contents
English
Safety and Warnings ........................................................................................................................ 2
Parts List .......................................................................................................................................... 4
Stroller Assembly .............................................................................................................................. 6
Stroller Operation ............................................................................................................................. 7
Care and Maintenance ................................................................................................................... 11
Team 432 ........................................................................................................................................ 12
Francais
Sécurité et Mise en Gardes ............................................................................................................ 14
Liste des Pièces ............................................................................................................................. 16
Assemblage de la Poussette .......................................................................................................... 18
Utilisation de la Poussette .............................................................................................................. 19
Entretien et Maintenance ................................................................................................................ 23
Équipe 432 ..................................................................................................................................... 24
Español
Seguridad y Advertencias .............................................................................................................. 25
Lista de Partes ................................................................................................................................ 27
Ensamblaje del Cochecito .............................................................................................................. 29
Uso del Cochecito .......................................................................................................................... 30
Cuidado y Mantenimiento .............................................................................................................. 34
Equipo 432 ..................................................................................................................................... 35

2
Safety and Warnings
IWARNING
Please read these instructions carefully before use
and keep them for future reference.
• Failure to follow these instructions could result in serious injury or death.
• Never leave child unattended.
• Avoid serious injury from falling or sliding out.
• Always use restraint system and ensure that all children are positioned
according to these instructions.
• Be certain that the stroller is fully opened, BOTH safety latches are in
position, and the wheel brakes are on before allowing children near the
stroller.
• The parking device should always be engaged during the loading and
unloading of children.
• The front seats are not suitable for a child under 6 months.
• The maximum weight of the child that can be seated in either forward
facing seat is 40 lbs. (18.2 kg).
• The rear stand-on platform and the rear bench seat are designed for a
child that is at least 2-1/2 years old but LESS than 44 in. (111.8 cm) tall
and less than 45 lbs. (20.5 kg).
• Use of the stroller with children totaling more than 125 lbs. (56.8 kg),
will cause excessive wear and stress on the stroller and may cause a
hazardous unstable condition.
• Never use this stroller to carry more than 3 children at the same time.
• Never allow a child to step on the footrest to get into or out of the
stroller.
• Do not use the stroller on stairways or escalators.
• Do not add any attachment not specically recommended by Joovy.
• Any load attached to the handle aects the stability of the stroller.
Hanging purses, shopping bags, parcels, changing bags or other
accessory items from handle bars or any other parts of the stroller may
change the balance of the stroller and cause a hazardous unstable
condition.
• The maximum weight that can be carried in the storage basket is
15 lbs. (6.8 kg). Excessive weight may result in a hazardous unstable
condition.
• The included parent organizer is for use ONLY on the Joovy Big
Caboose stroller. DO NOT use it on other stroller models.
• Never carry hot beverages or open containers in the parent organizer.
Maximum weight allowed is 5 lbs. (2.3 kg).

3
• When installing an infant carrier onto the stroller, ALWAYS use the
restraining strap to secure the carrier in place.
• The maximum weight that can be carried in each cup holder is 2 lbs. (0.9 kg).
• The maximum weight that can be carried in each seat side pocket is
1 lbs. (0.5 kg).
• Never allow your stroller to be used as a toy.
• Discard all packaging materials properly. Do not allow children to play
with them.
• Check your stroller for loose rivets, snaps, worn parts, and torn material
or stitching on a regular basis.
• Discontinue use of the stroller should it malfunction or become
damaged.
Please do not return this product to the store.
If you experience any of diculty with the assembly or use of this product, or if you have a question
regarding these instructions, please contact Team 432 (page 12).
Please note: Styles and colors may vary.

4
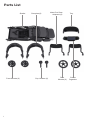
Parts List
Stroller Tray
Infant Car Seat
Adapters (2)
Canopies (2)
Rear
Wheels (2)
Parent
Organizer
Front Wheels (2) Cup Holders (2)

5
Rear Seat
• Removable/machine-washable seat
fabric
Additional Accessories (sold separately)
Customize your ride with a number of optional accessories for added functionality. All accessories
are sold separately.

6
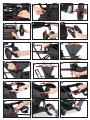
Stroller Assembly
IMPORTANT NOTE: Please refer to the end of this manual for all photos
that are referenced in parentheses in the instructions below.
Unpacking the Product
• Remove everything from the box – stroller, two canopies, two rear wheels, two front wheel sets,
parent organizer, tray, two Cup Holders, two infant car seat adapters, and documents (not shown).
• Discard all packaging materials properly including plastic coverings.
• DO NOT allow children to play with any packaging materials.
IWARNING: Adult assembly is required for this product. No
tools required.
Unfolding
• Keep children away from stroller while unfolding.
• Release the folding lock located on the right side by lifting the lever o of the catch. (1)
• Lift up on the handle of the stroller until the frame snaps into its open locked position.
CAUTION: While unfolding the stroller, be careful to keep your ngers from being pinched by
moving parts.
NOTE: Remove packing foam from rear frame assembly to ensure stroller locks in the open position.
• Lock BOTH the safety latches on both sides of the stroller. (2)
• Ensure that the safety latches are secured before ANY use of the stroller.
IWARNING: ALWAYS secure the safety latches on
BOTH sides of the stroller when it is in the unfolded use position. This
will prevent collapse of the stroller should the handle trigger locks be
accidentally opened. Possible pinching hazard – Be careful when
unfolding the stroller.
Installing/Removing Rear Wheels
• Install one rear wheel by sliding it onto the axle until it clicks into place. (3)
• Repeat for other rear wheel.
• Pull on the wheels to ensure they are installed securely.
• To remove each wheel, push up the plastic tab on the rear axle and then pull the wheel outward
from the stroller. (4)
Installing/Removing the Front Wheels
• Place the front wheel sets onto the front wheel posts until they click in place. (5)
• Pull on the wheel sets to ensure they are installed securely.
• To remove each wheel, press down on the plastic tab in the hole at the bottom of the front wheel
and then pull the wheel outward from the stroller. (6)
Front Wheel Locks
The front wheels can be set to swivel or lock.
• To lock the front wheels, rotate each wheel set so that it points forward.
• Pull up on the locking lever to engage the swivel lock. (7)
• To unlock the wheels (swivel mode) push down on the lever.
Installing and Operating the Canopies
These steps are for BOTH canopies.

7
• Position the canopy with the padded edge forward.
• Insert the canopy attachments into the frame mounts on BOTH sides. Ensure they snap into place. (8)
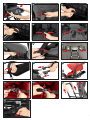
• The canopy can be adjusted forward and back, and locked open using the canopy locks on BOTH
sides. (9) and (10)
• To close the canopy, unlock the sides, then collapse. (11)
• To remove the canopy, press the lock buttons on BOTH sides of the canopy and pull up.(12)
IWARNING: Possible pinching hazard – Be careful when
closing and opening the side hinges so as not to pinch your ngers.
Attaching/Detaching the Front Tray
• To attach the front tray, slide the tray onto BOTH mounts until they snap in place. (13)
• To remove tray, press the lock buttons on BOTH mounts and pull forward. (14)
IWARNING: The child tray is not a restraint device. Always
secure your child with the restraint system. Never lift the stroller by the
child tray. Use caution when attaching the child tray when there is a child
seated in the stroller.
Attaching/Detaching the Cup Holders
• To attach the Cup Holders, slide the Cup Holders onto mount until they snap in place. (15)
• To remove Cup Holders, press the lock buttons on mount and pull forward. (16)
Rear Wheel Brakes
• Always engage rear wheel brakes before placing a child in or removing a child from the stroller.
• To engage, push down on the brake lever on either side. (17)
• To release, push down on the back of the brake lever on either side. (18)
NOTE: Gently push the stroller back and forth to ensure the brake is fully engaged.
IWARNING: Always engage the parking brake when the
stroller is not being pushed so that it will not roll away. Never leave
stroller unattended, especially on a hill or incline, as the stroller may tip
over or slide.
Adjusting the Footrest
• The footrest can be adjusted to 3 positions.
• To adjust it upwards, simply rotate it up to the desired position until it locks into place.
• To adjust it down, press the release buttons on both sides and rotate it down to the desired
position. (19)
IWARNING: Never allow a child to step onto the footrest in
either position in order to get into or out of the stroller. This may cause
the stroller to tip over and injure the child.
Securing the Front Seated Children
These steps are for BOTH front facing seats.
• There are three height adjustment positions for the shoulder harness. Adjust the height to the
closest height above your child’s shoulders.
Stroller Operation

8
• To remove the shoulder harness, turn the plastic ends sideways and push them through the slots
in the seatback. Reattach the harness at the proper height by reinserting the plastic ends through
the slots. (20) Ensure both straps are the same height.
• To remove the crotch strap, slide the strap through the small opening in the metal D-ring.
Reattach by pushing the metal-D ring through the slot in the seat, wrap the strap around the tube
under the seat bottom. Slide the strap through the small opening of the metal D-Ring and pull the
strap to secure it to the tube. (21)
• Remove the waist straps by sliding the strap through the small opening in the metal D-ring, then
pull the strap away from the seat. (22) Reattach by pushing the metal-D ring through the slot
in the seat, wrap the strap around the seat back frame tube. Slide the strap through the small
opening of the metal D-Ring and pull the strap to secure it to the tube. Repeat for the other end of
the strap.
• To unlatch the buckle press the center button and remove the male ends of each buckle. (23)
• Carefully place the child in the seat with the shoulder straps over their shoulders and chest. Then
place the crotch strap between the child’s legs.
• Push the shoulder/waist latch posts into the crotch buckle until all parts snap into place. (24)
• Tighten the waist belt to be snug around the child’s waist.
• The shoulder, waist, and crotch straps may be adjusted using the sliding plastic rings on these straps.
IWARNING: The front seats are not suitable for a child
under 6 months. Avoid serious injury from falling or sliding out. Always
use the restraint system.
Seat Recline Positioning
The front seat has two positions. This seat should be used for children who are at least 6 months
old. These steps are for BOTH front facing seats.
• To place the seat in the upright position, push the bar on the rear of the seat toward the front of the
stroller and rotate the seatback towards the front of the stroller until this bar is locked in its lowest
position. (25)
• To recline the seat, pull the bar on the rear of the seat toward the rear of the stroller and rotate the
seatback down until this bar is again in its lowest position. (25)
IWARNING: Whether the seatback is upright or reclined,
ALWAYS make certain that the recline mechanism is engaged before
placing the child into the seat.
Using the Stand-On Platform
• Push the bench seat to its most forward position.
• Position the canopy to its most forward position.
• Position the child on the platform on the back of the stroller. Be sure that the child is facing
forward and BOTH of their hands are holding onto the stroller frame.
• Be sure that BOTH of the child’s feet are fully on the platform at all times.
• You may need to adjust the recline position of the seat to allow for more room for the child to stand.
IWARNING: The rear stand-on platform and the rear bench
seat are designed for a child that is at least 2½ years old but LESS
than 44 inches (111.8 cm) tall and less than 45 lbs. (20.5 kg). Use of the
stroller with 3 children totaling more than 125 lbs. (56.8 kg) will cause
excessive wear and stress on the stroller and may cause a hazardous
unstable condition. NEVER allow a standing child to use the canopy as
a hand hold. NEVER use this stroller to carry more than 3 children at the
same time.

9
Using the Rear Bench Seat
• Push the bench seat to its most rearward position.
NOTE: There are webbing straps attached to the bottom of the rear seat pad. These straps will
lock the seat into the most rearward position. To lock the seat, pull the straps from EACH side of
the pad and loop them around the frame as shown, then snap them together. (26)
• To slide the seat forward, undo EACH snap and reattach the webbing to the underside of the seat
pad using the Velcro® attachments.
• Position the canopy to its most forward position.
• To unlatch the buckle press the center button and remove both latch posts.
• Have the child sit on the bench seat facing backward with their feet on the platform.
• You may need to adjust the recline position of the front seat to allow for more room for the child to
sit.
• Place the crotch strap between the child’s legs.
• Push the waist latch posts into the crotch buckle until all parts snap into place. (27)
• Adjust the waist straps to be snug around the child’s waist.
• Be sure that BOTH of the child’s feet are fully on the platform at all times.
• Be sure that BOTH of the child’s hands are holding the frame.
IWARNING: NEVER allow a rear seated child to use the
canopy as a hand hold.
Storage Basket
The maximum weight that can be carried in the storage basket is 15 lbs. (6.8 kg).
Parent Organizer
• Loop one strap of the parent organizer around one side of the handlebar and loop the rest of the
strap back around the handlebar to attach the Velcro®. (28)
• Repeat for the other side. Ensure the parent organizer is secure.
IWARNING: For use ONLY on the Joovy Big Caboose
Stroller. NEVER carry hot beverages or open containers in this product.
Maximum weight for Organizer is 5 lbs. (2.3 kg).
Using the Stroller with Infant Car Seats
These steps are for BOTH front facing seats. The Joovy Big Caboose will accommodate a car
seat in EACH of the front seats.
NOTE: See insert for a list of specic compatible car seat models.
• Remove the front tray and the front canopy. Install the infant car seat adapter in the front tray
mounts. Ensure it is secure on BOTH sides. (29)
• ADJUST THE SEAT TO ITS RECLINE POSITION.
• Remove the infant car seat from its base and place it onto the front seat of the stroller so it is in a
REAR FACING POSITION. Position the “head” end toward the front, resting on the infant car seat
adapter. Position the “feet” end on the seatback - but NOT on the top edge of the seatback. (30)
• Buckle the restraining straps over the LOWEST part of the infant car seat (the straps are located in
the pockets on the side of the seat). Adjust the straps so they are tight around the infant car seat
but AWAY from the child’s neck. Pull up on the infant car seat to be sure it is secure. (31)
• To remove the infant car seat from the stroller, unlock the restraining strap buckle by pressing the
button and both side releases. (32)
• Return the restraining straps to their pockets.

10
IWARNING: ALWAYS install the infant car seat so that the
child is facing toward the rear (handle) of the stroller with the restraining
straps secured. ALWAYS position the infant car seat so that it is securely
placed down inside the infant car seat adapter frame. ALWAYS position
the infant car seat so that it is resting ON the seatback, but NOT on the
top of the seatback. The seatback must be in the RECLINE position.
NEVER position the restraining straps on or near the child’s neck as this
may result in strangulation. The infant car seat adapter is for use ONLY
with specic infant car seat models. See insert for specic models.
DO NOT use other infant car seat models.
Folding the Stroller
• Keep children away from stroller while folding.
• Remove any infant car seat. The stroller can be folded with the infant car seat adapter in place.
• Close BOTH canopies and push it forward.
• Put the front seats into there most upright position.
• Make sure both rear wheel brakes are set to their locked positions.
• Lock BOTH front wheel sets in place with locking levers facing forward.
• Unlock the safety latches on the BOTH sides of the stroller.
• Pull upward on the trigger mechanisms on both sides of the stroller and push the handle fully
forward. (33)
CAUTION: While folding the stroller, be careful to keep your ngers from being pinched by moving
parts.
• Engage the fold lock on the right side of the stroller over the mounting post. (34)
IWARNING: ALWAYS keep children away from the stroller
when folding. Possible pinching hazard – Be careful when folding the
stroller.

11
Care & Maintenance
Maintenance
All of the ttings, snaps, locks, rivets, and other hardware and plastic parts on the stroller should be
inspected periodically to ensure that they are secured properly and not damaged or malfunctioning.
The safety harness, as well as all other straps and fabric items and their stitching should also be
inspected periodically to ensure that they are secured properly and not loose, torn or otherwise
damaged. All moving parts, such as wheels, brakes, and hinges should also be checked periodically
to ensure they are operating properly.
Any missing, broken, or worn components should be replaced immediately, and the playard should
not be used until they are replaced. Only original manufacturer’s components should be used. If
needed, please contact Joovy at our toll-free phone number.
Cleaning
The fabric material on this stroller can be cleaned using mild household soap or detergent and warm
water on a sponge or clean cloth. Always allow the fabric to completely air dry before using the
stroller.
The frame and wheels should always be kept clean and free of dirt and foreign matter, especially
after operating the stroller in rain, snow, or other harsh environments. Use a sponge or cloth
dampened with warm water and a mild household soap or detergent to clean the wheels after such
use.
Storage
Direct sunlight may fade fabric and dry out wheels. Store stroller indoors to prolong its appearance.
DO NOT store outdoors. Ensure that the stroller is dry before storing for prolonged periods. Always
store the stroller in a dry environment. Store the stroller in a safe place when not in use (i.e. away
from children). DO NOT place heavy objects on top of the stroller. DO NOT store the stroller near a
direct heat source such as a radiator or open re.

12
Team 432
Please do not return this product to the store.
If you experience any of diculty with the assembly or use of this product, or if you have a question
regarding these instructions, please contact Team 432:
United States
Joovy
(877) 456-5049, 8:30 am – 5:00 pm Central Time
joovy.com LiveChat, 8:30 am – 9:00 pm Central Time
customerservice@joovy.com
Canada
Elfe Juvenile Products
(800) 667-8184, 8:30 am – 5:00 pm Eastern Time
@joovy

13

14
Sécurité et Mise en Gardes
IMISE EN GARDE
Veuillez lire ces instructions attentivement avant chaque utilisation
et les conserver pour référence ultérieure.
• Le non-respect des présentes instructions pourrait entraîner des
blessures graves ou mortelles.
• Ne jamais laisser l’enfant sans surveillance.
• Évitez les blessures graves causées par tout glissement ou chute.
• Utilisez toujours les courroies de sécurité et assurez-vous que les
enfants sont positionnés conformément à ces instructions.
• S’assurer que la poussette est complètement ouverte, que LES DEUX
verrous de sécurité sont en place, et que les freins de roue sont mis
avant de permettre aux enfants de s’approcher de la poussette.
• Toujours mettre les freins avant de laisser les enfants monter dans la
poussette ou en descendre.
• Le siège avant ne convient pas à un enfant de moins de 6 mois.
• Le poids maximal de l’enfant pouvant être assis dans l’un des sièges
faisant face vers l’avant est de 18,2 kg (40 lb).
• Le marchepied et le banc à l’arrière de la poussette arrière sont conçus
pour un enfant âgé de 2 ans ½ ou plus,mais mesurant MOINS de
111.8 cm (44 po) et pesant MOINS de 20,5 kg (45 lb).
• L’utilisation de la poussette avec des enfants pesant plus de
56,8 kg (125 lb) provoque une usure et un stress excessifs sur la
poussette et peut causer une condition dangereuse d’instabilité.
• Ne jamais transporter plus de trois enfants à la fois dans la poussette.
• Ne jamais laisser un enfant prendre appui sur le repose-pieds pour
monter dans la poussette ou descendre de celle-ci.
• Ne pas utiliser la poussette dans un escalier xe ou roulant.
• N’ajouter aucun accessoire qui n’est pas expressément recommandé
par Joovy.
• Toute charge xée à la poignée touche la stabilité de la poussette. Les
sacoches, sacs de magasinage, colis, sacs à langer, ou autres objets
suspendus des barres de la poignée ou de toute autre pièce de la
poussette peuvent modier l’équilibre de la poussette et causer une
condition dangereuse d’instabilité.
• Le poids maximal pouvant être transporté dans le panier de rangement
est de 6,8 kg (15 lb). Un poids excessif peut aboutir en une condition
dangereuse d’instabilité.
• L’organisateur pour parent est conçu pour être utilisé UNIQUEMENT sur
la poussette Joovy Big Caboose. NE PAS utiliser sur d’autres modèles
de poussette.

15
• NE transportez JAMAIS de boissons chaudes ou de contenants ouverts
dans ce produit. Le poids maximum pour le classeur est de 2,3 kg (5 lb).
• Quand un siège d’auto porte-bébé est installé sur la poussette,
TOUJOURS l’attacher solidement à l’aide des sangles de retenue.
• La charge maximale que peuvent contenir chaque porte-gobelet ou le
plateau est de 0,9 kg (2 lb).
• Le poids maximal pouvant être transporté dans la poche latérale de
chaque siège est de 0,5 kg (1 lb).
• Ne jamais permettre que la poussette serve de jouet.
• Jeter tous les emballages de façon appropriée. Ne laisser aucun enfant
jouer avec les emballages.
• nspecter régulièrement la poussette et s’assurer que tous les rivets et
attaches sont solides, qu’aucune pièce n’est usée et que le tissu n’est ni
déchiré ni décousu.
• Cesser d’utiliser la poussette si elle fonctionne mal ou si elle est
endommagée.
ATTENTION: Durant les opérations d’ouverture, éviter de se pincer les
doigts dans les pièces mobiles de la poussette.
Veuillez ne pas retourner ce produit en magasin.
Si vous rencontrez des dicultés avec l’assemblage ou l’utilisation de ce produit, ou si vous avez
des questions à propos de ces instructions, veuillez contacter l’équipe 432(page 24).
Veuillez noter: Les styles et couleurs peuvent varier.

16
Liste des Pièces
Poussette Plateau
Deux Adaptateurs Pour
Siège D’auto Pour
Bambin (2)
Deux Auvents (2)
Jeu de Deux
Roues Arrière (2)
Classeur
Pour Parent
Jeu de Deux
Roues Avant (2)
Deux
Porte-Gobelets(2)

17
Siège arrière
• Tissu de siège amovible / lavable à la
machine
Accessoires Supplémentaires (vendus séparément)
Personnalisez votre produit avec divers accessoires oerts en option, an d’obtenir des
fonctionnalités supplémentaires. Tous les accessoires sont vendus séparément.

18
Assemblage de Poussette
REMARQUE IMPORTANTE : Veuillez consulter la n de ce manuel pour toutes
les photos référencées entre parenthèses dans les instructions ci-dessous.
Déballer le Produit
• Enlevez tout de la boîte : poussette, deux auvents, jeu de deux roues arrière, jeu de deux roues
avant, classeur pour parent, plateau, deux porte-gobelets, deux adaptateurs pour siège d’auto
pour bambin, et documents(non illustrés).
• Jeter tous les emballages de façon appropriée, y compris les éléments de recouvrement en plastique.
• Ne PAS laisser un enfant jouer avec les emballages.
IMISE EN GARDE: Ce produit doit être assemblé
par un adulte. Aucun outil requis.
Pour ouvrir la Poussette
• Garder tout enfant à bonne distance de la poussette pendant l’ouverture.
• Ouvrir le verrou du côté droit de la poussette en le soulevant pour le détacher du rivet. (1)
• Tirer la poignée vers le haut jusqu’à ce que le cadre se bloque avec un déclic en position d’ouverture.
ATTENTION: Durant les opérations d’ouverture, éviter de se pincer les doigts dans les pièces
mobiles de la poussette.
REMARQUE: Enlever la mousse qui couvre la partie arrière du cadre pour que la poussette se
bloque en position ouverte.
• Bloquer LES DEUX verrous de sécurité sur les deux côtés de la poussette. (2)
• S’assurer que le verrou de sécurité est mis avant TOUTE utilisation de la poussette.
IMISE EN GARDE: Fixer TOUJOURS les verrous
de sécurité sur LES DEUX côtés de la poussette lorsque celle-ci est en
position d’utilisation dépliée. Cela empêchera la poussette de s’aaisser
si les verrous à gâchette de chaque côté de la poignée sont actionnés
accidentellement. Possible risque de pincement – Soyez prudent lors du
dépliage de la poussette.
Installer/Enlever les Roues Arrière
• Installez une roue arrière en la glissant sur l’axe jusqu’à ce qu’elle clique en place. (3)
• Répétez pour l’autre roue arrière.
• Tirez sur les roues pour s’assurer qu’elles sont bien installées.
• Pour enlever chaque roue : poussez sur l’onglet en plastique sur l’axe arrière. Tirez la roue de la
poussette vers l’extérieur. (4)
Installer/Enlever les Roues Avant
• Placez le jeu de roues avant sur les tiges de roue avant jusqu’à ce que les roues cliquent en place. (5)
• Tirez sur le jeu de roues pour s’assurer qu’elles sont bien installées.
• Pour enlever chaque roue : appuyez sur l’onglet en plastique dans le trou situé au bas de la roue
avant, puis tirez la roue de la poussette vers l’extérieur. (6)
Trabas de las Ruedas Delanteras
Las ruedas delanteras pueden girar o trabarse en posición ja.
• Para trabar las ruedas delanteras, gírelas para que queden mirando hacia adelante.
• Tire de la palanca roja hacia arriba para trabar las ruedas. (7)
• Para destrabar las ruedas (modo giratorio) presione la palanca.
La page est en cours de chargement...
La page est en cours de chargement...
La page est en cours de chargement...
La page est en cours de chargement...
La page est en cours de chargement...
La page est en cours de chargement...
La page est en cours de chargement...
La page est en cours de chargement...
La page est en cours de chargement...
La page est en cours de chargement...
La page est en cours de chargement...
La page est en cours de chargement...
La page est en cours de chargement...
La page est en cours de chargement...
La page est en cours de chargement...
La page est en cours de chargement...
La page est en cours de chargement...
La page est en cours de chargement...
La page est en cours de chargement...
La page est en cours de chargement...
La page est en cours de chargement...
La page est en cours de chargement...
-
 1
1
-
 2
2
-
 3
3
-
 4
4
-
 5
5
-
 6
6
-
 7
7
-
 8
8
-
 9
9
-
 10
10
-
 11
11
-
 12
12
-
 13
13
-
 14
14
-
 15
15
-
 16
16
-
 17
17
-
 18
18
-
 19
19
-
 20
20
-
 21
21
-
 22
22
-
 23
23
-
 24
24
-
 25
25
-
 26
26
-
 27
27
-
 28
28
-
 29
29
-
 30
30
-
 31
31
-
 32
32
-
 33
33
-
 34
34
-
 35
35
-
 36
36
-
 37
37
-
 38
38
-
 39
39
-
 40
40
-
 41
41
-
 42
42


Joovy 220301 Manuel utilisateur
- Catégorie
- Poussettes
- Taper
- Manuel utilisateur
dans d''autres langues
- English: Joovy 220301 User manual
- español: Joovy 220301 Manual de usuario
Documents connexes
-
Joovy RS2 Manuel utilisateur
-
Joovy Caboose Too Ultralight Manuel utilisateur
-
-
Joovy Caboose Ultralight Sit and Stand Double Stroller Manuel utilisateur
-
-
-
-
-
-
Joovy Caboose Graphite Manuel utilisateur