ROSIERES RCM634TPS/G3 Manuel utilisateur
- Catégorie
- Plaques de cuisson
- Taper
- Manuel utilisateur
Ce manuel convient également à

RSTP634MC/G3


EN-2
ENGLISH

EN-3

Rosieres
Rosieres
EN-4
ENGLISH

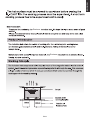
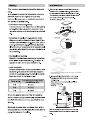
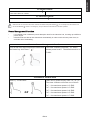
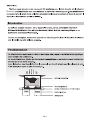
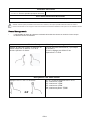
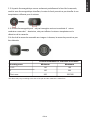
Flush installation: Feasible only if the oven is not installed
under the counter
EN-5

EN-6
ENGLISH

EN-7

EN-8
ENGLISH

• You can lock the controls to prevent unintended use (for example children accidentally turning the
cooking zones on).
• When the controls are locked, all the controls except the ON/OFF control are disabled.
Locking the Controls
Touch the pause control.
Touch the pause control “ ”.
EN-9

• it is possible to set a maximum power absorption level for the induction hob, choosing up to different
power ranges.
• induction hobs are able to limit themselves automatically in order to work at lower power level, to
avoid the risk of overloading.
Power Management Function
To lock the controls
Touch and hold the Timer “ ” and Timer ”
”
at the same time for a while.
The timer indicator will show “ Lo ”
To unlock the controls
Touch and hold the Timer “ ” and Timer ”
” at the same time for a while.
When the hob is in the lock mode, all the controls are disable except the ON/OFF , you can always turn the induction hob
off with the ON/OFF control in an emergency, but you shall unlock the hob first in the next operation.
To enter Power Management Function
Turn on the hob, then Press at the same time
the Pause key and Timer ”
”.
The timer indicator will show “ P5“ which
means power level 5。The default mode is on
7.0 。
To switch to another level
press +/- of the timer
or
There are 5 power levels, from “P1” to “p5”.
The timer indicator will show one of them.
“P1” : the maximum power is 2.5 .
“P2” : the maximum power is 3.5 .
“P3” : the maximum power is 4.5 .
“P4” : the maximum power is 5.5 .
“P5” : the maximum power is 7.0 .
EN-10
ENGLISH
k
W
k
W
k
W
k
W
k
W
k
W

You can use the timer in two different ways:
• You can use it as a minute minder. In this case, the timer will not turn any cooking zone off when the
set time is up.
• You can set it to turn one or more cooking zones off after the set time is up.
The timer of maximum is 99min.
If you are not selecting any cooking zone
Timer control
a) Using the Timer as a Minute Minder
Make sure the cooktop is turned on.
Note: you can use the minute minder even if you’re not
selecting any cooking zone.
Touch “+” the controls of the timer. The minder
indicator will start flashing and “10” will show
in the timer display.
Set the time by touching the “-” or “+” control
of the timer
Hint: Touch the “-” or “+” control of the timer
once to decrease or increase by 1 minute.
Touch and hold the “-” or “+” control of the timer to decrease
or increase by 10 minutes.
Touching the “-” and "+” together, the timer
is cancelled, and the “00” will show in the minute
display.
When the time is set, it will begin to count down
immediately. The display will show the remaining
time and the timer indicator will flash for 5 seconds.
Buzzer will beep for 30 seconds and the timer
indicator shows “- - “ when the setting time finished.
Confirmation and Exit Power Management Function
Press at the same time Pause key and Timer
”” for confirmation.
Then the hob will be turned off.
EN-11

Set one zone
Touching the heating zone slider control
Set the time by touching the or control of the timer
Hint: Touch the “-“ or “+” control of the timer
once will decrease or increase by 1 minute.
Touch and hold the ”-“ or “+”control of the timer
will decrease or increase by 10 minutes.
Touching the “-” and “+” together, the timer is cancelled, and the
“00” will show in the minute display.
When the time is set, it will begin to count down immediately. The
display will show the remaining time and the timer indicator flash
for 5 seconds.
NOTE: The red dot next to power level indicator will illuminate
indicating that zone is selected.
When cooking timer expires, the corresponding cooking zone will
be switched off automatically.
b) Setting the timer to turn one or more cooking zones off
Other cooking zone will keep operating if they are turned on previously.
EN-12
ENGLISH

c) Cancel the timer
set more zones:
The steps for setting more zones are similar to the steps of setting one zone;
When you set the time for several cooking zones simultaneously, decimal dots of the relevant cooking
zones are on. The minute display shows the min. timer. The dot of the corresponding zone flashes.
The shown as below:
(set to 15 minutes)
(set to 45 m
inutes)
Once the countdown timer expires, the corresponding zone
will switch off. Then it will show the new min. timer and
the dot of corresponding zone will flash.
The shown as right:
(set to 30 minutes)
Touch the heating zone selection control, the corresponding timer will be shown in the timer indicator.
Keep warm
Touching the heating zone slider control that you want to
cancel the timer
Touching the ”-“ and “+” together, the timer is
cancelled, and the ”00” will show in the minute
display.
Activate the Keep warm function
Touching the heating zone slider control ,
and a indicator next to
the key will flash.
Touching the keep warm control , the zone indicator show
“
|
”.
Cancel the keep warm function
Touching the heating zone slider control that you want to cancel
keep warm.
EN-13

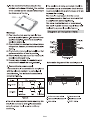
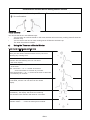
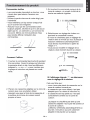
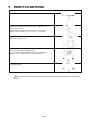
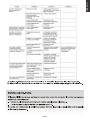
Selection of cooking vessels
You may have a number of different cooking vessels
1. This induction hob can identify a variety of cooking vessels, which you can test by
one of the following methods:
Place the vessel on the cooking zone. If the corresponding cooking zone displays a
power level, then the vessel is suitable. If “U” flashes, then the vessel is not
suitable for use with the induction hob.
2. Hold a magnet to the vessel. If the magnet is attracted to the vessel is suitable for
use with the induction hob.
NB: The base of the vessel must contain magnetic material.
It must have flat bottom with a diameter according to the table 1 below.
3. Use only ferromagnetic cookwares made from enameled steel, cast iron or stainless
steel but compatible with induction
4. Use pans whose diameter of the ferromagnetic area (base of the pan) is in the range
of dimensions in the table below. (Table 1)
- If you use smaller pots, performance could be affected
- If you use pot with a diameter smaller than the one indicated in the table 1, pots
may not be detected
According to the dimension of the zone you can use pots of different diameters as picture
below:
Iron oil frying
Stainless steel
Iron pan
Iron kettle
Enamel
stainless steel
kettle
Enamel cooking
utesil
Iron plate
EN-14
ENGLISH

5. If the ferromagnetic part covers only partially the base of the pan, only the
ferromagnetic area will heat up, the rest of the base may not heat up a sufficient
temperature for cooking.
6. If the ferromagnetic area is not homogeneous, but presents others material such as
aluminum this may affect the heating up and the pan detection.
If the base of the pan is similar to the pictures below the pan could be not detected.
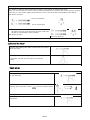
The base diameter of induction cookware
Cooking zone
1 & 2 140
160
180
2903
Minimum Maximum
Flexi zone 250
The above may vary according to the size of the pan and the material it is made from.
EN-15
395*180

EN-16
ENGLISH

EN-17

EN-18
ENGLISH

EN-19
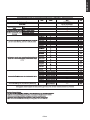
RSTP634MC/G3
189,7
174,7
189,9
184,8
La page est en cours de chargement...
La page est en cours de chargement...
La page est en cours de chargement...
La page est en cours de chargement...
La page est en cours de chargement...
La page est en cours de chargement...
La page est en cours de chargement...
La page est en cours de chargement...
La page est en cours de chargement...
La page est en cours de chargement...
La page est en cours de chargement...
La page est en cours de chargement...
La page est en cours de chargement...
La page est en cours de chargement...
La page est en cours de chargement...
La page est en cours de chargement...
La page est en cours de chargement...
La page est en cours de chargement...
La page est en cours de chargement...
La page est en cours de chargement...
-
 1
1
-
 2
2
-
 3
3
-
 4
4
-
 5
5
-
 6
6
-
 7
7
-
 8
8
-
 9
9
-
 10
10
-
 11
11
-
 12
12
-
 13
13
-
 14
14
-
 15
15
-
 16
16
-
 17
17
-
 18
18
-
 19
19
-
 20
20
-
 21
21
-
 22
22
-
 23
23
-
 24
24
-
 25
25
-
 26
26
-
 27
27
-
 28
28
-
 29
29
-
 30
30
-
 31
31
-
 32
32
-
 33
33
-
 34
34
-
 35
35
-
 36
36
-
 37
37
-
 38
38
-
 39
39
-
 40
40


ROSIERES RCM634TPS/G3 Manuel utilisateur
- Catégorie
- Plaques de cuisson
- Taper
- Manuel utilisateur
- Ce manuel convient également à
dans d''autres langues
- English: ROSIERES RCM634TPS/G3 User manual