
Your new Nighthawk carbon monoxide (CO) alarm is a sophisticated
instrument that has been carefully designed and tested to detect CO
build up in a residential environment. Your Nighthawk is for use
specifically in the home.
Carbon monoxide cannot be seen, smelled or tasted and can be fatal.
The build up of CO in the blood is called the carboxyhemoglobin level
and interferes with the body’s ability to supply itself with oxygen.
Depending on the concentration, carbon monoxide can kill in minutes.
The most common sources of carbon monoxide are malfunctioning gas
appliances used for heating and cooking, vehicles running in an
attached garage, blocked chimneys or flues, portable fuel burning
heaters, fireplaces, fuel powered tools and operating a barbeque in an
enclosed space.
Indications of carbon monoxide poisoning include symptoms similar to
the flu, but with no fever. Other symptoms include dizziness, fatigue,
weakness, headache, nausea, vomiting, sleepiness and confusion.
Everyone is susceptible to the danger of CO, but experts agree that
unborn babies, small children, pregnant women, senior citizens and
people with heart or respiratory problems are at the highest risk for
serious injury or death. Each year a qualified technician should inspect
and clean your heating system, vents, chimney, and flues.
Your new Nighthawk CO alarm has a five year limited warranty.
Please take a few minutes to thoroughly read the user’s guide and
familiarise yourself and your family with its operation. Your
Nighthawk CO alarm was designed to detect carbon monoxide gas
from ANY source of combustion. It is NOT designed to detect smoke,
fire or any other gases. If you have any questions please call 01753
685148.
This manual and the products described are copyrighted, with all rights
reserved. Under these copyright laws, no part of this manual may be
copied for use without the written consent of KIDDE Safety. If you
require further information, contact our Consumer Hotline, or write to
us at:
KIDDE Safety Europe Ltd
Mathisen Way, Colnbrook, Slough, Berkshire SL3 0HB
E-mail: [email protected]
www.kiddesafetyeurope.co.uk
2
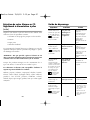
Carbon Monoxide Overview
Carbon Monoxide Overview . . . . . .Page 2
Nighthawk Product View . . . . . . . . .Pages 3-4
Quick Set Up . . . . . . . . . . . . . . . . . .Page 5
Installation Instructions . . . . . . . . .Pages 6-7
Mounting
Where to Install
Where NOT to Install
Features and Operations . . . . . . . . .Pages 8-15
Digital Display
Other Possible Displays
Peak Level Button
Test/Reset Button
Lights
Battery Life Indicator (Fuel Gauge)
Protocol Label
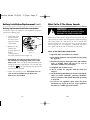
Battery Installation/Replacement . .Pages 16-17
What To Do If The Alarm Sounds . .Pages 18-19
Alarm/Danger Levels . . . . . . . . . . . .Pages 20-23
Caring For Your Nighthawk
Battery Powered CO Alarm
. . . . . . .Pages 24-25
Troubleshooting Guide . . . . . . . . . .Page 26
Frequently Asked Questions . . . . . .Page 27
Product Specifications . . . . . . . . . . .Pages 28-29
Warranty . . . . . . . . . . . . . . . . . . . . .Pages 30-31
1
ENGLISH
Table of Contents
Thank you for the purchase of your new Nighthawk
carbon monoxide alarm. If you have any questions
about the operation or setup of your CO alarm,
feel free to call us on 01753 685148.
Benelux Guide 21/8/01 2:15 pm Page 1

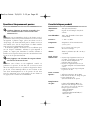
4
NIGHTHAWK
Test/
Reset
Peak
Level
Operate Alarm
PPM of CO
CARBON MONOXIDE
ALARM
Model No. 900-0089
Covers Closed
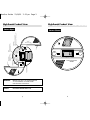
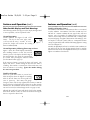
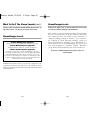
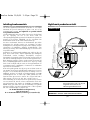
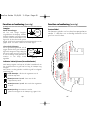
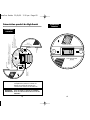
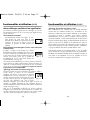
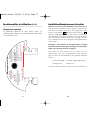
Nighthawk Product View
3
Nighthawk Product View
Covers Open
Digital Display
Displays concentration, in parts per million,
of carbon monoxide in air. Also displays "ERR" if unit
malfunctions, and "Lb" when low battery
levels are reached (see page 11 for more information).
Battery Life Indicator
See page 14 for more information.
Alarm
Loud 85 decibel alarm sounds
when detector senses dangerous
carbon monoxide levels.
See pages 18-23 for more information.
Protocol Label
Access by lifting top cover,
tells you what to do if the
alarm sounds.
See page 15 for more information.
Bottom Cover
Top Cover
Sensor Error Icon
See page 11 for
more information.
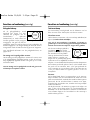
Local Emergency Number
If Reading/Alarm Occurs…
CAUTION
: See back
panel and/or Users Guide
for additional
information.
Alarm
Operate
Sensor
11 - 35 ppm
Ventilate your home –
monitor the unit for
rising CO levels.
100+ ppm
If no “flu-like” symptoms
are being experienced, follow
the previous procedures.
35 - 100 ppm
Ventilate your home –
call a qualified, service technician
to inspect for possible sources of
carbon monoxide.
If “flu-like” symptoms are
being experienced…
• Immediately evacuate the premises.
• Call 0800 111 999 or your local fire
department.
• Do not re-enter your home until the
problem is corrected.
Battery
Level
NIGHTHA
WK
Test/
Reset
Alarm
PPM of CO
CARBON MONOXIDE
ALARM
Peak
Level
Model No. 900-0089
Operate
WARNING: Malfunction may occur if tampered with
or not installed in accordance with
manufacturer’s instructions.
IMPORTANT THIS CARBON MONOXIDE ALARM IS NOT
NOTICE: INTENDED FOR PORTABLE USE.
Benelux Guide 21/8/01 2:15 pm Page 3

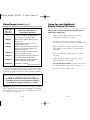
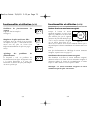
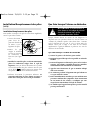
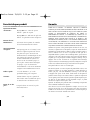
Mounting
Your CO alarm is designed for
mounting onto the inside wall.
You should fix the back plate
provided to the wall first, using
the screws and rawl plugs.
When the plate is attached,
locate the slots on the back of
the alarm with the keys on the
back plate, sliding downwards
and into position until the tab clips onto the top of the alarm
(see figure 1).
To remove, press the tab against the wall and lift the alarm out of
the mounting plate.
Where To Install Your Nighthawk CO Alarm
The following suggestions are intended to help you with the
placement and installation of your Nighthawk CO Alarm.
Ideally, you should have a alarm in or near every room that contains
a fuel burning appliance.
However, if you have more than one appliance, but only one alarm,
you should take the following into consideration when deciding
where best to put the alarm.
If there is an appliance in the room where you sleep, you should
put the alarm in that room.
If there is an appliance in a room that you use a lot e.g. a sitting
room, you should put it in that room.
If you live in a bedsit, put the alarm as far away from the cooking
appliances as possible, but near to the place where you sleep.
If the appliance is in a room not normally used (e.g. a boiler room),
put the alarm just outside the room so that you will be able to hear
the alarm more easily.
6
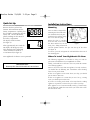
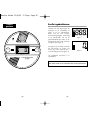
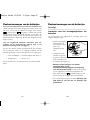
Installation Instructions
Figure 1
Remove the three enclosed AA
batteries and install them into the
battery compartment. Carefully place
the red battery warning flags into the
battery well. Observe the battery
polarity markings at the bottom of
the battery compartment.
The display should read 888
(see figure 1).
After approximately 30 seconds the
888 display will disappear, and a
black dot in the lower right hand
corner will flash on and off at 5
second intervals (see figure 2).
Your Nighthawk CO Alarm is now operational.
5
Quick Set Up
Figure 2
Figure 1
IMPORTANT NOTE:
Warm up time from initial switch on is one minute.
Benelux Guide 21/8/01 2:15 pm Page 5

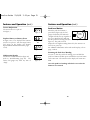
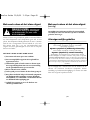
Your new Nighthawk Battery Powered CO Alarm utilizes
sophisticated electronic components to protect you and your
family from the dangers of CO.
Unique features include a digital display capable of displaying
CO readings every 30 seconds, the highest levels of CO detected,
status of the battery life, and sensor health. Familiarise yourself
with these features:
Digital Display - Shows CO level in PPM
Your Nighthawk CO alarm continuously displays a digital
readout of the CO level in Parts Per Million (PPM). The digital
display is capable of detecting and displaying readings between
30 and 999 (PPM). A reading of 0 PPM is expected under
normal conditions (see figure 5).
You will become accustomed to glancing at the
display in much the same manner as you look at a
thermometer or clock. The unit will
not display a reading below 30 PPM.
See pages 19-23 for an understanding of which CO levels
are dangerous.
8
Features and Operation
Figure 5
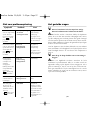
Where NOT To Install Your Nighthawk CO
Alarm
• Outside the building.
• In or below a cupboard.
• In a damp or humid area.
• Directly above a sink or cooker.
• Next to a door or window or anywhere that it would be
affected by draughts.
• Where it would be obstructed by curtains or furniture.
• In an area where the temperature could drop below 4.4°C
or rise above 37.8°C.
• Where dirt or dust could block the sensor and stop it
working.
• Where it could be easily knocked or damaged, or where it
could be accidentally turned off or removed.
7
Installation Instructions (cont.)
Benelux Guide 21/8/01 2:15 pm Page 7

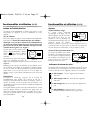
Peak Level Display (Cont.)
Concentrations of CO between 0 and 30 PPM can often occur in normal,
everyday conditions. Concentrations of CO below 30 PPM may be an
indication of a transient condition that may appear today and never
reappear. Just a few examples of conditions and/or sources that may
cause low level readings are heavy automobile traffic, a running vehicle
in an attached garage, an appliance that emits CO when starting up, a fire
in a fireplace or charcoal in a nearby barbecue. A temperature inversion
can trap CO generated by traffic and other fuel burning appliances causing
low level readings of CO.
Normally, the digital display will read “0” and under certain conditions you
may notice levels of 30 or more for short periods of time, by using the
Peak level memory feature on the Nighthawk CO alarm you can view the
highest concentrations of CO detected.
10
Features and Operation (cont.)
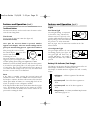
Other Possible Displays and Their Meanings
The following symbols will appear on the display during normal
or error operations, and are explained below.
Normal Operation
Normal operation (see figure 6) with a full
battery. The dot in the lower right corner
cycles on and off every 5 seconds. If CO is
present the display will indicate the reading in
Parts Per Million (PPM).
Normal Operation following Power-up or Reset
Figure 7 shows the normal display immediately
after installing batteries or after the test/reset
button is pressed. The display should change to
the normal display (see figure 7) approximately
30 seconds after pressing the test/reset button.
(see Test/Reset Button page 13).
If the test/reset button is pressed, the alarm will sound. The
display will show a number during the time that the alarm is
sounding. This number is a normal part of the test function, and
does not indicate a CO reading. Ignore the number during
the test/reset procedure.
Peak Level Display
When the peak level button is pressed and
held, the display shows the highest CO reading
taken by the CO alarm since its last peak level
reset or power-up. The battery fuel gauge
changes to show only the top segment of the battery to indicate
that peak level is being displayed (see figure 8). In this example
120 PPM was the maximum amount of CO recorded since the
unit was last reset (see Alarm/Danger Levels on pages 19-23).
Although the peak level feature will display levels below 30 PPM,
these levels will not result in an alarm no matter how long the
device is exposed to these levels.
9
Features and Operation (cont.)
Figure 6
Figure 7
Figure 8
Benelux Guide 21/8/01 2:15 pm Page 9

Peak Level Button
When the peak level button is
pressed (see figure 13), the fuel
gauge icon (battery life indicator)
changes and only the top segment of
the icon is displayed, this indicates
that the peak level is being read (see
figure 8). The peak CO level
displayed is the highest reading detected by the unit since its
last reset or power-up.
For additional information on the Peak Level Display, refer to
page 9 and 10.
Resetting the Peak Level Reading
To reset or clear the peak level reading, press and hold the
peak level button and then press and hold the test/reset button
at the same time. The number on the display will return to 0
PPM.
Note: The peak level reading will also be reset when the
batteries are removed.
12
Features and Operation (cont.)
Peak
Level
Alarm
Figure 13
Sensor Malfunction
The unit needs to be replaced
See figure 9.
Replace Battery or Battery Error
If Figure 10 or 11 is displayed the batteries
need to be replaced - note the empty battery
fuel gauge on the display (see Battery
Replacement/Installation Instructions pages
16-17).
Malfunction Display
The unit has malfunctioned (see figure 12)
(refer to Troubleshooting page 26). The
battery fuel gauge may show any state of
charge.
11
Features and Operation (cont.)
Figure 9
Figure 10
Figure 11
Figure 12
or
Benelux Guide 21/8/01 2:15 pm Page 11

Lights
Red Alarm Light
The red light flashing, accompanied
by the alarm “chirp”, indicates the
batteries need to be replaced, or the
unit has malfunctioned (see figure 15).
Rapid pulsing of the alarm indicates
the presence of carbon monoxide.
Refer to pages 18-19 for instructions on What to do if the
Alarm Sounds.
Green Operate Light
The green light indicates the unit is
functioning properly (see figure 16).
The green light will flash every 30
seconds indicating a CO reading is
being taken and when any button is
pressed.
Battery Life Indicator (Fuel Gauge)
The battery icon appears in the lower left hand corner of the CO
Alarm display and indicates remaining battery life.
The display is divided into three segments and will accurately
display:
1. Full Battery - All three segments of the indicator
are black.
2. 2/3 Battery Full - Two of the three segments are
black.
3. 1/3 Battery Full - One of the three segments is
black.
4. Empty Battery - See Battery Installation/Replacement
Instructions pages 16-17.
14
Features and Operation (cont.)
Peak
Level
Alarm
Test/
Reset
Operate
Figure 16
Figure 15
Test/Reset Button
The test/reset button is used to test the unit’s electronics and to
reset the unit during alarm.
Test the unit
To test, press the test/reset button (see figure 14)
Test the unit weekly!
Note: After the test/reset button is pressed, numbers
appear on the display. These are not CO readings and are
part of the internal testing process. Ignore these numbers!
After pressing the test/reset button,
the unit will display then other
numbers and then return to
monitoring CO levels.
Due to the loudness of the alarm we
suggest you place your fingers over the
sounder opening when testing your Nighthawk CO Alarm.
Familiarise yourself and family members with the alarm pattern.
A CO Alarm is rapid pulsing. This cycle will repeat in the event
of a CO alarm. This cycle will continue for the first 4 minutes of
a CO alarm and then change to one cycle every one minute until
the device is reset or the CO is eliminated.
Reset
If the alarm is sounding, pressing the test/reset button will
terminate the alarm. If the CO condition that caused the alert in
the first place continues, the alarm will reactivate. If the CO alarm
alarms again within six minutes, it is sensing high levels of CO
which can quickly become a dangerous situation.
If this happens follow What To Do If The Alarm Sounds on pages
18-19. Reactivation times depend on the amount of CO that
caused the CO alarm to initially alarm and the amount of CO
present after resetting the alarm.
13
Features and Operation (cont.)
Test/
Reset
P
Operate
Figure 14
Benelux Guide 21/8/01 2:15 pm Page 13

Since batteries are not installed in the unit at the factory, you will
need to install them. Also, you will need to replace the batteries
when your display shows “Low battery” or . Note the
battery fuel gauge is empty. The unit will remind you to replace
the batteries by chirping every 30 seconds for up to seven days.
Each chirp is accompanied by a flash of the red light.
Note: Your Nighthawk CO Alarm will NOT monitor CO
levels during the time that the “Low Battery” warning or
error warning is being displayed.
Three AA batteries have been included with your purchase.
When replacing the batteries, we recommend use of the
following for a minimum of one year normal operation:
• Duracell MN1500 • Camelion Mignon LR6-AM3-1.5
• Energizer E91 • Rayovac 815
These batteries can be purchased at your local retailer.
16
Battery Installation/Replacement
Protocol Label
The top cover of your unit slides open to expose a set of
helpful instructions in the event of a CO alarm.
15
Features and Operation (cont.)
Local Emergency Number
If Reading/Alarm Occurs…
CAUTION
: See back
panel and/or Users Guide
for additional
information.
Alarm
Operate
Sensor
810-1058
REV. A
11 - 35 ppm
Ventilate your home –
monitor the unit for
rising CO levels.
100+ ppm
If no “flu-like” symptoms
are being experienced, follow
the previous procedures.
35 - 100 ppm
Ventilate your home –
call a qualified, service technician
to inspect for possible sources of
carbon monoxide.
If “flu-like” symptoms are
being experienced…
• Immediately evacuate the premises.
• Call 0800 111 999 or your local fire
department.
• Do not re-enter your home until the
problem is corrected.
Battery
Level
Benelux Guide 21/8/01 2:15 pm Page 15

When the CO alarm senses a dangerous level of CO, the unit will
emit a loud alarm pattern. The alarm pattern is rapid and pulsing.
This alarm pattern will continue for the first 4 minutes after
detecting CO then, the cycle will repeat every one minute. Know
how to respond to a CO emergency. Periodically review this
user’s guide and discuss with all members of your family.
WHAT TO DO WHEN THE ALARM SOUNDS
1) Open the doors and windows to ventilate.
2) Turn off the appliance where possible and stop using
the appliance.
3) Evacuate the property leaving the doors and windows
open. A latching alarm will need to be reset in
accordance with the user instructions.
4) Call British Gas on 0800 111 999.
5) Do no re-enter the property until the alarm has
stopped.
6) Get medical help immediately for anyone suffering the
effects of carbon monoxide poisoning (headache,
nausea), and advise that carbon monoxide poisoning
is suspected.
7) Do not use the appliance again until it has been
checked by an expert. In the case of gas appliances
this must be a CORGI registered installer.
18
What To Do If The Alarm Sounds
▲
!
WARNING: Actuation of your CO
Alarm indicates the presence of Carbon
Monoxide (CO) which can KILL YOU.
Battery Replacement/Installation Instructions
To install or replace the batteries in your Nighthawk unit please
perform the following steps:
1. Gently slide open
the lower half of
the front cover to
expose the battery
compartment.
2. Remove the old
batteries and
properly dispose of
them as
recommended by
the battery manufacturer (see figure 17).
3. Reinstall the new batteries, being careful to seat
the red battery warning flags in the recess of the
battery well. Also, note the polarity illustration in the
bottom of the battery compartment. The unit will chirp
and display for approximately one minute and
return to normal operation.
4. Gently close the bottom cover. The bottom cover of
your CO alarm will NOT close if all three AA
batteries are not installed.
17
Battery Installation/Replacement (cont.)
NIGHTHAWK
T
est/
R
eset
Operate
P
e
ak
L
eve
l
Alarm
C
ARBO
N
M
ONO
XIDE
ALARM
Figure 17
Benelux Guide 21/8/01 2:15 pm Page 17

Exposure to high levels of carbon monoxide can be fatal
or cause permanent damage and disabilities.
Many victims of carbon monoxide poisoning indicate that while
they were aware that they were ill, they became so disoriented
and confused that they were unable to help themselves by
exiting the building or calling for assistance. If you experience
any symptoms of carbon monoxide poisoning, consult your
doctor immediately! CO poisoning can be determined by a
simple blood test called a carboxyhemoglobin test. Severe cases
may require treatment in a hyperbaric chamber. Remember,
young children and household pets may be the first effected.
If you have additional questions please call us on
01753 685148
20
Alarm/Danger Levels
Caution: This CO alarm will only indicate the presence of
CO at the sensor. CO may be present in other areas.
Common Mild Exposure Symptoms:
Slight headache, nausea, vomiting, fatigue (“flu-like” symptoms).
Common Medium Exposure Symptoms:
Throbbing headache, drowsiness, confusion, fast heart rate.
Common Extreme Exposure Symptoms:
Convulsions, unconsciousness, heart and lung failure. It can cause
brain damage and death. Many cases of reported CARBON MONOXIDE
POISONING indicate that while victims are aware they are not well,
they become so disoriented they are unable to save themselves by either
exiting the building or calling for assistance. Also young children and
household pets may be the first affected.
Familiarisation with the effects of each level is important. The
symptoms described in the chart above are related to carbon
monoxide poisoning and should be discussed with ALL members
of the household.
19
What To Do If The Alarm Sounds (cont.)
Alarm/Danger Levels
Benelux Guide 21/8/01 2:15 pm Page 19

High Levels:
100 PPM with no household members experiencing symptoms
or feeling ill is considered High Level Exposure. The only
difference between this level and a dangerous level is that no
symptoms are being experienced.
This can quickly tur
n into a serious situation!
All possible sources of CO should be immediately turned off and
a qualified service technician called. Ventilate the premises by
opening doors and windows. At this level it is advisable to wait
outside or at a neighbor’s home while your residence is being
ventilated. Do not restart any possible sources of CO until the
problem has been corrected.
Dangerous Levels:
Generally, levels of 100 PPM and greater accompanied by
symptoms is considered a dangerous level. Immediately gather
all residents, exit the house, and call 0800 111 999!
Symptoms indicate that this should be treated as an
emergency. This is a potentially life threatening situation!
Remain in fresh air and do not reenter under any circumstance
until the house has been ventilated and the source of the CO
emergency repaired.
22
Alarm/Danger Levels (cont.)
Low Levels:
Generally 35 PPM and below is considered Low Level Exposure.
Exposure to low levels of CO for extended periods of time can
still be dangerous and could result in loss of energy, headache,
etc. This situation should be closely monitored. Take extra care
to not expose any high risk individuals to even low levels for
more than eight hours. In some cases low levels can be caused
by air pollution, heavy traffic, cigarette smoke, temperature
inversions and other sources.
Mid Levels:
Generally 35 PPM-100 PPM is considered Mid Level Exposure.
Levels in this range are cause for concern and may cause serious
health problems. All possible sources of CO should be
immediately turned off and a qualified service technician called.
Ventilate the premises by opening doors and windows. Do not
restart any possible sources until the problem has been
corrected. Check all residents for symptoms!
If no symptoms are present, this is not considered a CO
emergency, but it should not be ignored!
21
Alarm/Danger Levels (cont.)
Benelux Guide 21/8/01 2:15 pm Page 21

To keep your CO alarm in good working order, please
follow these simple steps:
• Verify unit alarm, lights and battery operation by
pushing the test button once a week.
• Vacuum the CO alarm cover with a soft brush
attachment once a month to remove accumulated dust.
• Instruct children never to play with the CO alarm.
Warn children of the dangers of carbon monoxide
poisoning.
• Never use detergents or other solvents to clean the
CO alarm.
• Avoid spraying air fresheners, hair spray, paint or
other aerosols near the CO alarm.
• Do not paint the CO alarm. Paint will seal the vents
and interfere with the sensor ability to detect CO.
• Do not place near a nappy bucket.
24
Caring for your Nighthawk
Battery Powered CO Alarm
The chart above relates to healthy adults. Levels differ for those
at high risk. Individuals with medical problems may consider
using detection devices with lower COHb alarming capabilities.
This CO alarm meets the alarm response time requirements of
BSI 7860. Standard alarms times are as follows:
At 45 PPM, the unit must not alarm before 60 minutes
At 150 PPM, the unit must alarm within 10-30 minutes
At 350 PPM, the unit must alarm before 6 minutes
WARNING: This device may not alarm at low carbon monoxide
levels. The Health and Safety Executive (HSE) has established
that continuous exposure to levels of 50 PPM should not be
exceeded in an 8 hour period.
23
Alarm/Danger Levels (cont.)
The maximum allowable concentration for
continuous exposure for healthy adults in
any 8-hour period, according to HSE*.
Slight headache, fatigue, dizziness, nausea
after 2-3 hours.
Frontal headaches within 1-2 hours, life
threatening after 3 hours.
Dizziness, nausea and convulsions within 45
minutes. Unconsciousness within 2 hours.
Death within 2-3 hours.
Headache, dizziness and nausea within 20
minutes. Death within 1 hour.
Headache, dizziness and nausea within 5-10
minutes. Death within 25-30 minutes.
Headache, dizziness and nausea within 1-2
minutes. Death within 10-15 minutes.
Death within 1-3 minutes.
50 ppm
200 ppm
400 ppm
800 ppm
1,600 ppm
3,200 ppm
6,400 ppm
12,800 ppm
Concentration
of CO in Air
(ppm = par
ts
per million)
Approximate Inhalation Time
and Symptoms Developed
* Health and Safety Executive
Benelux Guide 21/8/01 2:15 pm Page 23

26
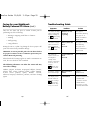
Troubleshooting Guide
Symptom Problem Action
Unit shows an empty
battery symbol and
displays reading of
Lb. Alarm chirp
every 30 seconds
Batteries are low
and need
replacing.
See page 11.
Low Battery Warning.
See pages 16-17.
Battery Installation/
Replacement.
Unit shows an empty
battery symbol and
displays reading of
Err. Alarm chirp
every 30 seconds
Battery failure has
been
detected.
See page 11. Battery
Error Warning.
See pages 16-17.
Battery Installation/
Replacement.
Unit shows the
replace sensor icon
and displays a
reading of Err
(battery symbol may
show any state of
charge).
Alarm chirp
every 30 seconds
Sensor failure has
been
detected.
Sensor Malfunction.
No display, constant
alarm and red light.
Microprocessor
failure.
Unit has
malfunctioned.
Unit display shows
Err with battery at
any state of charge
other than empty.
Alarm chirp
every 30 seconds
Unidentified Remove batteries and
reinstall. If Err
continues, unit has
malfunctioned.
See pages 30-31 for
warranty information.
Move the CO alarm and place in another location prior to
performing any of the following:
• Staining or stripping wood floors or furniture
• Painting
• Wall papering
• Using adhesives
Storing the unit in a plastic bag during the above projects will
protect the sensor from permanent damage.
WARNING: As soon as possible, place the CO alarm back in
its proper location to assure continuous protection from
Carbon Monoxide poisoning.
When household cleaning supplies or similar contaminants are
used, the area should be well ventilated.
The following substances can affect the sensor and may
cause false readings:
Methane, propane, iso-butane, iso-propanol, ethylene, benzene,
toluene, ethyl acetate, hydrogen sulfide, sulphur dioxides,
alcohol based products, paints, thinners, solvents,
adhesives, hairsprays, aftershaves, perfumes, and some cleaning
agents.
25
Caring for your Nighthawk
Battery Powered CO Alarm (cont.)
Benelux Guide 21/8/01 2:15 pm Page 25

28
Power: Three AA batteries (supplied)
Sensor: Electrochemical carbon monoxide
sensor
Humidity Range: 10% to 90% rh (non-condensing)
Accuracy: +/- 20% +15 PPM
Temperature: Operating range 40°F (4.4°C) to
100°F (37.8°C)
Mounting: Accessories supplied for wall
mounting
Alarm: 85+ dB at 10' @ 3.4 ± 0.5 KHz
pulsing alarm
LED Operation: • Flashing red LED every 30 seconds
accompanied by an alarm chirp
indicates a system problem
• Flashing green LED every 30 seconds
indicates proper operation
• Pulsing red LED indicates presence
of CO
LCD Display: • Digital readout 30-999 PPM
• Battery charge indicator (fuel gauge)
• Sensor malfunction icon
Battery
Replacement: Unit displays Err or Lb and an empty
fuel gauge icon. Replace the three
AA batteries with one of the
following approved brands.
• Duracell MN1500
• Energizer E91
• Camelion Mignon LR6-AM3-1.5
• Rayovac 815
Product Specifications
27
Q.
How many CO alarms do I need in my house?
How many square metres will one CO alarm cover?
A.
We recommend you place CO alarms near the sleeping
area(s). If you have a multi-level home, you should place a CO
alarm on each level of the home. A good rule of thumb for the
number and placement of CO alarms for your particular home is
to place CO alarms near smoke alarms that have been installed to
meet current building code requirements.
Generally, one CO alarm can be adequate for 300 square metres
of living space. The most important determination for the number
of alarms needed is whether an alarm can be heard in all sleeping
areas.
Q.
Do I have to press the test button to get a CO
reading
?
A.
No. Your Nighthawk CO alarm continuously monitors the air
for carbon monoxide. An updated reading is shown on the digital
display every 30 seconds. If there is no CO present, the digital
display will show a zero. The CO alarm will alert you to the
presence of CO automatically. To test the internal components
and circuitry of your CO alarm, press the test/reset button.
Frequently Asked Questions
Benelux Guide 21/8/01 2:15 pm Page 27

WARRANTY COVERAGE: THE MANUFACTURER WARRANTS TO THE
ORIGINAL CONSUMER PURCHASER, THAT THIS ALARM WILL BE FREE OF
DEFECTS IN MATERIAL AND WORKMANSHIP FOR A PERIOD OF FIVE (5)
YEARS FROM DATE OF PURCHASE. THE MANUFACTURER’S LIABILITY
HEREUNDER IS LIMITED TO REPLACEMENT OF THE PRODUCT, REPAIR
OF THE PRODUCT OR REPLACEMENT OF THE PRODUCT WITH
REPAIRED PRODUCT AT THE DISCRETION OF THE MANUFACTURER. THIS
WARRANTY IS VOID IF THE PRODUCT HAS BEEN DAMAGED BY
ACCIDENT, UNREASONABLE USE, NEGLECT, TAMPERING OR OTHER
CAUSES NOT ARISING FROM DEFECTS IN MATERIAL OR WORKMANSHIP.
THIS WARRANTY EXTENDS TO THE ORIGINAL CONSUMER PURCHASER
OF THE PRODUCT ONLY.
Warranty Disclaimers: Any implied warranties arising out of this sale, including
but not limited to the implied warranties of description, merchantability and
fitness for a particular purpose, are limited in duration to the above warranty
period. In no event shall the Manufacturer be liable for loss of use of this
product or for any indirect, special, incidental or consequential damages, or
costs, or expenses incurred by the consumer or any other user of this product,
whether due to a breach of contract, negligence, strict liability in tort or
otherwise. The Manufacturer shall have no liability for any personal injury,
property damage or any special, incidental, contingent or consequential damage
of any kind resulting from gas leakage, fire or explosion.
This warranty does not affect your statutory rights.
Warranty Performance: During the above warranty period, your product will be
replaced with a comparable product if the defective product is returned,
postage prepaid, to Kidde Safety Europe Ltd, Mathisen Way, Colnbrook, Slough,
Berkshire SL3 0HB, together with proof of purchase date. Please include a note
describing the problem when you return the unit. The replacement product will
be in warranty for the remainder of the original warranty period or for six
months, whichever is longer. Other than the cost of postage, no charge will be
made for replacement of the defective product.
Important: Do not remove back cover. Back cover removal will void
warranty.
30
Warranty
Unit Malfunction: Err message with sensor
icon showing - sensor failure
Err message with empty fuel gauge
icon showing - batteries need replacing
Test/Reset Button: Test button verifies proper unit
operation.
Peak Level
Memory: When pressed, the display will show
the top segment of the battery icon
and the highest CO PPM level
detected since unit was powered up
or since last system reset. Reading
will be stored in memory until
batteries are removed/exhausted or
test/reset and peak level buttons are
pressed simultaneously.
Size & Weight: 140mm diameter x 35.5mm depth
0.3Kg with batteries
Warranty: Five-year warranty from date of
purchase against defects in material
and workmanship on CO Alarm
unit.
29
Product Specifications
Benelux Guide 21/8/01 2:15 pm Page 29

Inleiding koolmonoxide . . . . . . . .Pagina 33
Nighthawk productoverzicht . . . . .Pagina 34-36
Snelle ingebruikname . . . . . . . . . .Pagina 36
Installatie-instructies . . . . . . . . . . .Pagina 37-38
Montage
Waar u uw alarm moet installeren
Waar u uw alarm NIET moet installeren
Functies en bedieningen . . . . . . . .Pagina 39-46
Digitaal scherm
Andere mogelijke schermen
Piekgehalteknop
Test/reset-knop
Lampjes
Indicator batterijniveau (brandstofmeter)
Protocollabel
Plaatsen/vervangen van de
batterijen . . . . . . . . . . . . . . . . . . . .Pagina 47-48
Wat moet u doen als het alarm
afgaat . . . . . . . . . . . . . . . . . . . . . . .Pagina 49-50
Alarm/gevaarlijke gehaltes . . . . . . .Pagina 51-54
Zorg voor uw Nighthawk
CO-alarm op batterijen . . . . . . . . .Pagina 55-56
Probleemoplossing . . . . . . . . . . . .Pagina 57
Veel gestelde vragen . . . . . . . . . . . .Pagina 58
Productspecificaties . . . . . . . . . . . .Pagina 59-60
Garantie . . . . . . . . . . . . . . . . . . . . .Pagina 61-62
32
NEDERLANDS
Inhoudsopgave
Bedankt voor het kopen van uw nieuwe Nighthawk
koolmonoxidealarm. Als u vragen heeft over de
werking of instelling van uw CO-alarm, kunt u ons
altijd bellen op telefoonnummer
NL: +31 (0) 79 361 5236 B+L: +32 (0) 14 232 371
Your Nighthawk Carbon Monoxide Alarm is not a substitute for property,
disability, life or other insurance of any kind. Appropriate insurance
coverage is your responsibility. Consult your insurance agent.
Warranty Registration
To register for your five year factory warranty, please fill out the enclosed
warranty card completely, apply necessary postage and place in the mail.
You may place the warranty card in a separate envelope if you wish.
Please use the following address for warranty
registration and all other correspondence:
KIDDE Safety Europe Ltd, Mathisen Way,
Colnbrook, Slough, Berkshire SL3 0HB
Warranty information is located on the label on the back of the CO alarm.
For your convenience, please complete the warranty information before
installing the CO alarm.
The model number and assembly number can also be found on the label
on the back of the CO alarm.
For Warranty Service:
In many cases the quickest way to exchange your CO alarm is to
return it to the original place of purchase. If you have questions,
call us on 01753 685148
31
Warranty
For questions concerning your Carbon Monoxide Alarm,
please call 01753 685148
Please have the following information ready when calling:
CO Alarm Model Number (Located on the back of alarm):
CO Alar
m Assembly Number
(Located on back of alarm):
Date of Manufacture (Located on back of alarm):
Date of Purchase:
Wher
e Pur
chased:
Benelux Guide 21/8/01 2:15 pm Page 31

WAARSCHUWING: Het alarm kan defect raken als
ermee geknoeid wordt of als hij niet
volgens de instructies van de
fabrikant geïnstalleerd wordt.
BELANGRIJKE DIT KOOLMONOXIDEALARM IS NIET
OPMERKING: BEDOELD VOOR DRAAGBAAR GEBRUIK.
34
Nighthawk productoverzicht
Deksels open
Digitaal scherm
Op dit scherm kunt u de concentratie koolmonoxide in de
lucht aflezen (in delen per miljoen). Als het alarm niet goed
werkt verschijnt op dit scherm ook de storingsmelding, en als
de batterij bijna leeg is de melding "Lb" (low battery).
(Zie pagina 42 voor meer informatie).
Indicator batterijniveau
Zie pagina 45 voor meer informatie.
Alarm
Als de sensor een gevaarlijk hoge
koolmonoxideconcentratie meet, hoort
u een luide alarmtoon van 85 decibel.
Zie pagina 49-54 voor meer informatie.
Protocollabel
Het protocollabel wordt zichtbaar
als u de afdekkap verwijdert en
vertelt u wat u moet doen als het
alarm afgaat.
Zie pagina 46 voor meer informatie.
Kap onder
Kap onder
Pictogram Sensordefect
Zie pagina 42 voor
meer informatie.
Local Emergency Number
If Reading/Alarm Occurs…
CAUTION
: See back
panel and/or Users Guide
for additional
information.
Alarm
Operate
Sensor
11 - 35 ppm
Ventilate your home –
monitor the unit for
rising CO levels.
100+ ppm
If no “flu-like” symptoms
are being experienced, follow
the previous procedures.
35 - 100 ppm
Ventilate your home –
call a qualified, service technician
to inspect for possible sources of
carbon monoxide.
If “flu-like” symptoms are
being experienced…
• Immediately evacuate the premises.
• Call 0800 111 999 or your local fire
department.
• Do not re-enter your home until the
problem is corrected.
Battery
Level
NIGHTHAWK
T
est/
Reset
Alarm
PPM of CO
CARBON MONOXIDE
ALARM
Peak
Level
Model No. 900-0089
Operate
Uw nieuwe Nighthawk koolmonoxide (CO)-alarm is een verfijnd
instrument dat speciaal ontworpen en getest is om CO in een
woonomgeving te meten. Uw Nighthawk is specifiek bedoeld
voor gebruik binnenshuis.
U kunt koolmonoxide niet zien, ruiken of proeven en het kan fataal
zijn. De ophoping van CO in het bloed wordt het
carboxyhemoglobinegehalte genoemd en belemmert de opname van
zuurstof in het lichaam. Afhankelijk van de concentratie kan
koolmonoxide binnen slechts enkele minuten fataal zijn.
De meest voorkomende bronnen van koolmonoxide zijn defecte
gasapparaten die gebruikt worden voor verwarming en koken,
voertuigen die in een aangebouwde garage staan te draaien, verstopte
schoorstenen of rookkanalen, draagbare brandstofkachels, open
haarden, gereedschap met brandstofaandrijving en een barbecue in
een gesloten ruimte.
Symptomen van koolmonoxidevergiftiging zijn gelijk aan die van
griep, maar zonder koorts. Andere symptomen zijn duizeligheid,
vermoeidheid, zwakte, hoofdpijn, misselijkheid, overgeven,
slaperigheid en verwarring. Iedereen is gevoelig voor het gevaar van
CO, maar de deskundigen zijn het erover eens dat ongeboren baby’s,
kleine kinderen, zwangere vrouwen, oudere mensen en mensen met
hart- of ademhalingsproblemen het meeste risico lopen op ernstig
letsel of zelfs overlijden. Elk jaar moet een bevoegd installateur uw
verwarmingssysteem, ventilatiegaten, schoorstenen en rookkanalen
inspecteren en schoonmaken.
Er zit een beperkte garantie van vijf jaar op uw CO-alarm. Neem een
paar minuten de tijd om de gebruikersgids grondig door te lezen en
zorg dat u en uw familie bekend zijn met de werking ervan. Uw
Nighthawk CO-alarm is bedoeld om koolmonoxidegas van ELKE
verbrandingsbron waar te nemen. Hij is NIET gemaakt om rook,
brand of andere gassen waar te nemen. Als u vragen heeft kunt u
bellen naar NL: +31 (0) 79 361 5236 B+L: +32 (0) 14 232 371.
Deze handleiding en de hierin beschreven producten zijn voorzien
van een auteursrecht, met alle rechten voorbehouden. Onder deze
auteursrechtwetten, mag zonder de schriftelijke toestemming van
KIDDE Safety geen enkel deel van de handleiding voor gebruik
gekopieerd worden. Voor meer informatie kunt u contact opnemen
met onze consumentenlijn, of schrijven naar:
NL: De Raat Brandkasten, Edelgasstraat 5,
2718 SX Zoetermeer
B + L: De Raat Brandkasten, Geelseweg 64, 2250 Olen (B)
33
Inleiding koolmonoxide
Benelux Guide 21/8/01 2:15 pm Page 33

Verwijder de drie bijgevoegde AA
batterijen uit de verpakking en
plaats ze in de batterijruimte.
Plaats ook de rode batterij-
waarschuwingsvlaggen voorzichtig
in de batterijruimte. Let op de
polariteitmarkeringen onder op de
batterijruimte. Het scherm moet 888
weergeven (zie figuur 1).
Na ongeveer 30 seconden verdwijnt
het 888-scherm en begint een
zwarte stip rechts onder in elke 5
seconden knipperen (zie figuur 2).
Uw Nighthawk CO-alarm is nu
operationeel.
36
Snelle ingebruikname
Figuur 2
Figuur 1
BELANGRIJKE OPMERKING:
Het alarm moet na het aanzetten één minuut opwarmen.
35
NI
GHTHAWK
T
est/
R
eset
P
eak
L
evel
Operate
Alarm
PPM of CO
CARBON MONOXIDE
ALARM
Model No. 900-0089
Deksels
gesloten
Benelux Guide 21/8/01 2:15 pm Page 35

Waar u uw Nighthawk CO-alarm NIET moet
installeren
• Buitenshuis.
• In of onder een kast.
• In een vochtige of natte ruimte.
• Direct boven een gootsteen of fornuis.
• Naast een deur of venster of op een plaats waar het tocht.
• Waar het door gordijnen of meubels belemmerd kan
worden.
• In een ruimte waar de temperatuur onder de -4,4°C of
boven de 37,8°C kan komen..
• Waar vuil of stof de sensor kunnen blokkeren waardoor hij
het niet meer doet.
• Waar er gemakkelijk tegen gestoten kan worden of waar
hij beschadigd of per ongeluk uitgezet of verwijderd kan
worden.
38
Installatie-instructies (vervolg)
Montage
Uw CO-alarm kan aan een
binnenmuur gemonteerd
worden.
U moet eerst de achterplaat met
de schroeven en keilbouten aan
de muur bevestigen.
Als de plaat bevestigd is, moet
de achterkant van de detector
over de achterplaat heen
geschoven worden totdat de tab boven aan het alarm vastklikt (zie
figuur 1).
Installeer uw CO-alarm op 1,5 meter boven de vloer, en niet verder
dan 2 meter van het verwarmingstoestel.
Om hem te verwijderen, moet u de tab tegen de muur drukken en
het alarm uit de montageplaat tillen.
Waar moet u uw Nighthawk CO-alarm
installeren
De volgende suggesties kunnen u helpen bij het plaatsen en
installeren van uw Nighthawk CO-alarm.
Ideaal gesproken zou u in of bij elke kamer met een
brandstofapparaat een detector moeten hebben.
Als u echter meer dan één apparaat heeft, maar slechts één detector,
dan dient u het volgende in overweging te nemen bij het vinden van
de beste plaats voor uw detector.
Als er in uw slaapkamer een apparaat is, moet u de detector in die
kamer monteren.
Als er een apparaat in een kamer is die u veel gebruikt, bijv. een
zitkamer, moet u het in die kamer monteren.
Als u een zit-/slaapkamer heeft, moet de detector zo ver mogelijk
van de kookapparatuur geplaatst worden, maar wel vlakbij de plaats
waar uw slaapt.
Als het apparaat in een kamer is die normaliter niet gebruikt wordt
(bijv. een boilerkamer), moet de detector net buiten de kamer
bevestigd worden, zodat u het alarm gemakkelijker kunt horen.
37
Installatie-instructies
Figuur 1
Benelux Guide 21/8/01 2:15 pm Page 37

Andere mogelijke schermen en de betekenissen
ervan
De volgende symbolen verschijnen tijdens normaal bedrijf of
foutbewerkingen op het scherm, en deze worden hieronder
uitgelegd.
Normaal bedrijf
Normaal bedrijf (zie figuur 6) met een volle
batterij. Het stipje rechts onder gaat elke 5
seconden aan en uit. Als er CO aanwezig is
geeft het scherm de meting aan in Parts per
Million (PPM) (deeltjes per miljoen).
Normaal bedrijf na aanzetten of reset
Figuur 7 toont een normaal scherm direct nadat
de batterijen geplaatst zijn of nadat de test/reset-
knop is ingedrukt. Het scherm moet ongeveer 30
seconden nadat de test/reset-knop is ingedrukt
naar het normale scherm gaan (zie figuur 7) (zie test/reset-
knop pagina 44).
Als de test/reset-knop wordt ingedrukt, klinkt het alarm. Het
scherm geeft gedurende de tijd dat het alarm klinkt een getal
weer. Dit getal is een normaal onderdeel van de testfunctie en
geeft geen CO-meting aan. Tijdens de test/reset-procedure
kan het getal genegeerd worden.
Scherm voor piekgehalte
Als de knop voor het piekgehalte ingedrukt
gehouden wordt, geeft het scherm de hoogste
CO-meting weer die door het CO-alarm genomen
is sinds de laatste reset van het piekgehalte of
aanzetten. De brandstofmeter van de batterij
wijzigt en geeft alleen het bovenste segment van de batterij aan
om aan te geven dat het piekgehalte wordt weergegeven (zie
figuur 8). In dit voorbeeld was 120 PPM de maximale
waargenomen hoeveelheid CO sinds de laatste reset van het
alarm (zie alarm/gevaarlijke gehaltes op pagina 51-54).
Hoewel de functie van het piekgehalte gehaltes onder 30 PPM
zal weergeven, veroorzaakt dit geen alarm, ongeacht hoe lang
het apparaat aan deze gehaltes wordt blootgesteld.
40
Functies en bediening (vervolg)
Figuur 6
Figuur 7
Figuur 8
Uw nieuwe Nighthawk CO-alarm op batterijen maakt gebruik
van geavanceerde elektronische onderdelen die u en uw familie
tegen de gevaren van koolmonoxide beschermen.
Unieke functies zijn een digitaal scherm waarop elke 30
seconden CO-metingen worden weergegeven, de hoogste
gemeten CO-gehaltes, status van de batterij en toestand van de
sensor. Zorg dat u bekend bent met deze functies.
Digitaal scherm - geeft CO-gehalte in PPM weer
Uw Nighthawk CO-alarm geeft continu een digitale meting van
het CO-gehalte in deeltjes per miljoen (PPM) weer. Het digitale
scherm kan metingen tussen de 30 en 999 (PPM) waarnemen en
weergeven. Onder normale omstandigheden wordt een
meting van 0 PPM verwacht(zie figuur 5).
U zult eraan gewend raken op het scherm te
kijken, net zoals u bijvoorbeeld op een
barometer of klok kijkt. Metingen onder de 30
PPM worden niet weergegeven.
Zie pagina 51-54 voor een overzicht over gevaarlijke CO-
gehaltes.
39
Functies en bediening
Figuur 5
Benelux Guide 21/8/01 2:15 pm Page 39
La page est en cours de chargement...
La page est en cours de chargement...
La page est en cours de chargement...
La page est en cours de chargement...
La page est en cours de chargement...
La page est en cours de chargement...
La page est en cours de chargement...
La page est en cours de chargement...
La page est en cours de chargement...
La page est en cours de chargement...
La page est en cours de chargement...
La page est en cours de chargement...
La page est en cours de chargement...
La page est en cours de chargement...
La page est en cours de chargement...
La page est en cours de chargement...
La page est en cours de chargement...
La page est en cours de chargement...
La page est en cours de chargement...
La page est en cours de chargement...
La page est en cours de chargement...
La page est en cours de chargement...
La page est en cours de chargement...
La page est en cours de chargement...
La page est en cours de chargement...
La page est en cours de chargement...
La page est en cours de chargement...
La page est en cours de chargement...
-
 1
1
-
 2
2
-
 3
3
-
 4
4
-
 5
5
-
 6
6
-
 7
7
-
 8
8
-
 9
9
-
 10
10
-
 11
11
-
 12
12
-
 13
13
-
 14
14
-
 15
15
-
 16
16
-
 17
17
-
 18
18
-
 19
19
-
 20
20
-
 21
21
-
 22
22
-
 23
23
-
 24
24
-
 25
25
-
 26
26
-
 27
27
-
 28
28
-
 29
29
-
 30
30
-
 31
31
-
 32
32
-
 33
33
-
 34
34
-
 35
35
-
 36
36
-
 37
37
-
 38
38
-
 39
39
-
 40
40
-
 41
41
-
 42
42
-
 43
43
-
 44
44
-
 45
45
-
 46
46
-
 47
47
-
 48
48


dans d''autres langues
- English: Kidde Nighthawk User manual
- Nederlands: Kidde Nighthawk Handleiding
Autres documents
-
 Atwood Mobile Products KN-COPP-B Manuel utilisateur
-
Bavaria BACM3 Manuel utilisateur
-
ELRO RM334 Manuel utilisateur
-
Firex COQ1 Le manuel du propriétaire
-
Chacon 34148 Manuel utilisateur
-
-
 American Sensor CO8LBD Le manuel du propriétaire
-
 American Sensor CO910 Manuel utilisateur
-
 American Sensor CO8B Manuel utilisateur
-
First Alert ZCOMBO Le manuel du propriétaire


