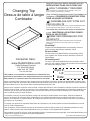
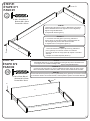
Delta Children Changing Top Assembly Instructions
- Taper
- Assembly Instructions

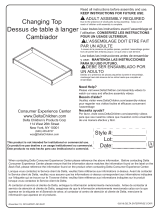
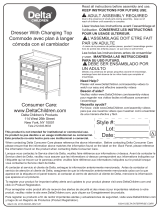
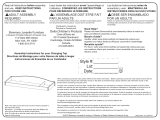
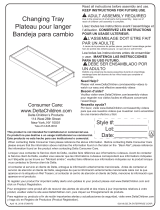
Changing Top
Dessus de table à langer
Cambiador
May 04, 2016-0550-26967(C)-R0
Consumer Care:
www.DeltaChildren.com
Delta Children’s Products
114 West 26th Street
New York, NY 10001
Tele.212-645-9033
Need Help?
Please visit www.DeltaChildren.com/assembly-videos to
watch our easy and effective assembly videos
Besoin d’aide?
Veuillez visiter www.DeltaChildren.com/assembly-videos
pour regarder nos vidéos faciles et efficaces concernant
l’assemblage
Necesita ayuda?
Por favor, visite www.DeltaChildren.com/assembly-videos
para que vea nuestros videos que muestran como ensamblar
de una manera efectiva y fácil.
Style #:
Lot:
Date:
___________
___________
___________
A
REV
Read all instructions before assembly and use.
KEEP INSTRUCTIONS FOR FUTURE USE.
ADULT ASSEMBLY REQUIRED
Due to the presence of small parts during assembly, keep out of
reach of children until assembly is complete.
Lisez toutes les instructions avant l’assemblage et
l’utilisation. CONSERVEZ LES INSTRUCTIONS
POUR UN USAGE ULTERIEUR.
L’ASSEMBLAGE DOIT ETRE FAIT
PAR UN ADULTE
A cause de la presence de petites pieces, pendant l’assemblage gardez
hors de portee des enfants jusqu'a ce que celui-ci soit termine.
Lea todas las instrucciones antes de ensamblar
y usar. MANTENGA LAS INSTRUCCIONES
PARA SU USO FUTURO.
DEBE SER ENSAMBLADO POR
UN ADULTO
Debido a la presencia de piezas pequeñas durante el ensamblaje,
mantenga fuera del alcance de los niños hasta que complete el
ensamblaje.
This product is not intended for institutional or commercial use.
Ce produit ne pas destine a un usage institutionnel ou commercial.
Este producto no esta hecho para uso institucional o comercial.
©2016 DELTA ENTERPRISE CORP.
When contacting Delta Consumer Care please reference the above information. Before contacting Delta Consumer Care
please ensure that the information above matches the information found on the label on the Back Panel, please reference
the information found on the product when contacting Delta Consumer Care.
Lorsque vous contactez le Service client de Delta, veuillez faire référence aux informations ci-dessus. Avant de contacter le
Service client de Delta, veuillez vous assurer que les informations ci-dessus correspondent aux informations indiquées sur
l’étiquette qui se trouve sur le panneau arrière; veuillez faire référence aux informations indiquées sur le produit lorsque
vous contactez le Service client de Delta.
Al contactar al servicio al cliente de Delta, entregue la información anteriormente mencionada. Antes de contactar al
servicio de atención al cliente de Delta, asegúrese de que la información anteriormente mencionada calza con la que
aparece en la etiqueta en el panel trasero; al contactar al centro de atención al cliente de Delta, mencione la información
que aparece en el producto.
To register your product for important safety alerts and updates to your product please visit www.DeltaChildren.com and
click on Product Registration.
Pour enregistrer votre produit afin de recevoir des alertes de sécurité et des mises à jour importantes relatives à votre
produit, veuillez visiter le site www.DeltaChildren.com, puis cliquer sur Enregistrement de produits.
Para registrar su producto a fin de recibir importantes alertas y actualizaciones de seguridad, visite www.DeltaChildren.com
y haga clic en Registro de Productos (Product Registration).

2
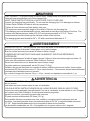
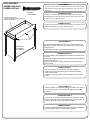
WARNING
FALL HAZARD - To prevent death or serious injury, always keep child within arm’s reach.
Read all instructions before use of the changing top.
KEEP THESE INSTRUCTIONS IN A SAFE PLACE FOR FUTURE USE.
Inspect the changing top periodically. Do not use the changing top if it is damaged or broken.
Contact Delta Children's Products with any questions.
Tighten all loose screws and bolts before each use.
The maximum recommended weight of the child is 30lbs for the changing top.
This changing top must be attached to a level, stable and structurally sound peice of furniture. The
surface must have a minimum width of 35-3/4” and a minimum depth of 17-1/4”. These
measurements should include only the flat level surface of the furniture.
The changing pad used should be 34" x 16" with a maximum thickness of 1".
RISQUE DE CHUTE – Afin de prévenir tout risque de décès ou de blessure grave, toujours
demeurer à portée de bras de l’enfant placé sur la table à langer.
Bien lire toutes les instructions avant d’utiliser la table à langer
CONSERVER CES INSTRUCTIONS DANS UN ENDROIT SÛR POUR RÉFÉRENCE
ULTÉRIEURE.
Inspecter régulièrement la table à langer. Ne pas l’utiliser si elle est endommagée ou brisée. Si
vous avez des questions contactez Delta Children's Products.
Serrer tous les boulons et vis desserrés avant chaque usage.
Le poids maximum recommandé est de 30 livres (13,6kg).
La table à langer doit être fixée à un meuble de niveau, stable et de structure solide, d’une surface
minimumde 35-3/4 po et d’au moins 17-1/4 po de profondeur. Ces mesures doivent essentiellement
correspondre à lasurface plane du meuble.
Le coussin à langer doit mesurer 34 po x 16 po et avoir une épaisseur maximale de 1 po
AVERTISSEMENT
PELIGRO DE CAIDAS - Para prevenir la muerte o lesiones graves, mantenga al niño al alcance
de sus manos.
Lea todas las instrucciones antes de usar el cambiador.
COLOQUE ESTAS INSTRUCCIONES EN UN LUGAR SEGURO PARA SU USO FUTURO.
Inspeccione este cambiador periodicamente. No use el cambiador si esta dañado o roto. Póngase
en contacto con Delta Children's Products para formular preguntas.
Apriete los tornillos y pernos flojos antes de cada uso.
El paso maximo recomendado 30 libras (13.6 g).
Este vestidor debe ser conectado a un nivel, estable y a una pieza estrúcturalmente sano de
muebles. Lasuperficies debe tener una anchura minima de 35-3/4” y una profundidad minima de
17-1/4”. Estas medidas debenincluír solo la superficié plana de los muebles.
La almohadilla usada debe ser 34 x 16 pulgadas con un grosor máximo de 1 pulgada.
ADVERTENCIA
La page est en cours de chargement...

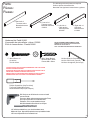
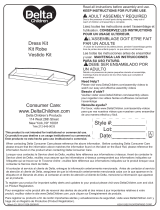
Parts:
Pièces:
Piezas:
A. Back rail x1
Traverse Arière
Baranda de atras
# 24220
# 24221
# 24222
# 24223
4
B. Front rail x1
Traverse avant
Baranda delantera
C. Left side x1
M4 Hex Wrench (Provided)
M4 Clé À Six Pans (Fournie)
M4 Llave hexagonal (Se incluye)
Phillips Screwdriver (Not Provided)
Tournevis’Phillips’(Non Prévu)
Destornillardor’Phillips’(No siempre)
Côté gauche
Lado izquierdo
D. Right side x1
Côté droit
Lado derecho
F. 40mm Screw x3
Vis 40mm
Tornillo 40mm
G. M6 x 35mm Bolt x4
Boulons M6 x 35mm
Pernos M6 x 35mm
CAUTION: DO NOT USE A POWER SCREWDRIVER THEY CAN CAUSE
SCREWS TO BREAK OR STRIP.
ATTENTION: NE PAS UTILISER UN TOURNEVIS ÉLECTRIQUE CARLE
VIS PEUVENT CASSER OU PERDRE LEURS FILETS.
PRECAUCIÓN: NO USE UN DESTORNILLADOR ELÉCTRICO PORQUE
PUEDEN HACER QUE LOS TORNILLOS SE ROMPAN O RUEDEN.
NOTE: FASTENERS ARE SHOWN FULL SIZE
REMARQUE: LES DISPOSITIFS DE FIXATION SONT
MONTRÉS EN TAILLE RÉELLE
NOTA: LOS PERNOS SE MUESTRAN EN TAMAÑO REAL
Hardware kits Part# 26966
L'ensemble de quincaillerie - pièce n°26966
El kit de herramientas - Pieza #26966
Drill: Only use to drill holes do not use to Install
screws or bolts
Perceuse : utiliser uniquement pour percer desTrous,
et non pour poser des vis ou des Boulons.
El taladro: sólo uso para taladrar hoyos.
NoUtilice instalar los tornillos ni los cerrojos
1/8” drill bit: available from your local hardware store
Mèche de 1/8 po : disponible auprès de votre quincaillerie locale.
1/8” broca: disponible de su ferretería local
The following tools and parts are required:
Outils et pièces nécessaires de:
Necesitan las siguientes herramientas y piezas:

D
C
B
G
G
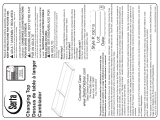
STEP #1
ÉTAPE N
O
1
PASO #1
1.Attach right side (part D) insert (1) M6x35mm bolt (part G)
into the threaded insert in the right end of front rail (part B).
Tighten using M4 allen wrench.
2. Repeat with left side (part C).
1.Connectez côté droit (pièce D) insert (1) M6x35mm
boulon (pièce G) dans l'insert fileté à l'extrémité droite du
rail avant (pièce B). Serrer l'aide de M4 clé allen.
2. Répétez avec le côté gauche (pièce C).
1.Conecte lado derecho (Pieza D) inserto (1) M6x35mm
perno (pieza G) en el inserto roscado en el extremo
derecho de la barra de carga (Pieza B). Apriete con la llave
Allen M4.
2. Repita con el lado izquierdo (Pieza C).
G. M6 x 35mm Bolt x2
Boulons M6 x 35mm
Pernos M6 x 35mm
5
G
G
A
STEP #2
ÉTAPE N
O
2
PASO #2
Attach Back Rail (part A): Insert (2) M6x35mm bolt (part G) into the threaded insert
in the right end of Left Side and Right Side.
Tighten using M4 allen wrench.
Connectez côté droit (pièce A): Insert (1) M6x35mm boulon (pièce G) dans l'insert
fileté à l'extrémité droite du Côté Droit, Côté Gauche. Serrer l'aide de M4 clé allen.
Conecte lado derecho (Pieza A) inserto (1) M6x35mm perno (pieza G) en el inserto roscado
en el extremo derecho de la Lado Derecho, Lado Isquirerdo. Apriete con la llave Allen M4.
G. M6 x 35mm Bolt x2
Boulons M6 x 35mm
Pernos M6 x 35mm
STEP #1
ÉTAPE N°1
PASO #1
STEP #2
ÉTAPE N°2
PASO #2

F. 40mm Screw x3
Vis 40mm
Tornillo 40mm
6
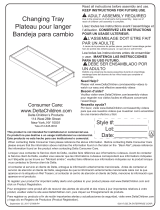
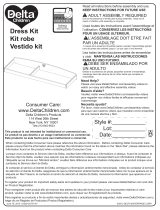
Assembled Changing Top
La Table À Langer Maintenant Assemblée
Equipó De Ensemblaje
DRESSER UNIT
LA COMMODE
EL CAMBIADOR
F
FINAL ASSEMBLY 2
2a) Set the assembled Chaning Top on the top of the dresser unit.
2b) Mark the location of the holes in the back of the Chaning Top on
the dresser unit.
2c) Drill pilot holes with a 1/8” drill bit at each location.
ASSEMBLAGE FINAL 2
2a) Placer la table à langer maintenant assemblée sur ledessus de la
commode.
2b) Marquer l’emplacement des trous pratiqués à l’arrièrede la table à
langer sur la commode.
2c) Percer des trous de guidage à l’aide d’une mèche de 1/8po à
chaque endroit.
ESEMBLAJE FINAL 2
2a) Poner el equipó de ensemblaje ensima del cambiador.
2b) Marcar la locasión de cada agujero en la parte de atrad del
equipó del cambiador.
2c) Hacer los agujeros pilotos con destornillador de 1/8 en cada
puesto.
FINAL ASSEMBLY 1
ASSEMBLAGE FINAL 1
ESEMBLAJE FINAL 1
FINAL ASSEMBLY 3
ASSEMBLAGE FINAL 3
ESEMBLAJE FINAL 3
1) Check to see if holes are drilled in the back of the dresser that
match the holes in the back of the Chaning Top. If yes, go to 3, if
not go to 2.
3) insert (3) 40mm screws (Part F) through the back of the Chaning
Top, into the pilot holes in the dresser unit. Tighten with a Phillips
Screwdriver.
3) Insérer (3) vis de 40mm (Pièce F) à partir de l’arrière de la table
à langer, jusque dans les trous de guidage que l’on percer dans la
commode. Serrer au moyen d’un tournevis Phillips.
3) Inserta (3) tornillos tamaño 40 mm (Pieza F) en la parte de atras en
los agujeros piloto. Apriete con destornillador Phillips.
FINAL ASSEMBLY
ASSEMBLAGE FINAL
ESEMBLAJE FINAL
1) Vérifiez si des trous sont perforés à l'arrière de la commode
correspondant aux trous à l'arrière du kit de commode. Si oui, allez
au point 3. Si non, allez au point 2.
1) Para insertar la gaveta, alinee la guía macho de la gaveta con la
guíahembradelmueble y empuje hasta que tope.

Consumer Care:
www.DeltaChildren.com
Delta Children’s Products
114 West 26th Street
New York, NY 10001
Tele.212-645-9033
To register your product for important safety alerts and updates to
your product please visit www.deltachildren.com
Pour enregistrer votre produit pour avoir les alertes de sécurité et
les mises a jour de votre produit veuillez visiter
www.DeltaChildren.com
Para registrar su producto para alertas importantes de seguridad y
estar al tanto sobre novedades de su producto por favor visite
www.DeltaChildren.com y seleccione Product Registration.
Warranty:
This Delta product is warranted to be free from defects for a period of 90
days from the date of purchase under normal use. This warranty extends only to the
original retail purchaser and is valid only when supplied with proof of purchase, or if
received as a gift, when the registration is on file with Delta.
Garantie: Ce produit Delta est garanti sans défauts pour une période de 90 jours a
partir de la date d’achat et sous condition d’une utilisation normale. Cette garantie
concerne seulement l’acheteur d’origine et est valide uniquement sur présentation de la
preuve d’achat, ou si reçu en cadeau, lorsque l’enregistrement en a été fait chez Delta.
Garantía: Esta producto Delta tienen una garantía por defectos de 90 dias desde la
fecha de su compra bajo uso normal. Esta garantía se ofrece solamente al
compradororiginal y es vålida solo si provee la prueba de su compra, o si fue recibido
como regalo cuando elregistro se encuentra en el archivo de Delta.
Date of Purchase: _____________ (you should also keep your receipt)
Date d’Achat: ____________ (vous devriez aussi garder votre facture d’achat)
Fecha de Compra: _____________ (debe además mantener su recibo)
To report a problem, please log on to www.deltachildren.com and
click the Consumer Care Tab, or contact us by phone at
(212) 645-9033.
Pour signaler un problème, veuillez vous connecter a
www.DeltaChildren.com et cliquez sur la touche Consumer Care,
ou contactez nous par téléphone au (212) 645-9033
Para reportarcualquier problema, por favor entre a
www.DeltaChildren.com y de clicen Servicio al cliente o
contáctenos por telefono al (212) 645-9033.
-
 1
1
-
 2
2
-
 3
3
-
 4
4
-
 5
5
-
 6
6
-
 7
7


Delta Children Changing Top Assembly Instructions
- Taper
- Assembly Instructions
dans d''autres langues
- English: Delta Children Changing Top
- español: Delta Children Changing Top
Documents connexes
-
 Delta Children Avery Changing Tray Assembly Instructions
-
 Delta Children Changing Tray Assembly Instructions
-
 Delta Children Disney Princess Magical Dreams Changing Top Assembly Instructions
-
 Delta Children Changing Top Assembly Instructions
-
 Delta Children Disney Mickey Icon Changing Top Assembly Instructions
-
 Delta Children Changing Top (W0551) Assembly Instructions
-
 Delta Children Epic Signature 3 Drawer Dresser Assembly Instructions
-
 Delta Children Hanover Park Changing Top Assembly Instructions
-
Delta Children Kingsley Changing Topper Assembly Instructions
-
 Delta Children Deluxe Changing Tray Assembly Instructions


