
JENN
GAS SLIDE-IN RANGE
_ABLE OF CONTENTS
Safety Instructions ...................................................................[-4
SurfaceCooking .......................................................................5-6
Oven Cooking ........................................................................7-15
Care & Cleaning ..................................................................15-17
Maintenance.........................................................................17-18
Before You Call for Service...................................................19
Warranty ....................................................................................21
Guide de I'utilisateur ................................................................22
Guh de[Usuario .......................................................................43
JENN-AIR
Form No. B/07/02 Part No. 8113P368-60 74005525 ©2002 Maytag Appliances Sales Co. Litho U.S.A.

[nsta[Jer: Pleaseleave this manual
with this appliance.
Consumer: Pleaseread and keep
this manualfor future reference.Keep
salesreceipt and/or cancelled check
asproof of purchase.
Mode[ Number
Serial Number
Date of Purchase
ffyou have questions, caff:
Jenn-Air Customer Assistance
1-800-688-I 100
1-800-688-2080 ( U.S.TTY for hear-
ing or speech impaired)
(Mon.-Fri., 8 am-8 pm EasternTime)
Internet: http://www.jen nair.com
For service information, see page
21.
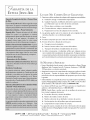
SAFETY iNSTRUCTIONS
Warning and Important Safety Instructions
appearingin thisguideare not meantto cover
all possibleconditions andsituationsthat may
occur. Common sense, caution, and care
must be exercisedwhen installing,maintain-
ing,or operating the appliance.
Always contact your dealer, distributor, ser-
vice agent, or manufacturer about problems
or conditions you do not understand.
RECOGNIZE SAFETY SYMBOLS,
WORDS, LABELS
WARNING
WARNING = Hazardsor unsafepractices
which COULD result in severe personal
injury or death.
CAUTION = Hazards or unsafe practices
which COULD resuk in minor personal in-
jury.
Read and follow all instructions before
using this appliance to prevent the poten-
tial risk of fire, electric shock, personal injury
or damage to the appliance as a result of
improper usage of the appliance. Use appli-
ance only for its intended purpose as de-
scribed in this guide.
To ensure proper and safe operation:
Appliance must be properly installed and
grounded by a qualified technician. Do not
attempt to adjust, repair, service, or replace
any part of your appliance unless it isspecifi-
cally recommended in this guide. All other
servicing should be referred to a qualified
servicer. Have the installer show you the
location of the gas shut off valve and how to
shut it off in an emergency.
Always disconnect power to appliance be-
fore servicing.
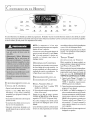
WARNING: If the
information in this manual is not
followed exactly, a fire or explo-
sion may result causing property
damage, personal in]ury ordeath.
= Do not store or use gasoline or
other flammable vapors and liq-
uids in the vicinity of this or any
appliance.
= IF YOU SMELL GAS:
• Do not try to light any
appliance.
• Do not touch any electrical
switch.
• Do not use any phone in your
building.
• Immediately call your gas
supplier from a neighbor's
phone. Follow the gas supplier's
instructions.
• If you cannot reach your gas
supplier, call the fire
department.
= Installation and service must be
performed by aqualified installer,
service agency or the gas
supplier.

A WARNING:
• ALL RANGES
CAN TiP AND
CAUSE iNJU-
RiES TO PER-
SONS
• INSTALLANTI-
TiP DEVICE
PACKED WiTH
RANGE
• FOLLOW ALL iNSTALLA-
TiON iNSTRUCTiONS
WARNING: To reduce risk of
tipping of the appliance from
abnormal usage or by excessive
loading of the oven door, the
appliance must be secured by a
properly installed anti-tip device.
To check if device is properly installed,
remove storage drawer and look under-
neath range to make sure one of the rear
leveling legs is properly engaged in the
bracket slot. Theanti-tip devicesecuresthe
rear levelinglegto the floor when properly
engaged.You should check this anytime
the range hasbeen moved.
To PREVENT FI REOR
S , OKEDA ' A(;E
Be sure all paddng materials are removed
from the appliance before operating it.
Keep area around appliance clear and free
from combustible materials, gasoline, and
other flammable vapors and materials.
If appliance is installednear a window,
proper precautions should be taken to
prevent curtains from blowing over burn-
ers.
NEVER leave any items on the cooktop.
The hot air from the vent may ignite flam-
mable items and may increase pressure in
closed containers which maycause them to
burst.
Many aerosol-type spray cans are EXPLO-
SIVEwhen exposed to heat and may be highly
flammable. Avoid their use or storage near
an appliance.
Many plastics are vulnerable to heat. Keep
plastics away from parts of the appliance that
may become warm or hot. Do not leave
plastic items on the cooktop as they may
melt or soften ifleft too close to the vent or
a lighted surfaceburner.
To eliminate the hazardof reachingover hot
surfaceburners, cabinet storage should not
be provided directly above a unit. If storage
is provided, it should be limited to items
which are used infrequentlyand which are
safelystored in an area subjected to heat
from an appliance. Temperatures may be
unsafefor some items,such asvolatile liq-
uids,cleaners or aerosol sprays.
IN CASE OF FIRE
Turn off applianceand ventilating hood to
avoid spreading the flame. Extinguish flame
then turn on hood to remove smoke and
odor.
• Cooktop: Smother fire or flame ina pan
with a lid or cookie sheet.
NEVER pick up or move a flaming pan.
• Oven: Smother fire or flame by closing
the oven door.
Do not use water on grease fires. Use baking
soda, a dry chemical or foam-type extin-
guisher to smother fire or flame.
CHILD SAFETY
NEVER leave children alone or unsuper-
vised near the appliance when it is in use or
isstill hot.
NEVER allow children to sitor standon any
part of the applianceasthey could be injured
or burned.
Children must be taught that the appliance
and utensilsin itcanbe hot. Lethot utensils
coo[ in a safe place, out of reach of small
children. Children should be taught that an
applianceisnot atoy. Children shouldnotbe
allowed to playwith controls or other parts
of the unit.
ABOUT YOUR
NEVER useapplianceasa spaceheater to
heator warm a room to prevent potential
hazardto the user anddamageto the appli-
ance.Also, do not usethe cooktop or oven
asa storage areafor food or cooking uten-
sils.
Do not obstruct the flow ofcombustion and
ventilation air by blocking the oven vent or
air intakes.Restriction of air flow to the
burner prevents proper performance and
increasescarbon monoxide emission to
unsafe levels.
Avoid touching oven vent area while oven is
on and for several minutes after oven is
turned off. Some parts of the vent and
surrounding area become hot enough to
cause burns. After oven isturned off, do not
touch the oven vent or surrounding areas
until they have had sufficient time to cool.
Other potentially hot surfaces include
cool<top, areas facing the cooktop, oven
vent, surfaces near the vent opening, oven
door, areas around the oven door and oven
window.
Do not much a hot oven light bulb with a
dampcloth asthe bulb could break. Should

,J'TMPoRTANT SAFETY [NSTRUCTXONS, CONTo
the bulb break, disconnect power to the
appliance before removing bulb to avoid
electrical shock.
COOKING SAFETY
Always place a pan on a surface burner
before turning it on. Be sure you know
which knob controls which surface burner.
Make sure the correct burner is turned on
and that the burner hasignited. When cool<-
ing is completed, turn burner off before
removing panto preventexposure to burner
flame.
Always adjust surface burner flame so that
it does not extend beyond the bottom edge
of the pan. An excessive flame is hazardous,
wastes energy and may damage the appli-
ance, pan or cabinets above the appliance.
NEVER leavea surfacecooking operation
unattended especially when using a high
heatsettingorwhen deepfatfrying.Boilovers
cause smoking and greasy spillovers may
ignite. Clean up greasy spills as soon as
possible.Do not usehighheatfor extended
cooking operations.
NEVER heat an unopened container on
the surfaceburner or in the oven. Pressure
build-up may causethe container to burst
resulting in serious personal injury or dam-
ageto the appliance.
Use dry, sturdy potho[ders. Damp pot-
holders may cause burns from steam.
Dishtowelsor other substitutesshouldnever
be usedaspotho[ders becausethey cantrail
acrosshot surfaceburners andignite orget
caught on applianceparts.
Alwaysletquantitiesof hot fat usedfor deep
fat fryingcoo[ beforeattempting to move or
handle.
Do not let cooking grease or other flam-
mable materials accumulate in or near the
appliance, hood or vent fan. Clean hood
frequently to prevent greasefrom accumu-
lating on hood or filter. When flamingfoods
under the hood turn the fan on.
NEVERwear garmentsmadeof flammable
material or loose fitting or long-sleeved
apparel while cooking. Clothing may ignite
or catch utensil handles.
Always placeoven racks in the desired posi-
tions while oven iscool. Slideoven rack out
to add or remove food, using dry, sturdy
potho[ders. Always avoid reaching into the
oven to addor remove food. Ifa rack mustbe
movedwhile hot, useadrypotho[der. Always
turn the oven off at the end of cooking.
Use care when opening the oven door. Let
hot air or steam escape before moving or
replacingfood.
PREPARED FOOD WARNING: Follow
food manufacturer's instructions. If a plastic
frozen food container and/or its cover dis-
torts, warps,or isotherwise damagedduring
cooking, immediatelydiscardthe food andits
container. The food could be contaminated.
NEVER use aluminum foil to cover oven
racks or oven bottom. This could result in
risk of electric shock, fire, or damageto the
appliance. Use foil only as directed in this
guide.
UTENSIL SAFETY
Use pans with flat bottoms and handles that
are easily grasped and stay coo[. Avoid using
unstable, warped, easily tipped or loose-
handled pans. Also avoid using pans, espe-
cially small pans, with heavy handles as they
could be unstable and easily tip. Pansthat are
heavy to move when filled with food may also
be hazardous.
Be sure utensil is large enough to properly
contain food and avoid boilovers. Pansizeis
particularly important in deep fat frying. Be
sure pan will accommodate the volume of
food that isto beadded aswell asthe bubble
action of fat.
To minimize burns, ignition of flammable
materials and spillage due to unintentional
contactwith the utensil, do not extend handles
over adjacent surface burners. Always turn
pan handles toward the side or back of the
appliance, not out into the room where they
are easily hit or reached by small children.
Never let a pan boil dry asthis could damage
the utensil and the appliance.
Follow the manufacturer's directions when
using oven cooking bags.
Only certain types of glass,glass/ceramic,
ceramic or glazed utensilsare suitable for
cod<top or oven usagewithout breaking
due to the suddenchangein temperature.
Follow manufacturer's instructions when
usingglass.
This appliance has been tested for safe
performance usingconventionalcookware.
Do not useanydevicesor accessoriesthat
are not specifically recommended in this
guide. Do not use eyelid covers for the
surface units, stovetop grills, or add-on
oven convection systems.The use of de-
vicesor accessoriesthat are not expressly
recommended in this manual can create
serious safety hazards, result in perfor-
manceproblems, and reducethe lifeof the
components of the appliance.
CLEANING SAFETY
Turn off all controls and wait for appliance
parts m coo[ before touching or cleaning
them. Do not much the burner grates or
surrounding areas until they have had suffi-
cient time to coo[.
Clean appliance with caution. Use care to
avoid steam burns ira wet sponge or cloth
is used to wipe spills on ahot surface. Some
cleaners can produce noxious fumes if ap-
plied to a hot surface.
SELFoCLEAN OVEN
Clean only parts listed in this guide. Do not
clean door gasket. The door gasket is es-
sential for agood sea[.Care should be taken
not to rub, damage, or move the gasket. Do
not use oven cleaners of any kind in or
around any part of the self-clean oven.
Before self-cleaning the oven, remove
broiler pan, oven racks and other utensils
and wipe up excessive spi[[overs to prevent
excessive smoke, flare-ups or flaming. CAU-
TION: Do not leave food or cooking
utensils, etc. in the oven during the self-
clean cycle.
Slide-in ranges feature a cooling fan which
operates automatically during a clean cycle.
Ifthe fan does not turn on, cancel the clean
operation and contact an authorized
servicer.

It isnormal for the cooktop ofthe rangeto
becomehot duringaself-cleancycle.There-
fore, touching the cooktop during a clean
cycle should be avoided.
_MPORTANT SAFETY
NOTICE AND
The California Safe Drinking Water and
Toxic Enforcement Act of 1986 (Proposi-
tion 65) requires the Governor of Califor-
nia to publish a list of substances known to
the State of California to cause cancer or
reproductive harm, and requires businesses
to warn customers of potential exposures
to such substances.
Users of this applianceare hereby warned
that the burning of gascan result in low-
level exposure to some of the listed sub-
stances, including benzene, formaldehyde
and soot, due primarily to the incomplete
combustion of natural gas or liquid petro-
leum (LP) fuels. Properly adjusted burners
will minimize incomplete combustion. Ex-
posure to these substances can also be
minimized by properly venting the burners
to the outdoors.
iMPORTANT NOTICE REGARDING
PET BIRDS: Never keep pet birds inthe
kitchen or inrooms where the fumesfrom
the kitchen could reach. Birds havea very
sensitive respiratory system. Fumes re-
leased during an oven self-cleaning cycle
may be harmful or fatal to birds. Fumes
released due to overheated cooking oil, fat,
margarine and overheated non-stick cool<-
ware may be equally harmful.
SAVE THESE INSTRUCTXONS FOR FUTURE REFERENCE

JSURFACE CONTROLS 1
]
SETTliNG THE
Your cooktop hassealedgasburners with
automatic re-ignition. If the burner flame
shouldgo out, the systemwill automatically
spar[<to re-ignite the burner.
1. Placea pan on the burner grate. (To
preserve thegrate finish,do not operate
the burnerswithout a panon the grateto
absorb the heatfrom the burner flame.)
2. Pushin knoband turn immediate[ycoun-
terc[ockwise to the desired setting.
• A clicking (spar[<)sound will be heard
and the burner will light. (All four
ignitors will spar[<when any surface
burner [<nobisturned on. However,
only the selectedburner will light.)
OPERATING DURING A
POWER FAILURE
I. Hold a lighted match to the desired
surfaceburner head.
2. Pushin andturn the control [<nobslowly
to desired setting.
PILOTLESS GNITION
Your range is equipped with pilotless igni-
tion. With this type of ignition system,the
gasautomatically shuts off and the oven
will not operate during a power [allure.
A lighted match will not light the oven
burner. No attempt should be made to
operate the ovenduring a power failure.
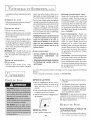
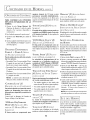
SURFACE CONTROL
Use to turn on the
surface burners. An
infinite choice of heat
settings is available
from Io to hi. At the
hi setting a detent or
notch may be felt. The knobs can be set on
or between any of the settings.
Graphics next to the knob identify which
burner the knob controls. For example, the
graphic at right shows the right
front burner location.
k._o
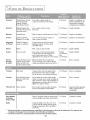
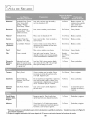
SUGGESTED HEAT SETTINGS 1
The sizeand type ofcool<warewill affect the heat setting. For information on cookware
and other factors affecting heat settings, refer to "Cooking Made Simple" booklet.
Settings
hi
I
©
IO
I
©
Uses
Use hi to bring liquid to a boil, or reach pressure in a
pressure cooker. Always reduce settingto a lower heatwhen
liquids begin to boil or foods begin to coo[<.
An intermediate flame size is used m continue cooking. Food
will not cool<any faster when a higher flame setting is used
than needed m maintain a gentle boil. Water boils at the same
temperature whether boiling gently or vigorously.
Use Io to simmer foods, keep foodswarm and melt
chocolate or butter.
Somecooking may take placeon the Io setting if the pan is
covered. It is possibleto reduce the heatby rotating the [<nob
toward OFF. Besure flame isstable.

[ COOKTOP I
To prevent the cooktop from discol-
oring or staining:
° Cleancooktop after eachuse.
° Wipe acidic or sugaryspillsassoon
asthe cooktop hascooled asthese
spillsmay discolor the porcdain.
S[MN_ER BURNER
This burner is located in the left front
position. The simmerburner offers alower
BTU flame for delicate saucesor melting
chocolate.
* BTUratingswillvarywhenusing,LPgas.
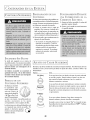
BURNER GRATES
The grates must be properly positioned
Unl&earangewithstan- before cooking. Improper installation of
dard gasburners, this the grates may result in chipping of the
cooktop does not lift- cooktop.
up nor isit removable.
Do not attempt to li_t
the cooktop [or any
reQson.
SEALED BURNERS
The sealedburners of your range are se-
cured to the cooktop and are not designed
to be removed. Since the burners are
sealedinto the cooktop, boilovers or spills
will not seepunderneath the cooktop.
However, the burner heads should be
cleaned after each use. The head portion of
the burner is easily removed for cleaning.
(See page 16for cleaning directions.)
H: GH PERFOR ' ANCE
BURNER {712,000 BTU*}
There is one high speed burner on your
range, located in the right front position.
This burner offers higher speed cooking
that canbeusedto quickly bringwater to a
boil and for large-quantity cooking.
Do not operate the burners without a
pan on the grate. The grate's porce-
lain finish may chip without a pan to
absorb the heat from the burner
flame.
Although the burner grates are durable,
they will gradually lose their shine and/or
discolor, due to the high temperatures of
the gas flame.
NOTES:
• A properly adjusted burner with clean ports will light within a few seconds. Ifusing
natural gas, the flame will be blue with a deeper blue inner cone.
Ifthe burner flame isyellow or is noisy, the air/gas mixture may be incorrect. Contact
a service technician to adjust. (Adjustments are not covered by the warranty.}
With LP gas, some yellow tips on the flames are acceptable. This is normal and
adjustment is not necessary.
• With some types of gas, you may hear a "popping" sound when the surface burner
is turned off. This is a normal operating sound of the burner.
• If the control knob is turned very quickly from hi to Io, the flame may go out,
particularly if the burner iscold. If this occurs, turn the knob to the OFF position,
wait several secondsand relight the burner.
• The flame should be adjusted so it does not extend beyond the edge of the pan.

/f
Keep
Warm
Clock
Oi_playOHO
Drying Timer 1
RH P,d HB÷_[
Ove_, 1 2 3 4 5
Light co,_o o_k 12 blour©f SOl_nd L_vll 2 24101 CI0:k SClOl_S peed
Bread Timer 2
Proofing 6 7 8 9 0
_ 0_k il _r'_ eps lair pC/F /_1 ,Jage Default SetupOpf o s
Bake Broil
Cook Stop Clean
Time Time _ly
Convect Meat
Bake Probe
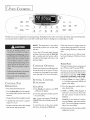
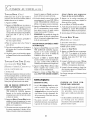
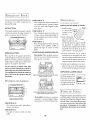
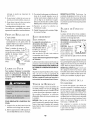
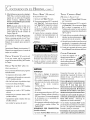
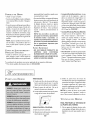
Theelectronic control isdesignedfor easein programming.Thedisplaywindow on the control showstime of day,timer andovenfunctions.
Control panel shown includes Convect and other model specificfeatures. (Stylingmay vary dependingon model.)
CONTROL PAD
• Press the desired function pad.
• Press the Auto Set pad or the appropri-
ate number pad(s) to enter time or tem-
perature.
• Abeepwill sound when any pad is pressed.
• A double beep will sound if a program-
ming error occurs.
• Further instructions will scroll in display
after function pads are pressed.
NOTE: The temperature or time will be
automatically entered four seconds after
selection.
If more than 30 seconds elapse between
pressing a function pad and the Auto Set
pad or number pads, the function will be
canceled and the display will return to the
previous display.
CONTROL OPTIONS
Several control options are indicated under
the number pads on the control. Factory-
set options can be changed to your prefer-
ences. See page 13 for more information.
SETTING CONTROL
CLOCK PAD
I. Press Clock pad. Indicator word TIME
will flash in the display.
2. Press the appropriate number pads for
the current time.
After a power interruption, POWER IN-
TERRUPTION will scroll followed by SET
CLOCK.
To recall the time of day when another
function is showing, press Clock pad.
Clock time cannot be changed when the
oven has been programmed for clock con-
trolled cooking, self-clean or delayed self-
clean.
The clock may be set to a 24-hour clock.
SeeControl Options (I 2124Hour Clock),
page 13.
TIMER PADS
Thetimer(s) may beset for any time period
up to 99 hours and 59 minutes (99:59).
Thetimer(s) operates independentlyof any
other function andcanbe setwhile another
oven function isoperating. THE TIHEP,
DOES NOT CONTROLTHE OVEN.
I. Pressthe Timer I or 2 pad. TIMER I
or 2 will flash respectively. 0HR:00 will
appear in the display.
2. Pressthe appropriate number padsto
enter desired time.
3. TIMER I or TIMER2 will be displayed. If
both timers are active, the Timer with
the least amount of time left will be
displayed.
EXAMPLE:To set atimer for 5 minutes,
press the Timer I pad and the number
pad 5. The control willbegin countdown
after a four second delay.
4. The last minute of the countdown will be
displayed in seconds.

S. Atthe end ofthe settime, "END" will be
displayed and two chimes will sound
followed byone chimeevery 30 seconds
for upto five minutes.Pressthe corre-
sponding Timer pad to cancel the
chimes.
NOTE: TheTimer reminder chimesat
the end of a set time may be changed.
See Control Options (End-of-Timer
Signal),page 13.
To Cancela Set Time:
Pressand hold the corresponding Timer
padfor severalseconds.After aslightdelay
the time of daywill appear.
OR
Pressthe Timer padand the "0" number
pad. After a slight delay the timer will be
canceled.
BAKE PAD
Use for bakingand roasting.
I.Press Bake pad.
2.Pressagainfor 350° For presstheAuto
Set pad. Eachadditional pressof Auto
Set will raisethetemperature 25° F.Or,
press the appropriate number padsfor
the desiredtemperature between I00° F
and 550° F.
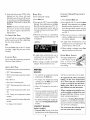
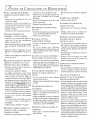
3.When the oven turns on, a red preheat
indicator will light and the bakeicon will
be displayed.
PREHEAT BAKE
tNDtCA TOR ICON
CONVECT BAKE PAD (SELECT
MODELS)
I. PressConvect Bake pad.
2. Pressagainfor 325° For pressthe Auto
Set pad. Eachadditional pressof Auto
Set will raisethetemperature 25° F. Or,
press the appropriate number pads for
the desiredtemperature between 100° F
and 550° F.
3. When the oven turns on, a red preheat
indicator will lightandthe convect
icon will be displayed.
4. A singlechime will indicate the oven is
preheated to the set temperature. The
preheat indicator will turn off.
5. When cooldng is complete, press Can-
cel pad. Removefood from oven.
CANCEL PAD
Use to cancel all programming except the
Clock and Timer functions.
AUTO SET PAD
Usewithfunctionpadsto automaticallyset:
• 350° Fbaketemperature
• 325° Fconvect baketemperature (select
models)
• hi or Io broil
• three hours of cleaningtime
• 140° Fdryingtemperature (select mod-
els)
• 160° Fprobe temperature (select mod-
els)
• 170° Fkeep warm temperature (select
models)
• quick or standard bread proofing (select
models)
• to changecontrol options
4.A singlechime will indicate the oven is
preheated to the set temperature. The
preheat indicator will turn off.
5.When cooking is complete, press Can-
cel pad. Removefood from oven.
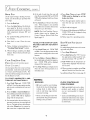
EVEN HEAT ASSIST _(_
Th_lr;vg: i1::tqr_P_:_:'_h-
ment to insure even
browning during baking
and roasting.
NOTES:
BAKING
• To recall the set temperature during
preheat press the Bake pad,
• To change oven temperature during
cooking, press the Bake pad and the
appropriate number pads.
• Allow 10-12 minutes for the oven to
preheat.
• Do not usetemperatures below 140° F
to keepfood warm or below 200°Ffor
cooking. Forfood safetyreasons,lower
temperatures are not recommended.
• For additional bakingandroasting tips,
refer tothe "Cooking Made Simple"
booklet
CONVECT BAKING
(select models)
• Convect Bake function cycles both
thebakeburner andbroil elementalong
with the convection fan at a low speed.
As a general rule, when convection
baking,set the oven temperature
25° F lower than the conventional
recipeor prepared mix directions.
Bakingtime will be the same to a
few minutes lessthandirections.
• When roastingmeat usingthe con-
vectionsetting,roastingtimes may
be up to 30% less. (Maintain conven-
tional roasting temperatures.)
" Seechart in "Cooldng Made Simple"
booklet for recommended roasting tem-
perature andtimes, andadditional baking
and convection cooking tips.
• The convection fan will stop when-
ever the oven door is opened.
8

COOKING, CONTo
BROIL PAD
Use for top browning or broiling. For best
results, usethe broiler pan provided with
your range.
I. Pressthe Broil pad.
2. Press the Auto Set pad for hi broil,
press again for Io broil, or press the
appropriate number padsto set desired
broil temperature between 300° and
550° F.
3. For optimal broiling, preheat three to
four minutes.
4. Place food in oven. Close the oven
door.
5. Follow broiling recommendations in
"Cooldng Made Simple" booklet.
6. When broiling is complete, press Can=
eel pad. Remove food and broiler pan
fromoven.
COOK TIME/STOP TIME
PADS (CLOCK CONTROLLED
OVEN COOKING)
Use to program the ovento start and stop
automatically. Cool<time maybesetfor up
to II hours and 59 minutes (I 1:59). The
clock must befunctioning andcorrectly set
for this feature to work.
TO START IMMEDIATELY AND
TURN OFF AUTOMATICALLY:
I. Press Cook Time pad. COOK TIME
will flash. Press the appropriate number
pads to enter cooking time in hours and
minutes.
2. Press the Baize or Convect Baize (se-
lect models) pad and select the tempera-
ture. COOK TIME will be displayed
along with the temperature.
3. One minute before the end of the pro-
grammed cook time, the oven light will
turn on. The light will turn off automati-
cally when Cancel pad is pressed or
after oven door isopened and closed.
4. At the end of cool< time, the oven will
shut offautomatically, END and COOK
TIMEwill be displayedand three chimes
will sound.
5.Press Cancel pad. Remove food from
oven. If the program is not canceled,
there will betwo reminder chimesevery
minute for up to 30 minutes.
NOTE: The Cook Time/Stop Time re-
minder chimes may be changed. See
Control Options (End-of-Cook-Time
Signal),page 13.
4. Press Stop Time pad again. STOP
TIME must be flashing to set the
delay start time.
5. Pressthe appropriate number padsto
enter the time you want the oven to
stop.
6. DELAY will be displayed.
7. At theendof thedelayperiod, BAKEand
COOK TIME will be displayed along
with the temperature.
8. Follow steps 3-5 inpreceding section.
TO DELAY THE START OF COOK=
ING AND TURN OFF AUTOMATI=
CALLY:
I. PressCook Time pad. COOK TIME
will flash. Pressthe appropriate number
padsto enter cooking time inhours and
minutes.
2. Pressthe Baizeor Convect Baize (se-
lect models)padandselectthetempera-
ture. COOK TIME will be displayed
along with the temperature.
3. PressStop Time pad. Display shows
when the oven will stop basedon an
immediatestart.
KEEP WARM PAD (SELECT
MODELS)
Forsafelykeepingfoodswarm or for warm-
ing breads and plates.
I. PressKeep Warm pad.
2. PressAuto Set padfor 170° For press
the appropriate number padsfor tem-
peratures between 145° and 190° F.
3. KEEPWARN and the temperature se-
lected will be displayedwhen the func-
tion is active.
4. When warming is complete, press Can=
cel pad. Remove food from the oven.
See additional Keep Warm notes, page 10.
NOTES:
BROILING
• Hi broil isused for most broiling.
Use IO broil when broiling longer
cooking foods to allow them to
cool< to well done stage without
excessivebrowning.
• Never cover broiler paninsertwith
aluminumfoil.Thispreventsfatfrom
draining to the pan below.
CLOCK CONTROLLED
OVEN COOKING
• Highly perishablefoods such asdairy
products, pork, poultry or seafood
are not recommended for delayed
cooking.
" Clockcontrolled bakingis notrecom-
mendedfor bakeditems that require
apreheatedoven,suchascakes,cook-
iesand breads.

MEAT PROBE PAD
CsELEcTMODELS)
To roast and bake items to the desired
temperature without over or under cooking.
I. Insert the probe into the food item. (For
meats, the probe tip should be located in
the center of the thickest part of the meat
and not into the fat or touching a bone.)
2. Insert the probe plug into the receptacle
located on the top right of the oven. Be
certain to insert plug into the receptacle
all the way. The control will read PRESS
PROBE PAD.
3. PressProbe Pad.
4. Set the desired internal temperature of
the food by pressing Auto Set pad for
160° For pressthe appropriate number
padsfor temperature between 100°and
185° F.
5. Press the Bake or Convect Bake
(selectmodels) pad.Presstheappropri-
ate number padsfor the desired tem-
perature between 100° and 550° F.
6. When the probe has reached the set
temperature, the oven will shut off,
"END'will bedisplayedandfour chimes
will soundfollowed byone chime every
minute for one hour or until the Can-
cel pad is pressed.
BREAD PROOFINC PAD
€ E EcTMODE 4
Forproofing or allowing yeastbread prod-
ucts to rise prior to baking.There are two
proofing methods available- STANDARD
and QUICK.
Standard Proofing temperature is slightly
higher than room temperature, protecting
doughfrom temperature changesanddrafts
that can affect proofing results.
Quick Proofingprovides fasterresults than
countertop or standard proofing, without
harming the yeast.
I. Press Bread Proofing pad.
2. Pressthe Auto Set pad for Standard
Proof, press againfor Quick Proof.
3. When proofing is complete, press the
Cancel pad.
OTES:
KEEP WARM
• For optimal food quality,ovencooked
foods should be kept warm for no
longer than I to 2 hours.
• For optimal food quality and color,
foods cooked on the rangetop should
be kept warm for an hour or less.
• To keep foods from drying, cover
loosely with foil or a lid.
• TO WARM DINNER ROLLS:
- press Keep Warm and Auto Set
pads.
- warm for five minutes, turn off the
oven and leave plates in the oven
for IS minutes more.
- use only oven-safe plates, check
with the manufacturer.
- do not set warm dishes on acold
surface as rapid temperature
changes could cause crazing.
• Usethehandleof theprobe for insert-
ingand removing. Do not pull on the
cable. Use a potholder to remove
since probe becomes hot.
• For frozen meats, insert probe after
1-2 hours of roasting.
• To clean cooled probe, wipe with a
soapy dishcloth. Do not submerge
probe in water or wash in the dish-
washer.
- cover rolls loosely with foil and
placein oven.
- pressKeep Warm andAuto Set
pads.
- warm for [2-[5 minutes.
• TO WARM PLATES:
- place2 stacksof up to four plates
eachin the oven.
MEAT PROBE
The probe must be removed from the
oven when it isnot being used.
Because of the excellent insulation ofthe
oven, the retained heat continues to
cool<the foodafter thesignalhassounded
and the oven has cycled off. For this
reason it is important to remove the
food from the oven assoonasthe signal
sounds.
BREAD PROOFING
• For anydough that requires one rise,
either Standardor Quick Proofingcan
be used.
For dough requiring two rises, Stan-
dard Proofing must be used for the
first rising period. EitherStandardor
Quick Proofing can be used for the
second rise.
IO

COOKXNG, CONTo
DRYING PAD
(SELECT MODELS)
Fordryingfruits, vegetables,herbs,etc. Use
adryingrack for bestresults. It allowsair to
circulate evenly around the foods.
I. Pressthe Drying pad.
2. Pressthe Auto Set pad for 140° F or
press the appropriate number padsfor
the desireddryingtemperature between
100° and 200° F.
3. The oven door needs to be opened
slightlyto allow moisture to escapefrom
the oven during the drying process.
• Open the oven door slightly.
• Placethe magneticdoor spacer
(Part No. 8010PI46-60) over the
plunger switch
at the upper
right sideof the
oven frame.
The spacer
provides agap
between the
oven frame andthe oven door allow-
ing moisture to escape.
• Gently closethe door until the spacer
magnetmakescontact with the oven
door. The magnetwfll hold the spacer
in the proper position during the
dryingprocessandallows the door to
be opened at anytime during drying
without losingproper positioning.
NOTES:
DRYING
To purchase a drying rack, contact
your Jenn-Air dealer for the
"DRYINGRACK" Accessory Kit or
call 1-800-688-8408.
• Most fruits and vegetables dry well
and retain their color when dried at
140° F. For optimal flavor, dry herbs
at 100° F, however, at this lower
temperature expect extended drying
times of up to 8 hours.
• The lengthof dryingtimesvary clueto
the following: water and sugarcon-
tent of food, size of food pieces,
amount offood being dried, humidity
in the air.
• Check foods at the minimum drying
time. Dry longer if necessary.
• More than one rack of food may be
dried at the same time. However,
additional drying time isneeded.
Fruits that turn brown when exposed
to air should be treated with an antioxi-
dant.Try oneofthe following methods:
I. Dip fruit inamixture oftwo parts
bottled lemon juice to one part
cool water.
2. Soakfruit in a solution of Itsp.
ascorbic acid or commercial anti-
oxidant to I quart of cold water.
" Foodsmay drip during the drying pro-
cess.After drying high acid or sugary
foods,cleantheoven bottom with soap
and water. The porcelain oven finish
maydiscolor ifacidor sugaryfood soils
are not wiped up prior to high heator
a self-cleaningcycle.
" Refer to other resources atyour local
library or callyour local County Exten-
sionservicefor additional information,
NOTE: If the spacer is not placed
correctly, the convection fanwill not
operate.
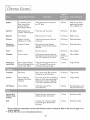
Follow the dryingguideon page12for
drying times. Cool foods to room
temperature before testing for
doneness.
4. When dryingiscomplete, turn the oven
off bypressingthe Cancel pad.Usinga
potholder, remove the magneticspacer.
NOTE: Pleasekeepthemagneticspacer
in a safeand convenient place for easy
access.To replace, call 1-800-688-8408
to order Part No. 8010PI46-60.
II

Apples* FirmVarieties:Graven
Stein,GrannySmith,
Jonathan,Winesap,
RomeBeauty,Newton.
Apricots* BlenheimlRoyalmost
common.Tikon alsogood.
Wash, peelifdesired,core andslice 4-8 hours Pliableto crisp.Dried
into 118"slices, applesstore bestwhen
they are slightlycrisp.
Wash, halve,andremove pits. 18-24hours Soft,pliable.
Bananas* FirmVarieties Peelandcut into I/4" slices. 17-24hours. Pliableto crisp.
Cherries Lambert,RoyalAnn,
Napoleon,Van or Bing.
Nectarines Freestone Varieties.
and Peaches*
Wash andremove stems.Halveand 18-24hours. Pliableandleathery.
remove pits.
Halveandremove pits.Peelingis 24-36 hours Pliableandleathery.
optionalbut resultsin better-looking
dried fruit.
Pears* Bartlett Peel,halveandcore. 24-36 hours Soft andpliable.
Pineapple Fresh or canned. Wash, peel and remove thorny eyes. Canned: Soft and pliable.
Slicelength wise and remove the small 14-18 hours
core. Cut crosswise into I/2" slices. Fresh:
12-16 hours
Orange and
Lemon Peel
Tomatoes
Selectrough-skinnedfruit.
Do not dry the peelof fruit
marked"color added".
Wash well. Thinly peel the outer 1/16
to I/8" of the peel. Do not use the
white bitter pith under the peel.
I-2 hours
Plum,Roma o Halve,removeseeds.Placetomatoes ° 12-18hours
skinsideupon rack.Prickskins.
Toughto brittle.
Toughto crisp.
Toughto brittle.Carrots DanversHalf Long, Do not usecarrots with woody fiber or 4-8 hours
Imperator, Red Cored pithy core. Wash, trim tops and peel if
Chantenay desired. Slice crosswise or diagonally
in I/4" slices. Steam blanch for 3 min.
Hot Peppers
Ancho, Anaheim Wash, halveandseed.Prick
skinseveraltimes.
Rinse in cold water. Leavestems on
until leavesare dry, thendiscard.
4-6 hours
Podsshouldappearshriv-
eled,darkred andcrisp.
I-3 hours Brittle andcrumbly.Parsley, Hint,
CUantro, Sage,
Oregano
Basil Cut leaves 3 to 4" from top of plant 2-5 hours Brittle and crumbly.
just asbudsappear.Rinseleavesin
coldwater.
*Fruits requiring an antioxidant to prevent discoloration and loss of nutrients. Refer to the notes on page I I for
spedfic methods.
** 12 Hour Offwill not occur during drying functions.
12

yCONTo
CONTROL OPTIONS]
TO CHANGE FACTORY SET
DEFAULT OPTIONS:
I. Press the Setup Options (O) pad and
the desired option pad. (See Options
below.)
2. Current option will appear in the dis-
play.
3. Press the Auto Set pad to change the
option.
4. Pressany function pad other than the
Cancel padto setthe displayedoption
and exit the program.
OPTIONS AVAILABLE:
END-OF-TIMER SIGNAL
(TIMER1 & TIMER2)
There are three choicesfor the end of
"timer" reminder signals.
• Two chimes (Timer I) or four chimes
(Timer 2) followed by one chime every
30 seconds for up to five minutes (default
setting).
• Two chimes (Timer l) or four chimes
(Timer 2) followed by one chime every
minute for up to 30 minutes.
• Two chimes (Timer I) or four chimes
(Timer 2) followed by no other chimes.
NOTE: The reminder signalchosenwill
apply to both timers.
CONTROL LOCK (1)
The function pads on the control can
be locked to prevent unwanted use
for safety and cleaning benefits.
Control Lod<will not loci<out the Timer,
Clod< or Oven Light.
12 HOUR OFF/SABBATH
MODE (2)
The oven may be set to turn off after
12 hours or stay on indefinitely. The
default isset to turn off after 12hours.
SOUND LEVEL (3)
The sound of the chimes may be
changed with 11111111(8)being the high-
est volume and I(I) being the lowest.
The default isset at level 6.
12/24 HOUR CLOCK (4)
The clock may be set for a 12-hour or
24-hour dock. The defaultisset for a 12-
hour clock.
SCROLL SPEED (5)
The scroll speed of the messages in the
display may be changed from FAST to
HEDIUH to SLOW. The default issetfor
the medium speed.
END-OF-COOK TIME
SIGNAL(6)
There are three choices for the end of
"clock controlled cooldng" reminder
signMs.
• Three chimes followed by two chimes
every minute for up to 30 minutes (default
setting).
• Threechimesfollowed bynootherchimes.
• Three chimes followed by two chimes
every 30 seconds for up to five minutes.
TEMP C/F {7)
The temperature scalemay be changed
to Centigrade or Fahrenheit. The de-
fault isset for Fahrenheit.
LANGUAGE {8)
Thewords which scroll inthe displaymaybe
changedfrom Englishto French or Spanish.
DEFAULT (9)
The control can be reset to restore the
factory setting for each option.
DISPLAY ON/OFF (CLOCK)
The time-of-day display maybe shut offwhen
the oven is not in a cooking or cleaning
function.
13
OVEN TEMPERATURE
ADJUSTMENT
Ifyou think the oven is operating too cold or
hot, you can adjust it. Bakeseveral test items
and then adjust the temperature setting not
more than I0° F at a time.
TO ADJUST:
I. Pressthe Bake padand enter 550° F.
2. Pressand hold the Bake pad for several
secondsuntil TEMPADJ isdisplayed.
3. Press the Auto Set pad - each press
changes the temperature by 5° F. The
control will accept changes from -35° to
+35° F.
.
S.
If the oven was previously adjusted, the
changewill be displayed. For example,if
the oven temperature was reduced by
IS° F,the displaywill show -IS° F.
When you have made the adjustment,
press any function pad, OPTION
CHANGEDwiII scroll andthetime ofday
will reappear inthe display.The ovenwill
now bakeat the adjusted temperature.
NOTE: It isnot recommended to adjust
the temperature ifonly one or two reci-
pesare in question.
[ OVEN LIGHT
The oven light automatically comes on when
the door isopened. When the door isclosed,
press the Oven Light pad on the control
panel to turn the light on or off.
The oven light will come on automatically
one minute before the end of a dock con-
trolled cooking operation.
[ OVEN BOTTOM
Protect oven bottom against spillovers, es-
pecially acidic or sugary spills,as they may
discolor the porcelain enamel Usethe cor-
rect pansizeto avoidspi[[oversandboi[overs.
Do not place utensils or aluminum foil
directly on the oven bottom.

{OVEN RACKS
The oven has two racks (three racks if
convection). All racks are designedwith a
lock-stop edge.
TO REMOVE OVEN RACKS:
Pull rack straight out until it stops at the
lock-stop position; lift up on the front of the
rack and pull out.
TO REPLACE OVEN RACKS:
Place rack on the rack support inthe oven;
tilt the front end up slightly; slide rack back
until it clears the lock-stop position; lower
front and slide back into the oven.
Do not cover an entire rack with alumi=
hum foil or place foil on the oven bot-
tom. Baking results will be affected and
damage may occur to the oven bottom.
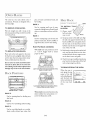
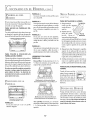
RACK POSITXONS
Three-rack Convection
Baking (Racks 1, 3 and 5)
RACK 5:
Use for toasting bread or broiling very
thin foods.
RACK 4:
Usefor two-rack baking and for broiling.
RACK 3:
Use for most bakedgoods on a cookie
sheet or jelly roll pan, layer cakes, fruit
pies, or frozen convenience foods, and
for broiling.
RACK 2:
Use for roasting small cuts of meat,
casseroles, baking loaves of bread, bun&
cakes or custard pies, and two-rack bak-
ing.
RACK I:
Use for roasting large cuts of meat and
poultry, frozen pies, dessert souffles or
angel food cake, and two-rack baking.
HULTIPLE RACK COOKING:
Two rack: Use rack positions 2 and 4,
or I and 4. Stagger food to ensure
proper air flow.
Layer Cake Placement (Conventional Oven)
Bake on racks 2 and 4
Layer Cake Placement (Convection Oven)
Convect Bake on racks 2 and 4
Three rack:(convection functionsonly,
select models) Use rack positions I, 3
and 5. Seeillustration at left.
HALE: RACK
(sELEc MO:DEL I
TO INSTALL Support_
IN OVEN:
I. Always install
half rack when _
oven is cool. "_
2.
Tabs
Grasp top center of the half rack. Align
the side arm support between the top
fourth and fifth oven rack guides. Insert
the two tabs on the back frame of the
half rack intothe slots on the upper left
rear of the oven wall.
3. Push firmly on the top surface of the half
rack until the tabs slide into the slots
and the half rack side arm support rests
on the fourth oven rack guide.
4. Check for proper installation byplacing
your hand on the top surface of the half
rack and pressing down firmly.
TO REMOVE FROM THE OVEN:
When the oven is
cool, grasp the top
center of the half
rackandpullupward
until the back tabs
on the rackslideout
of the oven back
slots.
14

JARE & CLEANING
NOTES:
HALF RACK
• Do not use cookware that extends
beyond edge of rack.
• For best results, allow two inches
between the pan placed on the rack
and the oven side wall.
• When opening the oven door, allow
steam and hot air to escape before
reaching into the oven to remove
food.
• Use caution when removing items
from the halfrack to avoid burns.
• Carefully remove items from the
lower rack to avoid disturbing the
half rack.
• If not includedwith your range,con-
tact your Jenn-Air dealer for the
HALFRACK Accessory Kit or call
1-800-688-8408.
[OVEN VENT 1
When the oven isin use, the area near the
vent may become hot enough to cause
burns. NEVER block the vent opening.
OVEN VENT LOCATION
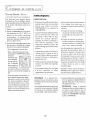
CLEAN PAD
Use to set a self-clean cycle or a delayed self-
clean cycle. One press of the Clean pad sets
up an immediate clean cycle. A second press
of the Clean pad sets up a delayed clean
cycle.
• Clean oven frame,
door frame (area
outside of gasket)
and around the
opening in the
door gasket with
a nonabrasive cleaner such as Bon Ami*.
These areas are not exposed to cleaning
temperatures.
• Remove oven racks. If racksare left in
during a cleancycle,it mayimpairfunction
and they will discolor. Turn off the oven
light and close door.
• Brand names for cleaning products are
registeredtrademarksoftherespectivemanu-
facturers.
TO SET FOR IMMEDIATE START:
I. PressClean pad once.
2. Pressthe Auto Set pad for 3 hours of
cleaningtime, pressagainfor 4 hours and
again if 2 hours of clean time is desired.
3. CLEANING and LOC plus the clean time
will appear in the display.
4. When the clean cycle is complete,
CLEANED will be displayed. LOC will
remain on until the oven has cooled
(approx. I hour).
5. When theoveniscool, LOC will no longer
be displayed and the door may be opened.
6. Wipe out the oven interior with a damp
cloth. Ifsoil remains it indicates the cycle
was not long enough.
TO CANCEL SELF-CLEAN:
I. PressCancel pad.
2. IfLOC isNOT displayed,openoven door.
If LOC isdisplayed,allow oven to cool.
TO SET FOR DELAY START:
I. PressClean pad twice.
2. Pressthe Auto Set padto program a 2-
hour delay.Eachadditional pressof Auto
Set will add 2 hours, upto atotal delayof
eight hours from the current time.
3. The start time and the time of daywill be
displayedduring the delayperiod.
4.At the end of the delay period, CLEAN-
ING,LOC and the clean time will appear
inthe display.
5. Follow steps 4-6 in preceding section.
[COOLING FAN ]
The cooling fanwill automatically turn on
during cleaning and some baking opera-
tions. It isusedto keepinternalpartson the
control panel coo[. The fan will automati-
cally turn off when parts havecooled. The
fanmaycontinue to operate after the oven
hasbeen turned off. This isnormal.
• To prevent damageto oven door, do
not attempt to open oven door when
the LOC indicatorword isdisplayed.
• During the cleaningprocess,the kitchen
should be we[[ ventilated to help elimi-
natenormalodors associatedwith dean-
ing. Odors will lessenwith use.
• It is normal for flare-ups,smoking or
flaming to occur during cleaning if the
oven is heavily soiled. It is better to
dean the oven regularly rather than to
wait until there isaheavybuildupof soil.
• Wipe up excessgreaseor spillovers to
prevent smoke and flare-ups.
• It is normal for parts of the range to
become hot during a cleancycle.Avoid
touching cooktop, door, windowor oven
vent area during a clean cycle.
• A cooling fan will automatically turn on
during cleaning. If it does not operate,
contact an authorized servicer.
• Wipe up sugary and acidic spillovers
such as sweet potatoes, tomato or mill<-
based sauces prior to a self-clean cycle.
Porcelain enamel is acid resistant, not
acid proof and may discolor if spills are
not wiped up before a self-clean cycle.
• A white discoloration may appear after
cleaning ifacidic or sugary foods are not
wiped up before the clean cycle. This
discoloration is normal and will NOT
affect performance.
15

CLEANING PROCEDURES
BROILER PAN AND INSERT
• Place soapy cloth over insertand pan;let
soak to loosen soil.
• Wash in warm soapy water. Use scour-
ing pad to remove stubborn soil.
• Broiler pan and insertcan be cleaned in
dishwasher.
BURNER HEADS
• The surface burner heads are remov-
able. The cap portion of the head is
porcelainand the port areaisaluminum.
Wash the burner headsin the sinkwith
mild detergent and a plastic scrubber.
• Checkto be sure all ports are open. To
open clogged ports, insert astraight pin
directly into each port. Do not enlarge
or distort the port.
• When replacingthe burner heads,care-
fully alignthe tabon the burner basewith
the indentation in the head. The two
pinswill fit in the slots when the tab is
alignedwith the indentation.
NOTE:Whenburnerheadsareremovedfar
cleaning,do not spill liquidsthrough the
holesin the burnerbase.
BURNER HEAD
PortArea
Slots Align
with Pins
Ignitor
BURNER BASE
BURNER GRATES
• Wash with warm, soapy water and a non-
abrasive, plastic, scrubbing pad or in the
dishwasher. Forstubborn soils,cleanwith
a soap-filled, nonabrasive,plastic pad or
Cool<top Cleaning Creme* (Part #
20000001)** and a sponge.
• The grates are madeof porcelain on cast
iron and are very durable, however, they
will graduallylose their shineand/or dis-
color. This is due to exposure to high
temperatures from the gasflame.
CLOCK AND CONTROL
PAD AREA
• To activate "Control Lock" for cleaning,
see page 13.
• Wipe with a damp cloth and dry.
• Glasscleaners may be used if sprayed on
a cloth first. DO NOT spray directly on
control pad and display area.
CONTROL PANEL
• Wipe with damp cloth.
• For stubborn soil, use mildly abrasive
cleaning agents such as Bon Ami*. Do
NOT use abrasive cleaners such as steel
woo[ pads or oven cleaners. These prod-
ucts will permanently damage the surface.
CONTROL KNOBS
• Remove knobs in the OFF position by
pulling forward.
• Wash, rinseanddry. Do not useabrasive
cleaning agentsas they may scratch the
finish.
• Turn on each burner to be sure the knobs
have been correctly replaced.
COOKTOP-PORCELAIN ENAMEL
Porcelain enamel isglass fused on metal and
may crack or chip with misuse. It is acid
resistant, not acid proof. Allspillovers, espe-
cially acidic or sugary spillovers, should be
wiped up immediately with a dry cloth.
16
• When cool, wash with soapy water, rinse
and dry.
• Neverwipe offawarm or hotsurfacewith
a damp cloth. This may cause cracking or
chipping.
• Never use oven cleaners, abrasive or caus-
tic cleaning agents on exterior finish of
range.
Door HANDLE -- PLASTIC
FINISHES
• When cool, cleanwith soap and water,
rinse and dry.
" Use aglasscleaner and a soft cloth.
NOTE: Never use oven cleaners,abrasive
or caustic liquid or powdered cleanserson
plastic finishes. These cleaning agents will
scratch or mar finish.
NOTE: To prevent staining or discolora-
tion, wipe up fat, grease or acid (tomato,
lemon, vinegar, mill<,fruit juice, marinade)
immediately with a dry paper towel.
OVEN WINDOW {_ Door -
GLASS
• Avoid using excessive amounts of water
which may seep under or behind glass
causing staining.
• Wash with soap and water. Rinse with
clear water and dry. Glass cleaner can be
used ifsprayed on a cloth first.
• Do not use abrasive materials such as
scouring pads, steel wool or powdered
cleaners as they will scratch glass.
OVEN INTERIORS
• Follow instructions on page 15 to set a
self-clean cycle.
OVEN RACKS
• Clean with soapy water.
• Remove stubborn soilwith cleansing pow-
der or soap-filled scouring pad. Rinse and
dry.

JARE CLEANING, CONToI
• If over time, racksdo not slideout easily,
wipe the rackedgeandrack support with
asmallamount ofvegetableoff to restore
easeof movement, then wipe off excess
oil. Likewise,placeone drop of vegetable
off on rack guides.
NOTE: Removeoven racks during a clean
cycle.Ifracksare lee inthe oven,it mayimpair
Functionandtheywill discolor.
STAINLESS STEEL
• DO NOT USEANY CLEANING PROD-
UCT CONTAINING CHLORINE
BLEACH.
• ALWAYS WIPE WITH THE GRAIN
WHEN CLEANING.
• Daily Cleaning/Ught Soil m Wipe with
one of the following - soapy water, white
vinegar/water solution, Formula409 Glass
and Surface Cleaner"_ or a similar glass
cleaner- usinga spongeor softcloth. Rinse
and dry. To polishandhelp prevent finger-
prints, follow with StainlessSteel Magic
Spray (Jenn-Air Model A912, Part No.
20000008)**.
Moderate/Heavy Soil m Wipe with one
of the following - BonAmi, SmartCleanser,
or SoftScrub";-usingadampspongeor soft
cloth. Rinseand dry. Stubbornsoilsmaybe
removed with a damp Scotch-Brite* pad;
rub evenlywith thegrain.Rinseanddry.To
restore luster and remove streaks,follow
with StainlessSteelMagicSpray.
Discoloration _ Usinga dampsponge or
softcloth, wipewith CameoStainlessSteel
Cleaner"_,Rinseimmediately and dry. To
remove streaksand restore luster, follow
with StainlessSteelMagicSpray.
STORAGE DRAWER - PAINTED
ENAMEL
• When cool, wash with warm soapy water,
rinse and dry. Never wipe a warm or hot
surfacewith adampcloth asthismaydamage
the surfaceandmay causea steamburn.
• For stubborn soil usemildly abrasivedean-
ingagentssuchasbakingsodapasteor Bon
Ami/' Do not useabrasive,causticor harsh
cleaningagentssuchassteelwoo[ padsor
ovencleaners.Theseproducts will scratch
or permanentlydamagethe surface.
NOTE: Usedry towel or cloth to wipe up
spills, especially acidic or sugary spills.
Surface may discolor or dull if soil isnot
immediately removed. This is especially
important for white surfaces.
* Brand namesfor cleaningproducts are registered trademarks of the respective manufacturers.
*_ To order direct, ca[[ 1-800-688-8408,
INTENANCE]
OVENDOOR
TO REMOVE:
I. When cool, open the oven door to the
first stop position (opened about four
inches).
2. Graspdoor ateach side. Do not usethe
door handleto lift door.
3. Lift up evenly until door clears hinge
arms.
TO REPLACE:
2.
o
Grasp door at each side.
Align slots in the door with the hinge
arms on the range.
Slide the door clown onto the hinge
armsuntil the door iscompletely seated
on the hinges. Pushdown on the top
corners of the door to completely seat
door on hinges. Door should not ap-
pear crooked,
17
NOTE: Theoven door on a newrange may
feel "spongy" when it is closed. This is
normal and will decreasewith use.
OVEN WINDOW
TO PROTECT THE OVEN DOOR
WINDOW:
I. Do not useabrasivecleaningagentssuch
assteelwool scouring padsor powdered
cleaners asthey may scratch the glass.
2. Do not hit the glass with pots, pans,
furniture, toys, or other objects.
3. Do notclosethe ovendoor until theoven
racks are in place.
Scratching, hitting, jarring or stressing the
glassmay weaken its structure causingan
increased risk of breakageat a later date.

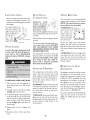
LEVELING LEGS
OVEN BOTTO_I
• Be sure the anti-tip bracket secures one
of the rear leveling legs to the floor. This
bracket prevents the range from acciden-
tally tipping.
The range should be lev-
eled when installed, if the
range is not level,turn the J 1
plastic leveling legs, lo-
cated at eachcor- _ !,:,,)
net of the _:_.: Y"
range, until _-*" _ ANTImPBRXCKET
rangeislevel.
\ LEVELING LEG
OVEN LIGHT
To assure the proper replacement bulb
is used, order bulb from May_ag Cus-
tomer Service. Call 1-800-688-8408,
askfor part number 74004458- halogen
bulb.
Appliances which
require electrical
power areequipped
with a three-prong
grounding plug
which must bepluggeddirectly intoaprop-
er[y grounded three-hole [20 volt electri-
caloutlet.
Alwaysdisconnectpower m appliancebefore
servicing.
Thethree-prong grounding plugoffers pro-
tection against shock hazards.DO NOT
CUT OR REMOVE THE THIRD
GROUNDING PRONG FROM THE
POWER CORD PLUG.
If an ungrounded, two-hole or other type
electrical outlet is encountered, it is the
personal responsibility of the appli-
ance owner to have the outlet re-
placed with a properly grounded
three-hole electrical outlet.
STORAGE DRAWER
The oven bottom on a conventional bake
range may be removed for easier cleaning.
NOTE: The oven bottom on convec-
tion models isnot removable.
TO REMOVE: When cool, re-
movetheovenracks.
twocatches,Io-
cared at each rear _ ............'_
corner of the oven ,_,_ _.V_r7
bottom, toward the g---- I' ----_
front of the oven. _ " "_;
Lift the rear edge of the oven bottom
slightly, then slide it back until the front
edge of the oven bottom dears the oven
front frame. Remove oven bottom from
oveR.
TO REPLACE: Fit the front edge of the
oven bottom into the oven front frame.
Lower the rear of the oven bottom and
slide the two catches back to lock the oven
bottom in place.
_Ei%OVAL OF GAS
TO REPLACE OVEN LIGHT BULB:
I. When oven is cool, use fingertips to
grasp edge of bulb cover. Pull out and
remove.
2. Carefully remove old bulb by pulling
straight out of ceramic base.
3. To avoiddamagingor decreasingthe life
of the new bulb, do not touch the bulb
with bare handsor fingers.Hold with a
cloth or paper towel. Push new bulb
prongs straight into small holes of
ceramic base.
The storage drawer at the bottom of the
range is safe and convenient for storing
metalandglasscookware. DO NOT store
plastic, paperware, food or flammable ma-
terial in this drawer. Remove drawer to
clean under range.
TO REMOVE: Empty drawer then pull
out to thefirst stop position. Lift upfront of
drawer and pull to the second stop posi-
tion. Grasp sides and lift up and out to
remove drawer.
TO REPLACE: Fit the ends of the drawer
glides onto the rails. Lift up drawer front
and gently pushinto first stop position. Lift
up and continue to slide drawer to the
closed position.
Gas appliance connectors used to connect
this appliance to the gas supply are not
designed for continuous movement. Once
installed, DO NOT repeatedly move this
gas appliance for cleaning or to relocate. If
this appliance has to be moved and/or
removed for servicing, follow the proce-
dure described in the installation instruc-
tions. For information, contact Haytag Cus-
tomer Service at 1-800-688- I 100.
To preventrange from accidentallytipping,
range must be secured to the floor by
sliding rear leveling leg into the anti-tip
bracket
4. Replace bulb cover by snapping into
place.
5. Reconnect power to the range. Reset
clock.
18

EFORE YOU CALL FOR
l
FOR MOST CONCERNS t TRY
THESE FIRST:
• Check ifoven controls have been prop-
er[y set.
• Checkto besure plugissecurelyinserted
into receptacle.
• Check or re-set circuit breaker. Check
or replace fuse.
• Check power supply.
PART OR ALL OF APPLIANCE DOES
NOT WORK.
• Check if surface and/or oven controls
havebeen properly set.Seepgs.5 & 7.
• Check ifoven door isunlocked after self-
clean cycle. See pg. 15.
• Check ifoven is set for a delayed coo[<or
cleanprogram. Seepgs.9 & 15.
• CheckifControl Lock isactivated.Seepg.
13.
BAKING RESULTS ARE NOT AS
EXPECTED OR DIFFER FROM
PREVIOUS OVEN,
• Make sure the oven vent has not been
blocked. See pg. 15for location.
• Check to make sure range is level.
• Temperatures often vary between a new
oven and an old one. As ovens age, the
oven temperature often "drifts" and may
become hotter or cooler. See pg. 13 for
instructions on adjusting the oven tem-
perature. NOTE: It is not recommended
to adjust the temperature if only one or
two recipes are in question.
• Checkthat oven temperature isdecreased
by 25° Fwhen convect baking.
• See "Cooking Made Simple" booklet
for more information on bakeware and
baking.
• Make sure oven is preheated when recipe
or directions recommend preheat.
• Check rack positions. See page [4.
FOOD IS NOT BROILING PRO-
PERLY OR SMOKES EXCESSIVELY.
• Check oven rack positions. Foodmay be
too dose to flame.
• Aluminum foil wasincorrectly used.Never
line the broiler insert with foil.
• Trim excessfatfrom meatbefore broiling.
• A soiled broiler panwas used.
OVEN WILL NOT SELF-CLEAN.
• Checkto makesurethe cycleisnot setfor
a delayedstart. Seepg. 15.
• Check if door isclosed.
OVEN DID NOT CLEAN PROPERLY.
o
Q
Longer cleaningtime may be needed.
Excessivespillovers,especiallysugaryand/
or acidic foods, were not removed prior
to the self-cleancycle.
OVEN DOOR WILL NOT UNLOCK
AFTER SELF-CLEAN CYCLE.
• Oven interior is still hot. Allow about one
hour for the oven to cool after the comple-
tion of aself-clean cycle. The door can be
opened when the LOC indicator word is
not displayed.
]_OISTURE COLLECTS ON OVEN
WINDOW OR STEAM COMES FROM
OVEN VENT.
• This isnormal when cooking foods highin
moisture.
• Excessivemoisture wasusedwhen clean-
ingthe window.
SURFACE BURNER FALLS TO
LIGHT.
• Check to be sure burner ports or ignition
ports are not clogged. Seepage 16.
• Checkto besureignitor isdryandclicking.
Burner will not light if ignitor isdamaged,
soiledor wet. If ignitor doesn't click, turn
control knob OFF.
SURFACE BURNER FLAME LIFTS
OFF PORTS.
• Check to be sure a pan is sitting on the
grate above.
• Contact an authorizedJenn-Air servicer.
19
THE FLAME IS UNEVEN.
• Burner ports may be clogged.
SURFACE BURNER FLAME IS
YELLOW IN COLOR.
• Contact an authorized Jenn-Air servicer.
• Some yellow tips on the flameare accept-
able when usingLPgas.
THERE IS A STRONG ODOR OR
LIGHT SMOKE WHEN OVEN IS
TURNED ON,
• This is normal for a new range and will
disappear after a few uses. Initiating a
dean cycle will "burn off" the odors more
quickly.
• Turning on a ventilation fan will help
remove the smoke andlor odor.
• Excessive food soils on the oven bottom.
Use a self-clean cycle.
A FAN SOUND CAN BE HEARD
• This isthe cooling fanand isnormal. The
fanwill continue to run after useuntil the
oven COOLS.
_! 7pr PLUS A NUMBER AND THE
MESSAGE: _CALL AN AUTHO"
RIZED SERVICER OR 800-688-
1100."
• This is called a fault code. Ifa fault code
appears in the display and beeps sound,
press the Cancel pad. If the fault code
and beeps continue, disconnect power to
the appliance. Wait a few minutes, then
reconnect power. Iffault code and beeps
still continue, disconnect power to the
appliance and call an authorized servicer.
• If the oven is heavily soiled, excessive
flare-ups may result in a fault code during
adean cycle. PressCancel pad and allow
the oven to coo[ completely, wipe out
excess soil, then reset the dean cycle. If
the fault code and beeps still continue,
disconnect power to the appliance and
call an authorized servicer.
La page est en cours de chargement...
La page est en cours de chargement...
La page est en cours de chargement...
La page est en cours de chargement...
La page est en cours de chargement...
La page est en cours de chargement...
La page est en cours de chargement...
La page est en cours de chargement...
La page est en cours de chargement...
La page est en cours de chargement...
La page est en cours de chargement...
La page est en cours de chargement...
La page est en cours de chargement...
La page est en cours de chargement...
La page est en cours de chargement...
La page est en cours de chargement...
La page est en cours de chargement...
La page est en cours de chargement...
La page est en cours de chargement...
La page est en cours de chargement...
La page est en cours de chargement...
La page est en cours de chargement...
La page est en cours de chargement...
La page est en cours de chargement...
La page est en cours de chargement...
La page est en cours de chargement...
La page est en cours de chargement...
La page est en cours de chargement...
La page est en cours de chargement...
La page est en cours de chargement...
La page est en cours de chargement...
La page est en cours de chargement...
La page est en cours de chargement...
La page est en cours de chargement...
La page est en cours de chargement...
La page est en cours de chargement...
La page est en cours de chargement...
La page est en cours de chargement...
La page est en cours de chargement...
La page est en cours de chargement...
La page est en cours de chargement...
La page est en cours de chargement...
La page est en cours de chargement...
La page est en cours de chargement...
-
 1
1
-
 2
2
-
 3
3
-
 4
4
-
 5
5
-
 6
6
-
 7
7
-
 8
8
-
 9
9
-
 10
10
-
 11
11
-
 12
12
-
 13
13
-
 14
14
-
 15
15
-
 16
16
-
 17
17
-
 18
18
-
 19
19
-
 20
20
-
 21
21
-
 22
22
-
 23
23
-
 24
24
-
 25
25
-
 26
26
-
 27
27
-
 28
28
-
 29
29
-
 30
30
-
 31
31
-
 32
32
-
 33
33
-
 34
34
-
 35
35
-
 36
36
-
 37
37
-
 38
38
-
 39
39
-
 40
40
-
 41
41
-
 42
42
-
 43
43
-
 44
44
-
 45
45
-
 46
46
-
 47
47
-
 48
48
-
 49
49
-
 50
50
-
 51
51
-
 52
52
-
 53
53
-
 54
54
-
 55
55
-
 56
56
-
 57
57
-
 58
58
-
 59
59
-
 60
60
-
 61
61
-
 62
62
-
 63
63
-
 64
64


dans d''autres langues
- English: Jenn-Air JGS8750ADS User manual
- español: Jenn-Air JGS8750ADS Manual de usuario
Autres documents
-
KitchenAid KDRS467VBU Mode d'emploi
-
KitchenAid KDRS463VBK01 Le manuel du propriétaire
-
-
-
KitchenAid KDRS463 Manuel utilisateur
-
-
Maytag MGR6875ADB26 Le manuel du propriétaire
-
-
KitchenAid KDRS807 Manuel utilisateur
-