Olimpia Splendid DOLCECLIMA nano silent Manuel utilisateur
- Catégorie
- Téléphones
- Taper
- Manuel utilisateur
Ce manuel convient également à
La page est en cours de chargement...
La page est en cours de chargement...
La page est en cours de chargement...

GB
F
D
4
I
3.13 RESETTAGGIO DI
TUTTE LE FUNZIONI DEL
TELECOMANDO
3.14 SELEZIONE UNITÀ
DI MISURA DELLA
TEMPERATURA (se
previsto)
3.15 AUTORESTART
3.16 CONTROLLO DELLA
DIREZIONE DEL FLUSSO
D’ARIA (solo nella versione
SILENT)
3.17 TRASPORTO DEL
CLIMATIZZATORE
3.18 MANUTENZIONE PERIODICA
3.19 PULIZIA DEI FILTRI
DELL’ARIA
3.20 PULIZIA DEL
CLIMATIZZATORE
3.21 RIPORRE IL
CLIMATIZZATORE A FINE
STAGIONE
3.22 MONTAGGIO E
MANUTENZIONE FILTRI
ADDIZIONALI (solo
versione SILENT)
SCHEMA ELETTRICO
DATI TECNICI
INDIVIDUAZIONE ANOMALIE
DI FUNZIONAMENTO
36
36
38
38
38
38
40
40
42
42
44
46
48
3.13 RESETTING ALL THE
REMOTE CONTROL
FUNCTIONS
3.14
TEMPERATURE
MEASUREMENT UNIT
SELECTION
(if present)
3.15 AUTORESTART
3.16 AIR FLOW DIRECTION
CONTROL (SILENT
version only)
3.17 HOW TO TRANSPORT THE
CONDITIONER
3.18 ROUTINE MAINTENANCE
3.19 CLEANING THE AIR
FILTERS
3.20 HOW TO CLEAN THE AIR
CONDITIONER
3.21 STOWING THE
CONDITIONER AT THE
END OF THE SEASON
3.22 FITTING AND
MAINTAINING
ADDITIONAL FILTERS
(SILENT version only)
ELECTRICAL SYSTEM
DIAGRAM
SPECIFICATIONS
TROUBLE SHOOTING
3.13 REMISE A ZERO
DE TOUTES LES
FONCTIONS DE LA
TELECOMMANDE
3.14
SELECTION DE
L’UNITE DE MESURE
DE LA TEMPERATURE
(si présente)
3.15 REDEMARRAGE
AUTOMATIQUE
3.16 CONTROLE DE LA
DIRECTION DU FLUX
D’AIR (uniquement version
SILENT)
3.17 TRANSPORT DU
CLIMATISEUR
3.18 ENTRETIEN PÉRIODIQUE
3.19 NETTOYAGE DES
FILTRES DE L’AIR
3.20 NETTOYAGE DU
CLIMATISEUR
3.21 RANGER LE
CLIMATISEUR EN FIN DE
SAISON
3.22 MONTAGE ET
ENTRETIEN DES
FILTRES ADDITIONNELS
(uniquement version
SILENT)
SCHÉMA ÉLECTRIQUE
DONNEES TECHNIQUES
ANOMALIES POSSIBLES
3.13 RESET ALLER
FUNKTIONEN VON
FERNBEDIENUNG
3.14
WAHL DER
MASSEINHEIT FÜR
DIE TEMPERATUR
(falls vorhanden)
3.15 AUTORESTART
3.16 KONTROLLE DER
LUFTSTROMRICHTUNG
(nur Version SILENT)
3.17 TRANSPORT DER
KLIMAANLAGE
3.18 REGELMÄSSIGE
WARTUNG
3.19 REINIGUNG DER
LUFTFILTER
3.20 REINIGUNG DER
KLIMAANLAGE
3.21 AUFBEWAHRUNG DER
KLIMAANLAGE FÜR
LÄNGEREN STILLSTAND
3.22 MONTAGE UND
WARTUNG DER
ZUSATZFILTER (nur
Version SILENT)
ELEKTROSCHALTPLAN
TECHNISCHEN DATEN
KLEINE STÖRUNGEN
SELBST BEHEBEN
La page est en cours de chargement...

GB
F
D
6
I
1
GENERALITÁ
INFORMAZIONI GENERALI
Desideriamo innanzitutto ringraziarVi
per aver deciso di accordare la vostra
preferenza ad un apparecchio di
nostra produzione.
Documento riservato ai termini di
legge con divieto di riproduzione
o di trasmissione a terzi senza
esplicita autorizzazione della ditta
costruttrice.
Le macchine possono subire
aggiornamenti e quindi presentare
particolari diversi da quelli
raffigurati, senza per questo
costituire pregiudizio per i testi
contenuti in questo manuale.
Leggere attentamente il
presente manuale prima
di procedere con qualsiasi
operazione (installazione,
manutenzione, uso) ed attenersi
scrupolosamente a quanto
descritto nei singoli capitoli.
Conservare con cura questo
libretto per ogni ulteriore
consultazione.
Dopo aver tolto l’imballaggio
assicurarsi dell’integrità
dell’apparecchio; gli
elementi dell’imballaggio
non devono essere lasciati
alla portata dei bambini
in quanto potenziali fonti di
pericolo.
LA DITTA COSTRUTTRICE NON
SI ASSUME RESPONSABILITÀ
PER DANNI A PERSONE O COSE
DERIVANTI DALLA MANCATA
OSSERVANZA DELLE NORME
CONTENUTE NEL PRESENTE
LIBRETTO.
La ditta costruttrice si riserva
il diritto di apportare modiche
in qualsiasi momento ai propri
modelli, fermo restando le
caratteristiche essenziali
descritte nel presente manuale.
Durante il montaggio, e ad ogni
operazione di manutenzione, è
necessario osservare le precauzioni
citate nel presente manuale, e
sulle etichette apposte all’interno
degli apparecchi, nonché adottare
ogni precauzione suggerita dal
comune buonsenso e dalle
Normative di Sicurezza vigenti nel
luogo d’installazione.
GENERAL
INFORMATION
GENERAL INFORMATION
We wish to thank you, rst of all,
for purchasing an air-conditioner
produced by our company.
This document is restricted in use to
the terms of the law and may not be
copied or transferred to third parties
without the express authorization of
the manufacturer.
Our machines are subject to
change and some parts may appear
different from the ones shown here,
without this affecting the text of the
manual in any way.
Read this manual carefully
before performing any operation
(installation, maintenance, use)
and follow the instructions
contained in each chapter.
Keep the manual carefully for
future reference.
After removing the packaging,
check that the appliance is in
perfect condition.
The packaging materials must
not be left within reach of children
as they can be dangerous.
THE MANUFACTURER IS NOT
RESPONSIBLE FOR DAMAGES
TO PERSONS OR PROPERTY
CAUSED BY FAILURE TO
FOLLOW THE INSTRUCTIONS
IN THIS MANUAL.
The manufacturer reserves the
right to make any changes it
deems advisable to its models,
although the essential features
described in this manual remain
the same.
During installation and maintenance,
respect the precautions indicated
in the manual, and on the labels
applied inside the units, as well
as all the precautions suggested
by good sense and by the safety
regulations in effect in your country.
GENERALITES
INFORMATIONS
GENERALES
Nous désirons avant tout vous
remercier pour avoir accordé la
préférence à un climatiseur de notre
production.
Document réservé aux termes de la
loi avec interdiction de reproduction
ou de transmission à tiers sans
l’autorisation expresse de le
fabricant.
Les machines peuvent subir des
mises à jour et par conséquent
présenter des éléments différents
de ceux qui sont représentés, sans
que cela constitue pour autant un
préjudice pour les textes contenus
dans ce manuel.
Lire attentivement le présent
manuel avant de procéder à
toute opération (installation,
entretien, utilisation) et suivre
scrupuleusement ce qui est
décrit dans chacun des chapitres.
Conserver soigneusement
le présent livret pour toute
consultation ultérieure. Après
avoir retiré l’emballage, s’assurer
que l’appareil est en parfait état.
Les éléments de l’emballage
ne doivent pas être laissés à
portée des enfants pour qui
ils représentent des sources
potentielles de danger.
LE FABRICANT DECLINE TOUTE
RESPONSABILITE EN CAS DE
DOMMAGES AUX PERSONNES
OU AUX BIENS DERIVANT DU
NON-RESPECT DES NORMES
CONTENUES DANS LE PRESENT
LIVRET.
Le fabricant se réserve le droit
d’apporter à tout moment des
modifications à ces modèles,
tout en conservant les
caractéristiques essentielles
décrites dans le présent manuel.
Lors du montage, et à chaque
opération d’entretien, il faut
observer les précautions citées
dans le présent manuel et sur les
étiquettes mises à l’intérieur des
appareils, ainsi qu’adopter toute les
précautions suggérées par le bon
sens commun et par les Normes
de Sécurité en vigueur sur le lieu
de l’installation.
ALLGEMEINES
ALLGEMEINE
INFORMATIONEN
Zunächst möchten wir Ihnen danken,
dass Sie sich für eine Klimaanlage
aus unserer Produktion entschieden
haben.
Laut Gesetz ist dies ein vertrauliches
Dokument, daher gilt das Verbot der
Vervielfältigung oder Übermittlung
an Dritte ohne ausdrückliche
Genehmigung die Herstellerrma.
An den Geräten können technische
Neuerungen vorgenommen
werden, d.h. Einzelteile können
u.U. anders aussehen als auf
den Abbildungen, was jedoch die
Gültigkeit der Anweisungen in
diesem Benutzerhandbuch in keiner
Weise beeinträchtigt.
Bevor Sie mit einer Tätigkeit
beginnen (Installation,
Instandhaltung, Gebrauch), lesen
Sie aufmerksam das vorliegende
Benutzerhandbuch und halten
Sie sich strengstens an die in den
einzelnen Kapiteln dargelegten
Anweisungen.
Bewahren Sie das Handbuch
sorgfältig auf, damit Sie es bei
Bedarf stets zur Hand haben.
Überprüfen Sie das Gerät
nach dem Auspacken auf
einwandfreien Zustand.
Die Verpackungsrückstände
nie in Reichweite von Kindern
lassen, da sie für diese eine
Gefahrenquelle darstellen.
DIE HERSTELLERFIRMA
ÜBERNIMMT KEINERLEI
VERANTWORTUNG FÜR
SCHÄDEN AN PERSONEN
ODER SACHEN, DIE
DURCH NICHTBEACHTUNG
DER IM VORLIEGENDEN
BENUTZERHANDBUCH
ENTHALTENEN
SICHERHEITSVORSCHRIFTEN
ENTSTEHEN.
Die Herstellerfirma behält
sich das Recht vor, an
ihren Modellen jederzeit
Veränderungen vorzunehmen,
wobei die wesentlichen im
vorliegenden Benutzerhandbuch
beschriebenen
Geräteeigenschaften unverändert
bleiben.
Während der Montage
und bei sämtlichen
Instandhaltungstätigkeiten
müssen die Vorsichtsmaßnahmen
eingehalten werden, die in diesem
Benutzerhandbuch und auf den
Schildern im Innern der Geräte
angeführt sind; außerdem müssen
sämtliche Vorsichtsmaßnahmen
ergriffen werden, die der
gesunde Menschenverstand
gebietet und die durch die am
Installationsort geltenden
Sicherheitsbestimmungen
vorgeschrieben sind.
1.1
La page est en cours de chargement...

GB
F
D
8
I
1
SIMBOLOGIA
I pittogrammi riportati nel seguente
capitolo consentono di fornire
rapidamente ed in modo univoco
informazioni necessarie alla corretta
utilizzazione della macchina in
condizioni di sicurezza.
Pittogrammi redazionali
Service
• Contrassegna situazioni nelle
quali si deve informare il
SERVICE aziendale interno:
SERVIZIO ASSISTENZA
TECNICA CLIENTI.
Indice
• I paragra preceduti da questo
simbolo contengono informazioni
e prescrizioni molto importanti,
particolarmente per quanto
riguarda la sicurezza.
Il mancato rispetto può comportare:
• pericolo per l’incolumità degli
operatori
• perdita della garanzia contrattuale
• declinazione di responsabilità da
parte della ditta costruttrice.
Mano alzata
• Contrassegna azioni che non si
devono assolutamente fare.
Pittogrammi relativi alla
sicurezza
Tensione elettrica pericolosa
• Segnala al personale interessato
che l’operazione descritta
presenta, se non effettuata
nel rispetto delle normative di
sicurezza, il rischio di subire uno
shock elettrico.
Pericolo generico
• Segnala al personale interessato
che l’operazione descritta
presenta, se non effettuata
nel rispetto delle normative di
sicurezza, il rischio di subire
dannisici.
Pericolo di forte calore
• Segnala al personale interessato
che l’operazione descritta
presenta, se non effettuata
nel rispetto delle normative di
sicurezza, il rischio di subire
bruciature per contatto con
componenti con elevata
temperatura.
SYMBOLS
The pictograms in the next chapter
provide the necessary information
for correct, safe use of the machine
in a rapid, unmistakable way.
Editorial pictograms
Service
• Refers to situations in which
you should inform the SERVICE
department in the company:
CUSTOMER TECHNICAL
SERVICE.
Index
• Paragraphs marked with
this symbol contain very
important information and
recommendations, particularly
as regards safety.
Failure to comply with them may
result in:
• danger of injury to the operators
• loss of the warranty
• refusal of liability by the
manufacturer.
Raised hand
• Refers to actions that absolutely
must not be performed.
Safety pictograms
Danger of high voltage
• Signals to the personnel that
the operation described could
cause electrocution if not
performed according to the safety
rules.
Generic danger
• Signals to the personnel that
the operation described could
cause physical injury if not
performed according to the safety
rules.
Danger due to heat
• Signals to the personnel that
the operation described could
cause burns if not performed
according to the safety rules.
1.2
1.2.1
SYMBOLOGIE
Les pictogrammes reportés au
chapitre suivant permettent de fournir
rapidement et de manière univoque
les informations nécessaires pour
une utilisation correcte de la machine
dans des conditions de sécurité.
Pictogrammes rédactionnels
Service
• Indique des situations où il faut
informer le SERVICE interne de
la société:
SERVICE APRES-VENTE
CLIENTS.
Index
• Les paragraphes précédés par
ce symbole contiennent des
informations et des prescriptions
très importantes, notamment
pour ce qui concerne la sécurité.
Le non-respect peut comporter:
-• danger pour la sécurité des
opérateurs.
• perte de la garantie du contrat.
• dégagement de la responsabilité
du fabricant.
Main levée
• Indique les actions qu’il ne faut
absolument pas accomplir.
Pictogrammes concernant la
sécurité
Tension électrique dangereuse
• Signale au personnel concerné
que l’opération décrite présente,
si elle n’est pas effectuée
conformément aux normes de
sécurité, le risque de provoquer
une décharge électrique.
Danger général
• Signale au personnel concerné
que l’opération décrite présente,
si elle n’est pas effectuée
conformément aux normes de
sécurité, le risque de provoquer
des dommages physiques.
Danger de température élevée
• Signale au personnel concerné
que l’opération décrite présente,
si elle n’est pas effectuée
conformément aux normes de
sécurité, le risque de provoquer
des brûlures par contact avec
des composants à température
élevée.
BILDSYMBOLE
Die im folgenden Kapitel aufgeführten
Bildsymbole liefern schnell und
eindeutig Informationen zum
korrekten und sicheren Gebrauch
des Gerätes.
Bildsymbole
Kundendienst
- Kennzeichnet Situationen,
in denen der interne
KUNDENDIENST der Firma
zu benachrichtigen ist:
KUNDENDIENST
Inhaltsverzeichnis
- Die Paragrafen, denen dieses
Symbol vorausgeht, enthalten
sehr wichtige Informationen
und Vorschriften, insbesondere
bezüglich der Sicherheit.
Die Nichtbeachtung dieser
Informationen und Vorschriften
kann dazu führen, dass:
- die Unversehrtheit des
Personals an den Geräten
gefährdet ist
- die vertragliche Garantie verfällt
- die Herstellerfirma jede
Verantwortung ablehnt.
Erhobene Hand
- Kennzeichnet Handlungen, die
absolut verboten sind.
Bildsymbole zur Sicherheit
Gefährliche elektrische
Spannung
- Zeigt dem betreffenden
Personal an, dass bei der
beschriebenen Tätigkeit die
Gefahr eines elektrischen
Schlags besteht, wenn
diese nicht unter Beachtung
der Sicherheitsvorschriften
durchgeführt wird.
Allgemeine Gefahr
- Zeigt dem betreffenden
Personal an, dass bei
der beschriebenen Tätigkeit
Verletzungsgefahr besteht, wenn
diese nicht unter Beachtung
der Sicherheitsvorschriften
durchgeführt wird.
Gefahr durch starke Hitze
- Zeigt dem betreffenden
Personal an, dass bei der
beschriebenen Tätigkeit
Verbrennungsgefahr durch
Berührung heißer Geräteteile
besteht, wenn diese nicht
unter Beachtung
der Sicherheitsvorschriften
durchgeführt wird.
1.2.2
La page est en cours de chargement...

GB
F
D
10
I
1
USO PREVISTO
Il climatizzatore deve essere
utilizzato esclusivamente per
migliorare e rendere confortevole
la temperatura nell’ambiente.
Per ottenere il massimo benessere
è pertanto indispensabile procedere
ad un calcolo dei carichi termici
estivi relativi al locale interessato.
AVVERTENZE
• Per impedire danneggiamenti
al compressore ogni partenza
è ritardata di 3 minuti rispetto
all’ultimo spegnimento.
• Questo apparecchio dovrà
essere destinato solo all’uso
per il quale è stato espressa-
mente concepito, e cioè per
climatizzare gli ambienti
dove viene installato . Ogni
altro uso è da considerarsi
improprio e quindi pericoloso.
Il costruttore non può essere
considerato responsabile per
eventuali danni derivanti da
usi impropri, erronei ed
irragionevoli.
• In caso di guasto e/o di
cattivo funzionamento dell’ap-
parecchio, spegnerlo e non
manometterlo. Per l’eventuale
riparazione rivolgersi esclusi-
vamente ai centri di assistenza
tecnica autorizzati dal
costruttore e richiedere l’uti-
lizzo di ricambi originali. Il
mancato rispetto di quanto
sopra può compromettere la
sicurezza dell’apparecchio.
• Non permettete che l’apparec-
chio sia usato da bambini o da
incapaci, senza sorveglianza.
• Non installare l’apparecchio in
ambienti dove l’aria può
contenere gas, olio, zolfo o in
prossimità di fonti di calore.
• Non appoggiare oggetti pesanti
o caldi sopra l’apparecchio.
• Nel caso in cui si decida di non
utilizzare più un apparecchio di
questo tipo, si raccomanda di
renderlo inoperante tagliando il
cavo di alimentazione, dopo
avere staccato la spina dalla
presa di corrente. Si raccoman-
da inoltre di rendere innocue
quelle parti dell’apparecchio
suscettibili di costituire un
pericolo, specialmente per i
bambini che potrebbero
servirsi dell’apparecchio fuori
uso per i propri giochi.
• Se il cavo di alimentazione è
danneggiato, per evitare rischi,
deve essere sostituito dal pro-
duttore, un suo agente o perso-
na ugualmente qualicata.
Non immettere R-410A nell’at-
mosfera: l’R-410A è un gas serra
fluorurato, richiamato nel Pro-
tocollo di Kyoto, con un Poten-
ziale di Riscaldamento Globale
(GWP)= 2088
ATTENZIONE!
QUESTO PRODOTTO CONTIE-
NE GAS REFRIGERANTE R-
410A CON CARATTERISTICHE DI
ODP=0 (POTENZIALE IMPOVERI-
MENTO OZONO).
INTENDED USE
The air-conditioner must only
be used for improving the room
temperature for increased comfort.
For the best results, it is therefore
essential to calculate the summer
temperature of the room concerned.
WARNINGS
• To prevent damage to the
compressor, the appliance is
unable to start for 3 minutes
after being turned off.
• This appliance must be used
solely for the specic purpose
for which it was designed, i.e.
for air-conditioning in the
rooms in which it is installed.
All other uses are to be
considered inappropriate and
therefore dangerous. The
manufacturer will not be held
responsible for personal
injury or damage to property
caused by inappropriate,
incorrect or unreasonable
use.
• In the even of a breakage or
malfunction of the appliance,
turn it off and do not attempt
to repair it. For repair work
contact solely the technical
service centres authorised by
the manufacturer and ask for
original spare parts to be
used. Failure to do this can
affect the safety of the
appliance.
• Do not allow the appliance to
be used by children or
disabled people without
supervision.
• Do not install the appliance in
areas where the air may
contain gas, oil or sulphur, or
near heat sources.
• Do not place heavy or hot
objects on top of the
appliance.
• If you no longer wish to use this
appliance, it must be made ino-
perative by cutting the power
supply cable after removing
the plug from the power socket.
Hazardous parts of the applian-
ce must be rendered harmless,
especially as there is a risk of
children playing with it.
• If the supply cord is damaged,
it must be replaced by the ma-
nufacturer, its service agent or
similarly qualied persons in
order to avoid a hazard.
Do not vent R-410A into atmo-
sphere: R-410A is a uorinated
greenhouse gas, covered by
Kyoto Protocol, with a Global
Warming Potential (GWP) = 2088
ATTENTION!
THIS PRODUCT CONTAINS R-
410A REFRIGERANT WITH O.D.P.
= 0 (OZONE DEPLETION POTEN-
TIAL).
UTILISATION PRÉVUE
Le climatiseur doit exclusivement
être utilisé pour améliorer et rendre
plus confortable la température
ambiante.
Pour un bien-être optimal, il est
donc indispensable de procéder à
un calcul des charges thermiques
estivales correspondant à la pièce
intéressée.
MISES EN GARDE
• Pour éviter d’endommager le
compresseur, chaque départ
est retardé de 3 minutes par
rapport à la dernière
extinction.
• Cet appareil doit être réser-
vé à l’usage pour lequel il
a été expressément conçu,
c’est-à-dire la climatisation
des pièces où il est installé.
Toute autre utilisation doit être
considérée comme incorrecte
et par conséquent dangereuse.
Le constructeur ne peut être
tenu responsable des éventuels
dégâts provoqués par un usage
impropre, erroné ou déraison
-
nable.
• En cas de panne et/ou de mau
-
vais fonctionnement de l’ap-
pareil, l’éteindre et ne pas
tenter de le manipuler. Pour
toute réparation, s’adresser
exclusivement aux services
après-vente agréés par le con
-
structeur et exiger l’utilisation
de pièces de rechange origina
-
les. Le non-respect de ce qui
précède peut compromettre la
sécurité de l’appareil.
• Interdire l’utilisation sans sur
-
veillance de l’appareil aux en-
fants ainsi qu’aux handicapés.
• Ne pas installer l’appareil dans
des pièces où l’air peut contenir
du gaz, de l’huile, du souffre
ni à proximité de sources de
chaleur.
• Ne pas appuyer d’objets lourds
ou chauds sur l’appareil.
• Si vous décidiez de ne plus
utiliser un appareil de ce type,
il est recommandé de le mettre
hors d’usage en coupant le
câble d’alimen-tation, après
avoir dé-branché la che de la
prise de courant. Il est en outre
recommander de rendre inof
-
fensives les éléments de l’appa-
reil susceptibles de constituer
un danger, notamment pour les
enfants, qui pourraient se servir
de l’appareil hors d’usage pour
jouer.
• Si le cordon d’alimentation est
endommagé, pour éviter des
risques, il doit être remplacé par
le producteur, son agent ou une
personne également qualiée.
Ne pas émettre de R-410A dans
l’atmosphère: le R-410A est un
gaz à effet de serre uoré, cité
dans le Protocole de Kyoto, avec
un Pouvoir de Réchauffement
Global (GWP) égal à 2088
ATTENTION!
CET APPAREIL CONTIENT DU GAZ
RÉFRIGÉRANT R-410A CLASSÉ
ODP = 0 (APPAUVRISSEMENT
POTENTIEL DE LA COUCHE
D’OZONE).
VORGESEHENER GE
-
BRAUCH
Die Klimaanlage darf allein zu dem
Zweck eingesetzt werden, die Umge-
bungstemperatur zu verbessern und
angenehm zu machen.
Zum Erreichen des höchsten Wohl-
bendens ist daher auf alle Fälle die
sommerliche Wärmebelastung des
betreffenden Raums zu berechnen.
WICHTIGE HINWEISE
• Das Gerät startet 3 Minuten
nach der letzten Abschaltung,
um Folgeschäden des
Verdichters zu vermeiden.
• Dieses Gerät darf nur für den
Gebrauchszweck eingesetzt
werden, für den es
ausdrücklich entwickelt wurde,
d.h. zum Klimatisieren der
Räume, in denen es installiert
ist. Jeder anderweitige
Gebrauch ist als unsachgemäß
und daher gefährlich
anzusehen. Der Hersteller
haftet nicht für Folgeschäden,
die durch unsachgemäße,
falsche und unangemessene
Ver- wendung entstehen
können.
• Bei Betriebsstörungen keine
eigenmächtigen Eingriffe
vornehmen, sondern das
Gerät ausschalten. Etwaige
Reparaturen dürfen
ausschließlich von den
Vertrags-Servicezentren und
unter Verwendung von
Originalersatzteilen aus-
geführt werden. Bei
Zuwiderhandeln ist die
Betriebssicherheit des
Gerätes gefährdet.
• Das Gerät darf nicht von
Kindern oder von Personen,
die die Funktion nicht ken-
nen, ohne Beaufsichtigung
benutzt werden.
• Das Gerät nie in Räumen mit g
as-, öl- oder schwe-felhaltiger
Luft und auch nicht in der Nähe
von Wärmequellen installieren.
• Keine schweren oder heißen
Gegenstände auf das Gerät
legen.
• Bei der Entsorgung des
Gerätes das Netzkabel
durchschneiden und alle Teile
entfernen, mit denen Kinder
spielen und sich dabei
verletzen können.
• Wenn das Versorgungskabel
beschädigt ist, ist dieses zur
Vermeidung von Gefahren vom
Hersteller, seinem Beauftragten
oder von entsprechend quali-
ziertem Personal zu ersetzen.
R-410A nicht in die Atmosphäre
auslassen: R-410A ist ein im
Kyoto-Protokoll verzeichnetes
Fluorgasmit mit einem globalem
Treibhauspotential (GWP) = 2088
ACHTUNG!
DIESES PRODUKT ENTHÄLT
KÄLTEMITTEL R-410A MIT
DEN EIGENSCHAFTEN ODP=0
(OZONZEHRUNGSPOTENTIAL).
1.4
1.3
La page est en cours de chargement...

GB
F
D
12
I
1
SMALTIMENTO
Il simbolo sul prodotto o sulla
confezione indica che il prodotto non
deve essere considerato come un
normale riuto domestico,madeve
essere portato nel punto di raccolta
appropriato per il riciclaggio di appa
-
recchiature elettriche ed elettroniche.
Provvedendo a smaltire questo
prodotto in modo appropriato, si
contribuisce a evitare potenziali
conseguenze negative per l’ambiente
e per la salute, che potrebbero deri
-
vare da uno smaltimento inadeguato
del prodotto.
Per informazioni più dettagliate
sul riciclaggio di questo prodotto,
contattare l’ufficio comunale, il
servizio locale di smaltimento
rifiuti o il negozio in cui è sta
-
to acquistato il prodotto. Que-
sta disposizione è valida
solamente negli Stati membri
dell’UE.
IMPORTANTE!
Per prevenire ogni rischio di fol-
gorazione è indispensabile
staccare l’interruttore generale
prima di effettuare collegamenti
elettrici ed ogni operazione di
manutenzione sugli apparecchi.
Rendere note a tutto il personale
interessato al trasporto ed all’instal-
lazione della macchina le presenti
istruzioni.
ACCESSORI A CORREDO
1- Tuboessibileda1.5m.
2- Convogliatore terminale per
nestra
3- Flangia per installazione a
vetro o a muro (solo per le
versioni in cui è prevista)
4- Tappochiusuraangia(soloper
le versioni in cui è previsto)
5- ventosapernestra
6- manuale di uso e manutenzione
7- telecomando
8 - n°2 Filtri azzurri fotocalitico,
n°2ltribianchihepa,
n°2ltrineriacarboniattivi
(solo per DOLCECLIMA
SILENT)
DISPOSAL
This symbol on the product or its
packaging indicates that the ap
-
pliance cannot be treated as normal
domestic trash, but must be handed
in at a collection point for recycling
electric and electronic appliances.
Your contribution to the correct
disposal of this product protects
the environment and the health of
your fellow men. Health and the
environment are endangered by
incorrect disposal.
Further information about the
recycling of this product can be
obtained from your local town hall,
your refuse collection service, or
in the store at which you bought
the product.
This regulation is valid only in EU
member states.
IMPORTANT!
To prevent any risk of electrocution,
always disconnect the main circuit
breaker before making electric
connections or performing any
maintenance on the units.
The following instructions must be
made known to all personnel invol-
ved in the machine’s transport and
installation.
ACCESSORIES SUPPLIED
1- 1.5 m exible pipe.
2- Window air conveyor outlet
3- Window or wall installation
ange (only for versions where
envisaged)
4- Flange cap (only for versions
where envisaged)
5- Window suction cup
6- use and maintenance manual
7- remote control
8 - n°2 Blue photo-catalytic lters,
n°2 white hepa lters,
n°2 black activated carbon lters
(DOLCECLIMA SILENT only)
ELIMINATION
Ce symbole apposé sur le produit
ou son emballage indique que ce
produit ne doit pas être jeté au titre
des ordures ménagères normales,
mais doit être remis à un centre de
collecte pour le recyclage des appa
-
reils électriques et électroniques. En
contribuant à une élimination cor
-
recte de ce produit, vous protégez
l’environnement et la santé d’autrui.
L’environnement et la santé sont
mis en danger par une élimination
incorrecte du produit. Pour toutes
informations complémentaires con
-
cernant le recyclage de ce produit,
adressez-vous à votre municipalité,
votre service des ordures ou au
magasin où vous avez acheté le
produit. Cette consigne n’est valable
que pour les états membres de l’UE.
IMPORTANT!
Andeprévenirtoutrisqued’électro-
cution, il est indispensable de couper
le courant au disjoncteur principal
avant d’effectuer des branchements
électriques et toute opération d’en-
tretien sur les appareils.
Communiquer ces instructions à tout
le personnel concerné par le tran-
sport et l’installation de la machine.
ACCESSOIRES FOURNIS
1- Tubeexibled’1.5m.
2- Convoyeur terminal pour fenêtre
3- Bride pour installation murale
ou sur vitre (uniquement pour les
versions où cela est prévu)
4- Bouchon fermeture bride
(uniquement pour les versions où
cela est prévu)
5- Ventouse pour fenêtre
6- notice d’utilisation et d’entretien
7- télécommande
8 - n°2 Filtres bleus ciel
photocatalytiques,
n°2ltresblancshepa,
n°2ltresnoirsàcharbonsactifs
(seulement pour DOLCECLIMA
SILENT)
ENTSORGUNG
Dieses Symbol auf dem Produkt
oder seiner Verpackung weist darauf
hin, dass dieses Produkt nicht
als normaler Haushaltsabfall zu
behandeln ist, sondern an einem
Sammelpunkt für das Recycling
von elektrischen und elektronischen
Geräten abgegeben werden muss.
Durch Ihren Beitrag zum korrekten
Entsorgen dieses Produktes
schützen Sie die Umwelt und die
Gesundheit Ihrer Mitmenschen.
Umwelt und Gesundheit werden
durch falsches Entsorgen gefährdet.
Weitere Informationen über das
Recycling dieses Produktes
erhalten Sie von Ihrem Rathaus,
Ihrer Müllabfuhr oder dem Geschäft,
in dem Sie das Produkt gekauft
haben.
Diese Vorschrift ist nur gültig für
Mitgliedstaaten der EU.
WICHTIG!
Um dem Risiko eines Stromschlags
vorzubeugen, muss unbedingt
der Hauptschalter ausgeschaltet
werden, bevor elektrische
Anschlüsse hergestellt oder
Instandhaltungsarbeiten an den
Geräten vorgenommen werden.
Das für den Transport und für die
Maschineninstallation zuständige
Personal ist von diesen Anweisungen
in Kenntnis zu setzen.
GELIEFERTES ZUBEHÖR
1- Schlauch in einer Länge von 1.5
m
2- Luftleitungsverschluss für
Fenster
3- Flansch zur Montage an Mauer-
oder Glaswänden (nurfür
Versionen, bei denen dies
vorgesehen ist)
4- Flanschverschluss (nurfür
Versionen, bei denen dies
vorgesehen ist)
5- Saugkopf für Fenster
6- Bedienungs- und
Wartungsanleitung
7- Fernbedienung
8 - Anz. 2 azurblaue Filter
Fotokatalyse
Anz. 2 weiße Filter Hepa
Anz 2 schwarze Aktivkohlelter
(nur für DOLCECLIMA SILENT)
1
1.5
1
4
2
3
5
7
6
8
La page est en cours de chargement...

GB
F
D
14
I
2
2.1
INSTALLAZIONE
IDENTIFICAZIONE DELLE
PARTI PRINCIPALI (g. 2)
1) Pannello comandi
2) Griglia di uscita dell’aria
3) Filtro dell’aria con griglia
4) Tappo per svuotamento
dell’acqua di condensa
5) Entrata dell’aria esterna
6) Uscita dell’aria esterna
7) Maniglia di spostamento
8) Interruttore di alimentazione
AVVERTENZE
Installazione non corretta
(g. 3)
Installazione corretta (g. 4)
• Assicuratevi che tende o altri
oggetti non ostruiscano i filtri
di aspirazione.
• Collegare il climatizzatore solo
a prese dotate di messa a terra.
•L’efcienza delclimatizzatore è
garantita da una pulizia
effettuata annualmente da un
Centro di assistenza.
• Il climatizzatore non deve esse-
re utilizzato in locali adibiti a
lavanderia.
• Installare il climatizzatore solo
in locali asciutti.
• Il climatizzatore non deve esse-
re messo in funzione in
presenza di materiali, vapori o
liquidi pericolosi.
• Assicurarsi di mantenere tra
il climatizzatore e le strutture
adiacenti le distanze minime
indicateingura5.1.
Attenzione!
Pericolo di esplosione o
incendio.
• Installare il climatizzatore su
supercipiane.
INSTALLATION
IDENTIFICATION OF MAIN
COMPONENTS (g. 2)
1) Control panel
2) Air outlet grille
3) Air lter with grille
4) Plug for draining
condensation water
5) External air inlet
6) External air outlet
7) Handle for moving
8) Power switch
WARNING
Incorrect assembly (g. 3)
Correct assembly (g. 4)
• Make sure curtains or other
objects ar e not obstructing the
suction lter.
• Always connect the air
conditioner to a grounded socket.
• To assure maximum efciency of
your air conditioner have it
cleaned once a year by a Service
Center.
• The air conditioner must not be
used in laundries.
• The air conditioner must be
installed in a dry place only.
• Make sure that the minimum
distances between the conditioner
and adjacent structures respect
those indicated in gure 5.1
Warning!
Danger of explosion or re.
• Always install the conditioner on
a at surface.
INSTALLATION
IDENTIFICATION DES
COMPOSANTS PRINCIPAUX
(g. 2)
1) Panneau de commande
2) Grille d’évacuation de l’air
3) Filtre de l’air avec grille
4) Bouchon pour le vidage de
l’eau de condensation
5) Entrée de l’air externe
6) Sortie de l’air externe
7) Poignée pour le déplacement
8) Interrupteur d’alimentation
MISE EN GARDE
Montage non correct (g. 3)
Montage correct (g. 4)
• Contrôlez qu’aucun obstacle ne
gêneleltred’aspiration.
• Brancher le climatiseur à des
prises équipées de mise à la
terre uniquement;
• Un nettoyage effectué tous les
ans par un Centre SAV garantit
le bon fonctionnement du
climatiseur.
• Le climatiseur ne doit pas être
utilisé dans des locaux servant
de buanderie.
• Installer le climatiseur
uniquement dans des locaux
secs.
• Veiller à garder entre le climatiseur
et le structures adjacentes les
distances minimales indiquées à
lagure5.1.
Attention!
Danger d’explosion ou
d’incendie.
• Installer le climatiseur sur des
surfaces planes.
INSTALLATION
BEZEICHNUNG DER
WICHTIGSTEN TEILE (Abb. 2)
1) Bedienkonsole
2) Luftablaßgitter
3) Luftlter mit Gitter
4) Kondenswasser-
Ablaßschraube
5) Außenlufteingang
6) Außenluftausgang
7) Verschiebegriff
8) Versorgungsschalter
WICHTIGER HINWEIS
Falsche Montage (Abb. 3)
Richtige Montage (Abb. 4)
• Sicherstellen, daß sich der
Ansaugfilter nicht zu nahe bei
Vorhängen oder anderen
behindernden Gegenständen
bendet.
• Die Klimaanlage darf nur an
Steckbuchsen mit Schutzleiter
angeschlossen werden.
• Zur Erhaltung der
Betriebstüchtigkeit der
Klimaanlage ist eine jährliche
Reinigung durch einen
technischen Kundendienst
erforderlich.
• Die Klimaanlage darf nicht in
Waschräumen installiert werden.
• Die Klimaanlage darf nur in
trockenen Räumen installiert
werden.
• Stellen Sie die in der Abbildung 5.1
angegebenen Mindestabstände
zwischen der Klimaanlage und
den angrenzenden Strukturen
sicher.
Achtung!
Explosions- oder Brandgefahr.
• Die Klimaanlage ist auf glatter
Oberäche aufzustellen.
2.2
2
2
1
7
3
4
6
5
8
La page est en cours de chargement...

GB
F
D
16
I
2
2.3
MOBILE INSTALLATION (Fig.
5)
The air conditioner must be installed
in a suitable environment.
Use shutters, curtains, venetian
blinds to reduce sunlight and keep
doors and windows closed.
• Position the air conditioner in front
of a window or French window
• Fold the conveyor end (g. 5 A)
back on itself and insert it into the
exible hose (g. 5 B).
• Insert the pipe into the tting.
• Lay the pipe only as far as
necessary so the air conveyor is
closed between the windows.
FIXED INSTALLATION
(Fig. 6)
The air conditioner can also be
installed with xed holes in windows
or walls. Air flow must not be
obstructed by protective mesh or
similar. Any forms of protection must
have a total cross-section for air ow
of not less than 140 cm
2
.
INSTALLAZIONE MOBILE
(Fig. 5)
Il climatizzatore deve essere
installato in ambiente adeguato.
Vi raccomandiamo di ridurre
l’irraggiamento solare tramite
tapparelle, tende, veneziane e di
tenerechiuseporteenestre.
• Posizionare il climatizzatore
davanti a una nestra o a una
portanestra.
• Ripiegare il convogliatore
terminalesusestesso(g.5A)e
inserirlo nel tubo essibile (g.5
B).
• Inserire il tubo nel raccordo.
• Estendere il tubo solo per il
necessario, in modo che il
convogliatore dell’aria rimanga
chiusotraibattentidell’insso.
INSTALLAZIONE FISSA
(Fig. 6)
Il climatizzatore può essere
installato anche con fori fissi a
vetro o a muro. Il usso dell’aria
non deve essere impedito da griglie
di protezione o altro. Eventuali
protezioni devono avere una
sezione totale di passaggio dell’aria
non inferiore a 140 cm
2
.
INSTALLATION MOBILE
(Fig. 5)
Le climatiseur doit être installé
dans un local approprié. Il est
recommandé de réduire au
minimum le rayonnement solaire
au moyen de volets roulants, de
rideaux, de stores vénitiens et de
maintenir les portes et les fenêtres
fermées.
• Positionner le climatiseur devant
une fenêtre ou bien une porte-
fenêtre.
• Replier le convoyeur final sur
lui-même(g.5A),puisl’insérer
dansletubeexible(g.5B).•
Introduisez le flexible dans le
raccord.
•Netendezleexiblequesicelaest
nécessaire, de façon à ce que le
convoyeur de l’air reste bloqué
entre les battants de la fenêtre.
INSTALLATION FIXE (Fig. 6)
Le climatiseur peut aussi être installé
sur des trous xes pratiqués dans
une vitre ou bien dans un mur. Le
uxdel’airnedoitpasêtreentravé
par des grilles de
protection ni par autre chose. Les
éventuelles protections doivent avoir
une section totale de passage de l’air
non inférieure à 140 cm
2
.
2.4
BEWEGLICHE INSTALLATION
(Abb. 5)
Die Klimaanlage muß in einem
geeigneten Raum installiert werden.
Direkte Sonnenbestrahlung muß
durch Rolläden, Vorhänge und
dergleichen verhindert werden,
Fenster und Türen sind geschlossen
zu halten.
• Die Klimaanlage vor einem
Fenster oder einer Fenstertür
aufstellen.
• Biegen Sie den Endförderer um
sich selbst (Abb. 5 A) und führen
ihn in den Schlauch (Abb. 5 B) ein.
• Den Schlauch am
Anschlußstutzen befestigen.
• Den Schlauch nur so lang wie
nötig ziehen, so daß die
Luftleitung zwischen
Fensterügel und Fensterzarge
eingeklemmt ist.
FESTE INSTALLATION
(Abb. 6)
Die Klimaanlage kann auch an
Mauer-oder Glaswänden fix
montiert werden.
Der Luftstrom darf nicht durch
Schutzgitter oder ähnliches
behindert werden. Eventuelle
Schutzgitter müssen einen freien
Querschnitt für den Luftstrom von
mindestens 140 cm
2
aufweisen.
5
BA
1
3
2
5.1
La page est en cours de chargement...

GB
F
D
18
I
2
2.5
ELECTRICAL POWER
SUPPLY
The device is tted with a power
supply cable and plug (Y-type con-
nection). Before connecting the air
conditioner ensure that:
• The voltage and frequency values
of the power supply respect those
specied on the device data plate.
• The power line is equipped with
an effective earth connection and
is correctly sized for maximum
power consumption of the air
conditioner.
• The appliance is powered solely
through a socket compatible with
the plug provided.
WARNING
Any replacement of the power
cable must be carried out solely by
Olimpia Splendid technical support
or by similarly qualied personnel.
WARNING
The mains power supply must be
tted with an adequate omnipolar
disconnect switch compliant with
national installation regulations.
Check that the mains power sup-
ply is correctly earthed and tted
with adequate overload and short
circuit protection (a 10 AT delay
fuse or other equivalent device is
recommended).
WARNING
The connection to the mains must
be made by the installer in complian-
ce with the national regulations in
force (excluding mobile appliances
that do not require a xed installa-
tion by a specialized installer).
RACCORDEMENT ÉLECTRI-
QUE
L’appareil est doté d’un cordon
d’alimentationàche(branchement
du type Y). Avant de brancher l’ap-
pareil, s’assurer que :
• Les valeurs de tension et de
fréquence de l’alimentation élec-
trique sont conformes aux in-
dications gurant sur la plaque
signalétique de l’appareil.
• La ligne d’alimentation électrique
est dotée d’une mise à la terre
efcace et est correctement di-
mensionnée pour l’absorption
maximale de l’appareil.
• L’appareil est alimenté exclusive-
ment à travers une prise compa-
tibleaveclachefournie.
AVERTISSEMENT
Le remplacement éventuel du
cordon d’alimentation doit être
effectué exclusivement par
le service technique Olimpia
Splendid ou par du personnel
ayantunequalicationsimilaire.
AVERTISSEMENT
Il faut prévoir sur le réseau
d’alimentation de l’appareil un
dispositif de déconnexion om-
nipolaire approprié conforme à
la réglementation d’installation
nationale. Il est nécessaire
néanmoins de s’assurer que l’a-
limentation électrique est dotée
d’une mise à la terreefcace
et de protections appropriées
contre les surcharges et/ou les
courts-circuits (il est conseillé
d’utiliser un fusible retardé du
type 10 AT ou d’autres dispositifs
à fonctions équivalentes).
.
AVERTISSEMENT
Le branchement au réseau d’a-
limentation électrique doit être
effectué par l’installateur (sauf
pour les appareils mobiles, qui
ne nécessitent pas d’installation
xepardu personnel qualié),
conformément à la réglementa-
tion nationale en vigueur.
STROMANSCHLUSS
Das Gerät ist mit einem Stromkabel
mit Strecker ausgestattet (An-
schluss vom Typ Y). Vor dem
Anschluss der Klimaanlage sind
folgende Bedingungen sicherzu-
stellen:
• Die Spannungs- und Fre-
quenzwerte der Stromversorgung
stehen in Übereinstimmung mit
den Angaben auf dem Typen-
schild des Gerätes.
• Die Versorgungsleitung ist mit
einem wirksamen Erdschluss
ausgestattet und korrekt für die
maximale Stromaufnahme des
Klimagerätes bemessen.
• Das Gerät wird ausschließlich
über eine zum mitgelieferten
Stecker passenden Steckdose
gespeist.
WARNHINWEIS
Die eventuelle Auswechse-
lung des Versorgungskabels
ist ausschließlich durch den
technischen Kundendienst von
Olimpia Splendid oder Personal
mit entsprechender Qualikation
auszuführen.
WARNHINWEIS
Am Stromnetz des Gerätes
ist eine geeignete allpolige
Trennvorrichtung in Überein-
stimmung mit den nationalen
Installationsregeln vorzusehen.
In jedem Fall ist es notwendig
sicherzustellen, dass die elektri-
sche Stromversorgung mit einer
geeigneten Erdung und ange-
messenen Schutzvorrichtun-
gen gegen Überlasten und/
oder Kurzschlüsse ausgestattet
ist (Die Verwendung einer
verzögerten Schmelzsicherung
Typ 10 AT oder anderer Vor-
richtungen mit gleichwertigen
Funktionen wird empfohlen).
WARNHINWEIS
Der Anschluss an das Ver-
sorgungsnetz hat in Überein-
stimmung mit den geltenden
nationalen Vorschriften durch
den Installateur zu erfolgen
(ausgenommen bewegliche
Geräte, für die keine feste In-
stallation durch qualifiziertes
Personal erforderlich ist).
ALLACCIAMENTO
ELETTRICO
L’apparecchio è dotato di un cavo
di alimentazione con spina (collega-
mento di tipo Y). Prima di collegare il
climatizzatore assicurarsi che:
• I valori della tensione e frequenza
di alimentazione rispettino quanto
specicatosuidatiditargadell’ap-
parecchio.
• La linea di alimentazione sia
dotatadiunefcacecollegamen-
to a terra e sia correttamente
dimensionata per il massimo
assorbimento del climatizzatore.
• L’apparecchiatura venga alimen-
tata esclusivamente attraverso
una presa compatibile con la spina
fornita a corredo.
AVVERTENZA
L’eventuale sostituzione del cavo di
alimentazione deve essere effettua-
ta esclusivamente dal servizio di as-
sistenza tecnica Olimpia Splendid o
dapersonaleconqualicasimilare.
AVVERTENZA
Sulla rete di alimentazione dell’ap-
parecchio deve essere previsto un
adeguato dispositivo di disconnes-
sione onnipolare in conformità alle
regole di installazione nazionali. E’
necessario comunque verificare
che l’alimentazione elettrica sia
provvista di un efcace messa a
terra e di adeguate protezioni contro
sovraccarichi e/o cortocircuiti (si
raccomanda l’utilizzo di un fusibile
ritardato di tipo 10 AT o altri disposi-
tivi con funzioni equivalenti).
AVVERTENZA
L’allacciamento alla rete di alimenta-
zione deve essere effettuato a cura
dell’installatore (esclusi gli apparec-
chi mobili, per i quali non è richiesta
una installazione ssada parte di
personalequalicato)inconformità
alle norme nazionali vigenti.”
La page est en cours de chargement...

GB
F
D
20
I
3
3.1
USO E
MANUTENZIONE
I tipi di funzionamento del condizionatore
possono essere selezionati sia tramite il
telecomando che dal pannello comandi
a bordo del condizionatore. Su entrambi i
dispositivi, il funzionamento selezionato è
indicato su un display LCD. La ricezione
del comando emesso viene confermata
dall’emissione di una nota da parte del
cicalino.
LEGENDA DEI SIMBOLI E
TASTI DEL PANNELLO
COMANDI (Fig.7)
- SW1: ON / Standby;
- SW2: (raffreddamento =>
automatico => ventilazione
=> deumidificazione =>
raffreddamento ….);
- SW3: Selezione velocità ventilatore
(velocità max => velocità med =>
velocità min => velocità max ….);
- SW4: Aumento temperatura/ritardo;
- SW5: Riduzione temperatura/
ritardo;
- SW6: Conferma/annullamento
ritardo accensione/spegnimento
unità;
- L2: LED modalità standby (rosso).
- D1: Temperatura impostata/Timer
- S2: indicatore temperatura °C ,
temperatura °F , ore;
- S3: Accensione ritardata;
- S4: Modalità timer;
- S5: Spegnimento ritardato;
- S6: Modalità raffreddamento;
- S7:Modalitàdeumidicazione;
- S8: Modalità automatica;
- S9: Modalità Sleep;
- S10: Modalità ventilatore /
ventilatore a bassa velocità;
- S11: Velocità media ventilatore;
- S12: Velocità massima ventilatore.
USE AND
MAINTENANCE
The different types of conditioner operation
can be selected either using the remote
control or from the control panel on board
the conditioner. On both devices the
selected function is indicated on an LCD
display. The reception of the command
emitted is confirmed by a beep from
the buzzer.
KEY TO THE SYMBOLS AND
BUTTONS ON CONTROL
PANEL (Fig.7)
- SW1: ON / Standby;
- SW2: (cooling => automatic =>
ventilation => dehumidication
=> cooling….);
- SW3: Fan speed selection (max
speed => med speed => min
speed => max speed ….);
- SW4: Temperature/delay set
increase;
- SW5: Temperature/delay set
decrease;
- SW6: Unit switch ON/OFF delay
conrmation/cancel;
- L2: Standby mode LED (red).
- D1: Tset/Timer
- S2: indicator of temperature °C,
temperature °F, hours;
- S3: Delayed switch ON;
- S4: Timer mode;
- S5: Delayed switch OFF;
- S6: Cooling mode;
- S7:Dehumidication mode;
- S8: Automatic mode;
- S9: Sleep mode;
- S10: Fan mode / low fan speed;
- S11: Medium fan speed;
- S12: Maximum fan speed.
7
D1
S3
S4
S5
S8
S2
S12
S6 S7 S9 S10
S11
GEBRAUCH UND
INSTANDHALTUNG
Die Betriebsarten des Klimageräts
können sowohl mittels Fernbedienung
als auch von der Bedienkonsole an
Bord des Klimagerätes aus gewählt
werden. Auf beiden Vorrichtungen wird
die gewählte Betriebsart auf einem LCD-
Display angezeigt. Der Eingang des
ausgegebenen Befehls wird durch einen
Summer bestätigt.
LEGENDE DER SYMBOLE
UND TASTEN DER
BEDIENKONSOLE (Abb. 7)
- SW1: ON / Stand-by;
- SW2: (Kühlung => Automatik =>
Belüftung => Entfeuchtung => Kühlung
….);
- SW3: Wahl der
Ventilatorgeschwindigkeit (maximale
Geschwindigkeit => mittlere
Geschwindigkeit => minimale
Geschwindigkeit => maximale
Geschwindigkeit ….);
- SW4: Erhöhung der Temperatur/
Verzögerung
- SW5: Erniedrigung der Temperatur/
Verzögerung
- SW6: Bestätigung/Annullierung der
Verzögerung beim Einschalten/
Ausschalten der Einheit
- L2: LED Betriebsart Stand-by (rot).
- D1: Tset/Timer
- S2: Temperaturanzeige °C, Temperatur
°F, Stunden;
- S3: Verzögerte Einschaltung
- S4 Betriebsart Timer
- S5: Verzögerte Ausschaltung
- S6: Betriebsart Kühlung
- S7: Betriebsart Entfeuchtung
- S8: Automatikbetriebsart
- S9: Betriebsart Sleep
- S10: Betriebsart Ventilator / Ventilator bei
niedriger Geschwindigkeit;
- S11: Mittlere
Ventilatorgeschwindigkeit
- S12: Maximale
Ventilatorgeschwindigkeit.
UTILISATION ET
ENTRETIEN
Les types de fonctionnement du
climatiseur peuvent être sélectionnés
aussi bien sur la télécommande que sur
le panneau de commande présent sur le
climatiseur. Sur les deux dispositifs, le
fonctionnement sélectionné est indiqué
surun afcheur LCD. La réception de
lacommandeémiseestconrméepar
l’émission d’un son par l’avertisseur.
LEGENDE DES SYMBOLES ET
DES TOUCHES DU PANNEAU
DE COMMANDE (Fig.7)
- SW1: ON / Veille;
- SW2: (refroidissement =>
automatique => ventilation
=> déshumidification =>
refroidissement ….);
- SW3: Sélection de la vitesse
du ventilateur (vitesse maxi =>
vitesse moyenne => vitesse mini
=> vitesse maxi….);
- SW4: Augmentation température/
retard;
- SW5: Réduction température/
retard;
- SW6: Confirmation/annulation
du retard allumage/extinction
appareil;
- L2: Voyant du mode veille
(rouge).
- D1: Tset/Temporisateur
- S2: indicateur de température °C,
température °F, heures;
- S3: Allumage retardé;
- S4: Mode temporisateur;
- S5: Extinction retardée;
- S6: Mode refroidissement;
- S7:Modedéshumidication;
- S8: Mode automatique;
- S9: Mode Sommeil;
- S10: Mode ventilateur /
ventilateur à petite vitesse;
- S11: Vitesse moyenne
ventilateur;
- S12: Vitesse maximale
ventilateur.
La page est en cours de chargement...

GB
F
D
22
I
3
3.2
3.3
LEGENDA DEI SIMBOLI E TASTI DEL
TELECOMANDO (Fig.8)
B1: ON/Standby;
B2: Selezione modalità operativa
(raffreddamento =>
automatico => ventilazione
=> deumidificazione =>
riscaldamento (disabilitata
per questo modello) =>
raffreddamento ….);
B3: Selezione modalità Turbo
(Avvia l’unità in modalità
raffreddamento, Temperatura
impostata=16°C, velocità
massima ventilatore);
B4: Aumento temperatura;
B5: Riduzione temperatura;
B6: Selezione velocità ventilatore
(velocità max => velocità med =>
velocità min => velocità max….);
B7: Selezione velocità ventilatore
automatica - Auto fan;
B8: Impostazione accensione
programmata unità;
B9: Impostazione spegnimento
programmato unità;
B10: Conferma/annullamento
accensione/spegnimento
programmati unità;
B11: Selezione modalità Sleep (on/
off);
B12: Reset telecomando (se
presente).
B13:Selezione unità di misura della
temperatura (se presente).
ACCENSIONE GENERALE E
GESTIONE DEL FUNZIONAMENTO
Per poter gestire l’apparecchio
occorre introdurre la spina di
alimentazione dell’apparecchio nella
presa dell’impianto e accertarsi che
l’interruttore di alimentazione (fig.
2, rif. 8) sia posizionato su “I”. Per
trasmettere i comandi occorre rivolgere
la parte anteriore del telecomando
verso la consolle del climatizzatore.
La distanza massima alla quale può
avvenire la ricezione dei comandi
tramite telecomando corrisponde ad 8
metri circa.
KEY TO THE SYMBOLS AND
BUTTONS ON REMOTE CONTROL
(Fig.8)
B1: ON/Standby;
B2: Operating mode selection
(cooling => automatic =>
ventilation => dehumidication
=> heating (disabled for this
model) => cooling….);
B3: Turbo mode selection (switch the
unit to cooling mode, Tset=16°C,
max fan speed);
B4: Temperature set increase;
B5: Temperature set decrease;
B6: Fan speed selection (max speed
=> med speed => min speed =>
max speed ….);
B7: Auto fan speed selection;
B8: Unit switch ON delay setting;
B9: Unit switch OFF delay setting;
B10: Unit switch ON/OFF delay
conrmation/cancel;
B11: Sleep mode selection (on/off);
B12: Remote controller reset (if
present).
B13: Temperature measurement unit
selection (if present).
SWITCHING ON THE APPLIANCE
AND FUNCTION MANAGEMENT
To manage the appliance, insert the
plug on the appliance in the mains
power supply outlet and ensure the
power switch (g. 2, ref. 8) is set to “I”.
To transmit command signals from the
remote control to the appliance, point
the front part of the remote handset
towards the control panel on the air
conditioner.
The maximum signal transmission
distance from the remote control is
about 8 metres.
LEGENDE DES SYMBOLES ET DES
TOUCHES DE LA TELECOMMANDE
(Fig.8)
B1: ON / Veille;
B2: Sélection du mode de
fonctionnement (refroidissement
=> automatique => ventilation =>
déshumidication => chauffage
(désactivée pour ce modèle) =>
refroidissement ….);
B3: Sélection du mode Turbo
(Démarre l’appareil en mode
refroidissement, Tset=16°C,
vitesse maximale du ventilateur);
B4: Augmentation de la température;
B5: Réduction de la température;
B6: Sélection de la vitesse du
ventilateur (vitesse maxi =>
vitesse moyenne => vitesse mini
=> vitesse maxi ….);
B7: Sélection de la vitesse du
ventilateur automatique - Auto
fan;
B8: Réglage de l’allumage
programmé de l’appareil;
B9: Réglage de l’extinction
programmé de l’appareil;
B10: Confirmation/annulation
de l’allumage/extinction
programmés de l’appareil;
B11: Sélection du mode Sommeil (on/
off);
B12: Remise à zéro de la
télécommande (si présente).
B13: Sélection de l’unité de mesure
de la température (si présente).
MISE EN MARCHE GÉNÉRALE ET
GESTION DU FONCTIONNEMENT
Il est nécessaire, pour gérer l’appareil,
d’introduirelached’alimentationde
l’appareil dans la prise de l’installation
et de s’assurer que l’interrupteur
d’alimentation (fig. 2, réf. 8) est
réglé sur “I”. Pour transmettre les
commandes, diriger la partie avant
de la télécommande vers la console
du climatiseur.
La distance maximale permettant la
réception des commandes provenant
de la télécommande est d’environ
8 mètres.
LEGENDE DER SYMBOLE UND
TASTEN DER FERNBEDIENUNG
(Abb. 8)
B1: ON/Stand-by;
B2: Wahl der Betriebsart: (Kühlung
=> Automatik => Belüftung
=> Entfeuchtung => Heizung
(deaktiviert für dieses Modell)
=> Kühlung ….);
B3: Wahl des Turbo-Modus (Startet
die Einheit im Kühlmodus,
Tset = 16°C, maximale
Ventilatorgeschwindigkeit)
B4: Erhöhung der Temperatur
B5: Erniedrigung der Temperatur
B6: Wahl der
Ventilatorgeschwindigkeit
(maximale Geschwindigkeit
max => mittlere Geschwindigkeit
=> minimale Geschwindigkeit =>
maximale Geschwindigkeit ….);
B7: Wahl der automatischen
Ventilatorgeschwindigkeit - Auto
fan
B8: Einstellung der programmierten
Einschaltung der Einheit
B9: Einstellung der programmierten
Ausschaltung der Einheit
B10: Bestätigung/Annullierung der
programmierten Einschaltung/
Ausschaltung der Einheit
B11: Wahl des Sleep-Modus (on/off);
B12: Reset Fernbedienung (falls
vorhanden).
B13: Wahl der Maßeinheit für die
Temperatur (falls vorhanden).
EINSCHALTEN UND
BETRIEBSSTEUERUNG
Um das Gerät steuern zu können,
muss zunächst der Gerätenetzstecker
in die Steckdose eingeführt werden.
Danach ist sicherzustellen, dass der
Versorgungsschalter (Abb. 2 Pos. 8)
auf “I” steht. Zur Übersendung der
Befehle richten Sie die Frontseite der
Fernbedienung auf die Konsole des
Klimagerätes.
Der Höchstabstand, bei dem die
Befehle über die Fernbedienung
empfangen werden können, beträgt
ca. 8 m.
°F
°C
A
A
ON
OFF
h
8
1
2
3
8
7
6
5
4
MODE
°C
TURBO
MOON
ON OFF SET
RESET
AUTO FANFAN SPEED
A
A
ON
OFF
h
B4
B11
B9
B8
B6
B5
B1
B12
B10
B7
B3
B2
FAN SPEED
AUTO FAN
MODE
°F
°C
TURBO
MOON
ON OFF SET
°C/°F
A
A
ON
OFF
h
B7
B13
B10
B2
B4
B3
B6
B1
B9
B8
B11
B5
Tipo di telecomando in dotazione dipende dal modello di unità
The type of remote control supplied depends on the unit model
Le type de télécommande fournie dépend du modèle d’unité
Der Typ der mitgelieferten Fernbedienung hängt vom Modell
der Einheit ab
El tipo de control remoto suministrado depende del modelo
de unidad
Tipo de controlo remoto em dotação depende do modelo
de unidade
Het type van de voorziene afstandsbediening hangt van het
eenheidsmodel af.
Ôýðïò ðáñå÷üìåíïõ ôçëå÷åéñéóôçñßïõ áíÜëïãá ìå ôï
ìïíôÝëï ôçò ìïíÜäáò
La page est en cours de chargement...

GB
F
D
24
I
3
AVVERTENZE
Il telecomando fornito a corredo
dell’apparecchio è stato studiato
in modo da conferirgli la massima
robustezza ed un’eccezionale
funzionalità, comunque esso deve
essere maneggiato con alcune
cautele.
Evitare di:
- lasciarlo esposto alla pioggia,
versare liquidi sulla sua
tastiera o farlo cadere in acqua;
- fargli subire forti urti o lasciarlo
cadere su superci dure,
- lasciarlo esposto ai raggi
solari,
- frapporre ostacoli tra il
telecomando e l’apparecchio
mentre si usa il telecomando
stesso.
Inoltre:
- nel caso in cui nello stesso
ambiente vengano usati altri
apparecchi dotati di
telecomando (TV, radio,
gruppi stereo, etc.), si
potrebbero verificare alcune
interferenze;
- le lampade elettroniche e
fluorescenti possono
interferire nelle
comunicazioni tra il
telecomando e l’apparecchio,
- estrarre le batterie in caso di
prolungato inutilizzo del
telecomando.
WARNINGS
Although the remote control
handset supplied with the appliance
is designed to be as robust and
practical to use as possible, please
handle with the due care and
attention.
Do not:
- expose to rain, spill any
liquids on the keypad or drop
in water,
- subject to violent knocks or
drop on hard surfaces,
- expose to sunlight,
- introduce obstacles between
the remote control and the
appliance while using the
remote control.
Furthermore:
- any other appliances in the
same room controlled by a
remote control (TV, radio,
stereo, etc.), may cause
interferences;
- electronic and fluorescent
lamps may interfere with the
signal transmission between
the remote control and the
appliance;
- remove the batteries if the
remote control is not used for
long periods.
INSTRUCTIONS
La télécommande fournie avec
l’appareil a été conçue pour être
dotée d’une extrême robustesse et
d’une fonctionnalité exceptionnelle.
Il faut cependant la manipuler en
adoptant quelques précautions.
Éviter :
- de la laisser sous la pluie, de
verser du liquide sur son
clavier ou de la faire tomber
dans l’eau,
- qu’elle ne subisse de gros
chocs ou qu’elle ne tombe
sur des surfaces dures,
- de l’exposer aux rayons du
soleil,
- d’interposer des obstacles
entre la télécommande et
l’appareil lors de l’utilisation
de la télécommande
ellemême.
En outre :
- des interférences pourraient se
produire en cas d’utilisation,
dans la même pièce, d’autres
appareils dotés de
télécommande (TV, radio,
chaînes stéréo, etc.);
- les lampes électroniques et
uorescentes peuvent interférer
dans les communications entre
la télécommande et l’appareil;
- extraire les piles en cas de
nonutilisation prolongée de la
télécommande.
HINWEISE
Die Fernbedienung des Gerätes ist
so ausgelegt, dass eine maximale
Stabilität und optimale Funktionalität
gewährleistet werden kann; bei ihrer
Benutzung müssen jedoch einige
Vorsichtsmaßnahmen beachtet
werden.
So sollte man vermeiden:
- sie Regen auszusetzen,
Flüssigkeiten auf die Tastatur
zu gießen oder sie ins Wasser
fallen zu lassen;
- starke Stöße oder das
Herunterfallen auf harte
Oberächen,
- Sonneneinstrahlung,
- Hindernisse zwischen dem
Gerät und der Fernsteuerung
während der Benutzung der
Fernsteuerung.
Beachten Sie außerdem:
- werden in demselben Raum
noch andere ferngesteuerte
Geräte benutzt (Fernsehgeräte,
Radio, Stereoanlagen usw.),
kann es zu gegenseitigen
Beeinträchtigungen kommen;
- elektronische und
Leuchtstofflampen können die
Kommunikation zwischen der
Fernbedienung und dem Gerät
beeinträchtigen;
- wird die Fernbedienung über
einen längeren Zeitraum nicht
benutzt, nehmen Sie die
Batterien heraus.
La page est en cours de chargement...

GB
F
D
26
I
3
INSERIMENTO/RIMOZIONE
DELLE BATTERIE
Per il telecomando devono essere
esclusivamente usate 2 batterie a
secco LR03 AAA da 1,5 V che,
una volta scariche, devono essere
eliminate solamente tramite gli
appositi punti di raccolta predisposti
dalleAutorità Locali per iriuti di
questo tipo.
ATTENZIONE:
Entrambe le batterie
devono essere sostituite
contemporaneamente.
Per inserire le batterie occorre
aprire l’apposito sportellino a
scatto che si trova nella parte
posteriore del telecomando.
Le batterie devono essere inserite
rispettando scrupolosamente i
segni di polarità indicati sul fondo
del vano.
Richiudere il portellino a scatto
una volta inserite le batterie.
ACCENSIONE/
SPEGNIMENTO
DELL’APPARECCHIO
AVVERTENZA: Accertarsi che
l’interruttore di alimentazione
(g. 2 rif. 8) sia posizionato su “I”.
L’apparecchio può essere acceso o
spento per brevi periodi premendo
B1 sul telecomando oppure
SW1 sul pannello di controllo
(in caso di prolungato arresto
dell’apparecchio,questo deve
essere disattivato togliendo la spina
dalla presa di corrente). Il relativo
LED L2 si accende per indicare che
l’apparecchio è spento. In queste
condizioni premere nuovamente B1
sul telecomando (oppure SW1 sul
pannello di controllo) per ripristinare
le funzioni selezionate in precedenza.
Quando l’apparecchio è spento tutti i
timer vengono resettati.
INSERTING/REMOVING BAT-
TERIES
Only use two dry LR03 AAA 1.5
V batteries to power the remote
control.
Always dispose of discharged
batteries using the collection points
set up for this type of waste product
by your Local Authority.
WARNING:
Always change both batteries at
the same time.
To insert the batteries, open the
ap on the back of the remote
control.
Strictly adhere to the polarity
signs on the bottom of the battery
housing.
Re-close the flap once the
batteries have been inserted.
SWITCHING THE APPLIANCE
ON/OFF
WARNING: Ensure the power
switch (g. 2 ref. 8) is set to “I”.
The appliance can be switched ON
or OFF for short periods by pressing
B1 on the remote control or SW1 on
the control panel (if the appliance is
switched off for a long period then it
should be deactivated by removing
the plug from the mains supply. The
corresponding LED L2 lights up to
indicate that the appliance is switched
off. In this condition, press B1 again
on the remote control (or SW1 on
the control panel) to restore all the
formerly selected functions. When
the appliance is OFF all the working
timers are ‘reset’.
INTRODUCTION/ENLEVE-
MENT DES BATTERIE
N’utiliser, pour la télécommande,
que 2 piles sèches LR03 AAA de
1,5 V qui, une fois déchargées, ne
doivent être éliminées qu’aux points
de collecte prévus pour ce genre de
déchets par les Autorités Locales.
ATTENTION :
Remplacer les deux piles en
même temps.
Pour l’introduction des piles,
ouvrir le compartiment à déclic
situé au dos de la télécommande.
Introduire les piles en respectant
scrupuleusement les polarités
indiquées sur le fond du
logement.
Refermer le compartiment à
déclic après l’introduction des
piles.
ALLUMAGE/EXTINCTION DE
L’APPAREIL
AVERTISSEMENT : S’assurer que
l’interrupteur d’alimentation (g.
2 réf. 8) est réglé sur “I”.
L’appareil peut être allumé ou éteint
pendant de courtes périodes en
appuyant sur B1 sur la télécommande
ou bien sur SW1 sur le panneau de
commande (en cas d’arrêt prolongé de
l’appareil, celui-ci doit être désactivé
en enlevant la che de la prise de
courant). Le voyant correspondant L2
s’allume pour indiquer que l’appareil
est éteint. Dans ces conditions,
appuyer de nouveau sur B1 sur la
télécommande (ou bien SW1 sur
le panneau de commande) pour
rétablir les fonctions précédemment
sélectionnées. Quand l’appareil est
éteint, tous les temporisateurs sont
remis à zéro.
EINSETZEN/ENTFERNEN
DER BATTERIEN
Für die Fernbedienung dürfen
ausschließlich 2 Trockenbatterien
LR03 AAA mit 1,5 V verwendet
werden, die nach ihrer Entleerung
nur über eine von den örtlichen
Behörden eingerichtete
Sammelstelle für diese Art von
Abfällen entsorgt werden müssen.
WICHTIGER HINWEIS:
Beide Batterien müssen
gleichzeitig ausgetauscht
werden.
Zum Einsetzen der Batterien die
Klappe auf der Rückseite der
Fernbedienung öffnen.
Die Batterien müssen so
eingesetzt werden, dass
die am Boden der Öffnung
aufgezeichneten Polaritätshinweise
beachtet werden.
Die Klappe nach dem Einsetzen
der Batterien wieder schließen.
EINSCHALTEN/
AUSSCHALTEN DES
GERÄTES
HINWEIS: Stellen Sie sich, dass
der Versorgungsschalter (Abb. 2
Pos. 8) auf “I” steht.
Das Gerät kann für kurze Zeiträume
eingeschaltet oder ausgeschaltet
werden, indem B1 auf der
Fernbedienung oder SW1 auf
der Bedienkonsole gedrückt wird
(bei einem längeren Stillstand des
Geräts ist dieses durch Ziehen des
Netzsteckers zu deaktivieren). Die
zugehörige LED L2 geht aus
um anzuzeigen, dass das Gerät
ausgeschaltet ist. Drücken Sie
unter diesen Bedingungen erneut
B1 auf der Fernbedienung (oder
SW1 auf der Bedienkonsole), um
die zuvor gewählten Funktionen
wiederherzustellen. Bein
ausgeschaltetem Gerät werden
alle Timer zurückgesetzt.
3.4
3.5
9
+
+ --
--
La page est en cours de chargement...

GB
F
D
28
I
MODALITÀ VENTILAZIONE
Usando questa modalità l’apparecchio
non esercita alcuna azione né sulla
temperatura né sull’umidità dell’aria in
ambiente,ma la mantiene solamente
in circolazione. Questa modalità
può essere selezionata premendo
B2 o SW2 no aquando ilsimbolo
di solo ventilatore ( ) compare
sia sul telecomando, sia sul display
del pannello di controllo. In questa
modalità operativa il ventilatore
interno è sempre accesso ed è
possibile selezionare la velocità
desiderata del ventilatore in qualsiasi
momento premendo l’apposito tasto
B6 o SW3. Queste sono le velocità
possibili per il ventilatore.
Simboli visualizzati:
Velocità MASSIMA
Velocità MEDIA
Velocità MINIMA
AVVERTENZA: Con temperature
ambiente particolarmente basse
o molto alte la velocità del
ventilatore esterno può essere
forzata alla massima velocità.
SOLO PER DOLCECLIMA SILENT:
Le velocità di ventilazione sono
state ottimizzate per consentire
una sensibile riduzione della
rumorosità complessiva
dell’apparecchio.
FUNZIONAMENTO IN
RAFFREDDAMENTO
Usando questa modalità
l’apparecchio deumidifica
e raffredda l’ambiente. Questa
modalità può essere selezionata
premendoB2oSW2noaquando
il simbolo di solo raffreddamento
( ) compare sia sul telecomando,
sia sul display del pannello di
controllo. Il ventilatore interno
è sempre acceso alla velocità
selezionata (premendo B6 o SW3)
oppure in velocità automatica
(solamente dal telecomando
premendo B7). Il set-point
di temperatura (Temperatura
impostata’) può essere regolato
da 16°C a 30°C (da 61 °F a 86
°F se presente) con variazioni di
1°C grazie a B4/B5 o SW4/SW5,
ed il relativo valore compare sia
sul telecomando, sia sul display
locale (D1).
Dopo tre minuti (come massimo)
dall’attivazione di questa modalità
di funzionamento il compressore
s’avvia e l’apparecchio inizia ad
erogare freddo.
3
3.6
VENTILATION MODE
When this operating mode is
used the appliance has no effect
on the temperature or humidity
of the environment, it merely
circulates the air. This mode can
be selected by pressing B2 or
SW2 until only fan symbol ( )
is shown both on remote control
than on control panel displays.
In this working mode the internal
fan is always switched on and it’s
possible to select the desired fan
speed at any time by pressing
the relative key B6 or SW3.
Here are the details about the
available fan speeds.
Symbols displayed:
High FAN
Med FAN
Min FAN
WARNING: At particularly low or
very high ambient temperatures,
the external fan speed may be
forced to maximum.
FOR DOLCECLIMA SILENT
ONLY: Ventilation speeds have
been optimised in order to
considerably reduce appliance
noise levels.
COOLING FUNCTION
In this mode the appliance cools
and dehumidies the environment.
This mode can be selected by
pressing B2 or SW2 until the only
cooling symbol ( ) is shown both
on remote control than on control
panel displays. The internal fan is
always switched on, and runs at the
selected speed (set by pressing B6
or SW3) or in automatic fan speed
(only from the remote control by
pressing B7).The temperature set-
point (Tset) can be adjusted from
16°C to 30°C
(from 61 °F to 86 °F
if present) in 1°C steps by means of
B4/B5 or SW4/SW5, and its value
is shown both on remote and local
interfaces (D1).
Three minutes (maximum) after
the activation of this operating
mode the compressor starts and
the appliance starts to distribute
cold air.
MODE VENTILATION
Dans ce mode, l’appareil n’exerce
aucune action, ni sur la température,
ni sur l’humidité de l’air dans la
pièce, mais il se contente de le
garder en circulation. Ce mode
peut être sélectionné en appuyant
sur B2 ou SW2 jusqu’à ce que
le symbole de ventilateur seul
( ) apparaisse sur la télécommande
et sur l’afficheur du panneau de
commande. Dans ce mode de
fonctionnement, le ventilateur interne
est toujours allumé et il est possible
de sélectionner la vitesse souhaitée
du ventilateur à tout moment en
appuyant sur la touche prévue
à cet effet, B6 ou SW3. Ce sont
les vitesses possibles pour le
ventilateur.
Symbolesafchés:
High FAN
Med FAN
Min FAN
AVERTISSEMENT : En présence
de températures ambiantes
particulièrement basses ou très
élevées, la vitesse du ventilateur
peut être forcée au maximum.
UNIQUEMENT POUR
DOLCECLIMA SILENT : Les
vitesses de ventilation ont été
optimisées pour permettre une
réduction sensible du bruit global
de l’appareil.
FONCTIONNEMENT EN
REFROIDISSEMENT
Dans ce mode, l’appareil
déshumidie et refroidit la pièce.
Ce mode peut être sélectionné en
appuyant sur B2 ou SW2 jusqu’à ce
que le symbole de refroidissement
seul ( ) apparaisse sur la
télécommande et sur l’afficheur
du panneau de commande. Le
ventilateur interne est toujours
allumé à la vitesse sélectionnée
(en appuyant sur B6 ou SW3),
ou bien en vitesse automatique
(seulement sur la télécommande,
en appuyant sur B7). La valeur de
consigne de température (Tset)
peut être réglée de 16°C à 30°C,
(de 61 °F à 86 °F si présent) avec
des variations de 1°C, au moyen de
B4/B5 ou de SW4/SW5, et la valeur
correspondante apparaît aussi
bien sur la télécommande que sur
l’afcheurdel’appareil(D1).
Au bout de trois minutes (maximum)
après l’activation de ce mode de
fonctionnement, le compresseur
démarre et l’appareil commande à
diffuser du froid.
BETRIEBSART BELÜFTUNG
Bei Verwendung dieser
Betriebsart hat das Gerät weder
auf die Temperatur noch auf die
Feuchtigkeit der Umgebungsluft
Wirkung, sondern hält die Luft nur
in Zirkulation. Diese Betriebsart
kann gewählt werden durch
Drücken von B2 oder SW2 bis
zum Erscheinen des Symbols
Nur Ventilator ( ) sowohl auf
der Fernbedienung als auch auf
dem Display der Bedienkonsole.
In dieser Betriebsart ist der innere
Ventilator stets eingeschaltet, und
es ist möglich, die gewünschte
Geschwindigkeit des Ventilators in
einem beliebigen Moment durch
Drücken der entsprechenden Taste
B6 oder SW3 zu wählen. Dies sind
die möglichen Geschwindigkeiten
für den Ventilator.
Angezeigte Symbole:
High FAN
Med FAN
Min FAN
HINWEIS: Bei besonders
niedrigen oder sehr hohen
Umgebungstemperaturen
kann die Geschwindigkeit des
Ventilators auf die maximale
Geschwindigkeit forciert werden.
NUR FÜR DOLCECLIMA SILENT:
Die Belüftungsgeschwindigkeiten
wurden optimiert, um eine
deutliche Minderung der
Gesamtgeräuschbelastung durch
das Gerät zu erreichen.
KÜHLBETRIEB
Bei Verwendung dieser Betriebsart
entfeuchtet und kühlt das Gerät
die Umgebung. Diese Betriebsart
kann gewählt werden durch
Drücken von B2 oder SW2 bis
zum Erscheinen des Symbols
Nur Kühlung ( ) sowohl auf der
Fernbedienung als auch auf dem
Display der Bedienkonsole. Der
innere Ventilator ist stets bei der
(durch Drücken von B6 oder SW3)
gewählten Geschwindigkeit oder
bei automatischer Geschwindigkeit
(nur von der Fernbedienung durch
Drücken von B7) aus eingeschaltet.
Der Temperatur-Setpoint (Tset) kann
eingestellt werden zwischen 16°C
und 30°C (von 61 °F bis 86 °F falls
vorhanden) mit Abstufungen von
1°C dank B4/B5 oder SW4/SW5.
Der entsprechende Wert erscheint
sowohl auf der Fernbedienung als
auch auf dem lokalen Display (D1).
Nach drei Minuten (maximal) ab
der Aktivierung dieser Betriebsart
startet der Kompressorbetrieb,
und das Gerät beginnt mit der
Kälteabgabe.
3.7
La page est en cours de chargement...

GB
F
D
30
I
FUNZIONAMENTO IN SOLA
DEUMIDIFICAZIONE
Questa modalità può essere
selezionata premendo B2 o SW2
fino a quando il simbolo di sola
deumidicazione ( ) compare sia
sul telecomando, sia sul display
del pannello di controllo. Questa
modalità è simile alla modalità
raffreddamento, eccezion fatta per:
- la velocità del ventilatore interno
non è impostabile e viene forzata
alla velocità minima (B6/B7 e
SW3 sono disabilitati);
- la temperatura ambiente
desiderata (“temperatura
impostata”) non può essere
selezionata (B4/B5 e SW4/SW5
sono disabilitati). Il climatizzatore
funzionerà in modo tale da
mantenere pressoché inalterata
la temperatura ambiente iniziale.
FUNZIONAMENTO
NOTTURNO
Questa modalità può essere
selezionata solo dal telecomando
(premendo B11) e può essere
utilizzata solo in abbinamento alla
modalità raffreddamento.
Quando questa funzione è abilitata
in modalità raffreddamento, il
ventilatore interno viene forzato alla
velocità minima e la temperatura
ambiente impostata viene
automaticamente incrementata di
un grado dopo la prima ora e di un
ulteriore grado dopo la seconda
ora di funzionamento (a partire
dall’attivazione della funzione o
dalla successiva modifica della
temperatura impostata).
Per disattivare la funzione occorre
premere nuovamente il tasto B11.
3.8
3
DEHUMIDIFYING FUNCTION
ONLY
This mode can be selected by
pressing B2 or SW2 until only
dehumidification symbol ( ) is
shown both on remote control than
on control panel displays. This mode
works similarly to cooling mode
except for:
- the internal fan speed cannot be
set and is forced to minimum (B6/
B7 and SW3 are disabled);
- the desired ambient temperature
(“set temperature”) cannot be
selected (B4/B5 and SW4/SW5
are disabled). The air conditioner
will operate to keep the initial
ambient temperature all but
unchanged.
NIGHT-TIME MODE
This mode can only be selected from
the remote control (by pressing B11)
and may only be used in conjunction
with cooling.
When this function is enabled in
cooling mode, the internal fan is
forced to minimum speed and the
set ambient temperature increases
automatically by one degree after
the rst hour and by a further degree
after the second hour of operation
(from activation of the function or
from the subsequent change in set
temperature).
To deactivate the function, press
key B11 again.
FONCTIONNEMENT EN
DESHUMIDIFICATION SEULE
Ce mode peut être sélectionné
en appuyant sur B2 ou SW2
jusqu’à ce que le symbole de
déshumidification seule ( )
apparaisse sur la télécommande
et sur l’afficheur du panneau de
commande. Ce mode est similaire
au mode refroidissement, exception
faite pour:
- la vitesse du ventilateur n’est pas
programmable et elle est forcée
à la vitesse minimale (B6/B7 et
SW3 sont désactivés);
- la température ambiante
souhaitée (“température
programmée”) ne peut pas être
sélectionnée (B4/B5 et SW4/
SW5 sont désactivés). Le
climatiseur fonctionnera de façon
à maintenir presque inchangée la
température ambiante initiale.
FONCTIONNEMENT
NOCTURNE
Ce mode ne peut être sélectionné
qu’au moyen de la télécommande
(en appuyant sur B11) et il ne peut
être utilisé qu’en association avec
le mode refroidissement.
Quand cette fonction est activée en
mode refroidissement, le ventilateur
interne est forcé à la vitesse
minimale et la température ambiante
paramétrée est automatiquement
augmentée d’un degré après la
première heure et d’un degré
supplémentaire après la seconde
heure de fonctionnement (à partir
de l’activation de la fonction ou
de la modication suivante de la
température paramétrée).
Pour désactiver la fonction, il faut
appuyer de nouveau sur la touche
B11.
BETRIEB NUR IN
ENTFEUCHTUNG
Diese Betriebsart kann gewählt
werden durch Drücken von B2
oder SW2 bis zum Erscheinen des
Symbols ( ) Nur Entfeuchtung
sowohl auf der Fernbedienung
als auch auf dem Display der
Bedienkonsole. Diese Betriebsart
ist ähnlich dem Kühlmodus,
Ausnahmen:
- Die Geschwindigkeit des
Innenventilators ist nicht
einstellbar und wird auf die
Mindestgeschwindigkeit forciert
(B6/B7 und SW3 sind deaktiviert);
- Die gewünschte Raumtemperatur
(“Einstelltemperatur”) kann nicht
gewählt werden (B4/B5 und
SW4/SW5 sind deaktiviert).
Die Klimaanlage funktioniert
derart, dass die Anfangs-
Raumtemperatur mehr oder
weniger unverändert bleibt.
NACHTBETRIEB
Diese Betriebsart kann nur von der
Fernbedienung (durch Drücken
von B11) aus gewählt und nur in
Kombination mit dem Kühlmodus.
Wenn diese Funktion im Kühlmodus
aktiviert ist, wird der Innenventilator
auf die Mindestgeschwindigkeit
forciert, und die eingestellte
Raumtemperatur wird um ein Grad
nach der ersten Stunde und um ein
weiteres Grad nach der zweiten
Betriebsstunde (ab Aktivierung
der Funktion oder der nächsten
Änderung der Einstelltemperatur)
erhöht.
Zur Deaktivierung der Funktion ist
erneut die Taste B11 zu drücken.
3.9
La page est en cours de chargement...

GB
F
D
32
I
3
FUNZIONAMENTO
AUTOMATICO
Questa modalità può essere
selezionata premendo B2 o SW2
noaquandoilsimboloautomatico
( ) compare sia sul telecomando,
sia sul display del pannello di
controllo. In questa modalità, le
funzioni RAFFREDDAMENTO,
VENTILAZIONE vengono
selezionate automaticamente
a seconda della temperatura
ambiente, che viene continuamente
controllata in modo da ottenere
nel locale climatizzato un comfort
ottimale.
FUNZIONAMENTO TURBO
Questa modalità può essere
selezionata solo da telecomando
(premendo B3) e imposta
l’unità direttamente in modalità
raffreddamento con Temperatura
impostata=16°C e velocità
massima del ventilatore in modo
da raggiungere la temperatura
impostata nei tempi più brevi.
FUNZIONAMENTO CON
TIMER
Questa modalità consente di
programmare l’accensione o lo
spegnimento dell’unità. Il tempo
di ritardo può essere impostato,
attivato ed annullato sia da
telecomando, sia da pannello di
controllo.
SETTAGGIO TIMER
DI ACCENSIONE DAL
TELECOMANDO
Dopo aver acceso
l’unità,selezionare la modalità
operativa,la temperatura desiderata
e la velocità di ventilazione con le
quali l’unità si attiverà all’accensione
programmata. Successivamente
mettere la macchina in Stand-By.
Premendo B8, impostare il ritardo
desiderato (da 1 a 12 ore) dopo il
quale l’unità si accenderà (partendo
dalla conferma del timer).
Se non viene premuto alcun tasto
entro 5 secondi la funzione di
impostazione del timer terminerà
automaticamente. Confermare il
valore desiderato premendo B10.
Il display del telecomando mostra il
conto alla rovescia per l’accensione.
Una volta trascorso il tempo
impostato, l’unità si avvierà con le
ultime impostazioni selezionate.
Per annullare l’accensione ritardata,
premere nuovamente il pulsante
B10.
3.10
3.11
3.12
3.12.1
3
AUTOMATIC FUNCTIONING
This mode can be selected by
pressing B2 or SW2 until the
automatic symbol ( ) is shown
both on remote control than on
control panel displays.
In this mode, COOLING and
VENTILATION functions are
selected automatically according
to the ambient temperature, which
is constantly checked to ensure
optimum comfort.
TURBO FUNCTIONING
This mode can only be selected
from the remote control (by pressing
B3) and switches the unit directly
to cooling mode with Tset=16°C
and maximum fan speed in order
to reach the set temperature in the
shortest possible time.
FUNCTIONING WITH TIMER
This mode enables a delayed switch
ON or switch OFF operation to the
overall unit. The time delay can be
set, enabled and cancelled from
both the remote control and the
control panel
SETTING SWITCH-ON TIMER
FROM REMOTE CONTROL
After switching on the unit, select
the operating mode, the desired
temperature and the ventilation
speed with which the unit will activate
automatically as programmed. Then
set the machine into Stand-by.
By pressing B8, set the desired
time delay (from 1 to 12 hours)
after which the unit will switch ON
(starting from timer conrmation).
If no button is pressed within 5
seconds the timer setting function
will terminate automatically.
Conrm the desired delay time by
pressing B10. The remote controller
display shows the delay countdown
to the switch ON operation.When
the delay time set has elapsed, the
unit switches ON with latest selected
settings.
To cancel the delayed switching on,
press B10 again.
FONCTIONNEMENT
AUTOMATIQUE
Ce mode peut être sélectionné en
appuyant sur B2 ou SW2 jusqu’à
ce que le symbole automatique
( ) apparaisse sur la
télécommandeetsurl’afcheurdu
panneau de commande.
Dans ce mode, les fonctions
REFROIDISSEMENT,
VENTILATION sont sélectionnées
automatiquement en fonction de
la température ambiante, qui est
contrôlée en permanence de façon
à obtenir un confort optimal dans la
pièce climatisée.
FONCTIONNEMENT TURBO
Ce mode peut être sélectionné
uniquement sur la télécommande
(en appuyant sur B3) et il règle
l’appareil directement en mode
refroidissement avec Tset=16°C
et vitesse maximum du ventilateur,
de façon à atteindre la température
réglée le plus rapidement possible.
FONCTIONNEMENT AVEC
TEMPORISATEUR
Ce mode permet de programmer
l’allumage ou l’extinction de
l’appareil. Le temps de retard peut
être réglé, activé et annulé aussi
bien sur la télécommande que sur
le panneau de commande.
REGLAGE DU
TEMPORISATEUR
D’ALLUMAGE SUR LA
TELECOMMANDE
Après avoir allumé l’unité,
sélectionner le mode de
fonctionnement, la température
souhaitée et la vitesse de ventilation
avec lesquels l’unité s’active lors
de l’allumage programmé. Puis
placer la machine en mode Stand-
By (pause).
En appuyant sur B8, régler le
retard souhaité (de 1 à 12 heures),
au bout duquel l’appareil s’allume
(à compter de la conrmation du
temporisateur).
Si l’on n’appuie sur aucune touche
dans les 5 secondes, la fonction de
paramétrage du temporisateur se
désactive automatiquement.
Conrmer la valeur souhaitée en
appuyantsurB10.L’afcheurdela
télécommandeafchelecompteà
rebours pour l’allumage. Une fois
le temps réglé écoulé, l’appareil
démarre avec les derniers réglages
sélectionnés.
Pour annuler l’allumage retardé,
appuyer de nouveau sur le bouton
B10.
AUTOMATIKBETRIEB
Diese Betriebsart kann gewählt
werden durch Drücken von B2
oder SW2 bis zum Erscheinen des
Automatik-Symbols ( ) sowohl
auf der Fernbedienung als auch
auf dem Display der Bedienkonsole.
In dieser Betriebsart werden
die Funktionen KÜHLUNG und
BELÜFTUNG automatisch je nach
Umgebungstemperatur gewählt,
die kontinuierlich kontrolliert wird,
um einen optimalen Komfort im
klimatisierten Raum zu erhalten.
TURBOBETRIEB
Diese Betriebsart kann nur von
der Fernbedienung aus (durch
Drücken von B3) gewählt werden
und stellt die Einheit direkt in
den Kühlmodus mit Tset = 16 °C
sowie die Höchstgeschwindigkeit
des Ventilators derart ein, dass
die eingestellte Temperatur in
kürzestmöglichen Zeiten erreicht
wird.
BETRIEB MIT TIMER
Diese Betriebsart erlaubt die
Programmierung des Einschaltens
oder Ausschaltens der Einheit. Die
Verzögerungszeit kann sowohl von
der Fernbedienung als auch von
der Bedienkonsole aus eingestellt
werden.
SETUP TIMER FÜR
EINSCHALTUNG VON
FERNBEDIENUNG
Nach dem Einschalten der Einheit
wählen Sie den Betriebsmodus,
die gewünschte Betriebsart und die
Belüftungsgeschwindigkeit, mit der
die Einheit bei der programmierten
Einschaltung aktiviert wird. Stellen
Sie das Gerät anschließend
auf Stand-by. Stellen Sie durch
Drücken von B8 die gewünschte
Verzögerung (zwischen 1 und 12
Stunden) ein, nach deren Ablauf
die Einheit sich einschaltet (ab
Bestätigung des Timers).
Wenn innerhalb von 5 Sekunden
keine Taste gedrückt wird, endet die
Funktion der Einstellung des Timers
automatisch.
Bestätigen Sie den gewünschten
Wert durch Drücken von B10. Das
Display der Fernbedienung zeigt die
Rückzählung für die Einschaltung
an. Nach Ablauf der eingestellten
Zeit startet die Einheit mit den
zuletzt gewählten Einstellungen.
Zur Annullierung der verzögerten
Einschaltung drücken Sie erneut
den Taster B10.
La page est en cours de chargement...

GB
F
D
34
I
3
SETTAGGIO TIMER DI
SPEGNIMENTO DAL
TELECOMANDO
Con l’unità in una qualsiasi modalità
operativa, premere B9 per impostare
il ritardo desiderato (da 1 a 12 ore)
dopo il quale l’unità si spegnerà
(partendo dalla conferma del timer).
Tutti i successivi interventi sul tasto
B9 aumenteranno il ritardo di 1
ora. Se non viene premuto alcun
tasto entro 5 secondi la funzione
di impostazione del timer terminerà
automaticamente. Confermare
il ritardo desiderato premendo
B10. Il display del telecomando
mostra il conto alla rovescia per lo
spegnimento. Una volta trascorso il
tempo impostato, l’unità si spegnerà.
Per annullare lo spegnimento
ritardato, premere nuovamente il
pulsante B10.
SETTAGGIO TIMER
DI ACCENSIONE DAL
PANNELLO COMANDI
Dopo aver acceso
l’unità,selezionare la modalità
operativa,la temperatura desiderata
e la velocità di ventilazione con le
quali l’unità si attiverà all’accensione
programmata. Successivamente
mettere la macchina in Stand-By.
Premere SW6 per abilitare il timer.
Premere SW4 o SW5 per
aumentare/ridurre il valore di ritardo
indicato sul display del pannello di
controllo (da 1 a 12 ore) dopo il
quale l’unità si avvierà (partendo
dalla conferma del timer).
Se non viene premuto alcun tasto
entro 5 secondi la funzione di
impostazione del timer terminerà
automaticamente. Confermare il
valore desiderato premendo SW6.
Il display del pannello di controllo
mostra il conto alla rovescia per
l’accensione. Una volta trascorso il
tempo impostato, l’unità si avvierà
con le impostazioni selezionate in
precedenza.
Per annullare l’accensione
programmata, premere nuovamente
SW6.
3.12.2
3.12.3
3
SETTING SWITCH-OFF TIMER
FROM REMOTE CONTROL
With the unit in any working mode,
press B9 to set the desired time
delay (from 1 to 12 hours) after
which the unit will switch OFF
(starting from timer conrmation).
Each following B9 key operation
increases the delay time value by 1
hour. If no button is pressed within
5 seconds the timer setting function
will terminate automatically.
Conrm the desired delay time by
pressing B10. Then the remote
controller display shows the delay
countdown to the switch OFF
operation. When the delay time
set has elapsed, the overall unit
switches OFF.
To cancel the delayed switching on,
press B10 again.
SETTING SWITCH-ON TIMER
FROM CONTROL PANEL
After switching on the unit, select
the operating mode, the desired
temperature and the ventilation
speed with which the unit will activate
automatically as programmed. Then
set the machine into Stand-by.
Press SW6 to enable the desired
time delay setting.
Press SW4 or SW5 to increase/
decrease the delay time value
shown by control panel display (from
1 to 12 hours) after which the unit
will switch ON (starting from timer
conrmation)
If no button is pressed within 5
seconds the timer setting function
will terminate automatically.
Conrm the desired delay time by
pressing SW6.The control panel
display shows the delay countdown
to the switch ON operation; When
the delay time set has elapsed, the
unit switches ON with previously
selected settings.
To cancel the programmed
switching-on, press SW6 again.
.
.
REGLAGE DU
TEMPORISATEUR
D’EXTINCTION SUR LA
TELECOMMANDE
L’appareil étant dans n’importe quel
mode de fonctionnement, appuyer
sur B9 pour régler le retard souhaité
(de 1 à 12 heures) au bout duquel
l’appareil s’éteindra (à compter de
la conrmation du temporisateur).
Toutes les interventions suivantes
sur la touche B9 augmenteront
le retard de une heure. Si l’on
n’appuie sur aucune touche dans
les 5 secondes, la fonction de
paramétrage du temporisateur se
désactive automatiquement.
Conrmer le retard souhaité en
appuyantsurB10.L’afcheurdela
télécommandeafchelecompteà
rebours pour l’extinction. Une fois
le temps réglé écoulé, l’appareil
s’éteindra.
Pour annuler l’allumage retardé,
appuyer de nouveau sur le bouton
B10.
REGLAGE DU
TEMPORISATEUR
D’ALLUMAGE SUR LE
PANNEAU DE COMMANDE
Après avoir allumé l’unité,
sélectionner le mode de
fonctionnement, la température
souhaitée et la vitesse de ventilation
avec lesquels l’unité s’active lors
de l’allumage programmé. Puis
placer la machine en mode Stand-
By (pause). Appuyer sur le SW6
pour activer le temporisateur.
Appuyer sur SW4 ou SW5 pour
augmenter/réduire la valeur de
retard sur l’afcheur du panneau
de commande (de 1 à 12 heures)
au bout duquel l’appareil démarrera
(à compter de la conrmationdu
temporisateur).
Si l’on n’appuie sur aucune touche
dans les 5 secondes, la fonction de
paramétrage du temporisateur se
désactive automatiquement.
Confirmer la valeur souhaitée en
appuyant sur SW6. L’afficheur du
panneau de commande affiche le
compte à rebours pour l’allumage.
Une fois le temps réglé écoulé,
l’appareil démarre avec les
derniers réglages sélectionnés
précédemment.
Pour annuler l’allumage programmé,
appuyer de nouveau sur SW6.
SETUP TIMER FÜR
AUSSCHALTUNG VON
FERNBEDIENUNG
Stellen Sie in einem beliebigen
Betriebsmodus durch Drücken von
B9 die gewünschte Verzögerung
(zwischen 1 und 12 Stunden) ein,
nach deren Ablauf die Einheit
sich ausschaltet (ab Bestätigung
des Timers). Alle anschließenden
Betätigungen der Taste B9 erhöhen
die Verzögerung um 1 Stunde.
Wenn innerhalb von 5 Sekunden
keine Taste gedrückt wird, endet die
Funktion der Einstellung des Timers
automatisch.
Bestätigen Sie den gewünschten
Wert durch Drücken von B10. Das
Display der Fernbedienung zeigt die
Rückzählung für die Ausschaltung
an. Nach Ablauf der eingestellten
Zeit geht die Einheit aus.
Zur Annullierung der verzögerten
Einschaltung drücken Sie erneut
den Taster B10.
SETUP TIMER FÜR
EINSCHALTUNG VON
BEDIENKONSOLE
Nach dem Einschalten der Einheit
wählen Sie den Betriebsmodus,
die gewünschte Betriebsart und die
Belüftungsgeschwindigkeit, mit der
die Einheit bei der programmierten
Einschaltung aktiviert wird. Stellen
Sie das Gerät anschließend auf
Stand-by. Drücken Sie SW6 zum
Aktivieren des Timers. Drücken
Sie SW4 oder SW5 zur Erhöhung/
Reduzierung der auf dem Display
der Bedienkonsole angezeigten
Verzögerungszeit (von 1 bis 12
Stunden), nach deren Ablauf die
Einheit startet (ab Bestätigung des
Timers).
Wenn innerhalb von 5 Sekunden
keine Taste gedrückt wird, endet die
Funktion der Einstellung des Timers
automatisch.
Bestätigen Sie den gewünschten
Wert durch Drücken von SW6. Das
Display der Fernbedienung zeigt die
Rückzählung für die Einschaltung
an. Die Einheit schaltet nach 5
Sekunden ab. Nach Ablauf der
eingestellten Zeit startet die
Einheit mit den zuletzt gewählten
Einstellungen.
Zur Annullierung der programmierten
Einschaltung drücken Sie erneut
SW6.
La page est en cours de chargement...

GB
F
D
36
I
3
3.12.4
3.13
3.14
3
SETTAGGIO TIMER DI
SPEGNIMENTO DAL
PANNELLO COMANDI
Con l’unità in una qualsiasi
modalità operativa, premere
SW6 per impostare il ritardo
desiderato. Premere SW4 o SW5
per aumentare/ridurre il valore
di ritardo indicato sul display del
pannello di controllo (da 1 a 12 ore)
dopo il quale l’unità si spegnerà
(partendo dalla conferma del timer).
Se non viene premuto alcun tasto
entro 5 secondi la funzione di
impostazione del timer terminerà
automaticamente. Confermare il
valore desiderato premendo SW6.
Per annullare lo spegnimento
programmato, premere nuovamente
il pulsante SW6.
RESETTAGGIO DI TUTTE
LE FUNZIONI DEL
TELECOMANDO (se presente)
Premendo il pulsante B12 vengono
resettate tutte le impostazioni del
telecomando. Così facendo si
annullano tutte le impostazioni ed
il telecomando si porta nello stato
di default.
Inoltre premendo il pulsante
B12 appaiono sul display tutte
le indicazioni possibili, rendendo
possibilelavericadell’integritàdel
display stesso.
SELEZIONE UNITÀ DI MISURA
DELLA TEMPERATURA (se
presente)
Premendo il pulsante B13 sul
telecomando, potrete cambiare
l’unità di misura della temperatura
indicata sul display da FAHRENHEIT
(si accende il simbolo °F sul display
del telecomando) a CELSIUS (si
accende il simbolo °C sul display del
telecomando) o viceversa.
SETTING SWITCH-OFF TIMER
FROM CONTROL PANEL
With the unit in any working mode,
press SW6 to enable the desired
time delay setting. Press SW4 or
SW5 to increase/decrease the
delay time value shown by control
panel display (from 1 to 12 hours)
after which the unit will switch OFF
(starting from timer conrmation).
If no button is pressed within 5
seconds the timer setting function
will terminate automatically.
Confirm the desired delay time
by pressing SW6. To cancel the
programmed switching-off, press
SW6 again.
RESETTING ALL THE REMOTE
CONTROL FUNCTIONS (if
present)
Press the B12 button to reset all
remote control settings.
By doing this, all the timer
settings are cancelled and the
remote control returns to its
default settings.
To check the integrity of the
display, press the B12 button
and all possible symbols are
displayed.
TEMPERATURE
MEASUREMENT UNIT
SELECTION (if present)
Press button B13 on the remote
control to change the temperature
measurement unit indicated on the
display from FAHRENHEIT (the
symbol °F lights up on the remote
control display) to CELSIUS (the
symbol °C lights up on the remote
control display) or vice-versa.
REGLAGE DU TEMPORISATEUR
D’EXTINCTION SUR LE
PANNEAU DE COMMANDE
L’appareil étant dans n’importe
quel mode de fonctionnement,
appuyer sur SW6 pour régler le
retard souhaité. Appuyer sur SW4
ou SW5 pour augmenter/réduire
la valeur de retard surl’afcheur
du panneau de commande (de
1 à 12 heures) au bout duquel
l’appareil s’éteindra (à compter de
la conrmation du temporisateur).
Si l’on n’appuie sur aucune touche
dans les 5 secondes, la fonction de
paramétrage du temporisateur se
désactive automatiquement.
Conrmer la valeur souhaitée en
appuyant sur SW6.
Pour annuler l’extinction
programmée, appuyer de nouveau
sur le bouton SW6.
NOUVEAU REGLAGE DE
TOUTES LES FONCTIONS
DE LA TELECOMMANDE (si
présente)
Appuyer sur le bouton B12 pour
remettre à zéro tous les réglages de
la télécommande. De cette façon,
tous les réglages sont annulés
et la télécommande revient aux
valeurs par défaut. De plus, la
pression du bouton B12 commande
l’affichage sur l’afficheur de
toutes les indications possibles,
permettant ainsi le contrôle du
bon fonctionnement de l’afcheur
lui-même.
SELECTION DE L’UNITE
DE MESURE DE LA
TEMPERATURE (si présente)
En appuyant sur le bouton B13 de
la télécommande, il est possible de
modierl’unitédemesureindiquée
sur l’afficheur de FAHRENHEIT
(symbole °F allumé sur l’afcheur
de la télécommande) à CELSIUS
(symbole°Callumésurl’afcheurde
la télécommande) ou inversement.
SETUP TIMER FÜR
AUSSCHALTUNG VON
BEDIENKONSOLE
Drücken Sie SW6 bei der
in einer beliebigen Betriebsart
laufenden Einheit zur Einstellung
der gewünschten Verzögerung.
Drücken Sie SW4 oder SW5 zur
Erhöhung/Reduzierung des auf
dem Display der Bedienkonsole
angezeigten Verzögerungszeit
(von 1 bis 12 Stunden), nach deren
Ablauf die Einheit abschaltet (ab
Bestätigung des Timers). Wenn
innerhalb von 5 Sekunden keine
Taste gedrückt wird, endet die
Funktion der Einstellung des Timers
automatisch.
Bestätigen Sie de gewünschten
Wert durch Drücken von SW6.
Zur Annullierung der programmier
-
ten Abschaltung drücken Sie erneut
den Taster SW6.
RESET ALLER FUNKTIONEN
VON FERNBEDIENUNG (falls
vorhanden)
Durch Drücken des Tasters
B12 werden alle Funktionen der
Fernbedienung zurückgestellt.
Dadurch werden alle Einstellungen
gelöscht, und die Fernbedienung
geht auf die Defaultwerte zurück.
Außerdem erscheinen beim
Drücken des Tasters B12 alle
auf dem Display vorgesehenen
Angaben, sodass es möglich ist,
die Integrität des Displays zu
überprüfen.
WAHL DER MASSEINHEIT
FÜR DIE TEMPERATUR (falls
vorhanden)
Durch Drücken des Tasters B13
auf der Fernbedienung können Sie
die Maßeinheit der auf dem Display
angezeigten Temperatur von
FAHRENHEIT (nur das Symbol °F
auf dem Display der Fernbedienung
leuchtet) auf CELSIUS ((nur das
Symbol °C auf dem Display der
Fernbedienung leuchtet) umstellen
oder umgekehrt.
La page est en cours de chargement...

GB
F
D
38
I
3
3.15
3.16
3.17
3.18
3
11
AUTORESTART
In caso di interruzione
dell’alimentazione elettrica,
l’apparecchiatura memorizza
l’ultima modalità operativa e
si riavvia, una volta ripristinata
l’alimentazione elettrica, con le
precedenti impostazioni.
CONTROLLO DELLA
DIREZIONE DEL FLUSSO
D’ARIA (solo versione SILENT)
Il flusso dell’aria può essere
controllato in direzione orizzontale
agendo sulle apposite alette di
deviazionearia(g.11).
TRASPORTO DEL
CLIMATIZZATORE
Deve avvenire in posizione
verticale.
In caso di trasporto in posizione
orizzontale attendere almeno un’ora
prima di riavviarlo.
Prima di effettuare il trasporto
scaricare completamente l’acqua
dicondensaaprendoiltappo(g.2
riferimento 4).
Avvertenza
:
Trasporto del climatizzatore su
pavimenti delicati (es. pavimenti
in legno):
• scaricare completamente l’acqua
dicondensaaprendoiltappo(g.
2 riferimento 4).
• prestare particolarmente
attenzione durante gli spostamenti
del climatizzatore in quanto le
ruote potrebbero segnare il
pavimento. Le ruote pur essendo
in materiale rigido e piroettanti,
possono essere danneggiate
dall’uso o essere sporche. Vi
preghiamo pertanto divericare
che le ruote risultino pulite e libere
nel loro movimento.
MANUTENZIONE PERIODICA
Prima di eseguire qualsiasi
operazione di manutenzione
scollegare sempre la spina.
AUTORESTART
In case a black-out occurs, the
appliance stores the former function
mode and start up again when re-
powered by recovering all previous
settings.
AIR FLOW DIRECTION
CONTROL (SILENT version
only)
The air flow can be controlled
horizontally by moving the air
diverter ns (g. 11).
HOW TO TRANSPORT THE
CONDITIONER
The conditioner must be kept
upright during transport.
If it is transported in a horizontal
position, wait at least one hour
before starting it.
Prior to transport, always open the
plug (g. 2 ref. 4) and drain all the
condensation.
Caution
:
Moving the air conditioner on
delicate flooring (e.g. wooden
ooring):
• drain all the condensation water
by opening the plug (g. 2 ref. 4);
• Take great care when moving the
conditioner as the wheels could
mark the ooring. Although the
wheels are made from a rigid
material and are swivelling, they
could get damaged by use or
excessive dirt. We recommend tat
you check they are always clean
and free to move.
ROUTINE MAINTENANCE
Always remove the plug from
the socket before carrying out
any type of maintenance.
REDEMARRAGE AUTOMATIQUE
En cas d’interruption de
l’alimentation électrique, l’appareil
mémorise le dernier mode de
fonctionnement et redémarre, une
fois l’alimentation électrique rétablie,
avec les réglages précédents.
CONTROLE DE LA DIRECTION
DU FLUX D’AIR (uniquement
version SILENT)
Le ux d’air peut êtrecontrôlé en
direction horizontale en agissant
sur les ailettes de déviation de l’air
(g.11).
TRANSPORT DU
CLIMATISEUR
Il doit se faire en position verticale.
Dans le cas de transport en position
horizontale, attendre au moins une
heure avant de le mettre en marche.
Avant d’effectuer le transport,
vidanger complètement la
condensation en enlevant le
bouchon(g.2référence4).
Recommandation
:
Déplacement du climatiseur sur sols
délicats (ex. planchers en bois):
• évacuer complètement l’eau de
condensation en retirant le bouchon
prévuàceteffet(g.2référence4);
• faire très attention lors des
déplacements du climatiseur, car
les roulettes pourraient rayer le
sol. Les roulettes, bien qu’elles
soient réalisées dans un matériau
rigide et qu’elles soient pivotantes,
peuvent s’abîmer à l’usage ou
s’encrasser. Il convient par
conséquent de s’assurer que les
roulettes restent propres et libres
dans leur mouvement.
ENTRETIEN PERIODIQUE
Avant d’effectuer une opération
d’entretien quelconque,
débrancher toujours la che de la
prise de courant.
AUTORESTART
Bei einer Unterbrechung der
Stromversorgung speichert das
Gerät die letzte Betriebsart und
startet nach Wiederherstellung der
elektrischen Energie neu mit den
vorherigen Einstellungen.
KONTROLLE DER
LUFTSTROMRICHTUNG (nur
Version SILENT)
Der Luftstrom kann durch Verstellen
der eigens vorgesehenen
Luftableitrippen in horizontaler
Richtung kontrolliert werden (Abb.
11).
TRANSPORT DER
KLIMAANLAGE
Die Klimaanlage muß in aufrechter
Stellung transportiert werden.
Wird sie in liegender Stellung
transportiert, muß vor dem ersten
Einschalten mindestens eine
Stunde abgewartet werden.
Vor dem Transport erst das
Kondenswasser vollständig
ablassen.
Dazu den Stöpsel entfernen (Abb.
2 Position 4).
Hinweis
:
Transport des Klimagerätes auf
empfindlichen Fußböden (z.B.
Holzfußböden. ):
• den Stopfen öffnen und das
Kondenswasser völlig ablaufen
lassen (Abb. 2 Position 4);
• Handeln Sie mit besonderer
Vorsicht bei der Versetzung des
Klimageräts, da die Räder den
Fußboden zeichnen könnten.
Obwohl die Räder aus steifen
Material und drehbar sind,
können sie durch den Gebrauch
beschädigt werden oder
verschmutzt sein. Prüfen Sie
daher unbedingt, ob die Räder
sauber und frei in der Bewegung
sind.
REGELMÄSSIGE WARTUNG
Vor jedem Wartungseingriff
stets den Netzstecker ziehen.
La page est en cours de chargement...

GB
F
D
40
I
3.19
3.20
3
NETTOYAGE DES FILTRES
DE L’AIR
Pourgarantiruneltrationefcace
de l’air intérieur ainsi qu’un bon
fonctionnement de votre climatiseur,
il est indispensable de nettoyer
périodiquementleltred’air.
La nécessité de procéder à cette
opération d’entretien importante est
signalée au bout d’un temps donné
de fonctionnement, par l’allumage
ducoded’alarmeFisurl’afcheur
du panneau de commande.
Eteindre l’appareil de climatisation
puis décrocher la grille arrière au
moyen de la prise prévue à cet
effet(g.12A).Sortirleltreàairau
moyen de la languette prévue à cet
effet en la pressant vers le bas puis
enlatirantversl’extérieur(g.12B).
Laver le filtre avec un jet d’eau
dirigé dans le sens contraire à
celui d’accumulation de la
poussière. En cas de saletés
particulièrementdifcilesàéliminer
(telle que la graisse ou toute autre
incrustation), il est nécessaire de
plongerpréalablementleltredans
une solution d’eau et de produit
détersif neutre.
Avant de remettre le filtre, le
secouer pour éliminer l’eau
accumulée durant le nettoyage.
Pour éliminer du dispositif
d’affichage du pupitre de
commande le code d’alarme "Fi",
rallumer l’appareil et appuyer
pendant 5 secondes sur la touche
SW1 (g. 7).
NETTOYAGE DU CLIMATISEUR
Débrancher toujours la che dela
prise de courant avant de nettoyer le
climatiseur.Utiliser uniquement des
détergents et non pas de l’essence,
du gazole ni des produits semblables
pour effectuer le nettoyage extérieur
du climatiseur.
Employer un chiffon humide pour
éviter que l’eau pénètre à l’intérieur.
REINIGUNG DER
LUFTFILTER
Um eine gute Filtration der Raumluft
und einen optimalen Betrieb Ihres
Gerätes zu gewährleisten, müssen
der Luftlter regelmäßig gereinigt
werden. Der Zeitpunkt, wann
diese wichtige Wartungsarbeit
durchgeführt werden muss,
wird nach der entsprechenden
Betriebszeit durch das Erscheinen
des Alarmcodes Fi auf dem Display
der Bedienkonsole angezeigt.
Schalten Sie die Klimaanlage ab
und hängen Sie anschließend
den hinteren Rost mit Hilfe des
vorgesehenen Griffs (Abb.12 A) aus.
Ziehen Sie den Luftlter mit Hilfe
der eigens vorgesehenen Lasche
heraus, indem Sie diese nach unten
drücken und anschließend nach
außen ziehen (Abb.12 B).
Das Filter wird ausgewaschen,
indem man die der Schmutzschicht
gegenüber liegende Seite unter
einen Wasserstrahl hält. Ist es sehr
stark verschmutzt (z.B. mit Fett oder
andersartigen Ablagerungen),
sollte es vorher in einer neutralen
Seifenlösung eingeweicht werden.
Schütteln Sie das Filter aus, bevor
Sie es wieder einsetzen, um das
Waschwasser zu entfernen.
Schalten Sie das Gerät ein und
drücken Sie für 5 Sekunden die
Taste SW1 der Bedienkonsole,
damit der Alarmcode vom Display
"Fi" gelöscht wird.
REINIGUNG DER
KLIMAANLAGE
Vor der Reinigung stets den
Netzstecker ziehen.
Zur äußeren Reinigung nur seige
Lösungen benützen. Kein
Reinigungsbenzin, Leichtöl oder
ähnliche Produkte zur Reinigung
verwenden. Nur mit feuchtem Tuch
abwischen. Es darf kein Wasser in
das Gerät gelangen.
CLEANING THE AIR FILTERS
To ensure the indoor air is ltered
correctly and to guarantee that
your air conditioner runs efciently,
it is vital to clean the air filter
regularly.
After a certain amount of time this
important maintenance operation
must be carried out. It is indicated
when the Fi alarm message appears
on the control panel display.
Switch off the air conditioner and
then release the back grill using the
special handle (g.12 A). Take out
the air lter by pressing the special
tab downwards and then pulling it
outwards (g.12 B).
Wash the filters with a water jet
aimed at the side opposite the
accumulation of dust. If the dirt is
particularly difcult to remove (such
as grease or other types of deposit),
rst immerge the lter in a solution
of water and a neutral detergent.
Shake off any water before
reinserting the lters.
To clear alarm code "Fi" from the
control panel display, switch the
appliance back on and press key
SW1 for 5 seconds (g.7).
HOW TO CLEAN THE AIR
CONDITIONER
Always pull out the plug from
the socket before cleaning the
conditioner. Use detergents to clean
the outside. Never use gasoline, fuel
oil or similar products. Use a moist
cloth to avoid water leaking into the
conditioner.
PULIZIA DEI FILTRI
DELL’ARIA
Per garantire una efficace
filtrazione dell’aria interna ed un
buon funzionamento del Vostro
climatizzatore è indispensabile
pulire periodicamente il filtro
dell’aria.
La segnalazione della necessità
di questa importante operazione
di manutenzione, viene segnalata
dopo un congruo periodo di
funzionamento, dalla accensione
del codice allarme Fi sul display
del pannello comandi. Spegnere il
climatizzatore e successivamente
sganciare la griglia posteriore
tramite la apposita presa (fig.12
A).Estrarre il ltro dell’aria tramite
la apposita linguetta premendola
verso il basso e poi tirandola verso
l’esterno(g.12B).
Il ltro deve essere lavatotramite
un getto d’acqua rivolto nella
direzione opposta a quella di
accumulo della polvere. Nel caso di
sporco particolarmente difcile da
togliere (come unto o incrostazioni
di altro tipo) è necessario immergere
preventivamente il ltro stesso in
una soluzione di acqua e detersivo
neutro.
Prima di reinserire il filtro è
opportuno scuoterlo per eliminare
l’acqua accumulata durante il
lavaggio.
Per eliminare dal display del
pannello comandi il codice
allarme "Fi",riaccendere
l'apparecchio e premere per 5
secondi il tasto SW1 (g.7)".
PULIZIA DEL CLIMATIZZATORE
Prima di pulire il climatizzatore
scollegare sempre la spina.
Per la pulizia esterna utilizzare
solo detergenti e non benzina,
gasoliooprodottiafni.
Utilizzare un panno umido per
evitare che l’acqua penetri
all’interno.
12
A B
La page est en cours de chargement...

GB
F
D
42
I
RANGER LE CLIMATISEUR
EN FIN DE SAISON
•Débrancher la che de la prise
de courant;
•Nettoyerleltreàair;
• Vidanger complètement l’eau de
condensation en enlevant le
bouchon(g.2référence4).
MONTAGE ET
ENTRETIEN DES FILTRES
SUPPLEMENTAIRES
(uniquement version
SILENT)
Eteindre l’appareil de climatisation,
démonterlagrillearrièreetleltre
à air selon la procédure décrite
au chapitre “NETTOYAGE DES
FILTRES A AIR”.
Ensuite, monter deux filtres
supplémentaires dans le logement
prévu à cet effet de la façon indiquée
àlagure13.
Remonter le ltre à air et la grille
arrière.
Il est nécessaire de procéder au
remplacement au bout de 500
heures d’utilisation environ.
Pour assurer un bon fonctionnement
du système de filtrage, il est
conseillé d’utiliser uniquement
des pièces originales OLIMPIA
SPLENDID.
AUFBEWAHRUNG DER
KLIMAANLAGE FÜR
LÄNGEREN STILLSTAND
• Netzstecker ziehen;
• Luftlter reinigen;
• Stöpsel ziehen und
Kondenswasser vollständig
leeren (Abb. 2 Position 4).
MONTAGE UND WARTUNG
DER ZUSATZFILTER (nur
Version SILENT)
Schalten Sie die Klimaanlage aus
und montieren Sie den hinteren
Rost und den Luftlter ab, indem
Sie die im Kapitel “REINIGUNG
DES LUFTFILTERS” angegebene
Prozedur befolgen.
Montieren Sie anschließend die
2 Zusatzfilter im vorgesehenen
Schacht, wie in der Abbildung 13
dargestellt.
Montieren Sie den Luftlter und den
hinteren Rost wieder.
Nach zirka 500 Betriebsstunden
ist die Auswechselung erforderlich.
Zur Gewährleistung des den
einwandfreien Betriebs des
Filtriersystems sollten nur
Originalersatzteile von OLIMPIA
SPLENDID verwendet werden.
STOWING THE
CONDITIONER AT THE END
OF THE SEASON
• Pull out the plug;
• Clean the air lter;
• Remove the specic plug and drain
all the condensation (g. 2 ref. 4).
FITTING AND MAINTAINING
ADDITIONAL FILTERS
(SILENT version only)
Switch off the air conditioner,
remove the back grill and the
air filter as described in chapter
“CLEANING AIR FILTERS”.
Then t 2 additional lters in the
compartment as illustrated in gure
13.
Ret the air lter and the back grill.
The filter needs replacing after
approximately 500 hours of use.
Use solely original OLIMPIA
SPLENDID spare parts to ensure
the filtering system continues to
work correctly.
RIPORRE IL
CLIMATIZZATORE A FINE
STAGIONE
• Scollegare la spina;
•Pulireilltrodell’aria;
• Scaricare completamente
l’acqua di condensa togliendo il
tappo(g.2riferimento4).
MONTAGGIO E
MANUTENZIONE FILTRI
ADDIZIONALI (solo versione
SILENT)
Spegnere il climatizzatore,
smontare la griglia posteriore e il
ltro aria seguendo la procedura
indicata nel capitolo “PULIZIA
FILTRI DELL’ARIA”.
Successivamente montare 2 ltri
addizionali nell’apposito vano come
illustratoingura13.
Rimontare il ltro aria ela griglia
posteriore.
E' necessario procedere alla
sostituzione dopo circa 500 ore di
utilizzo.
Per un corretto funzionamento
del sistema filtrante si consiglia
di utilizzare unicamente ricambi
originali OLIMPIA SPLENDID".
3.21
3.22
13
La page est en cours de chargement...
La page est en cours de chargement...
La page est en cours de chargement...
La page est en cours de chargement...
La page est en cours de chargement...
La page est en cours de chargement...
La page est en cours de chargement...
La page est en cours de chargement...
La page est en cours de chargement...
La page est en cours de chargement...
La page est en cours de chargement...
La page est en cours de chargement...
La page est en cours de chargement...
La page est en cours de chargement...
-
 1
1
-
 2
2
-
 3
3
-
 4
4
-
 5
5
-
 6
6
-
 7
7
-
 8
8
-
 9
9
-
 10
10
-
 11
11
-
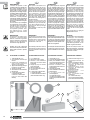 12
12
-
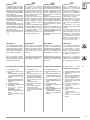 13
13
-
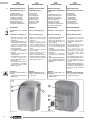 14
14
-
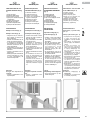 15
15
-
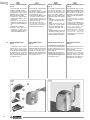 16
16
-
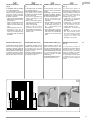 17
17
-
 18
18
-
 19
19
-
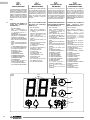 20
20
-
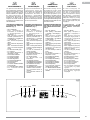 21
21
-
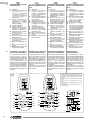 22
22
-
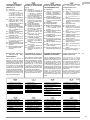 23
23
-
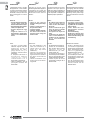 24
24
-
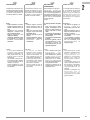 25
25
-
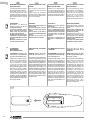 26
26
-
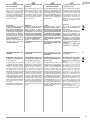 27
27
-
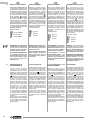 28
28
-
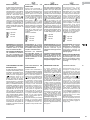 29
29
-
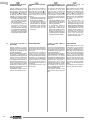 30
30
-
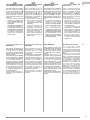 31
31
-
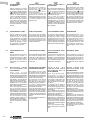 32
32
-
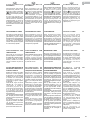 33
33
-
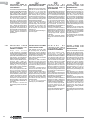 34
34
-
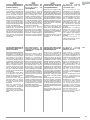 35
35
-
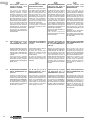 36
36
-
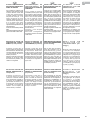 37
37
-
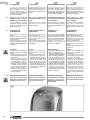 38
38
-
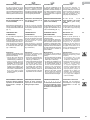 39
39
-
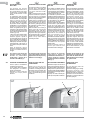 40
40
-
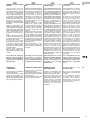 41
41
-
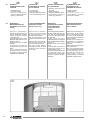 42
42
-
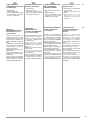 43
43
-
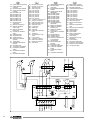 44
44
-
 45
45
-
 46
46
-
 47
47
-
 48
48
-
 49
49
-
 50
50
-
 51
51
-
 52
52
-
 53
53
-
 54
54
-
 55
55
-
 56
56


Olimpia Splendid DOLCECLIMA nano silent Manuel utilisateur
- Catégorie
- Téléphones
- Taper
- Manuel utilisateur
- Ce manuel convient également à
dans d''autres langues
- italiano: Olimpia Splendid DOLCECLIMA nano silent Manuale utente
- English: Olimpia Splendid DOLCECLIMA nano silent User manual
- español: Olimpia Splendid DOLCECLIMA nano silent Manual de usuario
- Deutsch: Olimpia Splendid DOLCECLIMA nano silent Benutzerhandbuch
- Nederlands: Olimpia Splendid DOLCECLIMA nano silent Handleiding
- português: Olimpia Splendid DOLCECLIMA nano silent Manual do usuário
Documents connexes
-
 Olimpia Splendid Dolceclima Nano Manuel utilisateur
-
Olimpia Splendid PIU+ Le manuel du propriétaire
-
 Olimpia Splendid Issimo Manuel utilisateur
-
 Olimpia Splendid Remote control for built-in controls Manuel utilisateur
-
Olimpia Splendid DOLCECLIMA cube Manuel utilisateur
-
Olimpia Splendid DOLCECLIMA Compact Manuel utilisateur
-
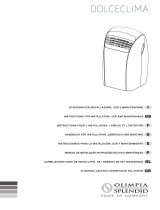 Olimpia Splendid DOLCECLIMA 10 HP Manuel utilisateur
-
Olimpia Splendid ELLISSE Manuel utilisateur
-
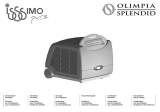 Olimpia Splendid Issimo Pure 10 Manuel utilisateur
-
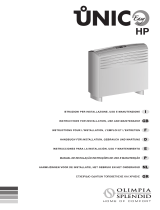 Olimpia Splendid UNICO EASY Manuel utilisateur


