
Stereo Control
035 86
Part. U2695C - 09/09-01 PC
Notice d’installation
Installation manual

Français 3
FR
English 11
UK

3
Table des matières
FR
1 - Introduction __________________________________________________ 4
1.1 - Avertissements et conseils __________________________________________ 4
1.2 - Contenu de l’emballage ____________________________________________ 4
1.3 - Description générale ______________________________________________ 5
2 - Installation __________________________________________________ 6
2.1 - Schéma de branchement ___________________________________________ 6
3 - Conguration _________________________________________________ 8
3.1 - Programmation __________________________________________________ 8
3.2 - Rétablissement ___________________________________________________ 8
4 - Éventuels problèmes et solutions ____________________________________ 9

4
1 - Introduction
1.1 - Avertissements et conseils
Avant de procéder à l’installation du module, il est important de lire attentivement la présente
notice.
Le fabricant décline toute responsabilité en cas de dommages causés par une mauvaise
utilisation et/ou une utilisation non conforme aux instructions gurant dans la présente
notice.
1.2 - Contenu de l’emballage
L’emballage du Contrôle Stéréo contient:
c Contrôle Stéréo 035 86
c Câble avec émetteur IR
c Câble RCA-RCA
c Câble du connexion au bus (2 mètres)
c Instructions d’utilisation
c CD

5
1.3 - Description générale
Le Contrôle Stéréo est un dispositif qui permet l’interfaçage, l’isolation, l’adaptation de niveau
et le contrôle à travers des signaux infrarouges entre une source stéréo externe et le BUS de
diusion sonore.
Le dispositif permet de mémoriser et de dupliquer des codes de télécommande à infrarouges sur
une plage de fonctionnement comprise entre 30 Khz et 80 Khz.
Contrôler attentivement cette caractéristique et au besoin contacter l’assistance technique Legrand
pour s’assurer de la compatibilité.
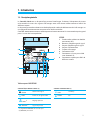
1 - Introduction
8
7
6
1
2
345
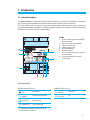
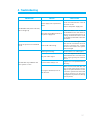
LEGEND
1 Entrée audio stéréo avec double
connecteur RCA
2 Boutons d’équilibrage du signal
3 Voyant d’équilibrage du signal
4 Voyant d’alimentation
5 Capteur infrarouge
6 Connecteur USB
7 Connecteur 3,5 mm pour câble
avec émetteur IR
8 Connecteur 8 pôles pour BUS de
diusion sonore
VOYANT ALIMENTATION (7)
VERT
Stand/by
JAUNE
On
VOYANT ÉQUILIBRAGE SIGNAL (8)
ÉTEINT
Absence de signal
VERT
Présence de signal audio
VERT
(1)
Réglage optimal
ORANGE
(2)
Signal trop élevé
1 clignotant ORANGE sur les seuls pics
2 ORANGE persistant
Tableau voyants INDICATEURS

6
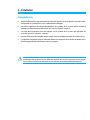
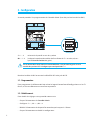
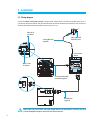
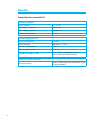
2.1 - Schéma de branchement
Installer le câble avec émetteur IR, en appliquant la partie adhésive de l’émetteur à proximité (à
une distance max. de 1 cm) du récepteur IR de la source (ne pas brancher l’émetteur au-dessus
du récepteur IR). La distance maximum entre le dispositif et la source est de 1 m.
2 - Installation
5 6 7 8
Émetteur IR adhésif
Capteur IR
source stéréo
Câble BUS longueur
2 m (fourni)
Câble avec émetteur IR
longueur 1,8 m (fourni)
Contrôle stéréo
035 86
Câble RCA/RCA
(fourni)
Bus diusion sonore
Bornes 5 et 6
Attention: ne pas augmenter la longueur du câble à émetteur IR.
En cas d’utilisation de la sortie casque du système Hi-Fi, veiller à bien régler le volume.

7
2 - Installation
c Avant d’eectuer la programmation du Contrôle Stéréo, s’assurer que les piles de la télé-
commande du système Hi-Fi sont susamment chargées.
c Contrôler la position du voyant de réception du système Hi-Fi et positionner le câble à
émetteur IR à une distance maximum de 1 cm par rapport à celui-ci
c S’assurer de la présence d’un seul voyant sur le système Hi-Fi (il n’est pas possible de
contrôler plusieurs voyants - sources).
c Durant l’utilisation du Contrôle Stéréo, ne pas utiliser la télécommande du système Hi-Fi.
c La capacité d’apprentissage du Contrôle Stéréo est comprise entre 30 Khz et 80 Khz, hors
de cette plage le fonctionnement n’est pas garanti.
Compte tenu des constantes évolutions technologiques et fonctionnelles (télécommandes à
infrarouges) des systèmes Hi-Fi, le fabricant conseille de s’assurer, auprès du Centre d’appel
ou du Centre d’assistance technique le plus proche, de la compatibilité du dispositif.
RECOMMANDATIONS

8
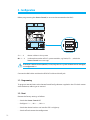
S = 1 – 4 adresse du dispositif au sein du système
M1 = 1 – 4 (indiquer le nombre de modules de l’installation Hi-Fi - ex.radio, cd, etc. -
que le Contrôle Stéréo doit gérer).
Brancher le câble du BUS et ensuite le câble RCA-RCA et le jack de l’IR.
3 - Conguration
Avant de procéder à la programmation du Contrôle Stéréo (il ne doit pas être branché au BUS):
3.1 - Programmation
Pour programmer la référence 035 86, utiliser le logiciel StereoControlCong présent sur le CD
fourni, en faisant référence au manuel correspondant.
3.2 - Rétablissement
Pour rétablir les réglages usine, procéder comme suit:
- Couper l’alimentation du Contrôle Stéréo
- Congurer: S = –; M1 = –; M2 = 9
- Rétablir l’alimentation du dispositif et attendre que le voyant 3 s’allume
- Couper l’alimentation et rétablir la conguration
En cas d’utilisation de la matrice multicanal 035 86, il est possible de gérer un seul
module du système Hi-Fi. Congurer par conséquent M1 = 1.

9
4 - Éventuels problèmes et solutions
PROBLÈME CAUSE SOLUTION
Le voyant ON/OFF (indicateur
d’état) ne s’allume pas
Alimentateur installation en
protection.
Contrôler et éliminer la cause du
court-circuit.
Charger l’alimentateur.
Absence de tension 27 Vdc sur la
borne BUS de l’alimentateur.
S’assurer de la présence de tension
24 – 27 Vdc sur la sortie OUT du
nœud A/V de connexion. En cas
d’absence de tension, éliminer le
court-circuit du BUS sur le côté du
nœud A/V
Le système Hi-Fi n’est pas
commandé via IR
Mauvais branchement du câble IR.
Contrôler et corriger le câblage:
le câble à émetteur IR doit se
trouver à 1 cm du récepteur IR du
système Hi-Fi à contrôler.
Quand le système Hi-Fi est allumé,
le voyant ADJ reste éteint.
Signal audio absent.
S’assurer de la présence du
signal audio.
Signal audio très faible.
Contrôler le réglage du poten-
tiomètre d’adaptation du niveau
ou augmenter le niveau du signal
fourni par la source externe.
Le voyant de niveau reste rouge.
Procéder au réglage du poten-
tiomètre d’adaptation du niveau.
Distorsion du signal reproduit y
compris à faible volume.
S’assurer que le voyant de niveau
ne devient pas orange durant la
reproduction des morceaux. Régler
le potentiomètre du système Hi-Fi
allumé de telle sorte que le voyant
soit toujours vert (seuls de brefs
allumages de couleur orange sont
admis lors des pics musicaux).

10
Appendice
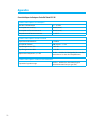
Caractéristiques techniques Contrôle Stéréo 035 86
CARACTÉRISTIQUES TECHNIQUES
Tension d’alimentation 18 – 27 Vdc
Absorption en stand-by 20 mA (max)
Absorption en fonctionnement 40 mA (max)
Température de fonctionnement 5 – 35 °C
CARACTÉRISTIQUES AUDIO STÉRÉO
Impédance d’entrée RCA 14 Kohm
Sensibilité d’entrée 200 mVrms – 1 Vrms
Équilibrage canaux TYP ± 0.5 dB
Équilibrage canaux MIN ± 1.5 dB
Réponse en fréquence @ -3 dB
20 Hz – 20 Khz (de l’intégralité du transfert,
mesurée sur la sortie de l’amplificateur).
CARACTÉRISTIQUES SIGNAUX INFRAROUGES
Capacité d’apprentissage
30 Khz – 80 Khz (hors de cette plage le
fonctionnement n’est pas garanti).

11
Contents
UK
1 - Introduction _________________________________________________ 12
1.1 - Warnings and tips__ ______________________________________________ 12
1.2 - Package content _________________________________________________ 12
1.3 - General description ______________________________________________ 13
2 - Installation _________________________________________________ 14
2.1 - Wiring diagram __________________________________________________ 14
3 - Conguration ________________________________________________ 16
3.1 - Programming ___________________________________________________ 16
3.2 - Reset __________________________________________________________ 16
4 - Troubleshooting ______________________________________________ 17
Appendix ___________________________________________________________ 18

12
1 - Introduction
1.1 - Warnings and tips
Before installing the module read this manual carefully.
The manufacturer declines all responsibility for any damage due to incorrect use and/or
use which does not conform to the instructions of this manual.
1.2 - Package content
The Stereo Control package contains:
c Stereo Control 035 86
c Cable with IR transmitter
c RCA-RCA cable
c Cable for connection to the BUS (2 metres)
c Instruction sheet
c CD

13
1.3 - General description
The Stereo Control is a device which allows the interfacing, insulation, level adaptation and control
via infrared signals between an external stereo source and the sound system BUS.
The item enables you to store and replicate infrared remote control codes with an operating
range between 30Khz and 80Khz. Carefully check this feature and if necessary contact Legrand’s
technical assistance to verify its compatibility.
1 - Introduction
8
7
6
1
2
345
POWER SUPPLY LED (4)
GREEN
Stand by
YELLOW
On
SIGNAL BALANCE LED (3)
OFF
No signal
GREEN
Audio signal present
GREEN(1)
Best setting
ORANGE(2)
Signal too high
(1) ORANGE ashing on the peaks only
(2) Continuous ORANGE
Led indication tables
LEGEND
1 Audio stereo input with double
RCA connector
2 Signal balance pushbuttons
3 Signal balance LED
4 Power supply LED
5 Infrared detector
6 USB Connector
7 3.5 mm connector for cable with
IR transmitter
8 8-pole connector for sound
system BUS

14
2.1 - Wiring diagram
Install the cable with IR transmitter, applying the adhesive part of the transmitter close (max 1
cm) to the source IR receiver (do not connect the transmitter above the IR receiver). The maximum
distance between the device and the source must be 1 m.
2 - Installation
5 6 7 8
Adhesive IR
transmitter
Stereo source
IR detector
2 m long BUS cable
(supplied)
1.8 m long cable with IR
transmitter(supplied)
Stereo control
035 86
RCA/RCA cable
(supplied)
Sound system BUS
Terminals 5 and 6
Please note: do not increase the cable length with an IR transmitter. If you use the Hi-
system headphone output, mind the level of the volume.

15
2 - Installation
c Before programming the Stereo Control, make sure that the remote control batteries of
your Hi-Fi are suciently charged.
c Check the position of the Hi-Fi system LED and place the cable with the IR transmitter at
a maximum distance of 1 cm from it.
c Make sure there is only one Hi-Fi LED (it is not possible to manage several source-LEDs).
c When using the Stereo Control, do not use the remote control of the Hi- system.
c The pickup capacity of the Stereo Control is between 30 Khz and 80 Khz;
operation outside this range is not guaranteed.
Given the continuous technical and functional developments (infrared remote controls) of
Hi-Fi systems, the manufacturer recommends to check the compatibility of the device. To
do so, please contact the Call Centre or your nearest Technical Service Centre.
WARNINGS

16
S = 1 – 4 device address in the system
M1 =1 – 4 (indicate the number of Hi-Fi system modules, e.g. Radio, CD…, which the
Stereo Control must manage)
Connect the BUS cable and then the RCA-RCA cable and the IR jack.
3 - Conguration
Before programming the Stereo Control (it must not be connected to the BUS):
3.1 - Programming
To program item 035 86 use the StereoControlCong software supplied in the CD which comes
with the device, referring to its manual.
3.2 - Reset
Restore the factory settings as follows:
- Switch the Stereo Control o
- Congure: S = – ; M1 = – ; M2 = 9
- Switch the device back on and wait for LED 3 to light up
- Switch o and restore the conguration
If the multi-channel matrix (035 84) is used, only one Hi-Fi system module can be managed,
so congure M1=1.

17
4 - Troubleshooting
PROBLEM CAUSE SOLUTION
The ON/OFF LED (status indicator)
does not light up
Power supply unit in protection
mode.
Check and eliminate the cause of
the short-circuit.
Replace the power supply unit.
No 27 Vdc on the BUS terminal of
the power supply unit.
Make sure there is 24 – 27 Vdc at
the OUTPUT of the A/V Node to
which it is connected. If there is no
voltage, eliminate the short-circuit
on the BUS (at the OUT side of the
A/V Node).
The Hi-Fi system is not controlled
via IR
Incorrect IR cable wiring.
Check and correct wiring the cable
with the IR transmitter must be
placed at a distance of 1 cm from
the IR receiver of the Hi-Fi system
to be managed.
The ADJ LED stays o when the
Hi-Fi system is active
Audio signal missing. Check if there is an audio signal.
Very low audio Signal.
Check the adjustment of the level
potentiometer or increase the level
of the signal given by the external
source.
The level LED is always red.
Adjust the level potentiometer
correctly.
The signal is distorted, even at
low volumes.
Make sure the level LED does not
turn orange when playing tracks.
Adjust the potentiometer of the
active Hi-Fi system so that the LED
is always green (it can only turn
orange for a very short time, during
musical peaks).

18
Appendix
Technical data Stereo Control 035 86
RATING PLATE DATA
Supply voltage: 18 – 27 Vdc
Absorption in stand-by 20 mA (max)
Absorption in operation 40 mA (max)
Operating temperature 5 – 35 °C
AUDIO STEREO FEATURES
RCA input impedance 14 Kohm
Input sensitivity 200 mVrms – 1 Vrms
Balancing TYP channels ± 0.5 dB
Balancing MIN channels ± 1.5 dB
Frequency range @ -3 dB
20 Hz – 20 Khz (of the entire transfer,
measured on the amplifier output).
INFRARED SIGNAL FEATURES
Learning capacity
30 Khz – 80 Khz (operation outside this range
is not guaranteed).


World Headquarters and
International Department
87045 LIMOGES CEDEX FRANCE
: 33 5 55 06 87 87
Fax : 33 5 55 06 74 55
www.legrandelectric.com
Legrand reserves at any time the right to modify the contents of this booklet and to communicate, in any form and modality, the
changes brought to the same.
-
 1
1
-
 2
2
-
 3
3
-
 4
4
-
 5
5
-
 6
6
-
 7
7
-
 8
8
-
 9
9
-
 10
10
-
 11
11
-
 12
12
-
 13
13
-
 14
14
-
 15
15
-
 16
16
-
 17
17
-
 18
18
-
 19
19
-
 20
20


dans d''autres langues
- English: Legrand 035 86 Installation guide
Autres documents
-
Ecler PKUB Manuel utilisateur
-
AKG HEARO 999 AUDIOSPHERE II Le manuel du propriétaire
-
Ecler CA40 Manuel utilisateur
-
Ecler CA120 Manuel utilisateur
-
AKG Acoustics K 105 UHF Manuel utilisateur
-
-
Yamaha MG124C (French) Manuel Du Propriétaire
-
-