Zigmund & Shtain CIS 299.60 BX Manuel utilisateur
- Catégorie
- Plaques de cuisson
- Taper
- Manuel utilisateur
Ce manuel convient également à

ITALIANO
IT
DEUTSCH
D
ENGLISH
GB
ESPAÑOL
E
FRANÇAIS
F
IT
GB
D
E
F
PIANO INDUZIONE VETROCERAMICA
- Istruzioni d'uso e manutenzione
INDUCTION GLASS CERAMIC COOKTOP
- Use and maintenance instructions
ELEKTRO GRASKERAMIK INDUKTIONS KOCHFELD
- Bedienungs und Wartungsanleitung
PLANO INDUCCION VIDRIOCERAMICA
- Instrucciones de uso y mantenimiento
TABLE INDUCTION VETROCERAMIQUE
- Instructions pour l’utilisation et manutention
RU
-
FRANÇAIS
RU
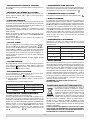
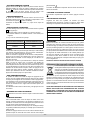
200
1,85kW
160
1,4kW
160
1,4kW
160
1,4kW
P:1,85kW
P: 2,1kW
6,75 kW

- 2 -
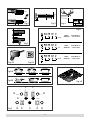
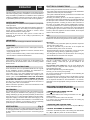
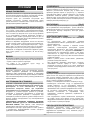
506 mm
560 mm
576 mm
490 mm
50 mm
50 mm
Fig.1

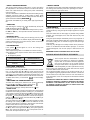
- 3 -
min. 50 mm
51
mm
20 mm
NO
YES
~ 2 mm
Induction
Fig.3
Fig.4
Fig.5
Fig.6
Fig.7A
Fig.7B
Fig.8A
Fig.10
Fig.8B
Fig.9
Fig.2
40 mm
30 mm
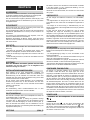
400V~
50/60 Hz
4 x 1.5 mm²
H 05 V2V2 - F
N
L2 L1
2P+N
L2
L1
2P
N
L
1P+1N
230V~
50/60 Hz
3 x 2.5 mm²
H 05 V2V2 - F
230V~
50/60 Hz
2 x 2.5 mm²
H 05 V2V2 - F
D
B E EA B
BB
F F

- 4 -
GENERALITÀ
Leggere attentamente il contenuto del presente libretto in
quanto fornisce importanti indicazioni riguardanti la sicurezza di
installazione, d’uso e di manutenzione.
Conservare il libretto per ogni ulteriore consultazione.
Tutte le operazioni relative all’installazione (connessioni elettriche)
devono essere effettuate da personale specializzato in conformità
delle norme vigenti.
AVVERTENZE PER LA SICUREZZA
Questo apparecchio non e adatto per l’uso da parte di bambini o
persone che necessitano di supervisione.
Per ragioni di sicurezza, non appoggiare mai oggetti ferromagnetici
di grandi dimensioni (ad es. placche da forno per torte) sulla zona di
cottura del piano in vetroceramica.
Per i portatori di pacemaker si consiglia di consultare un medico
prima di utilizzare le zone di cottura ad induzione.
Oggetti metallici quali coltelli, forchette, cucchiai o coperchi non
possono scaldarsi.
IMPORTANTE:
Dopo l’uso, spegnere il piano di cottura tramite il suo
dispositivo di comando.
- Evitare le fuoriuscite di liquido, pertanto per bollire o riscaldare
liquidi, ridurre l’alimentazione di calore.
- Non lasciare gli elementi riscaldanti accesi senza recipienti o con
recipienti vuoti.
- Una volta terminato di cucinare, spegnere la relativa resistenza
tramite il comando indicato in seguito.
ATTENZIONE :
sistema ad induzione.
I recipienti devono quindi contenere ferro.
ISTRUZIONI PER L’INSTALLAZIONE
Le presenti istruzioni sono rivolte ad un installatore specializzato
e fungono da guida per l’installazione, la regolazione e la
manutenzione in conformità delle leggi e delle norme vigenti. Se
un forno da incasso o qualsiasi altra apparecchiatura che genera
calore deve essere montato direttamente sotto il piano di cottura in
vetroceramica,
È NECESSARIO CHE TALE APPARECCHIATURA (forno)
E IL PIANO DI COTTURA IN VETROCERAMICA SIANO
ADEGUATAMENTE ISOLATI, in modo tale che il calore generato
dal forno, misurato sul lato destro del fondo del piano di cottura, non
superi i 60°C.
Il mancato rispetto di tale precauzione potrebbe determinare l’errato
funzionamento del sistema TOUCH CONTROL.
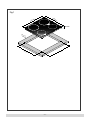
POSIZIONAMENTO
l’elettrodomestico sul piano
di lavoro mediante i 4 sostegni, tenendo presente lo spessore
necessario montare un pannello separatore rispettando le distanze
VENTILAZIONE (Fig.5)
La distanza tra il piano di cottura e i mobili da cucina o gli apparecchi
di pirolisi.
CONNESSIONI ELETTRICHE (Fig.6)
- le caratteristiche dell’impianto siano tali da soddisfare le indicazioni
obbligatoria per legge.
Nel caso in cui l’elettrodomestico non sia dotato di cavo e/o della
relativa spina, utilizzare materiale adatto per l’assorbimento indicato
necessario interporre un interruttore omnipolare, con un’apertura
minima di 3mm fra i contatti, appropriato al carico indicato nella
targhetta e conforme alle norme vigenti (il conduttore di terra giallo/
verde non deve essere interrotto dal commutatore). Terminata
l’installazione dell’apparecchiatura, l’interruttore omnipolare deve
essere facilmente raggiungibile.
USO
trasferimento diretto dell’energia riscaldante dal generatore al
recipiente di cottura.
Vantaggi:
sulla zona di cottura.
- Il calore viene generato solo sul fondo del recipiente e trasmesso
direttamente al cibo da cuocere.
- Tempi di riscaldamento ridotti e basso consumo di energia durante
l’inizio cottura, consentono un risparmio globale di energia.
- Il piano in vetroceramica rimane freddo. Il calore che si avverte sul
RECIPIENTI PER LA COTTURA
per il sistema ad induzione. I recipienti devono quindi contenere
ferro.
In questo modo l’energia può essere
utilizzata in modo ottimale. Un fattore non trascurabile nella cottura
recipienti con fondi di vari diametri. E’ comunque preferibile utilizzare
la zona di cottura appropriata al diametro
della pentola che si vuole
utilizzare.
ACCENSIONE PIANO COTTURA:
• Collegare il piano alla rete elettrica
• ACCENSIONE DEL PIANO
Premere per accendere il piano, (i display delle zone di cottura
visualizzeranno
in attesa di selezione.
Il comando rimarrà acceso per un tempo di 20 secondi, se in que-
sto tempo nessuna funzione sarà selezionata il piano cottura si
spegnarà automaticamente.
ITALIANO
IT

- 5 -
• SELEZIONE DELLA ZONA DI COTTURA
Per selezionare la zona di cottura desiderata, si deve premere uno
dei tasti (B).
• REGOLARE LA POTENZA DI COTTURA
Per aumentare / diminuire la potenza della zona di cottura sele-
zionata, agire sui polsanti - (D) o + (C). La potenza può essere
impostata da 0 a 9.
• FUNZIONE BOOSTER
Questa funzione riduce ulteriormente il tempo di cottura di una data
zona portando la temperatura alla massima potenza per un intervallo
di 10 minuti. Al termine di questo intervallo la potenza della zona di
cottura torna automaticamente al livello 9.
brevissimi di grandi quantità di liquidi (es. acqua per la cottura della
pasta) o pietanze.
Durante la regolazione del livello di potenza della zona di cottura
selezionata, dopo il livello 9 si entra in modalità BOOSTER indi-
cato dal simbolo
.
quella in basso a sinistra.
• USO DEL TIMER
Dopo aver selezionato la zona di cottura, premere contemporane-
amente i tasti C e D , sul display verranno visualizzati
.
Agendo sui tasti C e D aumenteremo o diminuiremo il tempo ( in
minuti da 00 min. a 99 min. ). La funzione timer può dirsi attivata
quando lampeggerà il led del decimale sul display della zona cot-
tura selezionata. Al termine del tempo impostato sarà emesso un
segnale acustico di avvertimento e la zona di cottara si spegnerà
automaticamente.
Questo procedimento è attivabile per ogni singola zona di
cottura.
• CALORE RESIDUO:
a 50°) dopo essere stata spenta, il display relativo a quella zona
mostra il simbolo
(calore residuo). L’indicazione scompare solo
• RICONOSCIMENTO PENTOLE:
Se su uno dei display, che indica la potenza, di una zona di cottura,
dovesse comparire il simbolo
dall’apparecchio.
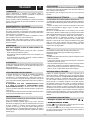
DIAMETRO ZONA COTTURA DIAMETRO MINIMO PENTOLA
Ø 200 mm
• FUNZIONE EGG TIMER/PROMEMORIA:
E’ possibile impostare un promemoria acustico.
Premere contemporaneamente sui tasti C e D
, ora agendo su uno
dei due tasti si può
minuti. Allo scadere del tempo impostato verrà emesso un segnale
acustico che potrà essere disattivato premendo un qualsiasi tasto
dell’area comandi. Le zone cottura precedentemente in funzione
rimarranno attive. La funzione EGG TIMER rimane attiva anche
dopo lo spegnimento dell’apparecchio. Per disattivare questa
funzione si deve riportare a
i display del timer
agendo sul
tasto D.
• SPEGNIMENTO ZONE COTTURA:
Per spegnere una zona di cottura,
selezionare la zona desiderata, si
deve premere contemporaneamente i tasti C e D oppure agendo
sul tasto D
.
• SPEGNIMENTO PIANO COTTURA:
Per spegnere completamente il piano di cottura premere il tasto .
• BLOCCO COMANDI:
intenzionali alle regolazioni del piano (bambini, operazioni di pulizia,
ecc.). Per attivare il blocco comandi premere contemporaneamente i
tasti B (destro) e D poi nuovamente il tasto B
il simbolo L per segnalare l’avvenuto blocco dei comandi.Per
i tasti B e D e poi nuovamente il tasto D
simbolo 0 e sarà possibile agire nuovamente sui comandi. Quando
cottura, in questo caso il blocco comandi rimane attivo anche alla
riaccensione del piano.
• SPEGNIMENTO DI SICUREZZA:
automaticamente il grill trascorso il tempo limite di accensione ad
una data potenza.
POTENZA TEMPO LIMITE ACCENSIONE (ore)
6
3 - 4 5
5 4
•
MANUTENZIONE
Pulire l’area riscaldata nel miglior modo possibile utilizzando prodotti
idonei ed un panno-carta, quindi sciacquare con acqua e asciugare
con un panno pulito. Mediante lo speciale raschietto rimuovere
immediatamente dall’area riscaldata di cottura frammenti di fogli di
alluminio e materiale plastico scioltisi inavvertitamente o residui di
zucchero o di cibi ad elevato contenuto di zucchero. In questo modo
si devono utilizzare spugnette abrasive o detergenti chimici irritanti
quali spray per forno o smacchiatori.
ATTENZIONE: NON DEVE ESSERE UTILIZZATO UN
PULITORE A VAPORE.
DISMISSIONE DEGLI ELET TRODOMESTICI
apparecchiature elettriche ed elettroniche (RAEE),
prevede che gli elettrodomestici non debbano essere
Gli
apparecchi dismessi devono essere raccolti
separatamente per ottimizzare il tasso di recupero e
riciclaggio dei materiali che li compongono ed impedire potenziali
riportato su tutti i prodotti per ricordare gli obblighi di raccolta
separata. Per ulteriori informazioni, sulla corretta dismissione degli
elettrodomestici, i detentori potranno rivolgersi al servizio pubblico
preposto o ai rivenditori.
SI DECLINA OGNI RESPONSABILITÀ PER EVENTUALI DANNI
PROVOCATI DALLA INOSSERVANZA DELLE SUDDETTE AVVERTENZE.
LA GARANZIA NON E’ VALIDA NEL CASO DI DANNI DERIVANTI DALLA
INOSSERVANZA DELLE SUDDETTE AVVERTENZE.

- 6 -
ENGLISH
GB
GENERAL
instructions regarding safety of installation, use and maintenance.
relating to installation (electrical connections) must be carried out
by specialised personnel in accordance with current regulations.
SAFETY INSTRUCTIONS
This apparatus is not suitable for use by children or people who
need supervision.
People carrying pacemakers are advised to consult a doctor
before using the induction cooking zones.
be placed on the surface of the cooking top because they can
become heated.
IMPORTANT:
After use, switch the cooking top off with the command device.
IMPORTANT:
- Avoid spilling liquid, therefore to boil or heat liquids, reduce the
heat.
- Please ensure when the appliance is turned on, that there are no
empty pots left on top.
element with the command indicated below.
WARNING
If the surface of the hob is cracked, turn off the appliance and
disconnect from the electrical main in order to avoid any possible
electric shocks.
INSTALLATION INSTRUCTIONS
These instructions are for a specialized installer and are a guide
for the installation process, regulations and maintenance in
accordance with the law and current standards.
If the built-in oven or any other appliances that produce heat,
need to be installed directly underneath the cooking hobs in
ceramic glass, IT IS NECESSARY THAT THE APPLIANCE
(oven) AND THE COOKING HOBS IN CERAMIC GLASS ARE
ADEQUATELY ISOLATED, in such a way that the heat generated
from the oven, measured on the right hand side of the bottom of
the cooking hobs, does not exceed 60°C.
TOUCH CONTROL system.
POSITIONING
The domestic appliance was built in order to be encased on a work
lower part of the appliance after installation, is accessable via the
lower part of the furniture, it is necessary to mount a separating
VENTILATION (Fig.5)
the distance between the cooktop and built-in kitchen’s furnitures
air. Not to use the cooktop if in the oven is in course the pyrolysis
process.
ELECTRICAL CONNECTIONS (Fig.6)
the laws and current standards.
Grounding is mandatory by law. If the domestic appliance is not
supplied with a cable and/or suitable plug, use material suitable for
operating temperature. If wishing to make a direct connection to
the mains, an omnipolar switch must be installed with a minimum
3 mm opening between the contacts and appropriate for the load
indicated on the plate and in accordance with current standards
(the yellow/green ground conductor must not be disconnected by
a switch). When the appliance has been installed, the omnipolar
switch must be easily reachable.
USE
The fundamental characteristic of the induction system is the direct
transference of heat from the generator to the cooking recipient.
Advantages:
- The transference of power takes place only when the recipient is
placed on the cooking zone.
- The heat is generated only at the base of the recipient and
transferred directly to the food to be cooked.
- Reduced heating time and low consumption of power during the
beginning of cooking, allowing a global saving of power.
COOKING RECIPIENTS
The use of appropriate recipients is an essential factor for
induction cooking. Check that your pots are suitable for the
induction system.
The recipients must contain iron. You can check whether the
material of the pot is magnetic with a simple magnet
This way you can use the power optimally.
Do not use recipients with a rough base to avoid scratching the
thermal surface of the top.
A very important factor in induction cooking is the dimension of the pot
The cooking zones allow the
use of recipients with bases of various diameters. It is, however,
preferable to use the appropriate cooking zone for the dimension
of the pot.
SWITCHING THE COOKING TOP ON
• Connect the stovetops to the mains
• SWITCHING THE COOKING TOP ON
Press
key to switch the top on.
All the displays relative to the cooking zones switch on in the
standby position.
The control unit remains active for 20 seconds.
If no cooking zone is selected within this time, the cooking top
switches off automatically
• SELECTING THE COOKING ZONE
To select the required cooking zone, you have to press of B keys.
• ADJUST THE POWER OF COOKING
To increase / decrease the power of the cooking zone selected the
key - (C) or + (D). The power can be set from 0 to 9.

• QUICK / BOOSTER HEATING
This function further reduces cooking time in a given area taking
the temperature to the maximum power for a 10 minute interval.
At the end of this interval, the cooking area power automatically
returns to level 9.
The use of this function is indicated for the short time heating of large
quantities of liquid (eg water for cooking pasta) or dishes. While
9 you
get into the mode indicated by BOOSTER
The function is available only in cooking zones upper right and lower
left.
• TIMER USE
After selecting the cooking zone, press simultaneosly the keys C
and D, the displays will show
.
Press the keys C or D to increase or decreasing the time (in minu-
00 min. 99 min.). That procedure shall be activated for each
cooking zone.
• RESIDUAL HEAT
If the temperature of the cooking zone is still high (over 50°) after
it has been switched off, the relative display will indicate the
symbol (residual heat). The symbol will only switch off when the
burn risk in no longer present.
• POT DETECTION
If the symbol
should appear on one of the cooking area
2)The diameter of the recipient used is inferior to that allowed by
the appliance.
3) No recipient is present.
COOKING ZONE DIAMETER MINIMUM PAN DIAMETER
Ø 200 mm
• EGG TIMER / REMINDER
Is it possible to set a reminder tone.
Press simultaneosly the keys C and D, to set a time for the reminder
C or D keys. When the time set will
sound an audible alarm that can be turned off by pressing any of the
commands. The cooking areas on previously will remain active. The
EGG TIMER function remains active even after the unit is turned off.
To disable this function, you must
state
the timer display
with D key.
• SWITCHING THE COOKING AREA OFF
To switch off a cooking zone, select the zone, press simultaneosly
the keys C e D or press D key until the desplay show
.
• SWITCHING THE COOKING TOP OFF
To turn off the cooking top entirely hold down the
key.
• CHILD LOCK
It is possible to block the controls to prevent the risk of unintentional
control panel lock press simultaneously the B key at the lower right
and the D key, then press again the B key. The 2 leds will show
the symbol
.
To temporarily release the controls and change the
settings (e.g.interrupt cooking), press simultaneously the B key at
the lower right and the D key.
, then it will be possible to modify
the settings. The cooking top can however be switched off even
when the controls block is activated. In this case the controls block
remains active when the top is
switched on again.
the B key at the lower right and the D key, then press again the
D key. The cooking top switches off. The control panel lock is not
active when
the top is switched on again.
• SAFETY SWITCH
The appliance has a safety switch that automatically switches off
the cooking zones when they have been operating for a certain
amount of time at a given power level.
POWER LEVEL OPERATING TIME LIMIT (hours)
6
3 - 4 5
5 4
• MAINTENANCE
Remove any residues of food and drops of grease from the
cooking surface by using the special scraper supplied on request
Clean the heated area as thoroughly as possible using suitable
products, and a cloth/paper, then rinse with water and dry with
a clean cloth.
Using the special scraper immediately remove any fragments of
aluminium and plastic material that have unintentionally melted on
the heated cooking area, or residues of sugar or food with a high
sugar content.
In this way, any damage to the cooktop surface can be prevented.
Under no circumstances should abrasive sponges, or corrosive
chemical detergents, such as oven sprays or stain removers, be
used.
WARNING: STEAM CLEANERS MUST NOT BE USED.
DISPOSAL OF OLD ELECTRICAL APPLIANCES
Electrical and Electronic Equipment (WEEE),
requires that old household electrical appliances
must not be disposed of in the normal unsorted
municipal waste stream. Old appliances must be
collected separately in order to optimise the recovery
and recycling of the materials they contain and reduce the impact
on human health and the environment.
The crossed-out dustbin symbol on the product reminds you of
your obligation regarding separated waste collection. Consumers
should contact their local public service or their local dealer for
more information on the correct disposal of exhausted household
appliances.
THE MANUFACTURER DECLINES ALL RESPONSIBILITY FOR
EVENTUAL DAMAGES CAUSED BY BREAKING THE ABOVE
WARNINGS. THE WARRANTY IS NOT VALID IN THE CASE
OF DAMAGE CAUSED BY FAILURE TO COMPLY WITH THE
ABOVE-MENTIONED WARNINGS.

DEUTSCH
D
ALLGEMEINE
Lesen Sie den Inhalt dieses Handbuchs, da sie wichtige Informationen
zur sicheren Installation, Einsatz und Wartung zur Verfügung stellt.
Halten Sie Anweisungen zum späteren Nachschlagen.
Alle damit verbundenen Aufgaben (elektrische Verbindungen) muss
durch geschultes Personal in Übereinstimmung mit den Vorschriften
durchgeführt werden.
SICHERHEIT
Dieses Gerät eignet sich nicht zur Verwendung durch Kinder oder
Personen, die eine Überwachung erfordern.
Aus Sicherheitsgründen stellen Sie niemals große ferromagnetische
Glaskeramik.
bevor Sie Induktionskochzonen konsultieren.
Metallische Gegenstände wie Messer, Gabeln, Löffel oder Deckel
heiß werden können.
WICHTIG:
Nach dem Gebrauch schalten Sie das Kochfeld durch seine
Steuerung.
- Halten Sie die Heizungen eingeschaltet ohne Container oder leere
Container.
- Sobald Sie fertig sind Kochen, schalten Sie seine Stärke durch den
ACHTUNG
INSTALLATIONSANWEISUNGEN
Diese Anleitung ist für einen professionellen Installateur und
Übereinstimmung mit den Gesetzen und Vorschriften. Wenn eine
integrierte Ofen oder andere Geräte, die Wärme erzeugt, muss direkt
unter dem Kochfeld Ofen montiert werden,
Kochfeld richtig isoliert sind, so dass die Wärme aus dem Ofen
nehmen, auf der rechten Seite von der Unterseite des Kochfeldes
gemessen, nicht mehr als
60 ° C erzeugt.
Die Nichtbeachtung dieser Vorsichtsmaßnahme kann zu einer
POSITIONIERUNG
Das Gerät ist so konzipiert, dass in einer Arbeitsplatte ummantelt, wie
Geben Dichtungsmittel (Abb. 4) entlang des gesamten Umfangs
Dicke der Ebene (Abb. 2).
Wenn der Unterseite des Gerätes, nach der Installation ist von der
Unterseite des Gehäuses, eine Unterteilungszuschnitt Einhaltung der
angegebenen Maße (Abb. 3),
LÜFTUNG (Abb. 5)
Der Abstand zwischen dem Kochfeld und Küchenmöbel und Geräte
ausreichende Abluft zu gewährleisten.
Verwenden Sie nicht das Kochfeld, wenn der Ofen ist in den Prozess
der Pyrolyse.
ANSCHLÜSSE (Abb. 6)
Vor dem Verlegen der elektrischen Anschlüsse, um sicherzustellen,
- Die Eigenschaften der Anlage sind wie die Angaben auf dem
Typenschild auf dem unteren Teil des Arbeitsplans angewendet zu
- Die Anlage ist mit einer Erdung in Übereinstimmung mit den
Regeln und Gesetzen in Kraft ausgestattet. Die Erdung ist gesetzlich
vorgeschrieben.
ausgestattet war, zeigte die Verwendung von Material für die
Sie eine direkte Verbindung mit der Stromleitung wollen, müssen Sie
einen zweipoligen Umschalter mit einem Minimum von 3 mm zwischen
Kontakten, angemessen auf die Last auf dem Etikett angegeben und
entspricht der aktuellen Gesetzgebung (der Dirigent gelb / grün sein
sollte unterbrochen durch den Schalter). Nach der Installation des
Gerätes muss der Pol-Schalter leicht zugänglich sein.
VERWENDEN
Das Hauptmerkmal der Sauganlage ist die direkte Übertragung von
Energie von der Wärmequelle mit dem Kochgefäß.
Kochzone gestellt wird.
direkt in der Lebensmittel gekocht werden.
-Reduzierte Aufheizzeiten und geringer Energieverbrauch während
des Kochens Startzeit, so dass ein Gesamt-Energieeinsparung.
CONTAINER ZUM KOCHEN
für Induktion. Achten Sie darauf, Ihre Töpfe eignen sich für die
überprüfen, ob das Material der Pfanne ist magnetisch mit einem
keine Pfannen mit einem rauen Grundlage, um Kratzer zu vermeiden
noch vorzuziehen, die entsprechende Kochzone dem Durchmesser
POWER-HOB
• Verbinden Sie die Herdplatten an das Stromnetz
•
POWER-HOB
Drücken Sie die Taste , um den oberen einzuschalten. Alle
Displays relativ zu den Kochzonen schalten Sie in der
Stan-
dby-Position. Die Steuereinheit bleibt für 20 Sekunden aktiv. Wenn
automatisch aus die Koch oben

• AUSWAHL DER KOCHZONE
-
reich der Kreiswahl “Round”) in der Position entsprechend der
Anzeige drücken
• EINSTELLUNG DER KRAFT DER KOCHEN
Erhöhung / Verringerung der Macht der ausgewählten Kochzone,
des kreisförmigen “Round”).
Die Stromversorgung kann von 0 bis 9 eingestellt werden.
•
RESTWÄRME
Wenn die Temperatur der Kochzone noch hoch (mehr als 50 °) nach
angezeigt (Restwärme). Die Anzeige verschwindet, wenn es keine
Gefahr von Verbrennungen.
•
ANERKENNUNG PANS
Wird auf einem Display, das die Macht einer Kochzone zeigt an, das
2) der Durchmesser des Topfes ist kleiner als der von der Maschine
erlaubt.
3) auf der Platte nicht vorhanden ist, keinen Topf.
BEREICH DER KOCHMESSER MINDESTDURCHMESSER PAN
Ø 200 mm
•
TIMER
nach der Auswahl der Kochzone, drücken Sie auf die oben
gezeigte Display-Runde
.
Jetzt swiping die Innenseite der Runde (im Uhrzeigersinn oder ge-
00 min 99 min) oder durch mehrmaliges Drücken
auf das Symbol
werden Sie vorwärts springen 10 Minuten.
des die gewählte Koch Symbol
wird angezeigt, dass die Ko-
chzone ist abgelaufen.
•
EGG TIMER / ERINNERUNG
Ist es möglich, eine Erinnerung Ton angeben.
Drücken Sie auf das Symbol
Runde (im Uhrzeigersinn oder gegen den Uhrzeigersinn), um eine
deaktivieren, müssen Sie die
Timer-Anzeige Wischen
der Innenseite der Runde (im Uhrzeigersinn oder gegen den Uhr-
zeigersinn) angeben.
•
BOOSTER-FUNKTION
zum Kochen Teigwaren) oder Speisen angegeben.
Sie beim Einstellen Leistungspegel des gewählten Kochzone
nach Level 9
gelangen
•
COOK OFF ZONE
So schalten Sie eine Kochzone Crawl und den Schlüssel auf den
Wert.
•
OFF HOB
Um das Gerät vollständig das Kochfeld ausschalten, drücken
Sie A.
•
SAFETY OFF
Das Gerät ist mit einem Sicherheitssystem ausgerüstet, schaltet
bestimmten Leistung zur Verfügung gestellt.
POTENCIA TIEMPO LÍMITE DE ENCENDIDO (horas)
6
3 - 4 5
5 4
•
WARTUNG
geliefert.
Produkten und Papier-Tuch, dann mit Wasser und trocknen Sie mit
einem sauberen Tuch gründlich. Unter Verwendung der speziellen
Schaber, um umgehend entfernen aus beheizten Koch Stücke aus
Aluminiumfolie und Kunststoff scioltisi versehentlich oder Rückstände
ACHTUNG: Sollte nicht verwendet werden Dampfreiniger.
ENTSORGUNG DES GERÄTS IN DER ZUKUNFT
Elektro- und Elektronik-Altgeräte (WEEE) dürfen
Elektrohaushalts-Altgeräte nicht über den
herkömmlichen Haushaltsmüllkreislauf entsorgt werden.
Altgeräte müssen separat gesammelt werden, um die
Wiederverwertung und das Recycling der beinhalteten
Elektrohaushaltsgeräte gesondert entsorgt werden müssen.
Endverbraucher können sich an Abfallämter der Gemeinden wenden,
um mehr Informationen über die korrekte Entsorgung ihrer
Elektrohaushaltsgeräte.
FÜR SCHÄDEN, DIE AUF DIE NICHTBEACHTUNG DER OBEN
STEHENDEN ANWEISUNGEN ZURÜCKZUFÜHREN SIND, WIRD
KEINERLEI HAFTUNG ÜBERNOMMEN.

GENERALIDADES
Lea atentamente el contenido de este libro que le proporcionará
importantes instrucciones en cuanto a la seguridad de instalación,
uso y mantenimiento.
Conservar el manual para cada ulterior consulta.
Todas las operaciones relativas a la instalación (conexión eléctrica)
deben ser realizadas por personal especializado conformes a las
normas vigentes.
ADVERTENCIAS DE SEGURIDAD
necesitan supervisión.
zona de cocción de la placa de vitrocerámica.
médico antes de utilizar las zonas de cocción a inducción.
pueden calentarse.
IMPORTANTE
Después del uso, apague la placa de cocina a través de su aparato
de mando.
- Evite el derramamiento de liquidos, por tanto para hervir o calentar
liquidos, reduzca la alimentación del calor al punto necesario.
- Una vez terminado de cocinar, apague el elemento calefactor
mediante el mando correspondiente.
ATENCION
apague inmediatamente el aparato, desconectelo de la red,
para evitar eventual descarga eléctrica.
INSTRUCCIONES PARA LA INSTALACION
Las presentes instrucciones están dirigidas a un instalador
especializado y sirven de guía para una correcta instalación,
regulación y mantenimeinto en conformidad con las leyes y normas
vigentes.
Si un horno de encastrar o cualquier otro aparato que genera calor
NECESARIO QUE TAL APARATO (Horno) Y EL VIDRIO QUEDEN
ADECUADAMENTE AISLADOS, de modo que el calor generado por
el horno (medido en la parte derecha-frontal del fondo de la Vitro),
no supere los 60º C.
La falta de tal precaución podría producir un mal funcionamiento del
sistema TOUCH CONTROL.
POSICIONAMIENTO
Este electrodomestico ha sido realizado para ser encastrado en
se puede acceder a la parte inferior del aparato desde la parte inferior
del mueble es necesario montar un panel separador respetando las
VENTILACIÓN (Fig.5)
La distancia entre el electrodomestico y los muebles o los aparatos
que cocinan de la cocina incorporada debe
ventilación del aire.
No utilizar el electrodomestico si en el horno es en curso el proceso
de la pirolisis.
CONEXIÓN ELECTRICA (Fig.6)
- El cable eléctrico correspondiente a la toma a tierra sea 2 cm más
largo que los otros dos.
- Las características de la acometida y tendido se puedan
corresponder con las necesidades indicadas en la placa de
características del aparato.
- La instalación esté dotadas de la correspondiente toma a tierra,
según normas y leyes vigentes.
La toma a tierra es obligatoria por ley.
En el caso que el aparato no estuviera dotado de cable y/o
correspondiente enchufe, utilice material adaptado a la absorción
eléctrica indicada en el Placa de caracteristicas, y a la temperatura
de funcionamiento.
Si se desea una conexión directa a la línea eléctrica, es necesario
interponer un interruptor omnipolar, con una apertura mínima de
3 mm entre contactos, apropiado a la carga indicada en la placa y
conforme a normas vigentes (el conductor a tierra amarillo/verde no
debe ser interrumpido por el conmutador).
Terminada la instalación del aparato, el interruptor omnipolar debe
quedar siempre facilmente accesible.
USO Y MANTENIMIENTO
La característica principal del sistema a inducción, es el traslado
directo de la energía de calentamiento desde el generador al
recipiente de cocción.
- El traslado de energía ocurre solamente cuando el recipiente es
puesto sobre la zona de cocción.
- El calor se genera solo en el fondo del recipiente y se transmite
directamente a los alimentos que han de cocinarse.
durante el inicio de la cocción, permiten un ahorro total de energía.
- La placa de cocina en vitrocerámica queda fría. El calor que se
recipiente.
RECIPIENTES PARA LA COCCIÓN
El uso de recipientes apropiados, es un factor esencial para la
cocción a inducción. Averigüe que sus ollas sean idóneas para el
sistema a inducción. Por lo tanto, los recipientes tienen que contener
hierro. Puede averiguar si el material de la olla es magnético con un
térmica de la placa. De este modo, la energía puede ser utilizada de
modo optimal. Un factor importante en la cocción a inducción, es el
de cocción permiten el empleo de recipientes con fondos de varios
diámetros. En todo caso, es preferible utilizar la zona de cocción
ENCENDIDO DE LA PLACA DE COCCIÓN
• ENCENDIDO DE LA PLACA DE COCCIÓN
Pulsar
para encender la placa,, (el display aparece la zona
de cocción
)
• ENCENDIDO DE LAS ZONAS DE COCCIÓN
C. Pulse la tecla D
para ir a la posición 9 o la tecla C
para ir a
la posición 1. Efectuada esta operación, es posible escoger las
ESPAÑOL
E

regulaciones de temperatura con las teclas C
o D. La potencia de
diferentes y será visualizada por el display luminoso B o E con un
.
• CALOR RESIDUAL
Si la temperatura de una zona de cocción es todavía elevada
(superior a 50°) después de haberla apagado, su display mostrará el
símbolo
(calor residual). Esta indicación desaparecerá solamente
cuando cese el riesgo de quemaduras.
• RECONOCIMIENTO OLLAS
Si en un display de una zona de cocción apareciera el símbolo
2) el diámetro del recipiente es inferior al admitido.
3) no hay ninguna olla en la placa.
DIÁMETRO DE LA ZONA DE COCCIÓN
DIÁMETRO MÍNIMO DE LA OLLA
Ø 200 mm
•
TEMPORIZADOR
para apagar automáticamente la zona de cocción. Activar una zona de
Activar el temporizador pulsando las teclas correspondientes. Pulse los
botones para seleccionar el área de la cocina en la que para activar el
temporizador. Esto se indica mediante un LED en una de las esquinas
de la pantalla.
Pulse el botón o para seleccionar el tiempo deseado. La zona de
se apagará automáticamente la zona de cocción y se escuchará un
pitido que se puede desactivar pulsando cualquiera de los comandos.
Para desactivar el temporizador en una zona de cocina y presione las
teclas para entrar en la función de temporizador. Pulse los botones
para seleccionar la zona del temporizador de cocción deseado. Pulse
el botón hasta que el valor.
•
EGG TIMER/ MEMORIA
Y ‘posible establecer un tono de aviso pulsando las teclas. La
zona central parpadea temporizador. A través de la clave o
la hora establecida se oye un pitido que se puede desactivar
pulsando cualquiera de los comandos. La zona de cocción se
recordatorio permanece activa incluso después de apagar.
Para desactivar esta teclas de función y luego presione la tecla
de valor.
• CALENTAMIENTO RÁPIDO / BOOSTER
Esta función reduce ulteriormente el tiempo de cocción de una
zona determinada llevando la temperatura a la máxima potencia
El uso de esta función está indicada para la calefacción a corto plazo
pasta) o los platos.
a partir de nivel 9 te metes en el modo indicado por BOOSTER
La función sólo está disponible en las zonas de cocción Ø 200 mm
de diámetro.
a partir de nivel 9 te metes en el modo indicado por BOOSTER
• APAGADO ZONAS DE COCCIÓN
Para apagar una zona de cocción, pulsar simultáneamente sus
correspondientes botones C y D , o bien pulsar el botón D hasta la
posición
.
• APAGADO PLACA DE COCCIÓN
Para apagar completamente el plano de cocción pulsar el botón
.
• APAGADO DE SEGURIDAD
El aparato cuenta con un sistema de seguridad que lo apaga
automáticamente una vez transcurrido el tiempo límite de encendido
a una determinada potencia, como se ilustra en la siguiente tabla.
POTENCIA TIEMPO LÍMITE DE ENCENDIDO (horas)
6
3 - 4 5
5 4
• MANTENIMIENTO
aluminio o material plástico deben ser inmediatamente rascados y
limpiados. Esto es tambien válido para restos de azucar o pasteles
abrasivos o detergentes químicos irritantes, como sprays para horno
o quitamanchas.
ATENCION: NO SE DEBE UTILIZAR UN APARATO DE
LIMPIEZA A VAPOR
ELIMINACION DE LOS ELECTRODOMESTICOS
de los apáratos eléctricos y electrónicos (RAEE),
provee que los electrodomésticos no deben ser
sólidos urbanos. Los aparatos para desechar deben
ser recogidos separadamente para optimizar la taza
El símbolo
del cesto de basura tachado se encuentra en todos los productos,
para recordar las obligación del recogido separado. Para ulteriores
informaciones, sobre la correcta eliminación de los electrodomesticos,
el comprador se puede dirigir al servicio publico propuesto o a el
vendedor.
EL FABRICANTE NO SE HACE RESPONSABLE DE LOS
DAÑOS PRODUCIDOS POR EL INCUMPLIMIENTO DE ESTAS
ADVERTENCIAS. LA GARANTÍA NO ES VÁLIDA EN EL CASO
DE DAÑOS PROVOCADOS POR EL IRRESPETO DE DICHAS
ADVERTENCIAS.

FRANÇAIS
F
d’air. Ne pas employer le cooktop si dans le four est dans le cours le
procédé de pyrolyse.
CÂBLAGE ÉLECTRIQUE (Fig.6)
- le câble électrique de la terre soit bien de 2 cm plus long par
- les caractéristiques du réseau électrique soient conformes aux
normes et aux dispositions de la loi en vigueur. La mise à terre est
obligatoire aux termes de la loi.
fonctionnement.
Si on souhaite un branchement directe à la ligne électrique, il est
sur la plaquette et conforme aux normes en vigueur (le conducteur de
l’installation de ‘appareil terminée, on doit pouvoir arriver aisément à
l’interrupteur omnipolaire.
MODE D’EMPLOI
transfert direct de l’énergie de chauffe du générateur au récipient de
cuisson.
Avantages:
- Le transfert d’énergie a lieu uniquement lorsque le récipient est
placé sur la zone de cuisson.
- La chaleur est générée uniquement sur le fond du récipient et
transmise directement aux aliments à cuire.
- Temps de chauffe réduits et faible consommation d’énergie au
début de la cuisson, entraînent une épargne globale d’énergie.
- La surface en vitrocéramique reste froide.
La chaleur ressentie sur le plan de cuisson est celle émanant du
fond du récipient.
RECIPIENTS POUR LA CUISSON
L’utilisation de récipients appropriés est un facteur essentiel pour la
cuisson à induction.
Les récipients doivent contenir du fer.
récipients à base rugueuse pour éviter de griffer la surface thermique
façon optimale.
dimensionnement de la casserole par rapport à la plaque utilisée
ALLUMAGE PLAN DE CUISSON
•
ALLUMAGE PLAN DE CUISSON
Appuyer sur la touche
pour allumer le plan de cuisson.
position standby
.
CARACTÉRISTIQUES GÉNÉRALES
Lire attentivement le contenu du présent livret, étant donné qu’il
fournit d’importantes indications concernant la sécurité d’installation,
d’utilisation et d’entretient. Conserver le livret pour toute consultation
ultérieure. Toutes les opérations concernant l’installation (et le
Conformément à Tous les Codes & Normes Applicables en Vigueur.
AVERTISSEMENTS DE SECURITE
Cet appareil n’est pas adapté à l’utilisation par des enfants ou des
exemple, les moules à tarte pour four) sur la zone de cuisson du plan
en vitrocéramique.
Les personnes ayant un pacemaker doivent consulter leur médecin
peuvent s’échauffer.
IMPORTANT:
de commande.
- éviter les débordements de liquide, ainsi pour faire bouillir ou
- ne pas laisser les plaques chauffantes allumées sans récipients ou
ATTENTION
Si la surface est fêlée, éteindre l’appareil et déconnecter l’alimentation
électrique pour éviter d’éventuelles décharges
INSTRUTIONS POUR L’INSTALLATION
Les instructions suivantes s’adressent à un installateur spécialisé
et servent de guide pour l’installation, le réglage et l’entretient
en conformité avec les lois et les normes en vigueur. Si un four
encastrable ou n’importe quel autre appareil produisant de la
vitrocéramique, IL EST NÉCESSAIRE QUE CET APPAREIL (four)
ET LA SURFACE DE CUISSON EN VITROCÉRAMIQUE SOIENT
CONVENABLEMENT ISOLÉS
produite par le four, mesurée sur le côté droit du fond de la surface de
cuisson, ne dépasse pas 60°C.
Le manque de respect de cette précaution pourrait déterminer le
POSITIONNEMENT
moyen des 4 appuis, compte tenu de l’épaisseur du plan de travail
accessible du côté inférieur du meuble, il faut monter un panneau
de
VENTILATION (Fig.5)
La distance entre les meubles de cette appareil et de cuisine intégrée
ou les équipements de cuisson doit garantir la
ventilation

•
ALLUMAGE ZONES DE CUISSON
Appuyer sur la touche A pour allumer le plan de cuisson.Tous les
standby
. L’unité de contrôle restera active pendant 10 secondes.
Si pendant ce laps de temps aucune zone de cuisson n’est
sélectionnée, le plan de cuisson s’éteindra automatiquement.
•
CHALEUR RESIDUELLE
zone montre le symbole
(chaleur résiduelle).
L’indication ne disparaît que quand il n’y a plus aucun risque de
brûlure.
•
IDENTIFICATION CASSEROLES
l’appareil.
3) il n’y a aucune casserole sur la plaque.
ZONE DE CUISSON DE DIAMÈTRE
DIAMÈTRE MINIMUM DU POT
Ø 200 mm
•
TIMER
pour éteindre automatiquement la zone de cuisson sélectionnée.
Activer la minuterie en appuyant sur les touches correspondantes.
Appuyez sur les boutons pour sélectionner la zone de cuisson sur
laquelle activer la minuterie. Ce sera indiqué par une LED sur l’un
des coins de l’écran.
Appuyez sur le bouton ou pour sélectionner le temps de sommeil
désiré. La zone de cuisson avec un minuteur sera signalé par
automatiquement la zone de cuisson et vous entendrez un bip sonore
désactiver la minuterie dans un espace cuisine et appuyer sur les
touches pour entrer dans la fonction minuterie. Appuyez sur les
boutons pour sélectionner la zone souhaitée minuterie de cuisine.
•
EGG TIMER/MÉMORANDUM
des commandes. La zone de cuisson restera actif auparavant. La
hors tension.
Pour désactiver cette fonction et les touches, puis appuyez sur la clé
de la valeur.
•
ETEINDRE LES ZONES DE CUISSON
Pour désactiver une zone de cuisson à ramper et à la clé de la valeur
.
•
FONCTION BOOSTER
Cette fonctionnalité réduit encore le temps de cuisson d’une zone
donnée, d’amener la température à la puissance maximale pour un
L’utilisation de cette fonction est indiqué pour le chauffage de temps
de grandes quantités de liquide (eau par exemple pour la cuisson des
pâtes) ou plats.
Pendant le réglage niveau de la zone de cuisson sélectionnée de
9, vous entrez
dans le mode indiqué
La fonction est disponible uniquement dans les zones de cuisson Ø
•
ETEINDRE LE PLAN DE CUISSON
.
•
EXTINCTION DE SÉCURITÉ
d’allumage à une puissance donnée selon le tableau suivant.
PUISSANCE TEMPS LIMITE ALLUMAGE (heures)
6
3 - 4 5
5 4
•
ENTRETIENT
Éliminer tous résidus de nourriture éventuels ainsi que les gouttes
de graisse de la surface de cuisson à l’aide du racloir spécial fourni
avec des produits appropriés et un chiffon papier, ensuite rincer avec
de l’eau et essuyer avec un chiffon bien propre. Au moyen du racloir
(en option) éliminer immédiatement de la surface de cuisson chauffée
ont fondu par mégarde ou les résidus de sucre ou d’aliment ayant
un contenu de sucre élevé. N’utiliser en aucun cas des éponges
abrasives ou des détergents chimiques irritants tels que spray pour
four ou dégraisseurs.
ATTENTION: NE PAS UTILISER UN NETTOYEUR À VAPEUR.
Enlèvement des appareils ménagers usAgés
des Equipements Electriques et Electroniques (DEEE),
exige que les appareils ménagers usagés ne soient
des matériaux qui les composent et réduire l’impact sur la santé
humaine et l’environnement. Le symbole de la “poubelle barrée” est
apposée sur tous les produits pour rappeler les obligations de collecte
séparée. Les consommateurs devront contacter les autorités locales
de leur vieil appareil.
TOUTE RESPONSABILITÉ EST DÉCLINÉE POUR LES ÉVENTUELS
DÉGATS PROVOQUÉS PAR L’INOBSERVATION DES SUSDITES
INSTRUCTIONS. LA GARANTIE N’EST PAS VALABLE EN CAS DE
DOMMAGES PROVOQUES PAR LE NON RESPECT DES MISES EN
GARDE CITEES CI-DESSUS.

RU
ОБЩИЕ ПОЛОЖЕНИЯ
ОСНОВНЫЕ ТРЕБОВАНИЯ ПО БЕЗОПАСНОСТИ
ВАЖНО
ВНИМАНИЕ
ИНСТРУКЦИИ ПО УСТАНОВКЕ
РАЗМЕЩЕНИЕ:
ВЕНТИЛЯЦИЯ (Fig.5)
ЭЛЕКТРИЧЕСКИЕ СХЕМЫ (Fig.6)
ПРИМЕНЕНИЕ
ПОСУДА ДЛЯ ПРИГОТОВЛЕНИЯ

ВКЛЮЧЕНИЕ ВАРОЧНОЙ ПАНЕЛИ
•
•
•
•
•«»
•
•
•
Ø 200 mm
•«EGG/
•
•
•
•
6
3 - 4 5
5 4
•
УТИЛИЗАЦИЯ ОТХОДОВ ЭЛЕКТРОБЫТОВЫХ
ПРИБОРОВ

3PCLIOBI3640ZS
26.08.2016
-
 1
1
-
 2
2
-
 3
3
-
 4
4
-
 5
5
-
 6
6
-
 7
7
-
 8
8
-
 9
9
-
 10
10
-
 11
11
-
 12
12
-
 13
13
-
 14
14
-
 15
15
-
 16
16


Zigmund & Shtain CIS 299.60 BX Manuel utilisateur
- Catégorie
- Plaques de cuisson
- Taper
- Manuel utilisateur
- Ce manuel convient également à