Zigmund & Shtain CIS 029.30 WX Manuel utilisateur
- Catégorie
- Plaques de cuisson
- Taper
- Manuel utilisateur

IT Manuale d’istallazione e uso 4
EN Use and installation manual 9
DE Bedienungs-und Montageanleitung 13
ES Manual de instalación y uso 18
FR Manuel d’installation et d’utilisation 23
PY Инструкциипопользованию 28
VITROCERAMIC
HOB
MANUAL
CIS 029.30 BX/WX

2
1
~ 2 mm
2
40 mm
B
30 mm
A
4
min. 50 mm
58
mm
20 mm
3
270 mm
490 mm
290 mm
520 mm
50 mm
58 mm
53 mm

3
Induction
A
B
6
L (brown)
N (blue or grey)
GND (green/yellow)
H05V2V2-F 3G / 1,5 mm
2
N
L
L2
L1
220-240V
~
220-240V2
~
5
A
F
E
B
CD
E
GH
CD
7

4
italiano
it
Leggere attentamente il contenuto del
presente libretto in quanto fornisce
importanti indicazioni riguardanti la sicurezza
di installazione, d’uso e di manutenzione.
Conservare il libretto per ogni ulteriore
consultazione.
Tutte le operazioni relative all’installazione
(connessioni elettriche) devono essere
effettuate da personale specializzato in
conformità delle norme vigenti.
AVVERTENZE PER LA SICUREZZA
• Il piano di cottura deve essere utilizzato
sempre nei limiti del normale uso
domestico per preparare e tenere in caldo
le pietanze. Qualsiasi altro impiego non è
ammesso.
• Le persone che per le loro capacità
fisiche, sensoriali o psichiche o per la loro
inesperienza o non conoscenza non siano
in grado di utilizzare in sicurezza il piano
di cottura, non devono farne uso senza
la sorveglianza e la guida di una persona
responsabile.
• I bambini sotto gli 8 anni di età devono
essere tenuti lontani dal piano di cottura
a meno che non siano sotto controllo
costante di un adulto.
• I bambini al di sopra degli 8 anni possono
eventualmente utilizzare l’apparecchio
da soli, se sono in grado di usarlo
correttamente. È importante che sappiano
riconoscere i pericoli che possono derivare
da un uso non corretto.
• Non permettere ai bambini di giocare con
l’apparecchio.
• I bambini non devono effettuare operazioni
di pulizia o manutenzione del piano di
cottura a meno che non siano sotto la
supervisione di un adulto.
• Lavori di installazione e manutenzione,
nonché riparazioni, devono essere
eseguiti da personale specializzato. Lavori
o riparazioni non correttamente eseguiti
possono creare seri pericoli per l’utente.
• PERICOLO DI SCOSSA ELETTRICA!
Non mettere in funzione o spegnere
subito il piano di cottura se la lastra in
vetroceramica è danneggiata o crepata.
Staccare l’apparecchio dalla rete elettrica.
• ATTENZIONE: Se il cavo di alimentazione
dell’apparecchio è danneggiato deve
essere sostituito dal produttore, dal servizio
assistenza autorizzato o da personale
qualificato al fine di evitare rischi.
• ATTENZIONE: L’apparecchio e le sue
parti accessibili diventano caldi durante
l’uso. Si deve prestare attenzione per
evitare di toccare gli elementi riscaldanti.
• ATTENZIONE: La cottura con olio o grasso
può essere pericolosa e può provocare
incendi. Non utilizzare MAI acqua per
cercare di spegnere il fuoco. Soffocare
le fiamme ad es. con un coperchio, un
panno da cucina umido o simili.
• ATTENZIONE: Il piano di cottura è molto
caldo quando è in funzione e rimane caldo
anche per un certo tempo dopo averlo
spento. Il rischio di ustione non sussiste
più solo quando si spengono le spie del
calore residuo.
• ATTENZIONE: Il normale processo di
cottura deve essere sorvegliato. Un
processo di cottura di breve durata deve
essere sorvegliato continuamente. Pentole
dalle quali evaporano completamente i
liquidi possono provocare danni al piano in
vetroceramica. Grasso o olio surriscaldati
possono iniziare a bruciare e provocare un
incendio.
• PERICOLO DI INCENDIO! Non
conservare oggetti sulle superfici di
cottura! Oggetti metallici quali coltelli,
forchette, cucchiai e coperchi non devono
essere posti sulla superficie del piano di
cottura in quanto possono surriscaldarsi.
• Spegnere sempre le zone di cottura dopo
l’uso!
• L’apparecchio non è destinato ad essere
utilizzato per mezzo di un timer esterno

5
o un sistema di comando a distanza
separato.
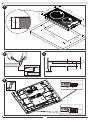
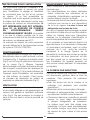
INSTALLAZIONE
Le presenti istruzioni sono rivolte ad un
installatore specializzato e fungono da
guida per l’installazione, la regolazione e la
manutenzione in conformità delle leggi e
delle norme vigenti.
Se un forno da incasso o qualsiasi altra
apparecchiatura che genera calore deve
essere montato direttamente sotto il piano di
cottura in vetroceramica, È NECESSARIO
CHE TALE APPARECCHIATURA
(forno) E IL PIANO DI COTTURA
IN VETROCERAMICA SIANO
ADEGUATAMENTE ISOLATI, in modo tale
che il calore generato dal forno, misurato sul
lato destro del fondo del piano di cottura,
non superi i 60°C.
Il mancato rispetto di tale precauzione
potrebbe determinare l’errato funzionamento
del sistema TOUCH CONTROL.
POSIZIONAMENTO
L’elettrodomestico è realizzato per essere
incassato in un piano di lavoro, come
illustrato nella figura (Fig.1).
Predisporre materiale sigillante (Fig.2) lungo
l’intero perimetro (dimensioni del taglio
(Fig.1).
Bloccare l’elettrodomestico sul piano di
lavoro mediante i 4 sostegni, tenendo
presente lo spessore del piano di lavoro
(Fig.4).
Se la parte inferiore dell’apparecchio, dopo
l’installazione, è accessibile dalla parte
inferiore del mobile è necessario montare un
pannello separatore rispettando le distanze
indicate (Fig.3).
VENTILAZIONE
La distanza tra il piano di cottura e i mobili
da cucina o gli apparecchi da incasso deve
essere tale da garantire una sufficiente
ventilazione ed un sufficiente scarico
dell’aria. (Fig.3).
Non utilizzare il piano di cottura se nel forno
è in corso il processo di pirolisi.
CONNESSIONI ELETTRICHE (Fig.5)
Prima di effettuare le connessioni elettriche
assicurarsi che:
- le caratteristiche dell’impianto siano tali
da soddisfare le indicazioni sulla targhetta
identificativa applicata sulla parte inferiore
del piano di lavoro;
- l’impianto sia dotato di una messa a
terra efficiente conforme alle norme e alle
disposizioni di legge in vigore. La messa a
terra è obbligatoria per legge.
Nel caso in cui l’elettrodomestico non
sia dotato di cavo e/o della relativa spina,
utilizzare materiale adatto per l’assorbimento
indicato nella targhetta identificativa e
per la temperatura di funzionamento. Se
si desidera una connessione diretta alla
linea elettrica, è necessario interporre un
interruttore omnipolare, con un’apertura
minima di 3 mm fra i contatti, appropriato
al carico indicato nella targhetta e conforme
alle norme vigenti (il conduttore di terra
giallo/verde non deve essere interrotto dal
commutatore). Terminata l’installazione
dell’apparecchiatura, l’interruttore
omnipolare deve essere facilmente
raggiungibile.
LA COTTURA AD INDUZIONE
Nel sistema di cottura ad induzione il calore
si genera direttamente alla base della
pentola, per questo motivo presenta una
serie di vantaggi:
• Risparmio di tempo mentre si bollono
cibi o si frigge, grazie al riscaldamento
proveniente direttamente dal recipiente.
• Risparmio di energia.
• Cura e pulizia più semplici. Gli alimenti
fuoriusciti non si bruciano con rapidità.
• Controllo della temperatura e maggiore
sicurezza. L’induttore reagisce
immediatamente alle variazioni della

6
temperatura, in questo modo la potenza
può essere dosata in modo preciso. La
zona di cottura a induzione smette di
produrre calore non appena si toglie la
pentola anche se l’induttore è ancora
acceso.
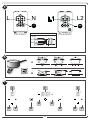
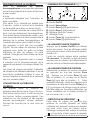
RECIPIENTI PER LA COTTURA
L’utilizzo di recipienti appropriati è un fattore
essenziale per la cottura ad induzione.
Solo pentole/recipienti ferromagnetici
sono adatti alla cottura ad induzione e
possono essere in:
• Acciaio smaltato
• Ghisa
• Recipienti/pentole speciali per induzione
in acciaio inossidabile.
Per sapere se i recipienti sono adeguati,
verificare che siano attratti da un magnete.
(Fig.6). Esistono in commercio alcune
pentole speciali per induzione i cui fondi
non sono totalmente ferromagnetici. Per
ottenere una buona cottura vi suggeriamo di
utilizzare pentole la cui zona ferromagnetica
abbia le stesse dimensioni della pentola.
Si consigliano recipienti a fondo piatto
(Fig.6A). Non utilizzare recipienti con base
ruvida, per evitare di graffiare la superficie
termica del piano.
Un fattore non trascurabile nella cottura ad
induzione sono infine le dimensioni della
pentola in relazione alla piastra utilizzata
(Fig.6B). Le zone di cottura consentono
l’utilizzo di recipienti con fondi di vari
diametri. E’ comunque preferibile utilizzare
la zona di cottura appropriata al diametro
della pentola che si vuole utilizzare.
USO DEL PIANO COTTURA
Questo apparecchio utilizza il sistema di
programmazione elettronica “touch control”
in cui le funzioni sono attivate toccando i
tasti sensori e confermate da indicazioni
sui display e segnali acustici. Toccare i tasti
dall’alto senza coprirli.
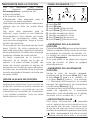
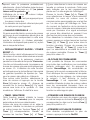
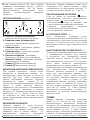
• PANNELLO COMANDI (Fig. 7)
A
F
E
B
CD
E
GH
CD
A. tasto On/Off
B. tasto Blocco
C. tasto Zona [+] (aumenta il valore)
D. tasto Zona [-] (diminuisce il valore)
E. Display Zona cottura
F. Display Timer
G. tasto Timer [+] (aumenta il valore)
H. tasto Timer [-] (diminuisce il valore)
• ACCENSIONE PIANO COTTURA
Premere il tasto On/Off per accendere
il piano. Tutti i display relativi alle zone di
cottura si accenderanno in posizione di
standby «0». Il pannello di controllo rimane
attivo per 10 secondi. Se entro questo
tempo non si effettua alcuna regolazione su
una zona di cottura l’apparecchio si spegne
automaticamente.
• ACCENSIONE ZONE COTTURA
Selezionare la zona di cottura desiderata
premendo uno dei tasti Zona [+] (C).
Premere il tasto Zona [-] (D) per andare
in posizione «9» oppure il tasto Zona [+]
per andare in posizione «1». Effettuata
questa operazione si possono scegliere le
regolazioni di temperatura con i tasti [+] o
[-].
La potenza di ogni singola zona può essere
regolata in 9 diversi livelli è sarà visualizzata
nel display corrispondente con un numero
da «1» a «9».
• RICONOSCIMENTO PENTOLE « »
Questo piano cottura è dotato di un sistema
di controllo interattivo che lo rende molto
semplice da usare. Quando una pentola
viene rimossa da una zona cottura attiva
il display relativo mostra il simbolo « ».

7
Il simbolo scompare se la pentola viene
riposizionata sulla zona e la cottura riprende
secondo le regolazioni precedentemente
impostate. Dopo l’uso riportare sempre a
«0» la potenza della zona (non lasciare mai
attivo il simbolo « »).
Il simbolo « » potrebbe comparire nel display
della zona cottura anche nel caso in cui:
1) Il recipiente usato non è adatto alla cottura
ad induzione.
2) Il diametro della pentola è inferiore a quello
consentito dall’apparecchio.
• CALORE RESIDUO «H»
Se la temperatura di una zona di cottura è
ancora elevata (superiore a 50°) dopo essere
stata spenta, il display relativo a quella
zona mostra il simbolo «H» (calore residuo).
L’indicazione scompare solo quando non vi
è più alcun rischio di ustioni.
• RISCALDAMENTO VELOCE / POWER
BOOST «P»
Questa funzione riduce ulteriormente il
tempo di cottura di una zona portando la
temperatura al livello di potenza massimo
per 10 minuti. Allo scadere di questo
tempo, la potenza della zona cottura torna
automaticamente al livello «9».
L’utilizzo di questa funzione è indicato per il
riscaldamento in tempi brevissimi di grandi
quantità di liquidi (es. acqua per cuocere la
pasta) o di altre pietanze.
Per attivare questa funzione selezionare la
zona di cottura e premere il tasto [+] fino
al livello 9. Premere nuovamente il tasto
[+]. Verrà emesso un segnale acustico ed
il simbolo «P» sarà visualizzato nel display
relativo alla zona.
• TIMER
Questa funzione permette di stabilire un
tempo da «01» (1 minuto) a «99» (99 minuti)
per lo spegnimento automatico di una
zona di cottura. Abilitare il timer premendo
contemporaneamente i relativi tasti [+] e
[-]. Premere nuovamente i tasti [+] e [-] per
selezionare la zona cottura su cui attivare il
timer. La selezione verrà indicata dal relativo
led posto su uno degli angoli del display
Timer. Premere il tasto [+] o [-] del Timer
per regolare il tempo di autospegnimento
desiderato. La zona di cottura con timer
attivo sarà segnalata da un led fisso su uno
degli angoli del display del Timer.
Allo scadere del timer la zona cottura si
spegnerà automaticamente e verrà emesso
un segnale acustico che potrà essere
disattivato premendo un qualsiasi tasto
dell’area comandi.
Per disattivare il timer di una zona di cottura
premere contemporaneamente i tasti [+] e
[-] del Timer e poi nuovamente i tasti [+] e
[-] del Timer fino a selezionare il timer della
zona cottura desiderata. Premere il tasto [-]
del Timer per riportare il valore a «0».
• BLOCCO COMANDI
E’ possibile bloccare i comandi per evitare
il rischio di modifiche non intenzionali alle
regolazioni (bambini, operazioni di pulizia,
ecc.). Premendo il tasto Blocco i comandi
si bloccano e la relativa spia si illumina.
Per sbloccare i comandi e tornare ad agire
sulle regolazioni (es. interrompere la cottura)
è necessario premere il tasto Blocco.
Quando il blocco dei comandi è attivo è
comunque possibile spegnere il piano di
cottura. In questo caso il blocco comandi
rimane attivo anche alla riaccesione del
piano.
• SPEGNIMENTO ZONE COTTURA
Per spegnere una zona di cottura premere
contemporaneamente i tasti [+] e [-] della
relativa zona oppure il tasto [-] fino a
riportare il valore a «0».
• SPEGNIMENTO PIANO COTTURA
Per spegnere completamente l’apparecchio
tenere premuto il tasto On/Off.

8
• SPEGNIMENTO DI SICUREZZA
L’apparecchio è provvisto di un sistema di
sicurezza che spegne automaticamente
le zone di cottura trascorso il tempo limite
di accensione ad una data potenza. In tal
caso l’indicazione del calore residuo «H»
viene visualizzata nel display della zona.
POTENZA
TEMPO LIMITE
ACCENSIONE (ore)
1 - 2 6
3 - 4 5
5 4
6 - 7 - 8 - 9 1,5
PULIZIA E MANUTENZIONE
Rimuovere eventuali residui di cibo e gocce
di unto dalla superficie di cottura utilizzando
lo speciale raschietto fornito su richiesta.
Pulire l’area riscaldata nel miglior modo
possibile utilizzando prodotti idonei ed
un panno-carta, quindi sciacquare con
acqua e asciugare con un panno pulito.
Mediante lo speciale raschietto rimuovere
immediatamente dall’area riscaldata di
cottura frammenti di fogli di alluminio e
materiale plastico scioltisi inavvertitamente
o residui di zucchero o di cibi ad elevato
contenuto di zucchero. In questo modo si
evita ogni possibile danno alla superficie del
piano. In nessun caso si devono utilizzare
spugnette abrasive o detergenti chimici
irritanti quali spray per forno o smacchiatori.
ATTENZIONE: Non utilizzare pulitori a
vapore.
DISMISSIONE DEGLI
ELETTRODOMESTICI
La direttiva Europea 2002/96/CE
sui rifiuti di apparecchiature
elettriche ed elettroniche (RAEE),
prevede che gli elettrodomestici
non debbano essere smaltiti nel
normale flusso dei rifiuti solidi urbani. Gli
apparecchi dismessi devono essere raccolti
separatamente per ottimizzare il tasso di
recupero e riciclaggio dei materiali che li
compongono ed impedire potenziali danni
per la salute e l’ambiente. Il simbolo del
cestino barrato è riportato su tutti i prodotti
per ricordare gli obblighi di raccolta separata.
Per ulteriori informazioni, sulla corretta
dismissione degli elettrodomestici, i detentori
potranno rivolgersi al servizio pubblico
preposto o ai rivenditori.
SI DECLINA OGNI RESPONSABILITÀ
PER EVENTUALI DANNI PROVOCATI
DALLA INOSSERVANZA DELLE SUDDETTE
AVVERTENZE.
LA GARANZIA NON E’ VALIDA NEL CASO DI
DANNI DERIVANTI DALLA INOSSERVANZA
DELLE SUDDETTE AVVERTENZE.

9
english
en
Carefully read the contents of this leaflet since
it provides important instructions regarding
safety of installation, use and maintenance.
Keep the leaflet for possible future
consultation. All the operations relating to
installation (electrical connections) must
be carried out by specialised personnel in
accordance with current regulations.
SAFETY WARNINGS
• Use the cooktop only in household-type
situations for the preparation and warming
of food. All other types of use are not
permitted.
• Individuals who are incapable of using the
appliance safely because of their physical,
sensory or mental capabilities or their lack
of experience or knowledge must not
use this appliance without supervision or
instruction by a responsible person.
• Children under 8 years of age must be kept
away from the cooktop unless they are
under constant supervision.
• Children 8 years and older must only be
allowed to use the cooktop if they have
been given supervision or instruction
concerning use of the appliance in a safe
way and understand the hazards involved.
• Children shall not play with the appliance.
• Cleaning and user maintenance shall not be
made by children without supervision.
• Installation, repair and maintenance work
should only be performed by an authorized
service technician. Work by unqualified
persons could be dangerous for the user.
• RISK OF ELECTRIC SHOCK! If the
cooktop is defective or chipped, cracked or
broken in any way, immediately switch it off
and do not continue to use it. Disconnect it
from the electrical power supply.
• WARNING: If the supply cord of the
appliance is damaged, it must be replaced
by the manufacturer, its service agent or
similarly qualified persons in order to avoid
a hazard.
• WARNING: The appliance and its
accessible parts become hot during use.
Care should be taken to avoid touching
heating elements.
• WARNING: Unattended cooking on a hob
with fat or oil can be dangerous and may
result in fire. NEVER try to extinguish a fire
with water, but switch off the appliance
and then cover flame e.g. with a lid or a fire
blanket.
• WARNING: The cooktop is hot during use
and remains so for some time after being
switched off. The risk of burns remains until
the residual heat indicators have gone out.
• CAUTION: The cooking process has to be
supervised. A short term cooking process
has to be supervised continuously.
• DANGER OF FIRE: Do not store items on
the cooking surfaces! Metallic objects such
as knives, forks, spoons and lids should not
be placed on the hob surface since they
can become hot.
• Always switch the cooking zones off after
use!
• The appliance is not intended to be
operated by means of an external timer or
separate remote-control system.
INSTALLATION INSTRUCTIONS
These instructions are for a specialized
installer and are a guide for the installation
process, regulations and maintenance
in accordance with the law and current
standards.
If the built-in oven or any other appliances
that produce heat, need to be installed
directly underneath the cooking hobs in
ceramic glass, IT IS NECESSARY THAT
THE APPLIANCE (oven) AND THE
COOKING HOBS IN CERAMIC GLASS
ARE ADEQUATELY ISOLATED, in such
a way that the heat generated from the
oven, measured on the right hand side of
the bottom of the cooking hobs, does not
exceed 60°C.
Failure to follow this precaution, could cause
a malfunction in the TOUCH CONTROL
system.
POSITIONING
The domestic appliance was built in order
to be encased on a work surface, the way it
is illustrated in the graph (Fig.1). Predispose
sealing material (Fig.2) along the whole
perimeter (for dimensions of the cut see

10
Fig.1). Lock the domestic appliance into place
with 4 supporters, keeping in mind the width
of the surface (Fig.4). If the lower part of the
appliance after installation, is accessable via
the lower part of the furniture, it is necessary
to mount a separating panel keeping in mind
the distances indicated (Fig.3).
VENTILATION
The distance between the cooktop and built-
in kitchen’s furnitures or cooking apparatuses
must guarantee sufficient ventilation of the air
(Fig.3). Not to use the cooktop if in the oven
is in course the pyrolysis process.
ELECTRICAL CONNECTIONS (Fig.5)
Before making the electrical connections,
check that:
- the system ratings meet the ratings indicated
on the identification plate fixed on the lower
part of the worktop;
- the system is fitted with efficient ground
wires in accordance with the laws and
current standards.
Grounding is mandatory by law. If the
domestic appliance is not supplied with
a cable and/or suitable plug, use material
suitable for the absorption value indicated
on the identification plate and the operating
temperature. If wishing to make a direct
connection to the mains, an omnipolar
switch must be installed with a minimum
3 mm opening between the contacts and
appropriate for the load indicated on the plate
and in accordance with current standards
(the yellow/green ground conductor must
not be disconnected by a switch). When the
appliance has been installed, the omnipolar
switch must be easily reachable.
INDUCTION COOKING
The fundamental characteristic of the
induction system is the direct transference
of heat from the generator to the cooking
recipient.
Advantages:
- The transference of power takes place only
when the recipient is placed on the cooking
zone.
- The heat is generated only at the base of
the recipient and transferred directly to the
food to be cooked.
- Reduced heating time and low consumption
of power during the beginning of cooking,
allowing a global saving of power.
- The fibreglass top remains cold, the heat
felt on the cooking top is that reflected from
the base of the recipient.
COOKING RECIPIENTS
The use of appropriate recipients is an
essential factor for induction cooking. Check
that your pots are suitable for the induction
system. Only ferromagnetic cookware made
of the following materials is suitable for
induction cooktops:
• Enameled steel
• Cast iron
• Induction-capable cookware of stainless
steel.
To determine whether the cookware is
suitable, check whether the base of the pot
or pan attracts a magnet (Fig.6).
There are other induction-capable pots
and pans whose bases are not completely
ferromagnetic. To get good cooking results,
we recommend that the dimension of the
ferromagnetic area of the cookware match
the size of the burner.
We advise recipients having a flat base
(Fig.6A). This way you can use the power
optimally.
Do not use recipients with a rough base to
avoid scratching the thermal surface of the
top.
A very important factor in induction cooking
is the dimension of the pot compared to the
plate used (Fig.6B). The cooking zones allow
the use of recipients with bases of various
diameters.
It is, however, preferable to use the
appropriate cooking zone for the dimension
of the pot.
USING THE COOKTOP
The appliance is operated using the control
panel sensor keys.
Functions are controlled by touching the
sensor keys and confirmed by displays and
acoustic signals. Touch the sensor keys from
above, without covering other sensor keys.
- the ground wire is 2 cm longer than the other cables;

11
• TOUCH CONTROL (Fig. 7)
A
F
E
B
CD
E
GH
CD
A. On/Off key
B. Lock key
C. Zone [+] key (increase power)
D. Zone [-] key (decrease power)
E. Cooking Zone Display
F. Timer Display
G. Timer [+] key (increase value)
H. Timer [-] key (decrease value)
• SWITCHING THE APPLIANCE ON
Press the On-Off key to switch the hob on.
All the displays relative to the cooking zones
switch on in the «0» standby position.
The control unit remains active for 10
seconds. If no cooking zone is selected
within this time, the appliance switches off
automatically.
• SWITCHING A COOKING ZONE ON
Select the desired cooking zone and press
one of the Zone [+] keys.
Press the Zone [-] key to go to position 9
(max. power) or Zone [+] key to go to position
1 (min. power). Once this operation has been
completed you can adjust the temperature
with the Zone [+] and [-] keys. The power
of the single cooking zone can be adjusted
in 9 different positions and will be shown on
the relative luminous display with a level from
«1» to «9».
• POT DETECTION « »
This cooktop is fitted with an interactive
control system that makes it very easy and
comfortable to use. If the cookware is removed
from an active cooking zone, the display
shows the symbol « » which disappear when
the cookware is repositioned on the cooking
zone, continuing with the previous settings.
After use, always bring power to «0» (do not
leave on the symbol « »). The symbol «
» also appears on one of the cooking zones
displays when:
1)The recipient being used is not suitable for
induction cooking.
2)The diameter of the recipient used is inferior
to that allowed by the appliance.
• RESIDUAL HEAT «H»
If the temperature of the cooking zone is still
high (over 50°) after it has been switched off,
the relative display will indicate the «H» symbol
(residual heat). The symbol will only switch off
when the burn risk in no longer present.
• QUICK HEATING/POWER BOOST «P»
This function further reduces cooking time
of a given area taking the temperature to the
maximum power for a 10 minute interval.
At the end of this interval, the cooking area
power automatically returns to level «9».
The use of this function is indicated for the
short time heating of large quantities of liquid
(eg. water for cooking pasta) or dishes.
To activate this function, select the cooking
zone and press the Zone [+] key up to level
«9». Press the Zone [+] key again.
An acoustic signal will be emitted and the
symbol «P» will be shown on the relative
Cooking Zone display.
• TIMER
This function allows establishing the time
(from «01» to «99» minutes) for automatically
switching the selected cooking zone off.
Switch on at least one cooking zone and
adjust the temperature. Press simultaneously
the Timer [+] and [-] keys to enter the timer
function. Press again the Timer [+] and [-]
keys simoultaneously to select the cooking
zone on which you want to activate the timer.
The selected cooking zone will be indicated
by a flashing led located on one of the corners
of the Timer Display.
Set the auto switching off time by pressing
the Timer [+] or Timer [-] key. The cooking
zone on which the timer has been activated
is indicated by a steady led at one of the
corners of the Timer Display.
An acoustic signal will indicate the timer
expiration and the relative cooking zone will
automatically switch off. Press any of the
keys to stop the acoustic signal.

12
In order to disable the timer on a cooking
zone press simultaneously the Timer [+]
and Timer [-] key to enter the timer function.
Press again the Timer [+] and Timer [-] key
simoultaneously to select the desired cooking
zone. Press the Timer [-] key until reaching
position «0».
• CONTROL PANEL LOCK
It is possible to block the controls to prevent
the risk of unintentional modification of the
settings (children, cleaning etc.). By pressing
the Lock key, the controls are blocked and
the relative warning light switches on.
To release the controls and change the
settings (e.g.interrupt cooking), the Lock
key must be pressed. The cooking top can
however be switched off even when the
controls block is activated. In this case the
controls block remains active when the top is
switched on again.
• SWITCHING A COOKING ZONE OFF
To switch a cooking zone off, press
simultaneously the Zone [+] and [-] key of
the desired zone, or press the Zone [-] key
until reaching position «0».
• SWITCHING THE APPLIANCE OFF
To turn off the cooking top entirely hold down
the On-Off key.
• SAFETY SWITCH
The appliance has a safety switch that
automatically switches off the cooking zones
when they have been operating for a certain
amount of time at a given power level.
POWER LEVEL OPERATING TIME
LIMIT (hours)
1 - 2 6
3 - 4 5
5 4
6 - 7 - 8 - 9 1,5
CLEANING AND MAINTENANCE
Remove any residues of food and drops of
grease from the cooking surface by using the
special scraper supplied on request.
Clean the heated area as thoroughly as
possible using suitable products, and a cloth/
paper, then rinse with water and dry with a
clean cloth.
Using the special scraper immediately remove
any fragments of aluminium and plastic
material that have unintentionally melted on
the heated cooking area, or residues of sugar
or food with a high sugar content.
In this way, any damage to the cooktop
surface can be prevented. Under no
circumstances should abrasive sponges, or
corrosive chemical detergents, such as oven
sprays or stain removers, be used.
WARNING: STEAM CLEANERS MUST
NOT BE USED.
DISPOSAL OF OLD ELECTRICAL
APPLIANCES
The European Directive 2002/96/EC
on Waste Electrical and Electronic
Equipment (WEEE), requires that old
household electrical appliances must
not be disposed of in the normal
unsorted municipal waste stream. Old
appliances must be collected separately in
order to optimise the recovery and recycling of
the materials they contain and reduce the
impact on human health and the environment.
The crossed-out dustbin symbol on the product
reminds you of your obligation regarding
separated waste collection. Consumers should
contact their local public service or their local
dealer for more information on the correct
disposal of exhausted household appliances.
THE MANUFACTURER DECLINES ALL
RESPONSIBILITY FOR EVENTUAL
DAMAGES CAUSED BY BREAKING THE
ABOVE WARNINGS.
THE WARRANTY IS NOT VALID IN
THE CASE OF DAMAGE CAUSED BY
FAILURE TO COMPLY WITH THE ABOVE-
MENTIONED WARNINGS.

13
deutsch
de
Lesen Sie den Inhalt dieses Handbuchs,
da sie wichtige Informationen zur sicheren
Installation, Einsatz und Wartung zur
Verfügung stellt.
Halten Sie Anweisungen zum späteren
Nachschlagen.
Alle damit verbundenen Aufgaben
(elektrische Verbindungen) muss durch
geschultes Personal in Übereinstimmung
mit den Vorschriften durchgeführt werden.
SICHERHEITSHINWEISE
• Verwenden Sie das Kochfeld ausschließlich
im haushaltsüblichen Rahmen zum
Zubereiten und Warmhalten von Speisen.
Alle anderen Anwendungsarten sind
unzulässig.
• Personen, die aufgrund ihrer physischen,
sensorischen oder geistigen Fähigkeiten
oder ihrer Unerfahrenheit oder Unkenntnis
nicht in der Lage sind, das Kochfeld sicher
zu bedienen, müssen bei der Bedienung
beaufsichtigt werden.
• Kinder unter acht Jahren müssen vom
Kochfeld ferngehalten werden - es sei
denn, sie werden ständig beaufsichtigt.
• Kinder ab acht Jahren dürfen das Kochfeld
nur ohne Aufsicht bedienen, wenn
ihnen das Gerät so erklärt wurde, dass
sie es sicher bedienen können. Kinder
müssen mögliche Gefahren einer falschen
Bedienung erkennen und verstehen
können.
• Lassen Sie Kinder niemals mit dem Gerät
spielen.
• Kinder dürfen das Kochfeld nicht ohne
Aufsicht reinigen oder warten.
• Durch unsachgemäße Installations- und
Wartungsarbeiten oder Reparaturen
können erhebliche Gefahren für den
Benutzer entstehen. Der Hersteller haftet
nicht für diese Schäden.
• Stromschlaggefahr! Nehmen Sie das
Kochfeld bei einem Defekt oder bei
Brüchen, Sprüngen oder Rissen in der
Glaskeramikscheibe nicht in Betrieb bzw.
schalten Sie es sofort aus. Trennen Sie es
vom Stromnetz.
• ACHTUNG: Falls das Stromkabel
beschädigt ist, muss es vom Hersteller,
Kundendienst oder Fachpersonal ersetzt
werden, um jede Gefahr zu verhindern.
• ACHTUNG: Das Gerät und die
zugänglichen Geräteteile werden während
des Betriebs heiß. Berühren Sie nicht die
Heizelemente.
• ACHTUNG: Öle und Fette können sich
bei Überhitzung entzünden. Löschen Sie
niemals Öl- und Fettbrände mit Wasser.
Schalten Sie das Gerät aus und ersticken
Sie die Flammen vorsichtig mit einem
Deckel oder einer Löschdecke.
• ACHTUNG: Das Kochfeld wird bei
Betrieb heiß und bleibt es noch einige
Zeit nach dem Ausschalten. Erst wenn
die Restwärmeanzeigen erloschen sind,
besteht keine Verbrennungsgefahr mehr.
• ACHTUNG: Lassen Sie das Kochfeld
während des Betriebs nicht unbeaufsichtigt.
Einen kurzfristigen Kochübergang ständig
überwachen. Leerkochende Töpfe können
zu Schäden an der Glaskeramikscheibe
führen. Öle und Fette können sich bei
Überhitzung entzünden.
• Brandgefahr: Verwenden Sie das
Kochfeld nicht als Ablagefläche! Legen
Sie keine Metallgegenstände wie Messer,
Gabeln, Löffel oder Topfdeckel auf die
Oberfläche des Kochfelds, da diese heiß
werden können.
• Schalten Sie die Kochzonen nach
Gebrauch aus!
• Das Kochfeld ist nicht für den Betrieb mit
einer externen Zeitschaltuhr oder einem
Fernbedienungssystem bestimmt.

14
INSTALLATIONSANWEISUNGEN
Diese Anleitung ist für einen professionellen
Installateur und geben Hinweise für die
Installation, Betrieb und Instandhaltung in
Übereinstimmung mit den Gesetzen und
Vorschriften. Wenn eine integrierte Ofen
oder andere Geräte, die Wärme erzeugt,
muss direkt unter dem Kochfeld Ofen
montiert werden,
ES IST müssen solche Geräte (Backofen)
und IN Glaskeramik-Kochfeld richtig isoliert
sind, so dass die Wärme aus dem Ofen
nehmen, auf der rechten Seite von der
Unterseite des Kochfeldes gemessen, nicht
mehr als 60 ° C erzeugt.
Die Nichtbeachtung dieser
Vorsichtsmaßnahme kann zu einer
Fehlfunktion des Systems führen TOUCH
CONTROL.
POSITIONIERUNG
Das Gerät ist so konzipiert, dass in
einer Arbeitsplatte ummantelt, wie in der
Abbildung (Abb. 1) dargestellt.
Geben Dichtungsmittel (Abb. 2) entlang
des gesamten Umfangs (cut Größe (Abb.
1). Block Apparatur auf der Arbeitsfläche
mit den 4 Stützen, unter Berücksichtigung
der Dicke der Ebene (Abb. 4). Wenn der
Unterseite des Gerätes, nach der Installation
ist von der Unterseite des Gehäuses, eine
Unterteilungszuschnitt Einhaltung der
angegebenen Maße (Abb. 3),
LÜFTUNG
Der Abstand zwischen dem Kochfeld und
Küchenmöbel und Geräte in der Brust
müssen so sein, ausreichende Belüftung und
eine ausreichende Abluft zu gewährleisten
(Abb.3).
Verwenden Sie nicht das Kochfeld, wenn
der Ofen ist in den Prozess der Pyrolyse.
ELEKTROANSCHLUSS (Abb.5)
Vor dem Verlegen der elektrischen
Anschlüsse, um sicherzustellen, dass:
- Die Eigenschaften der Anlage sind wie die
Angaben auf dem Typenschild auf dem
unteren Teil des Arbeitsplans angewendet
zu treffen;
- Die Anlage ist mit einer Erdung in
Übereinstimmung mit den Regeln und
Gesetzen in Kraft ausgestattet. Die Erdung
ist gesetzlich vorgeschrieben.
Im Falle, dass das Gerät nicht mit Kabel
und / oder die relative ausgestattet war,
zeigte die Verwendung von Material für die
Absorption in dem Typenschild und der
Betriebstemperatur. Wenn Sie eine direkte
Verbindung mit der Stromleitung wollen,
müssen Sie einen zweipoligen Umschalter
mit einem Minimum von 3 mm zwischen
Kontakten, angemessen auf die Last auf
dem Etikett angegeben und entspricht der
aktuellen Gesetzgebung (der Dirigent gelb
/ grün sein sollte unterbrochen durch den
Schalter). Nach der Installation des Gerätes
muss der Pol-Schalter leicht zugänglich
sein.
INDUKTIONSKOCHEN
Beim Induktionskochen entwickelt sich
die Hitze direkt am Pfannenboden. Daraus
ergeben sich viele Vorteile für Sie:
• Zeitersparnis beim Kochen und Braten.
Das Kochgeschirr wird direkt erhitzt.
• Geringerer Energieverbrauch.
• Einfache Reinigung und Wartung.
Verspritztes Essen brennt sich nicht so
schnell in das Kochfeld ein.
• Kontrollierte Wärmezufuhr und
höhere Sicherheit. Die Kochzone
reagiert unverzüglich auf jede
Leistungsstufenänderung, so kann die
Temperatur präzise eingestellt werden.
Die Wärmezufuhr wird unterbrochen,
sobald Sie das Kochgeschirr von der
Kochzone entfernen, auch wenn diese
noch eingeschaltet ist.

15
KOCHGESCHIRR
Nur ferromagnetisches Kochgeschirr
aus following Materialien ist für
Induktionskochfelder geeignet:
• Emaillierter Stahl
• Gusseisen
• Induktionstaugliches Kochgeschirr aus
Edelstahl.
Um festzustellen, ob das Kochgeschirr
geeignet ist, prüfen Sie, ob der Topf- oder
EINEN Pfannenboden Magneten anzieht
(Abb. 6).
There is und andere induktionstaugliche
Töpfe Pfannen, Derens Böden Angebote
sind nicht voll ferromagnetisch. Für gute
Kochresultate empfehlen wir that sterben
Dimension des ferromagnetischen Bereichs
Kochgeschirrs des mit der Größe der
Kochzone übereinstimmt.
Wir empfehlen, flacher Boden Empfänger
(Abb.6A). Verwenden Sie keine Pfannen
mit einem rauen Grundlage, um Kratzer zu
vermeiden die Oberflächentemperatur des
Plans. Auf diese Weise kann die Energie
optimal genutzt werden. Ein wesentlicher
Faktor bei der Induktion Kochen sind
letztlich die Größe des Pots in Bezug auf die
Platte verwendet (Abb. 6B). Die Kochzonen
erlauben die Verwendung von Behältern mit
unterschiedlichen Durchmessern Fonds. Es
„immer noch vorzuziehen, die entsprechende
Kochzone dem Durchmesser des Topfes
Sie verwenden möchten, verwenden.
BEDIENUNG DES KOCHFELDS
Dieses Kochfeld ist mit elektronischen
Sensortasten ausgestattet, die auf
Fingerkontakt reagieren. Die Anzeigen
auf das Bedienfeld und die Signaltone
bestätigen die Aktivierung der ausgewählten
Funktion. Die Sensortasten nicht abdecken.
• BEDIENFELD (Abb.7)
A
F
E
B
CD
E
GH
CD
A. Ein/Aus-taste
B. Verriegelung-Taste
C. Kochzone [+]-Taste (Inkrement)
D Kochzone [-]-Taste (Dekrement)
E. Kochzone Display
F. Timer Display
G. Timer [+]-Taste (Inkrement)
H. Timer [-]-Taste (Dekrement)
• KOCHFELD EINSCHALTEN
Beim ersten Einschalten des Kochfeldes
befindet sich das Gerät in Sicherheitsposition,
die Verriegelung-Taste leuchtet. Um das
Gerät verwenden zu können, muss die
Sicherheitsfunktion deaktiviert werden.
Dazu drücken Sie die Verriegelung-Taste
solange bis die Kontrollleuchte erlischt.
Die Ein/Aus-taste drücken, um das
Glaskeramikfeld einzuschalten. Die Anzeige
E schaltet sich im Standby-Modus «0» ein.
Die Kontrolleinheit bleibt für die Dauer von
10 Sekunden eingeschaltet. Wird innerhalb
dieses Zeitraumes das Kochfeld nicht
betätigt, geht die Elektronik automatisch
wieder in die OFF-Position über. Es muss
dann der eben beschriebene Vorgang
wiederholt werden, um das Kochfeld
einzuschalten.
• KOCHZONEN EINSCHALTEN
Drücken Sie die Kochzone-[+]-Taste um
die gewählte Kochzone auf Stufe 4 (mittlere
Heizleistung), oder die Kochzone-[-]-Taste,
um die gewählte Kochzone auf Stufe 9 (volle
Heizleistung) einzuschalten. Die Stufen 4
und 9 sind die am meisten verwendeten
Kochstufen, daher fängt die Elektronik dort
mit dem Zählen an. Mit den Kochzone [+]
und [-] Tasten können Sie jede gewünschte

16
Heizleistung einstellen.
Die Leistung der einzelnen Kochzonen kann
in 9 verschiedene Positionen eingestellt
werden und wird von der Anzeige E mit einer
Zahl von «1» bis «9» angezeigt.
• ERKENNUNG VON KOCHGESCHIRR
Dieses Kochfeld ist mit einer interaktiven
Steuerung versehen, die die Bedienung des
Geräts erleichtert.
Wenn eine Pfanne aus einer aktiven
Kochzone entfernt, zeigt das entsprechende
Display das Symbol « » an. Das Symbol
erlöscht, sobald das Kochgeschirr wieder
auf die Kochzone gestellt wird.
Der Kochvorgang setzt sich dann
automatisch auf der ursprünglich eingestellte
Leistungsstufe fort.
Nach Kochende die Leistungsstufe auf
«0» zurückstellen (das Symbol « » muss
gelöscht sein).
Das Symbol « » wird auf dem Display auch
angezeigt, falls:
1) das Kochgeschirr für das
Induktionskochfeld nicht geeignet ist;
2) der Bodendurchmesser kleiner ist als der
vom Gerät vorgesehene.
• RESTWÄRME «H»
Wenn die Temperatur der Kochzone noch
hoch (mehr als 50°) nach dem Ausschalten,
wird die Anzeige in Bezug auf diesen Bereich
angezeigt «H» (Restwärme). Die Anzeige
verschwindet, wenn es keine Gefahr von
Verbrennungen.
• POWER BOOST-FUNKTION «P»
Diese Funktion verkürzt die Garzeit auf
einem bestimmten Feld noch weiter, indem
die Temperatur für einen Zeitraum von 10
Minuten auf Höchstleistung gebracht wird.
Nach Ablauf dieses Zeitraums kehrt die
Leistung automatisch zur Stufe «9» zurück.
Die Verwendung dieser Funktion ist für die
besonders schnelle Erwärmung großer
Mengen an Flüssigkeit (z.B. Wasser zum
Kochen von Teigwaren) oder an Gerichten
angezeigt. Zur Aktivierung dieser Funktion
das Kochfeld wählen und die Kochzone
[+]-Taste bis zur Stufe «9» drücken. Erneut
die Kochzone [+]-Taste drücken. Es ertönt
ein akustisches Signal, und das Symbol «P»
erscheint in Entsprechung des Kochfeldes
auf dem Display E.
• TIMER
Durch diese Funktion kann die Zeit (von «01»
bis «99» Minuten) bis zum automatischen
Abschalten der ausgewählten Kochzone
eingestellt werden. Wählen Sie eine
Kochzone aus und stellen Sie für diese
die gewünschte Kochstufe ein. Durch das
gleichzeitige Drücken der Timer [+] und
[-] Tasten wird der Timer aktiviert. Durch
nochmaliges gleichzeitiges Drücken der
Timer [+] und [-] Tasten wird die Kochzone
ausgewählt, für die der Timer aktiviert wird.
Durch einen Leuchtpunkt an den Ecken
des Timer Displays wird die gewählte
Kochzone angezeigt. Mit den Timer [+]
und [-] Tasten kann nun die gewünschte
Garzeit eingestellt werden. Nach Ablauf
der eingestellten Kochzeit schaltet sich die
Kochzone automatisch ab und es ertönt
ein akustisches Signal, das durch Drücken
einer beliebigen Taste abgestellt wird.Zum
Deaktivieren des Timers wieder gleichzeitig
die Timer [+] und [-] Tasten drücken und
durch nochmaliges Drücken beider Tasten
die Kochzone auswählen. Mit Hilfe der
Timer [-]-Taste die Zeit zurückstellen bis auf
dem Display «0» erscheint.
• VERRIEGELUNG
Das Bedienfeld kann verriegelt werden,
um eine ungewollte Änderung der
Kochzoneneinstellung zu vermeiden (während
der Reinigung, Kinder, usw.). Um diese
Funktion zu aktivieren, die Verriegelung-taste
drücken. Die entsprechende Anzeige leuchtet
auf. Während diese Funktion kann das Gerät
ein- und ausgeschaltet werden. Um diese

17
Funktion zu deaktivieren, die Verriegelung-
tastewieder drücken. Die entsprechende
Anzeige erlöscht.
• KOCHZONEN AUSSCHALTEN
Um eine Kochzone auszuschalten,
gleichzeitig die Kochzone [+] und [-] Tasten
der entsprechenden Kochzone drücken, oder
die Kochzone [+]-Taste bis zur Position «
0
».
• KOCHFELD AUSSCHALTEN
Um das Gerät vollständig das Kochfeld
ausschalten, drücken Sie Ein/Aus-taste.
• SICHERHEITSAUSSCHALTUNG
Dieses Gerät ist mit einer
Sicherheitsausschaltung ausgestattet, das
alle Kochzonen nach der Betriebsdauer-
Begrenzung automatisch ausschaltet. In
diesem Fall erscheint auf dem Kochzonen-
Display die Restwärme «H».
LEISTUNG BETRIEBSDAUER-BE-
GRENZUNG (Stunden)
1 - 2 6
3 - 4 5
5 4
6 - 7 - 8 - 9 1,5
REINIGUNG UND PFLEGE
Nehmen Sie alle verbleibenden Lebensmittel-
und Tropfen Fett von der Kochfläche mit einem
speziellen Schaber auf Anfrage geliefert.
Reinigen Sie den beheizten Bereich so gut
wie möglich mit geeigneten Produkten und
Papier-Tuch, dann mit Wasser und trocknen
Sie mit einem sauberen Tuch gründlich.
Unter Verwendung der speziellen Schaber,
um umgehend entfernen aus beheizten Koch
Stücke aus Aluminiumfolie und Kunststoff
scioltisi versehentlich oder Rückstände
von Zucker oder Lebensmittel mit hohem
Zuckergehalt. Auf diese Weise verhindert eine
mögliche Beschädigung der Oberfläche des
Bodens.
Unter keinen Umständen sollten Sie kratzende
Schwämme oder reizende chemische
Reinigungsmittel wie Backofenspray oder
Fleckenentferner.
ACHTUNG: Sollte nicht verwendet werden
Dampfreiniger.
ENTSORGUNG VON ELEKTRO- UND
ELEKTRONIK-ALTGERÄTEN
Gemäß der Europäischen Richtlinie
2002/96/EC über Elektro- und
Elektronik-Altgeräte (WEEE) dürfen
Elektrohaushalts-Altgeräte nicht
über den herkömmlichen
Haushaltsmüllkreislauf entsorgt werden.
Altgeräte müssen separat gesammelt
werden, um die Wiederverwertung und das
Recycling der beinhalteten Materialien zu
optimieren und die Einflüsse auf die Umwelt
und die Gesundheit zu reduzieren. Das
Symbol „durchgestrichene Mülltonne“ auf
jedem Produkt erinnert Sie an Ihre
Verpflichtung, dass Elektrohaushaltsgeräte
gesondert entsorgt werden müssen.
Endverbraucher können sich an Abfallämter
der Gemeinden wenden, um mehr
Informationen über die korrekte Entsorgung
ihrer Elektrohaushaltsgeräte.
FÜR SCHÄDEN, DIE DURCH
NICHTBEACHTUNG DIESER
BEDIENUNGSANLEITUNG ENTSTEHEN,
ÜBERNIMMT DER HERSTELLER KEINE
HAFTUNG.
DIE GARANTIE GILT NICHT FÜR SCHÄDEN,
DIE DURCH NICHTBEACHTUNG DIESER
BEDIENUNGSANLEITUNG ENTSTEHEN.

18
español
es
Lea atentamente el contenido de este
libro que le proporcionará importantes
instrucciones en cuanto a la seguridad de
instalación, uso y mantenimiento.
Conservar el manual para cada ulterior
consulta.
Todas las operaciones relativas a la instalación
(conexión eléctrica) deben ser realizadas
por personal especializado conformes a las
normas vigentes.
ADVERTENCIAS PARA LA SEGURIDAD
• La placa vitrocerámica se tiene que usar
siempre dentro de los límites del normal
uso doméstico para preparar y mantener
calientes los alimentos, y no para un uso
profesional. No se admite ningún otro uso.
• Las personas que por sus capacidades
físicas, sensoriales o psiquicas o por su
inexperiencia o desconocimiento no fueran
capaces de utilizar de manera segura la
placa vitrocerámica, no tienen que utilizarla
sin la supervisión y la guía de una persona
responsable.
• Los niños que tengan menos de 8 años tienen
que estar lejos de la placa vitrocerámica
excepto si estuvieran acompañados por un
adulto que los controle.
• Eventualmente, los niños que tengan una
edad superior a los 8 años podrían utilizar
solos el aparato, si fueran capaces de
hacerlo correctamente. Es importante que
sepan reconocer los peligros que puedan
derivar de una utilización incorrecta.
• No permitir que los niños jueguen con la
placa vitrocerámica.
• Los niños no tienen que limpiar ni realizar
mantenimiento a la placa vitrocerámica a
menos que no estén vigilados por un adulto.
• Trabajos de instalación y mantenimiento,
así como reparaciones, tienen que ser
realizados por personal especializado. Si
los trabajos o reparaciones no se realizan
correctamente, pueden causar graves
peligros para el usuario.
• ¡Riesgo de descarga eléctrica! No poner
en marcha o apagar enseguida la placa
vitrocerámica si la misma presenta grietas o
està dañada. Desconectar el aparato de la
red eléctrica.
• ATENCIÓN: Si el cable de alimentación
está dañado,para evitar riesgos, este tiene
que ser cambiado por el fabricante, por
el servicio de asistencia autorizado o por
personal cualificado
• ATENCIÓN: El aparato y sus piezas
accesibles alcanzan temperaturas elevadas
durante el uso. Procure no tocar las partes
calientes.
• ATENCIÓN: La cocción con aceite o grasa
puede ser peligrosa y puede provocar
incendios. Si el aceite o la grasa se
incendiaran, no usar NUNCA agua para
tratar de apagar el fuego. Sofoque las
llamas por ejemplo con una tapa, un trapo
de cocina húmedo o algo por el estilo.
• ATENCIÓN: La placa vitrocerámica se
calienta mucho cuando està en función
y queda caliente por un rato hasta
después de haberla apagado. El riesgo
de quemaduras deja de existir cuando se
apagan los indicadores del calor residual.
• ATENCIÓN: vigilar el normal proceso de
cocción. Un proceso de cocción de corta
duración tiene que ser continuamente
vigilado. Ollas de las que continuamente se
evaporan líquidos pueden provocar daños
a la placa vitrocerámica. Grasa y aceite que
se calienten demasiado pueden empezar a
quemar y provocar un incendio.
• ¡Riesgo de incendio! No colocar objetos
sobre la superficie de cocción!
Objetos metálicos como cuchillos,
tenedores, cucharas y tapas no tienen
que apoyarse en la superficie de la placa
vidrocerámica porque se pueden calentar
demasiado.
• ¡Apagar siempre las zonas de cocción
después de haberlas usado!
• El destino del aparato no es el de ser usado
mediante un temporizador externo o un
sistema de control remoto por separado.

19
INSTRUCCIONES PARA LA
INSTALACION
Las presentes instrucciones están dirigidas
a un instalador especializado y sirven de guía
para una correcta instalación, regulación
y mantenimeinto en conformidad con las
leyes y normas vigentes.
Si un horno de encastrar o cualquier otro
aparato que genera calor debe ser montado
directamente debajo de la Vitrocerámica, ES
NECESARIO QUE TAL APARATO (Horno) Y
EL VIDRIO QUEDEN ADECUADAMENTE
AISLADOS, de modo que el calor generado
por el horno (medido en la parte derecha-
frontal del fondo de la Vitro), no supere los
60º C.
La falta de tal precaución podría producir
un mal funcionamiento del sistema TOUCH
CONTROL.
POSICIONAMIENTO
Este electrodomestico ha sido realizado para
ser encastrado en una encimera, tal y como
ilustra la figura (Fig.1). Instalar el material
aislante (Fig.2) de la dotación a lo largo de
todo el perímetro del orificio practicado para
acoger la Placa (Fig.1).
Fijar el aparato a la encimera mediante las 4
grapas, teniendo en cuenta el espesor de la
encimera (Fig.4). Si despues de la instalación
se puede acceder a la parte inferior del
aparato desde la parte inferior del mueble
es necesario montar un panel separador
respetando las distancias indicadas (Fig.3).
VENTILACIÓN
La distancia entre el electrodomestico y
los muebles o los aparatos que cocinan de
la cocina incorporada debe garantizar la
suficiente ventilación del aire (Fig.3).
No utilizar el electrodomestico si en el horno
es en curso el proceso de la pirolisis.
CONEXIÓN ELECTRICA (Fig.5)
Antes de efectuar la conexión eléctrica,
asegurese que:
- Las características de la acometida y
tendido se puedan corresponder con las
necesidades indicadas en la placa de
características del aparato.
- La instalación esté dotadas de la
correspondiente toma a tierra, según
normas y leyes vigentes.
La toma a tierra es obligatoria por ley.
En el caso que el aparato no estuviera
dotado de cable y/o correspondiente
enchufe, utilice material adaptado a la
absorción eléctrica indicada en el Placa
de caracteristicas, y a la temperatura de
funcionamiento.
Si se desea una conexión directa a la
línea eléctrica, es necesario interponer un
interruptor omnipolar, con una apertura
mínima de 3 mm entre contactos, apropiado
a la carga indicada en la placa y conforme
a normas vigentes (el conductor a tierra
amarillo/verde no debe ser interrumpido por
el conmutador).
Terminada la instalación del aparato, el
interruptor omnipolar debe quedar siempre
facilmente accesible.
LIMPIEZA Y MANTENIMIENTO
Cuando se usa la cocción por inducción
el calor se genera directamente en la base
de la olla. Por este motivo, presenta varias
ventajas:
• Ahorro de tiempo mientras se hierven los
alimentos o se fríen, gracias al calor que
llega directamente del recipiente.
• Ahorro de energía.
• Resultan más fáciles el cuidado y la
limpieza. Los alimentos que se vuelcan no
se queman tan rápidamente.
• Control de la temperatura y mayor
seguridad. El quemador reacciona
inmediatamente al cambio de temperatura;
de esta manera la potencia se puede
dosificar de forma precisa. La zona de
cocción por inducción deja de producir
calor si se quita la olla aunque si el
quemador todavía está encendido.

20
RECIPIENTES PARA LA COCCIÓN
Sólo son adecuados para cocinar
por inducción ollas/recipientes
ferrromagnéticos y pueden ser de:
• Acero esmaltado
• De fundición de hierro
• Recipientes/ ollas especiales para la
inducción en acero inoxidable.
Para saber si los recipientes son adecuados,
verifique que un imán los pueda atraer
(Fig.6).
Hay otras ollas especiales para la
inducción cuyos fondos no son totalemte
ferromagnéticos. Para obtener una buena
cocción, les aconsejamos utilizar ollas
cuya zona ferromagnética tenga el mismo
tamaño del quemador.
Se aconseja el uso de recipientes de fondo
plano (Fig.6A). No utilice recipientes con
base ruda, para evitar rasguñar la superficie
térmica de la placa. De este modo, la energía
puede ser utilizada de modo optimal.
Un factor importante en la cocción a
inducción, es el tamaño de la olla en
relación a la placa utilizada (Fig.6B). Las
zonas de cocción permiten el empleo de
recipientes con fondos de varios diámetros.
En todo caso, es preferible utilizar la zona de
cocción apropiada al diámetro de la olla que
se quiere utilizar.
USO DE LA PLACA DE COCCIÓN
Este aparato usa un sistema de
programación electrónico “touch control” en
el que las funciones se activan tocando las
teclas sensoriales y se conferman con las
indicaciones en la pantalla de visualización
y con señales acústicas. Tocar las teclas
desde arriba sin cubrirlas.
• PANEL DE MANDOS (Fig.7)
A
F
E
B
CD
E
GH
CD
A. tecla On-Off
B. tecla Bloque
C. tecla Zona [+] (aumentos)
D. tecla Zona [-] (disminuciones)
E. pantalla visualización Zona
F. pantalla visualización Timer
G. tecla Timer [+] (aumentos)
H. tecla Timer [-] (disminuciones)
• ENCENDIDO DE LA PLACA DE
COCCIÓN
Pulse el tecla On-Off para encender la placa.
Todos los displays de las zonas de cocción
se activarán en posición de standby «0».
La unidad de control permanecerá activa
durante 10 segundos.
Si en este plazo no se selecciona ninguna
zona de cocción, la placa se apagará
automáticamente.
• ENCENDIDO DE LAS ZONAS DE
COCCIÓN
Escoja la zona de cocción deseada,
pulsando una de las teclas Zona [+]. Pulse
la tecla Zona [-] para ir a la posición «9»
o la tecla Zona [+] para ir a la posición
«1». Efectuada esta operación, es posible
escoger las regulaciones de temperatura
con las teclas Zona [+] o [-].
La potencia de la zona individual de cocción,
puede ser regulada en 9 posiciones
diferentes y será visualizada por el display
luminoso con un número de «1» a «9».
• DETECCIÓN DE OLLAS « »
Esta placa vitrocerámica está equipada
con un sistema de control interactivo por lo
que resulta fácil de usar. Cuando se quite
la olla de una zona de cocción activa en la
pantalla de visualización aparecerá el símbolo
« ». Este desaparecerá si la olla se volverá
a colocar encima da la zona y la cocción
La page est en cours de chargement...
La page est en cours de chargement...
La page est en cours de chargement...
La page est en cours de chargement...
La page est en cours de chargement...
La page est en cours de chargement...
La page est en cours de chargement...
La page est en cours de chargement...
La page est en cours de chargement...
La page est en cours de chargement...
La page est en cours de chargement...
La page est en cours de chargement...
-
 1
1
-
 2
2
-
 3
3
-
 4
4
-
 5
5
-
 6
6
-
 7
7
-
 8
8
-
 9
9
-
 10
10
-
 11
11
-
 12
12
-
 13
13
-
 14
14
-
 15
15
-
 16
16
-
 17
17
-
 18
18
-
 19
19
-
 20
20
-
 21
21
-
 22
22
-
 23
23
-
 24
24
-
 25
25
-
 26
26
-
 27
27
-
 28
28
-
 29
29
-
 30
30
-
 31
31
-
 32
32


Zigmund & Shtain CIS 029.30 WX Manuel utilisateur
- Catégorie
- Plaques de cuisson
- Taper
- Manuel utilisateur
dans d''autres langues
Documents connexes
-
Zigmund & Shtain CIS 029.30 WX Manuel utilisateur
-
-
-
-
-
Autres documents
-
Barazza 1PIDS90N Mode d'emploi
-
Foster 7322/300 Use And Installation Manual
-
-
-
-
-
Smeg FTH380 Manuel utilisateur
-
ARIETE 180 B-taste Manuel utilisateur
-
Haier HCE520E Manuel utilisateur
-