Swann C510R Guide d'installation
- Catégorie
- Des caméras de sécurité
- Taper
- Guide d'installation

C510R
Professional CCTV Camera
Installation Guide
with Night Vision
English
If this device does not work when you first plug it in, do not take
it back to the store.
Swann Communications warrants this product against defects in workmanship and material for a
period of one (1) year from it’s original purchase date. You must present your receipt as proof of
date of purchase for warranty validation. Any unit which proves defective during the stated period
will be repaired without charge for parts or labour or replaced at the sole discretion of Swann. The
repair or replacement will be warranted for either ninety days or the remainder of the original one
year warranty period, whichever is longer. The end user is responsible for all freight charges incurred
to send the product to Swann’s repair centres. The end user is responsible for all shipping costs
incurred when shipping from and to any country other than the country of origin. The warranty does
not cover any incidental, accidental or consequential damages arising from the use of or the inability
to use this product. Any costs associated with the fitting or removal of this product by a tradesman
or other person or any other costs associated with its use are the responsibility of the end user. This
warranty applies to the original purchaser of the product only and is not transferrable to any third
party.
Unauthorised end user or third party modifications to any component or evidence of misuse or
abuse of the device will render all warranties void.
Help Desk / Support Details
Warranty Information
www.swannsecurity.com
4
Swann Technical Support
All Countries E-mail: [email protected]
Telephone Helpdesk
UNITED STATES toll free
877-274-3695
(Sun-Thurs, 2pm-10.30pm PST)
800-627-2799
(Mon-Fri, 9am-1pm PST)
USA Exchange & Repairs
562-777-2551
(Mon-Fri, 9am-5pm PST)
AUSTRALIA toll free
1300 13 8324
(Mon-Fri, 9am-5.30pm Aus EST)
International
+61 3 8412 4610
(Mon-Fri, 9am-5.30pm Aus EST)
See http://www.worldtimeserver.com for information on different time
zones and the time in Melbourne Australia compared to your local time.
Contact the Swann Helpdesk using our fast e-mail service
[email protected] or call us on one of the Toll-Free
numbers shown on the back cover of this booklet.
Most problems can be quickly and easily fixed with a simple
e-mail or a quick chat with one of our friendly technical staff.
(Toll-Free available in the US and Australia only)
WARNING: IMPORTANT
NOTICE ABOUT CORRECT
USE OF POWER ADAPTER
The correct orientation
for the enclosed power
adapter is in a vertical
or floor mount position.
L’orientation correcte pour
L’adapteur secteur fourni
est dans une position
verticale ou plancher-
monte.
La orientacion correcta para
el adaptador electrico incluido
es en posicion vertical o instalado
en el suelo.
INSTALLATION
INSTALLATION
FCC WARNIN G STATEMENT
This device complies with Part 15 of FCC Rules.
Opera tion is subject to the following tw o conditions:
(1) This device may not cause harmful interfe re nce, and
(2) th is device must accept any inte rfe rence re ceived,
including inte rfe rence th at may cause undesired operati on

1. C510R Colour CCD Security Camera
2. Manual Focus Lens
3. Adjustable Camera Stand
4. )
5. 10m (33feet) Cable
6.
12Volt DC Power Adaptor (adaptor design varies depending on country .
Instruction Manual (this document)
Before permanently fixing your C510R in the location which you wish to observe, fix it temporarily and
connect the necessary cables and check using your Video Monitor or TV to ensure you have a clear field
of view. Check also that the camera will not be pointing directly into a strong light source (check at
different times of the day to ensure the sun will not interfere with the image) or that there are any other
obstructions. Once this is complete, adjust the camera for focus and check that you have the correct field
of view. Once you are satisfied that the image is appropriate to your requirements, fix the stand to the
location correctly using the appropriate screws, and if necessary wall anchors. After mounting the
Camera Stand in the location the camera will be used, screw the C510R to the stand and tighten firmly.
Use the mounting hole in the top of the camera if mounting the C510R under a roof, ceiling or similar
surface to make sure that the picture shows correctly on your monitor.
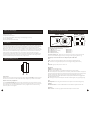
Description of connectors and controls on side of C510R
Pin arrangement for Auto Iris lens socket
Pin 1 - Video AI (+12V) DC AI (DAMP -)
Pin 2 - Video AI (Not Connected) DC AI (DAMP+)
Pin 3 - Video AI (VIDEO) DC AI (DRIVE+)
Pin 4 - Video AI (GROUND) DC AI (DRIVE -)
CS connector locking screw - Tighten this screw to lock the CS connector. Loosen to adjust the CS
connector to assist with focussing the lens if you cannot get a clear image using the focus ring.
Description of controls and connectors on the back panel of the C510R camera
Lens:
Video - Switch to this if using a Video Drive auto iris lens (ignore if using Manual Iris lens)
DC - Switch to this if using a DC (Direct) drive auto iris lens (ignore if using Manual Iris lens)
PL:
Power LED - Lights up when power to camera is on
Dip Switches:
AWB ON - Auto White Balance ON
AWB OFF - Auto White Balance OFF
MI - Mirror Image On/Off (On = Image flipped horizontally, Off = Normal image)
EE - Electronic Exposure control (
)
AI -
BLC - Back Light Compensation On/Off (On=Auto BLC, Off=Strong BLC (very bright background))
Level:
Phase Adjustment - When using a DC drive Auto Iris lens adjust this control for best image quality
Video Out:
BNC Female connector - Connects to BNC Male connector as fitted to supplied extension cable
12V DC IN:
Power connector - Connect using supplied 12Volt Power Adaptor or extension cable
In EE mode, a continuously variable electronic shutter is employed to
automatically control the exposure time of the CCD image sensor according to the incoming light level.
With this mode selected, a fixed or manual iris lens can be used instead of an auto iris lens
In AI mode, the CCD shutter speed is fixed to 1/60(1/50) second. And the incoming light level is
controlled by the auto iris lens.
AWB ON
LENS
EE
BLC ON
VIDEO
MI ON
DC
OFF
LEVEL
OFF
AI
OFF
PL
12V DC IN
VIDEO OUT
Rear ViewSide View
1
2
3
4
CS connector locking screw
Fitting the lens:
Make sure the CS Connector Locking Screw is tight, then by holding the Lens Body(1) carefully screw the
lens into the CS Connector on the front of the camera body making sure you do not cross the thread.
Adjust the lens to suit your application:
Turn the Focus Adjustment Ring (2) clockwise or anti-clockwise to focus the camera. If the Lens will not
focus, Loosen the CS Connector Locking Screw and turn the CS Connector either in or out until correct
focus is obtained. Once you have adjusted the focus correctly, re-tighten the CS Connector Locking
Screw firmly, but do not over-tighten.
21
What’s In This Package? C510R Control and Socket Description
Introduction
Fitting and Setting The Lens
2 3
-
 1
1
-
 2
2


Swann C510R Guide d'installation
- Catégorie
- Des caméras de sécurité
- Taper
- Guide d'installation
dans d''autres langues
- English: Swann C510R Installation guide
Documents connexes
-
Swann DIY Security Cam Guide d'installation
-
-
-
-
-
-
Swann PRO-770 Guide d'installation