VIORE PD42VH80 Manuel utilisateur
- Catégorie
- Téléviseurs LCD
- Taper
- Manuel utilisateur

42" Plasma Television
PD42VH80
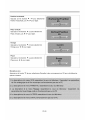
AIR (TV)/CABLE MODE SELECTION
The Air/Cable menu option is set to the"CABLE" (CableTetev ision) mode at the factory.
If you want to use an antenna for the built -in TVtuner, this menu op_on must be set to the
"Air" mode. Please refer to"CHA NNEL MENU"in page 20 of this manual for the details.

Contents
Contents .......................................................................................................... 1
Caution ............................................................................................................ 2
Unit and Accessory ........................................................................................ 4
Wall Mount ...................................................................................................... 5
Getting Started ............................................................................................... 6
Menu Operation ............................................................................................ 10
Simple Troubleshooting ............................................................................. 31
GB-1

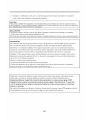
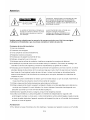
Caution
_R_ CAUTION: TO PREVENT ELECTRIC SHOCK,
DO NOT REMOVE COVER. NO USER-SERVICEABLE
t K PARTSINSIDE. REFER SERVICING TOQUALIFIED
SERVICE PERSONNEL.
The lightning symbol in the triangle tells you
that the voltage inside this product may be
strong enough to cause an electric shock.
The exclamation point in the triangle tells you
that important operating and maintenance
instructions follow this symbol. DO NOT TRY
TOSE RVlC E THIS PRODUCT YOURSELF
Please carefully study this manual and always keep it available, The following are some installation
and operation precautions, which you should be aware as a matte r of safety.
Important Safety Instructions
1) Read these instructions.
2) Keep these instructions.
3) Heed all warnings.
4) Follow alt instructions.
5) Do not usethisapparatus nearwater.
6) Clean onlywith dryctoth.
7) Do not block any ventilation openings. Install in accordance with the manufacturer's instructions.
8) Do not install near any heat sources such as radiators, heat registers, stoves, or other apparatus
(including amplifiers) that produce heat.
9) Do not defeat the safety purpose of the polarized or grounding-type plug. A polarized ptug has two blades with
one wider than the other. A grounding type plug has two blades and a third grounding prong. The wide blade or
the third prong are provided for your safety. If the provided plug does not fit into your outlet, consult an electrician
for reptacementof the obsolete outlet.
10) Protect the power cord from being walked on or pinched particularly d[ plugs, convenience receptacles, and the
pointwhere they exit from the apparatus.
11)Only use attachments/accessories specified by the manufacturer.
12) Use onlywith the cart, stand, tripod, bracket, or table specified by the manufacturer, or sold with the apparatus.
When a ca_t is used, use caution when moving thecart/apparatus combination to avoid injury from tip-over.
13) Unplug this apparatus during lightning storms or when unused for long periods of time.
14) Refer all servicing b qualified service personnel. Servicing is required when the apparatus has been damaged in
any way, such as power-supply cord or plug is damaged, liquid has been spilled or objects havefallen into the
apparatu& the apparatus has been exposed to rain or moisture, does not operate normally, or has been dropped.
Warning
1) To reduce the risk of fire or electric shock, do not expose this apparatu s to rain or moisture.
2) The apparatus shall not be exposed to dripping or splashing and that no objects filled with liquids, such as
vases, shall be placed on the apparatus.
3) The disconnect device (appliance inlet) shall remain readily operable.
GB-2

4)Changesormodificationstothisunitnotexpresslyapprovedbythepartyresponsibleforcompliance
couldvoidtheuseCsauthoritytooperatetheequipment.
CAUTION:
ThisproductsatisfiesFCCregulationswhen shielded cables and connectors are used to connect the unit to
other equipment. To prevent electromagnetic interference with electric appliances such as radios and televisions,
use shielded cables and connectors for connections.
DECLARATION:
This device complies with Part 15of the FCC Rules. Operation is subject to the following two conditions:
(1) This device may not cause harmful interference, and
(2) this device muetaccept any interference received, including interference that may cause undesired operation.
INFORMATION:
This equipment has been tested and found to complywith the limits for a Class B digital device, pursuant to
Part 15 of the FCC Rules. These limits are designed b provide reasonable protection against harmful
interference in a residential installation. This equipment generates, uses and can radiate radio frequency
energy and, if not installed and used in accordance with the instructions, may cause harmful interference to
radio communications. However, the_e is no guarantee that interference witt not occur in a particular
installation. If this equipment does cause harmful interference to radio or television reception, which can be
determined by turning the equipment off and on, the user is encouraged to try to correct the interference by
one or more of the following measures:
-Reorient or relocate the receiving antenna.
-increase the separation between the equipment and receiver.
-Connect the equipment into an outlet on a circuit dilferent from that to which the receiver is connected.
-Consult the dealer or an experienced radio/TV technician for help.
Additionally, viewing other stationary images and text such as stock market reports, video game displays,
station Iogos, web sites or computer graphics and patterns, should be limited as described above.
Displaying stationary images that exceed the above guidelines can cause uneven aging of PDP
Displays that leave subtle, but permanent burned-in ghost images in the PDP picture. To avoid this,
vary the programming and images, and primarily display full screen moving images, not stationary
patterns or dark bars.
Be careful in the selection and duration of television formats used for viewing. Uneven PDP aging as a result of
format selection and use, as well as burned-in images, are not covered by the warranty.
GB-3

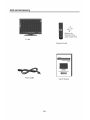
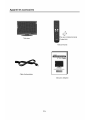
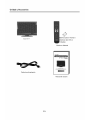
Unit and Accessory
TV Set
©
Batteries for
Remote Control
(Size AAAx2 PCS)
Remote Control
V|ORE" ................
42"P/e_tra r_/e,dsio n
Power Cable
User's Manual
GB-4

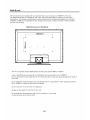
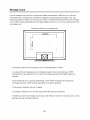
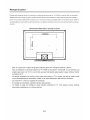
Wall Mount
The wall mount kit (not included) with your purchase allows you to mount your VIORE TV on the wall.
For detailed information on installing the wall mount, refer to the instructions provided by the wall mount
manufacturer. It is strongly recommended to contact a technician for professional assistance for wall mount
installation, VlORE is not responsible for any damage to the product or injury to yourself or others resulting
from the wall-mounting.
VESA Dimensions for Wall Mount
i • • • • g • i
\ /
600mm _1
E
E
o
o
o')
- This TV is complaint with the VESA Standart mounting hole patterrn 600mm x 300mm.
- 4 pcs of type M6 screws are required for installing the wall mount bracket to your VIORE TV.
Do not use screws that are longer than 12 ram. Screws that are too long may cause damage to the inside of
the TV set.
- Do not fasten the screws too tight for this may damage the TV or cause the TV to fall, resulting in personal
injury. VlORE is not liable for these kinds of incidents.
- Do not mount the TV at more than a 15 degree tilt.
- Always use two people to mount the TV to a wall.
- Do not install your Wall Mount Kit while yourTV is turned on. It may result
in personal injury due to electric shock.
GB-5

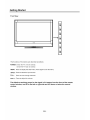
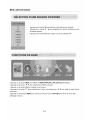
Getting Started
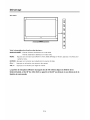
Front View
m
PO,A'ER
@
NENU
@
iNPUT
@
CH+
@
CH-
@
70L÷
@
70L-
@
The functions of the buttons are described as bellows:
POWER: Switch the TV on from standby.
Switch the TV back to standby.
MENU: Press to display the OSD menu, Press again to exit the menu.
INPUT: Press to select the input source.
CH+/-: Press to scan through channels.
VOL+/-: Press to adjust the volume.
The effective receiving scope for the signal is 5-8 meters from the front of the remote
control window, and 30°to the left or right side and 200above or below the control
window.
GB-6

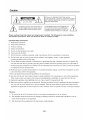
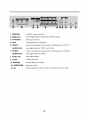
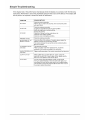
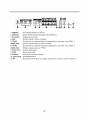
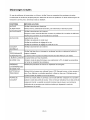
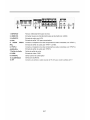
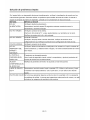
1.SERVICE
2. HDMI1/2/3
3. PC-AUDIO
4. VGA
5. YPbPrt
AUDIO (R/L)
6. YPbPr2
AUDIO (R/L)
7. Audio Out
8. CVBS
9. COAXIAL
10. |=ARPHONE
10. RF
USB Slot. (only for service )
HDMI (High-Definition Multimedia Interface) inputs.
Audio Input for VGA.
VGA signal input for computer,
Connect a component video device to these jacks,(with YPbPr 1)
Audio signal input for YPbPrl and CVBS.
Connect a component video device to these jacks,(with YPbPr 2)
Audio signal input for YPbPr2.
Audio signal output,
CVBS video input,
Coaxial digital audio output,
Earphone output,
Connect antenna or cable 75 Ohm coaxial to receive TV signal,
GB-7

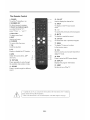
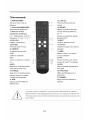
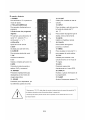
The Remote Control
1: POWER
To set the TV standby or on.
2: NUMBER KEY
For direct access to program.
3: Select two digital program
e.g.:select channel "5-1",
press "5" then "4-- " and "1".
4: VOL+NOL-
To adjust sound level.
5: EXIT
Used to exit menu.
6: CURSOR
To move within the menu.
7: OK
Confirms selection.
8: CC
Enable or disable the CC function.
9: MTS
Switch the sound stereo, SAP
and mono,
10: PICTURE
Press repeatedly to cycle through
the available video picture modes.
11: SOUND
Press to cycle through the different
sound.
3
4
8
9
10
11
12 12: CH.LIST
Used to display the channeI list.
13: INPUT
To display or exit TV input source.
menu,
14: qb
To access the previously viewed program,
15: MUTE
To disable or enable the sound.
16: CH+/CH-
To access the next or previous Program.
17: MENU
17 To display TV menu or to return
to the previous menu.
18: FAV
Used to access your favourite channels in
digital TV mode.
19: EPG
Press to enter the EPG menu directly.
20: DISPLAY
Displays the program Information.
21: SEEP
Set time to turn off the TV.
* To operate the LCD TV, you must point the remote control at the remote sensor of the TV (Objects-"]
laced between them may affect the operation). |
* Never let the remote sensor on the TV become exposed to the direct sunflght or strong fight ._
GB-8

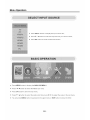
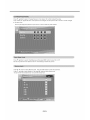
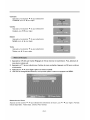
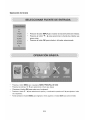
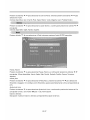
Menu Operation
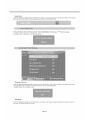
o Press INPUT button to displaytheinput source list;
o Press T / A button to select the inputsource you want to watch;
• PressOK button to enter theselected source.
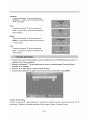
® Press MENU button to display the MAIN OSDMENU;
• Press _ t I_ button to select the MENU you want;
® Press OK button to enter the sub menu;
® Pres s _' / A button to select the option andthen press _1/ I_ to adjust the value in the sub menu;
• You canpressMENU buttontogoback to the uppermenu or EXITbuttontoctosetheOSD.
GB-9

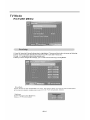
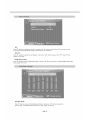
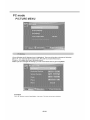
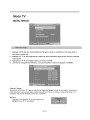
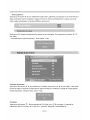
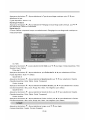
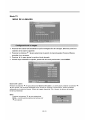
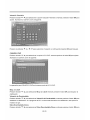
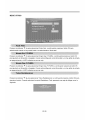
TV Mode
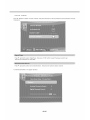
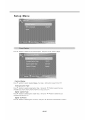
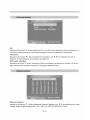
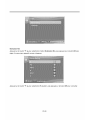
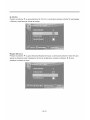
PICTURE MENU
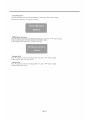
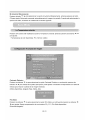
1,Press OK whenthe Picture Settings item is highlighted, Thenyouwillgotothe sub-menu as following.
2,Press _'/'_to aelectthe desired menu item. Press OK to proceed if necessary.
3,Press _/!_ toadjusttheitemto the desired level.
4,Whenyou have changed the settings, you can exit from the menu by pressing MENU.
Picture Mode
Press • / A button to select Pictu re Mode, than press _ / _ button to adjust. ©nl y in the User mode, the detail options
as fo}lowing can be adjusted. (Available picture mode: M ovie, User, Power saving, Dynamic, Standard.)
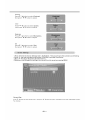
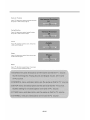
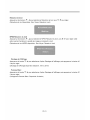
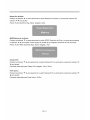
Brightness
Press T / A button to select Brightnes s,
thenprass _ / _ button toadjust.
GB-IO

Co nt ra st
Press T / A button to select Contrast,
thenpresS 41/ D,- button to adjust.
Color
PresS T / A button to select Colort,
then press _/_buttontoadjust.
Sharpness
Press • / A buttonto selectSharpness,
then press _/_*buttontoadjust.
Tint
Press T / A button to select Tint
thenpress _/_'buttontoadjust.
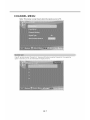
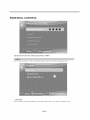
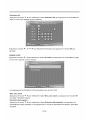
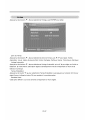
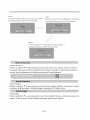
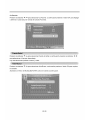
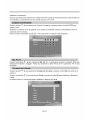
1.Press OKwhentheScreenSettingsitemis highlighted. Thenyouwillgotothesub-menuasfollowing.
2,Press 'v/ _,to select the desired menu item, Press OK to proceed if necessary.
3.Press _ / _- toadjust the item to the desiredlevet.
4,Whenyou have changedthe settings, you canexitfrom the menu by pressing MENU,
Screen Size
P ress T / A button to select Screen Size, then pres s 4 / _ b utton to adjust. (Available Screen Size: WaterGlass,Cin ema,
Fail, Normal)
GB-11

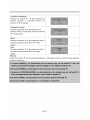
AutoWi de
Pre ss !_/ ,t,button le select the item Auto Wide, then press OK button to adjust, it ca n set the picture tofit the screen
automatically. When theAutoWideis selected, the symbolwillshow asfollowing :
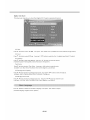
Dynamic Contrast
Press V'/ A button toselectthe item DynamicContrast, thenpresS _i / I_- buttonto adjust, itcan adjustthecontrast
corresponding tothe input signal inorde r toimprovethe picture qualitydisplayed.
(Available Mode: Off,Low,Medium,High)
Film Mode
Press T / A button _ select the item Film Mode, then press _i / i_ button to adjust, it handle s 3:2 pull down and 2:2
pulldown. (Available Film Mode: On/Off)
GB-12

Noise Reductio n
Press _' / 'L button to selecttheitem Noise Reduction, thenpress _ / _" button to adjust.
(Available Noise Reduction: Low, Medium, Off,High)
MPEG Noise Reduction
Press _/ A button toselectthe item MPEG Noise Reduction, thenpresS 4 / _,- buttonto adjust.
It can improveth equality of the pictures by reducingth eblock noise.
(Available MPEG Noise Reduction: Low, Medium, Off,High)
Display Shift
Press _'/ A button toselectthe item Display Shift, then press 4 / _ button to adjust.
(AveHabl e Display Shift: Off, 10min, 20rain )
White Panel
Press T/ _, button toselectthe item Display Shift, then press -_i/ _, button to adjust.
(AveilableWhite Panel: On/Off)
GB-13

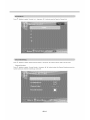
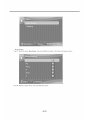
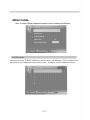
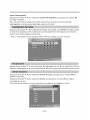
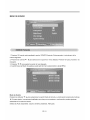
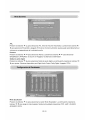
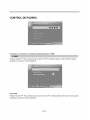
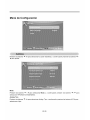
SOUND MENU
1.PressOKwhentheSoundSettings item is highl ighted. Then you willgotothesub-menuasfollowing.
2.Press _/ &toselect the desired menu item. Press OK to proceed if necessary.
3.Press _ / _" to adjust the it tothe desired level.
4.Whenyouhavechanged the settings, you can exit from the menu by pressing MENU.
Sound Mode
Press _"/ _- butbn toselectthe item Sound Mode, then press _ / _- bat[on b adjust.OnIy inthe User mode, the detail options
as following can beadjasted.
(Available Soun d Mode: User, Dyn amic, Standard, Soft )
GB-14

Bass
Press '_'/ h, butte nto select the item Bass,
then press _ / _- button to adjust.
Treble
Press _r/ Abutton toseiecttheitem Treble,
then press 4 / I_ buttonto adjust.
B a Ia nce r::"
Press T/ _-button toselect the item Balance,
then presS _ / _" buttonto adjust.
',, : _ /
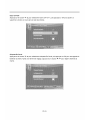
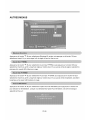
Surround Mode
Press v / ,_button to select the it em Surround Mode, the n press O K button to adjust. It can set the picture to fi t the
screen automatically. When the Auto Wide is selected, the symbol will show a s following:
Analog Sound
Press v/ '_button toselectthe item PreferredAnatogSound, then pros _ / 1_ buttonto selectthe prefer audio
when switching toananalog channel. (Available Analog Sound: SAP, Stereo, Mono)
GB-15

AVL
Press '_/ ,_buttonto select th eitem AVL, thenpresS _1/ _ buttonto select ONor OFF. Auto Volume Level
ca nse t the volum e automatically adjust correspondin g to the input audio.
Speaker
Press 'V"/,& button to select the item Speaker, then press 4 / t,- button to select ON or OFF. If set it Off, the
speaker will bemute.
Digital Audio Output
Press _/A button toselect Digital Audio Output, then press _1/ _ button to adjust. (Available Digital Audio Output:
Dolby Digital, Off, PCM)
E q ualizer Mode
Press • / Abutton to select theitem Equalizer Mode, then press _1/ 1_ button to selectthe
desired mode. Available Equalize r Mode: POP, JAZZ, USER, OFF, ROCK.
GB-16

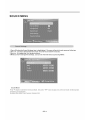
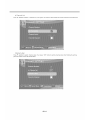
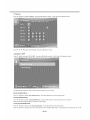
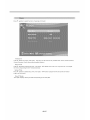
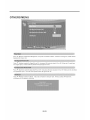
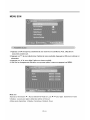
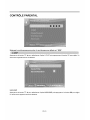
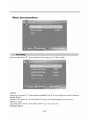
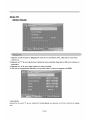
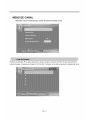
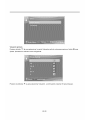
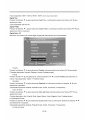
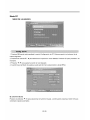
CHANNEL MENU
Note: This menu is only shown when the input source isTV.
GB-17

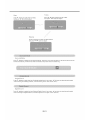
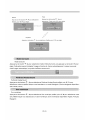
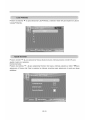
Press _ / _' button to select Favorite List, then press OK buttonto scantheFavorite Channel List.
Press 'V/ A buttonto select Manual Channel Setting, then press OK buttonto setthe value in the sub menu.
Channel Number
Press v" / ,_button # select Channel Number , thenpress 4 / _ button toselectthe Channel Numberorpressthe
number buttonsto select the channel you want toset.
GB-18

In Channel List
Press T/ A button toseleet In Channel List, thenpreee OK buttonto Addor Deletethe current channelinthechannel list.
Channet Label
Press _!'/ ,Lbuttonto select Channel Label, then press _ / _ buttonto setthe channel lable. Afterfinishingthesetting,
press OK button tosave thechannel table.
GB-19
La page charge ...
La page charge ...
La page charge ...
La page charge ...
La page charge ...
La page charge ...
La page charge ...
La page charge ...
La page charge ...
La page charge ...
La page charge ...
La page charge ...
La page charge ...
La page charge ...
La page charge ...
La page charge ...
La page charge ...
La page charge ...
La page charge ...
La page charge ...
La page charge ...
La page charge ...
La page charge ...
La page charge ...
La page charge ...
La page charge ...
La page charge ...
La page charge ...
La page charge ...
La page charge ...
La page charge ...
La page charge ...
La page charge ...
La page charge ...
La page charge ...
La page charge ...
La page charge ...
La page charge ...
La page charge ...
La page charge ...
La page charge ...
La page charge ...
La page charge ...
La page charge ...
La page charge ...
La page charge ...
La page charge ...
La page charge ...
La page charge ...
La page charge ...
La page charge ...
La page charge ...
La page charge ...
La page charge ...
La page charge ...
La page charge ...
La page charge ...
La page charge ...
La page charge ...
La page charge ...
La page charge ...
La page charge ...
La page charge ...
La page charge ...
La page charge ...
La page charge ...
La page charge ...
La page charge ...
La page charge ...
La page charge ...
La page charge ...
La page charge ...
La page charge ...
La page charge ...
La page charge ...
La page charge ...
La page charge ...
La page charge ...
La page charge ...
-
 1
1
-
 2
2
-
 3
3
-
 4
4
-
 5
5
-
 6
6
-
 7
7
-
 8
8
-
 9
9
-
 10
10
-
 11
11
-
 12
12
-
 13
13
-
 14
14
-
 15
15
-
 16
16
-
 17
17
-
 18
18
-
 19
19
-
 20
20
-
 21
21
-
 22
22
-
 23
23
-
 24
24
-
 25
25
-
 26
26
-
 27
27
-
 28
28
-
 29
29
-
 30
30
-
 31
31
-
 32
32
-
 33
33
-
 34
34
-
 35
35
-
 36
36
-
 37
37
-
 38
38
-
 39
39
-
 40
40
-
 41
41
-
 42
42
-
 43
43
-
 44
44
-
 45
45
-
 46
46
-
 47
47
-
 48
48
-
 49
49
-
 50
50
-
 51
51
-
 52
52
-
 53
53
-
 54
54
-
 55
55
-
 56
56
-
 57
57
-
 58
58
-
 59
59
-
 60
60
-
 61
61
-
 62
62
-
 63
63
-
 64
64
-
 65
65
-
 66
66
-
 67
67
-
 68
68
-
 69
69
-
 70
70
-
 71
71
-
 72
72
-
 73
73
-
 74
74
-
 75
75
-
 76
76
-
 77
77
-
 78
78
-
 79
79
-
 80
80
-
 81
81
-
 82
82
-
 83
83
-
 84
84
-
 85
85
-
 86
86
-
 87
87
-
 88
88
-
 89
89
-
 90
90
-
 91
91
-
 92
92
-
 93
93
-
 94
94
-
 95
95
-
 96
96
-
 97
97
-
 98
98
-
 99
99


VIORE PD42VH80 Manuel utilisateur
- Catégorie
- Téléviseurs LCD
- Taper
- Manuel utilisateur
dans d''autres langues
- English: VIORE PD42VH80 User manual
- español: VIORE PD42VH80 Manual de usuario
Autres documents
-
 Sole SEHDR15699US Manuel utilisateur
-
Palsonic TFTV8140DT Le manuel du propriétaire
-
Westinghouse LVM-47w1 Manuel utilisateur
-
LG 21SB3RV4AP Le manuel du propriétaire
-
Curtis LCD1922 Manuel utilisateur
-
-
Panasonic TC2185 Mode d'emploi
-
-
Gericom GTV4270 Le manuel du propriétaire
-
Aiwa CX-N4000 U Le manuel du propriétaire
