NexiGo N940P Manuel utilisateur
- Catégorie
- Webcams
- Taper
- Manuel utilisateur

User Manual
2K QHD Webcam
Scan the QR code or visit our link to
download the latest manual here:
nexigo.com/manuals
N940P

CONTENT
TRANSLATIONS
01
20
32
44
56
English
Español
Italiano
Français
Deutsch

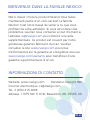
WELCOME TO THE NEXIGO FAMILY!
CONTACT INFORMATION
Website: www.nexigo.com Manufacturer: Nexight INC
E-mail: [email protected]omTel: +1(458) 215-6088
Address: 11075 SW 11th St, Beaverton, OR, 97005, US
Thank you for choosing the NexiGo N940P QHD Webcam!
You are now part of an exclusive club: the NexiGo family!
It's our job to make sure you enjoy your membership.
If you have any problems please contact us at
[email protected]om anytime for further assistance. Make
sure to register your purchase at nexigo.com/warranty
within 14 days of the delivery date to extend your
warranty coverage to TWO Years!
From all of us here at NexiGo, we want to thank you for
your trust in us. We look forward to serving you again
in the near future.
Yours Sincerely,
The NexiGo Team
US 01EN 01

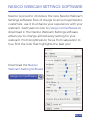
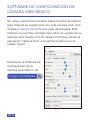
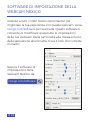
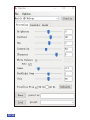
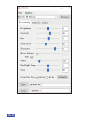
NEXIGO WEBCAM SETTINGS SOFTWARE
NexiGo is proud to introduce the new NexiGo Webcam
Settings software! Free of charge to all our loyal NexiGo
customers, use it to enhance your experience with your
webcam. Just head on over to nexigo.com/software to
download it. The NexiGo Webcam Settings software
allows you to change almost every setting for your
webcam. From brightness to focus, from saturation to
hue, find the look that highlights the best you!
Download the NexiGo
Webcam Setting Software
nexigo.com/software
US 02EN 02

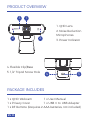
PRODUCT OVERVIEW
1 x QHD Webcam 1 x User Manual
1 x Privacy Cover 1 x USB C to USB Adapter
1 x RF Remote (Requires 2 AAA batteries, not included)
PACKAGE INCLUDES
4. Flexible Clip/Base
5. 1/4" Tripod Screw Hole 54
1. QHD Lens
2. Noise Reduction
Microphones
3. Power Indicator
3
22
1
EN 03

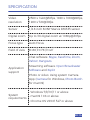
SPECIFICATION
• Windows 7/8/10/11 or above
• macOS 10.6 or above
• Chrome OS V29.01547 or above
Chat software: Skype, FaceTime, Zoom,
Yahoo!, Hangouts
Streaming software: Open Broadcaster
Software and Xsplit
Photo or video: Using system Camera
App (Camera for Windows, Photo Booth
for macOS)
D=88°/H=78°/V=49°
Auto Focus
Video
resolution
Digital zoom
Field of view
Application
support
2560 x 1440@30fps, 1920 x 1080@60fps,
1280 x 720@30fps
Up to 3X digital zoom at 1080p@30fps
Sensor 1/2.8 inch SONY Starvis IMX335 sensor
System
requirements
Focus type
EN 04

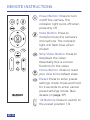
REMOTE INSTRUCTIONS
Power Button: Press to turn
on/off the camera. The
indicator light turns off when
powering off.
Mute Button: Press to
mute/unmute the camera’s
microphone. The indicator
light will flash blue when
muted.
Stop Video Button: Press to
stop/start the video.
Essentially this is a mute
function for the video.
Home Button: Press to reset
your view to its default state.
Preset: Press to enter preset
settings mode. Press and hold
for 2 seconds to enter cancel
preset settings mode. (See
details on page 17)
1/2 Buttons: Press to switch to
the preset position 1/2.
EN 05

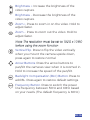
Brightness +: Increase the brightness of the
video capture.
Brightness -: Decrease the brightness of the
video capture.
Zoom +: Press to zoom in on the video. Hold to
adjust faster.
Zoom -: Press to zoom out the video. Hold to
adjust faster.
Note: The resolution must be set to 1920 x 1080
before using the zoom function
Vertical Flip: Press to flip the video vertically
when you mount the camera upside down,
press again to restore normal.
Arrow Buttons: Press the arrow buttons to
pan/tilt the camera's view when it is zoomed in.
Hold to increase the speed of the pan/tilt.
Backlight Compensation (BLC) Button: Press to
add BL. Press again to restore default settings.
Frequency Button: Press to switch the power
line frequency between 50Hz and 60Hz based
on your needs. (The default frequency is 60Hz.)
EN 06

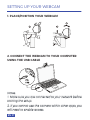
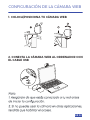
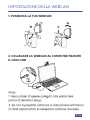
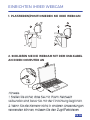
. PLACE/POSITION YOUR WEBCAM
. CONNECT THE WEBCAM TO YOUR COMPUTER
USING THE USB CABLE
Notes:
1. Make sure you are connected to your network before
starting the setup.
2. If you cannot use the camera within other apps, you
will need to enable access.
SETTING UP YOUR WEBCAM
EN 07

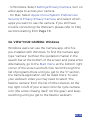
• In Windows: Select Settings>Privacy>Camera, turn on
allow apps to access your camera.
• On Mac: Select Apple menu>System Preferences>
Security & Privacy>Privacy>Camera, and select which
apps you want to use the camera. If you still have
trouble connecting the Webcam, please refer to FAQ
sections starting from Page 10.
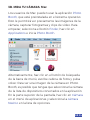
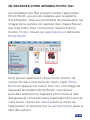
Windows users can use the Camera app, which is
pre-installed with Windows. To find the Camera app
type "camera" (without the quotation marks) in the
search bar at the bottom of the screen and press enter.
Alternatively, go to the Start menu at the bottom right
corner of the screen and left click. Scroll through the
list of programs there until you get to the "C" section,
the Camera application will be listed there. To view
your webcam video you may need to select "the
NexiGo camera" from the list of other devices. At the
top right or left of your screen click the cycle camera
icon (the arrow chasing itself, not the gear), and keep
switching until you get to the NexiGo webcam.
A. VIEW YOUR CAMERA: Windows
EN 08

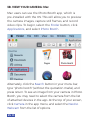
Mac users can use the Photo Booth app, which is
pre-installed with the OS. This will allow you to preview
the camera images, capture still frames, and record
video clips. To begin, select the Finder button, click
Applications, and select Photo Booth.
Alternately, click the Search button in your menu bar,
type "photo booth" (without the quotation marks), and
press return. To see an image from your camera in Photo
Booth, you may need to select the camera from the list
of attached devices in the app. At the top of your screen,
click Camera in the app menu, and select the NexiGo
Webcam from the list of options.
B. VIEW YOUR CAMERA: Mac
EN 09

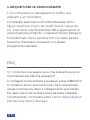
1) A computer with speakers (or a headset), your
NexiGo webcam, and a microphone;
2) Install a video-calling application such as Skype,
FaceTime, Zoom, or Hangouts. (Both parties need a
webcam and the same video application.)
. VIDEO CALLING REQUIREMENTS
Any changes or modifications not expressly approved
by the party responsible for compliance could void
the user's authority to operate the equipment.
This device complies with Part 15 of the FCC Rules.
Operation is subject to the following two conditions:
(1) this device may not cause harmful interference,
and
(2) this device must accept any interference received,
including interference that may cause undesired
operation.
FCC REQUIREMENT
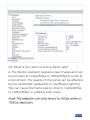
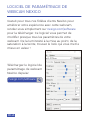
Q1: How do I know if my camera is being recognized
by the system?
FAQ
EN 10

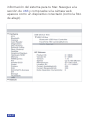
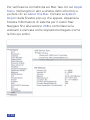
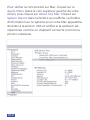
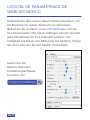
To verify the webcam is connected on a Mac computer,
click the Apple Menu (in the top left corner of your
screen) and then click About this Mac. Click on System
Report from the pop-up window that appears. The
System Information window for your Mac will appear.
Navigate to the USB section and check if the webcam
is listed as a connected device (like the photo below):
A: Connect the camera to any USB 2.0 or USB 3.0 port.
It will take a few seconds for the camera to be
recognized after it is connected to the system. To
ensure the camera has installed correctly on a
Windows computer; check under Control Panel>
System and Security>Device Manager.
EN 11

Q2: What is the video recording frame-rate?
A: The NexiGo webcam captures clear images and can
record video at 1440p/30fps or 1080p/60fps in a well-lit
environment. The quality of the signal can be affected
by low bandwidth availability or insucient lighting.
This can cause the frame rate to drop to 1440p/20fps
or 1080p/50fps, or possibly even lower.
Note: This webcam can only record at 60fps when at
1080p resolution.
EN 12

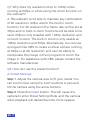
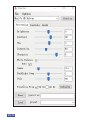
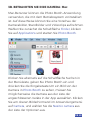
Q3: What can I do if the images or video are an
abnormal color? How to adjust image parameters
such as brightness or contrast?
A: Please ensure that the light in your environment is
free of unique tones or intense light sources. Things
such as walls/floors/other large-area non-standard
light sources, including areas with colored or intense
light. In such environments photographed pictures
are subjected to color cast due to the lighting
impact of these light sources.
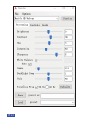
For Windows & Mac:
Using the NexiGo Webcam Setting Software, you can
adjust the image parameter you want according to
your needs.
Note: Download the NexiGo Webcam Setting Software
from nexigo.com/software.
EN 13

EN 14

1 2 3
Q4: Why is my video not in 1440p in my video calling
application?
A: Check the video output settings in your video
capture software, these may be set to a lower capture
format. There are various constraints on the system
that could impede the ability to attain a 1440p video
calling session. They center around processing power
(i.e. CPU speed) and available network bandwidth. In
all cases, review the requirements from the video
calling application. They will guide as to the system
performance required as well as the necessary
bandwidth.
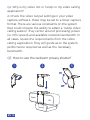
Q5: How to use the webcam privacy shutter?
EN 15

Q6: Why does my screen go blank or black while
trying to preview images?
A: There are several reasons this could happen:
1. There is something wrong with the USB port.
Please use a different USB port or another PC and
test the camera again.
2. The PC does not recognize the camera device.
3. The operating system and computer configuration
do not satisfy the requirements of the camera. Please
check your system specifications.
4. The video preview feature of the application is not
turned on, or the application has a privacy feature
that prohibits access to the camera. Please try with a
different application.
A: Step 1. Remove 3M tape backing on the back of the
privacy cover.
Step 2. Attach the cover to the webcam lens and
press firmly.
Step 3. Open/close the cover as needed.
EN 16

Q7: Why does my resolution drop to 1080p when
running at 60fps, or while using the zoom function on
the webcam?
A: This webcam is not able to maintain any combination
of 2K resolution, 60fps, and/or the built in zoom
function. For 2K resolution the frame rate will be set at
30fps and no built-in zoom functions will be able to be
used. 60fps is only possible with 1080p resolution and
no built-in zoom. The built in zoom is only usable at
1080p resolution and 30fps. Alternatively, vou can use
a program like OBS to create a virtual camera running
at 60fps or at 2K resolution, and use the ability to
manipulate the image in their program to zoom the
image in. For assistance with OBS, please contact the
software manufacturer.
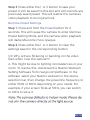
Q8: How do I use the preset function?
A: Preset Settings:
Step 1. Adjust the camera view to fit your needs. You
can zoom in/out using the zoom buttons or pan and
tilt the camera using the arrow buttons.
Step 2. Press the Preset button. This will cause the
camera to enter Preset Setting Mode, and the camera
video playback will darken/become more opaque.
EN 17

Step 3. Press either the 1 or 2 button to save your
preset. It will be saved to this slot and will override any
previously saved preset. This will restore the camera’s
video playback to its original look.
Remove Preset Settings:
Step 1. Press and hold the Preset button for 2
seconds. This will cause the camera to enter Remove
Preset Setting Mode, and the camera video playback
will darken/become more opaque.
Step 2. Press either the 1 or 2 button to clear the
settings saved in the corresponding button.
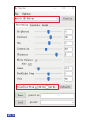
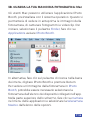
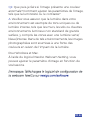
Q9: Why is there flickering or banding on the video
feed when I use the webcam?
A: This might be due to lighting inconsistencies in your
room. To resolve this, download the NexiGo Webcam
Setting Software from nexigo.com/software. In the
software, select your NexiGo webcam in the device
selection bar, then change the powerline frequency to
either 50Hz or 60Hz depending on your needs. For
example, if your screen flicks at 50Hz, you can switch
to 60Hz to solve it.
Note: The camera defaults to indoor mode. Please do
not aim the camera directly at the light source.
EN 18
La page est en cours de chargement...
La page est en cours de chargement...
La page est en cours de chargement...
La page est en cours de chargement...
La page est en cours de chargement...
La page est en cours de chargement...
La page est en cours de chargement...
La page est en cours de chargement...
La page est en cours de chargement...
La page est en cours de chargement...
La page est en cours de chargement...
La page est en cours de chargement...
La page est en cours de chargement...
La page est en cours de chargement...
La page est en cours de chargement...
La page est en cours de chargement...
La page est en cours de chargement...
La page est en cours de chargement...
La page est en cours de chargement...
La page est en cours de chargement...
La page est en cours de chargement...
La page est en cours de chargement...
La page est en cours de chargement...
La page est en cours de chargement...
La page est en cours de chargement...
La page est en cours de chargement...
La page est en cours de chargement...
La page est en cours de chargement...
La page est en cours de chargement...
La page est en cours de chargement...
La page est en cours de chargement...
La page est en cours de chargement...
La page est en cours de chargement...
La page est en cours de chargement...
La page est en cours de chargement...
La page est en cours de chargement...
La page est en cours de chargement...
La page est en cours de chargement...
La page est en cours de chargement...
La page est en cours de chargement...
La page est en cours de chargement...
La page est en cours de chargement...
La page est en cours de chargement...
La page est en cours de chargement...
La page est en cours de chargement...
La page est en cours de chargement...
La page est en cours de chargement...
La page est en cours de chargement...
La page est en cours de chargement...
La page est en cours de chargement...
-
 1
1
-
 2
2
-
 3
3
-
 4
4
-
 5
5
-
 6
6
-
 7
7
-
 8
8
-
 9
9
-
 10
10
-
 11
11
-
 12
12
-
 13
13
-
 14
14
-
 15
15
-
 16
16
-
 17
17
-
 18
18
-
 19
19
-
 20
20
-
 21
21
-
 22
22
-
 23
23
-
 24
24
-
 25
25
-
 26
26
-
 27
27
-
 28
28
-
 29
29
-
 30
30
-
 31
31
-
 32
32
-
 33
33
-
 34
34
-
 35
35
-
 36
36
-
 37
37
-
 38
38
-
 39
39
-
 40
40
-
 41
41
-
 42
42
-
 43
43
-
 44
44
-
 45
45
-
 46
46
-
 47
47
-
 48
48
-
 49
49
-
 50
50
-
 51
51
-
 52
52
-
 53
53
-
 54
54
-
 55
55
-
 56
56
-
 57
57
-
 58
58
-
 59
59
-
 60
60
-
 61
61
-
 62
62
-
 63
63
-
 64
64
-
 65
65
-
 66
66
-
 67
67
-
 68
68
-
 69
69
-
 70
70


NexiGo N940P Manuel utilisateur
- Catégorie
- Webcams
- Taper
- Manuel utilisateur
dans d''autres langues
- italiano: NexiGo N940P Manuale utente
- English: NexiGo N940P User manual
- español: NexiGo N940P Manual de usuario
- Deutsch: NexiGo N940P Benutzerhandbuch
Documents connexes
Autres documents
-
Papalook PA-PA552 Pro Manuel utilisateur
-
Cleyver ODWCAMMOVE Manuel utilisateur
-
 VORSCH ZC-D7 Manuel utilisateur
-
Midland H7+ WIFI Action Kamera, Ultra HD 4K Manuel utilisateur
-
 VORSCH ZC-D6 FHD1080P Webcam Manuel utilisateur
-
Papalook PA452 PRO Manuel utilisateur
-
J5create JVU368 Manuel utilisateur
-
Tripp Lite Owner's Manual - USB 2.0 Desktop/Laptop 1080p Webcam Le manuel du propriétaire
-
J5create JVCU100 Guide d'installation
-
 AUSDOM AW635 Manuel utilisateur


