La page est en cours de chargement...

LED.com
© 2023 Current Lighting Solutions, LLC. All rights reserved. Information and specifications subject to change
without notice. All values are design or typical values when measured under laboratory conditions.
Page 1 of 2
(Rev 06/26/23)
DT119-Daintree-WANSI-Wireless-Area-Controller-Installation-Guide_R01
Installation Guide
WANSI-277/480
Daintree™ Wireless Outdoor Lighting
Controller (Node)
WANSI-277/480
BEFORE YOU BEGIN
Read these instructions completely and carefully.
Save these instructions for future use.
Preparation:
1
Install the WANSI Node:
WARNING
RISK OF ELECTRIAL SHOCK. Disconnect power before
servicing or installing product.
RISK OF INJURY OR DAMAGE. Node may be damaged if not
installed properly. Follow installation instructions.
INSTALL IN ACCORDANCE WITH NATIONAL ELECTRIC
CODE AND LOCAL CODES.
CAUTION
RISK OF INJURY. Wear safety glasses and gloves during
installation and servicing.
•
Install the Daintree Wireless Area Controllers (WAC60) rst
Networkstart-upandmeshingissimpliediftheWACsare
operating before installing Nodes.
• Unpack Node
Inspect for defects before installing.
• Check Electrical Ratings
Verifythextureoperatingwattageisbelow1000W,andthe
supplyvoltageatthepoleiswithintheNode’sspeciedrange.
Using a Node outside these limits voids its warranty.
• Plan an Installation Route
InstallNodesnearesttotheWACsrst,andproceedoutwards.
• Verify that power to the WAC and Node is ON 24/7
constant power
The Daintree network will not operate properly with switched
power from a master timer or photocell.
•
Check nearby poles
Atthepoletobeinstalled,conrmthereiseitheraWACor
another active Daintree Node within 320 ft to ensure a
communication path and is within the Node’s RF range limits.
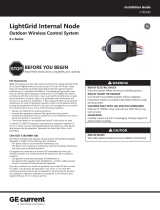
• Plug in the node
Alignthelargebladewiththelargeslotinreceptacle.Plugin,
and twist clockwise until it is locked in place. Energize the node
and observe the luminaire light output.
2

LED.com
© 2023 Current Lighting Solutions, LLC. All rights reserved. Information and specifications subject to change
without notice. All values are design or typical values when measured under laboratory conditions.
Page 2 of 2
(Rev 06/26/23)
DT119-Daintree-WANSI-Wireless-Area-Controller-Installation-Guide_R01
FCC Statements:
This device complies with Part 15 of the FCC Rules. Operation is subject to the
following two conditions: (1) This device may not cause harmful interference, and
(2) this device must accept any interference received, including interference that
may cause undesired operation. This Class [A] RFLD complies with the Canadian
standard ICES-005. Ce DEFR de la classe [A] est conforme à la NMB-005 du Canada.
Note: This equipment has been tested and found to comply with the limits for
a Class B digital device, pursuant to part 15 of the FCC Rules. These limits are
designed to provide reasonable protection against harmful interference in a
residential installation. This equipment generates, uses and can radiate radio
frequency energy and, if not installed and used in accordance with the instructions,
may cause harmful interference to radio communications. However, there is
no guarantee that interference will not occur in a particular installation. If this
equipment does cause harmful interference to radio or television reception, which
can be determined by turning the equipment off and on, the user is encouraged to
try to correct the interference by one or more of the following measures:
• Reorient or relocate the receiving antenna.
• Increase the separation between the equipment and receiver.
• Connect the equipment into an outlet on a circuit different from that to which the
receiver is connected.
• Consult the dealer or an experienced radio/TV technician for help.
To satisfy FCC/ISED RF exposure requirements a separation distance of 20 cm or
more must be
CAN ICES-5 (B)/NMB-3(B):
This device complies with Industry Canada license-exempt RSS standards.
Operation is subject to the following two conditions:
• This device may not cause harmful interference, and
• This device must accept any interference received, including interference that
may cause undesired operation.
Cet appareil est conforme aux normes RSS exemptees de licence de Industrie
Canada. Son fonctionnement est soumis aux deux conditions suivantes:
• Cet appareil ne doit pas provoquer d’interférences et
• Cet appareil doit accepter toute interférence, y compris celles pouvant causer un
mauvais fonctionnement de l’appareil.
Pour être conforme aux limites d’exposition aux ondes RF des normes FCC/ISED,
une distance de séparation d’au moins 20 cm doit être maintenue entre l’antenne
de cet appareil et toute personne pendant son opération. Mettre en opération cet
appareil a une distance plus rapprochée que 20 cm n’est pas permis.
Questions:
Web: LED.com
Phone: 1-866-855-8629
These instructions do not purport to cover all details or variations in equipment nor to provide every possible contingency to be met in connection with installation, operation
or maintenance. Should further information be desired or should particular problems arise which are not covered sufciently for the purchaser’s purposes, the matter should
be referred to Current.
Installation Guide
Daintree™ Wireless Outdoor Lighting Controller (Node)
Troubleshooting
3
•
Conrm the xture dims and brightens during the rst
1-2 seconds
WhentheNodeispoweredon,itwillturntheluminaireONat
full output and then rapidly dim and return the luminaire to full
output.Visuallyconrmthatthebrightnessoftheluminaire
dims and quickly increases after the node is energized to
conrmthatdimmingisworkingproperly.Note:appliesonly
todimmablextureswithanANSI5Pinor7Pinsocket.Fixtures
with a standard 3 Pin socket will not be dimmable.
•
The luminaire is not turning ON
Checkthatthepolehaspower.TheNode’srelayisNormally
Closed(NC),sotheluminaireshouldturnONwhentheNode
energized until a control command changes the luminaire
operating state.
• I did not see the dim and brightening sequence in the rst
1-2 seconds
Verifythextureisadimmableversion.Unplugthenodeand
plugitinagain.Ifyoustilldonotseethesequence,checkthat
thedriverdimmingwires(Grey&Violet)areproperlyconnected
to the dimming leads of the ANSI socket. If the wiring is
connectedandtheNodestilldoesnotdimtheluminaire,try
a new Node.
• Verify the node’s internal green, yellow, and red indicator
LEDs are lit
TheGreenLEDs(2)arepowerindicators.TheYellowLED
indicatesthenodeispairedwithaWACoradjacentnodewithin
itsRFrange.TheRedLEDisadimmingindicatorwithbrightness
proportionaltothe0-10Vdimmingoutput.All3LED’scolorsare
normally lit with proper operation. If all colors are not present try
a new Node.
1/2