Niko PM350-20078 Manuel utilisateur
- Catégorie
- Détecteurs de mouvement
- Taper
- Manuel utilisateur

PM350-20078R23041 NL
350-20078
1
Lees de volledige handleiding vóór installatie en ingebruikneming. Bewaar deze handleiding
zorgvuldig voor later gebruik.
1. BESCHRIJVING
De aanwezigheids- of afwezigheidsmelder 360° (master) voor opbouw bestaat uit een integrale unit
met aan-uitsturing van één kanaal, een bewegingssensor (PIR of passief infraroodtechnologie), een lichtsensor
en een geïntegreerde IR-ontvanger. Alle externe units zoals drukknoppen en verlichtingsarmaturen zijn
rechtstreeks aangesloten op de melder die op het plafond gemonteerd wordt.
Je kunt deze melder standalone gebruiken of als master gecombineerd met een of meerdere secundaire
melders (350-20079).
Je kunt de melder installeren en bedienen op basis van de fabrieksinstellingen. Voor een optimale lichtsturing
wordt het aanbevolen de fabrieksinstellingen aan te passen aan de omgevingsomstandigheden en specifieke
verlichtingsvereisten. De instellingen kun je naar keuze aanpassen op het toestel via de geïntegreerde
potentiometers en dipswitches of met behulp van de IR-afstandsbediening (niet bijgeleverd) (350-20089).
2. INSTALLATIE
2.1. Aansluiting
Gevaar: Installeer de melder niet onder spanning. Sluit het toestel pas na volledige installatie aan op de
netspanning.
A. Standalone
Raadpleeg het aansluitschema (fig. 1A).
B. In combinatie met een of meerdere secundaire melders
Raadpleeg het aansluitschema (fig. 1B).
2.2. Montage
Tip: Installeer de melder niet te dicht bij warmtebronnen zoals fornuizen of elektrische vuurtjes, luchtstromen
(ventilatiesystemen) of bewegende objecten (fig. 2). Dit kan het toestel ongewenst activeren omdat het
reageert op beweging en warmte in zijn omgeving.
Tip: De aanbevolen montagehoogte is 2 tot 3,4 m. Op een hoogte van 3 m heeft de melder een optimale
werking: op deze hoogte heeft de melder een bereik met een diameter van 24 m op de grond en 17,5 m op
80 cm hoogte (tafelhoogte) (fig. 3).
De melder is geschikt voor rechtstreekse montage op het plafond (fig. 4).
3. INSTELLINGEN
3.1. Fabrieksinstellingen
De parameters van de melder zijn bij levering als volgt ingesteld:
Parameter Fabrieksinstelling
toepassing - dipswitch 1: automatisch aan/uit
(Aanwezigheidsdetector/afwezigheidsdetector)
- dipswitch 3: met een korte druk op de drukknop
kun je:
• het licht inschakelen, en
• het licht uitschakelen zonder hoeven te
wachten op de uitschakelvertraging (= eco uit).
- dipswitch 4: kort drukken is daglichtafhankelijk
gevoeligheid van de bewegingssensor hoog
lichtgevoeligheid 200 lux
uitschakelvertraging 10 min
3.2. Dipswitches
Figuur 5 toont hoe je de dipswitches moet instellen afhankelijk van de toepassing en de gewenste
gevoeligheid van de bewegingssensor.
Toepassing instellen
Dipswitch Toepassing
1 Je kunt de melder instellen:
- ON: als aanwezigheidsmelder (automatisch
aan/uit)
De melder schakelt de verlichting automatisch in,
afhankelijk van de ingestelde luxwaarde en als hij
beweging detecteert.
- OFF: als afwezigheidsmelder (manueel aan/
automatisch uit)
De melder schakelt de verlichting enkel in als
je op de drukknop drukt, afhankelijk van de
ingestelde luxwaarde.
Nadat de laatste beweging gedetecteerd is, blijft de
verlichting ingeschakeld gedurende de ingestelde
uitschakelvertraging. Zodra de uitschakelvertraging
verlopen is, schakelt de verlichting uit.
2
Niet van toepassing.
3
Je kunt voor de aangesloten drukknop ook
verschillende functies selecteren:
- ON: Je kunt alleen de verlichting inschakelen
met een korte druk. De functies ‘eco uit’ en ‘lang
drukken’ zijn gedeactiveerd.
- OFF: Met een korte druk kun je zowel de
verlichting inschakelen als de verlichting
onmiddellijk uitschakelen zonder hoeven te
wachten op de uitschakelvertraging (= eco uit
1
).
Bij uitschakeling via de drukknop wordt de melder
gedurende tien seconden geblokkeerd om te
voorkomen dat de verlichting onmiddellijk opnieuw
ingeschakeld wordt.
Druk je langer dan één seconde op de drukknop,
dan knippert de rode indicatieled (0,25 s aan en
5 s uit) en worden de verlichting en de ingestelde
uitschakelvertraging gedurende twee uur in- of
uitgeschakeld.
4
- ON: Kort drukken is daglichtonafhankelijk.
- OFF: Kort drukken is daglichtafhankelijk.
Lang drukken is altijd daglichtonafhankelijk.
1
De functie ‘eco uit’ is de meest energiezuinige manier om de verlichting in te schakelen. Je schakelt zelf de
verlichting uit zodat je niet hoeft te wachten op de uitschakelvertraging. Vergeet je toch de verlichting uit te
schakelen, dan gebeurt dit automatisch zodra de uitschakelvertraging verlopen is.
Gevoeligheid instellen
Met de twee dipswitches uiterst rechts stel je de gevoeligheid van de bewegingssensor in. Je hebt de keuze
uit: minimaal, laag, hoog of maximaal. Raadpleeg figuur 5 voor de stand van de dipswitches afhankelijk van de
gewenste gevoeligheid.
3.3. Potentiometers
Onder de behuizing van de melder vind je twee potentiometers waarmee je de lichtgevoeligheid en de
uitschakelvertraging naar wens kunt instellen (fig. 6).
Potentiometer Functie
Je stelt het lichtniveau (lichtgevoeligheid) in
waarop de verlichting moet worden ingeschakeld.
De potentiometer heeft tien vaste lichtniveaus: 20,
50, 100, 200, 300, 400, 500, 700 en 1000 lux en
∞ (daglichtonafhankelijk).
Je stelt de uitschakelvertraging in.
Er zijn acht vooraf ingestelde waarden:
- wandeltest (zie rubriek 4.1.)
- puls: niet van toepassing
- 2 minuten
- 5 minuten
- 10 minuten
- 15 minuten
- 30 minuten
- 60 minuten
Om het ingestelde lichtniveau of de ingestelde uitschakelvertraging te bevestigen, knippert de groene
indicatieled eenmaal en de rode indicatieled een aantal keer afhankelijk van de geselecteerde instelling. In
onderstaande tabellen vind je het aantal keer dat de rode indicatieled zal knipperen voor de verschillende
instellingen:
Lichtniveau 20 50 100 200 300 400 500 700 1000 ∞
Aantal keer dat de rode
indicatieled knippert 12345678910
Voorbeeld: De potentiometer is ingesteld op 300 lux. Je wilt de luxwaarde verhogen tot 400 lux. Draai de
potentiometer voorzichtig tot de hogere luxwaarde. De groene indicatieled knippert eenmaal en de rode
indicatieled knippert zesmaal (= 400 lux) ter bevestiging.
Uitschakelvertraging puls 2 min 5 min 10 min 15 min 30 min 60 min
Aantal keer dat de rode
indicatieled knippert 1234567
Voorbeeld: De potentiometer is ingesteld op 10 minuten. Je wilt de uitschakelvertraging verhogen tot
15 minuten. Draai de potentiometer voorzichtig tot de hogere waarde. De groene indicatieled knippert eenmaal
en de rode indicatieled knippert vijfmaal (= 15 minuten) ter bevestiging.
4. IR-AFSTANDSBEDIENING
Naast een manuele instelling aan de hand van de potentiometers en dipswitches op het toestel kun je ook
de IR-afstandsbediening (fig. 7) gebruiken om een andere toepassing te selecteren, een test uit te voeren of
andere parameters in te geven.

NL PM350-20078R23041
350-20078
2
4.1. Functietoetsen
Toets Functie
Lock/
unlock
Short
push
Learn actual lux
20
Lux
50
Lux
100
Lux
300
Lux
400
Lux
200
Lux
500
Lux
700
Lux
1000
Lux
No
Lux
Fact.
setting
Long
push
Test
On/Off
30min 60min15min 8
Hours
Pulse 2min 5min 10min
Ch 1 Ch 2 Status
Ch 1
Status
Ch 2
Light 1
On/Off
Light 2
On/Off
LED
On/Off
Je schakelt het licht permanent in of uit,
ongeacht de gedetecteerde beweging en het
lichtniveau.
Druk kort op
Lock/
unlock
Short
push
Learn actual lux
20
Lux
50
Lux
100
Lux
300
Lux
400
Lux
200
Lux
500
Lux
700
Lux
1000
Lux
No
Lux
Fact.
setting
Long
push
Test
On/Off
30min 60min15min 8
Hours
Pulse 2min 5min 10min
Ch 1 Ch 2 Status
Ch 1
Status
Ch 2
Light 1
On/Off
Light 2
On/Off
LED
On/Off
of volg onderstaande stappen om
deze functie te activeren:
1. Druk op
Lock/
unlock
Short
push
Learn actual lux
20
Lux
50
Lux
100
Lux
300
Lux
400
Lux
200
Lux
500
Lux
700
Lux
1000
Lux
No
Lux
Fact.
setting
Long
push
Test
On/Off
30min 60min15min 8
Hours
Pulse 2min 5min 10min
Ch 1 Ch 2 Status
Ch 1
Status
Ch 2
Light 1
On/Off
Light 2
On/Off
LED
On/Off
om de verlichting in of uit te
schakelen.
Als de functie geactiveerd is, knippert de rode
indicatieled (1 s aan, 10 s uit).
2. Druk op
Lock/
unlock
Short
push
Learn actual lux
20
Lux
50
Lux
100
Lux
300
Lux
400
Lux
200
Lux
500
Lux
700
Lux
1000
Lux
No
Lux
Fact.
setting
Long
push
Test
On/Off
30min 60min15min 8
Hours
Pulse 2min 5min 10min
Ch 1 Ch 2 Status
Ch 1
Status
Ch 2
Light 1
On/Off
Light 2
On/Off
LED
On/Off
om de verlichting opnieuw in of uit
te schakelen.
3. Druk nogmaals op
Lock/
unlock
Short
push
Learn actual lux
20
Lux
50
Lux
100
Lux
300
Lux
400
Lux
200
Lux
500
Lux
700
Lux
1000
Lux
No
Lux
Fact.
setting
Long
push
Test
On/Off
30min 60min15min 8
Hours
Pulse 2min 5min 10min
Ch 1 Ch 2 Status
Ch 1
Status
Ch 2
Light 1
On/Off
Light 2
On/Off
LED
On/Off
.
De melder werkt opnieuw volgens de geselecteerde
instellingen. De rode indicatieled knippert eenmaal
ter bevestiging.
Lock/
unlock
Short
push
Learn actual lux
20
Lux
50
Lux
100
Lux
300
Lux
400
Lux
200
Lux
500
Lux
700
Lux
1000
Lux
No
Lux
Fact.
setting
Long
push
Test
On/Off
30min 60min15min 8
Hours
Pulse 2min 5min 10min
Ch 1 Ch 2 Status
Ch 1
Status
Ch 2
Light 1
On/Off
Light 2
On/Off
LED
On/Off
Je schakelt de indicatieled in of uit.
De indicatieled knippert als
Lock/
unlock
Short
push
Learn actual lux
20
Lux
50
Lux
100
Lux
300
Lux
400
Lux
200
Lux
500
Lux
700
Lux
1000
Lux
No
Lux
Fact.
setting
Long
push
Test
On/Off
30min 60min15min 8
Hours
Pulse 2min 5min 10min
Ch 1 Ch 2 Status
Ch 1
Status
Ch 2
Light 1
On/Off
Light 2
On/Off
LED
On/Off
of
Lock/
unlock
Short
push
Learn actual lux
20
Lux
50
Lux
100
Lux
300
Lux
400
Lux
200
Lux
500
Lux
700
Lux
1000
Lux
No
Lux
Fact.
setting
Long
push
Test
On/Off
30min 60min15min 8
Hours
Pulse 2min 5min 10min
Ch 1 Ch 2 Status
Ch 1
Status
Ch 2
Light 1
On/Off
Light 2
On/Off
LED
On/Off
geactiveerd is.
Lock/
unlock
Short
push
Learn actual lux
20
Lux
50
Lux
100
Lux
300
Lux
400
Lux
200
Lux
500
Lux
700
Lux
1000
Lux
No
Lux
Fact.
setting
Long
push
Test
On/Off
30min 60min15min 8
Hours
Pulse 2min 5min 10min
Ch 1 Ch 2
Status
Ch 1
Status
Ch 2
Light 1
On/Off
Light 2
On/Off
LED
On/Off
Als je op deze toets drukt, geeft het toestel via de
indicatieleds aan wat de huidige instellingen van
kanaal 1 zijn.
Eerst knippert de groene indicatieled eenmaal,
waarna de rode indicatieled de status aangeeft. De
eerste keer dat de rode indicatieled knippert, geeft
hij het ingestelde lichtniveau weer; de tweede keer
verwijst deze led naar de uitschakelvertraging (zie
ook tabellen in rubriek 3.3.).
Voorbeeld: Kanaal 1 is ingesteld op 300 lux en 10
minuten. Druk op
Lock/
unlock
Short
push
Learn actual lux
20
Lux
50
Lux
100
Lux
300
Lux
400
Lux
200
Lux
500
Lux
700
Lux
1000
Lux
No
Lux
Fact.
setting
Long
push
Test
On/Off
30min 60min15min 8
Hours
Pulse 2min 5min 10min
Ch 1 Ch 2
Status
Ch 1
Status
Ch 2
Light 1
On/Off
Light 2
On/Off
LED
On/Off
: de groene indicatieled
knippert eenmaal en de rode indicatieled vijfmaal
(= 300 lux), waarna de groene indicatieled opnieuw
eenmaal en de rode indicatieled viermaal
(= 10 min) knippert.
4.2. Insteltoetsen
Om de instellingen van de melder te wijzigen:
1. Druk binnen de vijf seconden driemaal op
Lock/
unlock
Short
push
Learn actual lux
20
Lux
50
Lux
100
Lux
300
Lux
400
Lux
200
Lux
500
Lux
700
Lux
1000
Lux
No
Lux
Fact.
setting
Long
push
Test
On/Off
30min 60min15min 8
Hours
Pulse 2min 5min 10min
Ch 1 Ch 2 Status
Ch 1
Status
Ch 2
Light 1
On/Off
Light 2
On/Off
LED
On/Off
om het toestel te deblokkeren.
De groene indicatieled knippert tweemaal ter bevestiging. Het toestel staat nu in de instelmode.
2. Wijzig het lichtniveau of de uitschakelvertraging via onderstaande toetsen.
3. Druk eenmaal op
Lock/
unlock
Short
push
Learn actual lux
20
Lux
50
Lux
100
Lux
300
Lux
400
Lux
200
Lux
500
Lux
700
Lux
1000
Lux
No
Lux
Fact.
setting
Long
push
Test
On/Off
30min 60min15min 8
Hours
Pulse 2min 5min 10min
Ch 1 Ch 2 Status
Ch 1
Status
Ch 2
Light 1
On/Off
Light 2
On/Off
LED
On/Off
om het toestel opnieuw te blokkeren.
De groene indicatieled knippert tweemaal ter bevestiging. De gewijzigde instelling is geactiveerd en het
toestel werkt opnieuw volgens de geselecteerde instellingen.
Opmerking: Als je het toestel niet blokkeert, gebeurt dit automatisch na twee minuten. Alle wijzigingen
worden dan automatisch opgeslagen.
Toets Functie
Lock/
unlock
Short
push
Learn actual lux
20
Lux
50
Lux
100
Lux
300
Lux
400
Lux
200
Lux
500
Lux
700
Lux
1000
Lux
No
Lux
Fact.
setting
Long
push
Test
On/Off
30min 60min15min 8
Hours
Pulse 2min 5min 10min
Ch 1
Ch 2 Status
Ch 1
Status
Ch 2
Light 1
On/Off
Light 2
On/Off
LED
On/Off
Druk op deze toets om de luxwaarde en/of
uitschakelvertraging voor kanaal 1 in te stellen.
Een rode indicatieled geeft aan dat je de instelling
kunt wijzigen.
Lock/
unlock
Short
push
Learn actual lux
20
Lux
50
Lux
100
Lux
300
Lux
400
Lux
200
Lux
500
Lux
700
Lux
1000
Lux
No
Lux
Fact.
setting
Long
push
Test
On/Off
30min 60min15min 8
Hours
Pulse 2min 5min 10min
Ch 1 Ch 2 Status
Ch 1
Status
Ch 2
Light 1
On/Off
Light 2
On/Off
LED
On/Off
Lock/
unlock
Short
push
Learn actual lux
20
Lux
50
Lux
100
Lux
300
Lux
400
Lux
200
Lux
500
Lux
700
Lux
1000
Lux
No
Lux
Fact.
setting
Long
push
Test
On/Off
30min 60min15min 8
Hours
Pulse 2min 5min 10min
Ch 1 Ch 2 Status
Ch 1
Status
Ch 2
Light 1
On/Off
Light 2
On/Off
LED
On/Off
Lock/
unlock
Short
push
Learn actual lux
20
Lux
50
Lux
100
Lux
300
Lux
400
Lux
200
Lux
500
Lux
700
Lux
1000
Lux
No
Lux
Fact.
setting
Long
push
Test
On/Off
30min 60min15min 8
Hours
Pulse 2min 5min 10min
Ch 1 Ch 2 Status
Ch 1
Status
Ch 2
Light 1
On/Off
Light 2
On/Off
LED
On/Off
Lock/
unlock
Short
push
Learn actual lux
20
Lux
50
Lux
100
Lux
300
Lux
400
Lux
200
Lux
500
Lux
700
Lux
1000
Lux
No
Lux
Fact.
setting
Long
push
Test
On/Off
30min 60min15min 8
Hours
Pulse 2min 5min 10min
Ch 1 Ch 2 Status
Ch 1
Status
Ch 2
Light 1
On/Off
Light 2
On/Off
LED
On/Off
- Met deze rode toetsen stel je het gewenste
lichtniveau (luxwaarde) in.
- Er zijn tien vaste luxwaarden: 20, 50, 100, 200,
300, 400, 500, 700 en 1000 lux en No lux
(daglichtonafhankelijk).
Lock/
unlock
Short
push
Learn actual lux
20
Lux
50
Lux
100
Lux
300
Lux
400
Lux
200
Lux
500
Lux
700
Lux
1000
Lux
No
Lux
Fact.
setting
Long
push
Test
On/Off
30min 60min15min 8
Hours
Pulse 2min 5min 10min
Ch 1 Ch 2 Status
Ch 1
Status
Ch 2
Light 1
On/Off
Light 2
On/Off
LED
On/Off
- Met deze toets stel je het huidige lichtniveau in
de ruimte in als het gewenste niveau waarop de
verlichting moet worden ingeschakeld.
- Als je op deze toets drukt, knippert de rode
indicatieled eenmaal om aan te geven dat het
huidige lichtniveau opgeladen wordt. Als dit
lichtniveau niet tussen 20 en 1000 lux ligt, wordt
het minimumniveau (20 lux) of maximumniveau
(1000 lux) opgeladen.
Gebruik deze instelling als het gewenste minimale
lichtniveau in de ruimte bereikt is. Dit is het tijdstip
waarop de verlichting moet worden ingeschakeld
omdat het daglichtniveau niet meer voldoende is.
Lock/
unlock
Short
push
Learn actual lux
20
Lux
50
Lux
100
Lux
300
Lux
400
Lux
200
Lux
500
Lux
700
Lux
1000
Lux
No
Lux
Fact.
setting
Long
push
Test
On/Off
30min 60min15min 8
Hours
Pulse 2min 5min 10min
Ch 1 Ch 2 Status
Ch 1
Status
Ch 2
Light 1
On/Off
Light 2
On/Off
LED
On/Off
- Met deze blauwe toetsen stel je de gewenste
uitschakelvertraging in.
- Er zijn zes vaste waarden: 2, 5, 10, 15, 30 en
60minuten.
Lock/
unlock
Short
push
Learn actual lux
20
Lux
50
Lux
100
Lux
300
Lux
400
Lux
200
Lux
500
Lux
700
Lux
1000
Lux
No
Lux
Fact.
setting
Long
push
Test
On/Off
30min 60min15min 8
Hours
Pulse
2min 5min 10min
Ch 1 Ch 2 Status
Ch 1
Status
Ch 2
Light 1
On/Off
Light 2
On/Off
LED
On/Off
Niet van toepassing.
Lock/
unlock
Short
push
Learn actual lux
20
Lux
50
Lux
100
Lux
300
Lux
400
Lux
200
Lux
500
Lux
700
Lux
1000
Lux
No
Lux
Fact.
setting
Long
push
Test
On/Off
30min 60min15min
8
Hours
Pulse 2min 5min 10min
Ch 1 Ch 2 Status
Ch 1
Status
Ch 2
Light 1
On/Off
Light 2
On/Off
LED
On/Off
Druk op deze toets:
- De verlichting wordt gedurende acht uur
permanent ingeschakeld.
- Na bevestiging van de blokkering van de instelling(
2 x groen), knippert de rode indicatieled (0,25 s
aan en 30 s uit).
Druk nogmaals op deze toets om de functie uit te
schakelen. De rode indicatieled knippert niet meer.
Je kunt deze functie niet uitschakelen via een
drukknop.
Lock/
unlock
Short
push
Learn actual lux
20
Lux
50
Lux
100
Lux
300
Lux
400
Lux
200
Lux
500
Lux
700
Lux
1000
Lux
No
Lux
Fact.
setting
Long
push
Test
On/Off
30min 60min15min 8
Hours
Pulse 2min 5min 10min
Ch 1 Ch 2 Status
Ch 1
Status
Ch 2
Light 1
On/Off
Light 2
On/Off
LED
On/Off
Het toestel keert terug naar de
fabrieksinstellingen.
Lock/
unlock
Short
push
Learn actual lux
20
Lux
50
Lux
100
Lux
300
Lux
400
Lux
200
Lux
500
Lux
700
Lux
1000
Lux
No
Lux
Fact.
setting
Long
push
Test
On/Off
30min 60min15min 8
Hours
Pulse 2min 5min 10min
Ch 1 Ch 2 Status
Ch 1
Status
Ch 2
Light 1
On/Off
Light 2
On/Off
LED
On/Off
Het detectiegebied wordt getest door de
geïntegreerde bewegingssensor te activeren voor de
wandeltest:
- De blauwe indicatieled brandt als je de testmode
activeert.
- Gedurende vijf seconden wordt de verlichting
ingeschakeld en brandt de rode indicatieled
telkens wanneer de sensor activiteit detecteert.
- Als er geen activiteit gedetecteerd wordt en de
sensor nog in testmode staat, brandt de blauwe
indicatieled.
- Als je de testmode vergeet af te sluiten, werkt
de melder na vijf minuten opnieuw volgens de
geselecteerde instellingen.
Tijdens de wandeltest werkt de lichtsensor niet.
Je kunt de wandeltest ook activeren via de
potentiometer voor de uitschakelvertraging.
5. WERKING EN GEBRUIK
5.1. Ingebruikneming
Je mag de melder pas onder spanning zetten als alle kabels aangesloten zijn. Nadat je de spanning ingeschakeld
hebt, is de melder na ongeveer 120 seconden (opwarmtijd) gebruiksklaar.
De rode indicatieled knippert tijdens het opwarmen. Als de opwarmtijd verstreken is, knippert de groene
indicatieled twee keer kort na elkaar.
5.2. Algemene werking
De geïntegreerde lichtsensor meet voortdurend het daglichtniveau in het detectiegebied en vergelijkt dit niveau
met de ingestelde luxwaarde. Dankzij de lichtsensor springt het licht enkel automatisch aan als de melder
beweging detecteert binnen het detectiebereik én als er onvoldoende daglicht aanwezig is:
• De verlichting blijft ingeschakeld zolang er beweging gedetecteerd wordt en onvoldoende daglicht
in de ruimte aanwezig is.
• Nadat de laatste beweging gedetecteerd is, blijft de verlichting ingeschakeld gedurende de
ingestelde uitschakelvertraging (1 tot 60 minuten). Zodra de uitschakelvertraging verlopen is,
schakelt de verlichting uit.
• De verlichting schakelt ook automatisch uit zodra het daglichtniveau voldoende hoog is, zelfs als er
op dat moment nog beweging in de ruimte is.
5.3. Detectiebereik
Je kunt het detectiegebied uitbreiden met een extra melder (secundair) (350-20079). Je mag maximaal tien
secundaire detectoren op één master (350-20078) aansluiten. De verlichting wordt geregeld afhankelijk van de
instellingen op de master. Zowel de master als de secundaire detector hebben hetzelfde detectiebereik (cirkel
met een diameter van 24 m). Om een volledig oppervlak te beslaan met meerdere melders, wordt het aanbevolen
rekening te houden met een overlap van ongeveer 30% (fig. 8).
Als je in een deel van het detectiegebied geen bewegingsdetectie wilt of als het detectiegebied te groot is, dek
je de lens van de sensor af met het bijgeleverde afschermmasker. Zo kun je de maximale reikwijdte van 24 m
verkleinen. De detectiehoek van 360° kun je verminderen in stappen van 30°.
5.4. Voorbeelden van toepassingen
Voorbeeld 1: klaslokaal
dipswitch 1 dipswitch 3 dipswitch 4
ON x x
OFF x
Werking van de aanwezigheidsmelder:
- De verlichting wordt automatisch ingeschakeld als de melder beweging detecteert in het detectiegebied en
het lichtniveau onder de ingestelde luxwaarde ligt.
- De verlichting wordt na een vooraf ingestelde tijd (uitschakelvertraging) opnieuw automatisch
uitgeschakeld, als de melder geen beweging meer detecteert in het detectiegebied of het lichtniveau de
ingestelde luxwaarde gedurende vijf minuten overschreden heeft.
- Je kunt de verlichting altijd manueel inschakelen door kort te drukken op de drukknop. Je hebt ook de
mogelijkheid om de verlichting manueel uit te schakelen (= eco uit).
- Daarnaast kun je ook lang drukken op de drukknop, wat geschikt is voor situaties waarbij de verlichting

350-20078
3
PM350-20078R23041 NL
gedurende langere tijd ingeschakeld (bv. examen) of uitgeschakeld (bv. filmvoorstelling) moet zijn:
• Als je lang drukt op de drukknop terwijl de verlichting ingeschakeld is, wordt de verlichting
uitgeschakeld. De melder wordt geblokkeerd zolang er activiteit gedetecteerd wordt en de ingestelde
uitschakelvertraging + 2 uur nog niet verstreken is. Daarna werkt de melder opnieuw volgens de
geselecteerde instellingen en wordt de verlichting ingeschakeld.
• Als je lang drukt op de drukknop terwijl de verlichting uitgeschakeld is, wordt de verlichting
ingeschakeld (onafhankelijk van het daglichtniveau). De verlichting blijft ingeschakeld zolang de melder
activiteit detecteert en de ingestelde uitschakelvertraging + 2 uur nog niet verstreken is. Daarna wordt
de verlichting uitgeschakeld, werkt de melder opnieuw volgens de geselecteerde instellingen en wordt de
verlichting ingeschakeld.
De rode indicatieled op de melder knippert (0,25 s aan en 5 s uit) om aan te geven dat je lang gedrukt hebt
op de drukknop. Je kunt de functie ‘lang drukken’ op elk moment onderbreken met een korte druk op de
drukknop, waarna de verlichting ingeschakeld wordt en de melder opnieuw werkt volgens de geselecteerde
instellingen.
Voorbeeld 2: kantoor
dipswitch 1 dipswitch 3 dipswitch 4
ON x x
OFF x
Werking van de afwezigheidsmelder:
- Je moet de verlichting inschakelen door kort te drukken op de drukknop (daglichtonafhankelijk).
- De functies ‘eco uit’ en ‘lang drukken’ zijn gedeactiveerd.
- De verlichting wordt na een vooraf ingestelde tijd (uitschakelvertraging) opnieuw automatisch
uitgeschakeld, als de melder geen beweging meer detecteert in het detectiegebied of het lichtniveau de
ingestelde luxwaarde gedurende vijf minuten overschreden heeft.
Voorbeeld 3: traphal
dipswitch 1 dipswitch 3 dipswitch 4
ON xxx
OFF
Werking van de aanwezigheidsmelder:
- De verlichting wordt automatisch ingeschakeld als de melder beweging detecteert in het detectiegebied en
het lichtniveau onder de ingestelde luxwaarde ligt.
- De verlichting wordt na een vooraf ingestelde tijd (uitschakelvertraging) opnieuw automatisch
uitgeschakeld, als de melder geen beweging meer detecteert in het detectiegebied of het lichtniveau de
ingestelde luxwaarde gedurende vijf minuten overschreden heeft.
- Je kunt de verlichting altijd manueel inschakelen via de drukknop, onafhankelijk van het daglichtniveau.
6. ONDERHOUD
Vuil kan de werking van de melder beïnvloeden. Houd daarom de lens altijd schoon en droog. Gebruik een
vochtige doek en water met weinig detergent om de lens te reinigen. Oefen nooit druk uit op de lens tijdens
het reinigen. Als de lens of andere onderdelen van de melder defect zijn, neem je contact op met een erkend
installateur.
7. TECHNISCHE GEGEVENS
afmetingen 45,9 x 117,3 mm (HxB)
64,1 x 117,3 mm (HxB) (incl. niet-zichtbaar deel)
voedingsspanning 230 Vac ± 10%, 50 Hz
vermogenschakelaar maximale nominale waarde vermogenschakelaar 10 A*
stroomverbruik 0,2 W
relaiscontact NO (max. 10 A), potentiaalvrij,
licht- en bewegingsgevoelig
maximale belasting gloeilampen (2300 W)
230V-halogeenlampen (2300 W)
alle laagspanningshalogeenlampen (1200 VA)
fluorescentielampen (niet-gecompenseerd) (1200 VA)
spaarlampen (CFLi) (350 W)
ledlampen 230 V (350 W)
maximaal schakelvermogen 140 μF
maximale inschakelstroom 165 A/20 ms of 800A/200 μs
lichtgevoeligheid 20 – 1000, ∞ lux
hysteresis op lichtgevoeligheid + 10%
uitschakelvertraging 2 – 60 min
montagehoogte (fig. 3) 2 – 3,4 m
detectiehoek (fig. 3) 360°
detectiebereik (fig. 3) max. 24 m
draadingang 3 x 2,5 mm²
kabeldoorvoer langs zijkant: 3 x Ø 14 mm
langs boven: 2 x Ø 14 mm
beschermingsgraad IP54
beschermklasse klasse I-toestellen
omgevingstemperatuur -5 – +50°C
keurmerk CE-gemarkeerd conform EN 60669-2-1
accessoires IR-afstandsbediening (350-20089)
afstandsbediening voor smartphone (350-41936)
aanwezigheids- of afwezigheidsmelder 360°
(secundair) (350-20079)
* De nominale waarde van de vermogenschakelaar is beperkt door nationale regelgeving voor installaties.
Waarschuwingen voor installatie
De installatie van producten die permanent onderdeel zullen uitmaken van de elektrische installatie en die
gevaarlijke spanningen bevatten, moet worden uitgevoerd door een erkend installateur en volgens de geldende
voorschriften. Deze handleiding moet aan de gebruiker worden overhandigd. Het moet bij het dossier van de
elektrische installatie worden gevoegd en worden overgedragen aan eventuele nieuwe eigenaars. Bijkomende
exemplaren zijn verkrijgbaar via de website of Niko customer services.
CE-markering
Dit product voldoet aan alle toepasselijke Europese richtlijnen en verordeningen. Voor radioapparatuur verklaart
Niko nv dat de radioapparatuur uit deze handleiding conform is met Richtlijn 2014/53/EU. De volledige tekst
van de EU-conformiteitsverklaring staat op www.niko.eu onder de productreferentie, indien van toepassing.
Milieu
Dit product of de bijgeleverde batterijen mag u niet bij het ongesorteerd afval gooien. Breng uw afgedankt
product naar een erkend verzamelpunt. Net als producenten en importeurs speelt ook u een belangrijke rol in de
bevordering van sortering, recycling en hergebruik van afgedankte elektrische en elektronische apparatuur. Om
de ophaling en verwerking te kunnen financieren, heft de overheid in bepaalde gevallen een recyclingbijdrage
(inbegrepen in de aankoopprijs van dit product).

350-20078
4
FR PM350-20078R23041
Veuillez lire le mode d’emploi entièrement avant l’installation et la mise en service. Veuillez
conserver ce mode d’emploi afin de pouvoir le consulter ultérieurement.
1. DESCRIPTION
Le détecteur de présence ou d’absence 360° (maître) pour montage en saillie se compose d’une
unité intégrale avec commande allumage/extinction d’un seul canal, d’un capteur de mouvement (PIR ou
technologie à infrarouge passif), d’un capteur de lumière et d’un récepteur IR intégré. Toutes les unités
externes comme des boutons-poussoirs et des armatures d’éclairage sont raccordées directement au
détecteur monté sur le plafond.
Vous pouvez utiliser ce détecteur comme appareil autonome ou comme maître en association avec un ou
plusieurs détecteurs secondaires (350-20079).
Vous pouvez installer le détecteur et le commander selon les réglages d’usine. Pour une commande optimale
de l’éclairage, il est recommandé d’adapter les réglages d’usine aux conditions ambiantes et aux exigences
spécifiques de l’éclairage. Vous pouvez modifier les réglages selon vos souhaits à l’aide des potentiomètres et
commutateurs miniatures intégrés à l’appareil ou à l’aide de la télécommande IR (non fournie) (350-20089).
2. INSTALLATION
2.1. Raccordement
Danger: N’installez pas le détecteur sous tension. Ne raccordez l’appareil à la tension réseau qu’après
installation complète.
A. Autonome
Consultez le schéma de raccordement (fig.1A).
B. En association avec un ou plusieurs détecteurs secondaires
Consultez le schéma de raccordement (fig.1B).
2.2. Montage
Conseil: N’installez pas le détecteur trop près de sources de chaleur comme des fours ou des chauffages
électriques, de courants d’air (systèmes de ventilation) ou d’objets mobiles (fig.2). En effet, ils risqueraient
d’activer l’appareil de manière intempestive car il réagit au mouvement et à la chaleur qu’il détecte dans son
environnement.
Conseil: La hauteur de montage recommandée est de 2 à 3,4m. Le fonctionnement du détecteur est optimal
à une hauteur de 3m: à cette hauteur, le détecteur couvre une zone d’un diamètre de 24 m au sol et de
17,5m sur 80cm en hauteur (hauteur de table) (fig. 3).
Le détecteur convient pour être monté directement sur le plafond (fig. 4).
3. RÉGLAGES
3.1. Réglages d’usine
À la livraison, les paramètres du détecteur sont réglés comme suit:
Paramètre Réglage d’usine
application - commutateur miniature1: allumage/extinction automatiques
(Détecteur de présence/détecteur d’absence)
- commutateur miniature3: une pression brève
sur le bouton-poussoir vous permet:
• d’allumer l’éclairage, et
• d’éteindre l’éclairage sans devoir attendre la fin de
la temporisation de déconnexion (=extinction éco).
- commutateur miniature4: une pression brève
est dépendante de la lumière naturelle
sensibilité du capteur de mouvement élevée
sensibilité à la lumière 200 lux
temporisation de déconnexion 10 min
3.2. Commutateurs miniatures
La figure5 montre comment vous devez régler les commutateurs miniatures selon l’application et la
sensibilité souhaitée du capteur de mouvement.
Réglage de l’application
Commutateur miniature Application
1 Vous pouvez régler le détecteur comme suit:
- ON: comme détecteur de présence
(allumage/extinction automatiques)
Le détecteur allume automatiquement l’éclairage,
en fonction de la valeur lux réglée, lorsqu’il perçoit
un mouvement.
- OFF: comme détecteur d’absence
(allumage manuel/extinction automatique)
Le détecteur allume l’éclairage uniquement si
vous appuyez sur le bouton-poussoir, en fonction
de la valeur lux réglée.
Après que le dernier mouvement a été détecté,
l’éclairage reste allumé pendant la temporisation
de déconnexion réglée. Dès que la temporisation de
déconnexion est écoulée, l’éclairage s’éteint.
2
Pas d’application.
3
Vous pouvez également sélectionner différentes
fonctions pour le bouton-poussoir raccordé:
- ON: Vous pouvez uniquement allumer
l’éclairage au moyen d’une pression brève.
Les fonctions ‘extinction éco’ et ‘pression longue’
sont désactivées.
- OFF: Une pression brève vous permet
d’allumer l’éclairage et de l’éteindre
immédiatement, sans devoir attendre la
fin de la temporisation de déconnexion
(=extinction éco
1
). En cas d’extinction au moyen
du bouton-poussoir, le détecteur est verrouillé
pendant dixsecondes afin d’éviter que l’éclairage
se rallume immédiatement.
Si vous appuyez plus d’une seconde sur le
bouton-poussoir, la LED d’indication rouge clignote
(0,25s allumée et 5s éteinte) et l’éclairage et la
temporisation de déconnexion réglée sont activés
ou désactivés pendant deux heures.
4
- ON: La pression brève est indépendante
de la lumière naturelle.
- OFF: La pression brève est dépendante
de la lumière naturelle.
Une pression longue est toujours indépendante de la
lumière naturelle.
1
La fonction ‘extinction éco’ est la façon d’allumer l’éclairage qui permet de consommer le moins d’énergie.
Vous éteignez l’éclairage vous-même et ne devez donc pas attendre la fin de la temporisation de déconnexion.
Si vous oubliez d’éteindre l’éclairage, il s’éteindra automatiquement une fois que la temporisation de
déconnexion sera écoulée.
Réglage de la sensibilité
Les deux commutateurs miniatures à l’extrême droite vous permettent de régler la sensibilité du capteur de
mouvement. Vous avez le choix parmi les possibilités suivantes: minimale, faible, élevée ou maximale. Pour
connaître la position des commutateurs miniatures selon la sensibilité souhaitée, vous consultez la figure5.
3.3. Potentiomètres
Sous le boîtier du détecteur, vous trouverez deux potentiomètres qui vous permettent de régler la sensibilité à
la lumière et la temporisation de déconnexion selon vos souhaits (fig.6).
Potentiomètre Fonction
Vous réglez le niveau de lumière (sensibilité à
la lumière) auquel l’éclairage doit s’allumer.
Le potentiomètre possède dix niveaux de lumière
fixes: 20, 50, 100, 200, 300, 400, 500, 700 et
1000lux et ∞ (indépendant de la lumière naturelle).
Vous réglez la temporisation de déconnexion.
Huit valeurs sont prédéfinies:
- test de mouvement (voir rubrique4.1.)
- impulsion: pas d’application
- 2 minutes
- 5 minutes
- 10 minutes
- 15 minutes
- 30 minutes
- 60 minutes
La LED d’indication verte clignote une fois et la LED d’indication rouge clignote plusieurs fois, selon le réglage
sélectionné, afin de confirmer le niveau de lumière ou la temporisation de déconnexion réglés. Les tableaux
ci-dessous indiquent le nombre de fois que la LED d’indication rouge clignote en fonction du réglage:
Niveau de lumière 20 50 100 200 300 400 500 700 1000 ∞
Nombre de fois que la LED
d’indication rouge clignote 12345678910
Exemple: Le potentiomètre est réglé sur 300lux. Vous souhaitez augmenter la valeur lux à 400lux. Tournez
le potentiomètre prudemment jusqu’à la valeur lux supérieure. La LED d’indication verte clignote une fois et la
LED d’indication rouge clignote six fois (=400lux) pour confirmer.
Temporisation de
déconnexion
impulsion 2 min 5 min 10 min 15 min 30 min 60 min
Nombre de fois que la LED
d’indication rouge clignote 1 234567
Exemple: Le potentiomètre est réglé sur 10minutes. Vous souhaitez augmenter la temporisation de
déconnexion à 15minutes. Tournez le potentiomètre prudemment jusqu’à la valeur supérieure. La LED
d’indication verte clignote une fois et la LED d’indication rouge clignote cinq fois (=15minutes) pour confirmer.
4. TÉLÉCOMMANDE IR
En plus du réglage manuel à l’aide des potentiomètres et des commutateurs miniatures qui se trouvent sur
l’appareil, vous pouvez aussi utiliser la télécommande IR (fig.7) pour sélectionner une autre application,
réaliser un test ou introduire d’autres paramètres.

350-20078
5
PM350-20078R23041 FR
4.1. Boutons de fonction
Bouton Fonction
Lock/
unlock
Short
push
Learn actual lux
20
Lux
50
Lux
100
Lux
300
Lux
400
Lux
200
Lux
500
Lux
700
Lux
1000
Lux
No
Lux
Fact.
setting
Long
push
Test
On/Off
30min 60min15min 8
Hours
Pulse 2min 5min 10min
Ch 1 Ch 2 Status
Ch 1
Status
Ch 2
Light 1
On/Off
Light 2
On/Off
LED
On/Off
Vous allumez ou éteignez l’éclairage de manière
permanente, indépendamment du mouvement
détecté et du niveau de lumière.
Appuyez sur
Lock/
unlock
Short
push
Learn actual lux
20
Lux
50
Lux
100
Lux
300
Lux
400
Lux
200
Lux
500
Lux
700
Lux
1000
Lux
No
Lux
Fact.
setting
Long
push
Test
On/Off
30min 60min15min 8
Hours
Pulse 2min 5min 10min
Ch 1 Ch 2 Status
Ch 1
Status
Ch 2
Light 1
On/Off
Light 2
On/Off
LED
On/Off
ou procédez comme indiqué
ci-dessous pour activer cette fonction:
1. Appuyez sur
Lock/
unlock
Short
push
Learn actual lux
20
Lux
50
Lux
100
Lux
300
Lux
400
Lux
200
Lux
500
Lux
700
Lux
1000
Lux
No
Lux
Fact.
setting
Long
push
Test
On/Off
30min 60min15min 8
Hours
Pulse 2min 5min 10min
Ch 1 Ch 2 Status
Ch 1
Status
Ch 2
Light 1
On/Off
Light 2
On/Off
LED
On/Off
pour allumer ou éteindre
l’éclairage.
Si la fonction est activée, la LED d’indication rouge
clignote (1s allumée, 10s éteinte).
2. Appuyez sur
Lock/
unlock
Short
push
Learn actual lux
20
Lux
50
Lux
100
Lux
300
Lux
400
Lux
200
Lux
500
Lux
700
Lux
1000
Lux
No
Lux
Fact.
setting
Long
push
Test
On/Off
30min 60min15min 8
Hours
Pulse 2min 5min 10min
Ch 1 Ch 2 Status
Ch 1
Status
Ch 2
Light 1
On/Off
Light 2
On/Off
LED
On/Off
pour allumer ou éteindre à
nouveau l’éclairage.
3. Appuyez encore une fois sur
Lock/
unlock
Short
push
Learn actual lux
20
Lux
50
Lux
100
Lux
300
Lux
400
Lux
200
Lux
500
Lux
700
Lux
1000
Lux
No
Lux
Fact.
setting
Long
push
Test
On/Off
30min 60min15min 8
Hours
Pulse 2min 5min 10min
Ch 1 Ch 2 Status
Ch 1
Status
Ch 2
Light 1
On/Off
Light 2
On/Off
LED
On/Off
.
Le détecteur fonctionne de nouveau selon les
réglages sélectionnés. La LED d’indication rouge
clignote une fois pour confirmer.
Lock/
unlock
Short
push
Learn actual lux
20
Lux
50
Lux
100
Lux
300
Lux
400
Lux
200
Lux
500
Lux
700
Lux
1000
Lux
No
Lux
Fact.
setting
Long
push
Test
On/Off
30min 60min15min 8
Hours
Pulse 2min 5min 10min
Ch 1 Ch 2 Status
Ch 1
Status
Ch 2
Light 1
On/Off
Light 2
On/Off
LED
On/Off
Vous allumez ou éteignez la LED d’indication.
La LED d’indication clignote lorsque
Lock/
unlock
Short
push
Learn actual lux
20
Lux
50
Lux
100
Lux
300
Lux
400
Lux
200
Lux
500
Lux
700
Lux
1000
Lux
No
Lux
Fact.
setting
Long
push
Test
On/Off
30min 60min15min 8
Hours
Pulse 2min 5min 10min
Ch 1 Ch 2 Status
Ch 1
Status
Ch 2
Light 1
On/Off
Light 2
On/Off
LED
On/Off
ou
Lock/
unlock
Short
push
Learn actual lux
20
Lux
50
Lux
100
Lux
300
Lux
400
Lux
200
Lux
500
Lux
700
Lux
1000
Lux
No
Lux
Fact.
setting
Long
push
Test
On/Off
30min 60min15min 8
Hours
Pulse 2min 5min 10min
Ch 1 Ch 2 Status
Ch 1
Status
Ch 2
Light 1
On/Off
Light 2
On/Off
LED
On/Off
est activé.
Lock/
unlock
Short
push
Learn actual lux
20
Lux
50
Lux
100
Lux
300
Lux
400
Lux
200
Lux
500
Lux
700
Lux
1000
Lux
No
Lux
Fact.
setting
Long
push
Test
On/Off
30min 60min15min 8
Hours
Pulse 2min 5min 10min
Ch 1 Ch 2
Status
Ch 1
Status
Ch 2
Light 1
On/Off
Light 2
On/Off
LED
On/Off
Lorsque vous appuyez sur ce bouton, l’appareil
indique les réglages actifs du canal1 au moyen
des LED d’indication.
D’abord, la LED d’indication verte clignote une fois,
puis la LED d’indication rouge indique le statut.
La première fois que la LED d’indication rouge
clignote, elle indique le niveau de lumière réglé; la
deuxième fois, cette LED indique la temporisation
de déconnexion (voir aussi les tableaux à la
rubrique3.3.).
Exemple: Le canal1 est réglé sur 300lux et
10minutes. Appuyez sur
Lock/
unlock
Short
push
Learn actual lux
20
Lux
50
Lux
100
Lux
300
Lux
400
Lux
200
Lux
500
Lux
700
Lux
1000
Lux
No
Lux
Fact.
setting
Long
push
Test
On/Off
30min 60min15min 8
Hours
Pulse 2min 5min 10min
Ch 1 Ch 2
Status
Ch 1
Status
Ch 2
Light 1
On/Off
Light 2
On/Off
LED
On/Off
: la LED d’indication
verte clignote une fois et la LED d’indication
rouge clignote cinq fois (=300lux), puis la LED
d’indication verte clignote à nouveau une fois
et la LED d’indication rouge clignote quatre fois
(=10min).
4.2. Boutons de réglage
Pour modifier les réglages du détecteur:
1. Appuyez trois fois sur
Lock/
unlock
Short
push
Learn actual lux
20
Lux
50
Lux
100
Lux
300
Lux
400
Lux
200
Lux
500
Lux
700
Lux
1000
Lux
No
Lux
Fact.
setting
Long
push
Test
On/Off
30min 60min15min 8
Hours
Pulse 2min 5min 10min
Ch 1 Ch 2 Status
Ch 1
Status
Ch 2
Light 1
On/Off
Light 2
On/Off
LED
On/Off
dans un délai de cinq secondes afin de déverrouiller l’appareil.
La LED d’indication verte clignote deux fois pour confirmer. L’appareil est à présent en mode de réglage.
2. Modifiez le niveau de lumière ou la temporisation de déconnexion au moyen des boutons ci-dessous..
3. Appuyez une fois sur
Lock/
unlock
Short
push
Learn actual lux
20
Lux
50
Lux
100
Lux
300
Lux
400
Lux
200
Lux
500
Lux
700
Lux
1000
Lux
No
Lux
Fact.
setting
Long
push
Test
On/Off
30min 60min15min 8
Hours
Pulse 2min 5min 10min
Ch 1 Ch 2 Status
Ch 1
Status
Ch 2
Light 1
On/Off
Light 2
On/Off
LED
On/Off
pour verrouiller à nouveau l’appareil.
La LED d’indication verte clignote deux fois pour confirmer. Le réglage modifié est activé et l’appareil
fonctionne de nouveau selon les réglages sélectionnés.
Remarque: Si vous ne verrouillez pas l’appareil, il se verrouille automatiquement après deux minutes.
Toutes les modifications sont enregistrées automatiquement.
Bouton Fonction
Lock/
unlock
Short
push
Learn actual lux
20
Lux
50
Lux
100
Lux
300
Lux
400
Lux
200
Lux
500
Lux
700
Lux
1000
Lux
No
Lux
Fact.
setting
Long
push
Test
On/Off
30min 60min15min 8
Hours
Pulse 2min 5min 10min
Ch 1
Ch 2 Status
Ch 1
Status
Ch 2
Light 1
On/Off
Light 2
On/Off
LED
On/Off
Appuyez sur ce bouton pour régler la valeur
lux et/ou la temporisation de déconnexion
associées au canal1.
Une LED d’indication rouge indique que vous pouvez
modifier le réglage.
Lock/
unlock
Short
push
Learn actual lux
20
Lux
50
Lux
100
Lux
300
Lux
400
Lux
200
Lux
500
Lux
700
Lux
1000
Lux
No
Lux
Fact.
setting
Long
push
Test
On/Off
30min 60min15min 8
Hours
Pulse 2min 5min 10min
Ch 1 Ch 2 Status
Ch 1
Status
Ch 2
Light 1
On/Off
Light 2
On/Off
LED
On/Off
Lock/
unlock
Short
push
Learn actual lux
20
Lux
50
Lux
100
Lux
300
Lux
400
Lux
200
Lux
500
Lux
700
Lux
1000
Lux
No
Lux
Fact.
setting
Long
push
Test
On/Off
30min 60min15min 8
Hours
Pulse 2min 5min 10min
Ch 1 Ch 2 Status
Ch 1
Status
Ch 2
Light 1
On/Off
Light 2
On/Off
LED
On/Off
Lock/
unlock
Short
push
Learn actual lux
20
Lux
50
Lux
100
Lux
300
Lux
400
Lux
200
Lux
500
Lux
700
Lux
1000
Lux
No
Lux
Fact.
setting
Long
push
Test
On/Off
30min 60min15min 8
Hours
Pulse 2min 5min 10min
Ch 1 Ch 2 Status
Ch 1
Status
Ch 2
Light 1
On/Off
Light 2
On/Off
LED
On/Off
Lock/
unlock
Short
push
Learn actual lux
20
Lux
50
Lux
100
Lux
300
Lux
400
Lux
200
Lux
500
Lux
700
Lux
1000
Lux
No
Lux
Fact.
setting
Long
push
Test
On/Off
30min 60min15min 8
Hours
Pulse 2min 5min 10min
Ch 1 Ch 2 Status
Ch 1
Status
Ch 2
Light 1
On/Off
Light 2
On/Off
LED
On/Off
- Ces boutons rouges vous permettent de régler le
niveau de lumière (valeur lux) souhaité.
- Il existe dix valeurs lux fixes: 20, 50, 100, 200,
300, 400, 500, 700 et 1000 lux et No lux
(indépendant de la lumière naturelle).
Lock/
unlock
Short
push
Learn actual lux
20
Lux
50
Lux
100
Lux
300
Lux
400
Lux
200
Lux
500
Lux
700
Lux
1000
Lux
No
Lux
Fact.
setting
Long
push
Test
On/Off
30min 60min15min 8
Hours
Pulse 2min 5min 10min
Ch 1 Ch 2 Status
Ch 1
Status
Ch 2
Light 1
On/Off
Light 2
On/Off
LED
On/Off
- Ce bouton vous permet de régler le niveau de
lumière actuel de la pièce comme niveau souhaité
auquel l’éclairage doit s’allumer.
- Lorsque vous appuyez sur ce bouton, la LED
d’indication rouge clignote une fois pour indiquer
que le niveau de lumière actuel est enregistré. Si
ce niveau de lumière n’est pas compris entre 20 et
1000lux, le niveau minimum (20lux) ou maximum
(1000lux) est enregistré.
Utilisez ce réglage lorsque le niveau de lumière
minimum souhaité dans la pièce est atteint. Il s’agit
du moment auquel l’éclairage doit s’allumer lorsque le
niveau de luminosité naturelle n’est plus suffisant.
Lock/
unlock
Short
push
Learn actual lux
20
Lux
50
Lux
100
Lux
300
Lux
400
Lux
200
Lux
500
Lux
700
Lux
1000
Lux
No
Lux
Fact.
setting
Long
push
Test
On/Off
30min 60min15min 8
Hours
Pulse 2min 5min 10min
Ch 1 Ch 2 Status
Ch 1
Status
Ch 2
Light 1
On/Off
Light 2
On/Off
LED
On/Off
- Ces boutons bleus vous permettent de régler la
temporisation de déconnexion souhaitée.
- Il existe six valeurs fixes: 2, 5, 10, 15, 30 et
60minutes.
Lock/
unlock
Short
push
Learn actual lux
20
Lux
50
Lux
100
Lux
300
Lux
400
Lux
200
Lux
500
Lux
700
Lux
1000
Lux
No
Lux
Fact.
setting
Long
push
Test
On/Off
30min 60min15min 8
Hours
Pulse
2min 5min 10min
Ch 1 Ch 2 Status
Ch 1
Status
Ch 2
Light 1
On/Off
Light 2
On/Off
LED
On/Off
Pas d’application
Lock/
unlock
Short
push
Learn actual lux
20
Lux
50
Lux
100
Lux
300
Lux
400
Lux
200
Lux
500
Lux
700
Lux
1000
Lux
No
Lux
Fact.
setting
Long
push
Test
On/Off
30min 60min15min
8
Hours
Pulse 2min 5min 10min
Ch 1 Ch 2 Status
Ch 1
Status
Ch 2
Light 1
On/Off
Light 2
On/Off
LED
On/Off
Appuyez sur ce bouton:
- L’éclairage s’allume en permanence pendant
huit heures.
- Une fois que le nouveau réglage a été confirmé (2
x vert), la LED d’indication rouge clignote (0,25 s
allumée et 30 s éteinte).
Appuyez à nouveau sur ce bouton pour désactiver la
fonction. La LED d’indication rouge ne clignote plus.
Vous ne pouvez pas désactiver cette fonction au
moyen d’un bouton-poussoir.
Lock/
unlock
Short
push
Learn actual lux
20
Lux
50
Lux
100
Lux
300
Lux
400
Lux
200
Lux
500
Lux
700
Lux
1000
Lux
No
Lux
Fact.
setting
Long
push
Test
On/Off
30min 60min15min 8
Hours
Pulse 2min 5min 10min
Ch 1 Ch 2 Status
Ch 1
Status
Ch 2
Light 1
On/Off
Light 2
On/Off
LED
On/Off
L’appareil revient aux réglages d’usine.
Lock/
unlock
Short
push
Learn actual lux
20
Lux
50
Lux
100
Lux
300
Lux
400
Lux
200
Lux
500
Lux
700
Lux
1000
Lux
No
Lux
Fact.
setting
Long
push
Test
On/Off
30min 60min15min 8
Hours
Pulse 2min 5min 10min
Ch 1 Ch 2 Status
Ch 1
Status
Ch 2
Light 1
On/Off
Light 2
On/Off
LED
On/Off
La zone de détection est testée en activant le
capteur de mouvement intégré pour le test de
mouvement:
- La LED d’indication bleue s’allume lorsque vous
activez le mode de test.
- L’éclairage s’allume pendant cinq secondes et la
LED d’indication rouge s’allume chaque fois que le
capteur détecte une activité.
- Si aucune activité n’est détectée et si le capteur
est toujours en mode de test, la LED d’indication
bleue s’allume.
- Si vous oubliez de terminer le mode de test,
le détecteur fonctionne de nouveau selon les
réglages sélectionnés après cinq minutes.
Le capteur de lumière ne fonctionne pas pendant le
test de mouvement.
Vous pouvez aussi activer le test de mouvement au
moyen du potentiomètre destiné à la temporisation
de déconnexion.
5. FONCTIONNEMENT ET UTILISATION
5.1. Mise en service
Vous ne pouvez mettre le détecteur sous tension que lorsque tous les câbles sont raccordés. Le détecteur est
prêt à être utilisé environ 120secondes (préchauffage) après avoir été mis sous tension.
Pendant le préchauffage, la LED d’indication rouge clignote. Lorsque le préchauffage est terminé, la LED
d’indication verte clignote rapidement à deux reprises.
5.2. Fonctionnement général
Le capteur de lumière intégré mesure en permanence le niveau de luminosité naturelle dans la zone de détection
et le compare avec la valeur lux réglée. Grâce au capteur de lumière, l’éclairage ne s’allume automatiquement
que si le détecteur perçoit un mouvement dans la portée de détection et si la lumière naturelle est insuffisante:
• L’éclairage reste allumé tant qu’un mouvement est détecté et que la lumière naturelle
est insuffisante dans la pièce.
• Après que le dernier mouvement a été détecté, l’éclairage reste allumé pendant la
temporisation de déconnexion réglée (1 à 60minutes). Dès que la temporisation de
déconnexion est écoulée, l’éclairage s’éteint.
• L’éclairage s’éteint aussi automatiquement dès que le niveau de luminosité naturelle
est suffisant, même si un mouvement est encore détecté dans la pièce à ce moment.
5.3. Portée de détection
Vous pouvez étendre la zone de détection au moyen d’un détecteur supplémentaire (secondaire) (350-20079).
Vous pouvez raccorder jusqu’à dix détecteurs secondaires sur un seul maître (350-20078). L’éclairage est régi
par les réglages du maître. Tant le maître que le détecteur secondaire possèdent la même portée de détection
(cercle de 24 m de diamètre). Pour couvrir une surface complète au moyen de plusieurs détecteurs, il est
conseillé de tenir compte d’un chevauchement d’environ 30% (fig.8).
Si vous ne souhaitez pas que les mouvements soient détectés dans une partie de la zone de détection ou si la
zone de détection est trop grande, vous couvrez la lentille du capteur à l’aide du masque d’obturation fourni.
Vous pouvez ainsi réduire la portée maximale de 24 m. Vous pouvez réduire l’angle de détection de 360° par
paliers de 30°.
5.4. Exemples d’application
Exemple 1: classe
commutateur miniature 1 commutateur miniature 3 commutateur miniature 4
ON x x
OFF x
Fonctionnement du détecteur de présence:
- L’éclairage s’allume automatiquement lorsque le détecteur perçoit un mouvement dans la zone de
détection et que le niveau de lumière est inférieur à la valeur lux réglée.
- L’éclairage s’éteint à nouveau automatiquement après une durée prédéfinie (temporisation de
déconnexion), lorsque le détecteur ne perçoit plus de mouvement dans la zone de détection ou que le niveau
de lumière dépasse la valeur lux réglée pendant cinq minutes.
- Vous pouvez toujours allumer l’éclairage manuellement en appuyant brièvement sur le bouton-poussoir. Vous
pouvez aussi éteindre l’éclairage manuellement (=extinction éco).

350-20078
6
FR PM350-20078R23041
- Par ailleurs, vous pouvez aussi exercer une pression longue sur le bouton-poussoir, ce qui convient dans
des cas où l’éclairage doit rester allumé (p.ex. examen) ou éteint (p.ex. projection d’un film) pendant une plus
longue durée:
• Si vous exercez une pression longue sur le bouton-poussoir alors que l’éclairage est allumé,
l’éclairage s’éteint. Le détecteur est verrouillé tant qu’une activité est détectée et que la temporisation de
déconnexion réglée + 2heures n’est pas encore écoulée. Ensuite, le détecteur fonctionne de nouveau
selon les réglages sélectionnés et l’éclairage s’allume.
• Si vous exercez une pression longue sur le bouton-poussoir alors que l’éclairage est éteint, l’éclairage
s’allume (indépendamment du niveau de luminosité naturelle). L’éclairage reste allumé tant que le
détecteur perçoit une activité et que la temporisation de déconnexion réglée + 2heures n’est pas encore
écoulée. Ensuite, l’éclairage s’éteint, le détecteur fonctionne de nouveau selon les réglages sélectionnés et
l’éclairage s’allume.
La LED d’indication rouge sur le détecteur clignote (0,25s allumée et 5s éteinte) pour indiquer que vous
avez exercé une pression longue sur le bouton-poussoir. Vous pouvez à tout moment interrompre la fonction
‘pression longue’ en appuyant brièvement sur le bouton-poussoir. L’éclairage s’allume alors et le détecteur
fonctionne de nouveau selon les réglages sélectionnés.
Exemple 2: bureau
commutateur miniature 1 commutateur miniature 3 commutateur miniature 4
ON x x
OFF x
Fonctionnement du détecteur d’absence:
- Vous devez allumer l’éclairage en appuyant brièvement sur le bouton-poussoir (indépendamment de la
lumière naturelle).
- Les fonctions ‘extinction éco’ et ‘pression longue’ sont désactivées.
- L’éclairage s’éteint à nouveau automatiquement après une durée prédéfinie (temporisation de
déconnexion), lorsque le détecteur ne perçoit plus de mouvement dans la zone de détection ou que le niveau
de lumière dépasse la valeur lux réglée pendant cinq minutes.
Exemple 3: cage d’escalier
commutateur miniature 1 commutateur miniature 3 commutateur miniature 4
ON x x x
OFF
Fonctionnement du détecteur de présence:
- L’éclairage s’allume automatiquement lorsque le détecteur perçoit un mouvement dans la zone de
détection et que le niveau de lumière est inférieur à la valeur lux réglée.
- L’éclairage s’éteint à nouveau automatiquement après une durée prédéfinie (temporisation de
déconnexion), lorsque le détecteur ne perçoit plus de mouvement dans la zone de détection ou que le niveau
de lumière dépasse la valeur lux réglée pendant cinq minutes.
- Vous pouvez toujours allumer l’éclairage manuellement au moyen du bouton-poussoir, indépendamment du
niveau de luminosité naturelle.
6. ENTRETIEN
La saleté peut influencer le fonctionnement du détecteur. Par conséquent, veillez à ce que la lentille soit
toujours propre et sèche. Pour nettoyer la lentille, utilisez un chiffon humide et de l’eau additionnée d’un peu
de détergent. N’exercez jamais de pression sur la lentille en la nettoyant. Si la lentille ou d’autres pièces du
détecteur sont défectueuses, contactez un installateur agréé.
7. DONNEÉS TECHNIQUES
dimensions 45,9 x 117,3 mm (HxL)
64,1 x 117,3 mm (HxL) (partie non visible comprise)
tension d’alimentation 230 Vac ± 10%, 50 Hz
disjoncteur calibre maximum du disjoncteur miniature 10 A*
consommation de courant 0,2 W
contact relais NO (max. 10A), libre de potentiel, sensible à la lumière et
au mouvement
charge maximale lampes à incandescence (2300 W)
lampes halogènes 230 V (2300 W)
toutes les lampes halogènes basse tension (1200 VA)
lampes fluorescentes (non compensées) (1200 VA)
lampes à économie d’énergie (CFLi) (350 W)
lampes à LED 230 V (350 W)
capacité de commutation maximale 140 μF
courant d’allumage maximal 165 A/20 ms ou 800A/200 μs
sensibilité à la lumière 20 – 1000, ∞ lux
hystérésis sur la sensibilité à la lumière + 10%
temporisation de déconnexion 2 – 60 min
hauteur de montage (fig. 3) 2 – 3,4 m
angle de détection (fig. 3) 360°
portée de détection (fig. 3) max. 24 m
entrée de fil 3 x 2,5 mm²
opercule de câble sur le côté: 3 x Ø 14 mm
en haut: 2 x Ø 14 mm
degré de protection IP54
classe de protection appareils de classe I
température ambiante -5 – +50°C
agrément marquage CE, conforme à la norme EN 60669-2-1
accessoires télécommande IR (350-20089)
télécommande pour smartphone (350-41936)
détecteur de présence ou d’absence 360°
(secondaire) (350-20079)
* Le calibre du disjoncteur miniature est limité par les règles nationales en matière d’installation.
Mises en garde relative à l’installation
L’installation de produits qui feront, de manière permanente, partie de l’installation électrique et qui comportent
des tensions dangereuses, doit être effectuée par un installateur agréé et conformément aux prescriptions en
vigueur. Ce mode d’emploi doit être remis à l’utilisateur. Il doit être joint au dossier de l’installation électrique et
être remis aux nouveaux propriétaires éventuels. Des exemplaires supplémentaires peuvent être obtenus sur le
site internet ou auprès de Niko customer services.
Marquage CE
Ce produit est conforme à l’ensemble des directives et règlements européens applicables. Pour l’appareillage
radio, Niko SA déclare que l’appareillage radio de ce mode d’emploi est conforme à la Directive 2014/53/EU.
Le texte complet de la déclaration de conformité UE est disponible, le cas échéant, sur le site www.niko.eu à
la rubrique référence produit.
Environnement
Vous ne pouvez pas mettre ce produit ou les batteries fournies au rebut en tant que déchet non trié. Déposez
votre produit usagé à un point de collecte agréé. Tout comme les fabricants et importateurs, vous jouez un rôle
important dans la promotion du tri, du recyclage et de la réutilisation d’appareils électriques et électroniques
mis au rebut. Pour financer la collecte et le traitement, les pouvoirs publics ont prévu, dans certains cas, une
cotisation de recyclage (comprise dans le prix d’achat de ce produit).
EMBALLAGES
CARTONS ET PAPIER
À TRIER

350-20078
7
PM350-20078R23041 DE
Gebrauchsanleitung vor Montage und Inbetriebnahme vollständig durchlesen. Bewahren Sie diese
Gebrauchsanleitung sorgfältig für einen späteren Gebrauch auf.
1. BESCHREIBUNG
Der Präsenz- bzw. Absenzmelder 360° (Master) für die Aufputzmontage besteht aus einer integralen
Einheit einschließlich 1-Kanal-An/Aus-Steuerung, einem Bewegungssensor (PIR bzw. Passiv-Infrarot-
Technologie), einem Lichtsensor und einem integrierten IR-Empfänger. Alle externen Einheiten wie Drucktaster
und Beleuchtungseinrichtungen werden direkt am an der Decke montierten Melder angeschlossen.
Sie können diesen Melder als Standalone-Betrieb oder als Master in Kombination mit einem bzw. mehreren
Sekundär-Meldern (350-20079) verwenden.
Die Werkseinstellungen ermöglichen eine Installation und Bedienung des Melders. Für eine optimale
Lichtsteuerung empfehlen wir die Anpassung der Werkseinstellungen an die Umgebungsbedingungen und
spezifischen Beleuchtungsanforderungen. Sie können die Einstellungen am Gerät nach Wunsch über die
integrierten Potentiometer und DIP-Schalter oder mit der IR-Fernbedienung (nicht mit inbegriffen) (350-20089)
anpassen.
2. INSTALLATION
2.1. Anschluss
Gefahrenhinweis: Melder niemals unter Spannung installieren. Schließen Sie das Gerät erst nach
vollständiger Installation an die Netzspannung an.
A. Standalone
Konsultieren Sie den Anschlussplan (Abb. 1A).
B. In Kombination mit einem bzw. mehreren Sekundär-Meldern
Konsultieren Sie den Anschlussplan (Abb. 1B).
2.2. Montage
Tipp: Montieren Sie den Melder nicht zu dicht in Nähe von Wärmequellen wie etwa Heizungen oder
Elektroöfen, Luftströmen (Ventilatoranlagen) oder von sich bewegenden Objekten (Abb. 2). Hierdurch kann das
Gerät unerwünschterweise aktiviert werden, da es in seiner Umgebung sowohl auf Bewegungen als auch auf
Wärme reagiert
Tipp: Die empfohlene Montagehöhe beträgt zwischen 2 und 3,4 m. Ein optimaler Betrieb des Melders erfolgt
auf einer Höhe von 3 m: Auf dieser Höhe deckt der Melder einen Bodenbereich eines Durchmessers von
24 m ab. Auf Tischhöhe (80 cm) hingegen deckt der Melder einen Durchmesser von 17,5 m ab (Abb. 3).
Der Melder ist für eine direkte Deckenmontage (Abb. 4) geeignet.
3. EINSTELLUNGEN
3.1. Werkseinstellungen
Die Parameter des Melders im Lieferzustand lauten wie folgt:
Parameter Werkseinstellung
Anwendung - DIP-Schalter 1: automatisches Ein- bzw. Ausschalten
(Präsenszmelder/Absenzmelder)
- DIP-Schalter 3: Drucktaster schaltet bei kurzer Betätigung:
• das Licht ein, und
• das Licht aus ohne auf die Ausschaltverzögerung warten
zu müssen (= eco aus).
- DIP-Schalter 4: kurz betätigen ist tageslichtabhängig
Empfindlichkeit des Bewegungssensors hoch
Lichtempfindlichkeit 200 lux
Ausschaltverzögerung 10 min
3.2. DIP-Schalter
Abbildung 5 enthält Anweisungen für eine Einstellung der DIP-Schalter je nach Anwendung und der
gewünschten Empfindlichkeit des Bewegungssensors.
Anwendung einstellen
DIP-Schalter Anwendung
1 Sie können den Melder wie folgt einstellen:
- ON: als Präsenzmelder
(automatisches Ein- bzw. Ausschalten)
Der Melder schaltet die Beleuchtung je nach
eingestelltem Luxwert und bei Bewegungserfassung
automatisch ein.
- OFF: als Absenzmelder
(manuelles Einschalten/automatisches Ausschalten)
Der Melder schaltet in dem Fall die Beleuchtung
abhängig vom eingestellten Luxwert nur dann ein, wenn
Sie den Drucktaster betätigen.
Nach Erfassung des letzten Bewegungsvorgangs
bleibt die Beleuchtung noch für den Zeitpunkt der
eingestellten Ausschaltverzögerung eingeschaltet. Sobald
die Ausschaltverzögerung verstrichen ist, schaltet die
Beleuchtung aus.
2
Nicht zutreffend.
3
Sie können dem angeschlossenen Drucktaster auch
unterschiedliche Funktionen zuweisen:
- ON: Sie können die Beleuchtung ausschließlich mit
einer kurzen Betätigung einschalten. Die Funktionen
‘eco aus’ und ‘länger betätigen’ sind deaktiviert..
- OFF: Mit einer kurzen Betätigung können Sie die
Beleuchtung sowohl einschalten als auch direkt
ausschalten, ohne auf die Ausschaltverzögerung
warten zu müssen (= eco aus
1
). Beim Ausschalten über
den Drucktaster wird der Melder zehn Sekunden lang
blockiert, um ein erneutes, unmittelbares Einschalten der
Beleuchtung zu verhindern.
Wenn Sie den Drucktaster länger als eine Sekunde lang
betätigen, dann blinkt die rote Anzeige-LED (0,25 s an
und 5 s aus) und werden die Beleuchtung sowie die
eingestellte Ausschaltverzögerung für zwei Stunden ein-
bzw. ausgeschaltet.
4
- ON: Kurz betätigen ist tageslichtunabhängig.
- OFF: Kurz betätigen ist tageslichtabhängig.
Lang betätigen ist immer tageslichtunabhängig.
1
Bei der Funktion ‘eco aus’ handelt es sich um die energiesparsamste Weise, die Beleuchtung einzuschalten.
Entweder Sie schalten die Beleuchtung selber aus und brauchen somit nicht auf die Ausschaltverzögerung zu
warten. Sollten Sie jedoch vergessen, die Beleuchtung auszuschalten, dann geschieht dies automatisch sobald
die Ausschaltverzögerung verstrichen ist.
Empfindlichkeit einstellen
Mit den beiden ganz außen rechts befindlichen DIP-Schaltern stellen Sie die Empfindlichkeit des
Bewegungssensors ein. Sie haben die Wahl zwischen minimaler, niedriger, hoher bzw. maximaler
Empfindlichkeit. Die für die jeweilige Empfindlichkeit erforderliche Stellung der DIP-Schalter können
Sie Abbildung 5 entnehmen.
3.3. Potentiometer
Unter dem Gehäuse des Melders befinden sich zwei Potentiometer, mit denen Sie die Lichtempfindlichkeit
und Ausschaltverzögerung nach Wunsch einstellen können (Abb. 6).
Potentiometer Funktion
Sie stellen die Lichtstärke
(Lichtempfindlichkeit) ein, bei der die
Beleuchtung einschalten muss.
Über das Potentiometer können Sie zehn feste
Lichtstärken einstellen: 20, 50, 100, 200,
300, 400, 500, 700 und 1000 Lux sowie ∞
(tageslichtunabhängig).
Sie stellen die Ausschaltverzögerung ein.
Es stehen acht voreingestellte Werte zur Verfügung:
- Funktionstest (siehe Abschnitt 4.1.)
- Impuls: nicht zutreffend
- 2 Minuten
- 5 Minuten
- 10 Minuten
- 15 Minuten
- 30 Minuten
- 60 Minuten
Um die eingestellte Lichtstärke bzw. die eingestellte Ausschaltverzögerung zu bestätigen, blinkt die grüne
Anzeige-LED einmalig bzw. die rote Anzeige-LED je nach gewählter Einstellung mehrmals. Untenstehende
Tabelle enthält die Anzahl der Blinkvorgänge der roten Anzeige-LED in Abhängigkeit der unterschiedlichen
Einstellungen:
Lichtstärke 20 50 100 200 300 400 500 700 1000 ∞
Anzahl der Blinkvorgänge
der roten Anzeige-LED 12345678910
Beispiel: Das Potentiometer ist auf 300 Lux eingestellt. Sie möchten den Luxwert auf 400 Lux erhöhen.
Verstellen Sie das Potentiometer vorsichtig auf den höheren Luxwert. Die grüne Anzeige-LED blinkt einmalig
und die rote Anzeige-LED sechsmal (= 400 Lux) zur Bestätigung.
Ausschaltverzögerung Impuls 2 min 5 min 10 min 15 min 30 min 60 min
Anzahl der Blinkvorgänge
der roten Anzeige-LED 1234567
Beispiel: Das Potentiometer ist auf 10 Minuten eingestellt. Sie möchten die Ausschaltverzögerung auf
15Minuten erhöhen. Verstellen Sie das Potentiometer vorsichtig auf den höheren Wert. Die grüne Anzeige-
LED blinkt einmalig und die rote Anzeige-LED fünfmal (= 15 Minuten) zur Bestätigung.
4. IR-FERNBEDIENUNG
Neben einer manuellen Einstellung über die Potentiometer und DIP-Schalter des Geräts können Sie auch
auf die IR-Fernbedienung (Abb. 7) zurückgreifen, um eine andere Anwendung auszuwählen, einen Test
auszuführen oder andere Parameter einzugeben.

350-20078
8
DE PM350-20078R23041
4.1. Funktionstasten
Taste Funktion
Lock/
unlock
Short
push
Learn actual lux
20
Lux
50
Lux
100
Lux
300
Lux
400
Lux
200
Lux
500
Lux
700
Lux
1000
Lux
No
Lux
Fact.
setting
Long
push
Test
On/Off
30min 60min15min 8
Hours
Pulse 2min 5min 10min
Ch 1 Ch 2 Status
Ch 1
Status
Ch 2
Light 1
On/Off
Light 2
On/Off
LED
On/Off
Sie schalten das Licht unabhängig von einer
erfassten Bewegung und der Lichtstärke dauerhaft
ein bzw. aus.
Betätigen Sie kurz
Lock/
unlock
Short
push
Learn actual lux
20
Lux
50
Lux
100
Lux
300
Lux
400
Lux
200
Lux
500
Lux
700
Lux
1000
Lux
No
Lux
Fact.
setting
Long
push
Test
On/Off
30min 60min15min 8
Hours
Pulse 2min 5min 10min
Ch 1 Ch 2 Status
Ch 1
Status
Ch 2
Light 1
On/Off
Light 2
On/Off
LED
On/Off
oder befolgen Sie
nachfolgende Schritte, um die genannte Funktion
zu aktivieren:
1. Betätigen Sie
Lock/
unlock
Short
push
Learn actual lux
20
Lux
50
Lux
100
Lux
300
Lux
400
Lux
200
Lux
500
Lux
700
Lux
1000
Lux
No
Lux
Fact.
setting
Long
push
Test
On/Off
30min 60min15min 8
Hours
Pulse 2min 5min 10min
Ch 1 Ch 2 Status
Ch 1
Status
Ch 2
Light 1
On/Off
Light 2
On/Off
LED
On/Off
um die Beleuchtung
ein- oder auszuschalten.
Wenn die Funktion aktiviert ist, blinkt die rote
Anzeige-LED (1 s an, 10 s aus).
2. Betätigen Sie
Lock/
unlock
Short
push
Learn actual lux
20
Lux
50
Lux
100
Lux
300
Lux
400
Lux
200
Lux
500
Lux
700
Lux
1000
Lux
No
Lux
Fact.
setting
Long
push
Test
On/Off
30min 60min15min 8
Hours
Pulse 2min 5min 10min
Ch 1 Ch 2 Status
Ch 1
Status
Ch 2
Light 1
On/Off
Light 2
On/Off
LED
On/Off
um die Beleuchtung erneut
ein- oder auszuschalten.
3. Betätigen Sie erneut
Lock/
unlock
Short
push
Learn actual lux
20
Lux
50
Lux
100
Lux
300
Lux
400
Lux
200
Lux
500
Lux
700
Lux
1000
Lux
No
Lux
Fact.
setting
Long
push
Test
On/Off
30min 60min15min 8
Hours
Pulse 2min 5min 10min
Ch 1 Ch 2 Status
Ch 1
Status
Ch 2
Light 1
On/Off
Light 2
On/Off
LED
On/Off
.
Der Melder funktioniert wieder gemäß den
ausgewählten Einstellungen. Zur Bestätigung blinkt
die rote Anzeige-LED einmalig.
Lock/
unlock
Short
push
Learn actual lux
20
Lux
50
Lux
100
Lux
300
Lux
400
Lux
200
Lux
500
Lux
700
Lux
1000
Lux
No
Lux
Fact.
setting
Long
push
Test
On/Off
30min 60min15min 8
Hours
Pulse 2min 5min 10min
Ch 1 Ch 2 Status
Ch 1
Status
Ch 2
Light 1
On/Off
Light 2
On/Off
LED
On/Off
Sie schalten die Anzeige-LED ein oder aus.
Die Anzeige-LED blinkt, wenn
Lock/
unlock
Short
push
Learn actual lux
20
Lux
50
Lux
100
Lux
300
Lux
400
Lux
200
Lux
500
Lux
700
Lux
1000
Lux
No
Lux
Fact.
setting
Long
push
Test
On/Off
30min 60min15min 8
Hours
Pulse 2min 5min 10min
Ch 1 Ch 2 Status
Ch 1
Status
Ch 2
Light 1
On/Off
Light 2
On/Off
LED
On/Off
oder
Lock/
unlock
Short
push
Learn actual lux
20
Lux
50
Lux
100
Lux
300
Lux
400
Lux
200
Lux
500
Lux
700
Lux
1000
Lux
No
Lux
Fact.
setting
Long
push
Test
On/Off
30min 60min15min 8
Hours
Pulse 2min 5min 10min
Ch 1 Ch 2 Status
Ch 1
Status
Ch 2
Light 1
On/Off
Light 2
On/Off
LED
On/Off
aktiviert ist.
Lock/
unlock
Short
push
Learn actual lux
20
Lux
50
Lux
100
Lux
300
Lux
400
Lux
200
Lux
500
Lux
700
Lux
1000
Lux
No
Lux
Fact.
setting
Long
push
Test
On/Off
30min 60min15min 8
Hours
Pulse 2min 5min 10min
Ch 1 Ch 2
Status
Ch 1
Status
Ch 2
Light 1
On/Off
Light 2
On/Off
LED
On/Off
Bei Betätigung dieser Taste zeigt das Gerät über
die Anzeige-LED die aktuellen Einstellungen für
Kanal 1 an.
Erst blinkt die grüne Anzeige-LED einmalig,
anschließend zeigt die rote Anzeige-LED den Status
an. Der erste Blinkdurchlauf der roten Anzeige-LED
zeigt die eingestellte Lichtstärke an; der zweite
Blinkdurchlauf zeigt die Ausschaltverzögerung an
(siehe auch die Tabellen in Abschnitt 3.3.).
Beispiel: Kanal 1 ist eingestellt auf 300 Lux und
10Minuten. Betätigen Sie
Lock/
unlock
Short
push
Learn actual lux
20
Lux
50
Lux
100
Lux
300
Lux
400
Lux
200
Lux
500
Lux
700
Lux
1000
Lux
No
Lux
Fact.
setting
Long
push
Test
On/Off
30min 60min15min 8
Hours
Pulse 2min 5min 10min
Ch 1 Ch 2
Status
Ch 1
Status
Ch 2
Light 1
On/Off
Light 2
On/Off
LED
On/Off
: Die grüne
Anzeige-LED blinkt einmalig und die rote Anzeige-
LED blinkt fünfmalig (= 300 Lux). Anschließend
blinkt die grüne Anzeige-LED erneut einmalig und
die rote Anzeige-LED viermalig (= 10 min).
4.2. Einstelltasten
Gehen Sie wie folgt vor, um die Einstellungen des Melders zu ändern:
1. Betätigen Sie innerhalb von fünf Sekunden drei Mal auf
Lock/
unlock
Short
push
Learn actual lux
20
Lux
50
Lux
100
Lux
300
Lux
400
Lux
200
Lux
500
Lux
700
Lux
1000
Lux
No
Lux
Fact.
setting
Long
push
Test
On/Off
30min 60min15min 8
Hours
Pulse 2min 5min 10min
Ch 1 Ch 2 Status
Ch 1
Status
Ch 2
Light 1
On/Off
Light 2
On/Off
LED
On/Off
um das Gerät zu deblockieren.
Zur Bestätigung blinkt zwei Mal die grüne Anzeige-LED. Das Gerät befindet sich nun im Einstellmodus.
2. Ändern Sie über untenstehende Tasten die Lichtstärke bzw. Ausschaltverzögerung.
3. Betätigen Sie einmalig
Lock/
unlock
Short
push
Learn actual lux
20
Lux
50
Lux
100
Lux
300
Lux
400
Lux
200
Lux
500
Lux
700
Lux
1000
Lux
No
Lux
Fact.
setting
Long
push
Test
On/Off
30min 60min15min 8
Hours
Pulse 2min 5min 10min
Ch 1 Ch 2 Status
Ch 1
Status
Ch 2
Light 1
On/Off
Light 2
On/Off
LED
On/Off
um das Gerät erneut zu blockieren.
Zur Bestätigung blinkt zwei Mal die grüne Anzeige-LED. Die geänderte Einstellung wurde aktiviert und das
Gerät funktioniert wieder gemäß den ausgewählten Einstellungen.
Anmerkung: Wenn Sie das Gerät nicht blockieren, geschieht dies nach zwei Minuten automatisch. Alle
Änderungen werden dann automatisch gespeichert.
Taste Funktion
Lock/
unlock
Short
push
Learn actual lux
20
Lux
50
Lux
100
Lux
300
Lux
400
Lux
200
Lux
500
Lux
700
Lux
1000
Lux
No
Lux
Fact.
setting
Long
push
Test
On/Off
30min 60min15min 8
Hours
Pulse 2min 5min 10min
Ch 1
Ch 2 Status
Ch 1
Status
Ch 2
Light 1
On/Off
Light 2
On/Off
LED
On/Off
Betätigen Sie diese Taste, um den Luxwert und/oder
die Ausschaltverzögerung für Kanal 1 einzustellen.
Die rote Anzeige-LED zeigt an, dass Sie
die Einstellung ändern können.
Lock/
unlock
Short
push
Learn actual lux
20
Lux
50
Lux
100
Lux
300
Lux
400
Lux
200
Lux
500
Lux
700
Lux
1000
Lux
No
Lux
Fact.
setting
Long
push
Test
On/Off
30min 60min15min 8
Hours
Pulse 2min 5min 10min
Ch 1 Ch 2 Status
Ch 1
Status
Ch 2
Light 1
On/Off
Light 2
On/Off
LED
On/Off
Lock/
unlock
Short
push
Learn actual lux
20
Lux
50
Lux
100
Lux
300
Lux
400
Lux
200
Lux
500
Lux
700
Lux
1000
Lux
No
Lux
Fact.
setting
Long
push
Test
On/Off
30min 60min15min 8
Hours
Pulse 2min 5min 10min
Ch 1 Ch 2 Status
Ch 1
Status
Ch 2
Light 1
On/Off
Light 2
On/Off
LED
On/Off
Lock/
unlock
Short
push
Learn actual lux
20
Lux
50
Lux
100
Lux
300
Lux
400
Lux
200
Lux
500
Lux
700
Lux
1000
Lux
No
Lux
Fact.
setting
Long
push
Test
On/Off
30min 60min15min 8
Hours
Pulse 2min 5min 10min
Ch 1 Ch 2 Status
Ch 1
Status
Ch 2
Light 1
On/Off
Light 2
On/Off
LED
On/Off
Lock/
unlock
Short
push
Learn actual lux
20
Lux
50
Lux
100
Lux
300
Lux
400
Lux
200
Lux
500
Lux
700
Lux
1000
Lux
No
Lux
Fact.
setting
Long
push
Test
On/Off
30min 60min15min 8
Hours
Pulse 2min 5min 10min
Ch 1 Ch 2 Status
Ch 1
Status
Ch 2
Light 1
On/Off
Light 2
On/Off
LED
On/Off
- Mit diesen roten Tasten stellen Sie die gewünschte
Lichtstärke (Luxwert) ein.
- Es existieren zehn feste Luxwerte: 20, 50, 100, 200,
300, 400, 500, 700 und 1000 Lux sowie No lux
(tageslichtunabhängig).
Lock/
unlock
Short
push
Learn actual lux
20
Lux
50
Lux
100
Lux
300
Lux
400
Lux
200
Lux
500
Lux
700
Lux
1000
Lux
No
Lux
Fact.
setting
Long
push
Test
On/Off
30min 60min15min 8
Hours
Pulse 2min 5min 10min
Ch 1 Ch 2 Status
Ch 1
Status
Ch 2
Light 1
On/Off
Light 2
On/Off
LED
On/Off
- Mit dieser Taste stellen Sie die im Raum aktuell
vorhandene Lichtstärke als den gewünschten
Einschaltpunkt der Beleuchtung ein.
- Wenn Sie diese Taste drücken, blinkt die rote Anzeige-
LED einmalig und bestätigt dadurch, dass die aktuelle
Lichtstärke hierfür gespeichert wird. Beträgt diese
Lichtstärke nicht zwischen 20 und 1000 Lux, wird
entweder der Mindestwert (20 Lux) oder der Maximalwert
(1000 Lux) gespeichert.
Greifen Sie auf diese Einstellung zurück, wenn im Raum
die gewünschte Mindestlichtstärke erreicht ist. Dies ist der
Zeitpunkt, an dem die Beleuchtung eingeschaltet werden
muss, da die Tageslichtstärke nicht mehr ausreichend ist.
Lock/
unlock
Short
push
Learn actual lux
20
Lux
50
Lux
100
Lux
300
Lux
400
Lux
200
Lux
500
Lux
700
Lux
1000
Lux
No
Lux
Fact.
setting
Long
push
Test
On/Off
30min 60min15min 8
Hours
Pulse 2min 5min 10min
Ch 1 Ch 2 Status
Ch 1
Status
Ch 2
Light 1
On/Off
Light 2
On/Off
LED
On/Off
- Mit diesen blauen Tasten stellen Sie die
gewünschte Ausschaltverzögerung ein.
- Es existieren sechs feste Werte: 2, 5, 10, 15, 30 und
60 Minuten.
Lock/
unlock
Short
push
Learn actual lux
20
Lux
50
Lux
100
Lux
300
Lux
400
Lux
200
Lux
500
Lux
700
Lux
1000
Lux
No
Lux
Fact.
setting
Long
push
Test
On/Off
30min 60min15min 8
Hours
Pulse
2min 5min 10min
Ch 1 Ch 2 Status
Ch 1
Status
Ch 2
Light 1
On/Off
Light 2
On/Off
LED
On/Off
Nicht zutreffend.
Lock/
unlock
Short
push
Learn actual lux
20
Lux
50
Lux
100
Lux
300
Lux
400
Lux
200
Lux
500
Lux
700
Lux
1000
Lux
No
Lux
Fact.
setting
Long
push
Test
On/Off
30min 60min15min
8
Hours
Pulse 2min 5min 10min
Ch 1 Ch 2 Status
Ch 1
Status
Ch 2
Light 1
On/Off
Light 2
On/Off
LED
On/Off
Wenn Sie diese Taste drücken:
- Wird die Beleuchtung für acht Stunden lang
dauerhaft eingeschaltet.
- Nach der Bestätigung der Blockierung der Einstellung
(2 x grüne LED), blinkt die rote Anzeige-LED (0,25 an
und 30 s aus)
Drücken Sie erneut diese Taste, um die Funktion
auszuschalten. Die rote Anzeige-LED blinkt nicht mehr.
Sie können diese Funktion nicht über eine Drucktaste
ausschalten.
Lock/
unlock
Short
push
Learn actual lux
20
Lux
50
Lux
100
Lux
300
Lux
400
Lux
200
Lux
500
Lux
700
Lux
1000
Lux
No
Lux
Fact.
setting
Long
push
Test
On/Off
30min 60min15min 8
Hours
Pulse 2min 5min 10min
Ch 1 Ch 2 Status
Ch 1
Status
Ch 2
Light 1
On/Off
Light 2
On/Off
LED
On/Off
Das Gerät kehrt zu den Werkseinstellungen zurück.
Lock/
unlock
Short
push
Learn actual lux
20
Lux
50
Lux
100
Lux
300
Lux
400
Lux
200
Lux
500
Lux
700
Lux
1000
Lux
No
Lux
Fact.
setting
Long
push
Test
On/Off
30min 60min15min 8
Hours
Pulse 2min 5min 10min
Ch 1 Ch 2 Status
Ch 1
Status
Ch 2
Light 1
On/Off
Light 2
On/Off
LED
On/Off
Sie können den Erfassungsbereichs überprüfen,
indem Sie den integrierten Bewegungssensor für den
Funktionstest aktivieren:
- Die blaue Anzeige-LED leuchtet auf, wenn Sie den
Testmodus aktivieren.
- Die Beleuchtung wird für fünf Sekunden lang
eingeschaltet und die rote Anzeige-LED leuchtet jedes
Mal auf, wenn der Sensor Aktivität erfasst.
- Wenn keine Aktivität erfasst wird und der Sensor
sich noch im Testmodus befindet, leuchtet die blaue
Anzeige-LED auf.
- Wenn Sie vergessen, den Testmodus wieder zu
verlassen, funktioniert der Melder nach fünf Minuten
wieder gemäß den ausgewählten Einstellungen.
Der Lichtsensor ist während des Funktionstests außer
Funktion.
Sie können den Funktionstest auch über das
Potentiometer für die Ausschaltverzögerung aktivieren.
5. FUNKTIONSWEISE UND BETRIEB
5.1. Inbetriebnahme
Sie dürfen den Melder erst nach dem Anschließen aller Kabel an Spannung anlegen. Nach dem Einschalten der
Spannung ist der Melder erst nach circa 120 sekunden (Aufwärmzeit) betriebsbereit.
Während der Aufwärmzeit blinkt die rote Anzeige-LED. Nach Ablauf der Aufwärmzeit blinkt die grüne Anzeige-LED
zwei Mal kurz hintereinander auf.
5.2. Allgemeine Funktion
Der integrierte Lichtsensor misst ständig im Erfassungsbereich die Tageslichtstärke und vergleicht diese mit dem
eingestellten Luxwert. Dank des Lichtsensors schaltet das Licht nur dann bei einer vom Melder innerhalb des
Erfassungsbereichs registrierten Bewegung automatisch ein, wenn die Tageslichtstärke nicht ausreicht:
• Die Beleuchtung bleibt solange eingeschaltet, wie eine Bewegung und unzureichend Tageslicht
im Raum erfasst werden.
• Nach Erfassung des letzten Bewegungsvorgangs bleibt das Licht noch während
der eingestellten Ausschaltverzögerung (1 bis 60 Minuten) eingeschaltet. Sobald die
Ausschaltverzögerung verstrichen ist, schaltet die Beleuchtung aus.
• Die Beleuchtung schaltet auch dann automatisch aus, sobald die Tageslichtstärke ausreichend
hoch ist und obwohl zu dem Zeitpunkt noch Bewegungen im Raum erfasst werden.
5.3. Erfassungsbereich
Sie können den Erfassungsbereich um einen zusätzlichen Melder (Sekundär) (350-20079) erweitern. Sie können
bis zu maximal zehn Sekundär-Melder an einem Master (350-20078) anschließen. Die Beleuchtung wird in
Abhängigkeit zu den Master-Einstellungen geregelt. Sowohl Master- als auch Sekundär-Meldern verfügen über
denselben Erfassungsbereich (Kreis eines Durchmessers von 24 m). Um eine Fläche vollständig mit mehreren
Meldern zu erfassen, wird eine Überlappung des Erfassungsbereichs von circa 30% empfohlen (Abb. 8).
Wenn Sie in einem bestimmten Abschnitt keine Bewegungserfassung wünschen bzw. wenn der
Erfassungsbereich zu groß ist, dann können Sie die Linse mit der mitgelieferten Abdeckmaske abdecken. Sie
können dadurch die maximale Reichweite von 24 m reduzieren. Den Erfassungswinkel von 360° können Sie in
Schritten zu je 30° verringern.
5.4. Anwendungsbeispiele
Beispiel 1: Klassenraum
DIP-Schalter 1 DIP-Schalter 3 DIP-Schalter 4
ON x x
OFF x
Funktionsweise des Präsenzmelders:
- Die Beleuchtung wird automatisch eingeschaltet, wenn der Melder im Erfassungsbereich Bewegung
registriert und wenn die Lichtstärke sich unterhalb des eingestellten Luxwertes befindet.
- Die Beleuchtung wird nach einer vorab eingestellten Zeit (Ausschaltverzögerung) erneut automatisch
ausgeschaltet, wenn der Melder keine Bewegung mehr im Erfassungsbereich erfasst oder wenn die
Lichtstärke den eingestellten Luxwert fünf Minuten lang überschritten hat.
- Sie können die Beleuchtung immer manuell einschalten, indem Sie kurz den Drucktaster drücken. Sie haben
auch die Möglichkeit, die Beleuchtung manuell auszuschalten (= eco aus).

350-20078
9
PM350-20078R23041 DE
- Darüber hinaus können Sie auch den Drucktaster lange drücken, was sich besonders für Situationen
anbietet, in denen die Beleuchtung für längere Zeit eingeschaltet (z.B. bei Prüfungen) oder ausgeschaltet (z.B.
während einer Filmvorführung) sein muss:
• Wenn Sie bei eingeschalteter Beleuchtung den Drucktaster lange betätigen, wird die Beleuchtung
ausgeschaltet. Der Melder wird solange blockiert, wie Aktivitäten erfasst werden und solange die
eingestellte Ausschaltverzögerung + 2 Stunden noch nicht abgelaufen ist. Anschließend funktioniert der
Melder gemäß den ausgewählten Einstellungen und die Beleuchtung wird eingeschaltet.
• Wenn Sie bei ausgeschalteter Beleuchtung den Drucktaster lange betätigen, wird die Beleuchtung
eingeschaltet (unabhängig von der Tageslichtstärke). Die Beleuchtung bleibt solange eingeschaltet, wie
vom Bewegungsmelder Aktivitäten erfasst werden und solange die eingestellte Ausschaltverzögerung
+ 2 Stunden noch nicht abgelaufen ist. Anschließend wird die Beleuchtung ausgeschaltet, der Melder
funktioniert gemäß den ausgewählten Einstellungen und die Beleuchtung wird eingeschaltet.
Die rote Anzeige-LED des Melders (0,25 s an und 5 s aus) blinkt und zeigt dadurch an, dass Sie den
Drucktaster lange gedrückt haben. Sie können die Funktion ‘länger betätigen’ zu jedem Zeitpunkt durch
einen kurzen Druck des Drucktasters unterbrechen. Anschließend wird die Beleuchtung eingeschaltet und der
Melder funktioniert wieder gemäß den ausgewählten Einstellungen.
Beispiel 2: Büro
DIP-Schalter 1 DIP-Schalter 3 DIP-Schalter 4
ON x x
OFF x
Funktionsweise des Absenzmelders:
- Sie müssen die Beleuchtung einschalten, indem Sie kurz den Drucktaster drücken (tageslichtunabhängig).
- Die Funktionen ‘eco aus’ und ‘länger betätigen’ sind deaktiviert.
- Die Beleuchtung wird nach einer vorab eingestellten Zeit (Ausschaltverzögerung) erneut automatisch
ausgeschaltet, wenn der Melder keine Bewegung mehr im Erfassungsbereich erfasst oder wenn die
Lichtstärke den eingestellten Luxwert fünf Minuten lang überschritten hat.
Beispiel 3: Treppenhaus
DIP-Schalter 1 DIP-Schalter 3 DIP-Schalter 4
ON x x x
OFF
Funktionsweise des Präsenzmelders:
- Die Beleuchtung wird automatisch eingeschaltet, wenn der Melder im Erfassungsbereich Bewegung
registriert und wenn die Lichtstärke sich unterhalb des eingestellten Luxwertes befindet.
- Die Beleuchtung wird nach einer vorab eingestellten Zeit (Ausschaltverzögerung) erneut automatisch
ausgeschaltet, wenn der Melder keine Bewegung mehr im Erfassungsbereich erfasst oder wenn die
Lichtstärke den eingestellten Luxwert fünf Minuten lang überschritten hat.
- Sie können die Beleuchtung unabhängig von der Tageslichtstärke immer manuell über den Drucktaster
einschalten.
6. PFLEGE
Schmutz beeinträchtigt die Funktion des Melders. Halten Sie deswegen immer die Linse sauber und trocken.
Benutzen Sie für die Linsenreinigung ein feuchtes Tuch mit Wasser und nur wenig Reinigungsmittel. Üben Sie
beim Reinigen niemals Druck auf die Linse aus. Sind Linse oder andere Komponenten des Melders defekt,
dann nehmen Sie Kontakt zu einem qualifizierten Elektroinstallateur auf.
7. TECHNISCHE DATEN
Abmessungen
45,9 x 117,3 mm (HxB)
64,1 x 117,3 mm (HxB) (einschließlich nicht-sichtbarer Teil)
Versorgungsspannung 230 Vac ± 10%, 50 Hz
Leistungsschalter maximaler MCB-Wert 10 A*
Leistungsaufnahme 0,2 W
Relaiskontakt Schließer (max. 10 A), potentialfrei, licht- und
bewegungsempfindlich
maximale Belastung Glühlampen (2300 W)
230 V-Halogenlampen (2300 W)
alle Niederspannungs-Halogenlampen (1200 VA)
Leuchtstofflampen (unkompensiert) (1200 VA)
Energiesparlampen (CFLi) (350 W)
LED-Lampen 230 V (350 W)
maximale Schaltleistung 140 μF
maximaler Einschaltspitzenstrom 165 A/20 ms oder 800A/200 μs
Lichtempfindlichkeit 20 – 1000, ∞ Lux
Lichtempfindlichkeitshysterese + 10%
Ausschaltverzögerung 2 – 60 min
Montagehöhe (Abb. 3) 2 – 3,4 m
Erfassungswinkel (Abb. 3) 360°
Erfassungsbereich (Abb. 3) max. 24 m
Leitungsanschluss 3 x 2,5 mm²
Leitungsdurchführung seitlich: 3 x Ø 14 mm
an der Oberseite: 2 x Ø 14 mm
Schutzart IP54
Schutzklasse Geräteklasse I
Umgebungstemperatur -5 – +50°C
Prüfzeichen CE-Kennzeichnung gemäß EN 60669-2-1
Zubehör IR-Fernbedienung (350-20089)
Fernbedienung fur Smartphone (350-41936)
Präsenz- bzw. Absenzmelder 360° (Sekundär)
(350-20079)
* Der MCB-Wert ist durch nationale Installationsvorschriften begrenzt.
Vor der Installation zu beachtende Sicherheitshinweise
Die Installation von Produkten, die fest an eine elektrische Anlage angeschlossen werden und gefährliche Spannungen
enthalten, müssen gemäß den geltenden Vorschriften von einem anerkannten Installateur vorgenommen werden.
Hinweis!
Installation nur durch Personen mit einschlägigen elektrotechnischen Kenntnissen und Erfahrungen!*
Durch eine unsachgemäße Installation gefährden Sie:
• Ihr eigenes Leben;
• das Leben der Nutzer der elektrischen Anlage.
Mit einer unsachgemäßen Installation riskieren Sie schwere Sachschäden, z. B. durch Brand.
Es droht für Sie die persönliche Haftung bei Personen- und Sachschäden.
Wenden Sie sich an einen Elektroinstallateur!
* Erforderliche Fachkenntnisse für die Installation
Für die Installation sind insbesondere folgende Fachkenntnisse erforderlich:
• die anzuwendenden „5 Sicherheitsregeln”: Freischalten; gegen Wiedereinschalten sichern; Spannungsfreiheit
feststellen; Erden und Kurzschließen; benachbarte, unter Spannung stehende Teile abdecken oder abschranken;
• Auswahl des geeigneten Werkzeuges, der Messgeräte und ggf. der persönlichen Schutzausrüstung;
• Auswertung der Messergebnisse;
• Auswahl des Elektro-Installationsmaterials zur Sicherstellung der Abschaltbedingungen;
• IP-Schutzarten;
• Einbau des Elektroinstallationsmaterials;
• Art des Versorgungsnetzes (TN-System, IT-System, TT-System) und die daraus folgenden Anschlussbedingungen
(klassische Nullung, Schutzerdung, erforderliche Zusatzmaßnahmen etc.).
Diese Gebrauchsanleitung muss dem Benutzer ausgehändigt werden.Die Gebrauchsanleitung ist den Unterlagen
der elektrischen Anlage beizufügen und muss auch eventuellen neuen Besitzern ausgehändigt werden. Zusätzliche
Exemplare erhalten Sie über die Website oder den Kundendienst von Niko.
CE-Kennzeichnung
Dieses Produkt erfüllt alle anwendbaren europäischen Richtlinien und Verordnungen. Für Funkgeräte erklärt Niko
nv, dass die Funkgeräte aus dieser Anleitung der Richtlinie 2014/53/EU entsprechen. Den vollständigen Text der
EU-Konformitätserklärung finden Sie unter www.niko.eu unter der Produktreferenz, falls zutreffend.
Umwelt
Sie dürfen dieses Produkt oder die mitgelieferten Batterien nicht über den normalen Hausmüll entsorgen. Bringen
Sie Ihr ausgedientes Produkt zu einer anerkannten Sammelstelle. Genau wie Hersteller und Importeure spielen
auch Sie eine wichtige Rolle bei Sortierung, Recycling und Wiederverwendung von ausgedienten elektrischen und
elektronischen Geräten. Um die Abholung und Verarbeitung wiederverwertbarer Abfälle finanzieren zu können,
ist im Verkaufspreis oftmals bereits eine obligatorische Recyclingabgabe enthalten.

350-20078
10
EN PM350-20078R23041
Read the complete manual before carrying out the installation and activating the system. Keep
the manual for future reference.
1. DESCRIPTION
The presence or absence detector 360° (master) for surface mounting consists of an integral unit
with on-off control of one channel, a motion sensor (PIR or passive infrared technology), a light sensor and an
integrated IR receiver. All external units, such as push buttons and lighting fixtures, are directly connected to the
detector, which is mounted to the ceiling.
This detector can be used as a stand-alone unit or as a master in combination with one or more secondary
detectors (350-20079).
The detector can be installed and operated on the basis of the factory settings. For optimal lighting control,
it is recommended to adjust the factory settings to the environmental conditions and to the specific lighting
requirements. The settings can be adjusted to your preference using the integrated potentiometers and DIP
switches on the device or using the IR remote control (not included) (350-20089).
2. INSTALLATION
2.1. Connection
Danger: Disconnect all power before installing the detector.
Do not connect the device to the mains voltage until installation has been completed.
A. Stand-alone
Refer to the wiring diagram (fig. 1A).
B. In combination with one or more secondary detectors
Refer to the wiring diagram (fig. 1B).
2.2. Mounting
Tip: Do not install the detector in the vicinity of heat sources such as stoves or electric heaters, air currents
(ventilation systems) or any moving objects (fig. 2). This can activate the device unnecessarily as it reacts to
motion and heat in its surroundings.
Tip: The recommended mounting height is 2 to 3.4 m. The working of the detector is optimal at a height of
3 m: at this height, the detector has a range with a diameter of 24 m on the ground and 17.5 m at a height of
80cm (table height) (fig. 3).
The detector is suited for direct mounting to the ceiling (fig. 4).
3. SETTINGS
3.1. Factory settings
At delivery the parameters of the detector are set as follows:
Parameter Factory setting
application - DIP switch 1: automatic on/off (Presence detector/
absence detector)
- DIP switch 3: a brief press of the push button
allows you to:
• switch on the light, and
• switch off the light without having to wait for
the switch-off delay (= eco off).
- DIP switch 4: a brief press is daylight-dependent
sensitivity of the motion sensor high
light sensitivity 200 lux
switch-off delay 10 min
3.2. DIP switches
Figure 5 shows how to set the DIP switches according to the application and the desired sensitivity of the
motion sensor.
Application setting
DIP switch Application
1 You can set the detector:
- ON: as presence detector
(automatic on/off)
The detector automatically switches on the lighting,
depending on the preset lux value and when motion
is detected.
- OFF: as absence detector
(manual on/automatic off)
The detector only switches on the lighting when
you press the push button, depending on the preset
lux value.
The lighting will remain on for the duration of the preset
switch-off delay after the last motion is detected. As
soon as the switch-off delay has elapsed, the lighting
switches off
2
Not applicable.
3
You can also make a selection from several functions for
the push button that is connected:
- ON: You can only switch on the lighting with a
brief press. The ‘eco off’ and ‘long push’ functions are
deactivated.
- OFF: With a brief press, the lighting can be either
switched on or switched off immediately without
having to wait for the switch-off delay (= eco off
1
).
When the lighting is switched off with the push button,
the detector will be locked for ten seconds to avoid the
lighting from immediately being switched on again.
If you press the push button for longer than one
second, the red indication LED will flash (0.25 s on and
5 s off). The lighting and the preset switch-off delay will
be activated or deactivated for two hours.
4
- ON: A brief press is daylight-independent.
- OFF: A brief press is daylight-dependent.
A long push is always daylight-independent.
1
The ‘eco off’ function is the most energy-efficient way to switch on the lighting. You switch off the lighting
yourself without having to wait for the switch-off delay. If you do forget to switch off the lighting, it will be
switched off automatically after the switch-off delay has elapsed.
Sensitivity setting
Using the two DIP switches located on the very right you set the sensitivity of the motion sensor. You can choose
from the following options: minimum, low, high or maximum. Refer to figure 5 for the position of the DIP switches
depending on the desired sensitivity.
3.3. Potentiometers
Under the housing of the detector, you will find two potentiometers that are used to set the light sensitivity and
the switch-off delay to your preference (fig. 6).
Potentiometer Function
You set the light level (light sensitivity) at which
the lighting should be switched on.
The potentiometer has ten fixed light levels: 20, 50,
100, 200, 300, 400, 500, 700 and 1000 lux and ∞
(daylight-independent).
You set the switch-off delay.
There are eight preset values:
- walking test (see section 4.1.)
- pulse: not applicable
- 2 minutes
- 5 minutes
- 10 minutes
- 15 minutes
- 30 minutes
- 60 minutes
To confirm the light level or the switch-off delay you set, the green indication LED will flash once and the red
indication LED will flash a number of times depending on the selected setting. The tables below indicate how
many times the red indication LED will flash for each setting:
Light level 20 50 100 200 300 400 500 700 1000 ∞
Number of times the red
indication LED will flash 12345678910
Example: The potentiometer is set at 300 lux. You want to increase the lux value to 400 lux. Carefully turn the
potentiometer to the higher lux value. The green indication LED will flash once and the red indication LED will
flash six times (= 400 lux) to confirm your selection.
Switch-off delay puls 2 min 5 min 10 min 15 min 30 min 60 min
Number of times the red
indication LED will flash 1234567
Example: The potentiometer is set at 10 minutes. You want to increase the switch-off delay to 15 minutes.
Carefully turn the potentiometer to the higher value. The green indication LED will flash once and the red
indication LED will flash five times (= 15 minutes) to confirm your selection.
4. IR REMOTE CONTROL
In addition to adjusting the settings manually using the potentiometers and DIP switches on the device,
you can also use the IR remote control (fig. 7) to select another application, perform a test or enter other
parameters.

350-20078
11
PM350-20078R23041 EN
4.1. Function buttons
Button Function
Lock/
unlock
Short
push
Learn actual lux
20
Lux
50
Lux
100
Lux
300
Lux
400
Lux
200
Lux
500
Lux
700
Lux
1000
Lux
No
Lux
Fact.
setting
Long
push
Test
On/Off
30min 60min15min 8
Hours
Pulse 2min 5min 10min
Ch 1 Ch 2 Status
Ch 1
Status
Ch 2
Light 1
On/Off
Light 2
On/Off
LED
On/Off
You switch the light permanently on or off,
irrespective of the detected movement and the light level.
Briefly press
Lock/
unlock
Short
push
Learn actual lux
20
Lux
50
Lux
100
Lux
300
Lux
400
Lux
200
Lux
500
Lux
700
Lux
1000
Lux
No
Lux
Fact.
setting
Long
push
Test
On/Off
30min 60min15min 8
Hours
Pulse 2min 5min 10min
Ch 1 Ch 2 Status
Ch 1
Status
Ch 2
Light 1
On/Off
Light 2
On/Off
LED
On/Off
or follow the steps below
to activate this function:
1. Press
Lock/
unlock
Short
push
Learn actual lux
20
Lux
50
Lux
100
Lux
300
Lux
400
Lux
200
Lux
500
Lux
700
Lux
1000
Lux
No
Lux
Fact.
setting
Long
push
Test
On/Off
30min 60min15min 8
Hours
Pulse 2min 5min 10min
Ch 1 Ch 2 Status
Ch 1
Status
Ch 2
Light 1
On/Off
Light 2
On/Off
LED
On/Off
to switch the lighting on or off.
If the function is activated, the red indication LED
will flash (1 s on, 10 s off).
2. Press
Lock/
unlock
Short
push
Learn actual lux
20
Lux
50
Lux
100
Lux
300
Lux
400
Lux
200
Lux
500
Lux
700
Lux
1000
Lux
No
Lux
Fact.
setting
Long
push
Test
On/Off
30min 60min15min 8
Hours
Pulse 2min 5min 10min
Ch 1 Ch 2 Status
Ch 1
Status
Ch 2
Light 1
On/Off
Light 2
On/Off
LED
On/Off
to switch the lighting on or off again.
3. Press
Lock/
unlock
Short
push
Learn actual lux
20
Lux
50
Lux
100
Lux
300
Lux
400
Lux
200
Lux
500
Lux
700
Lux
1000
Lux
No
Lux
Fact.
setting
Long
push
Test
On/Off
30min 60min15min 8
Hours
Pulse 2min 5min 10min
Ch 1 Ch 2 Status
Ch 1
Status
Ch 2
Light 1
On/Off
Light 2
On/Off
LED
On/Off
again.
The detector will return to the selected settings. The
red indication LED will flash once to confirm.
Lock/
unlock
Short
push
Learn actual lux
20
Lux
50
Lux
100
Lux
300
Lux
400
Lux
200
Lux
500
Lux
700
Lux
1000
Lux
No
Lux
Fact.
setting
Long
push
Test
On/Off
30min 60min15min 8
Hours
Pulse 2min 5min 10min
Ch 1 Ch 2 Status
Ch 1
Status
Ch 2
Light 1
On/Off
Light 2
On/Off
LED
On/Off
You switch the indication LED on or off.
The indication LED will flash when
Lock/
unlock
Short
push
Learn actual lux
20
Lux
50
Lux
100
Lux
300
Lux
400
Lux
200
Lux
500
Lux
700
Lux
1000
Lux
No
Lux
Fact.
setting
Long
push
Test
On/Off
30min 60min15min 8
Hours
Pulse 2min 5min 10min
Ch 1 Ch 2 Status
Ch 1
Status
Ch 2
Light 1
On/Off
Light 2
On/Off
LED
On/Off
or
Lock/
unlock
Short
push
Learn actual lux
20
Lux
50
Lux
100
Lux
300
Lux
400
Lux
200
Lux
500
Lux
700
Lux
1000
Lux
No
Lux
Fact.
setting
Long
push
Test
On/Off
30min 60min15min 8
Hours
Pulse 2min 5min 10min
Ch 1 Ch 2 Status
Ch 1
Status
Ch 2
Light 1
On/Off
Light 2
On/Off
LED
On/Off
is
activated.
Lock/
unlock
Short
push
Learn actual lux
20
Lux
50
Lux
100
Lux
300
Lux
400
Lux
200
Lux
500
Lux
700
Lux
1000
Lux
No
Lux
Fact.
setting
Long
push
Test
On/Off
30min 60min15min 8
Hours
Pulse 2min 5min 10min
Ch 1 Ch 2
Status
Ch 1
Status
Ch 2
Light 1
On/Off
Light 2
On/Off
LED
On/Off
If you press this button, the device will show the current
settings for channel 1 via the indication LEDs.
First, the green indication LED flashes once, after which
the red indication LED indicates the status. The first time
the red indication LED flashes, it indicates the lux level
you set; the second time, this LED refers to the switch-
off delay (see also the tables in section 3.3.).
Example: Channel 1 is set at 300 lux and 10 minutes.
Press
Lock/
unlock
Short
push
Learn actual lux
20
Lux
50
Lux
100
Lux
300
Lux
400
Lux
200
Lux
500
Lux
700
Lux
1000
Lux
No
Lux
Fact.
setting
Long
push
Test
On/Off
30min 60min15min 8
Hours
Pulse 2min 5min 10min
Ch 1 Ch 2
Status
Ch 1
Status
Ch 2
Light 1
On/Off
Light 2
On/Off
LED
On/Off
: the green indication LED flashes once and
the red indication LED flashes five times (= 300 lux),
after which the green indication LED flashes once again
and the red indication LED flashes four times (= 10 min).
4.2. ‘Set’ buttons
To change the settings of the detector:
1. Press
Lock/
unlock
Short
push
Learn actual lux
20
Lux
50
Lux
100
Lux
300
Lux
400
Lux
200
Lux
500
Lux
700
Lux
1000
Lux
No
Lux
Fact.
setting
Long
push
Test
On/Off
30min 60min15min 8
Hours
Pulse 2min 5min 10min
Ch 1 Ch 2 Status
Ch 1
Status
Ch 2
Light 1
On/Off
Light 2
On/Off
LED
On/Off
three times within five seconds to unlock the device.
The green indication LED flashes twice to confirm. The device is now in ‘set’ mode.
2. Change the light level or the switch-off delay using the buttons below.
3. Press
Lock/
unlock
Short
push
Learn actual lux
20
Lux
50
Lux
100
Lux
300
Lux
400
Lux
200
Lux
500
Lux
700
Lux
1000
Lux
No
Lux
Fact.
setting
Long
push
Test
On/Off
30min 60min15min 8
Hours
Pulse 2min 5min 10min
Ch 1 Ch 2 Status
Ch 1
Status
Ch 2
Light 1
On/Off
Light 2
On/Off
LED
On/Off
once to lock the device again.
The green indication LED flashes twice to confirm. The modified setting is activated and the device will
return to the selected settings.
Note: If you do not lock the device, it will be locked automatically after two minutes. All changes will then
be saved automatically.
Button Function
Lock/
unlock
Short
push
Learn actual lux
20
Lux
50
Lux
100
Lux
300
Lux
400
Lux
200
Lux
500
Lux
700
Lux
1000
Lux
No
Lux
Fact.
setting
Long
push
Test
On/Off
30min 60min15min 8
Hours
Pulse 2min 5min 10min
Ch 1
Ch 2 Status
Ch 1
Status
Ch 2
Light 1
On/Off
Light 2
On/Off
LED
On/Off
Press this button to set the lux value and/or the
switch-off delay for channel 1.
The red indication LED indicates that you can adjust
the setting.
Lock/
unlock
Short
push
Learn actual lux
20
Lux
50
Lux
100
Lux
300
Lux
400
Lux
200
Lux
500
Lux
700
Lux
1000
Lux
No
Lux
Fact.
setting
Long
push
Test
On/Off
30min 60min15min 8
Hours
Pulse 2min 5min 10min
Ch 1 Ch 2 Status
Ch 1
Status
Ch 2
Light 1
On/Off
Light 2
On/Off
LED
On/Off
Lock/
unlock
Short
push
Learn actual lux
20
Lux
50
Lux
100
Lux
300
Lux
400
Lux
200
Lux
500
Lux
700
Lux
1000
Lux
No
Lux
Fact.
setting
Long
push
Test
On/Off
30min 60min15min 8
Hours
Pulse 2min 5min 10min
Ch 1 Ch 2 Status
Ch 1
Status
Ch 2
Light 1
On/Off
Light 2
On/Off
LED
On/Off
Lock/
unlock
Short
push
Learn actual lux
20
Lux
50
Lux
100
Lux
300
Lux
400
Lux
200
Lux
500
Lux
700
Lux
1000
Lux
No
Lux
Fact.
setting
Long
push
Test
On/Off
30min 60min15min 8
Hours
Pulse 2min 5min 10min
Ch 1 Ch 2 Status
Ch 1
Status
Ch 2
Light 1
On/Off
Light 2
On/Off
LED
On/Off
Lock/
unlock
Short
push
Learn actual lux
20
Lux
50
Lux
100
Lux
300
Lux
400
Lux
200
Lux
500
Lux
700
Lux
1000
Lux
No
Lux
Fact.
setting
Long
push
Test
On/Off
30min 60min15min 8
Hours
Pulse 2min 5min 10min
Ch 1 Ch 2 Status
Ch 1
Status
Ch 2
Light 1
On/Off
Light 2
On/Off
LED
On/Off
- With these red buttons, you set the desired light
level (lux value).
- There are ten fixed lux values: 20, 50, 100, 200,
300, 400, 500, 700 and 1000 lux and No lux
(daylight-independent).
Lock/
unlock
Short
push
Learn actual lux
20
Lux
50
Lux
100
Lux
300
Lux
400
Lux
200
Lux
500
Lux
700
Lux
1000
Lux
No
Lux
Fact.
setting
Long
push
Test
On/Off
30min 60min15min 8
Hours
Pulse 2min 5min 10min
Ch 1 Ch 2 Status
Ch 1
Status
Ch 2
Light 1
On/Off
Light 2
On/Off
LED
On/Off
- With this button, you set the current light level in
the room as the desired level at which the lighting
should be switched on.
- If you press this button, the red indication LED will
flash once to indicate that the current light level is
being saved. If this light level is not between 20 and
1000 lux, the minimum level (20 lux) or maximum
level (1000 lux) will be saved.
Use this setting if the desired minimum light level in
the room has been achieved. This is the point at which
the lighting should be switched on as the daylight
level is no longer sufficient.
Lock/
unlock
Short
push
Learn actual lux
20
Lux
50
Lux
100
Lux
300
Lux
400
Lux
200
Lux
500
Lux
700
Lux
1000
Lux
No
Lux
Fact.
setting
Long
push
Test
On/Off
30min 60min15min 8
Hours
Pulse 2min 5min 10min
Ch 1 Ch 2 Status
Ch 1
Status
Ch 2
Light 1
On/Off
Light 2
On/Off
LED
On/Off
- With these blue buttons, you set
the desired switch-off delay.
- There are six fixed values: 2, 5, 10, 15, 30 and 60
minutes.
Lock/
unlock
Short
push
Learn actual lux
20
Lux
50
Lux
100
Lux
300
Lux
400
Lux
200
Lux
500
Lux
700
Lux
1000
Lux
No
Lux
Fact.
setting
Long
push
Test
On/Off
30min 60min15min 8
Hours
Pulse
2min 5min 10min
Ch 1 Ch 2 Status
Ch 1
Status
Ch 2
Light 1
On/Off
Light 2
On/Off
LED
On/Off
Not applicable.
Lock/
unlock
Short
push
Learn actual lux
20
Lux
50
Lux
100
Lux
300
Lux
400
Lux
200
Lux
500
Lux
700
Lux
1000
Lux
No
Lux
Fact.
setting
Long
push
Test
On/Off
30min 60min15min
8
Hours
Pulse 2min 5min 10min
Ch 1 Ch 2 Status
Ch 1
Status
Ch 2
Light 1
On/Off
Light 2
On/Off
LED
On/Off
Press this button:
- The lighting will be switched on
permanently for eight hours.
- Once the new setting has been confirmed (2 x
green led), the red led blinks (0,25 s on and 30 s
off).
Press this button again to deactivate the function.
The red indication LED will no longer flash. You
cannot switch off this function via a push button.
Lock/
unlock
Short
push
Learn actual lux
20
Lux
50
Lux
100
Lux
300
Lux
400
Lux
200
Lux
500
Lux
700
Lux
1000
Lux
No
Lux
Fact.
setting
Long
push
Test
On/Off
30min 60min15min 8
Hours
Pulse 2min 5min 10min
Ch 1 Ch 2 Status
Ch 1
Status
Ch 2
Light 1
On/Off
Light 2
On/Off
LED
On/Off
The device returns to the factory settings.
Lock/
unlock
Short
push
Learn actual lux
20
Lux
50
Lux
100
Lux
300
Lux
400
Lux
200
Lux
500
Lux
700
Lux
1000
Lux
No
Lux
Fact.
setting
Long
push
Test
On/Off
30min 60min15min 8
Hours
Pulse 2min 5min 10min
Ch 1 Ch 2 Status
Ch 1
Status
Ch 2
Light 1
On/Off
Light 2
On/Off
LED
On/Off
The detection area is tested by activating the
integrated motion sensor for the walking test:
- The blue indication LED lights up when you
activate the test mode.
- The lighting is switched on for five seconds and
the red indication LED lights up each time the
sensor detects activity.
- If no activity is detected and the sensor is still in
test mode, the blue indication LED lights up.
- If you forget to close the test mode, the detector
will return to the selected settings after five
minutes..
The light sensor does not work during the walking
test.
You can also activate the walking test via the
potentiometer for the switch-off delay.
5. OPERATION AND USE
5.1. Activation
The detector should not be powered until all cables are connected. After powering the device, the detector will be
ready for use after approximately 120 seconds (warm-up time).
The red indication LED flashes during warm-up time. After the device has warmed up, the green indication LED
will flash briefly twice.
5.2. General operation
The integrated light sensor continuously measures the daylight level in the detection area and compares this level
to the preset lux value. Thanks to the light sensor, the light switches on automatically only if the detector detects
motion within the detection range and if there is insufficient daylight:
• The lighting remains switched on as long as motion is detected and the amount of daylight
available in the room is insufficient.
• After the last motion is detected, the lighting remains switched on for the duration of the
preset switch-off delay (1 to 60 minutes). As soon as the switch-off delay has elapsed, the
lighting switches off.
• The lighting also switches off automatically as soon as the daylight level is sufficiently high,
even when motion is still detected in the room at that time.
5.3. Detection range
The detection area can be increased by adding an extra detector (secondary) (350-20079). A maximum of ten
secondary detectors can be connected to one master (350-20078). The lighting is operated in accordance with
the settings on the master. Both the master and the secondary detector have the same detection range (a circle
with a diameter of 24 m). When covering a complete area using several detectors, it is recommended to take into
account an overlap of approximately 30% (fig. 8).
If you would like to exclude motion detection in a portion of the detection area or if the detection area is too large,
you cover the sensor lens using the cover cap supplied. This allows you to reduce the maximum range to 24 m.
The 360° detection angle can be reduced in steps of 30°.
5.4. Examples of applications
Example 1: classroom
DIP switch 1 DIP switch 3 DIP switch 4
ON x x
OFF x
How the presence detector works:
- The lighting is automatically switched on when the detector detects motion in the detection area and the
light level is less than the preset lux value.
- The lighting is automatically switched off again after a preset time (switch-off delay), provided that no
more motion is detected by the detector in the detection area or the light level has been higher than the preset
lux value for five minutes.
- The lighting can be switched on manually at any time by briefly pressing the push button. You can also
switch off the lighting manually (= eco off).
- In addition, you can also press and hold the push button, which is ideal for situations in which the lighting
should remain switched on (e.g. exam) or off (e.g. movie) for a longer period of time:
•
By pressing and holding the push button while the lighting is switched on, the lighting will be
switched off. The detector will be locked for as long as activity is detected and the preset switch-off
delay + 2 hours has not yet elapsed. After that, the detector will return to the selected settings and the
lighting will be switched on.
• By pressing and holding the push button while the lighting is switched off, the lighting will be switched
on (irrespective of the daylight level). The lighting remains switched on for as long as activity is detected

350-20078
12
EN PM350-20078R23041
and the preset switch-off delay + 2 hours has not yet elapsed. After that, the lighting will be switched off,
the detector will return to the selected settings and the lighting will be switched on.
The red indication LED on the detector flashes (0.25 s on and 5 s off) to indicate that you have pressed and held
the push button. The ‘long push’ function can be interrupted at any time by briefly pressing the push button, after
which the lighting will be switched on and the detector will return to the selected settings.
Example 2: office
DIP switch 1 DIP switch 3 DIP switch 4
ON x x
OFF x
How the absence detector works:
- The lighting must be switched on by briefly pressing the push button (daylight-independent).
- The ‘eco off’ and ‘long push’ functions are deactivated.
- The lighting is automatically switched off again after a preset time (switch-off delay), provided that no
more motion is detected by the detector in the detection area or the light level has been higher than the preset
lux value for five minutes.
Example 3: staircase
DIP switch 1 DIP switch 3 DIP switch 4
ON x x x
OFF
How the presence detector works:
- The lighting is automatically switched on when the detector detects motion in the detection area and the
light level is less than the preset lux value.
- The lighting is automatically switched off again after a preset time (switch-off delay), provided that no
more motion is detected by the detector in the detection area or the light level has been higher than the preset
lux value for five minutes.
- The lighting can be switched on manually at any time via the push button, irrespective of the daylight level.
6. MAINTENANCE
Dirt may prevent the detector from functioning properly. Therefore, always keep the lens clean and dry. Use a
damp cloth and water with some detergent to clean the lens. Never exert pressure to wipe the lens clean. If
the lens or other parts of the detector are defective, please contact an authorised installer.
7. TECHNICAL DATA
dimensions 45.9 x 117.3 mm (HxW)
64.1 x 117.3 mm (HxW) (including non-visible part)
power supply voltage 230 Vac ± 10%, 50 Hz
circuit breaker maximum MCB rating 10 A*
power consumption 0.2 W
relay contact NO (max. 10 A), potential-free,
light- and motion-sensitive
maximum load incandescent lamps (2300 W)
230 V halogen lamps (2300 W)
all low-voltage halogen lamps (1200 VA)
fluorescent lamps (non-compensated) (1200 VA)
economy lamps (CFLi) (350 W)
LED lamps 230 V (350 W)
maximum switching capacity 140 μF
maximum inrush current 165 A/20 ms or 800A/200 μs
light sensitivity 20 – 1000, ∞ lux
hysteresis on light sensitivity + 10%
switch-off delay 2 – 60 min
mounting height (fig. 3) 2 – 3.4 m
detection angle (fig. 3) 360°
detection range (fig. 3) max. 24 m
wire input 3 x 2.5 mm²
cable inlet on the side: 3 x Ø 14 mm
on the top: 2 x Ø 14 mm
protection degree IP54
protection class class I devices
ambient temperature -5 – +50°C
quality mark CE marked in compliance with EN 60669-2-1
accessories IR remote control (350-20089)
Remote control for smartphone (350-41936)
presence or absence detector 360° (slave) (350-20079)
* The MCB rating is limited by national installation rules.
Warnings regarding installation
The installation of products that will permanently be part of the electrical installation and which include dangerous
voltages, should be carried out by a qualified installer and in accordance with the applicable regulations. This
user manual must be presented to the user. It should be included in the electrical installation file and it should be
passed on to any new owners. Additional copies are available on the Niko website or via Niko customer services.
CE marking
This product complies with all of the relevant European guidelines and regulations. For radio equipment Niko llc
declares that the radio equipment in this manual conforms with the 2014/53/EU directive. The full text of the
EU declaration of conformity is available at www.niko.eu under the product reference, if applicable.
Environment
This product and/or the batteries provided cannot be disposed of in non-recyclable waste. Take your discarded
product to a recognised collection point. Just like producers and importers, you too play an important role in
the promotion of sorting, recycling and reuse of discarded electrical and electronic equipment. To finance the
rubbish collection and waste treatment, the government levies recycling charges in certain cases (included in
the price of this product).

350-20078
13
PM350-20078R23041 SK
Pred inštaláciou a spustením systému si prečítajte celý návod. Návod uschovajte pre budúce
použitie.
1. POPIS
Detektor prítomnosti 360° (master) na povrchovú montáž sa skladá z jedného celku, ktorý obsahuje
ovládanie zapnutia/vypnutia 1 kanála, pohybový senzor PIR (pasívna infračervená technológia), svetelný senzor
a integrovaný IR prijímač. Všetky vonkajšie jednotky, ako napríklad tlačidlá a svietidlá, sú priamo spojené s
detektorom, ktorý je pripevnený k stropu.
Detektor môže byť použitý ako samostatná jednotka alebo ako master v kombinácii s jedným alebo viacerými
podružnými detektormi (350-20079).
Detektor možno nainštalovať a používať s továrenskými nastaveniami. Pre optimálne ovládanie osvetlenia
sa odporúča prispôsobiť základné nastavenie z výroby podmienkam prostredia a zvláštnym požiadavkám na
osvetlenie. Nastavenie možno upraviť podľa vašich preferencií pomocou integrovaných potenciometrov a DIP
prepínačov na prístroji alebo pomocou IR diaľkového ovládania (nie je súčasťou dodávky) (350-20089).
2. INŠTALÁCIA
2.1. Zapojenie
Upozornenie: Pred inštaláciou detektora odpojte všetky napájacie zdroje.
Nepripájajte zariadenie k napájaciemu zdroju až do dokončenia inštalácie.
A. Samostatná jednotka
Pozrite schému zapojenia (obr. 1A).
B. V kombinácii s jedným alebo viacerými podružnými detektormi
Pozrite schému zapojenia (obr. 1B).
2.2. Montáž
Tip: Neinštalujte detektor do blízkosti zdrojov tepla ako sú sporáky alebo elektrické ohrievače, na miesta s
prúdením vzduchu (ventilačné systémy) alebo k akýmkoľvek pohybujúcim sa objektom (obr. 2). Mohlo by
dochádzať k zbytočnej aktivácii, pretože detektor reaguje na pohyb a teplo vo svojom okolí.
Tip: Odporúčaná montážna výška je 2 až 3,4 m. Fungovanie detektora je optimálne pri montážnej výške
3 m: v tejto výške má detektor rozsah snímania s priemerom 24 m na zemi a 17,5 m vo výške 80 cm (výška
stola) (obr. 3).
Detektor je vhodný na priamu montáž na strop (obr. 4).
3. NASTAVENIA
3.1. Továrenské nastavenia
Pri dodávke sú parametre detektora nastavené takto:
Parameter Továrenské nastavenie
použitie - DIP prepínač 1: automatické zapnutie/vypnutie
(Detektor prítomnosti/neprítomnosti)
- DIP prepínač 3: krátke stlačenie tlačidla umožňuje:
• zapnúť svetlo, a
• vypnúť svetlo bez toho, aby bolo treba čakať
na automatické (= eko vypnutie) vypnutie.
- DIP prepínač 4: krátke stlačenie je závislé od
denného svetla
citlivosť pohybového senzora vysoká
svetelná citlivosť 200 luxov
doba oneskorenia vypnutia 10 min.
3.2. DIP prepínače
Obrázok 5 ukazuje, ako nastaviť DIP prepínače podľa použitia a požadovanú citlivosť pohybového senzora
.
Nastavenie použitia
DIP prepínač Použitie
1 Môžete nastaviť detektor:
- ON: ako detektor prítomnosti (automatické
zapnutie/vypnutie) Keď je detegovaný pohyb, detektor
automaticky v závislosti od nastavenej hodnoty luxov
zapne osvetlenie.
- OFF: ako detektor prítomnosti (manuálne
zapnutie/automatické vypnutie)
Detektor zapne osvetlenie len pri stlačení tlačidla, v
závislosti od nastavenej hodnoty luxov.
Osvetlenie zostane po poslednom zaregistrovanom
pohybe zapnuté tak dlho, ako je nastavený čas
oneskorenia vypnutia. Po uplynutí času oneskorenia
vypnutia sa svetlo vypne.
2
Nepoužité.
3
Môžete si tiež vybrať z niekoľkých funkcií pre tlačidlo,
ktoré je pripojené:
- ON: Osvetlenie môžete zapnúť len krátkym
stlačením. Funkcie ‘eko vypnutie’ a ‘dlhé stlačenie’ sú
deaktivované.
- OFF: Osvetlenie je možné okamžite zapnúť
alebo vypnúť krátkym stlačením, teda bez toho,
aby bolo potrebné čakať na oneskorenie vypnutia
(= eko vypnutie
1
). Pri vypnutí osvetlenia tlačidlom je
detektor na desať sekúnd uzamknutý, aby sa zabránilo
okamžitému opätovnému zapnutiu osvetlenia.
Ak stlačíte tlačidlo na dlhšie ako jednu sekundu, červená
LED začne blikať (každých 5 s na 0,25 s). Osvetlenie a
prednastavené oneskorenie vypnutia bude deaktivované
alebo aktivované na dve hodiny.
4
- ON: Po krátkom stlačení bude detektor
nezávislý od denného svetla.
- OFF: Po krátkom stlačení bude detektor
závislý od denného svetla.
Po dlhšom stlačení bude detektor vždy nezávislý
od denného svetla.
1
Funkcia ‘eko vypnutie’ je najefektívnejší spôsob zapnutia osvetlenia. Svetlo vypnete bez toho, aby ste museli
čakať na automatické vypnutie po dobe oneskorenia. Ak zabudnete vypnúť osvetlenie, bude vypnuté automaticky
po uplynutí doby oneskorenia vypnutia.
Nastavenie citlivosti
Citlivosť pohybového senzora nastavíte pomocou dvoch DIP prepínačov, ktoré sa nachádzajú úplne vpravo.
Môžete si vybrať z nasledujúcich možností: minimálna, nízka, vysoká alebo maximálna. Ohľadom polôh DIP
prepínačov v závislosti od požadovanej citlivosti pozrite obrázok 5.
3.3. Potenciometre
Pod krytom detektora sa nachádzajú dva potenciometre, ktoré sa používajú na nastavenie svetelnej citlivosti a
oneskorenia vypnutia na želanú hodnotu (obr. 6).
Potenciometer Funkcia
Nastavíte úroveň svetla (svetelnú citlivosť), pri
ktorej sa má osvetlenie zapnúť.
Potenciometer má desať fixných svetelných úrovní:
20, 50, 100, 200, 300, 400, 500, 700 a 1000 luxov
a ∞ (nezávislé od svetla).
Nastavíte oneskorenie vypnutia.
K dispozícii je sedem prednastavených hodnôt:
- testovací režim (pozrite bode 4.1.)
- impulz: nie je použité
- 2 minúty
- 5 minút
- 10 minút
- 15 minút
- 30 minút
- 60 minút
Pre potvrdenie nastavenej úrovne osvetlenia alebo oneskorenia vypnutia blikne zelená LED jedenkrát a červená
LED blikne niekoľkokrát, v závislosti od zvoleného nastavenia. Tabuľka nižšie udáva, koľkokrát červená LED pri
jednotlivých nastaveniach blikne:
Úroveň osvetlenia 20 50 100 200 300 400 500 700 1000 ∞
Počet bliknutí červenej
LED 12345678910
Príklad: Potenciometer je nastavený na 300 luxov. Chcete zvýšiť hodnotu luxov na 400 luxov. Opatrne otočte
potenciometer na vyššiu hodnotu luxov. Zelená LED blikne jedenkrát a červená LED blikne šesťkrát (= 400
luxov) pre potvrdenie vašej voľby.
Doba oneskorenia
vypnutia impulz 2
minúty
5
minút
10
minút
15
minút
30
minút
60
minút
Počet bliknutí červenej
LED 1234567
Príklad: Potenciometer je nastavený na 10 minút. Hodnotu oneskorenia vypnutia chcete zvýšiť na 15 minút.
Opatrne otočte potenciometer na vyššiu hodnotu. Zelená LED blikne jedenkrát a červená LED blikne päťkrát (=
15 minút) pre potvrdenie vašej voľby.
4. IR DIAĽKOVÉ OVLÁDANIE
Okrem manuálnej zmeny nastavení pomocou potenciometrov a DIP prepínačov na prístroji môžete pre výber
inej aplikácie, vykonanie testu alebo zadanie iných parametrov použiť aj IR diaľkové ovládanie (obr. 7).

350-20078
14
SK PM350-20078R23041
4.1. Funkčné tlačidlá
Tlačidlo Funkcia
Lock/
unlock
Short
push
Learn actual lux
20
Lux
50
Lux
100
Lux
300
Lux
400
Lux
200
Lux
500
Lux
700
Lux
1000
Lux
No
Lux
Fact.
setting
Long
push
Test
On/Off
30min 60min15min 8
Hours
Pulse 2min 5min 10min
Ch 1 Ch 2 Status
Ch 1
Status
Ch 2
Light 1
On/Off
Light 2
On/Off
LED
On/Off
Natrvalo vypnete alebo zapnete osvetlenie, bez
ohľadu na zistený pohyb a úroveň osvetlenia.
Pre aktiváciu tejto funkcie krátko stlačte
Lock/
unlock
Short
push
Learn actual lux
20
Lux
50
Lux
100
Lux
300
Lux
400
Lux
200
Lux
500
Lux
700
Lux
1000
Lux
No
Lux
Fact.
setting
Long
push
Test
On/Off
30min 60min15min 8
Hours
Pulse 2min 5min 10min
Ch 1 Ch 2 Status
Ch 1
Status
Ch 2
Light 1
On/Off
Light 2
On/Off
LED
On/Off
alebo
postupujte podľa pokynov nižšie.
1. Stlačte
Lock/
unlock
Short
push
Learn actual lux
20
Lux
50
Lux
100
Lux
300
Lux
400
Lux
200
Lux
500
Lux
700
Lux
1000
Lux
No
Lux
Fact.
setting
Long
push
Test
On/Off
30min 60min15min 8
Hours
Pulse 2min 5min 10min
Ch 1 Ch 2 Status
Ch 1
Status
Ch 2
Light 1
On/Off
Light 2
On/Off
LED
On/Off
pre zapnutie alebo vypnutie osvetlenia.
Ak je funkcia aktivovaná, červená LED bude blikať
(každých 10 s na 1 s).
2. Stlačte
Lock/
unlock
Short
push
Learn actual lux
20
Lux
50
Lux
100
Lux
300
Lux
400
Lux
200
Lux
500
Lux
700
Lux
1000
Lux
No
Lux
Fact.
setting
Long
push
Test
On/Off
30min 60min15min 8
Hours
Pulse 2min 5min 10min
Ch 1 Ch 2 Status
Ch 1
Status
Ch 2
Light 1
On/Off
Light 2
On/Off
LED
On/Off
pre opätovné zapnutie alebo vypnutie
osvetlenia.
3. Opäť stlačte
Lock/
unlock
Short
push
Learn actual lux
20
Lux
50
Lux
100
Lux
300
Lux
400
Lux
200
Lux
500
Lux
700
Lux
1000
Lux
No
Lux
Fact.
setting
Long
push
Test
On/Off
30min 60min15min 8
Hours
Pulse 2min 5min 10min
Ch 1 Ch 2 Status
Ch 1
Status
Ch 2
Light 1
On/Off
Light 2
On/Off
LED
On/Off
.
Detektor sa vráti do zvoleného nastavenia.
Červená LED jedenkrát blikne pre potvrdenie.
Lock/
unlock
Short
push
Learn actual lux
20
Lux
50
Lux
100
Lux
300
Lux
400
Lux
200
Lux
500
Lux
700
Lux
1000
Lux
No
Lux
Fact.
setting
Long
push
Test
On/Off
30min 60min15min 8
Hours
Pulse 2min 5min 10min
Ch 1 Ch 2 Status
Ch 1
Status
Ch 2
Light 1
On/Off
Light 2
On/Off
LED
On/Off
Zapínanie alebo vypínanie LED kontroliek.
LED kontrolka bude blikať, ak je aktivované
Lock/
unlock
Short
push
Learn actual lux
20
Lux
50
Lux
100
Lux
300
Lux
400
Lux
200
Lux
500
Lux
700
Lux
1000
Lux
No
Lux
Fact.
setting
Long
push
Test
On/Off
30min 60min15min 8
Hours
Pulse 2min 5min 10min
Ch 1 Ch 2 Status
Ch 1
Status
Ch 2
Light 1
On/Off
Light 2
On/Off
LED
On/Off
alebo
Lock/
unlock
Short
push
Learn actual lux
20
Lux
50
Lux
100
Lux
300
Lux
400
Lux
200
Lux
500
Lux
700
Lux
1000
Lux
No
Lux
Fact.
setting
Long
push
Test
On/Off
30min 60min15min 8
Hours
Pulse 2min 5min 10min
Ch 1 Ch 2 Status
Ch 1
Status
Ch 2
Light 1
On/Off
Light 2
On/Off
LED
On/Off
.
Lock/
unlock
Short
push
Learn actual lux
20
Lux
50
Lux
100
Lux
300
Lux
400
Lux
200
Lux
500
Lux
700
Lux
1000
Lux
No
Lux
Fact.
setting
Long
push
Test
On/Off
30min 60min15min 8
Hours
Pulse 2min 5min 10min
Ch 1 Ch 2
Status
Ch 1
Status
Ch 2
Light 1
On/Off
Light 2
On/Off
LED
On/Off
Ak stlačíte toto tlačidlo, prístroj zobrazí aktuálne
nastavenie pre kanál 1 pomocou LED kontroliek.
Najprv blikne zelená LED jedenkrát, po ktorej červená
LED kontrolka zobrazí stav. Prvé blikanie červenej LED
zobrazuje nastavenú hodnotu luxov. Druhé zobrazuje
hodnotu oneskorenia vypnutia (pozrite taktiež tabuľky v
bode 3.3.).
Príklad: Kanál 1 je nastavený na 300 luxov a 10 minút.
Stlačte
Lock/
unlock
Short
push
Learn actual lux
20
Lux
50
Lux
100
Lux
300
Lux
400
Lux
200
Lux
500
Lux
700
Lux
1000
Lux
No
Lux
Fact.
setting
Long
push
Test
On/Off
30min 60min15min 8
Hours
Pulse 2min 5min 10min
Ch 1 Ch 2
Status
Ch 1
Status
Ch 2
Light 1
On/Off
Light 2
On/Off
LED
On/Off
: zelená LED blikne jedenkrát a červená
LED blikne päťkrát (= 300 luxov), následne opäť blikne
zelená LED jedenkrát a červená LED blikne štyrikrát (=
10 minút).
4.2. Tlačidlá nastavovania
Ak chcete zmeniť nastavenia detektora:
1. Pre odblokovanie prístroja stlačte Lock/
unlock
Short
push
Learn actual lux
20
Lux
50
Lux
100
Lux
300
Lux
400
Lux
200
Lux
500
Lux
700
Lux
1000
Lux
No
Lux
Fact.
setting
Long
push
Test
On/Off
30min 60min15min 8
Hours
Pulse 2min 5min 10min
Ch 1 Ch 2 Status
Ch 1
Status
Ch 2
Light 1
On/Off
Light 2
On/Off
LED
On/Off
trikrát do piatich sekúnd.
Zelená LED kontrolka blikne dvakrát pre potvrdenie. Prístroj je teraz v ‘nastavovacom’ režime.
2. Zmeňte úroveň osvetlenia alebo hodnotu oneskorenia vypnutia pomocou tlačidiel nižšie.
3. Pre opätovné zablokovanie prístroja jedenkrát stlačte Lock/
unlock
Short
push
Learn actual lux
20
Lux
50
Lux
100
Lux
300
Lux
400
Lux
200
Lux
500
Lux
700
Lux
1000
Lux
No
Lux
Fact.
setting
Long
push
Test
On/Off
30min 60min15min 8
Hours
Pulse 2min 5min 10min
Ch 1 Ch 2 Status
Ch 1
Status
Ch 2
Light 1
On/Off
Light 2
On/Off
LED
On/Off
once to lock the device again.
Zelená LED kontrolka blikne dvakrát pre potvrdenie. Zmenené nastavenie sa aktivuje a prístroj sa vráti do
zvoleného nastavenia.
Poznámka: Ak prístroj neuzamknete, bude automaticky uzamknutý po dvoch minútach. Všetky zmeny sa
potom automaticky uložia.
Tlačidlo Funkcia
Lock/
unlock
Short
push
Learn actual lux
20
Lux
50
Lux
100
Lux
300
Lux
400
Lux
200
Lux
500
Lux
700
Lux
1000
Lux
No
Lux
Fact.
setting
Long
push
Test
On/Off
30min 60min15min 8
Hours
Pulse 2min 5min 10min
Ch 1
Ch 2 Status
Ch 1
Status
Ch 2
Light 1
On/Off
Light 2
On/Off
LED
On/Off
Stlačte toto tlačidlo pre nastavenie hodnoty luxov
alebo hodnoty oneskorenia vypnutia pre
kanál 1.
Červená LED kontrolka bude indikovať, že môžete
upraviť nastavenie.
Lock/
unlock
Short
push
Learn actual lux
20
Lux
50
Lux
100
Lux
300
Lux
400
Lux
200
Lux
500
Lux
700
Lux
1000
Lux
No
Lux
Fact.
setting
Long
push
Test
On/Off
30min 60min15min 8
Hours
Pulse 2min 5min 10min
Ch 1 Ch 2 Status
Ch 1
Status
Ch 2
Light 1
On/Off
Light 2
On/Off
LED
On/Off
Lock/
unlock
Short
push
Learn actual lux
20
Lux
50
Lux
100
Lux
300
Lux
400
Lux
200
Lux
500
Lux
700
Lux
1000
Lux
No
Lux
Fact.
setting
Long
push
Test
On/Off
30min 60min15min 8
Hours
Pulse 2min 5min 10min
Ch 1 Ch 2 Status
Ch 1
Status
Ch 2
Light 1
On/Off
Light 2
On/Off
LED
On/Off
Lock/
unlock
Short
push
Learn actual lux
20
Lux
50
Lux
100
Lux
300
Lux
400
Lux
200
Lux
500
Lux
700
Lux
1000
Lux
No
Lux
Fact.
setting
Long
push
Test
On/Off
30min 60min15min 8
Hours
Pulse 2min 5min 10min
Ch 1 Ch 2 Status
Ch 1
Status
Ch 2
Light 1
On/Off
Light 2
On/Off
LED
On/Off
Lock/
unlock
Short
push
Learn actual lux
20
Lux
50
Lux
100
Lux
300
Lux
400
Lux
200
Lux
500
Lux
700
Lux
1000
Lux
No
Lux
Fact.
setting
Long
push
Test
On/Off
30min 60min15min 8
Hours
Pulse 2min 5min 10min
Ch 1 Ch 2 Status
Ch 1
Status
Ch 2
Light 1
On/Off
Light 2
On/Off
LED
On/Off
- S týmito červenými tlačidlami nastavíte
požadovanú úroveň svetla (hodnota luxov).
- K dispozícii je desať fixných hodnôt luxov: 20, 50,
100, 200, 300, 400, 500, 700 a 1000 luxov a
žiadne (nezávislé od svetla).
Lock/
unlock
Short
push
Learn actual lux
20
Lux
50
Lux
100
Lux
300
Lux
400
Lux
200
Lux
500
Lux
700
Lux
1000
Lux
No
Lux
Fact.
setting
Long
push
Test
On/Off
30min 60min15min 8
Hours
Pulse 2min 5min 10min
Ch 1 Ch 2 Status
Ch 1
Status
Ch 2
Light 1
On/Off
Light 2
On/Off
LED
On/Off
- Pomocou tohto tlačidla nastavíte aktuálnu úroveň
svetla v miestnosti ako želanú úroveň, pri ktorej by
sa malo zapnúť osvetlenie.
- Po stlačení tohto tlačidla blikne červená LED
jedenkrát pre indikáciu toho, že aktuálna úroveň
svetla sa ukladá. Ak je úroveň svetla mimo rozsahu
20 až 1000 luxov, uloží sa minimálna úroveň (20
luxov) alebo maximálna úroveň (1000 luxov).
Toto nastavenie použite, ak sa v miestnosti dosiahla
požadovaná minimálna úroveň svetla. Toto je úroveň,
pri ktorej by malo dôjsť k zapnutiu osvetlenia, keďže
denné svetlo už nie je postačujúce.
Lock/
unlock
Short
push
Learn actual lux
20
Lux
50
Lux
100
Lux
300
Lux
400
Lux
200
Lux
500
Lux
700
Lux
1000
Lux
No
Lux
Fact.
setting
Long
push
Test
On/Off
30min 60min15min 8
Hours
Pulse 2min 5min 10min
Ch 1 Ch 2 Status
Ch 1
Status
Ch 2
Light 1
On/Off
Light 2
On/Off
LED
On/Off
- S týmito modrými tlačidlami môžete nastaviť
požadovanú hodnotu oneskorenia vypnutia.
- K dispozícii je šesť fixných hodnôt: 2, 5, 10, 15,
30 a 60 minút.
Lock/
unlock
Short
push
Learn actual lux
20
Lux
50
Lux
100
Lux
300
Lux
400
Lux
200
Lux
500
Lux
700
Lux
1000
Lux
No
Lux
Fact.
setting
Long
push
Test
On/Off
30min 60min15min 8
Hours
Pulse
2min 5min 10min
Ch 1 Ch 2 Status
Ch 1
Status
Ch 2
Light 1
On/Off
Light 2
On/Off
LED
On/Off
Nepoužité.
Lock/
unlock
Short
push
Learn actual lux
20
Lux
50
Lux
100
Lux
300
Lux
400
Lux
200
Lux
500
Lux
700
Lux
1000
Lux
No
Lux
Fact.
setting
Long
push
Test
On/Off
30min 60min15min
8
Hours
Pulse 2min 5min 10min
Ch 1 Ch 2 Status
Ch 1
Status
Ch 2
Light 1
On/Off
Light 2
On/Off
LED
On/Off
Stlačte toto tlačidlo:
- Osvetlenie bude natrvalo zapnuté na osem
hodín.
- Akonáhle je nové nastavenie potvrdené (2x zabliká
zelená LED), červená LED bliká (interval 30 s).
Pre deaktivovanie tejto funkcie opäť stlačte toto
tlačidlo. Červená LED kontrolka prestane blikať. Túto
funkciu nemôžete vypnúť prostredníctvom tlačidla.
Lock/
unlock
Short
push
Learn actual lux
20
Lux
50
Lux
100
Lux
300
Lux
400
Lux
200
Lux
500
Lux
700
Lux
1000
Lux
No
Lux
Fact.
setting
Long
push
Test
On/Off
30min 60min15min 8
Hours
Pulse 2min 5min 10min
Ch 1 Ch 2 Status
Ch 1
Status
Ch 2
Light 1
On/Off
Light 2
On/Off
LED
On/Off
Prístroj sa vráti do továrenského nastavenia.
Lock/
unlock
Short
push
Learn actual lux
20
Lux
50
Lux
100
Lux
300
Lux
400
Lux
200
Lux
500
Lux
700
Lux
1000
Lux
No
Lux
Fact.
setting
Long
push
Test
On/Off
30min 60min15min 8
Hours
Pulse 2min 5min 10min
Ch 1 Ch 2 Status
Ch 1
Status
Ch 2
Light 1
On/Off
Light 2
On/Off
LED
On/Off
Snímaná oblasť sa testuje aktivovaním
integrovaného snímača pohybu pre testovací
režim:
- Pri aktivovaní testovacieho režimu sa rozsvieti
modrá LED.
- Osvetlenie sa zapne na päť sekúnd a červená LED
kontrolka sa rozvieti zakaždým, keď zistí aktivitu.
- Ak nie je detegovaná žiadna aktivita a snímač je
stále v testovacom režime, rozsvieti sa modrá LED
kontrolka.
- Ak zabudnete ukončiť testovací režim, detektor
sa vráti do predošlého nastavenie po piatich
minútach.
Svetelný senzor je počas testovacieho režimu
vypnutý.
Testovací režim môžete aktivovať taktiež cez
potenciometer pre oneskorenie vypnutia.
5. PREVÁDZKA A POUŽÍVANIE
5.1. Aktivácia
Detektor nesmie byť pripojený k zdroju napájania, pokiaľ nie sú pripojené všetky káble. Po pripojení k napájaniu
bude detektor pripravený na prevádzku po približne 120 sekundách (doba spustenia).
Červená LED počas spúšťania bliká. Po spustení prístroja zelená LED kontrolka dvakrát krátko blikne.
5.2. Bežná prevádzka
Integrovaný svetelný senzor priebežne meria intenzitu denného svetla v snímanej oblasti a porovnáva ju s
nastavenou hodnotou. Vďaka svetelnému senzoru sa svetlo zapne automaticky iba v prípade, ak detektor zachytí
pohyb v snímanej oblasti a súčasne intenzita denného osvetlenia je nedostatočná:
• Osvetlenie zostane zapnuté tak dlho, dokiaľ je detegovaný pohyb a množstvo denného svetla v
miestnosti je nedostatočné.
• Po zaregistrovaní posledného pohybu zostane osvetlenie zapnuté po dobu nastaveného
oneskorenia vypnutia (1 až 60 minút). Po uplynutí času oneskorenia vypnutia sa osvetlenie
vypne.
• Osvetlenie sa vypne taktiež automaticky, akonáhle bude úroveň denného svetla dostatočne
vysoká, a to aj vtedy, keď je v tom čase v miestnosti stále registrovaný pohyb.
5.3. Snímaná oblasť
Oblasť snímania je možné zväčšiť pridaním ďalšieho detektora (podružný) (350-20079). K jednému master
(350-20078) môžete priradiť najviac desať detektorov typu podružný. Osvetlenie bude ovládané v závislosti od
nastavenia na detektore typu master. Detektory typu master a podružný majú rovnakú oblasť snímania (kruh s
priemerom 24 m). Pre dosiahnutie úplného pokrytia pomocou viacerých detektorov sa odporúča počítať s približne
30% presahom (obr. 8).
Ak chcete vylúčiť detekciu pohybu v časti snímanej oblasti alebo ak je oblasť snímania príliš veľká, prekryte
šošovku snímača pomocou dodávanej clony. To vám umožní znížiť maximálny rozsah 24 m. 360° uhol je možné
znížiť v krokoch po 30°.
5.4.Príklady použitia
Príklad 1: trieda
DIP prepínač 1 DIP prepínač 3 DIP prepínač 4
ON x x
OFF x
Ako funguje detektor prítomnosti:
- Osvetlenie sa automaticky zapne, keď detektor deteguje pohyb v snímanej oblasti a úroveň svetla je nižšia
ako nastavená hodnota luxov.
- Osvetlenie sa automaticky vypne po uplynutí nastaveného času (oneskorenie vypnutia), za predpokladu,
že v snímanej oblasti nebude detegovaný žiadny ďalší pohyb alebo úroveň svetla bude vyššia ako nastavená
hodnota luxov po dobu piatich minút.
- Osvetlenie sa dá kedykoľvek zapnúť manuálne krátkym stlačením tlačidla. Osvetlenie môžete taktiež
manuálne vypnúť (= eko vypnutie).
- Okrem toho môžete tiež tlačidlo stlačiť a podržať, čo je ideálne pre situácie, pri ktorých by osvetlenie malo
zostať zapnuté (napr. skúška) alebo vypnuté (napr. film) na dlhšiu dobu.
• Stlačením a podržaním tlačidla počas zapnutého osvetlenia sa osvetlenie vypne. Detektor bude uzamknutý
tak dlho, pokým je detegovaná aktivita a nastavený čas oneskorenia vypnutia + 2 hodiny ešte neuplynul.
Potom sa detektor vráti do zvoleného nastavenia a osvetlenie za zapne.
• Stlačením a podržaním tlačidla počas vypnutého osvetlenia sa osvetlenie zapne. Osvetlenie zostane
zapnuté tak dlho, pokým je detegovaná aktivita a nastavený čas oneskorenia vypnutia + 2 hodiny ešte
neuplynul. Potom sa osvetlenie vypne, detektor sa vráti do zvoleného nastavenia a osvetlenie za zapne.

350-20078
15
PM350-20078R23041 SK
Červená LED kontrolka na detektore bude blikať (každých 5 s na 0,25 s), čo znamená, že ste stlačili a podržali
tlačidlo. Funkciu ‘dlhé stlačenie’ je možné kedykoľvek prerušiť krátkym stlačením tlačidla, po ktorom sa osvetlenie
zapne a detektor sa vráti do zvoleného nastavenia.
Príklad 2: kancelária
DIP prepínač 1 DIP prepínač 3 DIP prepínač 4
ON x x
OFF x
Ako funguje detektor prítomnosti:
- Osvetlenie sa musí zapnúť krátkym stlačením tlačidla (nezávislé od denného svetla).
- Funkcie ‘eko vypnutie’ a ‘dlhé stlačenie’ sú deaktivované.
- Osvetlenie sa automaticky vypne po uplynutí nastaveného času (oneskorenie vypnutia), za predpokladu,
že v snímanej oblasti nebude detegovaný žiadny ďalší pohyb alebo úroveň svetla bude vyššia ako nastavená
hodnota luxov po dobu piatich minút
Príklad 3: schodisko
DIP prepínač 1 DIP prepínač 3 DIP prepínač 4
ON x x x
OFF
Ako funguje detektor prítomnosti:
- Osvetlenie sa automaticky zapne, keď detektor deteguje pohyb v snímanej oblasti a úroveň svetla je nižšia
ako nastavená hodnota luxov.
- Osvetlenie sa automaticky vypne po uplynutí nastaveného času (oneskorenie vypnutia), za predpokladu,
že v snímanej oblasti nebude detegovaný žiadny ďalší pohyb alebo úroveň svetla bude vyššia ako nastavená
hodnota luxov po dobu piatich minút.
- Osvetlenie sa môže kedykoľvek zapnúť manuálne stlačením tlačidla, bez ohľadu na úroveň denného svetla.
6. ÚDRŽBA
Správnej funkcii detektora môže brániť nečistota. Preto udržiavajte šošovky čisté a suché. Na čistenie šošovky
používajte vlhkú handričku a vodu s trochou saponátu. Pri čistení šošovky na ňu nikdy nevyvíjajte tlak. Ak je
chybná šošovka alebo iné časti detektora prítomnosti, obráťte sa na autorizovaného elektroinštalatéra.
7. TECHNICKÉ ÚDAJE
rozmery 45,9 x 117,3 mm (VxŠ)
64,1 x 117,3 mm (VxŠ) (vrátane častí, ktoré nie je vidieť)
sieťové napätie 230 Vac ± 10%, 50 Hz
istič hlavného napájania max. menovitá hodnota MCB 10 A*
spotreba elektrickej energie 0,2 W
reléový kontakt NO (max. 10 A), s bezpotenciálovým kontaktom,
citlivý na svetlo a pohyb
maximálna záťaž žiarovky (2300 W)
230 V halogénové žiarovky (2300 W)
všetky nízkonapäťové halogénové žiarovky (1200 VA)
žiarivky (nekompenzované) (1200 VA)
úsporné žiarivky (CFLi) (350 W)
LED žiarovky 230V (350 W)
maximálna kapacitná záťaž 140 μF
maximálny nárazový (zapínací) prúd 165 A/20 ms alebo 800A/200 μs
svetelná citlivosť 20 – 1000, ∞ lux
hysteréza svetelnej citlivosti + 10%
doba oneskorenia vypnutia 2 – 60 min.
montážna výška (obr. 3) 2 – 3,4 m
uhol snímania (obr. 3) 360°
snímaná oblasť (obr. 3) max. 24 m
vstup vodičov 3 x 2,5 mm²
káblový prívod na boku: 3 x Ø 14 mm
zhora: 2 x Ø 14 mm
stupeň ochrany IP54
trieda ochrany zariadenia triedy I
prevádzková teplota -5 – +50°C
značka kvality označenie CE v súlade s EN 60669-2-1
príslušenstvo IR diaľkové ovládanie (350-20089)
diaľkové ovládanie pre smartphone (350-41936)
detektor prítomnosti 360° (podružný) (350-20079)
* Menovitá hodnota MCB je obmedzená v súlade s národnými inštalačnými predpismi.
Upozornenia týkajúce sa inštalácie
Výrobky, ktoré sa natrvalo stanú súčasťou elektroinštalácie, a ktoré obsahujú nebezpečné napätia, musia byť
inštalované kvalifikovaným elektroinštalatérom a v súlade s platnými smernicami a nariadeniami. Tento návod
na použitie musí byť odovzdaný používateľovi. Mal by byť súčasťou dokumentácie o elektroinštalácii a mal by byť
odovzdaný každému novému používateľovi. Ďalšie kópie sú k dispozícii na internetových stránkach spoločnosti
Niko alebo prostredníctvom služby zákazníkom poskytovanej spoločnosťou Niko.
Označenie ES
Tento výrobok spĺňa všetky relevantné Európske pre dpisy a nariadenia. Čo sa rádiových
zariadení týka, spoločnosť Niko nv vyhlasuje, že rádiové zariadenia v tomto návode sú v súlade so
smernicou 2014/53/EÚ. Celé znenie EÚ vyhlásenia o zhode je dostupné na stránke www.niko.eu
v časti s referenciami o produktoch, ak bolo uplatnené.
Prostredie
Tento výrobok a/alebo k nemu pribalené batérie sa nesmú likvidovať spolu s nerecyklovateľným odpadom. Svoj
znehodnotený výrobok odneste na určené zberné miesto odpadu alebo do recyklačného strediska. Nielen výrobcovia a
dovozcovia, ale aj vy zohrávate veľmi dôležitú úlohu v rámci podpory triedenia, recyklovania a opätovného používania
odpadu vzniknutého z elektrických a elektronických zariadení. Aby bolo možné financovať zber, triedenie a spracovanie
odpadu, vláda v určitých prípadoch odvádza poplatky za recykláciu (tie sú zahrnuté v cene tohto výrobku).

350-20078
16
PM350-20078R23041
30%
Fig./Abb./Obr. 8
20
100
0
0
3
500
1k
Test
5
15
60
20
100
003
500
1k
Test
5
15
60
Fig./Abb./Obr. 6
Lock/
unlock
Short
push
Learn actual lux
20
Lux
50
Lux
100
Lux
300
Lux
400
Lux
200
Lux
500
Lux
700
Lux
1000
Lux
No
Lux
Fact.
setting
Long
push
Test
On/Off
Time
30min 60min15min 8
Hours
Pulse 2min 5min 10min
Ch 1 Ch 2 Status
Ch 1
Status
Ch 2
Light 1
On/Off
Light 2
On/Off
LED
On/Off
Fig./Abb./Obr. 7
350-20089
DIP switch:
Application
Factory setting:
1 = On
2 = On
3 = Off
4 = Off
DIP switch:
Sensitivity
On = 1 / Off = 0
DIP 1 2
0 0: Min
0 1: Low
1 0: High (Factory setting)
1 1: Max
Fig./Abb./Obr. 5
Fig./Abb./Obr. 3
71
51
Fig./Abb./Obr. 4
Support & contact
nv Niko sa
Industriepark West 40
9100 Sint-Niklaas, Belgium
www.niko.eu
EN +32 3 778 90 80 [email protected]
NL België: +32 3 778 90 80
Nederland: +31 880 15 96 10
FR
Belgique: +32 3 778 90 80
France: +33 820 20 66 25
Suisse: +41 44 878 22 22
DE
Deutschland: +49 7623 96697-0
Schweiz: +41 44 878 22 22
Österreich: +43 1 7965514
Belgien: +32 3 778 90 80
SK +421 2 63 825 155 [email protected]
Niko prepares its manuals with the greatest care and strives to make them as
complete, correct and up-to-date as possible. Nevertheless, some deficiencies may
subsist. Niko cannot be held responsible for this, other than within the legal limits.
Please inform us of any deficiencies in the manuals by contacting Niko customer
services at [email protected].
Fig./Abb./Obr. 1 Fig./Abb./Obr. 2
Driefasige aansluiting/connexion triphasé/three phase connection/dreiphasigen Anschluss/trojfázové zapojenie
Monofasige aansluiting/connexion monophase/single phase connection/einphasigen Anschluss/jednofazove zapojenie
N
L
1
L
2
L
3
L
350-20078 (master)
LL L’ NNT1/S T1
/S
LLN
L
N
L
350-20078 (master)
LL L’ NNT1/S T1
/S
LLN
N
L
1
L
2
L
3
L
350-20078 (master)
LL L’ NNT1/S T1/SLLN L
secondary
LL L T1/SNNN T1/ST1/S
L
N
L
350-20078 (master)
LL L’ NNT1/S T1/SLLN L
secondary
LL L T1/SNNN T1/ST1/S
A
A
B
B
This product must be secured with a miniature circuit breaker (MCB) of max. 10 A in the electrical cabinet. The MCB rating is limited by national installation rules.
H
A
B
360°
C
2 m
2.5 m
ø 10 m ø 4 mø 16 m
ø 12 m ø 5 mø 20 m
B
Towards
H C
Presence
3 m ø 14.4 m ø 6 mø 24 m
3.5 m
ø
16 m
ø
7 m
ø
28 m
A
Across
-
 1
1
-
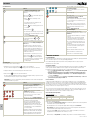 2
2
-
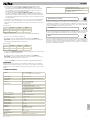 3
3
-
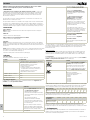 4
4
-
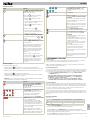 5
5
-
 6
6
-
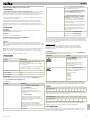 7
7
-
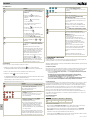 8
8
-
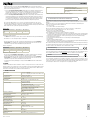 9
9
-
 10
10
-
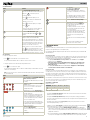 11
11
-
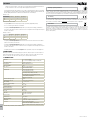 12
12
-
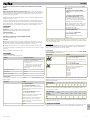 13
13
-
 14
14
-
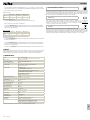 15
15
-
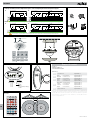 16
16


Niko PM350-20078 Manuel utilisateur
- Catégorie
- Détecteurs de mouvement
- Taper
- Manuel utilisateur
dans d''autres langues
- English: Niko PM350-20078 User manual
- Deutsch: Niko PM350-20078 Benutzerhandbuch
- Nederlands: Niko PM350-20078 Handleiding
- slovenčina: Niko PM350-20078 Používateľská príručka
Documents connexes
Autres documents
-
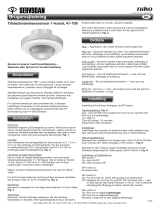 Servodan 5703102207630 Manuel utilisateur
-
Hager TX510 User Instructions
-
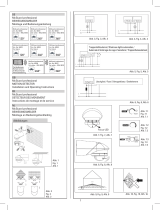 urmet domus 94532 Installation And Operating Instrucitons
-
STEINEL LuxMaster Operating Instructions Manual
-
Hager TX511 User Instructions
-
THEBEN ECO-IR 180A@ECO-IR 360A Le manuel du propriétaire
-
Intermatic GRASSLIN talis II PHB 360-20-1i Operating Instructions Manual
-
THEBEN LU361PE Le manuel du propriétaire
-
STEINEL HF 360 COM Le manuel du propriétaire
-
 SCS Sentinel SAL0011 Le manuel du propriétaire


