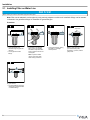
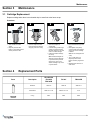
Vous trouverez ci-dessous de brèves informations pour Filtres à eau FB-34PR-PS, Filtres à eau FB-34PR, Filtres à eau FB2-34PR, Filtres à eau FC-34V, Filtres à eau AWP110, Filtres à eau AWP110-2, Filtres à eau AWP117, Filtres à eau C-01, Filtres à eau C-02, Joint torique OR-4, Joint torique OR-6, Joint torique OR-8. Ces filtres sont conçus pour une installation sur une conduite d'eau avec une pression maximale de 100 psi. Il est important de ne pas trop serrer les raccords de tuyauterie et d'utiliser du ruban téflon. Les filtres doivent être protégés du gel et ne doivent pas être installés en plein soleil. Le remplacement de la cartouche est nécessaire lorsqu'une baisse de débit est constatée. Il est recommandé d'utiliser les cartouches de la marque VIQUA.
Vous trouverez ci-dessous de brèves informations pour Filtres à eau FB-34PR-PS, Filtres à eau FB-34PR, Filtres à eau FB2-34PR, Filtres à eau FC-34V, Filtres à eau AWP110, Filtres à eau AWP110-2, Filtres à eau AWP117, Filtres à eau C-01, Filtres à eau C-02, Joint torique OR-4, Joint torique OR-6, Joint torique OR-8. Ces filtres sont conçus pour une installation sur une conduite d'eau avec une pression maximale de 100 psi. Il est important de ne pas trop serrer les raccords de tuyauterie et d'utiliser du ruban téflon. Les filtres doivent être protégés du gel et ne doivent pas être installés en plein soleil. Le remplacement de la cartouche est nécessaire lorsqu'une baisse de débit est constatée. Il est recommandé d'utiliser les cartouches de la marque VIQUA.


-
 1
1
-
 2
2
-
 3
3
-
 4
4


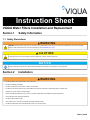
Viqua AWP117 Mode d'emploi
- Taper
- Mode d'emploi
Vous trouverez ci-dessous de brèves informations pour Filtres à eau FB-34PR-PS, Filtres à eau FB-34PR, Filtres à eau FB2-34PR, Filtres à eau FC-34V, Filtres à eau AWP110, Filtres à eau AWP110-2, Filtres à eau AWP117, Filtres à eau C-01, Filtres à eau C-02, Joint torique OR-4, Joint torique OR-6, Joint torique OR-8. Ces filtres sont conçus pour une installation sur une conduite d'eau avec une pression maximale de 100 psi. Il est important de ne pas trop serrer les raccords de tuyauterie et d'utiliser du ruban téflon. Les filtres doivent être protégés du gel et ne doivent pas être installés en plein soleil. Le remplacement de la cartouche est nécessaire lorsqu'une baisse de débit est constatée. Il est recommandé d'utiliser les cartouches de la marque VIQUA.
dans d''autres langues
- English: Viqua AWP117 Operating instructions