Jensen Automobile Electronics IR30 Manuel utilisateur
- Taper
- Manuel utilisateur

Installation Instructions
Instrucciones de Instalación
Instructions d'installation
IR30
Steering Wheel
Remote Control
Control Remoto con
Volante de Dirección
Télécommande
volant


The IR30 allows you to control a wide range of radio functions without removing your
hands from the steering wheel.
Features
! Easily mounts to steering wheel.
! Controls power, mode, CD, radio ,volume, tuning up/down, mute, track up/down and
eject.
! Compatible with the following radios: MP6211, CDX6311, MPX6411, MPA6511X,
MPA6611X, and MPV6811X.
INTRODUCTION
PAGE 1

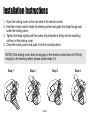
Installation Instructions
1. Open the locking cover on the rear side of the remote control.
2. Hold the remote control inside the steering wheel and guide the strap through and
under the locking cover.
3. Tighten the strap slightly and then press the perforations firmly into the matching
catches on the locking cover.
4. Close the locking cover and push it into the locked position.
NOTE: If the locking cover does not engage or the remote control does not fit firmly
enough on the steering wheel, please repeat steps 3-4.
PAGE 2
Step 1 Step 2 Step 3 Step 4

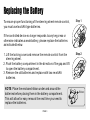
To ensure proper functioning of the steering wheel remote control,
you must use two AAA type batteries.
If the controlled device no longer responds to any key press or
otherwise indicates a weak battery, please replace the batteries
as indicated below.
1. Lift the locking cover and remove the remote control from the
steering wheel.
2. Push the battery compartment in the direction of the gap and lift
to open the battery compartment.
3. Remove the old batteries and replace with two new AAA
batteries.
Replacing the Battery
NOTE: Place the enclosed ribbon under and around the
batteries before placing them in the battery compartment.
This will allow for easy removal the next time you need to
replace the batteries.
Step 1
Step 2
Ribbon
PAGE 3

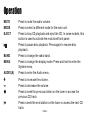
Operation
MUTE Press to mute the audio volume.
MODE Press to select a different mode for the main unit.
EJECT Press to stop CD playback and eject the CD. In some models, this
button is used to activate the motorized front panel.
Press to pause disc playback. Press again to resume disc
playback.
BAND Press to change the radio band.
MENU Press to change the display mode. Press and hold to enter the
System menu.
AUDIO(A) Press to enter the Audio menu.
Press to increase the volume.
Press to decrease the volume.
Press to seek the previous station on the tuner or access the
previous CD track.
Press is seek the next station on the tuner or access the next CD
track.
PAGE 4

Length of Warranty: This warranty from Audiovox Electronics
Corporation shall be in effect for a period of 1 year from the date of
the first consumer purchase.
Persons Protected: This warranty will be enforceable by the original
owner during the warranty period so long as proof of date of
purchase from an authorized dealer is presented whenever warranty
service is required.
What is Covered: Except as otherwise specified below, this warranty
covers all defects in material and workmanship in this product. The
following are not covered: damage resulting from accident, misuse,
abuse, neglect, product modification, improper installation, incorrect
line voltage, unauthorized repair or failure to follow instructions
supplied with the product; damage occurring during shipment (claims
must be presented to the carrier); any plexiglass included with the
product; elimination of car static or other electrical interferences; any
product purchased outside USA or Canada, or on which the serial
number has been defaced, modified or removed.
How You Can Get Service
U.S. Purchasers: Please telephone Jensen Customer Service at 1-
800-323-4815. We will either inform you of the name and address of
an authorized repair station which will service the product or will
advise you to send the product to a factory service center.
Canadian Purchasers: The product should be returned to the dealer
from whom it was purchased and such dealer either will service or
arrange for service of the product. If shipment of the product is
required, it should be packed properly. The original dated bill of sale
must always be included with the product as proof of warranty
coverage.
What We Will Pay For: We will pay for all labor and material
expenses required to repair the product, but you must pay any labor
costs for the removal and/or installation of the product. If the product
is shipped for warranty service, you must prepay the initial shipping
charges, but Audiovox Electronics Corporation will pay the return
shipping charges if the product is returned to an address inside the
USA or Canada.
Limitation of Implied or Statutory Warranties and Conditions
Exclusions: Audiovox Corp's liability is limited to the repair or
replacement, at our option, of any defective product and shall not
include special, indirect, incidental or consequential damages of any
kind. THIS WARRANTY IS EXCLUSIVE AND IN LIEU OF ANY AND
ALL OTHER WARRANTIES, EXPRESSED OR IMPLIED,
INCLUDING WITHOUT LIMITATION THE IMPLIED WARRANTIES
OF MERCHANTABILITY AND FITNESS FOR A PARTICULAR
PURPOSE AND ANY OBLIGATION, LIABILITY, RIGHT, CLAIM OR
REMEDY IN CONTRACT OR TORT, WHETHER OR NOT ARISING
FROM THE COMPANY'S NEGLIGENCE, ACTUAL OR IMPUTED.
NO PERSON OR REPRESENTATIVE IS AUTHORIZED TO
ASSUME FOR THE COMPANY ANY OTHER LIABILITY IN
CONNECTION WITH THE SALE OF THIS PRODUCT. IN NO
EVENT SHALL COMPANY BE LIABLE FOR INDIRECT,
INCIDENTAL OR CONSEQUENTIAL DAMAGES.
Limited 1 Year Warranty – USA and Canada
PAGE 5

PAGE 6

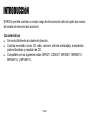
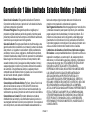
El IR30 le permite controlar un amplio rango de funciones del radio sin quitar sus manos
del volante de dirección del automóvil.
Características
! Se monta fácilmente al volante de dirección.
! Controla encendido, modo, CD, radio, volumen, sintonía arriba/abajo, enmudecido,
pista arriba/abajo y expulsión de CD.
! Compatible con los siguientes radios: MP6211, CDX6311, MPX6411, MPA6511X,
MPA6611X, y MPV6811X.
INTRODUCCI Nó
PAGE 7

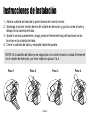
Instrucciones de Instalación
1. Abra la cubierta de traba de la parte trasera del control remoto.
2. Sostenga el control remoto dentro del volante de dirección y guíe la correa a tavés y
debajo de la cubierta de traba.
3. Ajuste la correa suavemente y luego presione firmemente las perforaciones en los
broches en la cubierta de traba.
4. Cierre la cubierta de traba y empújela hasta bloquearla.
NOTA: Si la cubierta de traba no se engancha o el control remoto no calza firmemente
en el volante de dirección, por favor repita los pasos 3 a 4.
PAGE 8
Paso 1 Paso 2 Paso 3 Paso 4

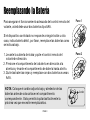
Para asegurar el funcionamiento adecuado del control remoto del
volante, usted debe usar dos baterías tipo AAA.
Si el dispositivo controlado no responde a ningún botón u otra
cosa, indica batería débil, por favor, reemplace las baterías como
se indica abajo.
1. Levante la cubierta de traba y quite el control remoto del
volante de dirección.
2. Presione el compartimento de la batería en dirección a la
abertura y levante el compartimento de batería hasta abrirlo.
3. Quite las baterías viejas y reemplace con dos baterías nuevas
AAA.
Reemplazando la Batería
NOTA: Coloque el cordón adjunto bajo y alrededor de las
baterías antes de colocarlas en el compartimento
correspondiente. Esto permitirá quitarlas fácilmente la
próxima vez que necesite reemplazarlas.
Paso 1
Paso 2
Cordó n
PAGE 9

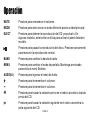
Operación
MUTE Presione para enmudecer el volumen.
MODE Presione para seleccionar un modo diferente para la unidad principal.
EJECT Presione para detener la reproducción del CD y expulsarlo. En
algunos modelos, este botón se utiliza para activar el panel delantero
movible.
Presione para pausar la reproducción del disco. Presione nuevamente
para reasumir la reproducción normal.
BAND Presione para cambiar la banda de radio.
MENU Presione para cambiar el modo de pantalla. Mantenga presionado
para entrar al menú Sistema.
AUDIO(A) Presione para ingresar al menú de Audio.
Presione para incrementar el volumen.
Presione para incrementar el volumen.
Presione para buscar la estación previa en el radio o acceder a la pista
previa del CD.
Presione para buscar la estación siguiente en el radio o acceder a la
pista siguiente del CD.
PAGE 10

Duración de la Garantía: Esta garantía de Audiovox Electronics
Corporation tendrá efecto por el periodo de 1 año desde la fecha de
la primera compra del consumidor.
Personas Protegidas: Esta garantía podrá ser exigida por el
propietario original durante el periodo de garantía, mientras pueda
presentar prueba de la fecha de compra a un distribuidor autorizado,
cuando sea que se requiera servicio de garantía.
Qué está Cubierto: Excepto especificado de otra forma abajo, esta
garantía cubre todos los defectos en el material y la mano de obra de
este producto. Lo siguiente no está cubierto: daños resultantes de
accidentes, mal uso, abuso, negligencia, modificación de producto,
instalación inadecuada, voltaje incorrecto, reparación no autorizada o
falla al seguir las instrucciones provistas con este producto; daño
causado durante el envío (las quejas las debe presentar al correo);
cualquier plexiglás incluido con el producto; eliminación de estática
del automóvil u otra interferencia eléctrica; cualquier producto
comprado fuera de Estados Unidos y Canadá, o en el cual el número
de serie ha sido borrado, quitado o modificado.
HCómo Puede Obtener un Servicio
Consumidores en Estados Unidos: Por favor, llame al Servicio de
Atención al Cliente de Jensen al 1-800-323-4815. Nosotros le
informaremos el nombre y dirección de un servicio autorizado o le
solicitaremos que envíe el producto al centro de servicio de la fábrica.
Consumidores en Canadá: El producto deberá ser enviado al
distribuidor del cual compró y ese distribuidor realizará el servicio o
se encargará de obtener el servicio para el producto. Si se requiere el
envío del producto, este debe estar embalado adecuadamente. La
factura de compra original siempre debe estar incluida con el
producto como prueba de la cobertura de la garantía.
Qué Pagaremos Nosotros: Nosotros pagaremos por mano de obra
y materiales necesarios para reparar el producto, pero usted debe
pagar cualquier costo de desinstalar y/o instalar el producto. Si el
producto se envía para el servicio de garantía, usted debe pagar
previamente los costos del envío inicial, pero Audiovox Electronics
Corporation pagará los costos del envío de vuelta si el producto se lo
envía a una dirección dentro de Estados Unidos o Canadá.
Limitaciones de Garantías o Condiciones Implicadas o legales
Exclusiones: La responsabilidad Audiovox Corporation se limita a la
reparación o reemplazo, a nuestra opción, de cualquier producto
defectuoso y no incluirá daños especiales, indirectos, incidentales o
consecuentes de ningún tipo. ESTA GARANTÍA ES EXCLUSIVA Y
ÙNICA EN LUGAR DE CUALQUIER OTRA GARANTÍA,
EXPRESADA O IMPLICADA, INCLUYENDO SIN LIMITACIONES
LAS GARANTÍAS IMPLICADAS DE MERCANTIBILIDAD Y
ADECUACIÓN PARA UN PROPÓSITO PARTICULAR Y
CUALQUIER OBLIGACIÓN, RESPONSABILIDAD, DERECHO,
RECLAMO O REMEDIO EN CONTRATO O DERECHO, SEA O NO
SEA ORIGINARIA EN LA NEGLIGENCIA DE LA COMPAÑÍA,
ACTUAL O IMPUTADA. NINGUNA PERSONA O REPRESENTANTE
ESTÁ AUTORIZADO A ASUMIR POR LA COMPAÑÍA NINGUNA
OTRA RESPONSABILIDAD EN CONEXIÓN CON LA VENTA DE
ESTE PRODUCTO. EN NINGÚN CASO LA COMPAÑÍA SERÁ
RESPONSABLE POR DAÑOS INDIRECTOS, INCIDENTALES O
CONSECUENTES.
Garantía de 1 Año Limitada Estados Unidos y Canadá
PAGE 11

PAGE 12

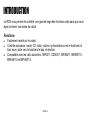
Le IR30 vous permet de contrôler une gamme large des fonctions radio sans que vous
ayez à enlever vos mains du volant.
Fonctions
! Facilement monté sur le volant.
! Contrôle puissance, mode, CD, radio, volume, syntonisations vers le haut/vers le
bas, muer, piste vers le haut/vers le bas, et éjection.
! Compatible avec les radio suivantes : MP6211, CDX6311, MPX6411, MPA6511X,
MPA6611X et MPV6811X.
INTRODUCTION
PAGE 13

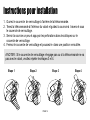
Instructions pour installation
1. Ouvrez le couvercle de verrouillage à l'arrière de la télécommande.
2. Tenez la télécommande à l'intérieur du volant et guidez la courroie à travers et sous
le couvercle de verrouillage.
3. Serrez la courroie un peu et appuyez les perforations dans les attrapes sur le
couvercle de verrouillage.
4. Fermez le couvercle de verrouillage et poussez-le dans une position verrouillée.
A NOTER : Si le couvercle de verrouillage n'engage pas ou si la télécommande ne va
pas avec le volant, veuillez répéter les étapes 3 et 4.
PAGE 14
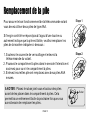
Etape 1 Etape 2 Etape 3 Etape 4

Pour assurer le bon fonctionnement de la télécommande volant
vous devez utiliser deux piles de type AAA.
Si l'engin contrôlé ne répond pas à l'appui d'une touche ou
autrement indique que la pile est faible, veuillez remplacer les
piles de la manière indiquée ci-dessous :
1. Soulevez le couvercle de verrouillage et enlevez la
télécommande du volant.
2. Poussez le compartiment à piles dans le sens de l'interstice et
soulevez pour ouvrir le compartiment à piles.
3. Enlevez les vieilles piles et remplacez avec deux piles AAA
neuves.
Remplacement de la pile
A NOTER : Placez le ruban joint sous et autour des piles
avant de les placer dans le compartiment à piles. Cela
permettra un enlèvement facile la prochaine fois que vous
aurez besoin de remplacer les piles.
Etape 1
Etape 2
Ruban
PAGE 15

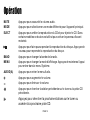
Opération
MUTE Appuyez pour assourdir le volume audio.
MODE Appuyez pour sélectionner une mode différente pour l'appareil principal.
EJECT Appuyez pour arrêter la reproduction du CD et pour éjecter le CD. Dans
certains modèles ce bouton est utilisé pour activer le panneau d'avant
motorisé.
Appuyez pour faire pause pendant la reproduction du disque. Appuyez de
nouveau pour reprendre la reproduction du disque.
BAND Appuyez pour changer la bande de la radio.
MENU Appuyez pour changer la mode d'affichage. Appuyez et maintenez l'appui
pour entrer dans le menu Système.
AUDIO(A) Appuyez pour entrer le menu Audio.
Appuyez pour augmenter le volume.
Appuyez pour diminuer le volume.
Appuyez pour chercher la station précédente sur le tuner ou la piste CD
précédente.
Appuyez pour chercher la prochaine stations sur le tuner ou
accéder à la prochaine piste CD.
PAGE 16

Durée du garanti : Ce garanti de Audiovox Electronics Corporation
sera effectif pour une période d'un an à partir de la date du premier
achat.
Personne protégée : Ce garanti sera exécutable par le propriétaire
d'origine pendant la période de garanti tant que la preuve de la date
d'achat d'un vendeur autorisé est présenté chaque fois que le service
de garanti est exigé.
Ce qui est couvert : A l'exception de ce qui est spécifié ci-dessous,
ce garanti couvre tous les défauts en matériel et d'artisanat dans ce
produit. Le suivant n'est pas couvert : dégâts résultant d'un accident ;
mauvaise manipulation, abus, négligence, modification du produit,
mauvaise installation, voltage de ligne incorrect, dépannage non-
autorisé, si les instructions fournies avec le produit n'ont pas été
suivies, dégâts ayant eu lieu pendant la transportation (les
revendications doivent être présenté au transporteur), tout plexiglass
compris avec le produit, éliminatioin du statique de voiture ou d'autres
interférences électriques, tout produit acheté en dehors des Etats-
Unis ou Canada, ou dont le numéro de série a été effacé, modifié ou
enlevé.
Comment vous pouvez obtenir du service
Acheteurs aux Etats-Unis : Veuillez téléphoner au Jensen
Customer Service à 1-800-323-4815. Nous vous informerons du nom
et de l'adresse d'une station de dépannage autorisée qui va
dépanner le produit, ou nous vous aviserons d'envoyer le produit à
un centre d'entretien d'usine.
Acheteurs Canadiens : Le produit doit être retourné au vendeur de
qui il a été acheté et le vendeur dépannera le produit ou fera
dépanner le produit. Si la transportation du produit est exigée, il doit
être emballé correctement. La facture d'origine du produit doit être
inclus avec le produit comme preuve du garanti.
Ce que nous payons : Nous payerons tous les coûts de travail et de
matériel exigés pour dépanner le produit, mais vous devez payer tous
les coûts du travail pour l'enlèvement et/ou installation du produit. Si
le produit est transporté pour l'entretien garanti, vous devez payer les
frais de transportation du départ, mais Audiovox Electronics
Corporation va payer la transportation du retour si le produit est
retourné à un adresse à l'intérieur des Etats-Unis ou du Canada.
Limitation des garantis impliqués ou statutaire et conditions
Exclusions : La responsabilité d'Audiovox Corp est limité au
dépannage ou remplacement, à notre choix, de tout produit
défectueux et ne comprendra pas des dommages accessoires ou
indirects ou spéciaux de n'importe quelle sorte. CE GARANTI EST
EXCLUSIF ET AU LIEU DE TOUT OU N'IMPORTE QUEL AUTRE
GARANTI EXPRIME OU IMPLIQUE Y COMPRIS SANS
LIMITATIONS LES GARANTIS IMPLIQUES DE MARCHANDABILITE
ET CAPACITE POUR UN BUT PARTICULIER ET TOUT
OBLIGATION, RESPONSABILITE DRIUT REVENDICATION OU
REMEDE EN CONTRAT OU TORT SI OU NON EMANANT DE LA
NEGLIGENCE DE LA SOCIETE, ACTUELLE OU IMPLIQUEE,
AUCUNE PERSONNE OU REPRESENTANT N'EST AUTORISEE A
ASSUMER DE LA PART DE LA SOCIETE TOUT AUTRE
RESPONSABILITE RELATIVEMENT A LA VENTE DE CE PRODUIT.
EN AUCUN CAS LA SOCIETE SERA RESPONSABLE POUR DES
DOMMAGES ACCESSOIRES OU INDIRECTS.
Garanti limité d'un an Etats-Unis et Canada
PAGE 17

Audiovox Electronics Corporation
Hauppauge, NY 11788
www.jensen.com
© 2006 Audiovox
v. 120805
Printed in China/Impreso en China/Imprimé en Chine
-
 1
1
-
 2
2
-
 3
3
-
 4
4
-
 5
5
-
 6
6
-
 7
7
-
 8
8
-
 9
9
-
 10
10
-
 11
11
-
 12
12
-
 13
13
-
 14
14
-
 15
15
-
 16
16
-
 17
17
-
 18
18
-
 19
19
-
 20
20


