Maxsa Innovations 44641 Le manuel du propriétaire
- Taper
- Le manuel du propriétaire

1
ASSEMBLY & OPERATING INSTRUCTIONS
IMPORTANT: Read all instructions carefully before use
ABOUT YOUR SOLAR SECURITY LIGHT
During the day, the solar panel included with this MAXSA Solar Security Light converts sunlight
into electricity, recharging the pre-installed battery. Using this stored energy, the Surface Mount
LED lights turn on automatically at night when motion is detected. This MAXSA Solar
Security Light has an adjustable TIME dial that allows light duration of up to 60 seconds. When
the battery is fully charged, this Solar Security Light can provide up to 200 thirty second cycles
when the TIME dial is set to the middle (30s) position.
The unit includes a rechargeable 3.7V/4.4Ah Lithium ion battery pack that will need to be
replaced when the charging ability is decreased.
Part #s 44640-B & 44641-B

2
Motion-Activated Solar Security Light
www.maxsainnovations.com
INCLUDED PARTS
Carefully remove and identify all the parts from their protective packaging and lay them out in
front of you.
2
Carefully remove and identify all the parts from their protective packaging and lay
them out in front of you.
INCLUDED PARTS:
the solar panel to your Solar Security Light
by plugging the 15 foot cord into the cord
attached to the front of the Solar Security
Light. Turn and twist the cords while pressing
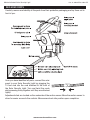
Adjustment dials are located on the underside of the motion sensor. Move the
motion sensor to allow for easier access to the controls. Move sensor back into
position upon completion.
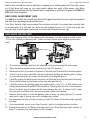
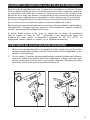
Once you have identified all parts, connect the solar
panel to your Solar Security Light by plugging the
15 foot cord into the cord attached to the front of
the Solar Security Light. Turn and twist the cords
while pressing firmly together until they are attached
tightly.
Adjustment dials are located on the underside of the motion sensor. Move the motion sensor to
allow for easier access to the controls. Move sensor back into position upon completion.
Part #s 44640-B & 44641-B

3www.maxsainnovations.com
CHOOSING A LOCATION FOR YOUR SOLAR SECURITY LIGHT
This Solar Security Light comes complete with a solar panel attached to a 15 foot power cord.
For optimum sun exposure and longer light output, place the solar panel in a position that
receives at least 6-8 hours of direct sunlight per day. Placing the solar panel in a shaded
location will not allow the battery to charge fully, reducing the number of hours the light will
operate per evening. Ensure that the security light is not placed near night time light sources
such as porch lighting or street lighting.
This Solar Security Light is ideal for areas where electricity is not available — including
driveways, carports, garages and entrance doors – for safety and security around your home.
When deciding where to mount the light, keep in mind that the motion sensor has a field of
vision of 180º (horizontal) at a distance of 40 feet when the surrounding temperature is 75F. The
outside temperature will impact the detection distance.
HOW TO INSTALL YOUR SOLAR SECURITY LIGHT
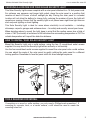
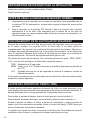
Mount the Security Light onto a solid surface, using the two (2) wood/sheet metal screws
supplied. You may mount the Security Light either vertically or horizontally.
Use the four wood/sheet metal screws supplied to mount the solar panel onto a solid surface.
You can adjust the angle of the solar panel by gently rotating the solar panel to a different
locking position. Remember to face the panel south for direct sunlight exposure.
TOOLS REQUIRED FOR INSTALL
If mounting on a wood or softer surface, you only need a Phillips-head screwdriver! If
mounting on concrete, brick, or a harder surface, a drill should be used to create the
mounting holes first
Motion-Activated Solar Security Light
Part #s 44640-B & 44641-B

4www.maxsainnovations.com
BEFORE FIRST USE OF YOUR SOLAR SECURITY LIGHT
Ensure the power switch on the main body of your Security Light is in the OFF position and the
solar panel is connected to the light unit. In this position, the solar panel will charge the battery
without activating the unit.
Leave the switch in the OFF position for 3 days with the solar panel placed in direct sunlight.
This will ensure that the battery in your Solar Security Light has a full charge prior to motion
sensor adjustment and normal operation.
OPERATING YOUR SOLAR SECURITY LIGHT
After the initial 3 day charge of your Solar Security Light, move the switch on the main body
to the AUTO position. The light should come on immediately, regardless of lighting or motion
conditions. This is a test activation that happens every time the light is switched to AUTO. It
should last for approximately 30 seconds. After the test activation, leave the switch on AUTO
and your Solar Security Light is now ready for use.
Underneath the motion sensor, there are 3 adjustment dials: TIME/SENS/LUX. The light has
been factory preset as follows:
TIME - Set at 30 seconds.
SENS - Set at a 15 - 20 foot range (when the surrounding temperature is 75 F).
LUX - Set for your Security Light to activate at dusk when motion is detected.
If the above settings are not suitable for your application, then these may be adjusted using the
steps below.
TIME PERIOD ADJUSTMENT (TIME)
The time period control dial sets the duration of the light upon each activation that the Solar
Security Light will remain illuminated after the last detected motion. The time period has an
adjustable range of 10 seconds to 1 minute.
To decrease the time period, move the dial toward the ( – ) symbol.
To increase the time period, move the dial toward the ( + ) symbol.
To test the Time Period, trigger the motion sensor and measure the length of time the light
remains activated. Adjust the TIME control until the desired illumination duration is reached.
A shorter TIME setting will conserve battery life. For best results, use the shortest TIME setting
for your location as possible.
MOTION SENSOR ADJUSTMENT (SENS)
The motion sensor on this Solar Security Light is temperature-sensitive. The cooler the
temperature, the more sensitive the motion sensor will become. Use the SENS dial to adjust
the sensitivity of the motion sensor to compensate for environmental temperature changes. The
motion sensor is most sensitive when the SENS dial is turned fully clockwise (+).
To decrease sensitivity, move the dial toward the ( – ) symbol.
To increase sensitivity, move the dial toward the ( + ) symbol.
To test the motion sensitivity, aim the sensor head toward the desired area. Set the TIME dial to
minimum ( – ) position and the LUX dial to the bright setting ().
Motion-Activated Solar Security Light Part #s 44640-B & 44641-B

5www.maxsainnovations.com
Walk slowly around the area of detection, changing your walking pace until the light comes
on. If light does not come on, you may need to adjust the angle of the sensor unit. Make
adjustments as needed until the desired level of sensitivity is reached. Re-adjust the TIME and
LUX dials when complete.
LIGHT LEVEL ADJUSTMENT (LUX)
The LUX dial controls the natural light level that triggers the Solar Security Light and prevents
the light from operating during daylight hours.
Your Solar Security Light comes preset for activation at dusk. If you want your security light
to activate when it is still light out, move the dial towards the sun (). If you only want your
security light to work when it gets dark, move the dial towards the moo ( ).
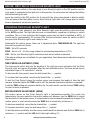
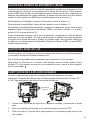
REPLACING THE BATTERY
When the charging ability of the battery pack decreases, you can replace it with a new
3.7V/4.4 Ah Lithium-Ion battery pack. Follow the steps below when replacing the battery
pack.
Battery Pack
1. First remove the main unit from its mounted surface and unplug the solar panel.
2. Move the power switch on the main body to the OFF position.
3. Remove the four (4) screws on the back of the main unit that hold the halves together.
4. Once the unit is open, carefully remove the bracket holding the battery pack in place
by unscrewing the two (2) screws as indicated in the diagram above.
5. Carefully unplug the battery pack from the unit. Be sure to pull by the base of the plug.
Do not pull the plug by the wires as this may damage the unit.
6. Carefully remove the battery pack and replace with a new 3.7V / 4.4Ah Lithium Ion
battery pack obtained from MAXSA Innovations. The plug will only fit in one orientation.
Do not force the plug into place as this may damage the unit. If it does not fit, rotate
the plug until it matches with the receiving end on the circuit board.
7. Replace the bracket to hold the battery pack in place by using the two (2) screws
removed in step 4, taking care not to damage any cables.
8. Re-assemble the main unit by screwing the two (2) halves of the main body together
securely.
9. Once assembled, mount your Solar Security Light to its original surface location.
10. Repeat the steps in the “Before first time use of your Solar Security Light” section on
page 4 to ensure your new battery is fully charged.
Motion-Activated Solar Security Light Part #s 44640-B & 44641-B

6www.maxsainnovations.com
MAINTENANCE TIPS
The LED lights in your Solar Security Light will last up to 30,000 hours and should never need
replacement.
To keep your Solar Security Light looking new, keep the lens free of dust and deposits by wiping
occasionally with a dry cloth or with warm soapy water.
It is important that the solar panel is kept free of dirt and debris at all times. A dirty solar panel
will not allow the batteries to be fully charged. This will shorten the life of the battery and may
cause the light to malfunction.
STORAGE
If you wish to store your light indoors for more than two or three days, turn the power switch to
the OFF position to prevent damage to the batteries. Battery capacity may be reduced during
prolonged storage. For optimal performance, we recommend that you do not store your Solar
Security Light for prolonged periods of time.
NOTE: Do not dispose of battery pack in general household trash or into a fire as the battery
pack may explode. Consult your local regulations for correct disposal of battery pack. The
battery pack may also be returned to MAXSA Innovations at 8412 Cathedral Forest Dr., Fairfax
Station, VA 22039. Do not take apart the battery pack since it contains corrosive chemicals.
EXTENSION CORDS
A 15-foot extension cord is available for this product for $14.95. This extension cord allows the solar panel
to be placed higher or further away from the security light to ensure maximum direct sunlight exposure.
For more information, please call 703-495-0661 or contact us at [email protected].
Motion-Activated Solar Security Light Part #s 44640-B & 44641-B

7www.maxsainnovations.com
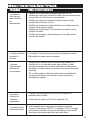
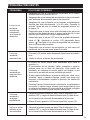
TROUBLESHOOTING
PROBLEM POSSIBLE SOLUTIONS
Light will not switch
on when there is
movement in the
detection area.
•Ensure that the power switch on the main body has been
turned to the AUTO position.
•Ensure that the motion sensor has been positioned to face
oncoming movement.
•Ensure that the battery has been fully charged in direct
sunlight for 3 sunny days. Refer to the “Before First Use of
Your Solar Security Light” section on page 4.
•Check to see that the solar panel is facing south so that it
receives direct sunlight for most of the day, enabling the
battery to fully charge.
•Check to see that the LUX control has not been set too far
towards ( ). Setting the LUX control too far towards ( ) will
cause the Solar Security Light to turn on only in complete
darkness.
•Check to see that the motion sensor is not near night time
light sources such as street lights.
Light switches on
during the day.
•The LUX control may be set too far towards the () position.
•Reposition the motion sensor.
Light switches on
for no apparent
reason.
•The SENS control may be set too far towards the (+) position.
•Moving trees, traffic, pets or birds may be getting in the area
of detection. This may be unavoidable, however the sensor
could be redirected to a height where this is less likely to
occur.
•If there are reflective objects in the detection area such as
windows, water, or white walls, you may need to redirect or
possibly reposition the motion sensor.
•Test the motion sensor by covering it completely with
cardboard and waiting several minutes to make sure it does
not detect motion. If the light still switches on, please contact
MAXSA for further assistance.
Light quickly
flashes on and off.
•Battery charge may be low. Turn the power switch to the OFF
position and charge the battery for three (3) sunny days with
the solar panel placed in direct sunlight.
•Move the LUX control more to the () position.
Light is not as
bright as normal.
•Battery charge may be low. Turn the power switch to the OFF
position and charge the battery for three (3) sunny days with
the solar panel placed in direct sunlight.
Motion-Activated Solar Security Light Part #s 44640-B & 44641-B

8
MADE IN CHINA
MAXSA Innovations
8412 Cathedral Forest Drive
Fairfax Station, VA 22039
Tel: 703-495-0661
www.maxsainnovations.com
ONE YEAR LIMITED WARRANTY
1 YEAR LIMITED WARRANTY: MAXSA Innovations, LLC warrants to the original
consumer/purchaser that this product shall be free of defects in material and workmanship
under normal use and circumstances for a period of one (1) year from the date of original
purchase for use. When the original consumer/purchaser returns the product pre-paid
(consumer pays return shipping) to MAXSA Innovations, LLC, 8412 Cathedral Forest Dr;
Fairfax Station, VA 22039; USA within the warranty period, and if the product is defective,
MAXSA Innovations, LLC will at its option repair or replace such. This warranty shall
constitute the sole liability of MAXSA Innovations, LLC concerning the product. MAXSA
Innovations, LLC expressly disclaims all other warranties INCLUDING, WITHOUT
LIMITATION, THE WARRANTIES OF MERCHANT ABILITY AND FITNESS FOR A
PARTICULAR PURPOSE. NO PERSON, FIRM, OR COPORATION IS AUTHORIZED
TO ASSUME FOR MAXSA Innovations, LLC ANY OTHER LIABILITY IN CONNECTION
WITH THE SALE AND USE OF THE PRODUCT. MAXSA Innovations, LLC and agents
and distributors will bear no liability whatsoever for incidental or consequential damages
or charges of any kind. Some states do not allow the reclusion or limitation of incidental
or consequential damages, so the above disclaimer regarding incidental or consequential
damages may not apply to you. This warranty is void if the product has been damaged
or tampered with or if the product or any such parts have been opened. In all cases of
damage during shipment, a claim must be filed with the shipping carrier and not with
MAXSA Innovations, LLC. This warranty gives you specific legal rights; you may also have
other rights which vary from state to state.
Please save these instructions for future reference.
SPECIFICATIONS
Power Source: Solar
Lumens: 878.6
Light Color: 6500K (Cool White or Daylight color)
Function: Motion-Activated
Power Storage: 3.7V/4.4Ah Lithium-ion battery pack
Light Duration: 10 - 60 seconds after motion stops
Maximum Runtime: up to 100 minutes on a full charge
Detection Angle: 180°
Maximum Detection Distance: 40 feet (12.2 meters)
Weatherproof Rating: IP44
©2015 MAXSA Innovations, LLC V15-3

9
Français
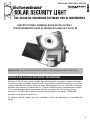
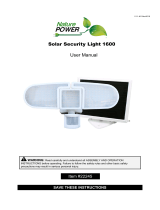
Notre Lampe Solaire de Mouvement la Plus
Brillante !
ATTENTION: IL FAUT LIRE TOUTES LES INSTRUCTIONS AVANT L'UTILISATION.
À PROPOS DE VOTRE LAMPE SOLAIRE DE SÉCURITÉ
Pendant la journée, le panneau solaire inclus avec ce produit transforme la lumière
du soleil en électricité qui recharge la batterie. En utilisant cette énergie, les ampoules
DEL s’allument automatiquement pour la nuit au moment où le capteur détecte des
mouvements. Votre Lampe Solaire de Sécurité a aussi un cadran TIME qui permet
une durée maximale de la lumière de 60 secondes. Si la batterie est complètement
chargée, cette lampe peut provider jusqu’à 300 cycles de 30 secondes lorsque le
cadran TIME est dans la position moyenne (de 30 secondes).
Cet unit possède aussi une batterie au lithium-ion rechargeable 3.7V.4.4Ah. Il faut la
remplacer lorsque la capacité de charger est faible.
INSTRUCTIONS D’INSTALLATION ET DE
FONCTIONNEMENT
Modèle #s: 44640-B & 44641-B
LAMPE SOLAIRE DE SÉCURITÉ

10
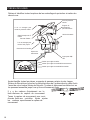
4 vis et ancrages pour
monter le panneau solaire
Câble électrique de 5
mètres
Panneau Solaire
2 vis et ancrages pour
monter l’unit propre
Couvercle de la lumière
Capteur de
mouvement
Pivot du panneau
solaire
Support de
montage du
panneau solaire
Unit de la batterie
Interrupteur ON/
OFF
Après identifier toutes les pièces, connectez le panneau solaire à votre Lampe
Solaire de Sécurité par brancher le câble électrique de 5 mètres dans le câble fixé à
l’avant de votre Lampe Solaire de Sécurité. Tournez et détournez les câbles tout en
les poussant ensemble jusqu’à ce qu’ils sont fermement fixés.
Il y a les cadrans d’ajustement sur la
face inferieure du capteur de mouvement.
Tenez le capteur de mouvement pour avoir
d’accès facile aux contrôles. Après ajuster
les cadrans, repositionnez le capteur de
mouvement.
Cadran pour régler la durée.
Cadran pour régler la sensibilité de mouvement
Cadran pour régler la sensibilité de lumière
PIÈCES INCLUSES
Retirez et Identifiez toutes les pièces de leur emballage de protection et mettez-les
devant vous.

11
CHOIX DE L’EMPLACEMENT DE VOTRE LAMPE SOLAIRE DE SÉCURITÉ
Cette Lampe Solaire de Sécurité vient avec un panneau solaire attaché d’un câble
électrique de 5 mètres. Pour la meilleure exposition au soleil, installez le panneau
solaire dans une position qui reçoit 6-8 heures du soleil par jour. Si vous placez le
panneau solaire dans une position à l’ombre, la batterie ne pourra pas complètement
charger. Cela permettra de réduire le nombre d'heures que la lampe peut être
utilisée chaque soirée. Vérifiez que l’emplacement de votre Lampe Solaire de
Sécurité est loin des autres sources de lumière de nuit comme des réverbères.
Ce produit est ideal pour les espaces sans électricité y compris les allées, les abris
d'auto, les garages et les portes d'entrée – pour la sécurité autour de votre maison.
En décidant l'emplacement de montage de la lampe, tenez compte que le capteur
de mouvement a un champ de vision de 180 ° (horizontal) à une distance de
12 mètres si Ie température ambiante est de 23 degrés celsius. La
température extérieure aura une incidence sur la distance de détection.
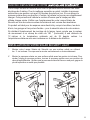
INSTALLATION DE VOTRE SOLAR SECURITY LIGHT
1.
Montez votre Lampe Solaire de Sécurité sur une surface solide en utilisant
les 2 vis incluses. Vous pouvez la monter verticalement ou horizontalement.
2.
Monter le panneau solaire sur une surface solide avec les quatre vis incluses. Pour
ajuster l’angle du panneau solaire, tournez le panneau solaire vers une position de
verrouillage différente. Vérifiez que le panneau solaire fait face au sud pour gagner le
plus d’exposition au soleil que possible.
SUD
TOIT
MUR
SUD
TOIT
MUR

12
OUTILS REQUIS POUR L’INSTALLATION
Si vous voulez monter votre Lampe Solaire de Sécurité sur le bois, vous
n’avez besoin d’un tournevis cruciforme. Si vous la montez sur le béton, la
brique, ou toutes les autres surfaces dures, vous devez utiliser une perceuse
pour créer les trous.
1.
Vérifiez que l’interrupteur d’énergie est à la position OFF et que le panneau solaire
est connecté à la lumière. Dans cette position, le panneau solaire peut charger la
batterie sans activer la lumière.
2.
Pendant 3 jours, laissez la lumière à OFF et mettez le panneau solaire sous le soleil,
pour charger complètement la batterie dans votre Lampe Solaire de Sécurité avant
ajuster le capteur de mouvement.
UTILISATION DE VOTRE LAMPE SOLAIRE DE SÉCURITÉ
Après la charger, tournez l’interrupteur à la position AUTO. La lampe doit immédiatement
s’allumer quelles que soient les conditions d’éclairage et de mouvement. C’est un test
d’activation qui se passe chaque fois que vous tournez l’interrupteur à la position AUTO.
Il dure pour 30 secondes. Après le test, laissez l’interrupteur à AUTO. Votre Lampe
Solaire de Sécurité est maintenant prête à utiliser.
En dessus du capteur de mouvement, il y a 2 cadrans d’ajustement : TIME/SENS/LUX.
L’usine prérègle la lumière comme ceci :
TIME Mis à 30 secondes.
SENS Mis à une gamme de 5-6 mètres.
LUX Mis pour activer votre Lampe Solaire de Sécurité au crépuscule en détectant
les mouvements.
les mouvements.
Vous pouvez ajuster tous les réglages du capteur en suivant ces directions.
AJUSTEMENT DE LA DURÉE (TIME)
Le cadran TIME règle la durée de la lumière après détecter les mouvements. La lampe
peut rester allumée pendant 10 secondes à 1 minute.
Pour diminuer la durée, tournez le cadran vers le symbole (–).
Pour augmenter la durée, tournez le cadran vers le symbole (+).
Pour tester la durée de la lumière, activez le capteur de mouvement et comptez combien
de temps qu’elle reste allumée. Vous pouvez continuer à ajuster le cadran TIME pour
atteindre la durée désirée.
Pour les meilleurs résultats, utilisez la position de TIME la plus courte que possible, et
vous conserverez aussi la batterie.
AVANT L’UTILISATION DE VOTRE LAMPE SOLAIRE DE SÉCURITÉ

13
AJUSTEMENT DU CAPTEUR DE MOUVEMENT (SENS)
Le capteur de mouvement de cette Lampe Solaire de Sécurité est thermosensible.
S’il fait froid, le capteur deviendra plus sensible aux mouvements. Pour compenser
les variations de température, utilisez le cadran SENS. Si le cadran SENS est
dans la position (+), le capteur est le plus sensible aux mouvements.
Pour diminuer la sensibilité, tournez le cadran vers le symbole (–).
Pour augmenter la sensibilité, tournez le cadran vers le symbole (+).
Pour tester la sensibilité de mouvement, positionnez le capteur face à la zone
désirée. Tournez le cadran TIME au minimum (–) et le cadran LUX à maximale ().
Marchez lentement dans la zone de détection jusqu’au moment où la lampe s’allume. Si
la lampe ne s’allume pas, ajustez l’angle du capteur de mouvement. Apportez
les ajustements nécessaires pour atteindre la sensibilité désirée. Après, réajustez
les cadrans TIME et LUX aux positions originales.
AJUSTEMENT DE LA LUMIÈRE
Le cadran LUX règle le niveau de lumière auquel Lampe Solaire de Sécurité
s’allume. Votre Lampe Solaire de Sécurité est préréglée pour l’activation au
crépuscule. Si vous préférez que votre lampe s’allume pendant la journée, tournez le
cadran vers le symbole du soleil. Si vous préférez que votre Lampe Solaire de Sécurité
ne s’allume que dans l’obscurité, tournez le cadran vers le symbole de la lune.
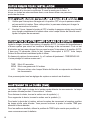
REMPLACEMENT DE LA BATTERIE
Vous pouvez remplacer la batterie si sa capacité de charger se diminue. Pour
changer la batterie, suivez ses étapes :
Compartiment de
la batterie
1.
Retirez la unit principal de la base et débranchez le panneau solaire.
2.
Tournez l’interrupteur ON/OFF à la position OFF.
3.
Retirez les 4 vis qui maintiennent ensemble les deux moitiés à l’arrière de l’unit
principal.

14
4.
Après ouvrir l’unit, retirez doucement le support qui maintient les batteries par
dévisser les deux vis indiqué dans le diagramme ci-dessus.
5.
Débranchez doucement le bloc de batteries de l’unit. Tirez-le sur la base de la fiche.
Ne tirez pas sur les câbles parce que vous pouvez endommagez l’unit.
6.
Retirez doucement le bloc de batteries et remplacez les batteries vieilles avec les
nouvelles. Il faut utiliser un bloc de batteries 3.7V / 4.4Ah lithium-ion (vous pouvez
acheter un nouveau bloc de batteries de MAXSA Innovations). La fiche ne rentre
que dans une orientation. Ne forcez pas la fiche. Si la fiche ne rentre pas, tournez la
fiche jusqu'à ce qu'elle corresponde à la fin de réception de la carte de circuit.
7.
Remplacez le support du bloc de batteries en utilisant les deux vis retirées à l’étape 4.
8.
Réassemblez l’unit principale par visser ensemble ses deux moitiés.
9.
Montez votre Lampe Solaire de Sécurité à sa surface d’origine.
10.
Il faut répéter les étapes de la section « Avant l’utilisation de votre Lampe Solaire de
Sécurité. »
ATTENTION : Ne jetez pas le bloc de batteries dans la poubelle ou feu (Il peut exploser).
Consultez vos réglementations locales pour l’élimination correcte de la batterie. Vous pouvez
rendre le bloc de batteries a MAXSA Innovations à l’adresse 8412 Cathedral Forest Dr,
Fairfax Station, VA 22039. Ne démontez pas le bloc de batteries qui contient des produits
chimiques corrosifs.
CONSEILS D’ENTRETIEN
Les ampoules DEL dans votre Lampe Solaire de Sécurité durent 30,000 heures. Il n’est
pas nécessaire de les remplacer.
Pour maintenir votre Lampe Solaire de Sécurité, nettoyez la lentille de la poussière.
Essuyez-la avec un chiffon sec.
Il faut protéger le panneau solaire de la poussière et les débris. Si le panneau solaire est
salle, il ne peut pas charger complètement les batteries. Ceci peut diminuer la durée des
batteries et endommager la lumière.
STOCKAGE
Si vous voulez entreposer votre Lampe Solaire de Sécurité à l’intérieur pendant un
période de plus de deux jours, tournez l’interrupteur à la position OFF pour éviter les
dommages à la batterie. L’entreposage prolongé peut réduire la capacité de la batterie.
RALLONGE ÉLECTRIQUE
Vous pouvez acheter une rallonge électrique au prix $14.95. Cette rallonge électrique
vous laisse installer le panneau solaire loin de la lumière pour assurer l’exposition
maximale du soleil.

15
RÉSOLUTION DE PROBLÈMES TYPIQUES
PROBLÈME RÉSOLUTIONS POSSIBLES
La lampe ne
s’allume pas
après détecter
les
mouvements :
•Vérifiez que l’interrupteur est dans la position AUTO.
•Vérifiez que vous avez installé le capteur de mouvement dans
une position où il fait face aux mouvements.
•Vérifiez que vous avez chargé la batterie dans le soleil
pendant un période de 3 jours.
•Vérifiez que le panneau solaire fait face au sud pour recevoir
le plus de soleil que possible.
•Vérifiez que l’interrupteur LUX est dans la position vers le
symbole du soleil.
•Vérifiez que le capteur de mouvement est loin des autres
sources de lumière.
La lampe s’allume
pendant la
journée :
•Le cadran LUX peut être trop proche du symbole de soleil.
•Réinstallez le capteur de mouvement.
La lampe
s’allume sans
détecter les
mouvements :
•Verifiez que le cadran SENS est proche du symbole (+).
•Verifiez qu’il n’y a pas des arbres, des voitures, ou des
animaux bougeant dans la zone de détection. Essayez de
réinstaller le capteur dans une position loin des mouvements
habituels.
•S’il y a des surfaces réflectives dans la zone de détection
comme des fenêtres, une piscine ou des murs blancs,
réinstallez le capteur.
La lumière
s’allume et
s’étendre
rapidement :
•Chargez les batteries pour 3 jours tout en plaçant le
panneau dans le soleil.
•Positionnez le cadran LUX vers le symbole ().
La brillance de la
lumière est faible
•Il est possible que la charge de la batterie soit basse.
Tournez l’interrupteur ON/OFF à la position OFF et chargez
les batteries pendent trois jours ensoleillés tout en vérifiant
que le panneau solaire est placé au soleil direct.

16
GARANTIE LIMIT ÉE D’UN ANNÉE
Ce produit est garanti contre le matériel défectueux et malfaçons pour un période d’un
année après l’achat. Avec cette garantie, l’obligation du fabriquant est limitée à l’entretien
et la réparation des pièces défectueuses, si vous rendez l’unit à MAXSA Innovations
pendant la période de la garantie. Le client doit aussi payer l’expédition. Il faut rendre le
reçu d’achat avec le produit.
Cette garantie devient nulle si l’unit est altéré ou endommagé par l’accident ou par la
mauvaise utilisation. Cette garantie accompagne toutes les garanties qui sont implicites
par l'Etat ou de la législation fédérale
FABRIQUÉ EN CHINA
MAXSA Innovations, LLC
8412 Cathedral Forest Drive
Fairfax Station, VA 22039
Tel: 703-495-0661
www.maxsainnovations.com
v15-3
©2015 MAXSA Innovations, LLC

9
IMPORTANTE: LEA TODAS LAS INSTRUCCIONES CUIDADOSAMENTE ANTES DE USAR.
ACERCA DE SU LUZ SOLAR DE SEGURIDAD
La batería incluida tendrá que ser sustituido cuando se disminuye la capacidad de
carga.
ESPAÑOL
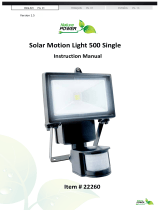
LUZ SOLAR DE SEGURIDAD ACTIVADO POR EL MOVIMIENTO
Durante el día, el panel solar incluido en esta unidad de seguridad recarga la batería.
Con esta energía guardada, las luces LED se encienden automáticamente por la noche
cuando detectan movimiento. Esta luz solar de seguridad tiene un marcador de tiempo
ajustable que permite la duración de luz. Cuando la batería está completamente cargada,
la luz solar de seguridad se encenderá durante un máximo de 100 minutos, lo que
equivale a 100 ciclos de un minuto cuando el botón giratorio de tiempo (TIME) está
ajustado en la posición máxima (+).
INSTRUCCIONES GENERALES DE INSTALACIÓN Y
FUNCIONAMIENTO PARA EL MODELOS 44640-B Y 44641-B
Modelo #s: 44640-B & 44641-B

10
Retire con cuidado e identifique todas las piezas del envase protectiva y ponlas en frente
de usted.
PIEZAS INCLUIDAS:
Tornillos y tacos
para montaje en
panel solar
Cable de
alimentacíon
Panel Solar
Tornillos y anclajes
para montaje en
panel solar
Cubierta de la luz
Sensor de
movimiento
Para el
ajustamiento de
montaje
El panel solar
soporte de
montaje
Unidad de la
batería principal
AUTO/OFF
interruptor
Una vez que haya identificado todas las piezas, conecte el panel solar a la luz solar
de seguridad a través del cable de 15 pies al cable localizado en la parte delantera
de la luz solar de seguridad. Gire las cuerdas
mientras presione con fuerza hasta que se unen
fuertemente.
Botones giratorios de ajuste se encuentran en la
parte inferior del sensor de movimiento. Mueva
el sensor de movimiento para permitir un acceso
más fácil a los controles. Coloque el sensor de
movimiento en su posición original al terminar.
Botón de ajuste para el tiempo de duración
Botón de ajuste de sensibilidad de movimiento
Botón de ajuste de sensibilidad a la luz

11
ELIGIENDO UN LUGAR PARA LA LUZ SOLAR DE SEGURIDAD
Esta luz solar de seguridad viene con un panel solar conectado a un cable de 15 pies.
Para una óptima exposición solar y una máxima iluminación de luz, coloque el panel solar
en una posición que recibe por lo menos 6-8 horas de luz solar al día. Colocación del
panel solar en un lugar con sombra o incluso detrás de una ventana no permitirá que la
batería se cargue completamente, reduciendo el número de horas que la luz funcionará
por la noche. Asegúrese de que el luminaria solar no se coloca cerca de fuentes de luz
po r la noche, como una iluminación pórtico o alumbrado público de la calle.
Esta luz solar de seguridad es ideal para la iluminación de áreas donde la electricidad no
está disponible - incluyendo porches, cocheras, caminos exteriores, garajes y zonas de
entrada - para la seguridad alrededor de su casa.
Al decidir dónde montar la luz, tener en cuenta que el sensor de movimiento
tiene un campo de visión de 180 º (horizontal) a una distancia de hasta 12.2
medidors (40 pies) cuando la temperatura ambiental es de 24°C (75°F). La
temperatura exterior tendrá un impacto en la distancia de detección.
CÓMO INSTALAR SU LUZ SOLAR DE SEGURIDAD
1. Monte la luz de seguridad sobre una superficie sólida, usando los dos (2) tornillos
de chapa metálica/para madera incluidos. Pueda montar la luz de seguridad, ya sea
vertical o horizontalmente.
2. Use los cuatro (4) tornillos de chapa metálica/para madera incluidos para montar el
panel solar sobre una superficie sólida. Se puede ajustar el ángulo del panel solar
girando suavemente el panel solar a una posición diferente. Recuerde que debe
posicionar el panel al sur para la exposición directa al sol.

12
HERRAMIENTAS NECESARIAS PARA LA INSTALACIÓN
Instalación sencilla con sólo un destornillador Phillips!
Taladro eléctrico opcional.
ANTES DE USAR LA UNIDAD DE SEGURIDAD PRIMERO
1. Asegúrese de que el interruptor en el cuerpo principal de la luz de seguridad está en
la posición OFF. En esta posición, el panel solar cargará la batería sin que se active
la unidad.
2. Deje el interruptor en la posición OFF durante 3 días con el panel solar colocado
directamente a la luz solar. Esto asegurará que la batería de su luz solar de
seguridad tenga una carga completa antes de ajustar el sensor de movimiento y el
funcionamiento normal.
FUNCIONAMIENTO DE SU LUZ SOLAR DE SEGURIDAD
Después de la carga inicial de 3 días de su luz solar de seguridad, mueva el interruptor
en el cuerpo principal a la posición AUTO. Al hacer esto, la luz debe activar de
inmediatamente. No importan las condiciones de iluminación o movimiento. Esta es una
activación de prueba para demostrar que la carga fluye de la bacteria. La luz debe durar
unos 30 segundos. Después de la prueba, la luz funcionará en base a los controles de
ajustes mencionado. Su luz solar de seguridad está listo para su uso.
Por debajo del sensor de movimiento, hay 3 botones giratorios de ajuste: TIME / SENS /
LUX. La luz ha sido ajustado en la fábrica de la siguiente manera:
TIME Establecido a 30 segundos.
SENS Fijado en un 10 a 15 metros de alcance (cuando la temperatura ambiental es
de 75 F).
LUX Ajustado para que su luz de seguridad se activará al atardecer, cuando se
detecta movimiento.
Si las opciones anteriores no son adecuados para su aplicación, éstos se pueden ajustar
mediante los pasos siguientes.
AJUSTE DEL PERIODO DE TIEMPO (TIME)
El botón giratorio del tiempo establece la duración de la luz con cada activación, la luz
solar de seguridad permanecerá iluminada después del último movimiento detectado. El
período de tiempo tiene un rango ajustable de 10 segundos hasta un minuto.
Para reducir el período de tiempo, mueva el botón giratorio hacia el símbolo (-).
Para aumentar el período de tiempo, mueva el botón giratorio hacia el símbolo (+).
Pruebe el período de tiempo al activar el sensor de movimiento y mide el período de
tiempo que la luz permanece encendida. Ajuste el control del tiempo (TIME) hasta que
alcance la duración de iluminación deseado.
Un ajuste de un tiempo mas corto conservará la vida de la pila. Para obtener los mejores
resultados, utilice la menor configuración de tiempo posible para su luga
La page est en cours de chargement...
La page est en cours de chargement...
La page est en cours de chargement...
La page est en cours de chargement...
-
 1
1
-
 2
2
-
 3
3
-
 4
4
-
 5
5
-
 6
6
-
 7
7
-
 8
8
-
 9
9
-
 10
10
-
 11
11
-
 12
12
-
 13
13
-
 14
14
-
 15
15
-
 16
16
-
 17
17
-
 18
18
-
 19
19
-
 20
20
-
 21
21
-
 22
22
-
 23
23
-
 24
24


Maxsa Innovations 44641 Le manuel du propriétaire
- Taper
- Le manuel du propriétaire
dans d''autres langues
Documents connexes


Autres documents
-
Pinegreen Lighting CL-SML2ST Manuel utilisateur
-
-
 Nature Power 22245 Manuel utilisateur
-
Defiant 2100W Guide d'installation
-
Nature Power 22060 Le manuel du propriétaire
-
 Nature Power 22260 Mode d'emploi
-
 Nature Power 22054 Manuel utilisateur
-
-
Sunforce 82256 Manuel utilisateur
-


