Episode R48ESSBR21BLK Manuel utilisateur
- Catégorie
- Haut-parleurs de la barre de son
- Taper
- Manuel utilisateur
Ce manuel convient également à

OWNER’S MANUAL
ActivE SOUNdbAR SyStEM With WiRELESS SUbWOOfER
ES-SNdbR-2.1-bLK
REAL. LIFE. SOUND.

2
1. READ these instructions.
2. KEEP these instructions.
3. HEED all warnings.
4. FOLLOW all instructions.
5. DO NOT use this apparatus near water.
6. CLEAN ONLY with dry cloth.
7. DO NOT block any ventilation openings. Install in accordance
with the manufacturer’s instructions.
8. DO NOT install near any heat sources such as radiators, heat
registers, stoves, or other apparatus (including amplifiers) that
produce heat.
9. DO NOT defeat the safety purpose of the polarized or grounding
type plug. A polarized plug has two blades with one wider
than the other. A grounding type plug has two blades and
a third grounding prong. The wider blade or the third prong
are provided for your safety. If the provided plug does not fit
into your outlet, consult an electrician for replacement of the
obsolete outlet.
10. PROTECT the power cord from being walked on or pinched,
particularly at plugs, convenience receptacles, and the point
where they exit from the apparatus.
11. ONLY USE attachments/accessories specified by the
manufacturer.
12. USE ONLY with the cart, stand, tripod, bracket,
or table specified by the manufacturer, or
sold with the apparatus. When a cart is used,
use caution when moving the cart/apparatus
combination to avoid injury from tip-over.
13. UNPLUG this apparatus during lightning
storms or when unused for long periods of time.
14. REFER all servicing to qualified service personnel. Servicing is
required when the apparatus has been damaged in any way,
such as power-supply cord or plug is damaged, liquid has been
spilled or objects have fallen into the apparatus, the apparatus
has been exposed to rain or moisture, does not operate
normally, or has been dropped.
15. To reduce the risk of fire or electric shock, do not expose this
apparatus to rain or moisture. The apparatus shall not be
exposed to dripping or splashing and that objects filled with
liquids, such as vases, shall not be placed on apparatus.
16. To completely disconnect this apparatus from the AC mains,
disconnect the power supply cord plug from the AC receptacle.
17. The mains plug/appliance coupler is used as disconnect device,
the disconnect device shall remain readily operable.
18. DO NOT overload wall outlets or extension cords beyond their
rated capacity as this can cause electric shock or fire.
19. No naked flame sources, such as lighted candles, should be
placed on the apparatus.
20. Correct Disposal of this product. This marking indicates that this
product should not be disposed with other household wastes
throughout the EU. To prevent possible harm to the environment
or human health from uncontrolled waste disposal, recycle
it responsibly to promote the sustainable reuse of material
resources. To return your used device, please use the return and
collection systems or contact the retailer where the product was
purchased. They can take this product for environmental safe
recycling.
21. This equipment is a Class II or double insulated electrical
appliance. It has been designed in such a way that it does not
require a safety connection to electrical earth. (for wireless
subwoofer unit)
WARNING: To reduce the risk of fire or electrical shock, do not expose this
apparatus to rain or moisture.
WARNING: No naked flame sources – such as candles – should be placed
on the product.
THIS PRODUCT CONTAINS A LITHIUM COIN CELL BATTERY. IF MISUSED OR
ABUSED THIS CAN RESULT IN:
• Smoke or gas hazard • Heat hazard • Fire hazard • Explosion hazard
WARNING: Do not place batteries in mouth or ingest.
Chemical burn hazard. Keep new and used batteries out of reach of chil-
dren and pets. If swallowed, it can cause severe internal burns in just 2
hours and can lead to death.
If you think batteries might have been swallowed or placed inside any part
of the body, seek immediate medical attention.
WARNING: If battery compartment does not close securely, stop using the
product and keep it away from children and pets.
WARNING: Do not handle leaking or damaged Lithium batteries.
WARNING: Risk of leakage. Only use the specified type of batteries. Never
mix new and used batteries. Observe correct polarity. Remove batter-
ies from products that are not in use for extended periods of time. Store
batteries in a dry place.
WARNING: Batteries (battery pack or batteries installed) shall not be
exposed to excessive heat such as sunshine, fire or the like.
WARNING: Danger of explosion if battery is incorrectly replaced. Replace
only with the same or equivalent type.
WARNING: Do not recharge non-rechargeable batteries.
WARNING: Avoid exposure to extreme heat or cold. Please dispose of any
used batteries properly, following any local regulations. Do not incinerate.
WARNING: Do Not Open! Risk of Electrical Shock. Voltages in this equip-
ment are hazardous to life. No user-serviceable parts inside. Refer all
servicing to qualified service personnel.
Place the equipment near a main power supply outlet and make sure that
you can easily access the power breaker switch.
WARNING: This product is intended to be operated ONLY from the AC Volt-
ages listed on the back panel or included power supply of the product.
Operation from other voltages other than those indicated may cause irre-
versible damage to the product and void the products warranty. The use
of AC Plug Adapters is cautioned because it can allow the product to be
plugged into voltages in which the product was not designed to operate. If
the product is equipped with a detachable power cord, use only the type
provided with your product or by your local distributor and/or retailer. If
Important Safety Instructions
CAUTION
RISK
OF
ELECTRIC
SHOCK!
DO
NOT
OPEN!
ATTENTION ! RISQUE DE CHOC
!
ÉLECTRIQUE PAS OUVRIR
!
1) Read these instructions.
2) Keep these instructions.
3) Heed all warnings.
4) Follow all instructions.
5) Do not use this apparatus near water.
6) Clean only with dry cloth.
7) Do not block any ventilation openings. Install in
accordance with the manufacturer's instructions.
8) Do not install near any heat sources such as
radiators, heat registers, stoves, or other apparatus
(including amplifiers) that produce heat.
9) Do not defeat the safety purpose of the polarized or
grounding-type plug. A polarized plug has two blades
with one wider than the other. A grounding type plug
has two blades and a third grounding prong. The
wide bladed or the third prong are provided for your
safety. If the provided plug does not fit into your
outlet, consult an electrician for replacement of the
obsolete outlet.
10) Protect the power cord from being walked on or
pinched particularly at plugs, convenience
receptacles, and the point where they exit from the
apparatus.
11) Only use attachments/accessories specified by the
manufacturer.
12) Use only with the cart, stand, tripod, bracket, or
table specified by the
manufacturer, or sold with the
apparatus. When a cart is used, use
caution when moving the
cart/apparatus combination to avoid
injury from tip-over.
13) Unplug this apparatus during lightning storms or
when unused for long periods of time.
14) Refer all servicing to qualified service personnel.
Servicing is required when the apparatus has been
damaged in any way, such as power-supply cord or
plug is damaged, liquid has been spilled or objects
have fallen into the apparatus, the apparatus has
been exposed to rain or moisture, does not operate
normally, or has been dropped.
15) The equipment shall be used at maximum 35
degree C ambient temperature.
16) Do not open the equipment to reduce the risk of
electrical shock. For safety reasons it is only
allowed to the opened by qualified service
personnel.
17) WARNING: To reduce the risk of fire or electric
shock, do not expose this apparatus to rain or
moisture. And the apparatus shall not be exposed
to dripping or splashing and that no objects filled
with liquids, such as vases, shall be placed on the
apparatus.
18) The APPLIANCE INLET plug is used as the
disconnect device and shall remain readily
operable.
19) The product shall be used on open bench.
The lightning flash with arrowhead symbol, within an equilateral
triangle, is intended to alert the user to the presence of
uninsulated dangerous voltage within the product's enclosure
that may be of sufficient magnitude to constitute a risk of
electric shock to persons.
The exclamation point within an equilateral triangle is intended
to alert the user to the presence of important operating and
maintenance (servicing) instructions in the literature
accompanying the appliance.
ATTENTION ! RISQUE DE CHOC ! ÉLECTRIQUE PAS OUVRIR !
CAUTION
Risk of Electrical Shock!
DO NOT OPEN!
!
The lightning flash with arrowhead symbol within an
equilateral triangle is intended to alert the user to the
presence of uninsulated “dangerous voltage” within the
product’s enclosure that may be of sufficient magnitude to
constitute a risk of electrical shock to persons.
The exclamation point, within an equilateral triangle, is
intended to alert the user to the presence of important
operating and maintenance (servicing) instructions in the
literature accompanying the product.
!

3
you are unsure of the correct operational voltage, please contact your local
distributor and/or retailer.
is equipment complies with FCC radiation exposure limits set forth for an
uncontrolled environment. is equipment should be installed and operated
with minimum distance 20cm between the radiator & your body.
EU COMPLIANCE INFORMATION
Eligible to bear the CE mark; Conforms to European Union Low Voltage
Directive 2006/95/EC; European Union EMC Directive 2004/108/EC; Euro-
pean Union Restriction of Hazardous Substances Recast (RoHS2) Direc-
tive 2011/65/EC; European Union WEEE Directive 2002/96/EC; European
Union Eco-Design Directive 2009/125/EC; European Union registration,
Evaluation, Authorization and Restriction of Chemicals (REACH) Directive
2006/121/EC; European Union Radio and Telecommunications Terminal
Equipment (R&TTE) Directive 1999/5/EC.
This product contains batteries that are covered under the 2006/66/EC
European Directive, which cannot be disposed of with normal household
waste. Please follow local regulations.
You may obtain a free copy of the Declaration of Conformity by contacting
your dealer, distributor or worldwide headquarters.
WEEE NOTICE
Note: This mark applies only to countries within the European Union (EU)
and Norway.
This appliance is labeled in accordance with European Direc-
tive 2002/96/EC concerning waste of electrical and electronic equipment
(WEEE). This label indicates that this product should not be disposed of
with household waste. It should be deposited at an appropriate facility to
enable recovery and recycling.
Federal Communication Commission Interference Statement
This device complies with Part 15 of the FCC Rules. Operation is subject
to the following two conditions: (1) This device may not cause harmful
interference, and (2) this device must accept any interference received,
including interference that may cause undesired operation.
This equipment has been tested and found to comply with the limits for a
Class B digital device, pursuant to Part 15 of the FCC Rules. These limits
are designed to provide reasonable protection against harmful interfer-
ence in a residential installation. This equipment generates, uses and can
radiate radio frequency energy and, if not installed and used in accordance
with the instructions, may cause harmful interference to radio communi-
cations. However, there is no guarantee that interference will not occur in
a particular installation. If this equipment does cause harmful interference
to radio or television reception, which can be determined by turning the
equipment off and on, the user is encouraged to try to correct the interfer-
ence by one of the following measures:
• Reorient or relocate the receiving antenna.
• Increase the separation between the equipment and receiver.
• Connect the equipment into an outlet on a circuit different from that
to which the receiver is connected.
• Consult the dealer or an experienced radio/TV technician for help.
Approved under the verification provision of FCC Part 15 as a Class B
Digital Device.
Caution: Changes or modifications not expressly approved by the manu-
facturer could void the user’s authority to operate this device.
Caution: To comply with the limits of the Class B digital device, pursuant
to Part 15 of the FCC Rules, this device is to comply with Class B limits. All
peripherals must be shielded and
grounded. Operation with non-certified peripherals or non-shielded cables
my result in interference to radio or reception.
Radiation Exposure Statement:
This equipment complies with FCC radiation exposure limits set forth for
an uncontrolled environment. This equipment should be installed and
operated with minimum distance 20cm between the radiator & your body.
Note: The country code selection is for non-US model only and is not avail-
able to all US model. Per FCC regulation, all WiFi product marketed in US
must fixed to US operation channels only.
This Class B digital apparatus complies with Canadian ICES-003. CAN ICES-3 (B)/
NMB-3(B)
WIRELESS TRANSMITTER COMPLIANCE INFORMATION
The term “IC:” before the radio certification number only signifies that
Industry Canada technical specifications were met.
This device complies with part 15 of the FCC Rules and the applicable
Industry Canada license-exempt RSS standard(s). Operation is subject to
the following two conditions: (1) this
device may not cause harmful interference, and (2) this device must
accept any interference, including interference that may cause undesired
operation of the device.
This equipment complies with FCC and IC radiation exposure limits set
forth for an uncontrolled environment. This equipment should be installed
and operated with minimum distance 20cm between the radiator and your
body. This transmitter must not be co-located or operating in conjunction
with any other antenna or transmitter.
PRÉCAUTIONS DE SÉCURITÉ IMPORTANTES A LIRE EN
PREMIER !
1. Lisez ces instructions.
2. Conservez ces instructions.
3. Tenez compte de tous les avertissements.
4. Suivez toutes les instructions.
5. N’utilisez pas cet appareil près de l’eau.
6. Nettoyez uniquement avec un chiffon sec.
7. Ne bouchez aucune ouverture de ventilation. Installez
conformément aux instructions du fabricant
8. Ne l’installez pas à proximité d’une source de chaleur telle
que des radiateurs, des bouches de chaleur, des fourneaux ou
d’autres appareils (y compris les amplificateurs) qui produisent
de la chaleur.
9. Ne détournez pas l’objectif de sécurité de la fiche polarisée ou
de mise à la terre. Une fiche polarisée a deux lames dont l’une
est plus large que l’autre. Une fiche avec mise à la terre a deux
lames et une troisième broche de mise à la terre. La lame large
ou la troisième broche sont conçues pour votre sécurité. Si la
fiche fournie ne s’insère pas correctement dans votre prise,
consultez un électricien pour le remplacement de la prise
obsolète.
10. Évitez de marcher sur le cordon secteur ou de le pincer, en
particulier au niveau des fiches, des prises de courant et à son
point de sortie de i
11. Utilisez seulement des compléments/accessoires spécifiés par
le constructeur.
12. Utilisez l’appareil seulement avec le chariot, pied, trépied,
support ou table spécifié par le constructeur, ou vendu avec
l’appareil. Lors de l’utilisation d’un chariot, faites attention en
déplaçant l’ensemble chariot/appareil afin d’éviter des blessures
dues à un basculement.
13. Débranchez cet appareil pendant les orages ou s’il est inutilisé
pendant de ‘algues périodes.
14. Confiez tous les travaux d’entretien à du personnel qualifié. Un
entretien est nécessaire si l’appareil a été endommagé d’une
façon quelconque, si le cordon ou la fiche d’alimentation sont
endommagés, si du liquide a été renversé sur l’appareil ou si des
objets sont tombés dedans, si l’appareil a été exposé à la pluie
ou à l’humidité, s’il ne fonctionne pas normalement ou s’il est
tombé.
15. L’appareil : ne doit pas être exposé à un égouttement ou à des
projections et aucun objet rempli de liquide, tel qu’un vase, ne
doit être placé sur .
16. Pour débrancher complètement cet appareil du secteur,
débranchez la fiche du cordon d’alimentation de la prise secteur.
17. La fiche secteur du cordon d’alimentation doit rester
immédiatement accessible.
18. Les piles ne doivent pas être exposées à une chaleur excessive
telle que le soleil, un feu ou un équivalent
AL’éclair avec un symbole fléché se trouvant dans un triangle équilatéral est
destiné à alerter l’utilisateur de la présence d’un cc voltage dangereux » non
isolé au sein du produit qui pourrait être d’une magnitude suffisante pour
constituer un risque de décharge électrique sur une personne.
ÀkLe point d’exclamation se trouvant dans un triangle équilatéral destiné
à alerter l’utilisateur de la présence de consignes de maintenance (entre-
tien) et d’utilisation importantes dans la documentation accompagnant le
produit. AVERTISSEMENT Pour réduire le risque d’incendie ou d’électrocu-
tion n’exposez pas cet appareil à la pluie ou à l’humidité
Legal Notice
Manufactured under license from Dolby Laboratories. Dolby and the
double-D symbol are registered trademarks of Dolby Laboratories.

4
INTRODUCTION
Thank you for purchasing one of our Episode™ speakers. To complete installation, follow these guidelines. Visit
our website for design recommendations and speaker calculators.
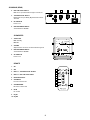
CONTENTS
• Soundbar
• Subwoofer
• Power cord (2)
• Analog audio cable
• Toslink cable
• Remote
• Wall bracket
• Wall Anchors (4)
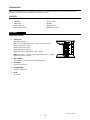
FEATURES
SOUND BAR
(
FRONT
)
1. SOURCE LED
Blue: Bluetooth input
Red: Solid - Standby; Blinks Once - Volume level at min/max;
Blinks Continuously - Muted
Green: Toslink optical input
Yellow: RCA Line Level Input
Purple: Blink Once - EQ Off; Blinks Twice - EQ On
White: Blink Once - Volume level changed; Blinks Twice - Dolby
Digital source being decoded
2. INPUT TOGGLE
Switch between all inputs; Digital, Analog, Bluetooth
3. VOLUME UP
Increase volume level
4. VOLUME DOWN
Decrease volume level
5. MUTE
No volume
Feaures cont’d...
3
2
5
4
1

5
SOUNDBAR
(
REAR
)
6. RCA LINE LEVEL INPUT 2
RCA stereo input with left and right connections.
7. TOSLINK OPTICAL INPUT 1
Digital optical input. Dolby Digital formats will be
decoded.
8. DC POWER IN
Power cord
9. MASTER POWER SWITCH
Switch between ON/OFF
SUBWOOFER
1. STATUS LED
Red: Standby
Blue: On
2. VOLUME
Adjust master volume to the desired listening level
3. MASTER POWER SWITCH
Switch between ON/OFF
4. AC POWER IN
Power cord
REMOTE
1. ON
2. OFF
3. INPUT 1
-
TOSLINK OPTICAL OUTPUT
4. INPUT 2
-
RCA LINE LEVEL INPUT
5. BLUETOOTH INPUT
6. VOLUME UP
Increase volume level
7. VOLUME DOWN
Decrease volume level
8. MUTE
No volume
9. EQ ON
10. EQ OFF
DIGITAL IN
1
DC IN
24V 2.5A
60W
POWER
OFF
ON
ANALOG IN
2
Factory
Use Only
R
L
6 7 8 9
21
4
3
This device complies with Part 15 of RCC Rules.
Operation is subject to the following two conditions.
(1) this device may cause harmful interference, and
(2) this device must accept any interference received,
including interference that may cause undesired operation.
CAN ICES-3 (B)/NMB-3 (B)
POWER
AC-100-240W
50/60Hz
90W
OFF ON
ES-SNDBR-2.1-BLK
Designed and Engineered in USA
Manufactured in China
VOLUMESTATUS
MIN
MAX
VOL
IN 2IN 1
OFFON
EQ
POWER
OFFON
1 2
3
4
6
7
8
9
10
5

6
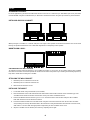
SETUP
SOUNDBAR PLACEMENT
For most applications, placement should be below a flat screen TV on a cabinet top or shelf. Other options for placement
include On-Wall using the included bracket, or attached to a Flat Panel mount using the optional Strong mount bracket.
INSTALLING ON OR IN A CABINET
When placing the soundbar on a cabinet shelf, the front edge of the speaker should be flush with the front of the shelf.
Placing the speaker further back on the shelf will degrade the sound quality of the speaker.
MOUNTING ON A WALL
CONSIDERATIONS FOR WALL MOUNTING
To maintain a proper listening experience, the soundbar should be as close to the TV as possible. Placing the soundbar
more than 3” from the screen will separate the audio from the video and provide a poor viewing and listening experience,
keep this in mind when locating the soundbar.
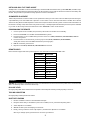
ATTACHING THE WALL BRACKET
1. Mark the position of the bottom of the TV.
2. Mark the position of the TV’s Center Point.
3. Remove the TV from the mount
INSTALLING THE MOUNT
1. Locate wall studs using a stud finder (not included).
2. Place the Bracket on the wall with the flat side towards the wall and the notched center mark facing up. The
Soundbar Center mark should be located at the center point of the installed television.
3. Position the Bracket Vertical Center v groove 2 1/8 ” from the bottom of the TV. This will place the soundbar
flush with the bottom of the TV when installed.
4. Level the bracket and attach it to the wall studs using the horizontal screwhole slots. All 4 screws should be
used, making sure to keep the bracket flat to the wall and securely attached.Note: If wall studs cannot be used,
wall mollies or anchors with the appropriate weight rating for the soundbar can be used.
5. Clip the soundbar onto the bracket, and center by adjusting left to right.

7
INSTALLING ON A FLAT PANEL MOUNT
The Episode 2.1 Soundbar can be mounted directly to a Flat Panel Mount with the Strong™ SM-SBAR-BKT (available sepa-
rately). Using the Flat Panel mount bracket allows for the speaker to move with the TV when mounted to articulating arm
mounts. This provides an optimum listening experience for these installations.
SUBWOOFER PLACEMENT
Subwoofer placement can have an effect on the performance that you receive. All rooms are different, but the strongest
output will likely occur if the subwoofer is placed in a corner of the room on the same wall as the soundbar. This is known
as the boundary effect and will emphasize certain bass frequencies while canceling others. Some listeners will find this to
be the best sounding result, while others may find it “boomy” or muddy. Experiment with the placement options available
to you and use the tuning instructions that follow in the “FINE TUNE” section of this manual.
PROGRAMMING THE REMOTE
1. Connect power to the soundbar, and press the power button to awaken it from standby.
2. Press and hold MUTE on soundbar until the LED flashes yellow.
3. Press the button on the soundbar that you wish to learn once (MUTE, VOLUME UP, VOLUME DOWN). LED will
now be solid yellow.
4. Press the button on the TV remote you are trying to learn (MUTE, VOLUME UP, VOLUME DOWN)
slowly four times (look for the LED to flash before pressing again).
5. LED will now blink green 6 times.
6. Repeat for until MUTE, VOLUME UP, VOLUME DOWN are learned.
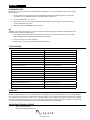
REMOTE CODES
Please visit the support tab of the product page for more information and available HEX codes.
COMMAND NEC CODE
ON 13EC
-
00
OFF 13EC
-
80
IN1 13EC
-
C0
IN2 13EC
-
40
BLUETOOTH 13EC
-
03
VOLUME + 13EC
-
E0
VOLUME
-
13EC
-
D0
MUTE 13EC
-
F0
EQ ON 13EC
-
08
EQ OFF 13EC
-
28
CONNECT
CAUTION: All connections and switching must be done with the device turned off. Connect power last to ensure that the
device is off during all the connections and set up.
RCA LINE LEVEL
Use high-quality RCA cables that feature low impedance with adequate shielding and high-quality connectors.
TOSLINK CONNECTION
Use high-quality toslink/optical audio cables.
BLUETOOTH PAIRING
1. Use the soundbar’s remote to select the bluetooth input.
2. Using the device that you would like to pair to the soundbar, access your bluetooth pairing menu.
3. Select “Episode 2.1 Soundbar”.
4. Wait till the device pairs and displays “Connected”.
5. Finally, select your device’s audio output options, and select the “Episode 2.1 Soundbar”.
Note: If you change inputs you will have to reconnect your devices.

FINE TUNE
SUBWOOFER LEVEL
After making all the connections and calibrating the loudspeakers, set up your Episode® subwoofer using the
following steps:
1. Connect power to the subwoofer. The status LED will illuminate solid red when power is present and
the subwoofer is on. LED will illuminate solid blue when soundbar is on.
2. Set volume dial at 50% or 12 o’clock.
3. Play a movie scene or music track and set the system volume to an average level. Listen to the bass
level from the listening position.
4. Adjust the subwoofer VOLUME control as desired.
EQ
The EQ is set to brings out the dialog to replicate a 3 channel setup with only two channels. Determine if the best
system settings using the following steps:
1. Play a movie scene during a acoustically chaotic scene and set the system volume to an average level
with the EQ off. Listen to the dialog from the listening position.
2. Listen to the same scene with the EQ on.
3. Repeat steps 1 & 2 until the preferred setting is determined.
WARRANTY
10/2-Year Limited Warranty
Episode® powered speakers have a 2-Year Warranty on the amplifier and a 10-Year Warranty on all other included devices
and accessories. This warranty includes parts and labor repairs on all components found to be defective in material
or workmanship under normal conditions of use. This warranty shall not apply to products which have been abused,
modified or disassembled. Products to be repaired under this warranty must be returned to SnapAV or a designated
service center with prior notification and an assigned return authorization number (RA).
CONTACTING TECHNICAL SUPPORT
Phone: (866) 838-5052
Email: Techsupport@snapav.com
SPECIFICATIONS
Tweeter Two - .75" Soft Dome
Woofer: Four - 3" Polypropylene
Subwoofer: 8" Polypropylene
Color: Black
Power Handling (Peak): 250 w
Frequency Response 35 Hz - 20 KHz
Input Power (Soundbar): 100-240 VAC, ~50/60 Hz, 1.8A
Input Power (Subwoofer): 100-240 VAC, ~50/60 Hz, 90W
Inputs: Digital Optical, RCA and Bluetooth Inputs
Subwoofer Adjustments: Volume, On/Off
Weight (Soundbar): 7.3 lbs
Weight (Subwoofer): 20.1 lbs
Grill Type: Acoustically Transparent Cloth
Soundbar Finished Dimensions 4.51" H x 43.9" W x 3.08" D
Soundbar Finished Dimensions incl Wall Mount Bracket 4.51" H x 43.9" W x 3.33" D
Subwoofer Finished Dimensions 9.88" W x 11.57" H x 12.96" D
Subwoofer Finished Dimensions incl Volume Knob 9.88" W x 11.57" H x 13.53" D
Sold As Each
Rev: 150204-1730
-
 1
1
-
 2
2
-
 3
3
-
 4
4
-
 5
5
-
 6
6
-
 7
7
-
 8
8


Episode R48ESSBR21BLK Manuel utilisateur
- Catégorie
- Haut-parleurs de la barre de son
- Taper
- Manuel utilisateur
- Ce manuel convient également à
dans d''autres langues
- English: Episode R48ESSBR21BLK User manual
Documents connexes
Autres documents
-
Klipsch HD Theater SB 3 Manuel utilisateur
-
Klipsch Icon SB 1 Le manuel du propriétaire
-
-
Novation Launchkey Mini MK2 Mode d'emploi
-
AMX MVP-9000i Mode d'emploi
-
Sanyo FWSB415E A Setup Manual
-
Magnavox MSB3610/F7 Guide de démarrage rapide
-
Paradigm Soundplay Manuel utilisateur
-
 MartinLogan Verse Manuel utilisateur
-
Paradigm PW Soundbar Manuel utilisateur
