Dorel Home 4654439 Assembly Manual
- Catégorie
- Supports d'équipement audiovisuel
- Taper
- Assembly Manual
Ce manuel convient également à

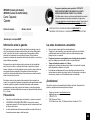
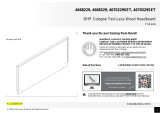
Questions, concerns, missing parts?
CONTACT OUR CUSTOMER SERVICE DEPARTMENT
BEFORE RETURNING PRODUCT TO THE RETAILER.
4654439 (Textured Gray Canvas)
4658339 (Textured Ivory Canvas)
B34465443900-KT
Date of Purchase
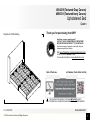
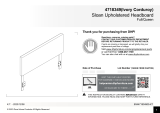
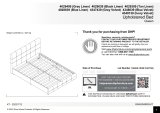
Upholstered Bed
KT - 2023/7/12
If parts are missing or damaged, we will gladly ship your
replacement parts free of charge.
Lot Number (TAKEN FROM CARTON)
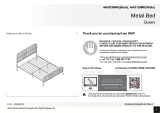
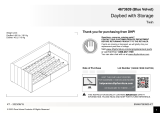
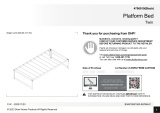
Thank you for purchasing from DHP!
THIS INSTRUCTION BOOKLET CONTAINS IMPORTANT SAFETY
INFORMATION. PLEASE READ AND KEEP FOR FUTURE REFERENCE.
1
2023 Dorel Home Products All Rights Reserved
Queen
Visit www.dhpfurniture.com/eng/replacement-parts
or call Toll-Free 1-800-267-1739
You can also chat with us at www.dhpfurniture.com
Weight Limit:1000Lb/454Kg

2
1-800-267-1739
DHP Consumer Services
12345 Albert Hudon, Suite 100,
Montreal, Quebec H1G 3L1
cs@dhpfurniture.com
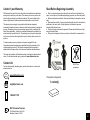
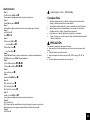
Work in a spacious area and near where the unit will be used, preferably on a
carpet, or use a piece of the cardboard packaging to protect your floor and product.
Make sure all parts are included. Most parts are labeled or stamped on the raw
edge.
Read each step carefully. It is very important that each step of the instructions is
performed in the correct order. If these steps are not followed in sequence,
assembly difficulties will occur.
This product may contain small components. Please ensure that they are kept
away from small children.
This product is designed for home use and is not intended for commercial use.
For help with assembly, identifying parts, product information or to order parts,
please contact us:
Limited 1 year Warranty
DHP warrants this product to be free from defects in material and workmanship
and agrees to remedy any such defect. This warranty covers one year from the
date of original purchase from authorized retailers. This is solely limited to the
repair or replacement of defective parts and assembly labor is not included.
This warranty does not apply to any product which has been improperly
assembled, subjected to misuse or abuse or which has been altered or repaired in
any way.The warranty does not cover wearing, tearing, fading or splitting of the
fabric (where applicable). Liability for consequential damages is excluded to the
extent exclusion is permitted by law. This warranty gives you specific legal rights
and you may also have other rights which vary from state to state or province to
province.
To obtain warranty service, purchaser must present original bill of sale.
Components repaired or replaced are warranted through the remainder of the
original warranty period only. The defective components will be repaired or
replaced without charge, subject to the terms and conditions described above.
The terms and conditions of the limited warranty are subject to change without
notice. For the latest warranty policy, please visit www.dhpfurniture.com.
Contact Us!
Read Before Beginning Assembly
1.5 hours
Do NOT use
powertools
This product is shipped in
1 carton(s)
Chat
with us! www.dhpfurniture.com
SCAN me
& I'll guide you to
DHP Helpcenter!

3
PARTS
A
N
A1
A2
B
E
C
D
F
H
I
J
G
K
L
S
TZ
P5
Z1

4
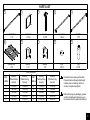
Each part has a unique part number.
Please reference the appropriate part
number when contacting customer
service for replacement parts.
Before throwing any packaging, please
verify all contents and make sure you
have received all the parts listed above!
PARTS LIST
Headboard
1 PC
PART NUMBERS
PART
LABELS
4654439
(Textured Gray
Canvas)
4658339
(Textured Ivory
Canvas)
PART
LABELS
4654439
(Textured Gray
Canvas)
4658339
(Textured Ivory
Canvas)
A T1029730 T1029820 C T1029780 T1029870
A1 T1029740 T1029830 D T1029790 T1029880
A2 T1029750 T1029840 E T1029800 T1029890
N T1029760 T1029850 F T1029810 T1029900
B T1029770 T1029860 G T1024600 T1024600
Footboard
1 PC
Side Board
1 PC Side Board
1 PC
N
Back Cover
1 PC
AA1
Side Panel
1 PC
Side Rail
4 PCS
DE
A2B
CF G
Side Panel
1 PC
Side Panel
1 PC
Side Panel
1 PC

5
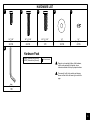
Each part has a unique part number.
Please reference the appropriate part
number when contacting customer
service for replacement parts.
Before throwing any packaging, please
verify all contents and make sure you
have received all the parts listed above!
PARTS LIST
End Rail
1 PC
Support Leg
2 PCS
Center Rail
2 PCS
Connector
2 PCS
Center Rail
1 PC
JK L
P5
Wooden Slats
1 PC Bracket
1 PC Foot
2 PCS Leg
2 PCS
Bracket
1 PC
HI
STZ1Z
PART NUMBERS
PART
LABELS
4654439
(Textured Gray
Canvas)
4658339
(Textured Ivory
Canvas)
PART
LABELS
4654439
(Textured Gray
Canvas)
4658339
(Textured Ivory
Canvas)
H T1024610 T1024610 P5 T1031120 T1031120
I T1011050 T1011050 S T393080 T393080
JT1011060 T1011060 T T393090 T393090
K T1031100 T1031100 Z1 T1027300 T1027300
L T1031110 T1031110 Z T1031130 T1031130

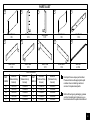
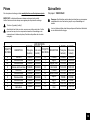
6
Please do not completely tighten all the hardware,
until the entire assembly is complete, unless
otherwise indicated in the step-by-step instructions.
The screw(s), bolt(s) to be used at each step are
shown in actual size in the lower right corner of the
page.
HARDWARE LIST
Hardware Pack
HP#:T4660339N-00
4654439 (Textured Gray Canvas)
4658339 (Textured Ivory Canvas)
53
2
1
Bolt
34 PCS
4mm
Allen Key
1 PC
Bolt
26 PCS
4
1/4" X 3/4" 1/4" X 1 9/16"
Bolt
1 PC
5/16" X 1 3/16" 1/4"
Metal Washer
14 PCS
6
Spring Washer
6 PCS
1/4"

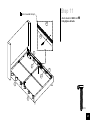
7
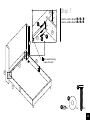
Step 1
Attach Z1 x 2 to A1 and A2 with .
Fully tighten all the bolts in this step.
X 2
Do not completely tighten the
bolts,leave half of the thread exposed.
Z1
Z1
1
1
A1
A2
1

8
Step 2
X 8
Attach A1 and A2 to A with and .
A
A1
A2
A
A1
2
4
X 8
4
2

9
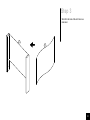
Step 3
A
N
Stick N to the back of A with Velcro as
illustrated.

10
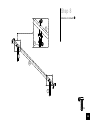
Step 4
Attach Z x 2 to B.
Screw into B as illustrated, making sure
to leave half of the threads exposed.
X 4
B
BZ
Z
Z
1
Do not completely tighten the BOLTS ,
leave half of the thread exposed.
1

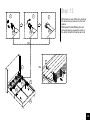
11
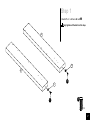
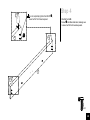
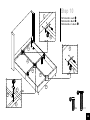
Step 5
X 14
5.1 Attach I to E and F with .
Attach I to C and D with .
5.2 Attach T to D with .
Attach S to F with .
1
C
D
F
E
F
D
S
T
II
1
1
11
5.1
5.2
5.2

12
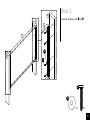
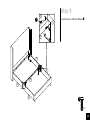
Step 6
Hang F and D on B as illustrated.
Don't completely tighten the bolts until
STEP 11 is complete.This will heip with
alignment.
F
D
B
F
F
B
B
S
S

13
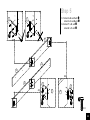
Step 7
Attach L and C to A1 with & & .
Attach L and E to A2 with & & .
X 6
C
E
A2
A1
L
L
2
4
5
E
A2
2
4
X 6
X 6
5
Slot should be facing
inside of the bed.

14
Step 8
X 6
Attach J x 2 to H with .
H
J
J
H
J
1
1
1

15
Step 9
F
E
H
1
E
F
C
D
H
Attach H and J to C/D and E/F with .
1
X 4

16
Step 10
X 1
10.1 Attach K to L with .
10.2 Attach K to B with .
10.3 Attach K x 2 to H with .
X 4
1
3
L
K
H
B
K
K
K
H
B
K
K
L
1
1
3
10.1
10.2
10.3

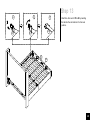
17
Step 11
Attach G x 4 to C/D/E/F with .
Fully tighten all bolts.
X 12
E
F
C
D
G
G
E
G
2
Velcro towards the top!

18
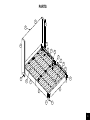
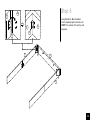
Step 12
12.1 Attach one end of P5 to L by inserting
the tab into the slot and turn it to the level
position.
12.2 Spread the slats P5 along the bed
with equal spacing, engage the velcro at
the end of slat with the counter part on G.
L
P5
P5
G
12.1
12.2
P5P5P5
P5
L
G
LLL
B

19
Step 13
Attach the other end of P5 to B by inserting
the tab into the slot and turn it to the level
position.
P5
B
BBB
P5
P5
P5

20
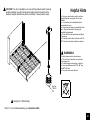
CAUTION: This unit is intended for use only with the products and/or maximum
weights indicated. Use with other products and/or products heavier than the
maximum weights indicated may result in instability or cause possible injury. Move your new furniture carefully, with two
people lifting and carrying the unit to its new
location.
Your furniture can be disassembled and
reassembled to move.
Some parts have been pre-assembled for this
item. They are illustrated on this page and
available for replacement.
Check bolts and nuts periodically and tighten
if necessary.
Clean the product with a soft damp cloth. DO
NOT use harsh chemicals or abrasive cleaners.
Helpful Hints
Weight Limit: 1000Lb/454Kg
That's it ! You've finished assembling your Upholstered Bed!
For safety reasons and to prevent injuries:
This bed is not intended for use by children
under 4 years old.
Prohibit jumping and horseplay on this bed.
Only use a mattress which is 79" - 80" long
and 59" - 60" wide.
Do not use risers under this bed.
WARNINGS:
End Cap
T392520
X 2
La page est en cours de chargement...
La page est en cours de chargement...
La page est en cours de chargement...
La page est en cours de chargement...
La page est en cours de chargement...
La page est en cours de chargement...
-
 1
1
-
 2
2
-
 3
3
-
 4
4
-
 5
5
-
 6
6
-
 7
7
-
 8
8
-
 9
9
-
 10
10
-
 11
11
-
 12
12
-
 13
13
-
 14
14
-
 15
15
-
 16
16
-
 17
17
-
 18
18
-
 19
19
-
 20
20
-
 21
21
-
 22
22
-
 23
23
-
 24
24
-
 25
25
-
 26
26


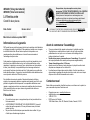
Dorel Home 4654439 Assembly Manual
- Catégorie
- Supports d'équipement audiovisuel
- Taper
- Assembly Manual
- Ce manuel convient également à
dans d''autres langues
- English: Dorel Home 4654439
- español: Dorel Home 4654439
Documents connexes
-
 Dorel Home 4656449A Assembly Manual
-
 Dorel Home 4643139MK Assembly Manual
-
 Dorel Home 4704339WE Assembly Manual
-
 Dorel Home 4673639 Assembly Manual
-
 Dorel Home 4706019 Assembly Manual
-
 Dorel Home 8035489LS Manuel utilisateur
-
 Dorel Home 4718349 Assembly Manual
-
 Dorel Home 4668229 Assembly Manual
-
 Dorel Home 4028639 Manuel utilisateur
-
 Dorel Home 4027149 Assembly Manual


