HP Color LaserJet 3000 Printer series Guide de démarrage rapide
- Catégorie
- Imprimer
- Taper
- Guide de démarrage rapide
Ce manuel convient également à

HP Color LaserJet 3000/3600/3800 Series printers
Getting Started Guide
Guide de mise en route

1
Copyright and License
© 2008 Copyright Hewlett-Packard Development Company, L.P.
Reproduction, adaptation or translation without prior written permission is
prohibited, except as allowed under the copyright laws.
The information contained herein is subject to change without notice.
The only warranties for HP products and services are set forth in the
express warranty statements accompanying such products and services.
Nothing herein should be construed as constituting an additional warranty.
HP shall not be liable for technical or editorial errors or omissions
contained herein.
Part number: Q5982-91045
Edition 1, 5/2008
FCC Regulations
This equipment has been tested and found to comply with the limits for a
Class B digital device, pursuant to Part 15 of the FCC rules. These limits
are designed to provide reasonable protection against harmful
interference in a residential installation. This equipment generates, uses,
and can radiate radio-frequency energy. If this equipment is not installed
and used in accordance with the instructions, it may cause harmful
interference to radio communications. However, there is no guarantee that
interference will not occur in a particular installation. If this equipment does
cause harmful interference to radio or television reception, which can be
determined by turning the equipment off and on, correct the interference
by one or more of the following measures:
• Reorient or relocate the receiving antenna. Increase separation
between equipment and receiver.
• Connect equipment to an outlet on a circuit different from that to
which the receiver is located.
• Consult your dealer or an experienced radio/TV technician.
Any changes or modifications to the printer that are not expressly
approved by HP could void the user’s authority to operate this equipment.
Use of a shielded interface cable is required to comply with the Class B
limits of Part 15 of FCC rules. For more regulatory information, see the
HP Color LaserJet 3000/3600/3800 Series printer electronic user guide.
Hewlett-Packard shall not be liable for any direct, indirect, incidental,
consequential, or other damage alleged in connection with the furnishing
or use of this information.
Trademark Credits
PostScript® is a trademark of Adobe Systems Incorporated.
Windows® is a U.S. registered trademark of Microsoft Corporation.
Copyright et licence
© 2008 Copyright Hewlett-Packard Development Company, L.P.
Il est interdit de reproduire, adapter ou traduire ce manuel sans
autorisation expresse par écrit, sauf dans les cas permis par les lois
régissant les droits d'auteur.
Les informations contenues dans ce document sont sujettes à
modification sans préavis.
Les seules garanties concernant les produits et services HP sont
énoncées dans la garantie qui accompagne ces produits et services. Rien
en ceci ne devra être interprété comme constituant une garantie
supplémentaire. HP ne pourra être tenue pour responsable des erreurs
techniques et rédactionnelles ou des omissions présentes dans ce
document.
Numéro de référence : Q5982-91045
Edition 1, 5/2008
Réglementations de la FCC
Les tests effectués sur cet équipement ont déterminé qu’il est conforme
aux prescriptions des unités numériques de classe B, telles que spécifiées
à l’article 15 des normes de la FCC (Commission fédérale des
communications). Ces limites sont destinées à assurer une protection
suffisante contre les interférences produites dans une installation
résidentielle. Cet équipement produit, utilise et peut émettre de l’énergie
sous forme de fréquences radio. Si ce matériel n’est pas installé et utilisé
conformément aux instructions, il peut causer des interférences nuisibles
aux communications radio. Cependant, l’absence d’interférences ne peut
pas être garantie dans une installation particulière. Si ce matériel
provoque des interférences qui perturbent la réception radio ou télévisée,
ce qui peut être vérifié en mettant le matériel sous et hors tension,
remédiez-y en appliquant l’une des mesures suivantes :
• Réorientez ou déplacez l’antenne de réception. Augmentez la
distance séparant l’équipement du récepteur.
• Connectez l’équipement à une prise située sur un circuit différent de
celui sur lequel se trouve le récepteur.
• Consultez votre revendeur ou un technicien radio/télévision
expérimenté.
Toute modification apportée au produit sans le consentement de HP peut
se traduire par la révocation du droit d’exploitation de l’équipement dont
jouit l’utilisateur. Un câble d’interface blindé est requis afin de satisfaire
aux stipulations de l’article 15 des réglementations de la FCC sur les
appareils de classe B. Pour plus d’informations sur les réglementations,
consultez le guide électronique de l’utilisateur de l’imprimante HP Color
LaserJet séries 3000/3600/3800. Hewlett-Packard ne saurait être tenu
responsable de tout dommage direct, indirect, consécutif ou autre
résultant de la fourniture ou de l’utilisation de ces informations.
Marques commerciales
PostScript® est une marque d’Adobe Systems Incorporated.
Windows® est une marque déposée aux Etats-Unis de Microsoft
Corporation.

2
540 mm (21.25 in)
400 mm (15.75 in)
450 mm (17.7 in)
423 mm (16.65 in)
400 mm (15.75 in)
563 mm (22 in)
17° - 25°C
(62.6° - 77°F)
229 mm (9 in)
89 mm (3.5 in)
356 mm (14 in)
89 mm (3.5 in)
178 mm (7 in)
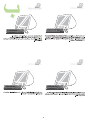
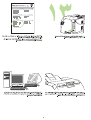
Select a sturdy, well-ventilated, dust-free area to
position the printer.
Choisissez une zone résistante, bien aérée et
exempte de poussière pour placer l'imprimante.

3
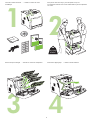
1
Ch
ec
k
th
e con
t
en
t
s o
f
th
e
b
ox. •
Vé
r
ifi
ez
l
e con
t
enu
d
u car
t
on
d’emballage.
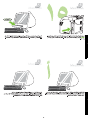
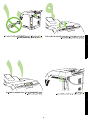
2
21.5 Kg.
47.4 lbs.
If
th
e pr
i
n
t
er came w
ith
a
t
ray
3
, p
l
ace
th
e pr
i
n
t
er on
t
op o
f
it
.
Si l’imprimante est livrée avec un bac d'alimentation 3, placez l’imprimante
sur ce bac.
3
R
emove
th
e pr
i
n
t
car
t
r
id
ges. •
R
e
ti
rez
l
es car
t
ouc
h
es
d’i
mpress
i
on.
4
R
emove
th
e s
hi
pp
i
ng
t
ape. •
R
e
ti
rez
l
a
b
an
d
e a
dhé
s
i
ve.

4
5
R
emove
th
e s
hi
pp
i
ng
l
oc
k
s an
d
t
ape
f
rom
th
e pr
i
n
t
car
t
r
id
ges.
Retirez le dispositif de sécurité d'expédition et la bande adhésive des
cartouches d’impression.
6
R
e
i
ns
t
a
ll
th
e pr
i
n
t
car
t
r
id
ges. •
Réi
ns
t
a
ll
ez
l
es car
t
ouc
h
es
d’i
mpress
i
on.
7
I
ns
t
a
ll
th
e ou
t
pu
t
bi
n. •
I
ns
t
a
ll
ez
l
e
b
ac
d
e sor
ti
e.
8
L
oa
d
paper. •
Ch
argez
d
u pap
i
er.

5
EnglishFrançaisEnglishFrançais
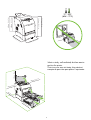
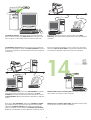
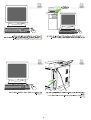
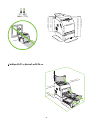
Install the control-panel overlay (if necessary). Press the ends of the
overlay straight down onto the printer and then move your hands toward
the center of the overlay until it completely adheres to the printer.
10.1 Plug in the power cord. Do not plug in the USB cable until you are
prompted to in step 14.
Note Plug the power cord directly into a wall outlet only.
10.2 Turn on the printer.
Note Printer calibration and start-up noises are normal.
Set the language/date/time (if necessary). If prompted, select your
language and date/time. Follow the instructions on the control panel.
Installez le cache du panneau de commande (si nécessaire). Appuyez sur
les extrémités du cache en le plaçant sur l’imprimante puis appuyez sur le
centre du cache pour qu’il adhère complètement à l'imprimante.
10.1 Branchez le cordon d’alimentation. Ne branchez pas le câble USB
avant d’y être invité à l’étape 14.
Remarque Branchez directement le cordon d’alimentation dans une prise
murale uniquement.
10.2 Mettez l’imprimante sous tension.
Remarque L’étalonnage de l’imprimante et les bruits à l’allumage sont
normaux.
Définition de la langue, de la date et de l'heure (si nécessaire). Si vous
y êtes invité, sélectionnez votre langue ainsi que la date et l’heure. Suivez
les instructions affichées sur le panneau de commande.
9
10
11

6
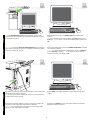
Set the media size and type for the input trays. At the printer control
panel, press MENU, use the or button to highlight PAPER
HANDLING, and then press . Use the control panel buttons to highlight
and select media sizes and types for each input tray. For more information,
see the online user guide.
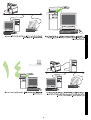
To connect to a network, go to step 13 on page 7.
To install software for Windows® with a direct connection (USB), go to
step 14 on page 8.
To install software for Macintosh with a direct connection (USB), go to step
15 on page 10.
Définition du format et du type de support pour les différents bacs
d’alimentation. Sur le panneau de commande de l’imprimante, appuyez
sur MENU, puis utilisez les touches et pour mettre GESTION DU
PAPIER en surbrillance, puis appuyez sur . Utilisez les boutons du
panneau de commande pour mettre en surbrillance et sélectionner le
format et le type de support de chaque bac d’alimentation. Pour plus
d’informations, consultez le guide de l’utilisateur en ligne.
Pour vous connecter à un réseau, passez à l’étape 13, page 7.
Pour installer un logiciel sous Windows® avec une connexion directe
(USB), passez à l'étape 14, page 8.
Pour installer un logiciel sous Macintosh avec une connexion directe
(USB), passez à l'étape 15, page 10.
12
LAN
13
14
15

7
EnglishFrançaisEnglishFrançais
13.1 Connect to a network. Connect the network cable to the printer.
Note Ensure that all cables are HP-compliant.
13.2 Find the IP address. On the control panel, press Menu. Select
INFORMATION, and then select PRINT CONFIGURATION. The IP
address is on the Jetdirect page, under “TCP/IP”.
Note You might need to assign an IP address depending on the type of
network that is installed. See “Configure an IP address (if necessary)” on
page 7 for more information.
13.3 Configure an IP address (if necessary). On the control panel,
press MENU. Select CONFIGURE DEVICE, select I/O, and then select
EMBEDDED JETDIRECT. Select TCP/IP, select CONFIG METHOD,
select MANUAL, and then select MANUAL SETTINGS. Use the control-
panel buttons to specify the IP address.
13.4 Prepare for software installation. Quit all of the programs (including
terminate-and-stay resident [TSR], antivirus, and firewall programs) on the
print server or on each computer that will use the printer.
13.1 Connexion à un réseau. Connectez le câble réseau à l’imprimante.
Remarque Assurez-vous que tous les câbles sont conformes aux
normes HP.
13.2 Recherche de l’adresse IP. Sur le panneau de commande, appuyez
sur Menu. Sélectionnez INFORMATIONS, puis sélectionnez IMPRIMER
CONFIGURATION. L'adresse IP se trouve sur la page Jetdirect, sous
«TCP/IP».
Remarque Vous devrez peut-être définir une adresse IP selon le type de
réseau installé. Pour obtenir plus d'informations, reportez-vous à la
section « Configuration d'une adresse IP (si nécessaire) », page 7.
13.3 Configuration d'une adresse IP (si nécessaire). Sur le panneau de
commande, appuyez sur MENU. Sélectionnez CONFIGURATION
PÉRIPHÉRIQUE, puis E/S et sélectionnez JETDIRECT INTÉGRÉ.
Sélectionnez TCP/IP, MÉTHODE CONFIG, puis MANUEL et sélectionnez
PARAMÈTRES MANUELS. Utilisez les boutons du panneau de
commande pour spécifier l’adresse IP.
13.4 Préparation à l’installation du logiciel. Quittez tous les
programmes (y compris les programmes résidents [TSR], les anti-virus et
les pare-feu) sur le serveur d’impression ou sur chaque ordinateur qui
utilise l'imprimante.
13

8
13.5 Install the software. 1) Insert the CD that came with the printer.
2) On the welcome screen, click Install Printer. (If the welcome screen
does not appear, run SETUP.EXE from the root directory of the CD.)
3) Follow the onscreen instructions. When prompted, select Wired
Networking. The installer shows available printers. Select the appropriate
IP address.
4) On the Installation Type screen select Full Installation to install the
most common drivers and software (recommended), select Basic
Installation to install the minimum set of drivers and software, or select
Custom Installation. 5) Allow the installation to finish. 6) Go to step 16 on
page 12.
Windows® with a direct connection (USB). 1) Install the software from
the CD before connecting the cable to the printer.
13.5 Installation du logiciel. 1) Insérez le CD fourni avec l’imprimante.
2) Sur l’écran de bienvenue, cliquez sur Installer l’imprimante. (Si l’écran
de bienvenue n’apparaît pas, exécutez SETUP.EXE à partir du répertoire
racine du CD.)
3) Suivez les instructions affichées à l’écran. Lorsque vous y êtes invité,
sélectionnez Mise en réseau câblée. Le programme d’installation affiche
les imprimantes disponibles. Sélectionnez l’adresse IP appropriée.
4) Sur l’écran Type d’installation, sélectionnez Installation complète
pour installer les pilotes et logiciels les plus répandus (recommandé),
sélectionnez Installation standard pour installer le jeu minimum de
pilotes et de logiciels, ou bien sélectionnez Installation personnalisée.
5) Attendez que l’installation se termine. 6) Passez à l’étape 16, page 12.
Windows® avec connexion directe (USB). 1) Installez le logiciel à partir
du CD avant de connecter le câble à l’imprimante.
14
Windows

9
EnglishFrançaisEnglishFrançais
Note If the New Hardware Found message appears, insert the CD.
Follow the onscreen instructions, accept the default selections, and then
go to step 16 on page 12.
2) On the welcome screen, click Install Printer. The Setup Wizard
appears.
Note If the welcome screen does not appear, click Start, and then click
Run. Type X:SETUP, replace X with the CD-ROM drive letter, and then click
OK.
3) Follow the onscreen instructions. When prompted, connect a USB cable
between the printer and the computer.
Note HP does not recommend using USB hubs. Use a USB cable that is
no longer than 2 meters (6.5 feet).
4) Click Finish. If prompted, restart the computer. 5) Go to step 16 on
page 12.
Remarque Si le message Nouveau matériel détecté apparaît, insérez le
CD. Suivez les instructions sur l’écran, acceptez les sélections par défaut,
puis passez à l’étape 16, page 12.
2) Sur l’écran de bienvenue, cliquez sur Installer l’imprimante. L’assistant
de configuration apparaît.
Remarque Si l’écran de bienvenue n’apparaît pas, cliquez sur Démarrer,
puis sur Exécuter. Saisissez X : SETUP, remplacez X par la lettre du
lecteur de CD-ROM, puis cliquez sur OK.
3) Suivez les instructions affichées à l’écran. Lorsque vous y êtes invité,
connectez un câble USB reliant l’imprimante et l’ordinateur.
Remarque HP recommande de ne pas utiliser de concentrateurs USB.
Utilisez un câble USB de moins de 2 mètres.
4) Cliquez sur Terminer. Si vous y êtes invité, redémarrez l’ordinateur.
5) Passez à l’étape 16, page 12.
Windows
Windows
Windows Windows

10
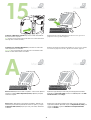
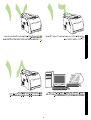
Connect to a Macintosh computer. 1) Connect a USB cable between
the printer and the computer.
Note HP does not recommend using USB hubs. Use a USB cable that is
not longer than 2 meters (6.5 feet).
2) Place the CD in the CD-ROM drive. For OS 9.1 to 9.2.x, go to A on
page 10. For OS X, go to B on page 11.
OS 9.1 to 9.2.x: 1) Run the Installer. Complete a custom install. 2) Select
all options, including USB Components (Classic). 3) When prompted,
restart the computer.
4) Run the Apple Desktop Printer Utility from HD/Applications/Utilities.
5) Double-click HP Printer (USB), and then click OK. 6) Next to the USB
Printer Selection, click Change.
Connexion à un ordinateur Macintosh. 1) Connectez un câble USB
reliant l’imprimante et l’ordinateur.
Remarque HP recommande de ne pas utiliser de concentrateurs USB.
Utilisez un câble USB de moins de 2 mètres.
2) Placez le CD dans le lecteur de CD-ROM. Pour OS 9.1 à 9.2.x, passez
à la section A, page 10. Pour OS X, passez à la section B, page 11.
OS 9.1 à 9.2.x : 1) Exécutez le programme d’installation. Effectuez une
installation personnalisée. 2) Sélectionnez toutes les options, y compris
Composants USB (Classic). 3) Lorsque vous y êtes invité, redémarrez
l’ordinateur.
4) Exécutez l’outil Apple Desktop Printer Utility à partir du dossier HD/
Applications/Utilitaires. 5) Double-cliquez sur Imprimante HP (USB), puis
cliquez sur OK. 6) En regard de Sélection d’une imprimante USB,
cliquez sur Modifier.
15
Macintosh
Macintosh
A
Macintosh Macintosh

11
EnglishFrançaisEnglishFrançais
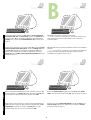
7) Select the printer, and then click OK. 8) Next to Postscript® Printer
Description (PPD) File, click Auto Setup, and then click Create. 9) Save
the printer setup. 10) On the desktop, highlight the printer. 11) Click the
Printing menu, and then click Set Default Printer. 12) Go to step 16 on
page 12.
OS X: 1) Run the Installer. Complete an easy install.
Note If OS X and OS 9.1 (Classic) to 9.2.x (Classic) are installed on the
same computer, the installer shows both the Classic and the OS X
installation options.
2) From HD/Applications/Utilities/Print Center, start the Print Center. 3) If
the printer appears in the Printer List, delete the printer. Click Add. 4) On
the next page, click the drop-down menu, and then select USB.
5) From the Printer Model drop-down list, select HP. 6) Under Model
Name, select the printer, and then click Add. 7) Go to step 16 on page 12.
7) Sélectionnez l’imprimante, puis cliquez sur OK. 8) En regard de Fichier
PPD (PostScript® Printer Description), cliquez sur Réglage auto, puis
sur Créer. 9) Enregistrez la configuration de l’imprimante. 10) Sur le
bureau, mettez l’imprimante en surbrillance. 11) Cliquez sur le menu
Impression, puis sur Définir comme imprimante par défaut. 12) Passez
à l’étape 16, page 12.
OS X : 1) Exécutez le programme d’installation. Effectuez une installation
standard.
Remarque Si OS X et OS 9.1 (Classic) à 9.2.x (Classic) sont installés sur
le même ordinateur, le programme d’installation affiche les options
d’installation des systèmes Classic et OS X.
2)
Démarrez le Centre d’impression à partir du dossier HD/Applications/
Utilitaires/Centre d’impression. 3) Si l’imprimante apparaît dans la Liste
d’imprimantes, supprimez-la. Cliquez sur Ajouter. 4) Sur la page
suivante, cliquez sur le menu local, puis sélectionnez USB.
5) Dans la liste locale Modèle d’imprimante, sélectionnez HP. 6) Sous
Nom du modèle, sélectionnez l’imprimante, puis cliquez sur Ajouter.
7) Passez à l’étape 16, page 12.
Macintosh
B
Macintosh
Macintosh Macintosh

12
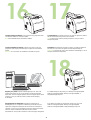
Test the software installation. Print a page from any program to make
sure that the software is correctly installed.
Note If the installation failed, reinstall the software.
Congratulations! The printer is ready to use. The user guide is located on
the CD and in the HP Easy Printer Care Software.
Note Save the boxes and the packing materials in case you need to
transport the printer.
Register your printer. Register at www.register.hp.com. This is the
quickest and easiest way for you to register to receive the following
information: technical support updates, enhanced support options, ideas
and ways to use your new HP printer, and news about emerging
technologies.
For additional help for the printer, go to www.hp.com/support/clj3000,
www.hp.com/support/clj3600, www.hp.com/support/clj3800, or
http://instantsupport.hp.com.
Test de l’installation du logiciel. Imprimez une page à partir d’un
programme quelconque pour vérifier que le logiciel est correctement
installé.
Remarque En cas d’échec de l’installation, réinstallez le logiciel.
Félicitations ! L’imprimante est prête à l’emploi. Le guide de l'utilisateur
est situé sur le CD et dans le logiciel Assistant d'imprimantes HP.
Remarque Conservez les cartons et les matériaux d’emballage en cas de
transport éventuel de l’imprimante.
Enregistrement de l’imprimante. Enregistrez l’imprimante sur
www.register.hp.com. Il s’agit de la méthode la plus simple et la plus
rapide pour enregistrer l’imprimante afin de recevoir les informations
suivantes : mises à jour de l’assistance technique, options d’assistance
avancées, idées et méthodes d’utilisation de votre nouvelle
imprimante HP, ainsi que des nouvelles sur les technologies émergentes.
Pour obtenir plus d’aide sur l’imprimante, rendez-vous sur le site
www.hp.com/support/clj3000, www.hp.com/support/clj3600,
www.hp.com/support/clj3800 ou http://instantsupport.hp.com.
16
17
18

13

14
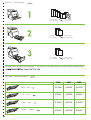
216 x 356 mm
(8.5 x 14 inches)
76 x 127 mm
(3 x 5 inches)
216 x 356 mm
(8.5 x 14 inches)
148 x 210 mm
(5.83 x 8.26 inches)
216 x 356 mm
(8.5 x 14 inches)
148 x 210 mm
(5.83 x 8.26 inches)
Paper sizes • Formats de papier •
For supplies, please visit www.hp.com/support/clj3000 • Pour obtenir des consommables, rendez-vous à l’adresse www.hp.com/support/clj3000
Part numbers • Numéros de référence •
Black • Noir •
Cyan • Cyan •
Yellow • Jaune •
Magenta • Magenta •
3000 3600 3800
Q7560A Q6470A Q6470A
Q7561A Q6470A Q7581A
Q7562A Q6472A Q7582A
Q7563A Q6473A Q7583A

15
1
2
3
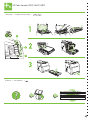
http://www.hp.com/support/go/clj3600
http://www.hp.com/support/go/clj3800
http://www.hp.com/support/go/clj3000
HP Color LaserJet 3000/3600/3800
Clearing jams • Suppression des bourrages •
Questions? • Des questions ? •

16

17
Macintosh
MacintoshMacintosh

18
Macintosh
Macintosh

19
Windows
Windows
WindowsWindows
La page charge ...
La page charge ...
La page charge ...
La page charge ...
La page charge ...
La page charge ...
La page charge ...
La page charge ...
-
 1
1
-
 2
2
-
 3
3
-
 4
4
-
 5
5
-
 6
6
-
 7
7
-
 8
8
-
 9
9
-
 10
10
-
 11
11
-
 12
12
-
 13
13
-
 14
14
-
 15
15
-
 16
16
-
 17
17
-
 18
18
-
 19
19
-
 20
20
-
 21
21
-
 22
22
-
 23
23
-
 24
24
-
 25
25
-
 26
26
-
 27
27
-
 28
28


HP Color LaserJet 3000 Printer series Guide de démarrage rapide
- Catégorie
- Imprimer
- Taper
- Guide de démarrage rapide
- Ce manuel convient également à
dans d''autres langues
Documents connexes
-
HP (Hewlett-Packard) 3000 Manuel utilisateur
-
HP LaserJet P3005 Printer series Guide de démarrage rapide
-
HP Color LaserJet 5550 Printer series Guide d'installation
-
HP Color LaserJet 3600 Printer series Le manuel du propriétaire
-
HP Color LaserJet 3500 Printer series Guide de démarrage rapide
-
HP Color LaserJet CP3505 Printer series Guide de démarrage rapide
-
-
-
-