
HC57xxxC_3L_092618
WARRANTY
DO NOT RETURN YOUR PRODUCT TO THE STORE. PLEASE CONTACT BABY TREND
FOR REPLACEMENT PARTS, SERVICE AND REPAIR.
The Baby Trend
®
warranty covers workmanship defects within the rst 180 days of purchase.
Any product which has been subjected to misuse, abuse, abnormal use, excessive wear
and tear, improper assembly, negligence, environmental exposure, alteration or accident, or
has had its serial number altered or removed invalidates all claims against the manufacturer.
Any damage to property during installation is the sole responsibility of the end user. The
Customer Service Department can be contacted at 1 (800) 328-7363 Monday through Friday
between 8:00am and 4:30 pm (PST). Return Authorizations are required prior to returning
product(s) to Baby Trend
®
. Warranty only valid in North America.
GARANTIA
NO DEVUELVA SU PRODUCTO A LA TIENDA. POR FAVOR CONTACTE A BABY TREND
PARA PIEZAS DE REPUESTO, SERVICIO Y REPARACION.
La garantía de Baby Trend
®
cubre defectos de fábrica dentro de los primeros 180 días de
la compra.Cualquier producto que haya sido sometido a uso indebido, abuso, uso anormal,
desgaste excesivo, montaje incorrecto, negligencia, exposición ambiental, alteración
o accidente, o que ha tenido su número de serie alterado o removido anula todos los
reclamos contra el fabricante. Cualquier daño a la propiedad durante la instalación es de la
exclusiva responsabilidad del usuario nal. El Departamento de Servicio al Cliente puede ser
contactado a 1 (800) 328-7363 Lunes a viernes entre 8:00 am y 4:30 pm (PST).Un numero
de autorizacion es requerido antes de la devolución de los producto(s) a Baby Trend®.
Garantia válida sólo en América del Norte.
GARANTIE
NE PAS RETOURNER VOTRE PRODUIT AU MAGASIN. VEUILLEZ CONTACTER BABY
TREND POUR DES PIÈCES DE RECHANGE, ENTRETIEN ET RÉPARATION.
La garantie Baby Trend
®
couvre les vices de fabrication dans les 180 jours suivant l'achat du
produit. Tout produit qui a été soumis à un usage abusif, une utilisation anormale, une usure
excessive, un montage incorrect, de la négligence, de l'exposition environnementale, de la
modication ou un accident, ou a eu son numéro de série modié ou supprimé annule toutes
les réclamations contre le fabricant. Tout dommage à la propriété lors de l'installation est de
la seule responsabilité de l'utilisateur nal. Le service client peut être contacté au 1 (800)
328-7363 du lundi au vendredi 8 h – 16 h 30 (PST). Une autorisation sera nécessaire avant
de retourner le produit à Baby Trend
®
. Garantie valable uniquement en Amérique du Nord.
www.babytrend.com
1-800-328-7363
(8:00am ~ 4:30pm PST)
www.babytrend.com
Baby Trend, Inc.
1607 S. Campus Ave.,
Ontario, CA 91761
www.babytrend.com
Read all instructions BEFORE assembly and USE of product.
KEEP INSTRUCTIONS FOR FUTURE USE.
Lea todas las instrucciones ANTES de armar y USAR el producto.
CONSERVE LAS INSTRUCCIONES PARA USO FUTURO.
Lisez toutes les instructions du manuel AVANT l’assemblage
ou L’UTILISATION de ce produit. CONSERVEZ CES
INSTRUCTIONS POUR RÉFÉRENCE ULTÉRIEURE.
HC57XXXC
Instruction Manual
Manual de Instrucciones
Manuel d’instruction

2
MODES
Copyright © 2018, Baby Trend Inc., All Rights Reserved. Todos los derechos reservados. Tous droits réservés.
1
Copyright © 2018, Baby Trend Inc., All Rights Reserved. Todos los derechos reservados. Tous droits réservés.
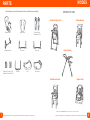
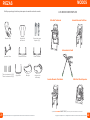
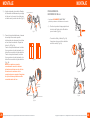
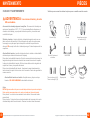
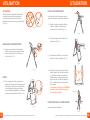
PARTS
Check that you have all the parts for this model before assembly.
Upper Frame
Assemblies (X2)
Booster Seat
Tray InsertTrayFootrest
Height Adjuster
Front Leg Rear Leg
Body Insert
MODES OF USE
Traditional High Chair
Infant Booster Seat
Infant Feeding
Toddler Booster
Toddler Chair
• ONLY approved SNAP TECH
TM
products can be used on the frame.
Extension Tubes A (X2)
Extension Tubes B (X2)

4
ASSEMBLY
Copyright © 2018, Baby Trend Inc., All Rights Reserved. Todos los derechos reservados. Tous droits réservés.
WARNING
3
Copyright © 2018, Baby Trend Inc., All Rights Reserved. Todos los derechos reservados. Tous droits réservés.
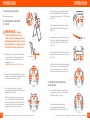
WARNING: Failure to follow these warnings and the
instructions could result in serious injury or death.
WARNING: Prevent serious injury or death from falls
or sliding out. Always secure child in the restraint. NEVER
leave child unattended.
WARNING: The child should be secured in the
high chair at all times by the 5-point restraining system,
either in the reclining, semi-reclining or upright position.
The tray is not designed to hold the child in the chair.
It is recommended that the high chair be used in the
upright position only by children capable of sitting upright
unassisted. See page 10 for instructions on proper use of
restraint system.
• ONLY approved SNAP TECH
TM
products can be used on the frame.
• Other accessory items may change the balance of the high chair and cause hazardous
unstable conditions, use approved Baby Trend toys only.
• Be certain the high chair is fully erect and latched in the open position before allowing the
child near the high chair.
• Use of the high chair with a child weighing more than 40 pounds will cause excessive wear
and stress on high chair.
• NEVER allow your high chair to be used as a toy.
• NEVER use this product if there are any loose or missing fasteners, loose joints, broken
parts, or torn mesh/fabric. Check before assembly and periodically during use. Contact
Baby Trend Customer Service at 1-800-328-7363 for replacement parts, repair or
instructions. NEVER substitute parts.
IMPORTANT!
To ensure safe operation of your product, please follow
these instructions carefully. Please keep these instructions for future reference.
IMPORTANT! Before assembly and each use, inspect this product
for damaged hardware, loose joints, missing parts or sharp edges. NEVER
use if any parts are missing or broken.
IMPORTANT! Adult assembly is required.
IMPORTANT! Always check that the high chair is locked in the open
position before using.
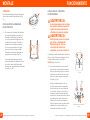
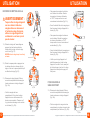
Fig. 1a
Fig. 1b
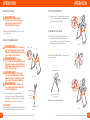
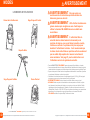
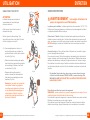
ATTENTION:
Carefully remove parts from box. Check that
you have all the parts for this model before
assembling the high chair. NOTE: Certain
High Chair models are packaged with the
High Chair Seat Fabric and Body Insert
already attached to the Seat Back.
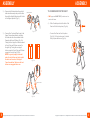
TO ASSEMBLE FRAME
1) • Take either the left or right Upper Frame
Assemblies, press and hold the button
and extend the frame then release the
button (Fig 1a).
• Insert the front tube of the right and left
side Upper Frame Assemblies into the
Height Adjuster (Fig. 1b). The front tube
is easily distinguished from the rear
tube by the array of holes located on the
backside of the front tube.
Button

5 6
ASSEMBLY ASSEMBLY
Copyright © 2018, Baby Trend Inc., All Rights Reserved. Todos los derechos reservados. Tous droits réservés. Copyright © 2018, Baby Trend Inc., All Rights Reserved. Todos los derechos reservados. Tous droits réservés.
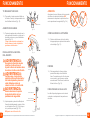
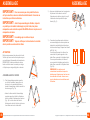
2) • Squeeze the Release Handles on both
sides simultaneously and push the tube
through the Height Adjusters until it locks
in the highest position (Fig. 2).
3) • Connect the Front and Rear Legs to the
Upper Frame Assemblies by inserting
the tube ends into the extension tubes
Separate the A and B tubes (Fig. 3a).
Facing the front legs the A tubes connect
to the left leg and B tubes connect to
the right leg. Facing the rear legs A
tubes connect to the left leg and B tubes
connect to the right leg (Fig 3b).
NOTE: Legs are properly connected
when the lock buttons are lined up with
the holes on the ends of the Upper
Frame Assemblies. Make sure the lock
buttons are engaged before use.
Release Handle
Fig. 2
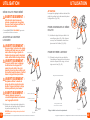
TO ASSEMBLE BOOSTER SEAT
• ONLY approved SNAP TECH
TM
products can be
used on the frame.
4) • Slide Footrest posts into the front of the
Seat until it clicks into place (Fig. 4a).
• Connect the Seat and lock into place
(Fig. 4b). Pull up to make sure it’s locked
rmly in place before use (Fig. 4c).
Fig. 4a
Fig. 4b
Fig. 4c
Extension Tubes
Fig. 3b
Fig. 3a
Front Leg
Rear Leg
B
A
A
B
A B A B

7 8
ASSEMBLY ASSEMBLY
Copyright © 2018, Baby Trend Inc., All Rights Reserved. Todos los derechos reservados. Tous droits réservés. Copyright © 2018, Baby Trend Inc., All Rights Reserved. Todos los derechos reservados. Tous droits réservés.
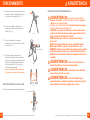
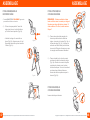
TO ATTACH SEAT PAD
NOTE:
Certain High Chair models are
packaged with the High Chair Seat Pad and
Seat Insert already attached to the Seat Back.
If your model has a Seat Pad and Seat Insert
on the Seat Back please skip ahead to Step 7.
5) • Thread non-buckle end of Harness Straps
called Harness Attachment Tabs through
the provided slots in the body insert, seat
fabric, seat back (Fig. 5a), and seat base
(Fig. 5b). When Harness Attachment Tabs
are through the provided slots, rotate the
Harness Attachment Tabs 90 degrees.
Make sure that the straps are rmly in
place.
6) • Loop the ap on the back of the pad
over the top of the Seat Back (Fig. 6a).
Connect the Seat Pad to the Seat Back
with the two Elastic Loops. These t over
the Attachment Tabs located near the top
harness slots (Fig. 6b).
TO REMOVE SEAT PAD
Reverse steps above.
Fig. 6a
Fig. 6b
Fig. 5a
Fig. 5b
Fig. 7a
Fig. 7b
Release Handle
Groove
TO ATTACH TRAY
WARNING: Always check
that the high chair is locked in
the open position before using.
WARNING: The tray is not
designed to hold the child in the
chair. The child must be secured
by the safety harness at all times
while in the high chair.
7) • To attach the Tray, line up the Grooves
on the bottom of the Tray with the
armrests of the high chair. Squeeze the
front release handle and slide the Tray
onto the armrests (Fig. 7a). The Tray
has a 3-position adjustment. To adjust
the position, squeeze the front release
handle located underneath the Tray and
reposition the Tray to the desired position.
Release the Tray’s handle. Make sure the
Tray is securely locked in its new position
before use.
ATTENTION:
Never leave the tray in a position where the
warning signs are visible (Fig. 7b).

10
OPERATION
Copyright © 2018, Baby Trend Inc., All Rights Reserved. Todos los derechos reservados. Tous droits réservés.
9
ASSEMBLY
Copyright © 2018, Baby Trend Inc., All Rights Reserved. Todos los derechos reservados. Tous droits réservés.
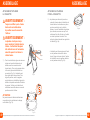
TO ATTACH INSERT TRAY
8) • The dishwasher safe Tray Insert snaps
onto the High Chair Tray and is held in
place by tabs on the sides of the Tray.
When installing the Tray Insert make
sure that it snaps into place to prevent
the child from removing the Tray Insert.
To remove Insert unsnap tabs from the
Tray (Fig. 8a).
• The Tray may be stored on the back
legs of the High Chair. Align the holes in
the rear of the tray with the small pegs
on the back legs (Fig. 8b).
Fig. 8a
Fig. 8b
TO USE SAFETY BELT
WARNING: It is
recommended that only children
capable of sitting upright
unassisted use the high chair in
the upright position.
WARNING:
Prevent
serious injury or death from falls
or sliding out. Always secure
child in the restraint system,
either in the reclining, semi-
reclining or upright position.
The Tray is not designed to hold the child in
the chair. Always keep child in view while in
high chair.
NEVER leave child unattended.
9) • The shoulder straps of the 5-point
harness have 2 attachment positions.
Select the position that places the
shoulder strap level with, or below, the
top of the child’s shoulder (Fig. 9a).
• Carefully place the child in the seat and
position the safety harness around the
child’s waist and over the shoulders.
Place the crotch strap between the
child’s legs. Insert the male end of each
shoulder/waist belt into the buckle on the
crotch strap. Tighten the harness to be
snug around the child’s waist and over the
child’s shoulders (Fig. 9b).
Fig. 9a
Fig. 9b
Adjust for a snug t

11 12
OPERATION OPERATION
Copyright © 2018, Baby Trend Inc., All Rights Reserved. Todos los derechos reservados. Tous droits réservés. Copyright © 2018, Baby Trend Inc., All Rights Reserved. Todos los derechos reservados. Tous droits réservés.
TO RELEASE THE CHILD
10) • To release the harness, push Button on
Center Clasp, the two Harness Buckles
will pop free (Fig. 10).
RECLINE SEAT
11) • Squeeze recline lever on back of the
seat and adjust to the preferred recline
or upright position (Fig.11).
Use caution not to trap arms, hands and
ngers when adjusting recline positions.
TO ADJUST SEAT HEIGHT
WARNING:
Do not adjust
seat height with child in seat.
Adjust seat height before placing
your child in the high chair.
WARNING: Always
check that the height adjustment
bracket is level and both left and
right sides are locked before
placing child in the high chair.
WARNING: Never rest
the height adjustment bracket
on the locking pins.
12) • Squeeze the Release Handles on both
sides simultaneously of the Height
Adjustment (Fig. 12a) and adjust to the
ideal position (Fig. 12b).
DO NOT adjust with child in the seat.
Fig. 12a
Fig. 12b
Fig. 11
Fig. 10
Center Clasp
Highest Position
Lowest Position
Release Lever
Locking Pin
ATTENTION:
Make sure the Height Brackets lock on the
lowest position. DO NOT rest Height Adjustment
Brackets on the Locking Pins (Fig. 12c).
ADJUSTING THE FOOTREST
13) • Press the buttons on both sides of the
Footrest to adjust the Footrest up or
down (Fig. 13).
BRAKES
14) • To engage brakes, apply downward
pressure to the brake tabs. Check that
the High Chair will not move and that
brakes are properly applied. To release,
lift up on the brake tabs (Fig. 14).
Fig. 13
Fig. 14
Fig. 12c

WARNING
14
Copyright © 2018, Baby Trend Inc., All Rights Reserved. Todos los derechos reservados. Tous droits réservés.
13
OPERATION
Copyright © 2018, Baby Trend Inc., All Rights Reserved. Todos los derechos reservados. Tous droits réservés.
TO FOLD HIGH CHAIR
The High Chair may be folded with the seat in
any of the height positions.
15) • Place seat in the desired height position.
Place Seat Back in the most upright
position (Fig. 15).
16) • Squeeze the Tray release handle and
slide the tray out (Fig. 16).
17) • Hang the Tray on the pegs located on
the back of the rear leg (Fig. 17).
18) • Press and hold release buttons (located
on the sides of the frame) and push the
rear legs in the direction of the front legs
until folded (Fig. 18). Chair is now ready
to put away.
This is not a toy. DO NOT allow your
child to play around a folded high chair.
Fig. 15
Fig. 16
Fig. 18
Fig. 17
Release Handle
Release Buttons
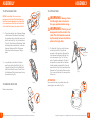
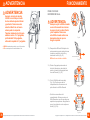
WARNING: Children have suffered head injuries,
including skull fractures, after falling with or from booster seats.
• Check that booster seat is securely attached to adult
chair before each use.
• ALWAYS use restraints until child is able to get in and out of
booster seat without help. (about 2 1/2 years old)
Adjust to t snugly.
• NEVER allow child to push away from table.
• NEVER lift and carry child in booster seat.
• STAY NEAR and watch your child during use.
• ALWAYS check security of t to adult chair before each use and
limitation of the product.
• NEVER use this product on a stool or bench that does not have
a seat back.
WARNING: Prevent serious injury or death. Do not
use in motor vehicles.
WARNING: The tray is not designed to hold the
child in the chair.
WARNING: It is recommended that the booster
seat be used in the upright position only by children
capable of sitting upright unassisted.
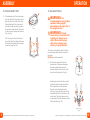
TO ATTACH BOOSTER SEAT TO CHAIR
WARNING:
Always secure the Booster Seat
on a chair using the bottom and
back attachment straps. Never
use this Booster Seat on a stool
or bench that does not have a seat
back. Minimum adult chair size:
Width: 16.1inch, depth: 16.9inch,
backrest height: 4.7inch.
• NEVER lift this product with your child in it.
• DO NOT use this product if it is damaged or broken.
Min 16.9"
Min. 4.7"
Min 16.1"

15 16
OPERATION OPERATION
Copyright © 2018, Baby Trend Inc., All Rights Reserved. Todos los derechos reservados. Tous droits réservés. Copyright © 2018, Baby Trend Inc., All Rights Reserved. Todos los derechos reservados. Tous droits réservés.
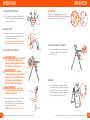
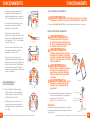
TO UNFOLD HIGH CHAIR
Reverse steps above.
TO ATTACH BOOSTER SEAT
TO CHAIR
WARNING: Always
secure the Booster Seat on a
chair using the bottom and back
attachment straps. Never use this
Booster Seat on a stool or bench
that does not have a seat back.
19) •
Detach Seat from Upper Frame Assembly
by pushing both modular release buttons
on each side of the seat and lifting seat
upwards (Fig. 19).
DO NOT remove with child in the seat.
20) • Remove Footrest by pushing the release
button on each side of the seat and pulling
Footrest out of the Seat (Fig. 20).
21) • Turn Booster Seat over. Slide Strap
Compartments open on the bottom of the
Booster Seat (Fig. 21a).
• Pull the straps out of the Compartment
(Fig. 21b). Then place the Booster Seat
onto a chair that has a seat back with no
armrests. Make sure there are not extra
paddings or cushions on the chair.
Release Buttons
Fig. 21a
Fig. 21b
Fig. 19
Fig. 20
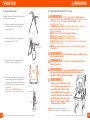
• Wrap the back straps around the back
of the chair. Buckle the straps making
sure you hear the buckle *CLICK* closed
(Fig. 21c).
• Pull the free ends of the strap to rmly
tighten the Booster Seat to the chair
(Fig. 21d).
•
Wrap bottom straps around the bottom
of the chair. Buckle the straps making
sure you hear buckle *CLICK* closed
(Fig. 21e).
• Pull the free ends of the straps to rmly
tighten the Booster Seat onto the chair
(Fig. 21d).
•
Check that the Booster is tightly installed
by attempting to move the Booster Seat
from side-to-side and up. The Booster
Seat should not move more than 1 inch.
TO REMOVE BOOSTER SEAT
FROM CHAIR
22) • Turn Booster Seat over. Slide Strap
Compartments open on the bottom of
the Booster Seat (Fig. 22a).
• Fold the straps and put them in
the compartment, then slide the
Compartment Door closed (Fig. 22b).
Fig. 21c
Fig. 21d
Fig. 21e
Fig. 22a
Fig. 22b

17 18
OPERATION OPERATION
Copyright © 2018, Baby Trend Inc., All Rights Reserved. Todos los derechos reservados. Tous droits réservés. Copyright © 2018, Baby Trend Inc., All Rights Reserved. Todos los derechos reservados. Tous droits réservés.
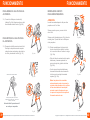
INFANT CAR SEAT
WARNING: Avoid
serious injury from falling or
sliding out, always use the
Infant Car Seat harness.
• ONLY approved SNAP TECH
TM
products can be
used on the frame.
ADJUST FRAME HEIGHT
WARNING:
Do not adjust
car seat height with child in seat.
Adjust seat height before placing
your child in the car seat.
WARNING: Always
check that the Height Adjustment
Bracket is level and both left and
right sides locked before placing
child in the car seat.
WARNING:
Never use
the car seat mode at any of the
higher positions. Always use the
car seat at the lowest position.
WARNING: Never rest
the height adjustment bracket
on the locking pins.
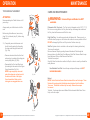
23) •
Squeeze both left and right Release
Handles of the Height Adjustment Bracket
and adjust to the lowest position (Fig. 23a).
DO NOT adjust with child in the seat.
ATTENTION:
The Height Adjustment Bracket must be set at the
lowest postion before placing car seat (Fig. 23b).
Fig. 23b
Fig. 23a
Release Handle
Lowest Position
Highest Position
Locking Pin
TO ATTACH CAR SEAT
24) •
Connect the Car Seat and lock into place
(Fig. 24a). Make sure its locked rmly in
place before use (Fig. 24b).
TO REMOVE CAR SEAT
25) • Detach Car Seat from Upper Frame
Assembly by pushing both modular
release buttons on each side of the seat
and lifting seat upwards (Fig. 25).
• ONLY approved SNAP TECH
TM
products can be
used on the frame.
Fig. 24a
Fig. 24b
Fig. 25
Face in either direction,
front or backwards.
Infant car seat sold separately
CAR SEAT MODE

20
MAINTENANCE
Copyright © 2018, Baby Trend Inc., All Rights Reserved. Todos los derechos reservados. Tous droits réservés.
19
OPERATION
Copyright © 2018, Baby Trend Inc., All Rights Reserved. Todos los derechos reservados. Tous droits réservés.
TODDLER SEAT ASSEMBLY
ATTENTION:
Recommended age for Toddler Seat use is 2-4
years of age.
Always assist your child into and out of the
seat.
Before using the toddler seat, remove tray
(step 16), lock wheels (step 14), before using
toddler seat.
26) • Completely remove the harness and
buckle from the product by threading
the strap ends through the seat back
(Fig. 26a).
• Remove extension tubes from the front
and rear legs by pushing the locking pins
in and pulling tubes (Fig. 26b).
• Reassemble the Front and Rear Legs
by inserting the tube ends into the Upper
Frame Assemblies (Fig. 26c).
NOTE: Legs are properly connected
when the locking pins are lined up with
the holes on the ends of the Upper
Frame Assemblies. Make sure the
locking pins are engaged before use.
Fig. 26b
Fig. 26a
Fig. 26c
CARE AND MAINTENANCE
WARNING: Harness Straps and Basket are NOT
washable.
Dishwasher Safe Tray Insert:
The Tray Insert is dishwasher safe to 160º F (71º C).
Do not use scouring pads on the Tray Insert as they will damage the surface and
the Tray Insert will become more difcult to clean.
High Chair/Tray: Use mild soap and wash with damp cloth. Please use only a
soft bristle brush, sponge or cloth to clean the surface or remove particles of food.
DO NOT submerge High Chair and Tray in water. Surface clean only.
Seat Pad (please refer to care label on the seat pad for cleaning instructions)
To remove the seat pad:
Remove Harness Straps by pushing Harness Attachment Tabs through the
Harness slots on the Seat Back, Seat Base and Seat Pad. Remove Elastic Loops
from Attachment Tabs on Seat Base and Seat Back.
To attach the seat pad:
Carefully follow the instructions outlined in Step 6 on how to correctly re-thread the
safety harness.
Non-Washable Seat Pad: Use mild soap and wipe with damp cloth. NOT
MACHINE WASHABLE.
Basket
NOTE: Certain Models will have a Basket underneath the seat for storage. These
Models will be packaged with the Basket already attached to the Seat Base.
To remove: The Basket is attached by four snaps. Release these snaps
for removal.
To attach: Feed snap strips around Basket Slots underneath Seat Base. Press
rmly on the four snaps.

22
MODOS
Copyright © 2018, Baby Trend Inc., All Rights Reserved. Todos los derechos reservados. Tous droits réservés.
21
PIEZAS
Copyright © 2018, Baby Trend Inc., All Rights Reserved. Todos los derechos reservados. Tous droits réservés.
Verique que tenga todas las piezas para este modelo antes de montar.
Conjunto de marco
superior (X2)
Booster Silla
Accesorio de
la Bandeja
BandejaApoya Piés
Ajustador Altura
Patas de Enfrente Patas Traceras
Almohadilla
del Asiento
• Aprobado SOLAMENTE SNAP TECH
TM
productos pueden ser utilizados en el armazón.
LOS MODOS DE EMPLEO
Silla Alta Tradicional
Asiento Elevador Para Bebés
Alimentación Infantil
Asiento Elevador De Niños
Silla Para Niños Pequeños
Tubos de extensión A (X2)
Tubos de extensión B (X2)

24
MONTAJE
Copyright © 2018, Baby Trend Inc., All Rights Reserved. Todos los derechos reservados. Tous droits réservés.
23
ADVERTENCIA
Copyright © 2018, Baby Trend Inc., All Rights Reserved. Todos los derechos reservados. Tous droits réservés.
ADVERTENCIA: La inobservancia de las
advertencias e instrucciones podría causar lesiones graves
o la muerte.
ADVERTENCIA: Evite lesiones graves o la
muerte por caídas o deslizamiento. Sujete siempre al niño
con el cinturón de seguridad. NUNCA deje al niño solo.
ADVERTENCIA: Todo el tiempo que esté en
la silla alta, el niño debe estar protegido por el sistema
de sujeción de cinco puntos, en la posición reclinable,
semirreclinable o erguida. La bandeja no está diseñada
para contener al niño en la silla. Se recomienda que la silla
alta se utilice en la posición erguida sólo si el niño puede
sentarse erguido sin ayuda. Consulte la página 30 para
obtener instrucciones sobre el uso correcto del sistema del
cinturón de seguridad.
• Aprobado SOLAMENTE SNAP TECH
TM
productos pueden ser utilizados en el armazón.
• Otros elementos adicionales pueden alterar el equilibrio de la silla alta y crear una
condición inestable peligrosa; utilice juguetes aprobados por Baby Trend.
• Asegúrese de que la silla alta esté completamente erguida y trabada en la posición abierta
antes de que el niño se acerque a ésta.
• Si un niño que pesa más de 40 libras utiliza la silla, se generarán un desgaste y una
tensión excesivos en la silla alta.
• NUNCA deje que la silla alta se utilice como un juguete.
• NUNCA utilice este producto si hay sujeciones sueltas o ausentes, uniones ojas, piezas
rotas o si la tela o la malla están rasgadas. Revise antes de armar y en forma periódica
durante el uso. Si necesita repuestos, reparación o instrucciones, llame al servicio de
atención al cliente de Baby Trend al 1-800-328-7363. NUNCA reemplace piezas.
IMPORTANTE! Para garantizar la operación segura del
producto,siga estas instrucciones cuidadosamente. Conserve estas
instrucciones para consultarlas en el futuro.
IMPORTANTE! Antes del armado y de cada uso, examine el
producto para detectar accesorios dañados, uniones ojas, piezas ausentes
o bordes puntiagudos. NUNCA utilice la silla con piezas ausentes o rotas.
IMPORTANTE! Un adulto debe armar el equipo.
IMPORTANTE! Controle siempre que la silla alta esté trabada en la
posición abierta antes de usarla.
ATENCIÓN:
Retire cuidadosamente las piezas de la
caja. Antes de armar la silla alta, verique
que tenga todas las piezas de este modelo.
NOTA: Ciertos modelos de sillas altas
se empaquetan con la malla del asiento
de la silla alta y el accesorio del asiento
previamente unidos al respaldo del asiento.
MONTAJE DEL ARMAZÓN
1) • Tome cualquiera de los Montajes del
armazón superior (izquierdo o derecho),
oprima y mantenga presionado el botón,
y extienda el armazón y luego suelte el
botón rojo (Fig. 1a).
• Introduzca el tubo delantero del Montaje
del armazón superior del lado izquierdo
y derecho en el Ajustador Altura (Fig. 1b).
El tubo delantero se distingue fácilmente
del tubo trasero por el despliegue de
agujeros situados en la parte posterior
del tubo delantero.
Fig. 1a
Fig. 1b
Botón

25 26
MONTAJE
MONTAJE
Copyright © 2018, Baby Trend Inc., All Rights Reserved. Todos los derechos reservados. Tous droits réservés. Copyright © 2018, Baby Trend Inc., All Rights Reserved. Todos los derechos reservados. Tous droits réservés.
2) •
Apriete izquierda y derecha las Manijas
de liberación simultáneamente y empuje
el tubo por los Ajustador Altura hasta que
se traben en la posición más alta (Fig. 2).
3) • Conecte las patas delanteras y traseras
al montaje del armazón superior
introduciendo los extremos de los tubos
en los tubos de extensión. Separe los
tubos A y B (Fig. 3a).
Frente a las patas delanteras los tubos
A se conectan a la pata izquierda y los
tubos B se conectan a la pata derecha.
Frente a las patas traseras, los tubos
A se conectan a la pata izquierda y los
tubos B se conectan a la pata derecha
(Fig. 3b).
NOTA: Las patas se conectan
correctamente cuando los botones
pulsadores se alinean con los oricios
ubicados en los extremos de los
conjuntos de marco superior. Asegúrese
de que los botones pulsadores estén
conectados antes del uso.
Manija de liberació
Fig. 2
PARA ARMAR EL
BOOSTER DE SILLA
• Aprobado SOLAMENTE SNAP TECH
TM
productos pueden ser utilizados en el armazón.
4) • Deslice los postes del apoyapiés hacia
el interior del frente de la sillita hasta
que se traben (Fig 4a).
• Conecte la sillita y trábela (Fig. 4b).
Asegúrese de que esté bien trabada
antes de usarla (Fig. 4c).
Fig. 4a
Fig. 4c
Fig. 4b
Fig. 3b
Tubos de
extensión
Patas de Enfrente
Patas Traceras
B
A
A
B
Fig. 3a
A B A B

27 28
MONTAJE
MONTAJE
Copyright © 2018, Baby Trend Inc., All Rights Reserved. Todos los derechos reservados. Tous droits réservés. Copyright © 2018, Baby Trend Inc., All Rights Reserved. Todos los derechos reservados. Tous droits réservés.
PARA COLOCAR LA
ALMOHADILLA DEL ASIENTO
NOTA: Algunos modelos de silla alta incluyen
la almohadilla del asiento para sillas altas y el
accesorio del asiento ya unidos al respaldo del
asiento. Si su modelo incluye una almohadilla
de asiento y el accesorio del asiento en el
respaldo del asiento, omita el paso 7.
5) •
Pase el extremo sin hebilla de las correas
del arnés denominadas lengüetas de
sujeción del arnés por las ranuras en la
tela del asiento, el accesorio, el respaldo
(Fig. 5a) y la base del asiento (Fig. 5b).
Una vez que las lengüetas de sujeción
del arnés hayan atravesado las ranuras,
gire las lengüetas 90 grados. Asegúrese
de que las correas están colocadas
rmemente en su lugar.
6) •
Sujete con un lazo la aleta de la parte
posterior de la almohadilla a la parte
superior del respaldo del asiento (Fig. 6a).
Sujete la almohadilla del asiento al respaldo
del asiento con dos lazos elásticos. Éstos
se ajustan a las lengüetas de sujeción
ubicadas cerca de las ranuras superiores
del arnés (Fig. 6b).
Fig. 6a
Fig. 6b
Fig. 5a
Fig. 5b
PARA QUITAR LA ALMOHADILLA
DEL ASIENTO
Invierta los pasos mencionados anteriormente.
PARA SUJETAR Y UTILIZAR
LA BANDEJA
ADVERTENCIA:
Controle siempre que la silla
alta esté trabada en la posición
abierta antes de usarla.
ADVERTENCIA: La
bandeja no está diseñada para
contener al niño en la silla.
Todo el tiempo que esté en la
silla alta, el niño debe estar
protegido por el sistema de
sujeción.
7) • Para sujetar la Bandeja, alinee las
muescas en la parte inferior de la
bandeja con los apoyabrazos de la sillita
alta. Apriete la manija de liberación
delantera y deslice la bandeja dentro de
los apoyabrazos (Fig. 7a). La Bandeja
tiene un ajuste de 3 posiciones. Para
ajustar la posición, apriete la manija de
liberación delantera ubicada debajo de la
bandeja, y vuelva a colocar la bandeja en
la posición deseada. Suelte la manija de
la Bandeja. Asegúrese de que la Bandeja
esté bien trabada en su nueva posición
antes de usarla.
Fig. 7a
Manija de liberació
Ranura
Fig. 7b

30
FUNCIONAMIENTO
Copyright © 2018, Baby Trend Inc., All Rights Reserved. Todos los derechos reservados. Tous droits réservés.
29
MONTAJE
Copyright © 2018, Baby Trend Inc., All Rights Reserved. Todos los derechos reservados. Tous droits réservés.
ATENCIÓN:
Nunca deje la bandeja posicionada de manera
que se vean las señales de advertencia (Fig.
7b).
PARA SUJETAR LA BANDEJA
DE ACCESORIO
8) • El accesorio de la bandeja de alimentos
apta para lavavajillas se encaja en la
bandeja de la silla alta y se sostiene
en su lugar mediante lengüetas en los
costados de la bandeja. Al instalar el
accesorio de la bandeja, asegúrese
de que quede encajado en su lugar
para que el niño no pueda retirarlo.
Para retirar el accesorio, destrabe las
lengüetas de la bandeja (Fig. 8a).
• La bandeja podrá guardarse en las
piernas traseras de la sillita alta. Alinee
los oricios en la parte trasera de la
bandeja con los ganchitos de las piernas
de atrás (Fig. 8b).
Fig. 8b
Fig. 8a
PARA USAR EL CINTURÓN
DE SEGURIDAD
ADVERTENCIA:
Se recomienda que sólo los niños
que pueden sentarse en posición
erguida sin supervisión usen la
silla alta en la posición erguida.
ADVERTENCIA:
Evite lesiones graves o la muerte
por caídas o deslizamiento.
Sujete siempre al niño con
el sistema del cinturón de
seguridad, ya sea en la posición.
La bandeja no está diseñada para contener al
niño en la silla. Siempre mantenga al niño a
la vista mientras esté en la silla alta.
NUNCA deje al nino solo.
9) • Las correas del hombro del arnés de 5
puntos tienen 2 posiciones de sujeción.
Escoja la posición que sitúe a la correa
del hombro al mismo nivel o a un nivel
inferior a la parte superior del hombro
del niño (Fig. 9a).
•
Coloque cuidadosamente al niño en
la sillita y pase el arnés de seguridad
por la cintura del niño y por encima de
los hombros. Coloque la correa de la
entrepierna entre las piernas del niño.
Introduzca el extremo macho del cinturón
de cada hombro o de la cintura en la
hebilla de la correa de la entrepierna.
Ajuste el arnés de modo que esté ceñido
alrededor de la cintura del niño y por
encima de sus hombros (Fig. 9b).
Fig. 9a
Fig. 9b
Regule para lograr un buen ajuste

31 32
FUNCIONAMIENTO FUNCIONAMIENTO
Copyright © 2018, Baby Trend Inc., All Rights Reserved. Todos los derechos reservados. Tous droits réservés. Copyright © 2018, Baby Trend Inc., All Rights Reserved. Todos los derechos reservados. Tous droits réservés.
TO RELEASE THE CHILD
10) • Para soltar el arnés, presione Botón en
el Broche Central y se desprenderán las
dos Hebillas del Arnés (Fig. 10).
ASIENTO RECLINABLE
11) • Presione la palanca de reclinación en la
parte posterior del asiento y ajuste en la
posición que desee, ya sea reclinable o
erguida (Fig.11).
Tenga la precaución de no atrapar los
brazos, manos y dedos al ajustar las
posiciones de reclinación.
PARA AJUSTAR LA ALTURA
DEL ASIENTO
ADVERTENCIA:
No ajuste la altura del asiento
mientras el niño esté en él.
Ajuste la altura del asiento antes
de colocar al niño en la silla alta.
ADVERTENCIA:
Verique que el soporte de
ajuste de altura esté nivelado y
los lados izquierdo y derecho
estén trabados antes de
colocar al niño en la silla alta.
ADVERTENCIA:
Nunca descansa el soporte
de ajuste de altura en los
pasadores de seguridad.
12) •
Apriete izquierda y derecha las Manijas de
liberación simultáneamente y empuje el tubo
por los Ajustador Altura (Fig. 12a) y coloque
en la posición que desee (Fig. 12b).
NO ajuste con el niño en la silla.
Fig. 11
Fig. 10
Presilla central
Fig. 12a
Fig. 12b
Manija de
liberación
Posición más alta
Posición más baja
Pasadores de bloqueo
ATENCIÓN:
Asegúrese de que el bloqueo de los soportes
de altura en la posición más baja. NO
descansan los soportes de ajuste de altura
en los pasadores de seguridad (Fig. 12c).
CÓMO AJUSTAR EL APOYAPIÉS
13) • Presione los botones de los dos lados
del apoyapiés para ajustarlo hacia arriba
o hacia abajo (Fig. 13).
FRENOS
14) • Para enganchar los frenos, aplique
presión hacia abajo a las chas del
freno. Compruebe que la silla de comer
no se moverá y que frenos se aplican
correctamente. Para liberar, levante las
chas del freno (Fig. 14).
PARA PLEGAR LA SILLA ALTA
La silla alta puede plegarse con el asiento
colocado en cualquiera de las posiciones
de altura.
Fig. 13
Fig. 12c
Fig. 14

34
ADVERTENCIA
Copyright © 2018, Baby Trend Inc., All Rights Reserved. Todos los derechos reservados. Tous droits réservés.
33
FUNCIONAMIENTO
Copyright © 2018, Baby Trend Inc., All Rights Reserved. Todos los derechos reservados. Tous droits réservés.
15) •
Coloque el asiento en la posición de altura
deseada. Coloque el respaldo del asiento
en la posición más erguida (Fig. 15).
16) • Presione la manija de liberación de
la bandeja y deslice la bandeja hacia
afuera (Fig. 16).
17) • Tome los ganchos de la bandeja
ubicados en la parte posterior de la pata
de atrás (Fig. 17).
18) • Tire hacia arriba las palancas de
liberación (ubicadas a los costados del
armazón) y empuje las patas traseras en
dirección a las patas delanteras hasta
que se plieguen (Fig. 18). La silla ya
está lista para guardarla.
Este no es un juguete. NO permita que su
hijo juegue cerca de una sillita alta plegada.
PARA DESPLEGAR LA SILLA ALTA
Invierta los pasos mencionados anteriormente.
Fig. 15
Fig. 16
Fig. 18
Fig. 17
Manija de liberació
Botones de liberación
ADVERTENCIA: Hay niños que han sufrido
lesiones de cabeza, incluidas fracturas de cráneo, luego de
caerse de las sillitas elevadas.
• Verique que la sillita elevada esté sujeta de manera segura a
la silla de adultos antes de cada uso.
• SIEMPRE use sujeciones hasta que el niño pueda entrar
y salir de la sillita elevada sin ayuda. (aproximadamente 2
años y medio de edad) Ajustar ceñido.
• NUNCA permita que el niño se empuje para apartarse
de la mesa.
• NUNCA levante y traslade al niño en una sillita elevada.
• Manténgase CERCA y vigile a su hijo durante su uso.
• SIEMPRE controle que se adapte de manera segura a la silla
de adultos antes de cada uso y la limitación del producto.
• NUNCA use este producto sobre una banqueta o banco sin
respaldo.
ADVERTENCIA: Evite una lesión grave o la
muerte. No utilizar en los vehículos de motor.
ADVERTENCIA: La bandeja no fue diseñada
para sostener al niño en la silla.
ADVERTENCIA: Es recomendable que el
asiento elevador se utiliza en posición vertical sólo por los
niños capaces de sentarse erguido por sí solos.
PARA COLOCAR BOOSTER DE SILLA

36
FUNCIONAMIENTO
Copyright © 2018, Baby Trend Inc., All Rights Reserved. Todos los derechos reservados. Tous droits réservés.
35
ADVERTENCIA
Copyright © 2018, Baby Trend Inc., All Rights Reserved. Todos los derechos reservados. Tous droits réservés.
Min 16.9"
Min. 4.7"
Min 16.1"
ADVERTENCIA:
Asegure siempre el asiento
infantil a una silla por medio
de las cintas de ajuste inferior
y posterior. Nunca use este
asiento infantil en un banco
o banqueta sin respaldo.
Tamaño mínimo de la silla para
adultos: ancho: 16.1 pulgadas,
profundidad: 16.9 pulgadas,
altura del respaldo: 4.7 pulgadas.
• NUNCA levante este producto con su hijo encima.
• NO use este producto si está dañado o roto.
PARA COLOCAR
BOOSTER DE SILLA
ADVERTENCIA:
Siempre sujete la Sillita elevada
a una silla usando las correas
de sujeción de la parte inferior
y del respaldo. Nunca use
esta Sillita elevada sobre una
banqueta o banco que no
tengan respaldo.
19) • Desprenda la Sillita del Montaje de las
patas armazón superior ambos botones
centrales a cada lado de la sillita y
levantando la sillita (Fig. 19).
NO la retire con el niño en la sillita.
20) • Retire el Apoyapiés presionando el
botón de liberación a cada lado del
asiento y tirando del Apoyapiés hacia
fuera del Asiento (Fig. 20).
21) • Gire la Sillita Elevada boca abajo
(Fig. 21a). Deslice para abrir el
compartimento de las correas en la
parte inferior de la Sillita Elevada.
• Quité las correas afuera del
compartimiento. Entonces coloque el
Sillita Elevada en una silla que tenga un
respaldo sin apoyabrazos. Asegúrese de
que no hay relleno de más o cojines en
la silla (Fig. 21b).
Botones de liberació
Fig. 20
Fig. 19
Fig. 21a
Fig. 21b

37 38
FUNCIONAMIENTO FUNCIONAMIENTO
Copyright © 2018, Baby Trend Inc., All Rights Reserved. Todos los derechos reservados. Tous droits réservés. Copyright © 2018, Baby Trend Inc., All Rights Reserved. Todos los derechos reservados. Tous droits réservés.
• Envuelva las correas alrededor del
respaldo de la silla. Enganche las
hebillas asegurándose que escuche el *
CLIC* de la hebilla cerrando (Fig. 21c).
• Jale los extremos libres de la correa
para apretar rmemente la Sillita
Elevada a la silla (Fig. 21d).
• Envuelva las correas inferiores
alrededor de la parte inferior de la silla.
Enganche las hebillas asegurándose
que escuche el * CLIC * de las hebillas
cerrando (Fig. 21e).
• Jale los extremos libres de la correa
para apretar rmemente la Sillita
Elevada a la silla (Fig. 21d).
• Compruebe que el Booster este
completamente ajustado por agarrar el
Booster y tratar de mover el Booster de
lado a lado y arriba. La Sillita Elevada
no debe moverse más de 1 pulgada.
Installer le siège portable sur une chaise
munie d’un dossier.
PARA REMOVER LA
SILLITA ELEVADA
22) • Gire la Sillita Elevada boca abajo.
Deslice para abrir el compartimento
de las correas en la parte inferior de
la Sillita Elevada (Fig. 22a).
• Doble las correas y meta las en el
compartimiento, entonces deslice la
puerta para cerrar el compartimiento
(Fig. 22b).
Fig. 21c
Fig. 21d
Fig. 21e
Fig. 22a
Fig. 22b
SILLITA PARA EL AUTOMÓVIL
ADVERTENCIA:
Evite lesiones graves por caídas o
resbalones, siempre use el arnés de la sillita para el automóvil.
• Aprobado SOLAMENTE SNAP TECH
TM
productos pueden ser utilizados en el armazón.
Fig. 23a
Fig. 23b
Manija de liberació
Posición más alta
Posición más baja
Pasadores de bloqueo
PARA AJUSTAR EL ARMAZÓN
ADVERTENCIA:
No
ajuste la altura del sillita para el
automóvil mientras el niño esté en
él. Ajuste la altura del asiento antes
de colocar al niño en la silla.
ADVERTENCIA:
Verique que el soporte de ajuste
de altura esté nivelado y los lados
izquierdo y derecho estén trabados
antes de colocar al niño en la sillita
para el automóvil.
ADVERTENCIA:
Nunca utilice el modo de asiento
de coche en cualquiera de las
posiciones más altas. Siempre
utilice el asiento en la posición
más baja.
ADVERTENCIA: Nunca
descansa el soporte de ajuste
de altura en los pasadores de
seguridad.
23) •
Presione las Manijas derecha e izquierda del
soporte de ajuste de altura y coloque en la
posición más bajo (Fig. 23a).
NO ajuste con el niño en la sillita.
ATENCIÓN:
El soporte de ajuste de altura deben ser ajustado
a la posición más baja antes de colocar la silla de
auto
(Fig. 23b)
.
La page charge ...
La page charge ...
La page charge ...
La page charge ...
La page charge ...
La page charge ...
La page charge ...
La page charge ...
La page charge ...
La page charge ...
La page charge ...
La page charge ...
-
 1
1
-
 2
2
-
 3
3
-
 4
4
-
 5
5
-
 6
6
-
 7
7
-
 8
8
-
 9
9
-
 10
10
-
 11
11
-
 12
12
-
 13
13
-
 14
14
-
 15
15
-
 16
16
-
 17
17
-
 18
18
-
 19
19
-
 20
20
-
 21
21
-
 22
22
-
 23
23
-
 24
24
-
 25
25
-
 26
26
-
 27
27
-
 28
28
-
 29
29
-
 30
30
-
 31
31
-
 32
32


BABYTREND GoLite 5-in-1 Feeding Center Le manuel du propriétaire
- Taper
- Le manuel du propriétaire
- Ce manuel convient également à
dans d''autres langues
Documents connexes
-
 BABYTREND GoLite® Snap Gear® 5-in-1 Feeding Center Le manuel du propriétaire
-
 BABYTREND MUV 6-in-1 Custom Dining Chair Le manuel du propriétaire
-
 BABYTREND GoLite 3-in-1 Feeding Center Le manuel du propriétaire
-
 BABYTREND MUV 6-in-1 Custom Dining Chair Le manuel du propriétaire
-
BABYTREND Kid Café Snap Tech 5-in-1 High Chair Le manuel du propriétaire
-
BABYTREND MUV 7-in-1 Feeding Center High Chair Le manuel du propriétaire
-
 BABYTREND GoLite 5-in-1 Feeding Center Le manuel du propriétaire
-
 BABYTREND GoLite 3-in-1 Feeding Center Le manuel du propriétaire
-
BABYTREND Fast Fold High Chair - Canada Le manuel du propriétaire
-
 BABYTREND A La Mode Snap Gear 3-in-1 High Chair Le manuel du propriétaire


