Iomega ULTRAMAX PLUS ESATA Le manuel du propriétaire
- Catégorie
- Disques durs externes
- Taper
- Le manuel du propriétaire
Ce manuel convient également à

Quick Start Guide
Guide de démarrage rapide
Schnellstart-Handbuch
Guida di installazione rapida
Guía de instrucciones rápidas
Guia de uso rápido
Snel aan de slag
Snabbstartguide
Introduktion
Hurtigreferanse
Pikaopas
Gyors útmutató
Stručná příručka
Wprowadzenie
Краткое руководство по началу работы
Οδηγός γρήγορης εκκίνησης
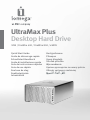
UltraMax Plus
Desktop Hard Drive
USB / FireWire 400 / FireWire 800 / eSATA
La page charge ...

3
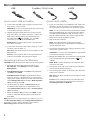
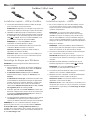
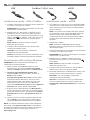
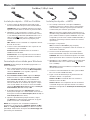
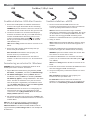
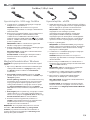
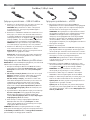
Installation rapide – USB ou FireWire
1. Connectez l’alimentation fournie à l’arrière du disque,
puis connectez-la à une prise secteur.
ATTENTION ! Ne déplacez pas le disque lorsqu’il est sous
tension pour éviter tout dommage ou perte de données.
2. Identifiez le câble approprié et connectez-le à l’arrière
du disque. Dans le cas d’une connexion USB, connectez
le câble USB à un port DuoLink (signalé par le symbole
USB
et eSATA). Pour une connexion FireWire, vous
pouvez utiliser n’importe quel port FireWire.
REMARQUE : ne connectez jamais le disque à
l’ordinateur à l’aide de plusieurs câbles.
3. Connectez l’autre extrémité du câble au port de votre
ordinateur. Mettez le lecteur sous tension.
Utilisateurs de Mac : Le lecteur doit être monté et
apparaître sur le bureau du Mac.
Utilisateurs de PC : votre ordinateur ne reconnaîtra pas le
disque tant que celui-ci ne sera pas reformaté. Reportez-
vous aux instructions ci-dessous.
Formatage du disque pour
Windows
ATTENTION ! Le reformatage du lecteur efface toutes les
données existantes !
1. Ouvrez l’utilitaire de gestion des disques de Windows
(cliquez avec le bouton droit de la souris sur Poste de
travail, Gérer, puis Gestion des disques).
2. Si l’Assistant lecteur s’ouvre, cliquez sur Suivant.
Sélectionnez le lecteur, cliquez sur Suivant puis sur
Terminer.
Si l’Assistant ne s’ouvre pas, recherchez le lecteur dans
la liste inférieure. Recherchez un disque ne présentant
ni lettre de lecteur ni système de fichiers. Cliquez avec
le bouton droit de la souris sur le nom du lecteur et
sélectionnez Initialiser le lecteur (Windows XP) ou Ecrire
une signature (Windows 2000) puis OK.
3. Le disque apparaît comme Non attribué et la barre doit
être noire. Cliquez avec le bouton droit sur la barre noire
et sélectionnez Nouvelle partition (Windows 2000) ou
Créer une partition (Windows XP).
4. Lorsque l’Assistant Création de partition s’ouvre, cliquez
sur Suivant sur chaque écran pour sélectionner les
options par défaut et formater le disque au format NTFS.
REMARQUE : si vous souhaitez utiliser le disque sur
plusieurs plates-formes, vous pouvez utiliser l’utilitaire
de disque Mac OS X ou Iomega FAT32 Formatter pour
modifier le format en FAT32. Pour obtenir des instructions
détaillées, consultez le service d’assistance technique sur
le site www.iomega.com.
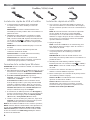
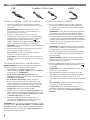
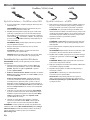
Installation rapide – eSATA
1. En cas de connexion à une carte PCI eSATA, assurez-
vous que les pilotes pour la carte ont été installés
et que la carte est correctement reconnue par votre
système d’exploitation.
REMARQUE : il n’est pas nécessaire d’installer
des pilotes particuliers pour le disque dur Iomega
UltraMax. Il est pris en charge par les pilotes inclus
avec la carte eSATA PCI. Si votre ordinateur dispose
d’une connexion eSATA intégrée, le lecteur est pris en
charge par les pilotes natifs du système d’exploitation.
2. Eteignez l’ordinateur.
REMARQUE : l’interface eSATA ne dispose PAS de la
fonction plug-and-play. Eteignez toujours l’ordinateur
avant de connecter ou de déconnecter le disque.
3. Connectez l’alimentation fournie à l’arrière du disque,
puis connectez-la à une prise secteur.
ATTENTION ! Ne déplacez pas le disque lorsqu’il est
sous tension pour éviter tout dommage ou perte de
données.
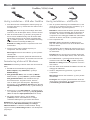
4. Identifiez le câble eSATA et connectez-le à un port
DuoLink (signalé par le symbole USB
et eSATA).
REMARQUE : ne connectez jamais le disque à
l’ordinateur à l’aide de plusieurs câbles.
5. Connectez l’autre extrémité du câble à votre carte PCI
eSATA ou à la connexion eSATA intégrée.
6. Redémarrez votre ordinateur à l’aide de l’interrupteur
d’alimentation situé à l’arrière du disque.
Utilisateurs de Mac : Le lecteur doit être monté et
apparaître sur le bureau du Mac.
Utilisateurs de PC : votre ordinateur ne reconnaîtra pas le
disque tant que celui-ci ne sera pas reformaté
. Consultez
les instructions à gauche pour le Formatage du disque
pour Windows.
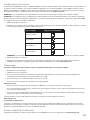
FireWire/1394/i.LinkUSB eSATA
S
A
T
A
SAT
A
La page charge ...
La page charge ...
La page charge ...
La page charge ...
La page charge ...

9
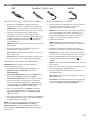
Snabbinstallation–USB eller Firewire
1. Anslut den medföljande strömkabeln till enhetens
baksida och koppla den därefter till ett strömuttag.
VARNING! Flytta inte enheten när den har startats för
att undvika att den skadas eller att data går förlorade.
2. Lokalisera rätt kabel och anslut den till uttaget på
baksidan av enheten. När du gör en USB-anslutning
ansluter du USB-kabeln i DuoLink-porten (som är
markerad med både USB-symbol
och ‘eSATA’).
När du gör en Firewire-anslutning kan du använda
valfri Firewire-port.
OBS! Anslut aldrig enheten till datorn med mer än en
kabel.
3. Anslut den andra änden av kabeln till porten på
datorn. Sätt på hårddisken.
Mac-användare: Hårddisken skall gå igång och
kommer att visas på skrivbordet.
PC-användare: Datorn kommer inte att känna av
enheten om den inte formateras om. Se instruktioner
nedan.
Formatering av enheten för Windows
VARNING! Omformatering av hårddisken innebär att all
befintlig information kommer att raderas!
1. Öppna Windows Diskhantering (högerklicka på Den
här datorn, välj Hantera, och klicka på Diskhantering).
2. Om Guiden disk öppnas, klicka på Nästa. Markera
hårddisken, klicka på Nästa och därefter på Avsluta.
Om Guiden ej öppnas, sök upp hårddisken i den undre
listan. Sök efter en hårddisk som ej har en bokstav
eller ett filsystem. Högerklicka på hårddiskens namn
och välj Initiera disk (Windows XP) eller Skriv signatur
(Windows 2000) och därefter OK.
3. Hårddisken kommer nu att visas som Tillgänglig och
listen kommer att vara svart. Högerklicka på den
svarta listen och välj Ny partition (Windows XP) eller
Skapa partition (Windows 2000).
4. När partitionsguiden öppnas klickar du på Nästa i alla
fönster för att välja standardalternativen och formatera
enheten NTFS.
OBS! Om du vill använda enhetens olika plattformar
kan du använda Mac OS X Disk Uitlity eller Iomega
FAT32 Formatter för att ändra formatet till FAT32. Besök
supportavsnittet på www.iomega.com för mer detaljerade
instruktioner.
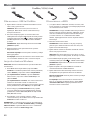
Snabbinstallation–eSATA
1. Om du ansluter till ett eSATA PCI-kort bör du
kontrollera att drivrutinerna för kortet har installerats
och att operativsystemet känner av kortet.
OBS! Du behöver inte installera några särskilda
drivrutiner för hårddisken Iomega UltraMax. Den stöds
av drivrutinerna som medföljer eSATA PCI-kortet. Om
din dator har en inbyggd eSATA-anslutning stöds
enheten av standarddrivrutinerna i operativsystemet.
2. Stäng av datorn.
OBS! eSATA-gränssnittet är INTE plug-and-play. Stäng
alltid av datorn innan du ansluter eller kopplar bort
enheten.
3. Anslut den medföljande strömkabeln till enhetens
baksida och koppla den därefter till ett strömuttag.
VARNING! Flytta inte enheten medan den startar. Den
kan skadas och du kan förlora data.
4. Lokalisera eSATA-kabeln och anslut den i DuoLink-
porten (som är markerad med både USB-symbol
och ‘eSATA’).
OBS! Anslut aldrig enheten till datorn med mer än en
kabel.
5. Anslut den andra änden av kabeln till eSATA PCI-kortet
eller den inbyggda eSATA-anslutningen.
6. Slå på strömbrytaren på enhetens baksida och starta
om datorn.
Mac-användare: Hårddisken skall gå igång och
kommer att visas på skrivbordet.
PC-användare: Datorn kommer inte att känna av
enheten om den inte formateras om. Se instruktioner
till vänster om Formatering av enheten för Windows.
FireWire/1394/i.LinkUSB eSATA
S
A
T
A
SAT
A

10
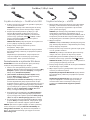
Hurtig installation – USB eller FireWire
1. Sæt stikket fra den medfølgende strømforsyning i på
bagsiden af drevet, og sæt derefter den anden ende i
en stikkontakt.
Forsigtig! Hvis du vil undgå at beskadige drevet eller
miste data, må du ikke flytte drevet, mens det startes.
2. Find det korrekte kabel, og sæt det i på bagsiden af
drevet. Ved en USB-tilslutning skal du tilslutte USB-
kablet til DuoLink-porten (markeret med både USB-
og ‘eSATA’-symbolet). Ved en FireWire-tilslutning
kan du anvende en vilkårlig FireWire-port.
Bemærk! Slut aldrig drevet til computeren med mere
end ét kabel.
3. Slut den anden ende af kablet til porten på
computeren. Tænd for drevet.
Mac-brugere: Drevet skal installeres og vises på Mac-
skrivebordet.
PC-brugere: Din computer genkender ikke drevet før
det er blevet omformateret. Se instruktioner herunder.
Formatering af drevet til Windows
FORSIGTIG! Formatering af drevet sletter alle eksisterende
data!
1. Åbn Windows Diskhåndtering (højreklik på
Dette computer, vælg Administrer, og klik på
Diskhåndtering).
2. Hvis guiden Disk åbnes, skal du klikke på Næste.
Marker disken, og klik på Næste og derefter Udfør.
Hvis guiden ikke åbnes, skal du finde drevet på
den nederste liste. Søg efter en disk, der ikke
viser et drevbogstav eller filsystem. Højreklik på
drevnavnet, og vælg Initialiser disk (Windows XP) eller
Signaturskrivning (Windows 2000), og klik derefter på
OK.
3. Drevet vises nu som Ikke-allokeret, og bjælken bliver
sort. Højreklik på den sorte linje, og vælg Ny partition
(Windows XP) eller Opret partition (Windows 2000).
4. Når guiden Partition åbnes, skal du klikke
på Næste på hvert skærmbillede for at vælge
standardindstillingerne og formatere drev-NTFS.
Bemærk! Hvis du vil bruge drevet på tværs af platforme,
kan du anvende Mac OS X Disk Utility eller Iomega
FAT32 Formatter for at ændre formatet til FAT32. Besøg
supportområdet på www.iomega.com for at få detaljerede
oplysninger.
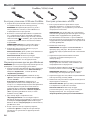
Hurtig installation – eSATA-stik
1. Hvis du opretter tilslutning til et eSATA PCI-kort, skal
du sørge for at driverne til kortet er installeret, og at
kortet genkendes af operativsystemet.
Bemærk! Du behøver ikke installere specielle drivere
til harddisken Iomega UltraMax. Den understøttes af
de drivere, der leveres med eSATA PCI-kortet. Hvis
computeren har et indbygget eSATA-stik, understøttes
drevet af de drivere, der findes i operativsystemet.
2. Luk computeren ned.
Bemærk! eSATA-grænsefladen er IKKE plug-and-
play. Luk altid computeren ned, før du tilslutter eller
frakobler drevet.
3. Sæt stikket fra den medfølgende strømforsyning i på
bagsiden af drevet, og sæt derefter den anden ende i
en stikkontakt.
Forsigtig! Hvis du vil undgå at beskadige drevet eller
miste data, må du ikke flytte drevet, mens det startes.
4. Find eSATA-kablet, og tilslut det til DuoLink-porten
(markeret med både USB-
og ‘eSATA’-symbolet).
Bemærk! Slut aldrig drevet til computeren med mere
end ét kabel.
5. Slut den anden ende af kablet til eSATA-kortet eller det
indbyggede eSATA-stik.
6. Tænd for afbryderen bag på drevet, og genstart
computeren.
Mac-brugere: Drevet skal installeres og vises på Mac-
skrivebordet.
PC-brugere: Din computer genkender ikke drevet før
det er blevet omformateret. Se instruktioner til venstre
på Formatering af drevet til Windows.
FireWire/1394/i.LinkUSB eSATA
S
AT
A
SAT
A

11
Rask installering – USB eller FireWire
1. Koble til den medfølgende strømforsyningen på
baksiden av stasjonen, og deretter til en stikkontakt.
FORSIKTIG! For å unngå skade på stasjonen eller tap
av data må ikke stasjonen flyttes mens den er slått på.
2. Finn frem den riktige kabelen og koble den til
på baksiden av stasjonen. Når det gjelder USB-
forbindelser, kobler du USB-kabelen til DuoLink-porten
(merket med både USB-symbolet
og ‘eSATA’). Til
FireWire-forbindelser kan du bruke en hvilken som
helst FireWire-port.
MERK: Koble aldri stasjonen til datamaskinen med mer
enn én kabel.
3. Koble den andre enden av kabelen til porten på
datamaskinen. Slå stasjonen på.
Mac-brukere: Stasjonen skal nå aktiveres og vises på
Mac-skrivebordet.
PC-brukere: Datamaskinen vil ikke finne stasjonen før
den er formatert på nytt. Se veiledningen nedenfor.
Formatere stasjonen for Windows
FORSIKTIG! Alle eksisterende data blir slettet ved
omformatering av stasjonen!
1. Åpne Windows Diskbehandling (høyreklikk på
Min datamaskin, velg Behandle og klikk på
Diskbehandling).
2. Hvis diskveiviseren åpnes, klikker du på Neste. Velg
disken, klikk på Neste og deretter på Fullfør.
Hvis veiviseren ikke åpnes, finner du frem stasjonen
på den nedre listen. Se etter en disk som ikke har
noen stasjonsbokstav eller filsystem. Høyreklikk på
stasjonsnavnet og velg Initialiser disk (Windows XP)
eller Signer (Windows 2000), og klikk på OK.
3. Nå vil stasjonen fremstå som Utildelt, og linjen vil
være svart. Høyreklikk på den svarte linjen og velg
Ny partisjon (Windows XP) eller Opprett partisjon
(Windows 2000).
4. Når partisjonsveiviseren åpnes, klikker du på Neste på
hvert skjermbilde for å velge standardalternativene og
formatere stasjonen med NTFS.
MERK: Hvis du vil bruke stasjonen på flere plattformer,
kan du bruke Mac OS X Diskverktøy eller Iomega
FAT32 Formatter til å endre formatet til FAT32. Besøk
støtteområdet på www.iomega.com for å finne detaljerte
instruksjoner.
Rask installering – eSATA
1. Hvis du kobler til et eSATA PCI-kort, må du kontrollere
at driverne for kortet er installert, og at kortet
gjenkjennes riktig av operativsystemet.
MERK: Det er ikke nødvendig å installere egne drivere
for Iomega UltraMax. Den støttes av driverne som
følger med eSATA PCI-kortet. Hvis datamaskinen har
en innebygd eSATA-tilkobling, støttes stasjonen av
driverne som er innebygd i operativsystemet.
2. Avslutt datamaskinen.
MERK: eSATA-grensesnittet er IKKE plug-and-play.
Avslutt alltid datamaskinen før du kobler stasjonen til
eller fra.
3. Koble til den medfølgende strømforsyningen på
baksiden av stasjonen, og deretter til en stikkontakt.
FORSIKTIG! For å unngå skade på stasjonen eller tap
av data må ikke stasjonen flyttes mens den er slått på.
4. Finn frem eSATA-kabelen og koble den til DuoLink-
porten (merket med både USB-symbolet
og
‘eSATA’).
MERK: Koble aldri stasjonen til datamaskinen med mer
enn én kabel.
5. Koble den andre enden av kabelen til eSATA PCI-kortet
eller den innebygde eSATA-tilkoblingen.
6. Slå på strømbryteren på baksiden av stasjonen, og
start datamaskinen.
Mac-brukere: Stasjonen skal nå aktiveres og vises på
Mac-skrivebordet.
PC-brukere: Datamaskinen vil ikke finne stasjonen før
den er formatert på nytt. Se veiledningen til venstre
angående Formatere stasjonen for Windows.
FireWire/1394/i.LinkUSB eSATA
S
A
T
A
SAT
A

12
Pika-asennus–USB tai FireWire
1. Kytke laitteen mukana toimitettu virtalähde aseman
takaosaan ja pistorasiaan.
VAROITUS: Älä irrota asemaa, kun sen virta on
kytkettynä. Näin vältät aseman vaurioitumisen ja
tietojen katoamisen.
2. Etsi oikea kaapeli ja kytke se aseman takaosaan.
USB-kytkennässä kytke USB-kaapeli DuoLink-porttiin
(merkitty USB-symbolilla
ja ‘eSATA’-merkinnällä).
FireWire-kytkennässä voit käyttää kaikkia FireWire-
portteja.
HUOMAUTUS: Kytke kiintolevy tietokoneeseen vain
yhdellä kaapelilla.
3. Kytke kaapelin toinen pää tietokoneen porttiin.
Käynnistä asema.
Macintosh-käyttäjät: Aseman pitäisi asentua ja näkyä
Mac-työpöydällä.
PC-käyttäjät: Tietokone ei tunnista asemaa ennen kuin
se on alustettu uudelleen. Katso seuraavat ohjeet.
Levyn alustaminen Windows
VAROITUS! Aseman uudelleenalustus poistaa kaikki sillä
olevat tiedot!
1. Avaa Windowsin levynhallinta (napsauta Oma
tietokone –kuvakkeen päällä hiiren oikeaa painiketta,
valitse Hallitse ja napsauta valintaa Levynhallinta.
2. Jos ohjattutoiminto avautuu, napsauta Seuraava.
Valitse asema, napsauta valintaa Seuraava ja sen
jälkeen Valmis.
Jos ohjattutoiminto ei avaudu, etsi asema alemmasta
luettelosta. Asemalla ei vielä ole tunnusta tai
tiedostojärjestelmää. Napsauta aseman nimeä oikealla
hiiren painikkeella, valitse Alusta ja sen jälkee OK.
3. Asema näkyy nyt varaamattomana tilana ja palkki
on musta. Napsauta mustaa palkkia hiiren oikealla
painikkeella, valitse Uusi osio (Windows XP) tai Luo
osio (Windows 2000).
4. Kun Ohjattu osion luominen aukeaa, valitse
oletusasetukset ja alusta NTFS-asema napsauttamalla
Seuraava kussakin ruudussa.
HUOMAUTUS: Jos haluat käyttää asemaa alustariippumat-
tomasti, voit alustaa sen Mac OS X Disk Utility- tai Iomega
FAT32 Formatter -ohjelmalla FAT32-muotoon. Tarkemmat
ohjeet löydät osoitteesta www.iomega.com.
Pika-asennus–eSATA
1. Jos kytket laitteen eSATA PCI -korttiin, varmista, että
kortin ohjaimet on asennettu ja että käyttöjärjestelmä
on tunnistanut kortin oikein.
HUOMAUTUS: Iomega UltraMax -kiintolevyä varten ei
tarvitse asentaa erityisiä ohjaimia. eSATA PCI -kortin
mukana toimitettavat ohjaimet tukevat kiintolevyä.
Jos tietokoneessa on sisäänrakennettu eSATA-
liitäntä, käyttöjärjestelmän asema ohjaimet tukevat
kiintolevyä.
2. Katkaise tietokoneesta virta.
HUOMAUTUS: eSata-liitäntä ei ole plug-and-play-
yhteensopiva. Katkaise tietokoneen virta aina, kun
kytket tai irrotat kiintolevyn.
3. Kytke laitteen mukana toimitettu virtalähde aseman
takaosaan ja pistorasiaan.
VAROITUS: Älä siirrä kiintolevyä, kun siihen on virta
kytkettynä. Levy voi vahingoittua, tai tietoja voi hävitä.
4. Etsi eSATA-kaapeli ja kytke se DuoLink-porttiin
(merkitty USB-symbolilla
ja ‘eSATA’-merkinnällä).
HUOMAUTUS: Kytke kiintolevy tietokoneeseen vain
yhdellä kaapelilla.
5. Kytke kaapelin toinen pää eSATA PCI -korttiin tai
sisäänrakennettuun eSATA-liitäntään.
6. Kytke laitteeseen virta kiintolevyn takana olevasta
virtakytkimestä ja käynnistä tietokone uudelleen.
Macintosh-käyttäjät: Aseman pitäisi asentua ja näkyä
Mac-työpöydällä.
PC-käyttäjät: Tietokone ei tunnista asemaa ennen
kuin se on alustettu uudelleen. Katso ohjeet Levyn
alustaminen Windows-käyttöjärjestelmää varten -
toimintoa varten vasemmalta.
FireWire/1394/i.LinkUSB eSATA
S
AT
A
SAT
A

13
Gyorstelepítés - USB vagy FireWire
1. Csatlakoztassa a mellékelt tápegységet a meghajtó
hátuljához és a konnektorhoz.
VIGYÁZAT! Bekapcsolás közben ne mozgassa a
meghajtót, így elkerülheti az esetleges sérüléseket és
adatvesztéseket.
2. Keresse meg a megfelelő kábelt, majd csatlakoztassa
a meghajtó hátuljához. USB használata esetén
csatlakoztassa az USB kábelt a DuoLink porthoz
(melynél szerepel az USB szimbólum
és az ’eSATA’
felirat is). FireWire használata esetén bármely FireWire
porthoz csatlakozhat.
MEGJEGYZÉS: Soha ne csatlakoztassa egynél több
kábellel a meghajtót a számítógéphez.
3. A kábel másik végét csatlakoztassa a számítógép egyik
portjához. Kapcsolja be a meghajtót.
Mac felhasználók: A meghajtót csatlakoztatni kell és
megjelenik a Mac asztalán.
PC felhasználók: A számítógép csak újraformázást
követően ismeri fel a meghajtót. Lásd a lenti
utasításokat.
Meghajtó formázásához Windows
FIGYELEM! A meghajtó újraformázása töröl minden meglévő
adatot!
1. Nyissa meg a Windows Lemezkezelés menütételt (jobb
oldali gombbal kattintson a Sajátgép menüre, jelölje
ki a Kezelés menüt és kattintson a Lemezkezelés
menütételre).
2. Ha megnyílik a Lemez varázsló, kattintson a Tovább
gombra. Jelölje ki a lemezt és kattintson a Továb b, majd
a Befejezés gombra.
Ha nem nyílik meg a Varázsló, az alsó listán keresse meg
a meghajtót. Keressen olyan lemezt, mely nem jeleníti
meg egy meghajtó betűjelét vagy fájlrendszert. Jobb
oldali gombbal kattintson a meghajtó nevére és jelölje
ki a Lemez inicializálása (Windows XP) vagy Aláírás
írása (Windows 2000) menütételt, majd kattintson az OK
gombra.
3. Nem lefoglalt jelzéssel jelenik meg a meghajtó, és fekete
színűre változik a sor. Jobb oldali gombbal kattintson a
fekete sorra és jelölje ki az Új partíció (Windows XP) vagy
Partíció létrehozása (Windows 2000) beállítást.
4. A Partíció varázsló megjelenésekor kattintson a
Tovább
gombra minden képernyőn az alapértelmezett
beállítások kijelöléséhez és a meghajtó NTFS
fájlrendszerrel való formázásához.
MEGJEGYZÉS: Ha a meghajtót több platformon szeretné
használni, a Mac OS X Disk Uitlity vagy Iomega FAT32
Formatter programmal formázza FAT32 formátumúra. A
részletes utasításokat megtalálhatja a www.iomega.com
webhely támogatási részletben.
Gyorstelepítés - eSATA
1. eSATA PCI-kártyához való csatlakoztatáskor győződjön
meg arról, hogy a kártyához tartozó meghajtó telepítve
lett, és a kártyát az operációs rendszer felismeri.
MEGJEGYZÉS: Az Iomega UltraMax merevlemez-
meghajtóhoz nem szükséges speciális
meghajtóprogramokat telepíteni. A meghajtót
támogatják az eSATA PCI-kártyához mellékelt
meghajtóprogramok. Amennyiben számítógépéhez
beépített eSATA-csatlakozó tartozik, a meghajtót az
operációs rendszer saját meghajtói is támogatják.
2. Zárja le a számítógépet.
MEGJEGYZÉS: Az eSATA felület NEM „plug-and-play“
jellegű, vagyis nem használható azonnal. A meghajtó
csatlakoztatásakor, illetve leválasztásakor mindig
kapcsolja ki a számítógépet.
3. Csatlakoztassa a mellékelt tápegységet a meghajtó
hátuljához és a konnektorhoz.
VIGYÁZAT! Bekapcsolás közben ne mozgassa a
meghajtót, így elkerülheti az esetleges sérüléseket és
adatvesztéseket.
4. Keresse meg az eSATA kábelt, és csatlakoztassa a
DuoLink porthoz (melynél szerepel az USB szimbólum
és az ’eSATA’ felirat is).
MEGJEGYZÉS: Soha ne csatlakoztassa egynél több
kábellel a meghajtót a számítógéphez.
5. Csatlakoztassa a kábel másik végét az eSATA PCI-
kártyához vagy a beépített eSATA-csatlakozóhoz.
6. Kapcsolja be a meghajtó hátoldalán található
főkapcsolót, és indítja újra a számítógépet.
Mac felhasználók: A meghajtót csatlakoztatni kell és
megjelenik a Mac asztalán.
PC felhasználók: A számítógép csak újraformázást
követően ismeri fel a meghajtót. Lásd a bal oldalon
lévő utasításokat a Meghajtó formázásához Windows
rendszerben.
FireWire/1394/i.LinkUSB eSATA
S
A
T
A
SAT
A

14
Rychlá instalace – FireWire nebo USB
1. Pomocí přiloženého adaptéru připojte diskové pole k
elektrické síti.
UPOZORNĚNÍ! Nepřemísťujte zapnuté diskové pole.
Hrozí poškození disků a ztráta dat.
2. Najděte příslušný kabel a připojte jej do zadní části
jednotky. U připojení pomocí rozhraní USB připojte
kabel USB k portu DuoLink (je označen jak symbolem
rozhraní USB
, tak textem „eSATA“). Pro připojení
pomocí rozhraní FireWire můžete použít jakýkoli port
rozhraní FireWire.
POZNÁMKA: Nikdy nepřipojujte jednotku k počítači
více než jedním kabelem.
3. Připojte druhý konec kabelu k portu v počítači.
Zapněte jednotku.
Systém Mac: Jednotka by se měla nainstalovat a
zobrazit na ploše systému Mac.
Uživatelé PC: Váš počítač jednotku nerozpozná dříve,
než bude znovu naformátována. Viz pokyny níže.
Formátování pro systém Windows
UPOZORNĚNÍ! Změna formátu jednotky smaže veškerá
stávající data!
1. Otevřete nástroj Správce disků systému Windows
(klepněte pravým tlačítkem myši na položku Tento
počítač, klepněte na příkaz Spravovat a vyberte
položku Správa disků).
2. Pokud se otevře Průvodce diskem, klepněte na tlačítko
Další. Vyberte disk, klepněte na tlačítko Další a potom
na tlačítko Dokončit.
Pokud se Průvodce neotevře, vyhledejte jednotku
v seznamu uvedeném dole. Vyhledejte disk, který
neuvádí písmeno jednotky nebo systém souborů.
Klepněte pravým tlačítkem myši na název jednotky a
klepněte na příkaz Inicializace disku (systém Windows
XP) nebo Podepsat (Windows 2000). Potom klepněte
na tlačítko OK.
3. Jednotka se nyní bude zobrazovat jako nerozdělená
a panel se bude zobrazovat černě. Klepněte pravým
tlačítkem myši na černý panel a vyberte příkaz Nový
oddíl (systém Windows XP) nebo Vytvořit oddíl
(systém Windows 2000).
4. Jakmile se otevře Průvodce oddílem, na každé
obrazovce stiskněte tlačítko Další, abyste vybrali
výchozí možnosti a zformátovali jednotku NTFS.
POZNÁMKA: Chcete-li jednotku použít mezi platformami,
můžete použít nástroj Mac OS X Disk Utility nebo Iomega
FAT32 Formatter ke změně formátu na FAT32. Podrobný
návod naleznete v oblasti podpory na stránkách
www.iomega.com.
Rychlá instalace – eSATA
1. Připojujete-li jednotku ke kartě PCI eSATA, ujistěte se,
že jsou pro kartu nainstalovány všechny ovladače a
karta je správně rozpoznána operačním systémem.
POZNÁMKA: Pro pevný disk Iomega UltraMax není
nutné instalovat zvláštní ovladače. Disk je podporován
ovladači ke kartě PCI eSATA. Je-li v počítači k dispozici
vestavěné připojení eSATA, je jednotka podporována
nativními ovladači v operačním systému.
2. Vypněte počítač.
POZNÁMKA: eSATA NENÍ rozhraní typu plug-and-play.
Před připojováním či odpojováním jednotky počítač
vždy vypněte.
3. Pomocí přiloženého adaptéru připojte diskové pole k
elektrické síti.
UPOZORNĚNÍ! Nepřemísťujte diskovou jednotku, když
je napájena. Hrozí poškození disků a ztráta dat.
4. Najděte kabel eSATA a připojte ho k portu DuoLink (je
označen jak symbolem rozhraní USB
, tak textem
„eSATA“).
POZNÁMKA: Nikdy nepřipojujte jednotku k počítači
pomocí více než jednoho kabelu.
5. Připojte opačný konec kabelu ke kartě PCI eSATA nebo
vestavěnému připojení eSATA.
6. Zapněte síťový vypínač na zadní straně jednotky a
restartujte počítač.
Systém Mac: Jednotka by se měla nainstalovat a
zobrazit na ploše systému Mac.
Uživatelé PC: Váš počítač jednotku nerozpozná
dříve, než bude znovu naformátována. Informace o
Formátování jednotky pro systém Windows naleznete
v pokynech vlevo.
FireWire/1394/i.LinkUSB eSATA
S
AT
A
SAT
A

15
Szybka instalacja — FireWire lub USB
1. Podłącz dostarczony zasilacz do gniazda z tyłu dysku
oraz do gniazda zasilania.
UWAGA! Aby uniknąć uszkodzenia dysku lub utraty
danych, nie wolno przenosić włączonego napędu.
2. Znajdź odpowiedni przewód i podłącz go z tyłu
napędu. W przypadku podłączania za pomocą
złącza USB, podłącz kabel USB do portu DuoLink
(oznaczonego symbolem USB
i eSATA). Celem
użycia połączenia FireWire można skorzystać z
dowolnego portu FireWire.
UWAGA: Nie wolno podłączać dysku do komputera za
pomocą więcej niż jednego przewodu.
3. Podłącz drugi koniec przewodu do portu w
komputerze. Włącz dysk.
Użytkownicy komputerów Macintosh: Dysk powinien
być zainstalowany i widoczny na pulpicie komputera
Macintosh.
Użytkownicy komputerów PC: Twój komputer nie
rozpozna napędu do momentu jego ponownego
sformatowania. Patrz: poniższe instrukcje.
Formatowanie w systemie Windows
OSTROŻNIE! Ponowne formatowanie dysku powoduje
usunięcie wszystkich istniejących danych!
1. Otwórz okno Zarządzanie dyskami w systemie
Windows (kliknij prawym przyciskiem myszy ikonę Mój
komputer, wybierz polecenie Zarządzaj, a następnie
kliknij ikonę Zarządzanie dyskami).
2. Jeśli zostanie uruchomiony Kreator dysku, kliknij
przycisk Dalej. Wybierz dysk, a następnie kliknij
kolejno przyciski Dalej i Zakończ.
Jeśli kreator nie zostanie uruchomiony, znajdź dysk
na liście wyświetlanej niżej. Dyskowi temu nie jest
przypisana litera i nie jest on sformatowany za pomocą
żadnego systemu plików. Kliknij prawym przyciskiem
myszy nazwę dysku i wybierz polecenie Zainicjuj dysk
(Windows XP) lub Zapisywanie podpisu (Windows
2000), a następnie kliknij przycisk OK.
3. Dysl będzie teraz wyświetlany jako Nieprzydzielony,
a pasek będzie czarny. Kliknij prawym przyciskiem
myszy czarny pasek i wybierz polecenie Nowa partycja
(Windows XP) lub Utwórz partycję (Windows 2000).
4. Po otwarciu kreatora partycji Partition Wizard, kliknij
przycisk Dalej na każdym ekranie, żeby wybrać opcje
domyślne i sformatować napęd w systemie NTFS.
UWAGA: Jeśli chcesz używać napędu na wielu systemach,
można skorzystać z narzędzi Mac OS X Disk Uitlity lub
Iomega FAT32 Formatter, aby zmienić format plików na
FAT32. Szczegółowe instrukcje są dostępne na stronie:
www.iomega.com.
Szybka instalacja — eSATA
1. W przypadku podłączania dysku do karty PCI eSATA
pamiętaj o zainstalowaniu sterowników karty oraz
sprawdź, czy karta jest poprawnie rozpoznawana
przez system operacyjny.
UWAGA: Dysk twardy Iomega UltraMax nie wymaga
instalowania specjalnych sterowników. Jest on
obsługiwany przez sterowniki karty PCI eSATA. Jeśli w
komputerze jest wbudowane złącze eSATA, dysk jest
obsługiwany przez sterowniki systemu operacyjnego.
2. Wyłącz komputer.
UWAGA: Interfejs eSATA NIE jest interfejsem plug-and-
play. Przed podłączeniem i odłączeniem dysku należy
zawsze wyłączyć komputer.
3. Podłącz dostarczony zasilacz do gniazda z tyłu dysku
oraz do gniazda zasilania.
UWAGA! Aby uniknąć uszkodzenia dysku lub utraty
danych, nie wolno przenosić włączonego dysku.
4. Zidentyfikuj przewód eSATA i podłącz go do portu
DuoLink (oznaczonego symbolem USB
i eSATA).
UWAGA: Nie wolno podłączać dysku do komputera za
pomocą więcej niż jednego przewodu.
5. Podłącz drugi koniec przewodu do karty PCI eSATA lub
wbudowanego złącza eSATA.
6. Włącz dysk za pomocą przełącznika z tyłu obudowy i
uruchom ponownie komputer.
Użytkownicy komputerów Macintosh: Dysk powinien
być zainstalowany i widoczny na pulpicie komputera
Macintosh.
Użytkownicy komputerów PC: Twój komputer nie
rozpozna napędu do momentu jego ponownego
sformatowania. Patrz: instrukcje z lewej strony
poświęcone Formatowaniu napędu w systemie
Windows.
FireWire/1394/i.LinkUSB eSATA
S
A
T
A
SAT
A
La page charge ...

17
Γρήγορη εγκατάσταση – USB ή FireWire
1. Συνδέστε το τροφοδοτικό που συνοδεύει το δίσκο στο
πίσω μέρος του και σε μια πρίζα ηλεκτρικού.
ΠΡΟΣΟΧΗ! Μην μετακινείτε το δίσκο όταν ξεκινά
η τροφοδοσία του, για να μην προκληθεί ζημιά ή
απώλεια δεδομένων.
2. Εντοπίστε το κατάλληλο καλώδιο και συνδέστε το στο
πίσω μέρος του δίσκου. Για σύνδεση USB, συνδέστε
το καλώδιο USB στην υποδοχή DuoLink (η οποία είναι
επισημασμένη και με το σύμβολο USB
και με την
ένδειξη ‘eSATA’). Για σύνδεση FireWire, μπορείτε να
χρησιμοποιήσετε οποιαδήποτε υποδοχή FireWire.
ΣΗΜΕΙΩΣΗ: Ποτέ μην συνδέετε τη μονάδα δίσκου με
τον υπολογιστή με περισσότερα του ενός καλώδια.
3. Συνδέστε το άλλο άκρο του καλωδίου σε μια υποδοχή
στον υπολογιστή σας. Ενεργοποιήστε το δίσκο.
Χρήστες Mac: Ο δίσκος πρέπει να μονταριστεί και να
εμφανιστεί στο γραφείο του Mac.
Χρήστες PC: Ο υπολογιστής σας δεν θα αναγνωρίσει
τον δίσκο έως ότου διαμορφωθεί εκ νέου. Δείτε τις
οδηγίες που ακολουθούν.
Διαμόρφωση του δίσκου για Windows
ΠΡΟΣΟΧΗ! Με την επανάληψη διαμόρφωσης του δίσκου θα
χαθούν όλα τα υπάρχοντα δεδομένα!
1. Ανοίξτε τη Διαχείριση Δίσκων των Windows (κάντε
δεξιό κλικ στην επιλογή Ο Υπολογιστής μου, επιλέξτε
Διαχείριση και κάντε κλικ στην επιλογή Διαχείριση
Δίσκων).
2. Εάν ανοίξει ο Οδηγός δίσκων, κάντε κλικ στο κουμπί
Επόμενο. Επιλέξτε το δίσκο, κάντε κλικ στο κουμπί
Επόμενο και, στη συνέχεια, στο κουμπί Τέλος.
Εάν δεν ανοίξει ο οδηγός, εντοπίστε το δίσκο στην
κάτω λίστα. Αναζητήστε ένα δίσκο για τον οποίο δεν
εμφανίζεται γράμμα μονάδας δίσκου ή σύστημα
αρχείων. Κάντε δεξιό κλικ στο όνομα της μονάδας
δίσκου και επιλέξτε Προετοιμασία δίσκου (Windows
XP) ή Εγγραφή υπογραφής (Windows 2000) και, στη
συνέχεια, OK.
3. Η μονάδα δίσκου θα εμφανιστεί τώρα με την ένδειξη
Δεν έχει εκχωρηθεί και η γραμμή θα είναι μαύρη.
Κάντε δεξιό κλικ επάνω στη μαύρη γραμμή και
επιλέξτε Νέο διαμέρισμα (Windows XP) ή Δημιουργία
διαμερίσματος (Windows 2000).
4. Όταν ανοίξει ο οδηγός διαμερισμάτων (Partition
Wizard) κάντε κλικ στο κουμπί Επόμενο σε κάθε
οθόνη, για να επιλέξετε τις προεπιλογές και να γίνει
διαμόρφωση NTFS του δίσκου.
ΣΗΜΕΙΩΣΗ: Εάν θέλετε να χρησιμοποιήσετε τον οδηγό
διαφορετικών πλατφόρμων, μπορείτε να χρησιμοποιήσετε
το Disk Uitlity του Mac OS X ή το Iomega FAT32 Formatter
για να αλλάξετε τη διαμόρφωση σε FAT32.
Γρήγορη εγκατάσταση –
eSATA
1. Εάν κάνετε σύνδεση σε μια κάρτα eSATA PCI,
βεβαιωθείτε ότι έχουν εγκατασταθεί τα προγράμματα
οδήγησης της κάρτας και ότι η κάρτα αναγνωρίζεται
κανονικά από το λειτουργικό σας σύστημα.
ΣΗΜΕΙΩΣΗ: Δεν χρειάζεται να εγκαταστήσετε ειδικά
προγράμματα οδήγησης για το σκληρό δίσκο Iomega
UltraMax. Υποστηρίζεται από τα προγράμματα
οδήγησης που περιλαμβάνονται στην κάρτα eSATA
PCI. Εάν ο υπολογιστής σας διαθέτει ενσωματωμένη
σύνδεση eSATA, ο δίσκος υποστηρίζεται από τα
προγράμματα οδήγησης που περιλαμβάνονται ήδη στο
λειτουργικό σύστημα.
2. Σβήστε τον υπολογιστή.
ΣΗΜΕΙΩΣΗ: Η διασύνδεση eSATA ΔΕΝ είναι plug-and-
play. Πρέπει πάντα να τερματίζετε τη λειτουργία του
υπολογιστή πριν συνδέσετε ή αποσυνδέσετε το δίσκο.
3. Συνδέστε το τροφοδοτικό που συνοδεύει το δίσκο στο
πίσω μέρος του και σε μια πρίζα ηλεκτρικού.
ΠΡΟΣΟΧΗ! Μην μετακινείτε το δίσκο όταν ξεκινά
η τροφοδοσία του, για να μην προκληθεί ζημιά ή
απώλεια δεδομένων.
4. Εντοπίστε το καλώδιο eSATA και συνδέστε το στην
υποδοχή DuoLink (η οποία είναι επισημασμένη και με
το σύμβολο USB
και με την ένδειξη ‘eSATA’).
ΣΗΜΕΙΩΣΗ: Ποτέ μην συνδέετε το δίσκο με τον
υπολογιστή με περισσότερα του ενός καλώδια.
5. Συνδέστε το άλλο άκρο του καλωδίου στην κάρτα
eSATA PCI ή στην ενσωματωμένη υποδοχή eSATA.
6. Ανάψτε το διακόπτη τροφοδοσίας στο πίσω μέρος του
δίσκου και κάντε επανεκκίνηση του υπολογιστή.
Χρήστες Mac: Ο δίσκος πρέπει να μονταριστεί και να
εμφανιστεί στο γραφείο του Mac.
Χρήστες PC: Ο υπολογιστής σας δεν θα αναγνωρίσει
τον δίσκο έως ότου διαμορφωθεί εκ νέου. Ανατρέξτε
στις οδηγίες αριστερά, στην ενότητα Διαμόρφωση του
δίσκου για Windows.
FireWire/1394/i.LinkUSB eSATA
S
A
T
A
SAT
A

18
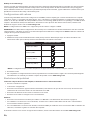
FireWire/1394/i.LinkUSB eSATA
S
AT
A
SAT
A
NewPartitionBpB;dG\WindowsXPCreate
Partition
dG\/IhWindows
!mYD]h/G\s:b/Ue=6YBiT
Nextob/6b
3.ql53qMD6Yu/qAb/q6@u3H/Ha_ncT
/Ri1D\sD?e
NTFS
SpDGb0q_D6beSATA
3\/Q1BA6F/1aqKm6b/1m]54i_eSATAPCI
ge3\/Q2b/13K/AbaqWI6b:eD14q295geB_*6Y
=q?Ka`I13\/Q2bncTaqWI6b/RhDU5
3K/@aqWI5:eD14q295nb/6?5u4h3R>ve
D\sD?fb
IomegaUltraMaxmTBemlY
3\/Q1Se3ifNfbaqWI6b:eD13QFm1
eSATA
PCIaqKm5CZieBA6G54i_eSATA:eBe
aqWI5:eD13QFm1D\sD?edTd6p
aqWI6b/RhoY3qc?e
D5mq2f`b/l;aqWI5/]p,1d\
3l;dTB5u3R>ve
eSATAaqKm6b3qK/@
D5mq2f`b/l;aqWI5/]p,1/f-d\aqWI6b
jcLYD\sD?eaqKm5a2\
D?eD@+f13]YDfb3\/Qb3cKaqKm61d\
3\/PC@*eD\s
jcqWI5/i8D\sD?e^pD?61d]5ujq2i5
/h/q2bB]YD\sD?eXc5/Z6b^b
!a2_BpB?61d\
eSATACZif1jcqKm5DuoLinkCb
Eeo6evTaf?p
USBeSATA
D\sD?eaqKm61/]cQed]5u3R>ve
B>a2_geD9_BA6F/1D5mq2f`b/l<1
"3\/Q21D@ra2`bDPaqKm61d\
eSATAPCI
aqKm5CZif1
eSATA:eBfb
#D?eD@+eoYm;mfb3\/Qb/6ZeaqWI61d\
D5mq2f`b/l;aqWI5BTd8D\s
El;oeBA6Gfb32Gib/1
MacD?eaqf?5d6qF
/l;06`e=QFncTDlRqFD\s
Mac
/l;DU6pgbD5mq2f`bEl;oeBA6Gfb32Gib/1
j6.ql5/Td65n6>D\sD?encTD5mq2f`b
aqWI6b/RibD\sD?e3.ql5/HDRh
WindowsgqfqbncTm;mfb
SpDGb0q_D6bUSBFireWire
D?eD@+f13]YDfb3\/Qb3cKaqKm61d\
3\/PC@*eD\s
jcqWI5/i8D\sD?e^pD?61d]5ujq2i5
/h/q2bB]YD\sD?eXc5/Z6b^b
D?eD@+f1jcqKm50F/ifba2`bBpB?61d\
BA6F/1aqKm6cbD\s
USBa2_aqKm61d\
USBCZif1DuoLinkEeo6evTaf?pCbUSB
eSATABA6F/1aqKm6cbFireWire
CZieBA6F^i`fp
FireWire
D\sD?eaqKm61/]cQed]5u3R>ve
B>a2_geD9_BA6F/1D5mq2f`b/l<1
/l<1/AbCZifb/1D@ra2`bDPaqKm61d\
D\sD?eaqWI61d\D5mq2f`b
El;oeBA6Gfb32Gib/1
MacD?eaqf?5d6qF
/l;06`e=QFncTDlRqFD\s
Mac
/l;DU6pgbD5mq2f`bEl;oeBA6Gfb32Gib/1
j6.ql5/Td65n6>D\sD?encTD5mq2f`b
/hmb/HtDRh
aqWI6b/RibD\sD?e3.ql5
Windows
Sqf;=GenbD\sD?e3.ql5/T+6Fjq2i5
m;mfb/h/q2b
aqWI6b/Ri13K/AbD\s=6Y
Win-
dows
mYgfps/fbE1D]hMyComputer
D6@D5mq2f`b/l;
ManageD]hd8
mY
DiskManagementD\s
mYD]hD\s:b/Ue=6Yd5
Nextob/6b
mYD]hd8D]bD6@
NextmYd8ob/6b
FinishBpB?61d]Y:b/Ufb=6Yd6pdb/lh
oYm;mfb3f-/]boYD\sD?e/`e
D?eD>DlRpuD\gT7?1aZFs
gfps/fbE1D]h/Zce/RhD\
D6@D\sD?edFmY
InitializeDisk
D]b3.ql5
WindowsXPWriteSignature
Sq\m531/6_
WindowsmYD]hd8OK
[Yme
jhncTrD\sD?eDlRqF
Unallocated
D]hmFsmcb/1OpDIbDlRqFJLAeDqV
D6@mFsOpDIbCkmYgfps/fbE1
La page charge ...

20
3. Turn the drive on.
4. Repartition and format your hard drive to complete the volume configuration. See the complete user’s manual
available on www.iomega.com if you need detailed instructions.
Troubleshooting
Drive does not appear in My Computer or Windows Explorer or on the Mac Desktop
• Try rebooting your computer.
• Check all connections.
• Make sure the drive is receiving power (check if the status light is on). Make sure the power switch is on.
• Make sure you are using the cable that came with your drive.
• Make sure the drive is connected to only one interface.
PC Users:
• Make sure the drive is formatted for use with Windows. Refer to the instructions on page 2.
• If you are connecting to a PCI card, make sure the correct drivers for the card are installed and recognized by your
operating system.
• If you are connecting to USB, check your BIOS to ensure USB is enabled. Please refer to your computer’s user’s guide
or manual for instructions.
If the drive is still not assigned a drive letter, please visit the support area on www.iomega.com.
PC will not start up
If your PC will not start up when the drive is connected, the BIOS on the computer probably has a conflict with large capacity
removable drives. To work around this problem, power off the drive when starting the computer. Power on the drive after
the computer finishes starting up.
Complete User's Manual
A complete user’s manual in HTML format is available on the support area on www.iomega.com.
Utilisation du lecteur
Déconnexion du lecteur
ATTENTION ! Pour éviter toute perte de données, ne déconnectez pas le lecteur pendant un transfert de données (voyant
d’activité clignotant).
Utilisateurs de USB/FireWire :
Utilisez toujours la procédure de retrait sécurisée de votre système d’exploitation lors de la
déconnexion du lecteur.
Utilisateurs de eSATA : mettez toujours le lecteur et l’ordinateur hors tension avant la déconnexion.
Utilisation du concentrateur USB
Le disque Iomega UltraMax comporte un concentrateur USB 2.0 à trois ports. Lorsque le disque est connecté via USB, vous
pouvez utiliser le concentrateur pour connecter d’autres périphériques USB à votre système.
REMARQUE : le concentrateur USB fonctionne uniquement lorsque le disque dur UltraMax est connecté à un port USB de
l’ordinateur. Ne connectez PAS le disque dur à plusieurs interfaces en même temps.
Utilisation du transfert FireWire
Le disque Iomega UltraMax comporte deux ports FireWire 400 et un port FireWire 800. Lorsque le disque dur est connecté
via FireWire, vous pouvez utiliser les autres ports pour connecter d’autres périphériques FireWire à votre système.
REMARQUE : le transfert FireWire fonctionne uniquement quand le disque UltraMax est connecté à un port FireWire de
l’ordinateur. Ne connectez PAS le disque dur à plusieurs interfaces en même temps.
Sauvegarder avec votre disque dur
Iomega recommande d’effectuer des sauvegardes régulières du système et des sauvegardes fréquentes de données
pour assurer la protection permanente de vos données les plus importantes. La périodicité des sauvegardes dépend
directement de l’importance des données à sauvegarder. Pour protéger vos données, copiez vos fichiers les plus importants
sur le disque par simple glisser-déplacer ou utilisez le logiciel de sauvegarde pour programmer des sauvegardes régulières.

21
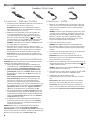
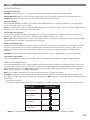
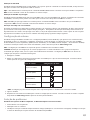
Confi guration du volume
Le disque Iomega UltraMax possède la configuration RAID 0 (volume réparti) qui s’affiche comme lettre de lecteur ou disque unique sur
le système. Si vous le souhaitez, vous pouvez modifier la configuration vers un autre type RAID, y compris RAID 1 (volume en miroir),
JBOD (volume étendu) ou non-RAID (volumes simples avec deux lettres de lecteur). Référez-vous aux instructions ci-dessous. Pour de
plus amples informations, consultez le service d’assistance technique sur le site
www.iomega.com
.
REMARQUE : une configuration autre que RAID n’est pas prise en charge lorsque le disque est connecté à eSATA.
ATTENTION ! La modification de la configuration du volume efface toutes les données existantes ! Si le disque contient des
fichiers que vous voulez sauvegarder, déplacez-les sur un autre disque avant de modifier la configuration. Ne modifiez PAS
la configuration lorsque le disque est alimenté.
1. Mettez le disque hors tension.
2. Modifiez les paramètres du commutateur situé à l’arrière du disque pour obtenir le type de volume souhaité. Consultez
les options des paramètres dans le tableau ci-dessous.
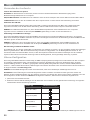
Type de volume Réglages de l’interrupteur
Simple (non-RAID)*
Etendu (JBOD)
Réparti (RAID 0)
En miroir (RAID 1)
REMARQUE : la configuration des volumes simples n’est pas prise en charge lorsque le disque est connecté à eSATA.
3. Mettez le disque sous tension.
4. Partitionnez et formatez le disque dur pour terminer la configuration du volume. Pour obtenir des instructions
détaillées, reportez-vous au guide complet de l’utilisateur disponible sur le site www.iomega.com.
Dépannage
Le lecteur n’apparaît pas dans le Poste de travail, l’Explorateur Windows ou sur le bureau du Mac.
• Redémarrez votre ordinateur.
• Vérifiez toutes les connexions.
• Assurez-vous que le lecteur est connecté à l’alimentation (vérifiez que le voyant d’état est allumé). Vérifiez que
l’interrupteur d’alimentation à l’arrière du lecteur est sur ON.
• Assurez-vous que vous utilisez le câble fourni avec le disque.
• Assurez-vous que le disque est connecté à une seule interface.
Utilisateurs de PC :
• Assurez-vous que le disque dur est formaté sous Windows. Consultez les instructions à la page 3.
• En cas de connexion à une carte PCI, assurez-vous que les pilotes corrects pour la carte sont installés et reconnus par
votre système d’exploitation.
• En cas de connexion USB, vérifiez votre BIOS pour vous assurer que la connexion USB est activée. Reportez-vous aux
instructions de la documentation de votre ordinateur.
Si aucune lettre n’a encore été attribuée au lecteur, consultez la section Support à l’adresse
www.iomega.com.
L’ordinateur ne démarre pas
Si votre PC ne démarre pas lorsque le disque est connecté, il est possible que le BIOS de votre ordinateur rencontre des
problèmes avec les disques amovibles de grande capacité. Afin de résoudre ce problème, éteignez le disque lorsque vous
démarrez l’ordinateur. Allumez-le une fois l’ordinateur démarré.
Guide complet de l’utilisateur
Un guide de l’utilisateur complet est disponible au format HTML dans la section Support du site www.iomega.com.
La page charge ...
La page charge ...
La page charge ...
La page charge ...
La page charge ...
La page charge ...
La page charge ...
La page charge ...
La page charge ...
La page charge ...

32
Limited Warranty • Garantie Limitée
Eingeschränkte Garantie • Garanzia limitata
Garantía limitada • Garantia limitada • Beperkte garantie
Ограниченная гарантия
Iomega warrants this hardware product to be free from defects in materials and workmanship for the warranty period. This non-transferable,
limited warranty is only to you, the first end-user purchaser. The warranty begins on the date of purchase and lasts for a period of one (1)
year for product purchased in the Americas or the Asia-Pacific region; ninety (90) days for Iomega reconditioned products purchased in these
regions; or, two (2) years for product purchased by an end-user in Europe, the Middle East, or Africa.
This warranty does not apply to: (a) Iomega software products; (b) expendable components such as fuses or bulbs; or (c) third party products,
hardware or software, supplied with the warranted product. Iomega makes no warranty of any kind on such products which, if included, are
provided “AS IS.” This warranty also excludes damage caused by accident, misuse, abuse, use of non-Iomega approved media, exposure of
media to excessive magnetic fields, or external environmental causes.
Your sole and exclusive remedy for a covered defect is repair or replacement of the defective product, at Iomega’s sole option and expense
(shipping may be charged), and Iomega may use new or refurbished parts or products to do so. The replaced part/product will be warranted for
the remainder of the original warranty or three (3) months from the date of shipment of such parts/products, whichever is longer. If Iomega is
unable to repair or replace a defective product, your alternate exclusive remedy shall be a refund of the original purchase price.
The above is Iomega’s entire obligation to you under this warranty. IN NO EVENT SHALL IOMEGA BE LIABLE FOR INDIRECT, INCIDENTAL,
CONSEQUENTIAL OR SPECIAL DAMAGES OR LOSSES, INCLUDING LOSS OF DATA, USE, OR PROFITS EVEN IF IOMEGA HAS BEEN ADVISED OF THE
POSSIBILITY OF SUCH DAMAGES. In no event shall Iomega’s liability exceed the original purchase price of the drive or the media disk. Some
jurisdictions do not allow the exclusion or limitation of incidental or consequential damages, so the above limitation or exclusion may not apply
to you.
Obtaining Warranty Service
You must notify Iomega within the warranty period to receive warranty service. Just as technology and market conditions vary, Iomega’s specific
customer support policies (including fees for services) and procedures change over time. To obtain information about Iomega’s current policies
or warranty service, please visit our website at www.iomega.com/supportpolicy.html or write to: Iomega Customer Service, 4059 South 1900
West, Roy, UT 84067. Contact Information for Iomega Customer Service in Europe can be obtained on our Support website at www.iomega.
com/europe/support. If your product is eligible for warranty service, you will be required to return it to Iomega, along with proper identification,
a return authorization number obtained from the Iomega website or provided by the Iomega representative, and proof of purchase. Iomega will
not protect, recover, or return data during warranty service so you should duplicate your data before shipment.
Limitations
THE ABOVE WARRANTY IS EXCLUSIVE AND IN LIEU OF ALL OTHER WARRANTIES, EXPRESS OR IMPLIED. To the extent permitted by applicable
law, IOMEGA SPECIFICALLY DISCLAIMS ANY IMPLIED WARRANTIES, INCLUDING ANY IMPLIED WARRANTY OF MERCHANTABILITY OR FITNESS FOR
A PARTICULAR PURPOSE. Any implied warranty required by applicable law shall be limited in duration to the express warranty term. Some
jurisdictions do not allow disclaimers of implied warranties or limitations on how long an implied warranty lasts, so the above limitation may not
apply to you. This warranty gives you specific legal rights and you may also have other rights that vary from jurisdiction to jurisdiction. Any suit
for breach of any warranty on your Product must be filed within one (1) year of the first date the suit could have been brought.
Iomega garantit que ce produit est exempt de tout vice de fabrication ou de malfaçon pendant toute la période de garantie. Cette garantie
limitée n’est pas transférable et ne s’applique qu’à l’utilisateur final. La garantie est effective à partir de la date d’achat et reste ensuite valable
pendant une période de un (1) an à compter de cette même date sur le continent américain ou dans la région Asie-Pacifique, quatre-vingt dix
(90) jours pour les produits remis en état achetés dans les régions précédemment citées ou deux (2) ans dans le cadre d’un achat effectué par
un utilisateur final en Europe, au Moyen-Orient ou en Afrique.
Cette garantie ne s’applique pas : (a) aux produits logiciels Iomega, (b) aux composants consommables comme les fusibles ou les ampoules
ou (c) aux produits tiers, matériel ou logiciel, fournis avec le produit sous garantie. Iomega ne garantit en aucun cas ces produits qui, si inclus,
sont fournis “EN L’ETAT”. Sont exclus les dommages causés par un accident, une mauvaise utilisation, un usage abusif, l’utilisation de supports
non fournis ou non approuvés par Iomega, une exposition excessive des supports à un champ magnétique ou tout autre cause externe d’origine
naturelle.
Votre seul et unique recours en cas de défaut reconnu est la réparation ou le remplacement du produit défectueux, aux frais et à la discrétion
de Iomega (l’expédition pourra vous être facturée). Iomega se réserve le droit d’utiliser des pièces ou produits neufs ou remis en état pour
procéder à la réparation. L’élément/produit remplacé sera garanti pendant le reste de la garantie d’origine ou, au maximum, trois (3) mois à
dater de l’expédition desdits éléments/produits. S’il s’avère que Iomega est dans l’impossibilité de réparer ou remplacer un produit défectueux,
votre seul recours sera le remboursement du prix d’achat initial. L’obligation de garantie de Iomega envers vous se limite aux éléments cités
précédemment. EN AUCUN CAS IOMEGA NE POURRA ETRE TENUE POUR RESPONSABLE DES DOMMAGES OU PERTES INDIRECTS, ACCESSOIRES
OU SPECIAUX, Y COMPRIS LA PERTE DE DONNEES, DE L’IMPOSSIBILITE D’UTILISATION OU DE PROFIT ET CE MEME SI IOMEGA A ETE AVERTIE DE
L’EVENTUALITE DE TELS DOMMAGES. En aucun cas la responsabilité de Iomega ne pourra s’étendre au-delà du prix d’achat initial de l’appareil
ou du support. Certaines juridictions ne reconnaissent pas l’exclusion ou la limitation des dommages accessoires ou indirects. De ce fait, les
limitations ou les exclusions énoncées ci-dessus peuvent ne pas être applicables dans votre cas.
Obtention d’un service de garantie
Pour bénéficier des services sous garantie, vous devez en avertir Iomega pendant la période de garantie. A l’image des technologies et des
conditions du marché, les procédures et les politiques d’Iomega en matière d’assistance clientèle (notamment la tarification des services)
sont susceptibles de varier dans le temps. Afin d’obtenir des informations pertinentes sur les politiques actuelles ou sur le service de garantie

33
d’Iomega, veuillez visiter notre site Web www.iomega.com/supportpolicy.html ou nous écrire à l’adresse suivante : Iomega Customer Service,
4059 South 1900 West, Roy, UT 84067. Les coordonnées des services d’assistance clientèle d’Iomega en Europe se trouvent sur notre site Web
d’assistance, www.iomega.com/europe/support. Si votre produit peut bénéficier du service sous garantie, vous devrez le retourner à Iomega,
avec son identification détaillée, un numéro d’autorisation de retour obtenu à partir de notre site Web ou fourni par votre représentant Iomega
et une preuve d’achat. Iomega ne protège, ne récupère ni ne retourne des données pendant le service de garantie ; assurez-vous donc de copier
vos données avant d’expédier le matériel.
Limites
LA PRESENTE GARANTIE EST EXCLUSIVE ET TIENT LIEU DE TOUTE AUTRE GARANTIE, EXPRESSE OU IMPLICITE. Dans les limites de la législation en
vigueur, IOMEGA DECLINE TOUTE GARANTIE IMPLICITE, Y COMPRIS TOUTE GARANTIE IMPLICITE DE COMMERCIALISATION OU D’ADAPTATION A UN
USAGE PARTICULIER. Toute garantie implicite requise par la législation en vigueur sera limitée dans le temps à la durée de la garantie expresse.
Certaines juridictions ne reconnaissent pas la déclaration de non-responsabilité des dommages accessoires ou indirects. De ce fait, les limitations ou
les exclusions énoncées ci-dessus peuvent ne pas être applicables dans votre cas. Cette garantie vous donne certains droits spécifiques, mais vous
pouvez également bénéficier de droits supplémentaires en fonction de la législation de votre état. Toute poursuite pour défaut de garantie sur votre
produit devra être déposée dans un délai d’un an à compter du premier jour à partir duquel la poursuite peut être engagée.
Iomega garantiert, dass dieses Hardwareprodukt während des Garantiezeitraums keine Material- oder Herstellungsfehler aufweist. Diese nicht
übertragbare, eingeschränkte Garantie gilt ausschließlich für Sie als ersten Käufer sowie Endnutzer dieses Produkts. Der Garantiezeitraum
beginnt mit dem Erwerbsdatum und hat für folgenden Zeitraum Gültigkeit: ein (1) Jahr für Produkte, die in Nord-, Mittel- und Südamerika oder
im asiatisch-pazifischen Raum erworben wurden; neunzig (90) Tage für alle bei Iomega überholten Produkte, die in diesen Regionen erworben
wurden; zwei (2) Jahre für Produkte, die von Endverbrauchern in Europa, im Nahen Osten oder in Afrika erworben wurden.
Von dieser Garantie sind ausgenommen: (a) Iomega-Softwareprodukte; (b) Verschleißteile wie Sicherungen oder Glühbirnen; bzw. (c)
Drittanbieterprodukte, -Hardware oder -Software, die im Lieferumfang des Produkts enthalten waren, auf das sich die Garantie bezieht. Iomega
übernimmt hinsichtlich dieser Art von Produkten keinerlei Garantie. Falls diese im Lieferumfang enthalten sind, werden sie mit Abbedingen der
Haftung für einen bestimmten Zweck zur Verfügung gestellt. Ausgenommen sind Schäden, die durch Unfall, Zweckentfremdung, unsachgemäße
Verwendung, Verwendung von Medien, die nicht von Iomega zur Verfügung gestellt oder anerkannt wurden, Kontakt der Medien mit übermäßig
starken Magnetfeldern oder Umwelteinflüssen verursacht wurden.
Ihr einziges und ausschließliches Rechtsmittel im Falle eines abgedeckten Defekts ist die Reparatur bzw. der Ersatz des defekten Produkts; die
diesbezügliche Entscheidung sowie die anfallenden Kosten liegen ausschließlich bei Iomega (abgesehen von evtl. anfallenden Frachtkosten).
Iomega kann hierzu neue oder gebrauchte Teile oder Produkte verwenden. Für das ersetzte Teil/Produkt wird für den Rest der ursprünglichen
Garantiefrist oder für drei (3) Monate ab Versanddatum solcher Teile/Produkte Garantie geleistet, je nachdem, welcher Zeitraum länger ist. Falls
die Reparatur bzw. der Ersatz eines defekten Produkts durch Iomega nicht möglich ist, ist Ihr einziges alternatives Rechtsmittel die Erstattung
des ursprünglichen Kaufpreises. Die obigen Angaben stellen sämtliche Verpflichtungen dar, die Iomega Ihnen gegenüber im Rahmen dieser
Garantie hat. IOMEGA IST UNTER KEINEN UMSTÄNDEN HAFTBAR FÜR MITTELBARE SCHÄDEN, SCHADENSERSATZ FÜR AUFWENDUNGEN BEI
VERTRAGSERFÜLLUNG, FOLGESCHÄDEN ODER SPEZIELLE SCHÄDEN BZW. VERLUSTE, EINSCHLIESSLICH DATENVERLUST, NUTZUNGSAUSFALL
SOWIE BETRIEBSUNTERBRECHUNG, SELBST WENN IOMEGA AUF DIE MÖGLICHKEIT SOLCHER SCHÄDEN HINGEWIESEN WURDE. Die Haftung von
Iomega übersteigt keinesfalls den ursprünglichen Kaufpreis des jeweiligen Laufwerks oder Datenträgers. Gemäß einiger Rechtsprechungen ist
der Ausschluss bzw. die Einschränkung von Schadensersatz für Aufwendungen bei Vertragserfüllung bzw. Folgeschäden nicht zulässig, sodass
die oben genannten Ausschluss- bzw. Einschränkungsklauseln für Sie möglicherweise nicht relevant sind.
Inanspruchnahme des Garantieservice
Um den Garantieservice in Anspruch nehmen zu können, müssen Sie Iomega innerhalb der Garantiefrist benachrichtigen. Die spezifischen
Kundendienstrichtlinien von Iomega (einschließlich der Servicegebühren) sowie die entsprechenden Vorgehensweisen können sich aufgrund
der veränderlichen Technologie und Marktbedingungen ändern. Wenn Sie gerne mehr über die aktuellen Kundendienstangebote oder
Garantieleistungen von Iomega erfahren möchten, besuchen Sie unsere Website unter
www.iomega.com/supportpolicy.html. Sie können sich auch unter folgender Adresse schriftlich mit Iomega in Verbindung setzen: Iomega
Customer Service, 4059 South 1900 West, Roy, UT 84067. Informationen zur Kontaktaufnahme mit dem Kundendienst von Iomega finden Sie
auf unserer Kundendienst-Website unter www.iomega.com/europe/support. Wenn für Ihr Produkt Garantieanspruch besteht, müssen Sie es mit
ordnungsgemäßer Identifikation, der über die Iomega Website oder vom Vertreter zur Verfügung gestellten Nummer der Rückgabeberechtigung
sowie dem Kaufnachweis an Iomega zurück senden. Im Rahmen des Garantieservice werden Daten von Iomega weder geschützt noch
wiederhergestellt oder zurückgegeben, weshalb es sich empfiehlt, Ihre Daten vor dem Versand zu duplizieren.
Einschränkungen
BEI DER OBIGEN GARANTIE HANDELT ES SICH UM EINE AUSSCHLIESSLICHE GARANTIE, DIE ANSTELLE ALLER WEITEREN GARANTIEN,
AUSDRÜCKLICHER ODER STILLSCHWEIGENDER NATUR, GÜLTIGKEIT HAT. Innerhalb des gesetzlich zulässigen Rahmens SCHLIESST IOMEGA
AUSDRÜCKLICH JEGLICHE STILLSCHWEIGENDEN GARANTIEN AUS, EINSCHLIESSLICH JEGLICHER STILLSCHWEIGENDER GARANTIE HINSICHTLICH
DER MARKTGÄNGIGKEIT BZW. DER EIGNUNG FÜR EINEN BESTIMMTEN ZWECK. Sämtliche stillschweigenden Garantien, die laut geltendem
Recht gewährt werden müssen, sind auf die Laufzeit der ausdrücklichen Garantie beschränkt. Gemäß einiger Rechtsprechungen ist der
Haftungsausschluss stillschweigender Garantien oder die Einschränkung bezüglich der Laufzeit stillschweigender Garantien nicht zulässig,
sodass die obigen Einschränkungsklauseln für Sie möglicherweise nicht relevant sind. Durch diese Garantie werden Ihnen gewisse
subjektive Rechte verliehen, und Sie verfügen u. U. über weitere Rechte, die je nach Rechtsprechung variieren. Sämtliche Klagen hinsichtlich
Garantieverletzungen in Bezug auf Ihr Produkt müssen innerhalb 1 Jahres erhoben werden. Ausschlaggebend hierfür ist das Datum, zu dem die
Klageerhebung erstmalig möglich war.
Iomega garantisce che questo prodotto hardware è privo di difetti di fabbricazione e dei materiali durante l’intero periodo di validità della
garanzia. La presente garanzia limitata, non trasferibile, è da considerarsi valida per il solo utente finale e non può quindi essere ceduta a terze
parti. La garanzia decorre a partire dalla data di acquisto del prodotto e ha validità di un (1) anno per i prodotti acquistati nelle Americhe o nella
regione dell’Estremo Oriente e Oceania; la garanzia ha una validità di novanta (90) giorni per i prodotti Iomega ricondizionati acquistati in tali
regioni; oppure di due (2) anni per i prodotti acquistati dall’utente finale in Europa, Medio Oriente o Africa.
La page charge ...
La page charge ...
La page charge ...

37
Manufacturer/Responsible Party
Iomega Corporation
4059 South 1900 West
Roy, UT 84067 USA
CE (European Community)
This Iomega product conforms to the following European Directive(s)and Standard(s): Application of Council Directive: 2004/108/EC. Standards
to which Conformity is declared: EN55022, EN55024, EN61000-3-2, EN61000-3-3. Importer’s Name: Iomega International, S.A. Type of
Equipment: Information Technology Equipment.
Waste Electrical and Electronic Equipment (WEEE)
In accordance with European Directive 2002/96/EC on Waste Electrical and Electronic Equipment (WEEE), the presence of the above symbol on
the product or on its packaging indicates that this item must not be disposed of in the normal unsorted municipal waste stream. Instead, it is
the user’s responsibility to dispose of this product by returning it to a collection point designated for the recycling of electrical and electronic
equipment waste. Separate collection of this waste helps to optimize the recovery and recycling of any reclaimable materials and also reduces
the impact on human health and the environment.
For more information concerning the correct disposal of this product, please contact your local authority or the retailer where this product was
purchased.
FCC
This equipment complies with Part 15 of the FCC Rules. Operation is subject to the
following conditions: (1) This device may not cause harmful interference, and (2) this
device must accept any interference received, including interference that may cause
undesired operation.
NOTE: This equipment has been tested and found to comply with the limits for a Class
B digital device, pursuant to part 15 of the FCC Rules. These limits are designed to provide reasonable protection against harmful interference
in a residential installation. This equipment generates, uses and can radiate radio frequency energy and, if not installed and used in accordance
with the instructions, may cause harmful interference to radio communications. However, there is no guarantee that interference will not occur in
a particular installation. If this equipment does cause harmful interference to radio or television reception, which can be determined by turning
the equipment off and on, the user is encouraged to try to correct the interference by one of more or the following measures:
• Reorient or relocate the receiving antenna.
• Increase the separation between the equipment and receiver.
• Connect the equipment into an outlet on a circuit different from that to which the receiver is connected.
• Consult the dealer or an experienced radio/TV technician for help.
Canadian Verifi cation
This Class B digital apparatus meets all requirements of the Canadian Interference-Causing Equipment Regulations (ICES-003, Class B).
CE (Union européenne)
Ce produit Iomega est certifié conforme aux normes et directives européennes suivantes : Application de la directive du Conseil : 2004/108/EC.
Conformité déclarée pour les normes suivantes : EN55022, EN55024, EN61000-3-2, EN61000-3-3. Nom de l’importateur : Iomega International,
S.A. Type d’équipement : matériel informatique.
Déchets d’équipements électriques et électroniques (WEEE)
Conformément à la Directive européenne 2002/96/EC relative aux déchets d’équipements électriques et électroniques (WEEE), la présence
du symbole ci-dessus sur un produit ou sur son emballage indique que cet article ne doit pas être mis au rebut avec les déchets municipaux
normaux non-triés. La responsabilité incombe à l’utilisateur de ramener ce produit à un endroit dédié au recyclage des déchets d’équipements
électriques et électroniques. La collecte indépendante de ces déchets permet d’optimiser la récupération et le recyclage des matériaux
récupérables et de minimiser l’impact sur la santé des personnes et l’environnement.
Pour de plus amples informations concernant la mise au rebut appropriée de ce produit, contactez les autorités locales ou le revendeur auprès
duquel le produit a été acheté.
Regulatory Information • Informations relatives à la réglementation
Gesetzliche Bestimmungen • Informazioni sulle regolamentazioni
Información reglamentaria • Informações regulamentares
Regulatieve informatie • Сведения о нормативных требованиях
La page charge ...
La page charge ...

Copyright © 2009 Iomega Corporation. All rights reserved. Iomega and the stylized “i” logo are either registered trademarks or trademarks
of Iomega Corporation in the United States and/or other countries. Microsoft and Windows are either registered trademarks or trademarks of
Microsoft Corporation in the United States and/or other countries. Apple, Mac, and FireWire are either registered trademarks or trademarks of
Apple Inc. in the United States and/or other countries. Certain other product names, brand names, and company names may be trademarks or
designations of their respective owners.
31792801 2/06/09 b
English
If you have a problem, we can help. Please do NOT return this product to the store!
Your answer is on the web. Visit our award-winning web support site www.iomega.com.
Select your region, then select Support.
Français
Si vous avez un problème, nous pouvons vous aider. NE RENVOYEZ PAS ce produit au magasin !
Votre réponse est sur le Web. Site Web d’assistance primé www.iomega.com.
Sélectionnez votre région puis Support.
Deutsch
Wenn Sie ein Problem haben, können wir Ihnen helfen.
Bringen Sie dieses Produkt NICHT zu Ihrem Händler zurück!
Ihre Antwort steht im Netz. Preisgekrönte Support-Website www.iomega.com.
Wählen Sie Ihr Gebiet aus und klicken Sie auf Support.
Italiano
In caso di problemi, noi possiamo fornire assistenza. NON restituire questo prodotto al rivenditore!
La risposta è sul Web. Sito di supporto sul Web premiato www.iomega.com.
Selezionare la propria regione, quindi scegliere Assistenza.
Español
Si tiene algún problema, podemos ayudar. ¡Por favor, NO devuelva este producto a la tienda!
Su respuesta está en la web. Destacado sitio Web de atención al cliente www.iomega.com.
Elija su región y luego seleccione Suporte.
Português
Se você tiver um problema, nós podemos ajudar. NÃO devolva esse produto à loja!
A resposta para você está na web. Site da web vencedor de prêmios www.iomega.com.
Selecione a sua região e Suporte.
Русский
Возникли проблемы – обращайтесь за помощью. НЕ возвращайте этот продукт в магазин!
Решение можно найти в сети Интернет. Посетите наш отмеченный наградами веб-сайт службы
поддержки по адресу www.iomega.com/support.
-
 1
1
-
 2
2
-
 3
3
-
 4
4
-
 5
5
-
 6
6
-
 7
7
-
 8
8
-
 9
9
-
 10
10
-
 11
11
-
 12
12
-
 13
13
-
 14
14
-
 15
15
-
 16
16
-
 17
17
-
 18
18
-
 19
19
-
 20
20
-
 21
21
-
 22
22
-
 23
23
-
 24
24
-
 25
25
-
 26
26
-
 27
27
-
 28
28
-
 29
29
-
 30
30
-
 31
31
-
 32
32
-
 33
33
-
 34
34
-
 35
35
-
 36
36
-
 37
37
-
 38
38
-
 39
39
-
 40
40


Iomega ULTRAMAX PLUS ESATA Le manuel du propriétaire
- Catégorie
- Disques durs externes
- Taper
- Le manuel du propriétaire
- Ce manuel convient également à
dans d''autres langues
- italiano: Iomega ULTRAMAX PLUS ESATA Manuale del proprietario
- English: Iomega ULTRAMAX PLUS ESATA Owner's manual
- español: Iomega ULTRAMAX PLUS ESATA El manual del propietario
- Deutsch: Iomega ULTRAMAX PLUS ESATA Bedienungsanleitung
- русский: Iomega ULTRAMAX PLUS ESATA Инструкция по применению
- Nederlands: Iomega ULTRAMAX PLUS ESATA de handleiding
- português: Iomega ULTRAMAX PLUS ESATA Manual do proprietário
Documents connexes
-
Iomega ULTRAMAX PRO Guide de démarrage rapide
-
-
-
-
-
Iomega UltraMax Plus Guide de démarrage rapide
-
-
-
-
Iomega eGo 34375 Guide de démarrage rapide
Autres documents
-
SilverStone DS221B Le manuel du propriétaire
-
Akitio Taurus Mini Super-S LCM Manuel utilisateur
-
Cooler Master X Craft 350, Silver spécification
-
Verbatim 2-Disk RAID USB and eSATA External Hard Drive Mode d'emploi
-
Western Digital My Book Premium ES Edition Manuel utilisateur
-
Cavalry CAXB Guide d'installation
-
Buffalo DriveStation Combo4 1.0TB Manuel utilisateur
-
-