iOttie Auto Sense 2 Mode d'emploi

Taper
Mode d'emploi
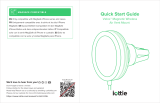
Remove the plastic cover from the suction cup and firmly press onto the dashboard pad.
Push the lever down to engage suction.
Retirez le couvercle en plastique de la ventouse et appuyez fermement sur le disque du
fixation pour le tableau de bord. Poussez le levier vers le bas pour enclencher l'aspiration.
Rimuovi la copertura in plastica dalla ventosa ed esercita una pressione decisa sul pad per
cruscotto. Abbassa la leva di blocco per fissare la ventosa.
Entfernen Sie die Kunststoabdeckung vom Saugnapf und drücken Sie ihn fest auf die
Armaturenbrettunterlage. Drücken Sie den Hebel nach unten, um die Absaugung zu
aktivieren.
Retire la cubierta de plástico de la ventosa y presione firmemente sobre la almohadilla para
tablero. Mueva la palanca hacia abajo para activar la succión.
EN Do not install on leather dashboards. FR Ne pas installer sur les tableaux de bord
en cuir. IT Non installare sui cruscotti in pelle. DE Nicht auf ledernen Armaturenbrettern
installieren. ES No la instale en tableros de cuero.
3
LOCK
1
2
20
min
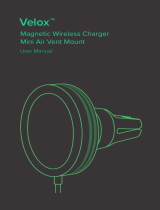
Connect the mount cradle to the ball joint. Tighten the cradle knob.
Connectez le support de montage avec la rotule d’attelage. Serrez ensuite le bouton du support.
Collegare la base del supporto con il giunto sferico. Stringere la manopola della base.
Verbinden Sie die Montagehalterung mit dem Kugelgelenk. Dann ziehen Sie den Wiegeknopf fest.
Conecte la horquilla a la junta esférica. Apriete la perilla de la horquilla.
Choose a flat mounting location on your dashboard and wipe the surface clean. Peel o the
film on the dashboard pad and evenly press onto the desired location. Wait 20 minutes.
Choisissez un emplacement de montage plat sur votre tableau de bord et nettoyez la surface.
Décollez le film protecteur du disque de fixation pour le tableau de bord et appuyez
uniformément sur l'emplacement souhaité. Patientez 20 minutes.
Scegli una posizione piana sul cruscotto dove fissare il pad e pulisci la superficie. Rimuovi la
pellicola dal pad per cruscotto, collocalo nella posizione desiderata e fissalo esercitando una
pressione uniforme. Attendi 20 minuti.
Wählen Sie einen ebenen Montageort auf dem Armaturenbrett und wischen Sie die Oberfläche
sauber. Ziehen Sie die Folie auf dem Armaturenbrett-Pad ab und drücken Sie sie gleichmäßig
auf die gewünschte Stelle. Warten Sie 20 Minuten.
Elija una ubicación de montaje plana en el tablero y limpie la superficie. Despegue la película
de la almohadilla para tablero y presiónela uniformemente en la ubicación de deseada. Espere
20 minutos.
2
1
Assemblage et installation du produit · Assemblaggio e installazione
del prodotto · Produktmontage und -installation · Montaje e instalación
de productos
Product Assembly & Installation Connexion de l’alimentation · Collegamento di energia · Anschließen der
Stromversorgung · Conexión a la corriente
Connecting to Power
Plug the included USB-C cable into the USB port located on the back of the mount cradle.
Branchez le câble USB-C sur le support de charge à l'arrière de la tête de montage.
Collega il cavo USB-C al supporto di ricarica sul retro della testina di montaggio.
Stecken Sie das USB-C-Kabel in die Ladehalterung auf der Rückseite des magnetischen
Befestigungskopfes.
Enchufe el cable USB-C en el puerto USB que está detrás del cabezal del soporte.
Connect the USB-C cable to your vehicle’s USB-C port or auxiliary power outlet via a 20W adapter.
Connectez le câble USB-C au port USB-C ou au port auxiliaire de votre véhicule via un
adaptateur 20W.
Collega il cavo USB-C alla porta USB-C del tuo veicolo o alla porta ausiliaria tramite un adattatore
20W.
Schließen Sie das USB-C-Kabel über einen 20W-Adapter an den USB-C-Anschluss Ihres
Fahrzeugs oder an den Zusatzanschluss an.
Conecte el cable USB-C al puerto USB-C de su vehículo o al puerto auxiliar mediante un
adaptador de 20W.
Quick Start Guide
Auto Sense 2 Fold
Dashboard Mount
Place the phone inside the mount. The arms will close automatically after one second and
wireless charging will begin.
Placez le téléphone à l'intérieur du support. Les bras se fermeront automatiquement après une
seconde et le chargement sans fil commencera.
Posiziona il telefono all'interno del supporto. I bracci si chiuderanno automaticamente dopo un
secondo e inizierà la ricarica wireless.
Legen Sie das Telefon in die Halterung. Die Arme schließen sich nach einer Sekunde automatisch
und das kabellose Laden beginnt.
Coloque el teléfono dentro del soporte. Los brazos se cerrarán automáticamente después de un
segundo y comenzará la carga inalámbrica.
Hold the phone in front of the mount cradle to activate the automatic clamping arms.
Tenez le téléphone devant le support de montage pour activer les bras de serrage automatiques.
Tieni il telefono davanti al supporto per attivare i bracci di bloccaggio automatici.
Halten Sie das Telefon vor der Halterung, um die automatischen Klemmarme zu aktivieren.
Sostenga el teléfono frente al soporte para activar los brazos de sujeción automáticos.
Montage de votre téléphone · Collegando il telefono · Anbringen Ihres Telefons
Adjuntando tu teléfono
Mounting Your Phone Guide d’alignement · Guida di allineamento · Ausrichtungshilfe · Guía de alineación
Portrait / Phone open (foot down)
Portrait / Téléphone ouvert (pied vers le bas)
Verticale / Telefono aperto (piede abbassato)
Porträt / Telefon oen (Fuß nach unten)
Vertical / Teléfono abierto (pie abajo)
Landscape / Phone open
Paysage / Téléphone ouvert
Orizzontale / Telefono aperto
Querformat / Telefon oen
Paisaje / Teléfono abierto
Portrait / Phone closed (mount rotated)
Portrait / Téléphone fermé (monture tournée)
Verticale / Telefono chiuso (supporto ruotato)
Hochformat / Telefon geschlossen (Halterung gedreht)
Vertical / Teléfono cerrado (montaje girado)
Landscape / Phone closed
Paysage / Téléphone fermé
Orizzontale / Telefono chiuso
Querformat / Telefon geschlossen
Paisaje / Teléfono cerrado
Alignment Guide
Scan QR code for
full manual &
Product Registration
Full Manual & Product Registration
http://www.iottie.com/qr-code?sku=ATSWCG208
Don’t forget to leave a review.
Follow @iottie for the latest news and updates!
Need help? Reach out to us directly by emailing: [email protected]
Please visit our website for more information. www.iottie.com
We’d love to hear from you!
This device complies with Part 15 of the FCC Rules. Operation is subject to the
following two conditions:
(1) This device may not cause harmful interference, and (2) this device must accept
any interference received, including interference that may cause undesired
operation.
CAUTION: Changes or modifications not expressly approved by the party
responsible for compliance could void the user’s authority to operate the product.
NOTE: This equipment has been tested and found to comply with the limits for
a wireless power transfer, pursuant to Part 15 of the FCC Rules. These limits
are designed to provide reasonable protection against harmful interference
in a residential installation. This equipment generates, uses and can radiate
radio frequency energy and, if not installed and used in accordance with the
instructions, may cause harmful interference to radio communications. However,
there is no guarantee that interference will not occur in a particular installation. If
this equipment does cause harmful interference to radio or television reception,
which can be determined by turning the equipment o and on, the user is
encouraged to try to correct the interference by one or more of the following
measures:
Reorient or relocate the receiving antenna.
Increase the separation between the equipment and receiver.
Connect the equipment into an outlet on a circuit dierent from that to which
the receiver is connected.
Consult the dealer or an experienced radio/TV technician for help.
Hereby, iOttie, Inc declares that the radio equipment type ATSWCG208 is in
compliance with Directive 2014/53/EU. The full text of the EU declaration of
conformity is available at the following internet address: www.iottie.com.
Declaration for EU Compliance: Operation Freq: 118.59-151.12 kHz, Max. RF power
transmitted: H-Field 20.35dBμA/m @3m distance.
This equipment complies with FCC radiation exposure limits set forth for an
uncontrolled environment. This equipment should be installed and operated with
minimum distance 20cm between the radiator and your body. This transmitter
must not be co-located or operating in conjunction with any other antenna or
transmitter.
-English Warning Statement:
RSS-GEN ISSUE 5, 8.4 User manual notice
This device contains licence-exempt transmitter(s)/receiver(s) that comply with
Innovation, Science and Economic Development Canada’s licence-exempt RSS(s).
Operation is subject to the following two conditions:
(1) This device may not cause interference.
(2) This device must accept any interference, including interference that may cause
undesired operation of the device.
The digital apparatus complies with Canadian CAN ICES-3 (B)/NMB-3(B).
-French Warning Statement:
RSS - Gen version 5, 8.4 avis du manuel de l'utilisateur
Cet appareil contient un émetteur / récepteur sans licence conforme au RSS sans
licence d'innovation, science et veloppement économique Canada.L'opération doit
satisfaire aux deux conditions suivantes:
Cet équipement peut ne pas causer d'interférence.
L'équipement doit accepter toute interférence, y compris toute interférence qui
pourrait entraîner un fonctionnement indésirable de l'équipement.
This equipment complies with IC radiation exposure limits set forth for an
uncontrolled environment and meets RSS-102 of the IC radio frequency (RF)
Exposure rules. This equipment has very low levels of RF energy that are deemed to
comply without testing of specifc absorption ratio (SAR).Cet équipement est
conforme aux limites d’exposition aux rayonnements énoncées pour un
environnement non contrôlé et respecte les règles d’exposition aux fréquences
radioélectriques (RF) CNR-102 de l’IC. Cet équipement émet une énergie RF très
faible qui est considérée conforme sans évaluation du débit d’absorption spécifque
(DAS).
This equipment should be installed and operated with minimum distance 10cm
between the radiator & your body.
Lors de l'installation et du fonctionnement de cet équipement, la distance minimale
entre le radiateur et le corps doit être de 10 cm.
  • Page 1 1
  • Page 2 2
  • Page 3 3
  • Page 4 4

iOttie Auto Sense 2 Mode d'emploi

Taper
Mode d'emploi

dans d''autres langues