Philips HR1565/55 Manuel utilisateur
- Catégorie
- Mélangeurs
- Taper
- Manuel utilisateur


2

1


6
Introduction
Congratulations on your purchase and welcome to Philips! To fully benefit
from the support that Philips offers, register your product at www.philips.
com/welcome.
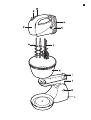
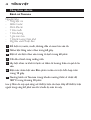
General description (Fig. 1)
A Control slide
- = eject position
- 0 = off
- 1 = low speed
- 2 = medium speed
- 3 = high speed
B Turbo button
C Motor unit
D Cord storage facility
E Cord clip for fixing the cord
F Beaters
G Kneading hooks
H Rotating bowl
I Mixer release lever
J Mixer holder
K Holder release button
L Stand
Important
Read this user manual carefully before you use the appliance and save it
for future reference.
Danger
- Do not immerse the motor unit in water nor rinse it under the tap.
Warning
- Check if the voltage indicated on the bottom of the appliance
corresponds to the local mains voltage before you connect the
appliance.
ENGLISH

- Do not use the appliance if the mains cord, the plug or other parts
are damaged.
- If the mains cord is damaged, you must have it replaced by Philips, a
service centre authorised by Philips or similarly qualified persons in
order to avoid a hazard.
- This appliance is not intended for use by persons (including children)
with reduced physical, sensory or mental capabilities, or lack of
experience and knowledge, unless they have been given supervision
or instruction concerning use of the appliance by a person
responsible for their safety.
- Children should be supervised to ensure that they do not play with
the appliance.
Caution
- Always insert the beaters or the kneading hooks into the mixer
before you connect it to the mains.
- Lower the beaters or kneading hooks into the ingredients before you
switch on the appliance.
- Unplug the mixer before you remove the beaters or kneading hooks
and before you clean it.
- This appliance is intended for household use only.
- Never use any accessories or parts from other manufacturers or that
Philips does not specifically recommend. If you use such accessories
or parts, your guarantee becomes invalid.
Electromagnetic fields (EMF)
This Philips appliance complies with all standards regarding
electromagnetic fields (EMF). If handled properly and according to the
instructions in this user manual, the appliance is safe to use based on
scientific evidence available today.
Using the appliance
Tip: The rotating bowl is especially suitable for large quantities. If you want to
process small quantities, we advise you to use a small bowl and hold the
mixer with your hand.
ENGLISH 7

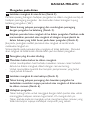
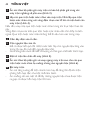
Mixing on the stand
1 Place the mixer on the stand (Fig. 2).
First fit the front of the mixer into the snap hook at the front of the
mixer holder and then press down the rear end of the mixer (‘click’).
2 Press the holder release button and tilt the holder with the mixer
backwards (Fig. 3).
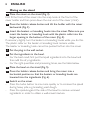
3 Insert the beaters or kneading hooks into the mixer. Make sure you
insert the beater or kneading hook with the plastic collar into the
larger opening in the bottom of the mixer (Fig. 4).
If necessary slightly turn the beaters or kneading hooks while you do this.
The plastic collar on the beater or kneading hook remains visible.
The beater or kneading hook cannot be pushed further into the mixer.
4 Put the plug in the wall socket.
5 Put the ingredients in the bowl.
- For the best result, first put the liquid ingredients into the bowl and
then add the dry ingredients.
- For the right quantities and processing times, see the table below.
6 Place the bowl on the stand (Fig. 5).
7 Press the holder release button and bring the mixer into a
horizontal position so that the beaters or kneading hooks are
lowered into the ingredients (Fig. 6).
8 Switch on the mixer.
- Press the turbo button to mix more quickly or to increase the speed
during heavy jobs, e.g. kneading yeast dough.
- Press the spatula against the side of the bowl to remove unmixed
ingredients in order to obtain a well-mixed mixture.
ENGLISH8

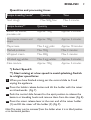
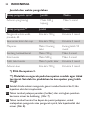
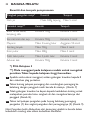
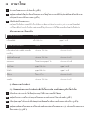
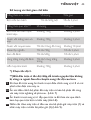
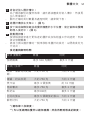
Quantities and processing times
Recipe kneading hooks* Quantity Time
Yeast dough Max. 500g flour Max. 5 minutes
Recipe beaters** Quantity Time
Batters for waffles,
pancakes, etc.
Approx. 750g Approx. 3 minutes
Thin sauces, creams and
soups
Approx. 750g Approx. 3 minutes
Mayonnaise Max. 3 egg yolks Approx. 10 minutes
Mashed potatoes Max. 750g Max. 3 minutes
Whipped cream Max. 500g Max. 5 minutes
Whisked egg whites Max. 5 egg whites Approx. 3 minutes
Cake mixture Approx. 750g Approx. 3 minutes
*) Select Speed 3.
**) Start mixing at a low speed to avoid splashing. Switch
to a higher speed later.
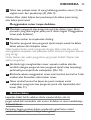
9 When you have finished mixing, set the control slide to 0 and
unplug the appliance.
10 Press the holder release button and tilt the holder with the mixer
on it backwards. (Fig. 7)
11
Push the control slide forward to the eject position to release the
beaters or kneading hooks and remove them from the mixer (Fig. 8).
12 Press the mixer release lever at the rear end of the mixer holder
(1) and lift the mixer off the holder (2) (Fig. 9).
Note: The mixer can be removed from the holder when it is in tilted position
or in horizontal position.
ENGLISH 9

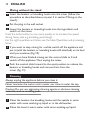
Mixing without the stand
1 Insert the beaters or kneading hooks into the mixer (follow the
procedure as described above at point 3 in section ‘Mixing on the
stand’).
2 Put the plug in the wall socket.
3 Lower the beaters or kneading hooks into the ingredients and
switch on the mixer.
Press the turbo button to mix more quickly or to increase the speed
during heavy jobs, e.g. kneading yeast dough.
For the right quantities and times, see the table ‘Quantities and processing
times’.
4 If you want to stop mixing for a while, switch off the appliance and
put it (with the beaters or kneading hooks still attached) on its heel
until you continue (Fig. 10).
5 When you have finished mixing, set the control slide to 0 and
switch off the appliance. Then unplug the mixer.
6 Push the control slide forward to the eject position to release the
beaters or kneading hooks and remove them from the
mixer (Fig. 11).
Cleaning
Always unplug the appliance before you clean it.
Never immerse the motor unit in water nor rinse it under the tap.
Caution: Do not use aggressive cleaning agents or abrasive cleaning
materials, such as scouring pads.
1 Clean the beaters, the kneading hooks and the spatula in warm
water with some washing up liquid or in the dishwasher.
2 Clean the bowl in warm water with some washing-up liquid.
ENGLISH10

3 Clean the motor unit, the stand and the holder with a soft damp
cloth.
The bowl, the stand, the holder and the motor unit cannot be cleaned
in the dishwasher.
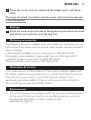
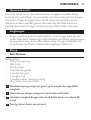
Storage
1 Wind the cord round the heel of the appliance and attach the loose
end of the cord with the cord clip (Fig. 12).
Ordering accessories
The following items are available from your dealer for replacement or as
extra accessories. Please use the service code number mentioned below
when ordering.
O Wire beaters: available in pairs under type no. 4203 065 63221
+ Kneading hooks: available in pairs under type no. 4203 065 63211
BSpatula: available under type no. 4203 065 63241
N Bowl: available under type no. 4203 065 63231
Guarantee & service
If you need service or information or if you have a problem, please visit
the Philips website at www.philips.com or contact the Philips Consumer
Care Centre in your country (you find its phone number in the
worldwide guarantee leaflet). If there is no Consumer Care Centre in
your country, go to your local Philips dealer.
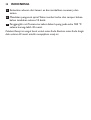
Environment
- Do not throw away the appliance with the normal household waste
at the end of its life, but hand it in at an official collection point for
recycling. By doing this, you help to preserve the
environment (Fig. 13).
ENGLISH 11

Recipes
Toscana bread
Ingredients:
- 750g flour
- 380ml water
- 50ml oil
- 1 teaspoon salt
- 1 teaspoon sugar
- 1 package yeast
- 1 spoon dry rosemary
- 30g green or black olives
1 Put the flour, water, salt, sugar, oil and yeast in a bowl.
2 Knead the dough with the kneading hooks for 60 seconds.
3 Put the bowl with the dough in the fridge for 60 minutes.
4 Cut the olives into small pieces.
5 Take the dough out of the fridge and add the rosemary and the
olives.
6 Insert the kneading hooks. Press the turbo button and mix the
added ingredients for 10 seconds.
7 Bake the Toscana bread in a baking tin at 180°C for approximately
30 minutes.
Note: This recipe is extremely heavy for your mixer. Let your mixer cool down
for 60 minutes after preparing this recipe.
ENGLISH12

13
Introduction
Félicitations pour votre achat et bienvenue dans l’univers Philips ! Pour
profiter pleinement de l’assistance Philips, enregistrez votre produit sur le
site à l’adresse suivante : www.philips.com/welcome.
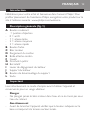
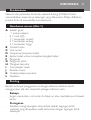
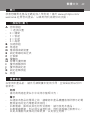
Description générale (fig. 1)
A Bouton coulissant
- = position d’éjection
- 0 = arrêt
- 1 = vitesse lente
- 2 = vitesse moyenne
- 3 = vitesse rapide
B Bouton Turbo
C Bloc moteur
D Rangement du cordon
E Bride attache-cordon
F Fouets
G Crochets à pétrir
H Bol rotatif
I Levier de dégagement du batteur
J Support du batteur
K Bouton de déverrouillage du support
L Socle
Important
Lisez attentivement ce mode d’emploi avant d’utiliser l’appareil et
conservez-le pour un usage ultérieur.
Danger
- Ne plongez jamais le bloc moteur dans l’eau et ne le rincez pas sous
l’eau du robinet.
Avertissement
- Avant de brancher l’appareil, vérifiez que la tension indiquée sur la
base correspond à la tension secteur locale.
FRANÇAIS

- N’utilisez pas l’appareil si le cordon d’alimentation, la fiche ou d’autres
pièces sont endommagées.
- Si le cordon d’alimentation est endommagé, il doit être remplacé par
Philips, par un Centre Service Agréé Philips ou par un technicien
qualifié afin d’éviter tout accident.
- Cet appareil n’est pas destiné à être utilisé par des personnes
(notamment des enfants) dont les capacités physiques, sensorielles ou
intellectuelles sont réduites, ou par des personnes manquant
d’expérience ou de connaissances, à moins que celles-ci ne soient
sous surveillance ou qu’elles n’aient reçu des instructions quant à
l’utilisation de l’appareil par une personne responsable de leur
sécurité.
- Veillez à ce que les enfants ne puissent pas jouer avec l’appareil.
Attention
- Avant de brancher l’appareil, insérez les fouets ou les crochets à
pétrir dans le batteur.
- Abaissez les fouets ou les crochets à pétrir dans les ingrédients avant
de mettre l’appareil en marche.
- Débranchez l’appareil avant de retirer les fouets ou les crochets à
pétrir et avant de le nettoyer.
- Cet appareil est destiné à un usage domestique uniquement.
- N’utilisez jamais d’accessoires, ni de pièces d’autres fabricants ou qui
n’ont pas été spécifiquement recommandés par Philips. Votre garantie
ne sera pas valable en cas d’utilisation de tels accessoires ou pièces.
Champs électromagnétiques (CEM)
Cet appareil Philips est conforme à toutes les normes relatives aux
champs électromagnétiques (CEM). Il répond aux règles de sécurité
établies sur la base des connaissances scientifiques actuelles s’il est
manipulé correctement et conformément aux instructions de ce mode
d’emploi.
Utilisation de l’appareil
Conseil : Le bol rotatif est très pratique pour les grandes quantités. Si vous
souhaitez préparer de petites quantités, il est conseillé d’utiliser un bol plus
petit et de tenir le batteur à la main.
FRANÇAIS14

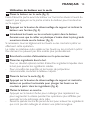
Utilisation du batteur sur le socle
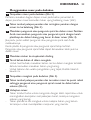
1 Placez le batteur sur le socle (fig. 2).
Fixez d’abord la partie avant du batteur sur l’accroche située à l’avant du
support, puis appuyez sur la partie arrière du batteur pour l’enclencher
sur le support.
2 Appuyez sur le bouton de déverrouillage du support et inclinez le
batteur vers l’arrière (fig. 3).
3 Introduisez les fouets ou les crochets à pétrir dans le batteur.
Assurez-vous que le collier en plastique s’insère dans la plus grande
ouverture située sous le batteur (fig. 4).
Si nécessaire, tournez légèrement les fouets ou les crochets à pétrir en
effectuant cette opération.
Le collier en plastique reste visible sur les fouets ou les crochets à pétrir.
Ces derniers ne peuvent pas être insérés plus profondément.
4 Branchez le cordon d’alimentation sur la prise secteur.
5 Placez les ingrédients dans le bol.
- Pour un résultat optimal, mettez d’abord les ingrédients liquides dans
le bol, puis ajoutez les ingrédients solides.
- Pour connaître les quantités et les temps de préparation
recommandés, consultez le tableau ci-après.
6 Placez le bol sur le socle (fig. 5).
7 Appuyez sur le bouton de déverrouillage du support et mettez le
batteur en position horizontale pour plonger les fouets ou les
crochets à pétrir dans les ingrédients (fig. 6).
8 Mettez le batteur en marche.
- Appuyez sur le bouton Turbo pour mélanger plus rapidement ou
pour augmenter la vitesse pendant les opérations plus difficiles, par
exemple lors du pétrissage de la pâte.
- Passez la spatule contre les parois du bol pour enlever les ingrédients
qui n’ont pas été mélangés et obtenir une pâte homogène.
FRANÇAIS 15

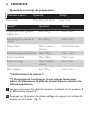
Quantités et temps de préparation
Crochets à pétrir Quantité Temps
Pâte levée Max. 500 g de farine Max. 5 min
Fouets** Quantité Temps
Préparation pour gaufres,
crêpes, etc.
Env. 750 g Env. 3 min
Sauces légères, crèmes et
soupes
Env. 750 g Env. 3 min
Mayonnaise Max. 3 jaunes
d’œufs
Env. 10 minutes
Purée de pommes de terre Max. 750 g Max. 3 min
Crème fouettée Max. 500 g Max. 5 min
Blancs en neige Max. 5 blancs
d’œufs
Env. 3 min
Pâte à gâteau Env. 750 g Env. 3 min
*) Sélectionnez la vitesse 3.
**) Commencez à mélanger à une vitesse lente pour
éviter d’éclabousser le plan de travail. Passez ensuite à la
vitesse supérieure.
9 Lorsque vous avez fini, réglez le bouton coulissant sur la position 0
et débranchez l’appareil.
10 Appuyez sur le bouton de déverrouillage du support et inclinez le
mixeur vers l’arrière. (fig. 7)
FRANÇAIS16

11 Poussez le bouton coulissant vers l’avant sur la position d’éjection
pour retirer les fouets ou les crochets (fig. 8).
12 Appuyez sur le levier de dégagement du batteur à l’arrière du
support (1) et soulevez le batteur du support (2) (fig. 9).
Remarque : Le batteur peut être retiré du support lorsqu’il est en position
inclinée ou horizontale.
Utilisation du mixeur sans le socle
1 Insérez les fouets ou les crochets à pétrir dans le batteur (suivez la
procédure décrite ci-dessus au point 3, dans la section « Utilisation
du batteur sur le socle »).
2 Branchez le cordon d’alimentation sur la prise secteur.
3 Abaissez les fouets ou les crochets à pétrir dans les ingrédients et
mettez l’appareil en marche.
Appuyez sur le bouton Turbo pour mélanger plus rapidement ou pour
augmenter la vitesse pendant les opérations plus difficiles, par exemple
lors du pétrissage de la pâte.
Pour connaître les quantités et les temps de préparation recommandés,
consultez le tableau « Quantités et temps de préparation ».
4 Si vous souhaitez interrompre l’opération quelque temps, éteignez
l’appareil et posez-le (avec les fouets ou les crochets à pétrir fixés)
sur son talon jusqu’à ce que vous repreniez l’opération (fig. 10).
5 Lorsque vous avez fini, réglez le bouton coulissant sur la position 0
et éteignez l’appareil. Débranchez ensuite le batteur.
6 Poussez le bouton coulissant vers l’avant sur la position d’éjection
pour retirer les fouets ou les crochets à pétrir du batteur (fig. 11).
FRANÇAIS 17

Nettoyage
Débranchez toujours l’appareil avant de le nettoyer.
Ne plongez jamais le bloc moteur dans l’eau et ne le rincez pas sous le
robinet.
Attention : N’utilisez pas de produits nettoyants agressifs ni abrasifs,
tels que des tampons à récurer.
1 Nettoyez les fouets, les crochets et la spatule à l’eau chaude
savonneuse ou au lave-vaisselle.
2 Nettoyez le bol à l’eau chaude savonneuse.
3 Nettoyez le bloc moteur, le socle et le support à l’aide d’un chiffon
humide.
Le bol, le socle, le support et le bloc moteur ne peuvent pas être
nettoyés au lave-vaisselle.
Rangement
1 Rangez le cordon d’alimentation en l’enroulant autour du talon de
l’appareil et fixez l’extrémité du cordon à l’aide de la bride (fig. 12).
Commande d’accessoires
Pour commander des accessoires supplémentaires, rendez-vous chez
votre revendeur Philips et utilisez les codes mentionnés ci-dessous.
O Fouets métalliques (par deux) : code n° 4203 065 63221
+ Crochets à pétrir (par deux) : code n° 4203 065 63211
BSpatule : code n° 4203 065 63241
N Bol : code n° 4203 065 63231
FRANÇAIS18

Garantie et service
Si vous souhaitez obtenir des informations supplémentaires ou faire
réparer l’appareil, ou si vous rencontrez un problème, rendez-vous sur le
site Web de Philips à l’adresse www.philips.com ou contactez le
Service Consommateurs Philips de votre pays (vous trouverez le numéro
de téléphone correspondant sur le dépliant de garantie internationale).
S’il n’existe pas de Service Consommateurs Philips dans votre pays,
renseignez-vous auprès de votre revendeur Philips local.
Environnement
- Lorsqu’il ne fonctionnera plus, ne jetez pas l’appareil avec les ordures
ménagères, mais déposez-le à un endroit assigné à cet effet, où il
pourra être recyclé. Vous contribuerez ainsi à la protection de
l’environnement (fig. 13).
Recettes
Pain toscan
Ingrédients :
- 750 g de farine
- 380 ml d’eau
- 50 ml d’huile
- 1 cuillère à café de sel
- 1 cuillère à café de sucre
- 1 sachet de levure
- 1 cuillère de romarin séché
- 30 g d’olives vertes ou noires
1 Placez la farine, l’eau, le sel, le sucre, l’huile et la levure dans un
saladier.
2 Mélangez la pâte avec les crochets à pétrir pendant 60 secondes.
3 Mettez le saladier contenant la pâte dans le réfrigérateur pendant
60 minutes.
4 Coupez les olives en petits morceaux.
FRANÇAIS 19

5 Sortez la pâte du réfrigérateur et ajoutez le romarin et les olives.
6 Insérez les crochets à pétrir. Appuyez sur le bouton Turbo et
mélangez pendant 10 secondes les ingrédients ajoutés.
7 Versez la pâte du pain toscan dans un moule à gâteau et faites cuire
pendant 30 minutes à 180 °C.
Remarque : Cette recette est extrêmement éprouvante pour votre batteur.
Une fois la préparation achevée, laissez votre batteur refroidir pendant
60 minutes.
FRANÇAIS20
La page est en cours de chargement...
La page est en cours de chargement...
La page est en cours de chargement...
La page est en cours de chargement...
La page est en cours de chargement...
La page est en cours de chargement...
La page est en cours de chargement...
La page est en cours de chargement...
La page est en cours de chargement...
La page est en cours de chargement...
La page est en cours de chargement...
La page est en cours de chargement...
La page est en cours de chargement...
La page est en cours de chargement...
La page est en cours de chargement...
La page est en cours de chargement...
La page est en cours de chargement...
La page est en cours de chargement...
La page est en cours de chargement...
La page est en cours de chargement...
La page est en cours de chargement...
La page est en cours de chargement...
La page est en cours de chargement...
La page est en cours de chargement...
La page est en cours de chargement...
La page est en cours de chargement...
La page est en cours de chargement...
La page est en cours de chargement...
La page est en cours de chargement...
La page est en cours de chargement...
La page est en cours de chargement...
La page est en cours de chargement...
La page est en cours de chargement...
La page est en cours de chargement...
La page est en cours de chargement...
La page est en cours de chargement...
La page est en cours de chargement...
La page est en cours de chargement...
La page est en cours de chargement...
La page est en cours de chargement...
-
 1
1
-
 2
2
-
 3
3
-
 4
4
-
 5
5
-
 6
6
-
 7
7
-
 8
8
-
 9
9
-
 10
10
-
 11
11
-
 12
12
-
 13
13
-
 14
14
-
 15
15
-
 16
16
-
 17
17
-
 18
18
-
 19
19
-
 20
20
-
 21
21
-
 22
22
-
 23
23
-
 24
24
-
 25
25
-
 26
26
-
 27
27
-
 28
28
-
 29
29
-
 30
30
-
 31
31
-
 32
32
-
 33
33
-
 34
34
-
 35
35
-
 36
36
-
 37
37
-
 38
38
-
 39
39
-
 40
40
-
 41
41
-
 42
42
-
 43
43
-
 44
44
-
 45
45
-
 46
46
-
 47
47
-
 48
48
-
 49
49
-
 50
50
-
 51
51
-
 52
52
-
 53
53
-
 54
54
-
 55
55
-
 56
56
-
 57
57
-
 58
58
-
 59
59
-
 60
60


Philips HR1565/55 Manuel utilisateur
- Catégorie
- Mélangeurs
- Taper
- Manuel utilisateur
dans d''autres langues
- English: Philips HR1565/55 User manual
Documents connexes
-
Philips HR3741/00 Manuel utilisateur
-
Philips HR3705/20 Manuel utilisateur
-
Philips HR3704/11 Manuel utilisateur
-
-
-
-
Philips HR1565/40 Product Datasheet
-
Philips 32PHT4022S/98 Guide de démarrage rapide
-
Philips HR7771/50 Manuel utilisateur
-
Philips HR2605 Manuel utilisateur