Sharp EL-2607R Le manuel du propriétaire
- Taper
- Le manuel du propriétaire

ELECTRONIC PRINTING CALCULATOR
DRUCKENDER TISCHRECHNER
CALCULATRICE IMPRIMANTE ÉLECTRONIQUE
SZALAGOS ASZTALI KALKULÁTOR
OPERATION MANUAL
BEDIENUNGSANLEITUNG
MODE D’EMPLOI
HASZNÁLATI ÚTMUTATÓ
EL-2607R
ENGLISH ............................................... Page 2
CALCULATION EXAMPLES ............. Page 34
DEUTSCH .............................................. Seite 10
RECHNUNGSBEISPIELE ................ Seite 34
FRANÇAIS ............................................. Page 18
EXEMPLES DE CALCULS ............... Page 35
MAGYAR ................................................ Oldal 26
SZÁMÍTÁSI PÉLDÁK ........................ Oldal 35

Caution!
The socket outlet shall be installed near the equipment and shall be easily accessible.
Vorsicht!
Die Netzsteckdose muß in der Nähe des Gerätes angebracht und leicht zugänglich
sein.
Observera!
Anslut till ett vägguttag som återfinns nära enheten och är lätt åtkomligt.
Let op!
Het stopcontact moet in de buurt van het apparaat zijn en ook gemakkelijk
toegankelijk zijn.
Atenção!
A tomada elétrica deve estar perto do equipamento e ser de fácil acesso.
Attention!
La prise de courant murale doit être installée à proximité de l’appareil et doit être
facilement accessible.
Aviso!
El tomacorriente debe estar instalado cerca del equipo y debe quedar bien accesible.
Attenzione!
La presa della corrente deve essere installata in prossimità dell’apparecchio ed
essere facilmente accessibile.
Huomautus!
Pistorasia tulee asentaa laitteen lähelle paikkaan, jossa sen käyttöä on helppoa.
Figyelem!
A kalkulátort úgy érdemes elhelyezni, hogy a hálózati csatlakozó aljzatot könnyen
el lehessen érni.

– 1 –
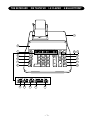
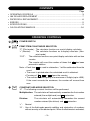
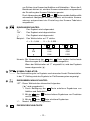
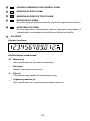
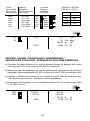
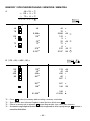
THE KEYBOARD DIE TASTATUR LE CLAVIER A BILLENTYŰZET
P P IC K A F 6 3 2 1
0
5
4
+
CE
GT
7
8
9
45
6
1
2
3
0
000
•
MU
M
M
M
M
%
GT
P PIC K A F6321
0
5
4
GT
9
7
63
2
1716
14
15
1
13
12
54
11
10
8
18

– 2 –
Thank you for your purchase of the SHARP electronic calculator, model EL-2607R. Your
SHARP calculator is specially designed to save work and increase efficiency in all business
applications and general office calculations. Careful reading of this manual will enable
you to use your new SHARP calculator to its fullest capability.
To insure trouble-free operation of your SHARP calculator, we recommend the following:
1. The calculator should be kept in areas free from extreme temperature changes,
moisture, and dust.
2. A soft, dry cloth should be used to clean the calculator. Do not use solvents or a wet
cloth.
3. If you are not going to use the calculator for a time period, please pull out the power
cord to cut electricity completely.
4. If service should be required, use only a SHARP servicing dealer, a SHARP approved
service facility or SHARP repair service.
5. Do not wind the AC cord around the body or otherwise forcibly bend or twist it.
6. Since this product is not waterproof, do not use it or store it where fluids, for example
water, can splash onto it. Raindrops, water spray, juice, coffee, steam, perspiration,
etc. will also cause malfunction.
SHARP will not be liable nor responsible for any incidental or consequential economic
or property damage caused by misuse and/or malfunctions of this product and its
peripherals, unless such liability is acknowledged by law.
WARNING
THE VOLTAGE USED MUST BE THE SAME AS SPECIFIED ON THIS CALCULATOR.
USING THIS CALCULATOR WITH A HIGHER VOLTAGE THAN THAT WHICH IS
SPECIFIED IS DANGEROUS AND MAY RESULT IN A FIRE OR OTHER TYPE OF
ACCIDENT CAUSING DAMAGE. WE ARE NOT RESPONSIBLE FOR ANY DAMAGE
RESULTING FROM USE OF THIS CALCULATOR WITH A VOLTAGE OTHER THAN
THAT WHICH IS SPECIFIED.
ENGLISH
INTRODUCTION
OPERATIONAL NOTES

– 3 –
POWER SWITCH
PRINT/ITEM COUNT MODE SELECTOR:
“P” (Print mode): The calculator functions as a print/display calculator.
“•” (Neutral): The calculator functions as a display calculator. (Non-
print mode)
“P
•
IC”: The calculator functions as a print/display calculator with an item
counter.
The counter will count the number of times that
+
=
has been
pressed in addition.
Note: • Each time is used in subtraction, 1 will be subtracted from the
count.
• The count is printed when the calculated result is obtained.
• Pressing of
CE
, or clears the counter.
• The counter has the capacity of a maximum of 3 digits (up to ±999).
If the count exceeds the maximum, the counter will recount from
zero.
CONSTANT/ADD MODE SELECTOR:
“K” : The following constant functions will be performed:
Multiplication: The calculator will automatically remember the first number
entered (the multiplicand) and instruction.
Division: The calculator will automatically remember the second
number entered (the divisor) and instruction.
“•” : Neutral
“A” : Use of the Add mode permits addition and subtraction of numbers
without an entry of the decimal point. When the Add mode is activated,
OPERATING CONTROLS
CONTENTS
Page
• OPERATING CONTROLS ........................................................................................3
• INK ROLLER REPLACEMENT ................................................................................7
• PAPER ROLL REPLACEMENT ................................................................................8
• ERRORS ..................................................................................................................9
• SPECIFICATIONS ....................................................................................................9
• CALCULATION EXAMPLES ...................................................................................34

– 4 –
the decimal point is automatically positioned according to the decimal
selector setting.
Use of , , and will automatically override the Add mode
and decimally correct answers will be printed at the preset decimal
position.
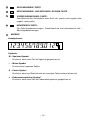
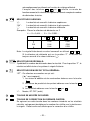
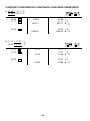
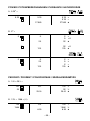
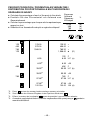
ROUNDING SELECTOR:
“ ” : An answer is rounded up.
“5/4” : An answer is rounded off.
“ ” : An answer is rounded down.
Example: Set Decimal Selector to 2.
4 ⴓ 9 = 0.444 ... , 5 ⴓ 9 = 0.555 ...
4 9
+
=
5 9
+
=
0.45 0.56
5/4 0.44 0.56
0.44 0.55
Note: The decimal point floats during successive calculation by the use of
or .
If the decimal selector is set to “F” then the answer is always rounded
down ( ).
DECIMAL SELECTOR:
Presets the number of decimal places in the answer.
In the “F” position, the answer is displayed in the floating decimal system.
GRAND TOTAL MODE SELECTOR:
“GT”: This selector will accumulate the following:
(“✱+” will be printed.)
1. Addition and subtraction totals obtained with
CE
.
2. Product and quotient totals obtained with
+
=
or .
3. Answers obtained with or .
“•”: Neutral, GT OFF
PAPER FEED KEY
LAST DIGIT CORRECTION KEY:
Operation of this key in entered numbers or calculated results shifts the
number one digit to the right together with the decimal point. Used for one
digit correction.

– 5 –
GRAND TOTAL KEY:
Prints and clears the “GT” memory contents.
NON-ADD/SUBTOTAL KEY:
Non-add – When this key is pressed right after an entry of a number in
the Print mode, the entry is printed on the left-hand side with
“#”.
This key is used to print out numbers not subjects to calculation
such as code, date, etc.
Subtotal – Used to get subtotal(s) of additions and/or subtractions. When
pressed following
+
=
or , the subtotal is printed with “ ◊ ”
and the calculation may be continued.
By pressing this key even in the Non-print mode, the displayed number
is printed with “P”.
CE
CLEAR ENTRY/CLEAR AND TOTAL KEY:
Clear entry – When pressed after a number and before a function,
clear the number.
Clear and total – When pressed after a function key, prints the total of
addition and subtraction with “ ✱ ”. This key also serves
as a clear key for the calculation register and resets an
error condition. The contents of the memory are not
affected by use of
CE
.
MEMORY PLUS KEY
MEMORY MINUS KEY
RECALL MEMORY KEY
RECALL AND CLEAR MEMORY KEY
CHANGE SIGN KEY:
Changes the algebraic sign of a number (i.e., positive to negative or negative
to positive).
MARKUP KEY:
Used to perform mark-ups, percent change and automatic add-on/discount.

– 6 –
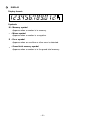
DISPLAY
Display format:
Symbols:
M : Memory symbol
Appears when a number is in memory.
– : Minus symbol
Appears when a number is a negative.
E : Error symbol
Appears when an overflow or other error is detected.
•
: Grand total memory symbol
Appears when a number is in the grand total memory.

– 7 –
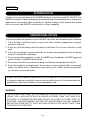
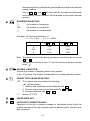
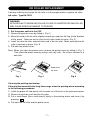
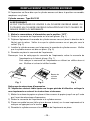
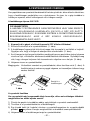
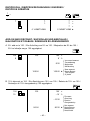
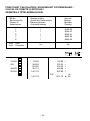
If printing is blurry even when the ink roller is in the proper position, replace the roller.
Ink roller: Type EA-741R
WARNING
APPLYING INK TO WORN INK ROLLER OR USE OF UNAPPROVED INK ROLLER
MAY CAUSE SERIOUS DAMAGE TO PRINTER.
1. Set the power switch to the OFF.
2. Remove the printer cover by sliding it. (Fig. 1)
3. Move the knob of the ink roller slightly towards you and then lift it up (in the direction
of the arrow). Take care not to catch the ink roller under the case. (Fig. 2)
4. Install the new ink roller and push the knob of the ink roller. Make sure that the ink
roller is securely in place. (Fig. 3)
5. Put back the printer cover.
Note: When you clean the printer cover, remove the printer cover by sliding it. (Fig. 1)
Then clean the printer cover by using a soft, dry cloth. Do not use solvents or a
wet cloth.
Cleaning the printing mechanism
If the print becomes dull after long time usage, clean the printing wheel according
to the following procedures:
1) Install the paper roll and feed it until it comes out of the front of the print mechanism.
2) Remove the printer cover and the ink roller.
3) Put a small brush (like a tooth brush) lightly to the printing wheel and clean it by
pressing .
4) Put back the ink roller and the printer cover.
INK ROLLER REPLACEMENT
Fig. 2
Fig. 1
Fig. 3
Knob of the
ink roller

– 8 –
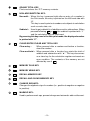
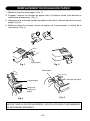
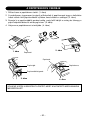
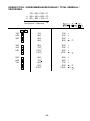
Paper roll
Paper holder
Fig. 4
Fig. 3
Paper cutter
Paper feed key
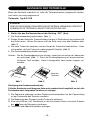
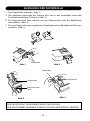
PAPER ROLL REPLACEMENT
Paper holder
Fig. 1
Fig. 2
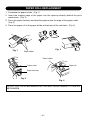
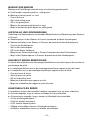
DO NOT PULL PAPER BACKWARDS AS THIS MAY CAUSE DAMAGE TO PRINTER
MECHANISM.
1. Assemble the paper holder. (Fig. 1)
2. Insert the leading edge of the paper into the opening directly behind the print
mechanism. (Fig. 2)
3. Press the paper feed key and feed the paper under the edge of the paper cutter.
(Fig. 3)
4. Place the paper roll in the paper holder at the back of the calculator. (Fig. 4)

– 9 –
There are several situations which will cause an overflow or an error condition. When
this occurs, the error symbol “E” will be displayed and all keys will electronically lock.
The contents of the memory at the time of the error are retained.
If an “0.E” is printed on the tape at the time of the error,
CE
must be used to clear the
calculator. If an “E” with any numerals except zero is printed on the tape or if an “E” is
not printed on the tape, the error may be cleared with
CE
or and the calculation can
still be continued.
Error conditions:
1. Entry of more than 12 digits or 11 decimals.
This error can be cleared with
CE
or .
2. When the integer portion of an answer exceeds 12 digits.
3. When the integer portion of the contents of the memory exceeds 12 digits.
(Ex. 999999999999 1 )
4. When any number is divided by zero. (Ex. 5 0
+
=
)
Power source: AC: 220V–230V, 50Hz
Operating capacity: 12 digits
Calculations: Four arithmetic, constant multiplication and division, power,
add-on, discount, repeat addition and subtraction, reciprocal
grand total, item count, markup, memory, etc.
PRINTING SECTION
Printing speed: Approx. 3.0 lines/sec.
Printing paper: 57 mm (2-1/4″) ~ 58 mm (2-9/32″) wide
80 mm (3-5/32″) in diameter (max.)
Operating temperature: 0°C ~ 40°C (32°F ~ 104°F)
Power consumption: 73 mA
Dimensions: 220 (W) × 274 (D) × 69 (H) mm
8-21/32″ (W) × 10-25/32″ (D) × 2-23/32″ (H)
Weight: Approx. 1.4 kg (3.1 Ibs.)
Accessories: 1 paper roll, 1 ink roller (installed), paper holder and operation
manual
ERRORS
SPECIFICATIONS

– 10 –
Wir freuen uns, daß Sie sich zum Kauf des elektronischen Rechners Modell EL-2607R
von SHARP entschieden haben. Der Rechner ist speziell für leistungsintensiven,
arbeitssparenden Betrieb entworfen. Um alle Funktionen dieses neuen SHARP Rechners
in vollem Umfang nutzen zu können, lesen Sie bitte diese Bedienungsanleitung sorgfältig
durch.
Um den störungsfreien Betrieb dieses SHARP Rechners sicherzustellen, beachten Sie
bitte folgende Punkte:
1. Den Rechner nicht an Orten aufbewahren, wo er extrem hohen Temperaturschwan-
kungen, Feuchtigkeit oder Staub ausgesetzt ist.
2. Zum Reinigen des Rechners verwendet man ein trockenes, weiches Tuch. Keine
Lösungsmittel oder feuchte Lappen verwenden.
3. Wenn das Gerät längere Zeit nicht verwendet wird, sollten der Stecker von der
Steckdose abgetrennt werden.
4. Sollte eine Reparatur dieses Gerätes erforderlich sein, wenden Sie sich nur an einen
SHARP-Fachhändler, eine zugelassene SHARP-Reparaturwerkstatt oder an eine
SHARP-Kundendienststelle.
5. Nicht das Kabel um das Gerät wickeln oder anderweitig verdrehen oder knicken.
6. Da dieses Produkt nicht wasserdicht ist, sollten Sie es nicht an Orten benutzen oder
lagern, die extremer Feuchtigkeit ausgesetzt sind. Schützen Sie das Gerät vor Wasser,
Regentropfen, Sprühwasser, Saft, Kaffee, Dampf, Schweiß usw., da der Eintritt von
irgendwelchen Flüssigkeit zu Funktionsstörungen führen kann.
SHARP übernimmt keine Verantwortung oder Haftung für irgendwelche zufälligen
oder aus der Verwendung folgenden wirtschaftlichen oder sachlichen Schäden, die
aufgrund der falschen Verwendung bzw. durch Fehlfunktionen dieses Gerätes und
dessen Zubehör auftreten, ausgenommen diese Haftung ist gesetzlich festgelegt.
WARNUNG
Die verwendete Netzspannung muß der auf dem Gerät angegebenen
Betriebsspannung entsprechen. Die Verwendung des Gerätes mit einer höheren als
der angegebenen Netzspannung ist gefährlich und kann zu Feuer oder anderen
Unfällen führen, die das Gerät beschädigen können. Der Hersteller übernimmt keine
Verantwortung für Beschädigungen, die durch die Verwendung dieses Gerätes mit
einer anderen als der angegebenen Netzspannung verursacht werden.
EINLEITUNG
DEUTSCH
HINWEISE ZUM BETRIEB

– 11 –
EIN/AUS-SCHALTER
DRUCKBETRIEBS/POSTENZÄHLER-WAHLSCHALTER:
“P” (Druck-Betriebsart): Der Rechner arbeitet als druckender, anzeigender
Rechner.
“•” (Neutral): Der Rechner arbeitet als anzeigender Rechner.
(Nichtdruck-Betriebsart).
“P
•
IC”: Der Rechner arbeitet als druckender, anzeigender Rechner mit
einem Postenzähler. Der Zähler zählt, wie oft die
+
=
-Taste in
einem Rechenprozeß hintereinander betätigt wurde.
Hinweis: • Mit jedem Drücken der -Taste für Subtraktion wird 1 vom
Zähler subtrahiert.
• Wenn man das Rechenergebnis erhält, wird der Stand des
Postenzählers ausgedruckt.
• Durch Drücken der
CE
, oder -Taste wird der
Postenzähler nullgestellt.
• Der Postenzähler hat eine Kapazität von max. 3 Stellen (bis zu
±999). Wenn der Zähler den Maximalwert überschreitet, beginnt
die Zählung wieder ab Null.
KONSTANTENBETRIEBS/ADDITIONSHILFE-WAHLSCHALTER:
“K” : Die folgenden Konstantenfunktionen werden ausgeführt:
Multiplikation: Der Rechner registriert automatisch die erste eingegebene
Zahl (Multiplikand) und die -Anweisung.
Division: Der Rechner registriert automatisch die zweite
eingegebene Zahl (Divisor) und die -Anweisung.
“•” : Neutral
“A” : Verwendung der A-Betriebsart (Additionshilfe) gestattet die Eingabe
BEDIENUNGSELEMENTE
INHALT
Seite
• BEDIENUNGSELEMENTE ..................................................................................... 11
• AUSTAUSCH DER TINTENROLLE ........................................................................15
• AUSTAUSCH DER PAPIERROLLE ........................................................................16
• FEHLER ..................................................................................................................17
• TECHNISCHE DATEN............................................................................................17
• RECHNUNGSBEISPIELE ......................................................................................34

– 12 –
von Zahlen ohne Komma bei Addition und Subtraktion. Wenn die A-
Betriebsart aktiviert ist, wird das Komma automatisch entsprechend
der Einstellung des Komma-Tabulators gesetzt.
Durch Verwendung der , und -Tasten wird die Additionshilfe
automatisch übergangen und das Ergebnis mit korrekter Komma-
setzung entsprechend der Einstellung des Komma-Tabulators
ausgedruckt.
RUNDUNGSSCHALTER:
“ ” : Das Ergebnis wird aufgerundet.
“5/4” : Das Ergebnis wird abgeschnitten.
“ ” : Das Ergebnis wird abgerundet.
Beispiel: Den Wahlschalter auf “2” stellen.
4 ⴓ 9 = 0,444 ... , 5 ⴓ 9 = 0,555 ...
4 9
+
=
5 9
+
=
0.45 0.56
5/4 0.44 0.56
0.44 0.55
Hinweis: Bei Verwendung der oder -Taste werden fortlau-fende
Berechnungen im Fließkommabetrieb ausgeführt.
Wenn der Wahlschalter auf “F” eingestellt ist, wird das Ergebnis
immer abgerundet ( ).
KOMMA-TABULATOR:
Zur Voreinstellung der im Ergebnis erscheinenden Anzahl Dezimalstellen.
In der “F”-Stellung wird das Ergebnis im Fließkommasystem angezeigt.
ENDSUMMEN-WAHLSCHALTER:
“GT”: Dieser Wahlschalter akkumuliert folgendes:
(“✱+” wird ausgedruckt.)
1. Durch Betätigung der
CE
-Taste erhaltene Ergebnisse von
Addition und Subtraktion.
2. Mit der
+
=
oder -Taste erhaltene Ergebnisse von Produkten
und Quotienten.
3. Mit der - oder -Taste erhaltene Ergebnisse.
“•”: Neutral, Betriebsart aufgehoben.
PAPIERVORSCHUB-TASTE

– 13 –
TASTE ZUR KORREKTUR DER LETZTEN STELLE:
Durch Drücken dieser Taste wird die angezeigte eingegebene Zahl bzw.
das Rechenergebnis zusammen mit dem Komma um eine Stelle nach rechts
verschoben. Eine praktische Funktion zur Korrektur der letzten
eingegebenen Ziffer.
ENDSUMMEN-TASTE:
Zum Ausdrucken und gleichzeitigen Löschen des Endsummen-Speichers
(GT).
NON-ADD / ZWISCHENSUMMEN-TASTE:
Non-Add – Durch Drücken dieser Taste in der Druck-Betriebsart
unmittelbar nach Eingabe einer Zahl wird die Zahl auf der linken
Seite des Papierstreifens zusammen mit dem Symbol “#”
ausgedruckt.
Diese Taste dient zum Ausdrucken von Zahlen, die nicht in der
Rechnung enthalten sein sollen, z.B. Code-Nummern, Daten
usw.
Zwischensumme – Zur Ermittlung von Zwischensummen bei Addition und/
oder Subtraktion. Durch Drücken dieser Taste nach
Betätigung der
+
=
oder -Taste wird die
Zwischensumme zusammen mit dem Symbol “ ◊ ”
ausgedruckt, woraufhin die Rechnung unmittelbar
fortgesetzt werden kann.
Durch Drücken dieser Taste in der Nichtdruck-Betriebsart wird die
angezeigte Zahl ausgedruckt.
CE
TASTE FÜR EINGABE LÖSCHEN / LÖSCHEN UND GESAMTSUMME:
Eingabe löschen – Durch Drücken dieser Taste nach einer Zahl und vor
einer Funktion wird die Zahl gelöscht.
Löschen und Summe – Durch Drücken der Taste nach einer
Funktionstaste wird die Summe der Addition und
Subtraktion zusammen mit dem Symbol “ ✱ ”
gedruckt. Diese Taste dient auch als
Gesamtlöschtaste für die Rechenregister und
beseitigt einen Fehlerzustand.
Die Speicherinhalte werden durch Bedienung der
CE
-Taste nicht beeinflußt.
SPEICHER-PLUS-TASTE
SPEICHER-MINUS-TASTE

– 14 –
SPEICHERABRUF-TASTE
SPEICHERABRUF- UND SPEICHER LÖSCHEN-TASTE
VORZEICHENWECHSEL-TASTE:
Zum Wechsel des Vorzeichens einer Zahl (d.h. positiv nach negativ oder
negativ nach positiv).
MEHRZWECK-TASTE:
Für Aufschlagsberechnungen, Prozentwechsel und automatische Auf-/
Abschlagsberechnungen.
ANZEIGE
Anzeigeformat:
Symbole:
M : Speicher-Symbol
Erscheint, wenn eine Zahl im Speicher gespeichert ist.
– : Minus-Symbol
Erscheint bei negativen Zahlen.
E : Fehler-Symbol
Erscheint, wenn ein Überlauf oder ein sonstiger Fehlerzustand erkannt ist.
•
: Endsummenspeicher-Symbol
Erscheint, wenn eine Zahl im Endsummenspeicher gespeichert ist.

– 15 –
AUSTAUSCH DER TINTENROLLE
Knopf der
Tintenrolle
Abb. 2
Abb. 1
Abb. 3
Wenn der Ausdruck undeutlich ist, sollte die Tintendruckwalze ausgetauscht werden,
auch wenn sie richtig eingesetzt ist.
Tintenrolle: Typ EA-741R
VORSICHT
DER DRUCKER KANN STARK BESCHÄDIGT WERDEN, WENN MAN VERSUCHT,
VERBRAUCHTE TINTENROLLEN MIT TINTE AUFZUFÜLLEN.
1. Stellen Sie den Ein/Ausschalter auf die Stellung “OFF” (Aus).
2. Die Druckerabdeckung aufschieben. (Abb. 1)
3. Ziehen Sie den Knopf der Tintenrolle etwas heraus (in Pfeilrichtung) und nehmen Sie
die Rolle heraus. Achten Sie darauf, daß die Rolle nicht unter dem Gehäuse hakt.
(Abb. 2)
4. Die neue Tintenrolle einsetzen und den Knopf der Tintenrolle hineindrücken. Dann
sicherstellen, daß die Tintenrolle ordnungsgemäß festsitzt. (Abb. 3)
5. Die Druckerabdeckung wieder anbringen.
Hinweis: Um die Druckerabdeckung zu reinigen, nimmt mas sie vorher ab, indem man
sie aufschiebt. (Abb. 1) Dann die Druckerabdeckung mit einem weichen,
trockenen Tuch reinigen. Keine Lösungsmittel oder nassen Lappen ver-
wenden.
Reinigung des Druckermechanismus
Falls der Ausdruck nach längerem Gebrauch unscharf wird, empfiehlt es sich, die
Druckwalze nach folgendem Verfahren zu reinigen.
1) Die Papierrolle anbringen und den Papiervorschub betreiben, bis der Papieranfang
an der Vorderseite des Druckers erscheint.
2) Die Abdeckung des Druckers und die Tintenrolle entfernen.
3) Eine kleine Bürste (z.B. Zahnbürste) an die Druckwalze halten und durch Drücken
der -Taste die Reinigung vornehmen.
4) Tintenrolle und Abdeckung wieder anbringen.

– 16 –
1. Den Papierhalter anbringen. (Abb. 1)
2. Den gefalteten Anfangsteil des Papiers führt man in den unmittelbar hinter dem
Druckwerk befindlichen Schlitz ein. (Abb. 2)
3. Die Papiervorschub-Taste drücken und den Papierstreifen unter der Abreißkante
herausführen. (Abb. 3)
4. Die neue Papierrolle in den vorgesehenen Papierhalter an der Rückseite des Rechners
einsetzen. (Abb. 4)
DAS PAPIER NICHT IN RÜCKWÄRTSRICHTUNG ZIEHEN;
DER DRUCKERMECHANISMUS KÖNNTE DADURCH BESCHÄDIGT WERDEN.
AUSTAUSCH DER PAPIERROLLE
Abreißkante
Papiervorschub-
Taste
Papierhalter
Papierrolle
Abb. 3
Abb. 4
Abb. 1
Abb. 2
Papierhalter

– 17 –
Überlauf- bzw. Fehlerzustände können unter verschiedenen Bedingungen entstehen.
In diesem Falle wird das Fehlersymbol “E” angezeigt und alle Tasten werden elektronisch
blockiert. Wenn ein Fehlerzustand entsteht, bleibt der derzeitige Speicherinhalt erhalten.
Wenn “0.E” bei Auftreten des Fehlers ausgedruckt wird, kann man den Fehlerzustand
durch Drücken der
CE
-Taste aufheben. Wenn ein “E” mit anderen Zahlen (außer null)
ausgedruckt wird oder wenn kein “E” auf dem Papier ausgedruckt wird, verwendet man
zur Aufhebung des Fehlerzustands die
CE
oder -Taste, woraufhin die Rechnung
fortgesetzt werden kann.
Fehlerbedingungen:
1. Eingabe von mehr als 12 Stellen oder mehr als 11 Dezimalstellen.
Dieser Fehlerzustand kann mit der Taste
CE
oder aufgehoben werden.
2. Wenn der ganzzahlige Teil des Ergebnisses 12 Stellen überschreitet.
3. Wenn der ganzzahlige Teil des Speicherinhalts 12 Stellen überschreitet.
(Bsp. 999999999999 1 )
4. Wenn eine Zahl durch 0 (null) dividiert wird (Bsp. 5 0
+
=
).
Stromversorgung: Wechselstrom: 220V–230V, 50Hz
Kapazität: 12 Stellen
Rechenleistung: 4 Grundrechenarten, Konstantenmultiplikation und -division,
Potenzrechnen, Zuschlagsberechnung, wiederholte Addition
und Subtraktion, Reziprokberechnung, Endsummen-
Berechnung, Rechnen mit Ereigniszähler, Kalkulations-
aufschlag, Speicherfunktion, usw.
DRUCKWERK
Druckgeschwindigkeit: Ca. 3,0 Zeilen/Sekunde
Papierrolle: 57 mm ~ 58 mm breit
80 mm φ (max.)
Temperatur: 0°C ~ 40°C
Leistungsaufnahme: 73 mA
Abmessungen: 220 (B) × 274 (T) × 69 (H) mm
Gewicht: Ca. 1,4 kg
Zubehör: Eine Papierrolle, eine Tintenrolle (eingebaut), Papierhalter
und Bedienungsanleitung
Geräuschpegel: 63 dB (Drucken), gemessen nach DIN 45635
Sicherheitshinweise: Die versorgende Steckdose muß nahe am Gerät angebracht
und leicht zugänglich sein.
FEHLER
TECHNISCHE DATEN

– 18 –
Nous vous félicitons pour l’achat de cette calculatrice électronique SHARP, modèle EL-
2607R. Cette calculatrice SHARP a été spécialement conçue pour vous épargner du
travail et accroître l’efficacité dans toutes les applications de gestion et les calculs de
bureau. Veuillez lire ce mode d’emploi attentivement pour pouvoir tirer le meilleur parti
de cette nouvelle calculatrice SHARP.
Afin d’assurer un fonctionnement sans ennui de la calculatrice SHARP, veuillez prendre
les précautions suivantes:
1. Ne pas laisser la calculatrice dans les endroits sujets à de forts changements de
température, à l’humidité, et à la poussière.
2. Pour le nettoyage de la calculatrice, utiliser un chiffon doux et sec. Ne pas utiliser de
solvants ni un chiffon humide.
3. Si vous n’envisagez pas d’utiliser la calculatrice pendant une longue période,
débranchez la fiche de cordon d’alimentation.
4. Si une réparation s’avérait nécessaire, confier l’appareil à un distributeur agréé par
SHARP et assurant l’entretien, à un service d’entretien agréé par SHARP, ou à un
centre d’entretien SHARP.
5. N’enroulez pas le cordon d’alimentation autour de l’appareil; ne le tordez pas outre
mesure.
6. Cet appareil n’étant pas étanche, il ne faut pas l’utiliser ou l’entreposer dans des
endroits où il risquerait d’être mouillé, par exemple par de l’eau. La pluie, l’eau brumisée,
l’humidité, le café, la vapeur, la transpiration, etc. sont à l’origine de
dysfonctionnements.
SHARP ne peut pas être tenu responsable pour tout incident ou dommages consécutifs
économiques ou à ses biens, causés par une mauvaise utilisation et/ou un mauvais
fonctionnement de cet appareil et de ses périphériques, à moins qu’une telle
responsabilité soit reconnue par la loi.
ATTENTION
LA TENSION DU SECTEUR DOIT ÊTRE LA MÊME QUE CELLE POUR LAQUELLE
LA CALCULATRICE A ÉTÉ CONÇUE. L’UTILISATION D’UNE TENSION PLUS
ÉLEVÉE EST DANGEREUSE ET PEUT PROVOQUER UN INCENDIE OU UN
ACCIDENT. SHARP NE PEUT PAS ÊTRE TENUE RESPONSABLE DES
DOMMAGES QUI RÉSULTERAIENT DE L’UTILISATION D’UNE TENSION
SECTEUR PLUS ÉLEVÉE QUE CELLE POUR LAQUELLE LA CALCULATRICE A
ÉTÉ CONÇUE.
INTRODUCTION
FRANÇAIS
PRÉCAUTIONS
La page est en cours de chargement...
La page est en cours de chargement...
La page est en cours de chargement...
La page est en cours de chargement...
La page est en cours de chargement...
La page est en cours de chargement...
La page est en cours de chargement...
La page est en cours de chargement...
La page est en cours de chargement...
La page est en cours de chargement...
La page est en cours de chargement...
La page est en cours de chargement...
La page est en cours de chargement...
La page est en cours de chargement...
La page est en cours de chargement...
La page est en cours de chargement...
La page est en cours de chargement...
La page est en cours de chargement...
La page est en cours de chargement...
La page est en cours de chargement...
La page est en cours de chargement...
La page est en cours de chargement...
La page est en cours de chargement...
La page est en cours de chargement...
La page est en cours de chargement...
La page est en cours de chargement...
La page est en cours de chargement...
La page est en cours de chargement...
La page est en cours de chargement...
La page est en cours de chargement...
La page est en cours de chargement...
La page est en cours de chargement...
-
 1
1
-
 2
2
-
 3
3
-
 4
4
-
 5
5
-
 6
6
-
 7
7
-
 8
8
-
 9
9
-
 10
10
-
 11
11
-
 12
12
-
 13
13
-
 14
14
-
 15
15
-
 16
16
-
 17
17
-
 18
18
-
 19
19
-
 20
20
-
 21
21
-
 22
22
-
 23
23
-
 24
24
-
 25
25
-
 26
26
-
 27
27
-
 28
28
-
 29
29
-
 30
30
-
 31
31
-
 32
32
-
 33
33
-
 34
34
-
 35
35
-
 36
36
-
 37
37
-
 38
38
-
 39
39
-
 40
40
-
 41
41
-
 42
42
-
 43
43
-
 44
44
-
 45
45
-
 46
46
-
 47
47
-
 48
48
-
 49
49
-
 50
50
-
 51
51
-
 52
52


Sharp EL-2607R Le manuel du propriétaire
- Taper
- Le manuel du propriétaire
dans d''autres langues
- English: Sharp EL-2607R Owner's manual
- Deutsch: Sharp EL-2607R Bedienungsanleitung
Documents connexes
-
Sharp EL-2902E Le manuel du propriétaire
-
-
-
-
Sharp EL-2901RH Le manuel du propriétaire
-
Sharp EL-1611P Le manuel du propriétaire
-
-
Sharp EL-1607P Le manuel du propriétaire
-