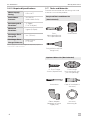
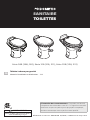
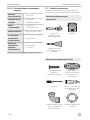
Dometic 300, 301, 310, 311, 320, 321 Guide d'installation
- Taper
- Guide d'installation

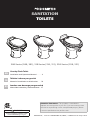
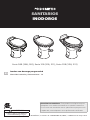
SANITATION
TOILETS
REVISION D | Form No. 600346504 10/2020 | ©2020 Dometic Corporation
WARNING
Cancer and Reproductive Harm
www.P65Warnings.ca.gov
300 Series (300, 301), 310 Series (310, 311), 320 Series (320, 321)
EN
Gravity-Flush Toilet
Installation and Operation Manual ......2
FR
Toilette à chasse par gravité
Manuel d’installation et d’utilisation ...19
ES
Inodoro con descarga por gravedad
Manual de instalación y funcionamiento ..37
Attention Consumers: This product is intended to
replace an existing toilet in your RV. If you are creating a new
installation or planning a more complicated project, please
consult a qualified service professional.

2
EN
Contents
1 Explanation of Symbols and Safety
Instructions ......................2
2 Pre-Installation ...................3
3 Installation .......................7
4 Operation ........................9
5 Maintenance ....................10
6 Troubleshooting .................15
7 Disposal ........................17
8 Warranty Information .............17
Service Center & Dealer Locations
Visit: www.dometic.com
Read these instructions carefully.
These instructions MUST stay with this product.
Contents
CAUTION
Indicates a hazardous situation that, if
not avoided, could result in minor or
moderate injury.
NOTICE: Used to address practices not related
to physical injury.
I
Indicates additional information that is
not related to physical injury.
1.3 Supplemental Directives
To reduce the risk of accidents and injuries,
please observe the following directives before
proceeding to install, operate, or service this
appliance:
• Read and follow all safety information and
instructions.
• Read and understand these instructions
before installing, operating, or servicing this
product.
• The installation must comply with all
applicable local or national codes, including
the latest edition of the following standards:
U.S.A.
– ANSI/NFPA70, National Electrical Code
(NEC)
– ANSI/NFPA 1192, Recreational Vehicles
Code
– ANSI Z21.57, Recreational Vehicles Code
Canada
– CSA C22.1, Parts l & ll, Canadian Electrical
Code
– CSA Z240 RV Series, Recreational
Vehicles
1.4 Personal and Product Safety
NOTICE: Failure to adhere to the instructions
in the following statements could result in
personal, product, and/or property damage.
• Modifying this product may result in property
damage.
• Always turn off the water supply before
removing, installing, or repairing a plumbing
fixture.
1 Explanation of Symbols and
Safety Instructions
This manual has safety information and
instructions to help you eliminate or reduce the
risk of accidents and injuries.
1.1 Recognize Safety Information
This is the safety alert symbol. It is
used to alert you to potential physical
injury hazards. Obey all safety messages
that follow this symbol to avoid possible
injury or death.
1.2 Understand Signal Words
A signal word will identify safety messages
and property damage messages, and also
will indicate the degree or level of hazard
seriousness.
DANGER!
Indicates a hazardous situation that, if not
avoided, will result in death or serious
injury.
WARNING
Indicates a hazardous situation that, if not
avoided, could result in death or serious
injury.
Gravity-Flush Toilet

3
EN
Pre-Installation
• Do not use chlorine or caustic chemicals,
such as laundry bleach or drain-opening
products, in the system. These products
damage the seals in toilets and other
plumbing valves.
• Do not flush foreign objects (paper towels,
paper cups, diapers, sanitary napkins, etc.).
• Mechanical seal toilets are designed to
only discharge directly into a holding tank.
Avoid horizontal pipe runs (oen found
in conventional residential or commercial
plumbing systems).
• The toilet bowl must be regularly cleaned
and the system winterized according to
the procedures in this manual, or your
warranty coverage may be voided. Refer to
“Performing Routine Toilet Cleaning” on
page11 and “Winterizing and Storing the
Toilet” on page12.
2 Pre-Installation
This section provides product information,
including specifications, and helps you prepare
to install your new toilet.
2.1 Intended Use
The Dometic 300, 310, and 320 Series Gravity-
Flush Toilets are designed for use in recreational
vehicles (RVs). These products are lightweight,
residential-size toilets for installation directly
above a holding tank.
The manufacturer accepts no liability for damage
in the following cases:
• Faulty assembly or connection
• Damage to the product resulting from
mechanical influences and excess voltage
• Alterations to the product without express
permission from the manufacturer
• Use for purposes other than those described
in the operating manual
Dometic Corporation reserves the right to modify
appearances and specifications without notice.
I
The images are for reference purposes
only. Parts and part locations may vary
according to specific product models.
Measurements may vary ±0.38 in. (10mm).
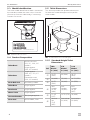
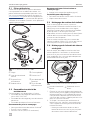
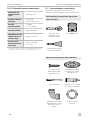
2.2 Package Contents
This section shows the package contents
provided with the toilet models. Actual package
contents may vary. Refer to the complete parts
list (available online at www.dometic.com) for
additional information.
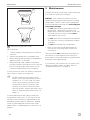
AA
BB
CC
DD
EE
FF
1 Contents
(AA) Assembled Toilet (DD) Floor Mounting
Washer(x2)
(BB) Floor Mounting
Cap(x2)
(EE) Floor Mounting
T-bolt(x2)
(CC) Floor Mounting
Nut(x2)
(FF) Floor Flange
Seal
Gravity-Flush Toilet

4
EN
Pre-Installation
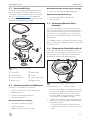
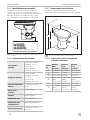
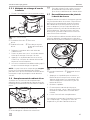
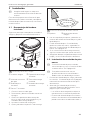
2.3 Model Identification
The toilet model identification label is located on
the toilet base under the water valve. Have the
information from this label ready, if contacting
Dometic for service.
Loreasm
Loreasam
Model :
Item :
123456789
PNC :
123456789
Serial :
Dometic Sanitation www.dometicusa.com
123456789
SO 1234
2 Model ID Label Location
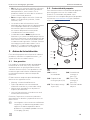
2.4 Product Composition
Toilet Bowl
Vitreous ceramic
(310, 311, 320, 321
models)
Polypropylene
(300, 301 models)
Toilet Seat
Polypropylene
(300, 301, 310, 311
models)
Enameled wood
(320, 321 models)
Flush Ball Seal
Nitrile butyl rubber
Toilet Base
Polypropylene
Foot Pedal
Polypropylene
Water Valve
Polypropylene
Vacuum Breaker
ABS/polypropylene
Floor Seal
Nitrile rubber, foam
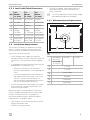
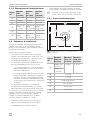
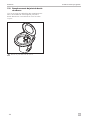
2.5 Toilet Dimensions
This section provides the product dimensions
for both the standard-height and low-profile
toilet models.
e
y
w
q
t
r
3 Product Dimensions: Both Heights
2.5.1 Standard-Height Toilet
Dimensions
Ref
300
Model
in. (mm)
310
Model
in. (mm)
320
Model
in. (mm)
q
19.75
(502)
20 (508) 19.75
(502)
w
16 (406)
15 (381) 14.75 (375)
e
19.75
(502)
19 (483) 22 (559)
r
Seat
Height:
18.25
(464)
Seat
Height:
18 (457)
Seat
Height:
18.25
(467)
t
13.25
(337)
14.75 (375) 16 (406)
y
Seat Lid
Up:
33.5
(851)
Seat Lid Up:
33 (838)
Seat Lid Up:
35 (889)
Gravity-Flush Toilet

5
EN
Pre-Installation
2.5.2 Low-Profile Toilet Dimensions
Ref
301
Model
in. (mm)
311
Model
in. (mm)
321
Model
in. (mm)
q
15.5 (394)
15.25 (387) 15 (381)
w
16 (406)
15 (381) 14.75 (375)
e
19.75 (502)
19 (483) 22 (559)
r
Seat
Height:
14 (356)
Seat
Height:
13.75(349)
Seat
Height:
13.5 (343)
t
13 (330)
14.75 (375) 15.75 (400)
y
Seat Lid Up:
30 (762)
Seat Lid Up:
29.5 (749)
Seat Lid Up:
31 (787)
2.6 Installation Requirements
This manual will help you replace an existing
toilet. To create a new location for your new
toilet, contact a qualified service professional.
Verify that your existing toilet:
• Has a flexible water supply line coming
through the floor or wall. If the line comes out
of the floor, you will need an elbow adapter
kit.
• Is attached to the floor with two bolts that are
perpendicular to the back wall.
– If there are four bolts, you will need a
Universal Mounting Kit, in the appropriate
color.
– If you are changing the toilet orientation
(the angle of the toilet to the room ), you
can use a Universal Mounting Kit, or
remove the floor flange and install a new
one in your preferred orientation.
• Is level with the floor. If the flange is installed
in the sub-floor, you may need a taller seal
than the one provided.
Make sure there is enough space for your new
toilet. Compare the dimensions for your model
listed in “Toilet Dimensions” on page4 to
the measurements listed in “Minimum Space
Requirements” on page5. Verify:
• The rough-in size (from the centerline of the
flange to the back wall)
• The door swing clearance
• That the foot pedal, when depressed, will
touch the same flat surface on which the
toilet is installed.
I
For a more pleasant installation day, empty
the holding tank before you begin.
2.6.1 Minimum Space Requirements
q
r
t
y
u
w e
4 Required Clearances, Including Rough-In
q
300 Model:
8.5 (216)
10 (254) 11 (279)
301 Model:
8.75 (222)
w
11 (279)
e
11 (279)
r
Floor Flange
t
Le Wall
y
Back Wall
u
Right Wall
Gravity-Flush Toilet

6
EN
Pre-Installation
2.6.2 Required Specifications
Water Supply
Fitting
0.5 in. NPT
Static Water
Pressure
30–100 PSI
(206.8–689.5 kPa)
Recommended
Flow Rate
1
3–5 gpm
(11.4–18.9 lpm)
Minimum
Flow Rate
2 gpm (9.5 lpm)
Discharge Floor
Flange ID
3 in. (76 mm)
Discharge Floor
Flange Thickness
0.25–0.44 in.
(7–11 mm)
1
Water supply that exceeds 5.0 gpm (18.9 lpm) may require a
flow restrictor at the toilet inlet.
2.7 Tools and Materials
Dometic recommends the following tools and
materials to install the product:
Required Tools and Materials
(Not Included)
Pliers,
Adjustable Wrench,
or Torque Wrench
Small Bucket
Putty Knife (to remove
flange seal)
Optional Materials (Not Included)
4 - Floor Flange
Screws (8 preferred)
Floor Flange
(must match the one
you are replacing)
Screwdriver Caulk (if installed in a
wet area)
Elbow Adapter
(depends on water
supply line)
Universal
Mounting Kit
Gravity-Flush Toilet

7
EN
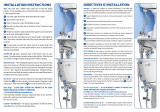
Installation
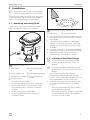
3 Installation
I
Make sure to follow the recommended
installation requirements in this manual.
This section provides instructions for removing
an existing toilet, replacing the floor flange (if
necessary), and installing your new toilet.
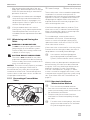
3.1 Removing an Existing Toilet
Follow these steps when replacing an older
toilet, to prepare for the new installation:
e
r
t
y
u
w
q
5 Removing an Old Toilet
q
Old Toilet
t
Existing Mounting
Cap
w
Water Supply Line
y
Existing Mounting Nut
e
Existing Floor Flange
u
Existing Mounting
Washer
r
Existing T-bolts
1. Turn off the water supply.
2. Disconnect and drain the water supply line.
3. Remove the existing floor mounting caps,
floor mounting nuts, and floor mounting
washers.
4. Li the existing toilet off the bolts.
5. Remove and discard the existing floor
mounting T-bolts.
q
w
6 Removing the Existing Seal Material
q
Putty Knife
w
Old Seal Material
6. Use a putty knife to remove and discard any
existing seal material from the floor and the
floor flange.
7. Evaluate the floor flange. If it is damaged,
remove it and install a new one, following
the steps in “Installing a New Floor Flange”
on page7.
8. If you are installing a Universal Mounting Kit,
follow the instructions that came with the kit.
9. Make sure the top surface of the floor is
clean and free of any debris or sealant.
3.2 Installing a New Floor Flange
I
If you will use the existing floor flange,
skip to “Installing the New Toilet” on
page8.
I
Consider engaging a qualified service
professional if you must install a new floor
flange.
1. Remove the existing floor flange by
unfastening and discarding the existing
screws. If the floor flange is glued down, you
may need additional tools to remove it.
2. Before fastening the new floor flange, refer
to “Installation Requirements” on page5
to verify:
– The toilet mounting holes are located at
your preferred orientation.
– The center of the floor flange is at least the
recommended distance from the back
wall for your toilet model.
Gravity-Flush Toilet

8
EN
Installation
e
w
q
7 Installing the New Floor Flange
q
Screws
e
Outlet hole
w
New floor flange
3. Place the new floor flange into the outlet
hole and secure it to the floor with a
minimum of four screws (eight are preferred).
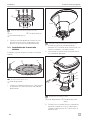
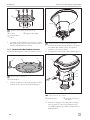
3.3 Installing the New Toilet
Follow these steps to install your new toilet:
q
EE
EE
8 Inserting the T-bolts
q
Floor flange
1. Insert the new floor mounting T-bolts (EE)
into the slots in the floor flange.
AA
FF
9 Installing the Floor Flange Seal (FF)
2. Install the new floor flange seal (FF) to the
base of the toilet (AA). On some models, it is
already installed.
3. Carefully position the toilet (AA) over the
floor flange.
AA
EE
BB
CC
DD
w
q
10 Securing the New Toilet
q
Floor Flange
w
Water Supply Line
4. Align the holes in the toilet base with the
floor mounting T-bolts (EE) as you lower the
toilet (AA) onto the floor flange.
Gravity-Flush Toilet

9
EN
Operation
I
Be sure the entire outlet drain of the toilet
base fits inside the floor flange outlet hole
to avoid leaks.
I
The toilet base might not rest evenly
against the floor yet. The floor flange
seal(FF) will compress as you complete
the following steps.
5. Place the new floor mounting washers (DD)
and then the new floor mounting nuts (CC)
onto the floor mounting T-bolts (EE).
6. Tighten the floor mounting nuts (CC). If a
torque wrench is available, tighten them
to 30–40 in. lb (3.4–4.5 N·m). Do not
overtighten. Alternate between sides when
tightening to prevent distortion. When the
floor-mounting nuts (CC) are tight, the base
of the toilet (AA) should be securely attached
and flat against the floor.
7. Attach the floor mounting caps (BB) onto the
floor mounting nuts (CC).
I
If the toilet (AA) is being installed in a
shower stall (or other wet area), apply a
bead of caulk around the base of the toilet
to prevent water seepage under the base.
8. Connect the water supply line and torque
the connection to 30–40 in. lb
(3.4–4.5 N·m). Do not overtighten.
I
If the water supply line comes out of
the floor, install a 1/2in. (13 mm) elbow
fitting or adapter.
9. Turn on the water supply.
10. Flush the toilet several times and check
for leaks. Refer to “Flushing the Toilet” on
page9.
11. Test for leaks by filling the bowl with water
and letting it sit for an hour.
4 Operation
This section provides instructions on the proper
use of these gravity-flush toilets.
4.1 Adding Water to the Bowl
Adding water to an empty bowl helps prevent
holding tank odors from entering the living
space. Adding water is recommended prior to
flushing solids and toilet paper.
q
11 Partially Depressing the Flush Pedal
q
Flush Pedal
1. To add water to the toilet, depress the flush
pedal part way. Water flows into the bowl
while the flush ball remains closed.
2. If the flush ball moves, let up on the pedal
slightly.
4.2 Flushing the Toilet
NOTICE: Flush only water, bodily wastes,
and rapid-dissolving toilet tissue. Do not flush
foreign objects. Do not flush wet wipes, sanitary
napkins, diapers, paper cups, cotton swabs,
food, hair, or liquids such as oils or solvents.
Failure to follow these instructions could cause
clogging or damage to the toilet or the toilet
system.
Gravity-Flush Toilet

10
EN
Maintenance
q
12 Fully Depressing the Flush Pedal
q
Flush Pedal
1. To flush, depress the pedal until it contacts
the floor.
2. Release the pedal aer a complete flush.
• When flushing liquids, depress the pedal for
approximately 1–2 seconds.
• When flushing solids, depress the pedal
until the contents of the bowl rinses from the
bowl. Flushing longer than necessary will
cause the holding tank to fill too quickly.
A small amount of water will collect in the bowl
aer a flush to create an airtight seal.
I
Residual water trickle in the ceramic
bowls: Due to the integrated rim of the
models 310, 311, 320, and 321 toilets,
water may continue to trickle into the
toilet bowl for up to 20 minutes aer
flushing. If the water trickle continues
aer 30 minutes, replace the water valve.
Refer to “Replacing the Water Valve” on
page14.
So that holding tank odors do not enter the
living space, make sure 1 in. (24 mm) of water
remains in the toilet bowl. Depending on the
plumbing system and user operation, adding
water may be required to achieve this water
depth. Refer to “Adding Water to the Bowl” on
page9.
5 Maintenance
Properly cleaning, winterizing, and maintaining
your toilet will increase its lifespan.
NOTICE: If this toilet ever requires service,
read the following statements before servicing
the product. Failure to follow these guidelines
can cause product damage and can void your
warranty coverage:
• Do not separate the ceramic bowl from the
plastic base. Unlike other Dometic foot-
pedal toilets, the bowl and base of the 300,
310, and 320 series toilets should not be
separated for any reason.
• Do not remove the foot pedal from the base.
This toilet has a factory-sealed bowl-to-base
assembly.
• Do not disassemble the components.
• Refer to this manual and replacement kit
instructions for maintenance and service
information.
The toilet does not need to be removed from
the vehicle (or unfastened from the floor) for
basic repairs, like the flush ball seal replacement
and water valve replacement.
If you need to call Dometic for assistance, have
the exact model number available. Refer to
“Model Identification” on page4.
Gravity-Flush Toilet

11
EN
Maintenance
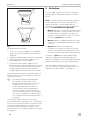
5.1 Serviceable Parts
This section shows the replacement parts for
the toilet models. Actual available parts may
vary. Refer to the complete parts list (available
online at www.dometic.com) for additional
information. To order parts, contact your local
Dometic service partner or dealer.
q
w
e
r
u
i
y
t
13 300 Series Serviceable Parts
q
Toilet Seat
t
Pedal Cover
w
Flush Ball Seal
y
T-Bolts
e
Vacuum Breaker
u
Floor Flange Seal
r
Water Valve
i
Supply Hose
5.2 Maintenance Kits and Materials
These kits are available for purchase:
• 300/310/320 Series Toilet Water Valve
Replacement Kit
• Flush Ball Seal Replacement Kit
• Vacuum Breaker Kit
Recommended for cleaning:
• SeaLand
®
Toilet Bowl Cleaner
• So bristle brush
• Rubbing alcohol (300/301 only)
Recommended for winterization/storage:
• Nontoxic antifreeze (propylene glycol)
Optional for troubleshooting:
• SeaLand Holding Tank Deodorant
• Silicone spray
5.3 Performing Routine Toilet
Cleaning
For routine cleaning, use SeaLand toilet bowl
cleaner. If this cleaner cannot be found in your
area, contact Dometic for your nearest dealer. If
the cleaner is not available, use a non-abrasive
bathroom and toilet bowl cleaner. Follow label
instructions.
For stubborn stains on model 300 and 301 toilet
bowls, carefully use rubbing alcohol to wipe and
remove the stain.
5.4 Cleaning the Flush Ball and Seal
Aer a period of time, mineral deposits from
hard water may build up on the flush ball or seal,
resulting in a slow water leak. To prevent this,
periodically clean the flush ball and seal.
w
q
14 Cleaning Debris from the Flush Ball Seal
q
Flush Ball Seal
w
Flush Pedal
1. Remove minor debris from the flush ball and
seal by slowly depressing and releasing the
flush pedal several times. This will loosen
and rinse debris from the surfaces. Repeat
several times for stubborn buildup.
2. If step 1 does not fully clean the ball and seal,
clean with a so bristle brush and SeaLand
toilet bowl cleaner.
– Fully clean the top of the flush ball and
under the seal where it contacts the flush
ball.
Gravity-Flush Toilet

12
EN
Maintenance
– Aer cleaning the underside of the seal,
apply light, downward pressure to the top
of the seal while brushing around the full
perimeter of the seal.
I
If the ball pivot arm becomes dislodged
while cleaning inside the base beneath
the flush ball and seal, re-engage it into
the pivot point. Refer to Figure 16 for the
location of the pivot point.
I
If this procedure does not correct a
leaking seal, it may require replacement.
Detailed replacement instructions are
included with the replacement flush ball
seal kits.
5.5 Winterizing and Storing the
Toilet
WARNING: POISON HAZARD.
Do not use automotive-type antifreeze
(ethylene glycol) in freshwater systems.
Failure to obey this warning could result
in death or serious injury:
CAUTION: BODILY HARM HAZARD.
This toilet is not intended for use when
exposed to temperatures below freezing.
Failure to obey this caution could result in
minor or moderate injury.
NOTICE: The toilet warranty expressly excludes
coverage for any damages to the toilet or
the vehicle that may occur due to improper
winterization of the toilet. Freeze damage that
results in leaks to the water valve is an indicator
of improper winterization.
5.5.1 Preventing a Frozen Water
Valve
q
w
15 Identifying a Damaged Water Valve
q
Freeze Damage
w
Water Valve Damage
These toilet water valves exceed the applicable
standards for maximum water pressure as
defined by the North American plumbing code
agencies. However, if trapped water freezes in
the piping that supplies water to the toilet, it
expands and creates extremely high pressure
that can damage the valve.
If the freeze damage indicator window (1) has
white stress marks, it indicates freeze-damage.
Water valve damage is due to severe exposure
to below-freezing temperatures.
To avoid damage, winterize the toilet as
described in this manual. If freeze damage
occurs as a result of improper winterization,
replace the water valve with a 300/310/320
series toilet water valve kit.
If the water valve is returned for a warranty claim,
Dometic reserves the right to deny the claim if
the problem is caused by freeze damage.
I
Use nontoxic antifreeze (propylene
glycol) designated for potable water
systems (See the vehicle owner’s manual).
When a toilet may be exposed to temperatures
below freezing, the toilet must be winterized
using the “Non-toxic Antifreeze Winterization
Method” on page12 or the “Drain Water
from the Toilet Method” on page13. When
a toilet is stored for long periods of time, or the
water becomes stagnant, flush the system using
the “Drain Water from the Toilet Method” on
page13.
5.5.2 Non-toxic Antifreeze
Winterization Method
I
This is the recommended method.
1. Pour non-toxic antifreeze into the potable
water tank according to the instructions from
the antifreeze manufacturer.
2. Flush the toilet (several times) until the
antifreeze has flowed completely through
the toilet.
I
For toilets with a hand sprayer, the hand
sprayer must be turned on for antifreeze
to cycle through the sprayer.
Gravity-Flush Toilet

13
EN
Maintenance
5.5.3 Drain Water from the Toilet
Method
1. Turn off the water supply to the toilet.
w
r
q
e
16 Removing the Water Supply
q
Water Supply Line
e
Small Bucket
w
Water Inlet Valve
r
Pivot Point for the
Ball Pivot Arm
2. Remove the water supply line from the water
valve.
3. Place a small bucket under the water valve
inlet to catch draining water.
4. Depress the flush pedal and allow water to
completely drain from the water valve and
vacuum breaker.
5. Leave the water line disconnected until the
threat of freezing temperatures is past.
NOTICE: Do not leave the RV unoccupied for
extended periods of time with a municipal water
supply connected, or with the onboard water
pump turned on, when there is a possibility of
freezing temperatures.
5.6 Replacing the Water Valve
Refer to the detailed replacement instructions in
the water valve replacement kit before removing
or installing a water valve assembly.
q
17 Removing the Water Valve Assembly
q
Water Inlet Valve Assembly
I
In cold climates, be sure to follow the
winterizing procedure in this manual to
help avoid water valve failure.
5.7 Reconditioning the Flush Ball
Seal
Each toilet is factory-tested to assure a watertight
seal in the toilet bowl. This quality-assurance
testing process requires a device to hold the
flush ball open, which may temporarily distort
the flush ball seal from its original shape. As a
result, it may cause the flush ball seal to leak
water into the holding tank during normal use.
If you discover a water leak into the holding tank,
recondition the flush ball seal into its original
shape.
w
q
18 Reconditioning the Flush Ball Seal
q
Flush Ball Seal
w
Flush Pedal
1. Depress the pedal to hold the flush ball
open, then lightly press down around the
edge of the seal with a finger to conform the
seal to the flush ball.
2. Release the pedal.
3. Keeping the flush ball closed, pour 1 qt
(0.9L) of hot tap water into the toilet bowl.
4. Let the water cool completely.
If the toilet does not hold water in the bowl, refer
to “Troubleshooting” on page15 before you
replace the flush ball seal.
Gravity-Flush Toilet


15
EN
Troubleshooting
6 Troubleshooting
Problem Possible Cause Suggested Remedy
Water will not stay in
the bowl.
The flush ball seal is not
properly positioned.
Refer to “Reconditioning the Flush Ball Seal”
on page13.
The flush ball seal’s
shape is temporarily
distorted.
Refer to “Reconditioning the Flush Ball Seal”
on page13.
The flush ball or flush
ball seal is dirty.
Clean and seal the flush ball.
Refer to “Cleaning the Flush Ball and Seal” on
page11.
The flush ball seal is
worn or defective.
Replace the flush ball seal.
To replace the flush ball seal, refer to the
detailed instructions included with the flush
ball seal replacement kit.
Water flow into the
toilet will not stop.
The water valve is worn
or defective.
Replace the water valve.
Refer to “Replacing the Water Valve” on
page13.
Water does not
enter the toilet bowl
properly.
There is an insufficient
water flow rate at the
toilet inlet.
Make sure the flow rate at the toilet inlet
is 3–5 gpm (11.4–18.9 lpm), which is the
recommended rate.
The screen at the water
valve inlet is clogged.
Clean the screen, on the inlet side, using a
cotton swab or an old toothbrush. Do not
disassemble the valve.
The water valve is worn
or damaged.
Replace the water valve.
Refer to “Replacing the Water Valve” on
page13.
There are plugged rim
wash holes or a plugged
rim jet (300 series only)
in the toilet.
Clean the rim wash holes or rim jet.
Odor emits from the
toilet when the flush
ball is open.
The holding tank vent is
plugged.
Clear obstructions from the vent. Refer to the
tank owner’s manual.
The odor is from the
holding tank contents.
Add deodorant to the holding tank.
Gravity-Flush Toilet

16
EN
Troubleshooting
Problem Possible Cause Suggested Remedy
Odor emits from the
toilet when the flush
ball is closed.
There is no water in the
bowl.
Add water to the bowl.
Refer to “Adding Water to the Bowl” on
page9.
The flush ball seal is
damaged.
Replace the flush ball seal.
To replace the flush ball seal, refer to the
detailed instructions included with the flush
ball seal replacement kit.
The floor flange seal is
damaged.
Replace the floor flange seal.
Refer to “Removing an Existing Toilet”
on
page7
and “Installing the New Toilet”
on
page8
, using the existing toilet and a new
seal throughout the procedures.
The flush ball will not
close completely.
There is too much
friction between the
flush ball and the seal.
Clean and lubricate the flush ball and flush
ball seal with silicone spray or furniture polish.
The flush ball will not
operate properly.
The ball pivot arm may
have become dislodged
when cleaning beneath
the flush ball and seal.
Re-engage the ball pivot arm back into the
pivot point. Refer to Figure 16 for the location
of the pivot point.
The hand sprayer
leaks.
The hand sprayer is
defective.
Replace the hand sprayer.
Refer to the hand sprayer owner’s manual.
Water is leaking from
the water valve.
The water line
connection is loose or
not seated properly.
Make sure that the threads are not cross-
threaded and tighten the connection.
The water valve is
damaged or defective.
Replace the water valve.
Refer to “Replacing the Water Valve”
on
page
13.
Water is leaking from
the toilet base.
The toilet is not secured
to the floor.
Tighten the toilet mounting bolts.
Follow the steps in “Installing the New Toilet”
on page8
.
The floor flange seal is
worn or defective.
Replace the floor flange seal.
Refer to “Removing an Existing Toilet”
on
page7
and “Installing the New Toilet”
on page8, using the existing toilet and a
new seal throughout the procedures.
Gravity-Flush Toilet

17
EN
Disposal
Problem Possible Cause Suggested Remedy
Water is leaking from
the rear of the toilet.
There is a loose vacuum
breaker.
Make sure the vacuum breaker stem is pushed
fully into the sealing grommet in the back of
the bowl (310 and 320 series), or securely
connected to the rim jet (300 series).
The vacuum breaker is
damaged or defective.
Replace the vacuum breaker.
Follow the instructions provided with the new
vacuum breaker.
The supply hose is
damaged or defective.
Tighten the supply hose clamps.
Replace the supply hose.
The toilet bowl is
cracked or defective.
Replace the toilet.
7 Disposal
M
Place the packaging material in the
appropriate recycling waste bins,
whenever possible. Consult a local
recycling center or specialist dealer
for details about how to dispose
of the product in accordance with
all applicable national and local
regulations.
8 Warranty Information
Refer to the sections below for information
about warranty and warranty support in the US,
Canada, and all other regions.
8.1 United States and Canada
LIMITED WARRANTY AVAILABLE AT WWW.
DOMETIC.COM/WARRANTY.
IF YOU HAVE QUESTIONS, OR TO OBTAIN A
COPY OF THE LIMITED WARRANTY FREE OF
CHARGE, CONTACT:
DOMETIC CORPORATION
CUSTOMER SUPPORT CENTER
5155 VERDANT DRIVE
ELKHART, INDIANA 46516
1-800-544-4881 OPT 1
8.2 All Other Regions
The statutory warranty period applies. If the
product is defective, please contact the
manufacturer’s branch in your region (see the
back of the instruction manual for the websites)
or your retailer.
For repair and guarantee processing, please
include the following documents when you
send in the device:
• A copy of the receipt with purchasing date
• A reason for the claim or description of the
fault
Gravity-Flush Toilet

18
EN
Disposal

SANITATION
TOILETS
SANITAIRE
TOILETTES
RÉVISIOND Document n°600346504 10/2020 | ©2020 Dometic Corporation
AVERTISSEMENT
Cancer et effets nocifs sur la reproduction
www.P65Warnings.ca.gov
Série300 (300, 301), Série310 (310, 311), Série320 (320, 321)
FR
Toilette à chasse par gravité
Manuel d’installation et d’utilisation ..20
À l’attention des consommateurs: Ce produit est destiné
àremplacer une toilette dans votre VR. S’il s’agit d’une nouvelle
installation ou que vous prévoyez un projet plus compliqué,
veuillez communiquer avec un professionnel qualifié.

20
Sommaire
ATTENTION
Indique une situation dangereuse qui,
si elle n’est pas évitée, peut causer des
blessures légères ou modérées.
AVIS : Utilisé pour signaler des pratiques non
liées à une blessure physique.
I
Fournit des renseignements additionnels
sans rapport avec des blessures
physiques.
1.3 Directives supplémentaires
Pour réduire le risque d’accidents et de
blessures, observer les directives suivantes avant
de continuer à installer, utiliser ou entretenir cet
appareil:
• Lire et suivre toutes les consignes de sécurité
et les instructions.
• Lire et comprendre ces instructions avant
l’installation, l’utilisation ou l’entretien de ce
produit.
• L’installation doit se conformer à tous les
codes locaux ou nationaux applicables,
ycompris la toute dernière édition des
normes suivantes:
États-Unis
– ANSI/NFPA 70, Code national de
l’électricité (CNE)
– ANSI/NFPA 1192, Code des véhicules
récréatifs
– ANSI Z21.57, Code des véhicules
récréatifs
Canada
– CSA C22.1, Parties l et ll, Code canadien
de l’électricité
– CSA Z240 RV Series, véhicules récréatifs
1.4 Sécurité personnelle et relative
au produit
AVIS : Le non-respect des instructions ci-après
peut entraîner un préjudice corporel et des
dégâts matériels (produit et/ou biens).
• La modification de ce produit peut causer
des dégâts matériels.
• Toujours fermer l’arrivée d’eau avant
d’enlever, d’installer ou de réparer un
appareil sanitaire.
1 Explication des symboles et
consignes de sécurité
Ce manuel contient des consignes de sécurité et
des instructions pour aider l’utilisateur à éliminer
ou à réduire le risque d’accidents et de blessures.
1.1 Reconnaître les consignes de
sécurité
C’est le symbole d’alerte à la sécurité.
Il signale des risques de blessures
physiques. Obéir à tous les messages de
sécurité qui suivent ce symbole pour éviter
les risques de blessures ou de mort.
1.2 Comprendre les mots-indicateurs
Un mot-indicateur identifie les messages
de sécurité et les messages liés aux dégâts
matériels, et signale aussi le degré ou niveau de
gravité du danger.
DANGER!
Indique une situation dangereuse qui, si
elle n’est pas évitée, causera la mort ou
des blessures graves.
AVERTISSEMENT
Indique une situation dangereuse qui, si
elle n’est pas évitée, peut causer la mort
ou des blessures graves.
FR
Toilette à chasse par gravité
Liste des centres de service et des
revendeurs
Visitez: www.dometic.com
Lisez attentivement ces instructions.
Ces instructions DOIVENT rester avec
ceproduit.
Sommaire
1 Explication des symboles
et consignes de sécurité ...........20
2 Avant l’installation ...............21
3 Installation ......................25
4 Mode d’emploi ..................27
5 Entretien ........................28
6 Dépannage .....................33
7 Mise au rebut ....................35
8 Informations de garantie ..........35
La page est en cours de chargement...
La page est en cours de chargement...
La page est en cours de chargement...
La page est en cours de chargement...
La page est en cours de chargement...
La page est en cours de chargement...
La page est en cours de chargement...
La page est en cours de chargement...
La page est en cours de chargement...
La page est en cours de chargement...
La page est en cours de chargement...
La page est en cours de chargement...
La page est en cours de chargement...
La page est en cours de chargement...
La page est en cours de chargement...
La page est en cours de chargement...
La page est en cours de chargement...
La page est en cours de chargement...
La page est en cours de chargement...
La page est en cours de chargement...
La page est en cours de chargement...
La page est en cours de chargement...
La page est en cours de chargement...
La page est en cours de chargement...
La page est en cours de chargement...
La page est en cours de chargement...
La page est en cours de chargement...
La page est en cours de chargement...
La page est en cours de chargement...
La page est en cours de chargement...
La page est en cours de chargement...
La page est en cours de chargement...
La page est en cours de chargement...
La page est en cours de chargement...
-
 1
1
-
 2
2
-
 3
3
-
 4
4
-
 5
5
-
 6
6
-
 7
7
-
 8
8
-
 9
9
-
 10
10
-
 11
11
-
 12
12
-
 13
13
-
 14
14
-
 15
15
-
 16
16
-
 17
17
-
 18
18
-
 19
19
-
 20
20
-
 21
21
-
 22
22
-
 23
23
-
 24
24
-
 25
25
-
 26
26
-
 27
27
-
 28
28
-
 29
29
-
 30
30
-
 31
31
-
 32
32
-
 33
33
-
 34
34
-
 35
35
-
 36
36
-
 37
37
-
 38
38
-
 39
39
-
 40
40
-
 41
41
-
 42
42
-
 43
43
-
 44
44
-
 45
45
-
 46
46
-
 47
47
-
 48
48
-
 49
49
-
 50
50
-
 51
51
-
 52
52
-
 53
53
-
 54
54


Dometic 300, 301, 310, 311, 320, 321 Guide d'installation
- Taper
- Guide d'installation
dans d''autres langues
Documents connexes
-
Dometic 385310681 Mode d'emploi
-
-
-
-
-
-
-
-
-
Dometic 976 Manuel utilisateur
Autres documents
-
Camco 8616062 Le manuel du propriétaire
-
THETFORD Aqua Magic Aurora Le manuel du propriétaire
-
-
 Aquaus ABT-360 Mode d'emploi
-
Coleman Portable Flush Toilet Le manuel du propriétaire
-
Moen DN7020 Le manuel du propriétaire
-
 TROBOLO MAN.HTS4XX1461.7 Manuel utilisateur
-

