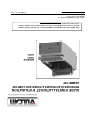
Vulcan CEF40 Le manuel du propriétaire
- Catégorie
- Friteuses
- Taper
- Le manuel du propriétaire
Ce manuel convient également à

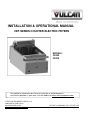
INSTALLATION & OPERATIONAL MANUAL
CEF SERIES COUNTER ELECTRIC FRYERS
MODELS:
CEF40
CEF75
For additional information on Vulcan or to locate an authorized parts
and service provider in your area, visit out website at www.vulcanequipment.com
©ITW FOOD EQUIPMENT GROUP, LLC
3600 NORTH POINT BLVD.
BALTIMORE,MD 21222 RETAIN THIS MANUAL FOR FUTURE USE
WWW.VULCANEQUIPMENT.COM F-47660 Rev D (12-16)

2
IMPORTANT FOR YOUR SAFETY
THIS MANUAL HAS BEEN PREPARED FOR PERSONNEL QUALIFIED TO INSTALL
ELECTRIC EQUIPMENT, WHO SHOULD PERFORM THE INITIAL FIELD START-UP
AND ADJUSTMENTS OF THE EQUIPMENT COVERED BY THIS MANUAL.
FOR YOUR SAFETY
DO NOT STORE OR USE GASOLINE OR OTHER FLAMMABLE VAPORS OR
LIQUIDS IN THE VICINITY OF THIS OR ANY OTHER APPLIANCE.
Improper installation, adjustment, alteration, service or
maintenance can cause property damage, injury or death.
Read the installation, operating and maintenance instructions
thoroughly before installing or servicing this equipment.

3
TABLE OF CONTENTS
IMPORTANT FOR YOUR SAFETY…………………………………...……
2
INTRODUCTION……………………………………………………………...
4
GENERAL……………………………………………………………
4
ORDERING PARTS……..………………………………………… 4
UNPACKING………………..……………………………………….
4
FRYER CAPACITIES……………………………………………… 5
INSTALLATION……………………………………………………………….
5
CODES AND STANDARDS………………………………………. 6
ASSEMBLY…………………………………………………………. 6
ELECTRICAL CONNECTIONS…………………………………... 7
LEVELING THE FRYER…………………………………………... 7
OPERATION…………………………………………………………
7
OVER-TEMPERATURE SHUTDOWN……………………………
8
BEFORE FIRST USE……………………………………………….
8
Cleaning…………………………………………………………..
8
FILLING TANK WITH SHORTENING…………………………….
9
BASIC FRYING INSTRUCTIONS…………………………………
9
Fry Basket Guidelines…………………………………………..
10
EXTENDED SHORTENING LIFE…………………………………
10
TURNING ON THE FRYER………………………………………..
11
TURNING OFF THE FRYER………………………………………
12
EXTENDED SHUTDOWN…………………………………………
12
FILTERING THE OIL………………………………………………. 12
DRAINING THE TANK…………………………………………….. 13
BOIL OUT PROCEDURE…………………………………………………… 13
CLEANING………………………………………………………….. 14
Daily……………………………………………………………… 14
MAINTENANCE……………………………………………………………… 15
SERVICE IN US AND CANADA…………………………………..
15
IN AUSTRALIA………………………………………………………
15
TROUBLESHOOTING………………………………………………………. 15
TROUBLESHOOTING CHART……………………………………
15

4
INTRODUCTION
GENERAL
Vulcan Fryers are produced with quality workmanship and material. Proper installation,
usage and maintenance will result in years of satisfactory performance.
Before installing the fryer, thoroughly read this manual and carefully follow all
instruction.
This manual is applicable to model listed on the cover page. Procedures in this manual
will apply to all models unless specified. Pictures and illustrations can be of any model
unless the picture or illustration needs to be model specific.
ORDERING PARTS
Customers may order parts directly from their local authorized service center. If not
known, call Vulcan Customer Service at 800-814-2028.
To speed up your order, provide the model number, serial number, electrical
specifications, part needed, item part number (if known) and quantity needed.
UNPACKING
This fryer was carefully inspected before leaving the factory. The carrier assumes full
responsibility for the safe delivery upon acceptance of the shipment. Check for possible
shipping damage immediately after receipt.
If the fryer is found to be damaged, complete the following steps:
1. Carrier must be notified within 5 business days of receipt.
2. Carrier’s local terminal must be notified immediately upon discovery (note time,
date, and who was spoken to), and follow up and confirm with written or
electronic communication.
3. All original packing materials must be kept for inspection purposes.
4. The fryer cannot have been moved, installed, or modified.
5. Notify Vulcan Customer Service immediately at 800-814-2028.
Check that the following have been included:
Basket Rack
Tank Brush
Twin Fry Baskets (2) per fry tank
Cleanout Rod
Drain Pipe Extension

5
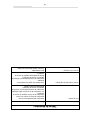
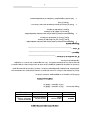
FRYER CAPACITY
MODEL
KW PER FRY TANK
WIDTH INCH (cm)
TOTAL SYTEM
SHORTENING LBS
(kg) PER FRY TANK
CEF40 17 18” (46 cm) 40 (18 kg)
CEF75 24 27” (69 cm) 75 (34 kg)
Voltage ranges are: 208, 3 Phase - 50 – 60 Hz
240, 3 Phase - 50 – 60 Hz
INSTALLATION
Do not use the door or its handle to lift the fryer.
Before installing the fryer, verify that the electrical requirements agree with the
specifications on the fryer data plate, which is located on the inside of the door panel.
Record your fryer model, device, and serial numbers for future reference in the space
provided below. This information can be found on the fryer data plate.
Fryer Model No: ___________________________
Device: ___________________________________
Serial No: ________________________________
Clearances
Minimum clearance from combustible construction:
6” (15 cm) from the sides of the fryer
6” (15 cm) from the back of the fryer
Minimum clearance from noncombustible construction:
0” from the sides of the fryer
0” from the back of the fryer
Between the fryer and any open-top flame units:
16” (41 cm)
Allow space for servicing and operation.

6
CODES AND STANDARDS
The fryer must be installed in accordance with:
In the United States:
State and local codes, or in the absence of local codes, with:
National Electrical Code, ANSI/NFPA-70 (latest edition). Copies may be
obtained from The National Fire Protection Association, Batterymarch
Park, Quincy, MA. 02169-7471.
In Canada:
Local codes
CSA C22.1 Canadian Electric Code L4W 5N6.
ASSEMBLY
The fryer must be restrained to prevent tipping and the splashing
of hot liquid. The means of restraint may be the manner of installation, such as
connection to a battery of appliances, installing the fryer in an alcove, or by
separate means such as adequate ties.
The fryer must be secured to the counter top to prevent accidental
moving and splashing of hot oil onto the operator.
Fryers Mounted On Counter Bases With Casters
A restraining device must be attached to limit movement.
After restraining device hardware has been installed, apply a silicone sealant
along all edges of the fryer that make contact with the counter base to prevent
liquid and debris from accumulating under the fryer.
The fryer must be installed with a connector (not supplied by Vulcan)
complying with codes.
The fryer must be installed with restraining means to guard against
transmission of strain to the connector.
If the restraint is ever to be disconnected, turn off electric supply to the fryer.
If the fryer is installed on a counter base with casters without a supply cord, it
must be hard wired using flexible conduit when making connection to the power
supply.

7
ELECTRICAL CONNECTION
Electrical and Grounding connections must comply with the
National Electrical Code and/or other local codes.
Disconnect the electrical power supply to the machine and follow
lockout / tag out procedures.
Place fryer as near to its final position as possible. Connect 3 phase line to X, Y and Z
on terminal block. To reach terminal block, remove electric cover plate from fryer.
For each fryer, a 3 phase supply line capable of handling the required KW at the fryer’s
rated voltage (208 and 240) is needed. Refer to the fryer data plate for this electrical
information.
To shield electric connection supply wiring, a permanently connected or
direct wired device must be installed using flexible conduit sleeve with the appropriate
connectors.
LEVELING THE FRYER
Check the level of the fryer by placing a level on top of the fryer after electrical
connections have been made.
Ensure that the fryer is level front-to-back and side-to-side in the final installed position.
If using a counter base with casters, lock the wheels after unit is level.
OPERATION
Hot oil and parts can cause burns. Use care when operating,
cleaning and servicing the fryer.
Spilling hot frying compound can cause severe burns. Do not move
fryer without draining all frying compound from the tank.

8
OVER-TEMPERATURE SHUTDOWN
If the shortening becomes overheated, a high-temperature shutoff device will turn the
heating elements off, shutting down the fryer.
If the fryer shuts down due to overheating, do not turn fryer on until the shortening
temperature is below 300°F (149°C).
If activated, the high-temperature shut-off device has a manual reset button that must
be depressed to reset and allow fryer to heat again. The red reset button is located near
the top, left, rear corner of the fryer.
If an overheating situation persists, contact the local Vulcan Service Contractor in your
area.
BEFORE FIRST USE
Cleaning
New units are wiped down at the factory to remove any visible signs of dirt, oil, grease,
etc. remaining from the manufacturing process.
Before any food preparation, thoroughly wash the protective oil from all surface parts
and the tank interior with hot soapy water to remove any film residue and dust or debris.
Do not use chlorine or sulfate/sulfide cleaners.
Wash any accessories shipped with unit.
• Rinse fryer and accessories thoroughly and drain the fryer.
Wipe tank completely dry with a soft, clean cloth.
High-temperature Reset
Button

9
FILLING TANK WITH SHORTENING
Close the drain valve.
Fill the fryer tank with shortening. Vulcan recommends using liquid shortening.
Shortening level should be between the MIN and MAX lines in the fryer tank.
Shortening will expand when heated. Do not fill the fryer tank past the MAX line.
Press the melt switch to liquid or solid shortening.
Add fresh shortening as needed to maintain oil level.
Solid Shortening: Do not set a complete block of solid shortening
on top of an electric fryer’s heating elements. Doing this may damage the
elements and increase the potential for shortening flash fire. If solid shortening
is to be used in an electric fryer, remove the baskets and crumb screen (s), and
raise the elements from the tank. Pack the bottom of the tank completely with
solid shortening, lower the elements and then pack the shortening completely
around and over top of the elements. Lay basket rack(s) in the tank on top of the
packed shortening. Follow the melt instructions in this manual. Once all
shortening has been melted and the fryer has met the set temperature, fill baskets
and resume frying.
Do not press the START switch unless oil or shortening level is above the
heating elements (between the MIN and MAX tank marks). Doing so may cause a flash
fire and damage to the fryer, thereby voiding your warranty.
BASIC FRYING INSTRUCTION
Set the desired temperature and allow shortening to heat up to that temperature.
Fry items that are the same size to ensure equal doneness.
Drain or wipe dry raw or wet foods to minimize splatter when lowering into hot
shortening.
Add fresh shortening as needed.

10
Fry Basket Guidelines
Do not overfill baskets. (See fry basket capacity) Carefully lower basket into
oil.
When frying doughnuts and fritters, turn product only once during frying.
When cooking French fries or onion rings, shake the basket several times.
Batter covered foods should be dropped carefully, one by one, into shortening or
basket. If you use the basket, first dip the basket into the shortening to
reduce batter-build up on basket surfaces.
When frying is completed, remove basket or product. Hang basket on rear
hanger.
Fry Basket Capacity:
CEF40: Recommended pounds per basket are 2.5 lbs. (1.1 kg).
CEF75: Recommended pounds per basket are 3.5 lbs. (1.6 kg).
EXTENDING SHORTENING LIFE
Shortening life can be extended by the following guidelines:
Do not salt foods over the fryer.
Use good-quality shortening.
Filter shortening daily (at a minimum).
Replace shortening if it becomes poorly flavored.
Keep equipment and surrounding area clean.
Set thermostat correctly.
Remove excess moisture and particles from food products before placing
in fryer.

11
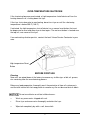
TURNING ON THE FRYER
Ensure fry tank is filled to between the MIN and MAX fill lines with oil.
Open the door to the fryer. Press the power switch to the ON position. The
START-ON indicator light above the temperature knob should illuminate red and
the ON indicator light on the chassis should illuminate green.
Move the melt switch to the correct shortening being used: Solid or Liquid.
Set temperature by turning the knob to the desired temperature.
Press the START switch. The START-ON light should illuminate green
The HEATING light will illuminate yellow along with the corresponding
heating light on the frame of the fryer. The START switch is a momentary switch
and will reset after being depressed.
The fryer heating elements and heating indicator lights will cycle on and off
through the melt cycle. When the temperature reaches 135º F, the melt cycle
ends and the heating elements will stay on until the set temperature is reached.
The heating elements and heating indicator lights will cycle on and off to maintain
the set temperature.
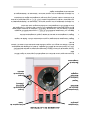
START Switch
Power Switch
Melt Switch
ON
Indicator
Light(Chassis)
Temperature
Knob
Heatin
g
Indicator Light
START
-
ON
Indicator Light

12
Do not press the START switch unless oil or shortening level is above the
heating elements (between the MIN and MAX tank marks). Doing so may cause a flash
fire and damage to the fryer, thereby voiding your warranty.
TURNING OFF THE FRYER
Open the door to the fryer. Press the top of the power switch to the off position.
All indicator lights should go off.
EXTENDED SHUTDOWN
1. Open the door to the fryer. Press the top of power switch to the off position. All
indicator lights should go off.
2. Thoroughly drain the fryer. Refer to DRAINING THE FRYER.
3. Clean the fryer according to CLEANING.
4. Turn off the main electric circuit breaker to fryer.
FILTERING THE OIL
Hot oil and hot parts can cause burns. Use care when operating,
cleaning, and servicing the fryer.
Filter shortening at least once a day.
1. A cold fryer will not drain properly. Always filter shortening between 250°F and
350°F. The shortening in the cold zone area will remain hard if not heated
properly. If necessary, use the clean-out rod to carefully stir the hard shortening
to an area above the cold zone where it will melt.
2. Open the door to the fryer. Press the power switch to the off position; turning off
the fryer.
3. Insert the drain extension into the drain valve.
4. Direct the drain extension into Vulcan’s MF-1 mobile filter or equivalent mobile
filtering device.
5. Use a crumb scoop to remove the heavy debris lying on the bottom of the tank.
6. Slowly open the drain valve to allow oil to flow from the fry tank to the filter pan
or discard container.

13
7. When fry tank is empty use the tank brush to remove any additional debris.
8. Close the drain valve.
9. Fill tank with new shortening. Fill to a minimum of the MIN level but no higher
than halfway between MIN and MAX. Oil will expand as it is heated.
10. Turn fryer on and then press the start switch only after step 9 is fully completed.
The fryer will begin to heat the shortening.
DRAINING THE TANK
1. Open the door to the fryer. Press the power switch to off position; turning off the
fryer.
2. Insert the drain extension into the drain valve. Tighten only hand tight.
3. Direct the drain spout into the container that you want to drain the shortening into.
4. Open the drain valve slowly allowing the oil to drain into the container. When the
container is full or the fryer tank is empty, close the drain valve. Repeat this step
until the fryer is empty. Remove the drain extension and place it back in holder.
5. It is recommended to now boil out your fry tank. Follow the BOIL OUT
PROCEDURE. Then clean-out as described under CLEANING.
BOIL OUT PROCEDURE
Weekly or when oil is replaced:
1. Drain the tank as described under DRAINING THE TANK.
2. Close the drain valve and fill tank with water Use a boil out degreaser which can be
ordered from your local dealer. Follow the instructions on the side of the package.
Do not use chlorine or sulfate/sulfide cleaners.
3. Solution level must be between the MIN and MAX levels on the fryer tank.
4. Press the power switch to the on position. Set the temperature knob to 200°F.
Water boils at 212°F. Do not bring water temperature to an overly active boil.
5. Press the start switch to begin heating the boil out solution.
6. Use the tank brush; clean the sides, bottom and heat exchanger tubes.

14
7. Place the drain extension in the drain valve and hand tighten only. Drain the
cleaning solution from the tank into a container.
8. Close the drain valve and refill the tank with water. Add 1 cup (1/4 L) of vinegar to
neutralize alkaline left by the cleaner. Solution level must be between the MIN and
MAX level on the fryer tank. Press the start button to allow the solution to heat up.
Allow solution to stand for a few minutes.
9. Drain the tank according to DRAINING THE TANK. Rinse thoroughly with clear, hot
water. All traces of cleaner must be removed. Dry the tank thoroughly.
10. Close the drain valve and add shortening. Follow the FILLING TANK WITH
SHORTENING procedure in this manual. The fryer is now ready for use. Press the
start button to begin heating the shortening.
CLEANING
Hot oil and hot parts can cause burns. Use care when operating,
cleaning, and servicing the fryer.
Daily
Clean your fryer regularly with the tank brush along with a damp cloth, and polish with a soft dry
cloth. If regular cleaning is neglected, grease will be burned on and discolorations may form.
Fingerprints are sometimes a problem on highly polished surfaces of stainless steel. They can
be minimized by applying a cleaner that will leave a thin oily or waxy film.
Clean all exterior surfaces of your fryer at least once daily.
Use a damp cloth with warm water and a mild soap or detergent.
Do not use chlorine or sulfate/sulfide cleaners.
Rinse thoroughly, and then polish with a soft dry cloth.
Keep the fryer exterior clean and free of accumulated grease to prevent stubborn stains
from forming. If regular cleaning is neglected, grease will be burned on and
discolorations may form.
Remove discolorations by washing with any detergent or soap and water.
Use a self-soaping, non-metallic scouring pad for particularly stubborn discolorations.
Always rub with the grain of the stainless steel.
Do not use a metallic scoring pad or harsh cleaners.

15
MAINTENANCE
Hot oil and hot parts can cause burns. Use care when operating,
cleaning, and servicing the fryer.
Spilling hot fryer compound can cause severe burns. Do not
move fryer without draining all frying compound from the tank.
Service in the US and Canada
Contact the local Vulcan Service Contractor in your area to obtain service and parts
information. For a complete listing of Service and Parts depots refer to
www.vulcanequipment.com.
In Australia
Contact Hobart Food Equipment PTY. LTD., 16 Hilly Street Morlake, N.S.W. 2137
Australia; P.O. Box 100, Concord N.S.W. 2137; Tel: (02) 9736 1200; Fax: (02) 9736 1555.
www.hobartfood.com.au
Troubleshooting Chart:
Problem: Probable Cause:
No Heat: Power switch not turned on.
Start switch not depressed.
Wire connections loose (call service).
Wires connections need cleaning.
High temperature shut-off activated. Reset (call service).
Power supply interrupted.
Insufficient or too much heat: Temperature not set to desired temperature.
High temperature shut-off activated. Reset (call service).
Temperature probe (call service)
Tank will not drain: Shortening too cold.
Drain pipe clogged with debris.

16
Tableau de dépannage :
Problème : Cause probable :
Pas de chaleur :
Interrupteur d'alimentation hors tension.
Interrupteur de mise en marche non activé.
Connexions de fils lâches (Appeler le service de
l’entretien).
Les connexions de fils ont besoin d'être nettoyées
Interrupteur de surchauffe déclenché. Réinitialiser
(Appeler le service de l’entretien).
Alimentation électrique coupée.
Chaleur insuffisante ou trop élevée :
Température non réglée à la température
souhaitée.
Interrupteur de surchauffe déclenché. Réinitialiser
(Appeler le service de l’entretien).
Sonde de température (Appeler le service de
l’entretien).
La cuve ne se vide pas :
Graisse trop froide.
Tuyau de vidange obstrué par des débris.

15
Gardez l'extérieur de la friteuse propre et exempt d'accumulation de graisse pour éviter
la formation de taches tenaces. Si le nettoyage régulier est négligé, la graisse brûlée
s'incrustera et une décoloration peut apparaître.
Enlevez toute décoloration par un lavage avec de l'eau et du détergent ou du savon.
Utilisez un tampon à récurer auto moussant non métallique pour les décolorations
particulièrement tenaces.
Frottez toujours dans le sens du grain de l'acier inoxydable.
N'utilisez pas de tampon à récurer métallique ou des nettoyants abrasifs.
ENTRETIEN
L'huile et les pièces chaudes peuvent causer des brûlures.
Soyez prudent lors de l'utilisation, du nettoyage et de l'entretien de la friteuse.
Le déversement de gras de friture chaud peut causer de graves
brûlures. Ne déplacez pas la friteuse sans vidanger tous les gras de friture de la
cuve.
Service aux États-Unis et au Canada
Pour obtenir de l’information sur l’entretien et les pièces de rechange, contacter l’agence
de service Vulcan de votre région. Visiter le site www.vulcanequipment.com pour une liste
exhaustive des agences d’entretien et des dépôts de pièces de rechange.
En Australie
Contactez Hobart Food Equipment PTY. LTD., 16 Hilly Street Morlake, N.S.W. 2137
Australia; P.O. Box 100, Concord N.S.W. 2137; Tél.: (02) 9736 1200; Télécopie : (02)
9736 1555. www.hobartfood.com.au

14
4. Mettez l'interrupteur d'alimentation à la position de marche (ON). Réglez le bouton de
température à 200 °F (93 °C). L'eau bout à 212 °F (100 °C). Ne portez pas la température
de l'eau à trop forte ébullition.
5. Appuyez sur le bouton de marche pour commencer à chauffer la solution d'ébouillantage.
6. Utilisez la brosse à cuve ; nettoyez les côtés, le fond et les tubes de l'échangeur de
chaleur.
7. Placez la rallonge de vidange dans le robinet de vidange et serrez à la main uniquement.
Vidangez la solution de nettoyage de la cuve dans un récipient.
8. Fermez le robinet de vidange et remplissez la cuve d'eau. Ajoutez 1 tasse (1/4 L) de
vinaigre pour neutraliser tout alcali laissé par le nettoyant. Le niveau de la solution doit se
situer entre les niveaux MIN et MAX de la cuve de la friteuse. Appuyez sur le bouton de
marche pour permettre à la solution de chauffer. Laissez reposer la solution pendant
quelques minutes.
9. Vidangez la cuve tel que décrit sous VIDANGE DE LA CUVE. Rincez à fond à l'eau claire
et chaude. Toute trace de nettoyant doit être enlevée. Séchez soigneusement la cuve.
10. Fermez le robinet de vidange et ajoutez la graisse alimentaire. Suivez la procédure de
REMPLISSAGE DE LA CUVE DE GRAISSE ALIMENTAIRE de ce manuel. La friteuse est
maintenant prête à l'emploi. Appuyez sur le bouton de marche pour commencer à chauffer
la graisse alimentaire.
NETTOYAGE
L'huile et les pièces chaudes peuvent causer des brûlures. Soyez
prudent lors de l'utilisation, du nettoyage et de l'entretien de la friteuse.
Chaque jour
Nettoyez votre friteuse régulièrement avec la brosse à cuve ainsi qu'avec un chiffon humide, et
polissez avec un chiffon sec et doux. Si le nettoyage régulier est négligé, la graisse brûlée
s'incrustera et une décoloration peut apparaître.
Les empreintes digitales sont parfois un problème sur les surfaces très polies en acier
inoxydable. Elles peuvent être minimisées en appliquant un nettoyant qui laissera un mince film
huileux ou cireux.
Nettoyez toutes les surfaces extérieures de la friteuse au moins une fois par jour.
Utilisez un chiffon humidifié avec de l'eau tiède et un savon ou un détergent doux.
N'utilisez pas d'agent nettoyant à base de chlore ou de sulfate/sulfure.
Rincez en profondeur, puis polissez avec un linge doux.
AVIS

13
7. Lorsque la cuve de friture est vide, utilisez la brosse à cuve pour enlever les débris
restants.
8. Fermez le robinet de vidange.
9. Remplissez la cuve de nouvelle graisse alimentaire. Remplissez au moins jusqu'au niveau
MIN, mais pas plus qu'à mi-chemin entre MIN et MAX. L'huile augmente de volume
lorsqu'elle est chauffée.
10. Allumez la friteuse et appuyez ensuite sur l’interrupteur de mise en marche mais seulement
après avoir terminé complètement l’étape 9. La friteuse commencera à chauffer la graisse
alimentaire.
VIDANGE DE LA CUVE
1. Ouvrez la porte de la friteuse. Mettez l’interrupteur principal à l’arrêt, ce qui éteint la
friteuse.
2. Insérez la rallonge de vidange dans le robinet de vidange. Serrez à la main uniquement.
3. Dirigez le bec de vidange dans le récipient dans lequel vous voulez vidanger la graisse.
4. Ouvrez lentement le robinet de vidange pour laisser l'huile s'écouler dans le récipient.
Lorsque le récipient est plein ou lorsque la cuve de la friteuse est vide, fermez le robinet de
vidange. Répétez cette étape jusqu'à ce que la friteuse soit vide. Enlevez la rallonge de
vidange et remettez-la en place sur le support.
5. Il est recommandé d'ébouillanter maintenant la cuve de friture. Suivez la PROCÉDURE
D'ÉBOUILLANTAGE. Puis, nettoyez-la tel que décrit dans la section NETTOYAGE.
PROCÉDURE D'ÉBOUILLANTAGE
Chaque semaine ou lorsque l'huile est remplacée :
1. Vidangez la cuve tel que décrit à la rubrique VIDANGE DE LA CUVE.
2. Fermez le robinet de vidange et remplissez la cuve d'eau. Utilisez les comprimés
nettoyants peu moussants Boil-Out de Vulcan (code d'article 956812-1) que vous pouvez
commander auprès de votre détaillant local. Suivez les instructions figurant sur le côté de
l'emballage.
N'utilisez pas d'agent nettoyant à base de chlore ou de sulfate/sulfure.
3. Le niveau de la solution doit se situer entre les lignes MIN et MAX de la cuve de la friteuse.
AVIS

12
Il ne pas appuyer sur le commutateur de démarrage (START) avant que le
niveau de l’huile ou de graisse alimentaire n’ait dépassé le dessus des éléments
électriques (soit entre les lignes MIN et MAX sur la cuve). Ce faisant, il peut se produire
un feu à inflammation instantanée qui causera des dommages à la friteuse et par
conséquent en annulera la garantie.
ARRÊT DE LA FRITEUSE
Ouvrez la porte de la friteuse. Appuyez sur l'interrupteur d'alimentation pour le
mettre à la position d'arrêt (OFF).
ARRÊT PROLONGÉ
1. Ouvrez la porte de la friteuse. Appuyez sur l'interrupteur d'alimentation pour le
mettre à la position d'arrêt (OFF).
2. Vidangez complètement la friteuse. Consultez la section VIDANGE DE LA
FRITEUSE.
3. Nettoyez la friteuse tel qu'indiqué dans la section NETTOYAGE.
4. Désactivez le disjoncteur pour couper le circuit électrique principal de la friteuse.
FILTRAGE DE L'HUILE
L'huile et les pièces chaudes peuvent causer des brûlures.
Soyez prudent lors de l'utilisation, du nettoyage et de l'entretien de la friteuse.
Filtrez la graisse au moins une fois par jour.
1. Si la friteuse est froide, le filtrage ne s'effectue pas correctement. Filtrez toujours la graisse
alimentaire entre 250 °F et 350 °F (120 et 175 °C). La graisse de la zone froide restera
dure si elle n'est pas chauffée suffisamment. Si nécessaire, utilisez délicatement la tige de
nettoyage pour faire monter la graisse dure dans une zone au-dessus de la zone froide où
elle fondra.
2. Ouvrez la porte de la friteuse. Mettez l’interrupteur principal à l’arrêt, ce qui éteint la
friteuse.
3. Insérez la rallonge de vidange dans le robinet de vidange.
4. Posez la rallonge de vidange dans le filtre mobile MF-1 de Vulcan ou un dispositif de
filtrage mobile équivalent.
5. Servez-vous d’une pelle à miettes pour retirer les gros débris déposés au fond de la cuve.
6. Ouvrez lentement le robinet de vidange pour laisser couler l’huile de la cuve de friture vers
le bac de filtration ou le récipient de mise au rebut.
AVIS
La page charge ...
La page charge ...
La page charge ...
La page charge ...
La page charge ...
La page charge ...
La page charge ...
La page charge ...
La page charge ...
La page charge ...
La page charge ...
-
 1
1
-
 2
2
-
 3
3
-
 4
4
-
 5
5
-
 6
6
-
 7
7
-
 8
8
-
 9
9
-
 10
10
-
 11
11
-
 12
12
-
 13
13
-
 14
14
-
 15
15
-
 16
16
-
 17
17
-
 18
18
-
 19
19
-
 20
20
-
 21
21
-
 22
22
-
 23
23
-
 24
24
-
 25
25
-
 26
26
-
 27
27
-
 28
28
-
 29
29
-
 30
30
-
 31
31


Vulcan CEF40 Le manuel du propriétaire
- Catégorie
- Friteuses
- Taper
- Le manuel du propriétaire
- Ce manuel convient également à
dans d''autres langues
- English: Vulcan CEF40 Owner's manual
Documents connexes
-
Vulcan LG300 Le manuel du propriétaire
-
Vulcan VEG50 Le manuel du propriétaire
-
Vulcan GR45 Le manuel du propriétaire
-
Vulcan ER50 Le manuel du propriétaire
-
Vulcan VK45 Le manuel du propriétaire
-
-
Vulcan VHG75 Le manuel du propriétaire
-
Vulcan VCS36 Le manuel du propriétaire
-
Autres documents
-
Vulcan-Hart 1ER85D Manuel utilisateur
-
 VULCAN & WOLF GRMF Series Fryer Gas Mode d'emploi
-
Magic Chef MCCGF40A-P Manuel utilisateur
-
Garland E20 Series Owner Instruction Manual
-
Garland 36ET11 Mode d'emploi
-
 VULCAN & WOLF VHG-C, VHG-D Series Fryer Le manuel du propriétaire
-
Vollrath Fryer, Electric, Countertop, Cayenne®, Medium-Duty Manuel utilisateur

