
A
DETAIL A
SCALE 1 : 4
Figure 1
B
Figure 2
DETAIL B
SCALE 1 : 4
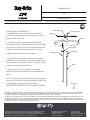
Cable Gripper
Retention Screw
C
DETAIL C
SCALE 1 : 3
1. Unpack suspension kit and make sure all parts are accounted
for. (4-suspension brackets, 8-screws, 2-cross cables, 2-steel
wires, 2-cable connectors, and 2-cable grippers)
2. Unscrew (4) T-grid hooks,
Figure 1
, and discard each hook
including the (2) screws from each.
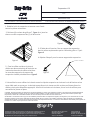
3. Using the screws that were provided, fasten a suspension
bracket in the same location as the discarded T-grid hook.
Figure 2
4. Repeat step 3 for the remaining suspension brackets.
5. Attach (2) cross cables and cable
gripper to both ends of the luminaire by
inserting the cross cable toggles through
hanger holes on the suspension bracket
previously installed.
Figure 3
6. Lock cable grippers in place midway between hanging clips by inserting the retention screw into the bottom
of the gripper and tightening loosely. Luminaire can be leveled once it is in place by sliding cross cables to
appropriate balance point. Once luminaire is leveled tighten retention screw to lock grippers in place.
Figure 3
CAUTION: THE INSTALLATION AND SERVCING OF THIS PRODUCT SHOULD
BE PERFORMED BY A QUALIFIED ELETRICIAN OR SERVICE PERSONNAL
Suspension Kit
FPZ
442295201936
ATTENTION : L’INSTALLATION ET L’ENTRETIEN DE CE PRODUIT DOIVENT ETRE
EFFECTUÉS PAR UN ÉLECTRICIEN OU UN MEMBRE DU PERSONNEL QUALIFIÉ.
CAUTION: Electrical luminaires are designed for permanent installation in ordinary (non-hazardous) locations in accordance with the National Electrical
Code and all applicable local codes. Do not use in areas of limited ventilation or in high ambient enclosures. The lamp and luminaire operate at high
temperatures, contact with combustible materials can cause fire and personal contact can cause severe burns.
ATTENTION: Ce luminaire a été conçu pour une installation permanente dans un emplacement régulier (non dangereux) et en conformité avec le Code
électrique canadien et codes locaux applicables. Ne jamais installer dans un endroit où la ventilation est limitée ou dans des boîtiers où la température
ambiante est très élevée. La lampe et le luminaire fonctionnent à des températures élevées, un contact avec des matériaux combustibles peut engendrer un
incendie et un contact corporel peut causer de sévères brûlures
© 2019 Signify Holding. All rights reserved. This document may be subject to change. No
representation or warranty as to the accoracy or completeness of the information
included herein is given and any liability for any action in reliance thereon is disclaimed.
All trademarks are owned by signify holding or their respective owners.
Signify Canada Ltd.
281 Hillmount Road
Markham, ON, Canada L6C 2S3
Telephone: 800-668-9008
Signify North America Corporation
200 Franklin Square Drive
Somerset, NJ 08873
Telephone: 855-486-2216

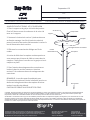
POWER-FEED: SUSPENSION KIT
1. Attach bracket and stud to customer supplied
junction box. Attach green ground lead from cord to
ground screw on bracket.
2. Support the luminaire approximately 2' below
mounting surface. Use outer couple ring to lock canopy
to junction box. Once luminaire is supported pass end
of power cord through power feed hole in canopy.
3. Make wiring connections to cord leads.
4. Insert cable into two piece coupler ensuring that
cable terminal sits in coupler. Slide power feed canopy
over stud and screw coupler to stud. Use outer couple
ring to lock canopy to junction box.
5. Attach strain relief to cord and insert canopy
opening. Allow approximately 6" of cord above strain
relief.
NOTE: For splice inspection the canopy can be dropped
away from junction box by loosening outer coupler ring
and dropping canopy away from the ceiling.
ATTACHMENT OF CABLES TO CROSS CABLE GRIPPERS.
Bracket
Threaded Stud
Ground Screw
Canopy
Strain Relief
Coupler
Power Cord
Cable
To Fixture
CAUTION: THE INSTALLATION AND SERVCING OF THIS PRODUCT SHOULD
BE PERFORMED BY A QUALIFIED ELETRICIAN OR SERVICE PERSONNAL
Suspension Kit
FPZ
442295201936
ATTENTION : L’INSTALLATION ET L’ENTRETIEN DE CE PRODUIT DOIVENT ETRE
EFFECTUÉS PAR UN ÉLECTRICIEN OU UN MEMBRE DU PERSONNEL QUALIFIÉ.
CAUTION: Electrical luminaires are designed for permanent installation in ordinary (non-hazardous) locations in accordance with the National Electrical
Code and all applicable local codes. Do not use in areas of limited ventilation or in high ambient enclosures. The lamp and luminaire operate at high
temperatures, contact with combustible materials can cause fire and personal contact can cause severe burns.
ATTENTION: Ce luminaire a été conçu pour une installation permanente dans un emplacement régulier (non dangereux) et en conformité avec le Code
électrique canadien et codes locaux applicables. Ne jamais installer dans un endroit où la ventilation est limitée ou dans des boîtiers où la température
ambiante est très élevée. La lampe et le luminaire fonctionnent à des températures élevées, un contact avec des matériaux combustibles peut engendrer un
incendie et un contact corporel peut causer de sévères brûlures
© 2019 Signify Holding. All rights reserved. This document may be subject to change. No
representation or warranty as to the accoracy or completeness of the information
included herein is given and any liability for any action in reliance thereon is disclaimed.
All trademarks are owned by signify holding or their respective owners.
Signify Canada Ltd.
281 Hillmount Road
Markham, ON, Canada L6C 2S3
Telephone: 800-668-9008
Signify North America Corporation
200 Franklin Square Drive
Somerset, NJ 08873
Telephone: 855-486-2216

D
DETAIL D
SCALE 1 : 4
Figure 1
E
Figure 2
DETAIL E
SCALE 1 : 4
Pince à câble
Vis de rétention
F
DETAIL F
SCALE 1 : 3
1.
Déballez le kit de suspension et assurez-vous d'avoir
toutes les pièces nécessaires.
2.
Dévissez (4) crochets de grille en T, F
igure 1
, et jetez-les
chacun crochet comprenant les (2) vis de chacun
.
3. À l'aide des vis fournies, fixer un support de suspension
dans le même emplacement que le crochet de grille en T jeté..
Figure 2
4. Répétez l'étape 3 pour les autres supports de suspension.
5.
Fixez les câbles croisés et la pince à
câbles aux deux extrémités du luminaire en
insérant les bascules du câble croisé dans
les trous de suspension du support de
suspension installé précédemment.
Figure 3
6. Verrouillez les serre-câbles à mi-chemin entre les clips de suspension en insérant la vis de fixation en bas
serre-câble mais ne serrez pas. Le luminaire peut être mis à niveau une fois en place en faisant glisser les
câbles croisés point d'équilibre approprié. Une fois le luminaire mis à niveau, serrer la vis de retenue pour
verrouiller les pinces en place.
Figure 3
CAUTION: THE INSTALLATION AND SERVCING OF THIS PRODUCT SHOULD
BE PERFORMED BY A QUALIFIED ELETRICIAN OR SERVICE PERSONNAL
Suspension Kit
FPZ
442295201936
ATTENTION : L’INSTALLATION ET L’ENTRETIEN DE CE PRODUIT DOIVENT ETRE
EFFECTUÉS PAR UN ÉLECTRICIEN OU UN MEMBRE DU PERSONNEL QUALIFIÉ.
CAUTION: Electrical luminaires are designed for permanent installation in ordinary (non-hazardous) locations in accordance with the National Electrical
Code and all applicable local codes. Do not use in areas of limited ventilation or in high ambient enclosures. The lamp and luminaire operate at high
temperatures, contact with combustible materials can cause fire and personal contact can cause severe burns.
ATTENTION: Ce luminaire a été conçu pour une installation permanente dans un emplacement régulier (non dangereux) et en conformité avec le Code
électrique canadien et codes locaux applicables. Ne jamais installer dans un endroit où la ventilation est limitée ou dans des boîtiers où la température
ambiante est très élevée. La lampe et le luminaire fonctionnent à des températures élevées, un contact avec des matériaux combustibles peut engendrer un
incendie et un contact corporel peut causer de sévères brûlures
© 2019 Signify Holding. All rights reserved. This document may be subject to change. No
representation or warranty as to the accoracy or completeness of the information
included herein is given and any liability for any action in reliance thereon is disclaimed.
All trademarks are owned by signify holding or their respective owners.
Signify Canada Ltd.
281 Hillmount Road
Markham, ON, Canada L6C 2S3
Telephone: 800-668-9008
Signify North America Corporation
200 Franklin Square Drive
Somerset, NJ 08873
Telephone: 855-486-2216

ALIMENTATION ÉLECTRIQUE: KIT DE SUSPENSION
1. Fixez le support et le goujon à la boîte de jonction.
Fixez le fil de terre vert du cordon au vis de mise à la
terre sur le support.
2. Soutenez le luminaire à environ 2 pieds au-dessous
surface de montage. Une fois le luminaire sécurisé,
passez l'extrémité du cordon d'alimentation à travers le
trou d'alimentation de la verrière.
3. Effectuez les connexions de câblage aux fils du
cordon.
4. Insérez le câble dans le coupleur en deux parties en
vous assurant que la borne du câble se trouve dans le
coupleur. Faites glisser la verrière sur le goujon et la vis
coupleur en place.
5. Fixez l'attache de soulagement des contraintes et
insérez-le dans la verrière ouverture. Autoriser
environ 6" de cordon au-dessus du soulagement des
contraintes.
REMARQUE: La verrière peut être abaissée pour
l'inspection des épissures loin de la boîte de jonction en
desserrant la bague extérieure du coupleur et laisser
tomber la verrière du plafond.
FIXATION DES CÂBLES AUX CROCHETS DE CÂBLE.
Support
Goujon fileté
Vis de terre
Canopée
Soulagement des contraintes
Coupleur
Cordon
d'alimentation
Câble
Au luminaire
CAUTION: THE INSTALLATION AND SERVCING OF THIS PRODUCT SHOULD
BE PERFORMED BY A QUALIFIED ELETRICIAN OR SERVICE PERSONNAL
Suspension Kit
FPZ
442295201936
ATTENTION : L’INSTALLATION ET L’ENTRETIEN DE CE PRODUIT DOIVENT ETRE
EFFECTUÉS PAR UN ÉLECTRICIEN OU UN MEMBRE DU PERSONNEL QUALIFIÉ.
CAUTION: Electrical luminaires are designed for permanent installation in ordinary (non-hazardous) locations in accordance with the National Electrical
Code and all applicable local codes. Do not use in areas of limited ventilation or in high ambient enclosures. The lamp and luminaire operate at high
temperatures, contact with combustible materials can cause fire and personal contact can cause severe burns.
ATTENTION: Ce luminaire a été conçu pour une installation permanente dans un emplacement régulier (non dangereux) et en conformité avec le Code
électrique canadien et codes locaux applicables. Ne jamais installer dans un endroit où la ventilation est limitée ou dans des boîtiers où la température
ambiante est très élevée. La lampe et le luminaire fonctionnent à des températures élevées, un contact avec des matériaux combustibles peut engendrer un
incendie et un contact corporel peut causer de sévères brûlures
© 2019 Signify Holding. All rights reserved. This document may be subject to change. No
representation or warranty as to the accoracy or completeness of the information
included herein is given and any liability for any action in reliance thereon is disclaimed.
All trademarks are owned by signify holding or their respective owners.
Signify Canada Ltd.
281 Hillmount Road
Markham, ON, Canada L6C 2S3
Telephone: 800-668-9008
Signify North America Corporation
200 Franklin Square Drive
Somerset, NJ 08873
Telephone: 855-486-2216
-
 1
1
-
 2
2
-
 3
3
-
 4
4


Day-Brite CFI FluxPanel LED Install Instructions
- Taper
- Install Instructions
- Ce manuel convient également à
dans d''autres langues
- English: Day-Brite CFI FluxPanel LED