Reloop Mixon 8 Pro Manuel utilisateur
- Catégorie
- Contrôleurs DJ
- Taper
- Manuel utilisateur

1
Bedienungsanleitung
ACHTUNG!
Lesen Sie sich vor der ersten Inbetriebnahme zur eigenen Sicher-
heit diese Bedienungsanleitung sorgfältig durch! Alle Personen,
die mit der Aufstellung, Inbetriebnahme, Bedienung, Wartung und
Instandhaltung dieses Gerätes zu tun haben, müssen entspre-
chend qualiziert sein und diese Betriebsanleitung genau be-
achten. Dieses Produkt erfüllt die Anforderungen der geltenden
europäischen und nationalen Richtlinien, die Konformität wurde
nachgewiesen, die entsprechenden Erklärungen und Unterlagen
sind beim Hersteller hinterlegt.
Instruction Manual
CAUTION!
For your own safety, please read this operation manual carefully
before initial operation! All persons involved in the installation, set-
ting-up, operation, maintenance and service of this device must be
apPropriately qualied and observe this operation manual in de-
tail. This Product complies with the requirements of the applicable
European and national regulations. Conformity has been Proven.
The respective statements and documents are deposited at the
manufacturer.
Mode d‘emploi
ATTENTION!
Pour votre Propre sécurité, veuillez lire attentivement ce mode
d‘emploi avant la première utilisation ! Toutes les personnes
chargées de l‘installation, de la mise en service, de l‘utilisation,
de l‘entretien et la maintenance de cet appareil doivent possé-
der les qualications nécessaires et respecter les instructions
de ce mode d‘emploi. Ce Produit est conforme aux directives
européennes et nationales, la conformité a été certiée et les
déclarations et documents sont en possession du fabricant.
Manual de instrucciones
¡ATENCIÓN!
En aras de su Propia seguridad, ¡lea detenidamente este manual
de instrucciones antes de la primera puesta en marcha! Todas
las personas relacionadas con el montaje, la puesta en marcha,
la operación, el mantenimiento y la reparación de este equipo
deben estar correctamente cualicadas y haber leído con aten-
ción este manual de instrucciones. Este Producto cumple con los
requisitos de las directivas europeas y nacionales, se ha com-
Probado la conformidad y las declaraciones y los documentos
correspondientes están en posesión del fabricante.
WARNUNG!
Um Feuer oder einen elektrischen Schock zu vermeiden, setzen
Sie dieses Gerät nicht Wasser oder Flüssigkeiten aus! Öffnen Sie
niemals das Gehäuse!
WARNING!
To prevent re or avoid an electric shock do not expose the
device to water or uids!
Never open the housing!
ATTENTION !
An d‘éviter un incendie ou une décharge électrique, veillez à te-
nir cet appareil à l‘écart des liquides et de l‘humidité ! N´ouvrez
jamais le boîtier !
¡ADVERTENCIA!
Para evitar incendios o descargas eléctricas, ¡no sumerja este
equipo en agua u otras sustancias líquidas! ¡Nunca abra la
carcasa!
Für weiteren Gebrauch aufbewahren!
Keep information for further reference!
Gardez ces instructions pour des utilisations ultérieurs!
¡Conservar para su uso posterior!
www.reloop.com
Reloop Trademark
Global Distribution GmbH & Co. KG
Schuckertstr. 28
48153 Muenster / Germany
© 2022
Rev. 1 Reloop Mixon 8 Pro
This device complies with Part 15 of the FCC rules. Operation is
subject to the following two conditions:
(1) this device may not cause harmful inference, and
(2) this device must accept any interference received, including
interference that may cause undesired operation.


Instruction Manual
Bedienungsanleitung
Mode d‘emploi
Manual de instrucciones
English ........................................................................04-13
Deutsch ...................................................................... 14-23
Français .......................................................................12-33
Español .......................................................................16-43

4
ENGLISH
CAUTION!
For your own safety, please read this operation manual carefully before initial operation! All persons involved in the installation, setting-up,
operation, maintenance and service of this device must be apPropriately qualied and observe this operation manual in detail. This Product
complies with the requirements of the applicable European and national regulations. Conformity has been Proven. The respective statements
and documents are deposited at the manufacturer.
Please remove the Mixon 8 Pro from its packaging. Check before initial operation to make sure that the device has not been visibly damaged
during transport. If you detect any damage to the power cable or the casing, do not operate the device. Contact your specialised dealer.
SAFETY INSTRUCTIONS
CAUTION!
Please exercise particular caution when handling AC 100 - 240 V, 50/60Hz power voltage. This voltage rating may lead to a critical electrical
shock! Any damage caused by the non-observance of this operation manual excludes any warranty claims. The manufacturer is not liable for
any damage to Property or for personal injury caused by imProper handling or non-observance of the safety instructions.
WARNING!
To prevent re or avoid an electric shock do not expose the device to water or uids! Never open the housing!
- T his device left the factory in perfect condition. To maintain this condition and to ensure a risk-free operation the user must observe the safety
instructions and warnings contained in this operation manual.
- For reasons of safety and certication (CE) the unauthorised conversion and/or modication of the device is Prohibited. Please note that in the
event of damage caused by the manual modication to this device any warranty claims are excluded.
- The inside of the device does not contain any parts which require maintenance, with the exception of wear parts that can be exchanged from
the outside. Qualied staff must carry out maintenance, otherwise the warranty does not apply!
- The fuse must exclusively be exchanged against fuses of the same class, with the same trigger features and nominal current rating.
- Ensure that the power will only be supplied after the device has been fully set up.
- Only use cables that comply with regulations. Observe that all jacks and bushes are tightened and correctly hooked up.
Refer to your dealer, if you have any questions.
- Ensure that when setting up the Product, the mains cable is not squashed or damaged by sharp edges.
- Prevent the mains cable from coming into contact with other cables! Exercise great care when handling mains cables and connections.
Never touch these parts with wet hands!
- Connect the power cable exclusively to apPropriate shock-Proof outlets. The only supply point to be used is a supply outlet in accordance with
specications of the public supply network.
- Disconnect the device from the supply outlet when not in use and before cleaning! Be sure to hold the mains plug by the body.
Never pull the mains cord!
- Position the device on a horizontal and stable low-ame base.
- Avoid any concussions or violent impact when installing or operating the device.
- When selecting the location of installation, make sure that the device is not exposed to excessive heat, humidity and dust.
Be sure that no cables lie around openly. You will endanger your own safety and that of others!
- Do not rest any containers lled with liquid that could easily spill onto the device or in its immediate vicinity. If, however, uids should access
the inside of the device, immediately disconnect the mains plug. Have the device checked by a qualied service technician before re-use.
Damage caused by uids inside the device is excluded from warranty.
- Do not operate the device under extremely hot (in excess of 35° C) or extremely cold (below 5° C) conditions. Keep the device away from direct
exposure to the sun and heat sources such as radiators, ovens, etc. (even during transport in a closed vehicle). Always ensure sufcient ventilation.
- The device must not be operated after being taken from a cold environment into a warm environment. The condensation caused hereby may
destroy your device. Do not switch on or operate the device until it has reached ambient temperature!
- Controls and switches should never be treated with spray-on cleaning agents and lubricants. This device should only be cleaned with a damp
cloth. Never use solvents or cleaning uids with a petroleum base for cleaning.
- When relocating, the device should be transported in its original packaging.
- When starting operation, the crossfaders and volume controls of your amplier must be set to minimum level. Bring the loudspeaker switches
into the “OFF” position. Wait between 8 to 10 seconds before increasing the volume to avoid damage to loudspeakers.
- Devices supplied by voltage should not be left in the hands of children. Please exercise particular care when in the presence of children.
- At commercial facilities the regulations for the prevention of accidents as stipulated
by the organization of Professional associations must be observed.
- At schools, training facilities, hobby and self-help workshops the operation of the device must be monitored with responsibility by trained staff.
- Keep this operation manual in a safe place for later reference in the event of questions or Problems.
APPLICATION IN ACCORDANCE WITH REGULATIONS
- This device is a 4-channel DJ controller, which can regulate and mix audio signals. The device needs to be connected to a tablet or computer and
an audio amplier or active speakers.
- If the device is used for any other purposes than those described in the operation manual, damage can be caused to the Product, leading to the
exclusion of warranty rights. Moreover, any other application that does not comply with the specied purpose harbours risks such as short circuit,
re, electric shock, etc.
- The serial number determined by the manufacturer must never be removed to uphold the warranty rights.
MAINTENANCE
- Check the technical safety of the device regularly for damage to the mains line or the casing,
as well as for wear of wear parts such as rotary and sliding switches.
- If it is to be assumed that the safe operation is no longer feasible, then the device must be disconnected
and secured against accidental use. Always disconnect the mains plug from the outlet!
- It must be assumed that a safe operation is no longer feasible, if the device bears visible defects, if the device no longer functions,
following longer storage under unfavourable conditions or after major transport stress.

5
ENGLISH
ENGLISH
CONTROLS
FRONT SIDE
REAR PANEL
SET UP AND CONNECT THE MIXON 8 PRO:
1. Connect the output devices (speakers, headphones, etc.) to the Mixon 8 Pro.
The audio output takes place via the master output (XLR and cinch) and booth output (6.3 mm jack).
2. Connect the input devices (microphones) to the Mixon 8 Pro. The output of the respective microphone input is controlled via channel 3 for
microphone 1 and via channel 4 for microphone 2. The corresponding input signal must be selected on the channel before hand.
3. Make sure that the Mixon 8 Pro is switched off and the Master and Booth controls are set to „Min“.
4. Connect all units to the power source and switch on the units.
5. If you want to use the Mixon 8 Pro with Serato DJ Pro, see the installation instructions below for further steps.
If you choose to use djay Pro AI, please refer to the steps below.
55 56 57
75 74 73 72 71 6570 64
69 63
68 62
67 61
66
60
59 58
1
2
4
7
3
10
11 25 26
33312927
28 30 32 34
11
22
24 2424 24
1111
12 1212 12
13 1313 13
14 1414
15 15 15 15
14
16 16
16
16
21
52 52
51 51
50 50
46 46
42 42
41 41
40 40
39 39
38 38
35 35
25
27
28 30 32 34
3736 36 37
29 31 33
26
45 45
49 49
44 44
43 43
47 4748 48
2121 21
17 1717 176
8
9
20 20 20 20
18 1818 18
19 19 19 19
5
23
54
53 53
54

6
SOFTWARE INSTALLATION & CONNECTION
Serato DJ Pro installation macOS
- Go to serato.com click on Products and select the download for “Serato DJ Pro”.
- If you are not already logged in to serato.com please create an account.
- After you have logged in and clicked on Products ¬ Serato DJ Pro, you will see the latest Serato DJ Pro version
and a download banner on the right-hand side.
- Click to download the installation le.
- Once the download is complete, you can start the installation.
- Read the terms and conditions and click „Agree“ when you are nished.
- Follow the different steps until the installation is complete.
- Afterwards you will nd your Serato DJ Pro software in the Applications folder.
NOTE!
Depending on the operating software you are using, you may need to enable Serato access in your security settings.
Serato DJ Pro installation Windows
- Go to serato.com click on Products and select the download for “Serato DJ Pro”.
- If you are not already logged in to serato.com please create an account.
- You will see the latest Serato DJ Pro version and a download banner on the right hand side.
- Click to download the installation le.
- The Serato DJ Pro Windows Installer appears as an ‚archived‘ zip le, which can be opened with Windows Explorer.
Alternatively, you can use your favourite archive manager, such as Winzip or 7zip.
- Once the download is complete, you can start the installation.
- If you are using the Windows Explorer, you can double-click on the downloaded le and you will see the Serato DJ Pro executable.
- If you are using a third-party archive manager, such as Winzip or 7zip, you can right-click on the context-sensitive menu and select
„Extract Here“, which will extract the Serato DJ Pro le and place it in the location you selected to save the original le.
- Double-click the resulting Serato DJ Pro exe le from the archive after opening or extracting the archive to start the Serato DJ Pro setup.
You will now see the license terms. Check the „I agree to the license terms and conditions“ box and then click „Install“.
NOTE!
When using Windows, it is necessary to install an ASIO driver!
djay Pro AI iPad/iPhone Installation & Connection:
You can download the djay Pro AI app from the App Store.
- Download the djay Pro AI app from the App Store.
- Set the USB source switch -62- to “iOS”.
- Connect your existing Lightning or USB-C cable to the Reloop Mixon 8 Pro’s USB-“iOS” Port -61-, as well as to your “iOS” device.
- Open the previously downloaded djay Pro AI app.
Your Mixon 8 Pro will be recognized automatically and can now be operated.
ENGLISH
ENGLISH

7
OPERATION
Serato DJ Pro djay Pro AI
MIXER SECTION:
1. Stereo/Mono-Switch Selects between stereo or mono output of the master out signal. Selects between stereo or mono output of the master out signal.
2. Volume (Master) Controls the Master output volume Controls the Master output volume
3. Booth Controls the Booth output volume Controls the Booth output volume
4. Cue Vol Controls the Headphone output volume Controls the Headphone output volume
5. Cue Mix Mixes the Cue and Master signal for pre-listening Mixes the Cue and Master signal for pre-listening
6. Sampler Controls the Sampler output volume Controls the Sampler output volume
7. Browse-Encoder
The Browse Encoder navigates through your libraries. Press the browse
encoder to conrm your selection.
- SHIFT+Turn Browse Encoder: Fast browsing (quick search).
- SHIFT+Press Browse Encoder: Toggles between waveform and library view.
The Browse Encoder navigates through your libraries. Press the browse
encoder to conrm your selection.
- SHIFT+Turn Browse Encoder: Fast browsing (quick search).
- SHIFT+Press Browse Encoder: N/A
8. Back
With the Back button you can jump back one menu item at a time
in your Navigation.
- SHIFT+Back: Switches through the available views.
With the Back button you can jump back one menu item at a time
in your Navigation.
- SHIFT+Back: Enlarges the playlist view.
9. Cue Split Separates the headphone signal, on both sides, into master and selected
pre-listening signal.
Separates the headphone signal, on both sides, into master and selected
pre-listening signal.
10. Crossfader
Crossfades between the selected left and right channel. Via.
Note! You can use the crossfader assignment switch (21.), assign the
desired Channel to a side or switch it off completely.
switch off completely.
- A: Left crossfader side
- Centre position: Assignment deactivated
- B: Right crossfader side
11. Load Channel (1-4)
Loads the selected track from the library onto the deck.
Double-click to assign the playing track to both decks (instant doubles).
- SHIFT+Load Channel 3: Loads the selected track into the the Prepare folder
- SHIFT+Load Channel 1: Opens the Prepare folder.
- SHIFT+Load Channel 2: Switches between the available available SDJ
windows (FX, SP-6, Rec etc.)
- SHIFT+Load Channel 4: Switches through the user interfaces interfaces
(les, browser, etc.)
Loads the selected track from the library to the deck.
- SHIFT+Load Channel 3: Loads the selected track to the deck the Queue List*****
- SHIFT+Load Channel 1: Opens/closes the queue list*****
- SHIFT+Load Channel 2: Switches between the different deck views
- SHIFT+Load Channel 4: Switches between the different library sources
( iTunes/supported streaming services/
video/history/nder)***
12. Signal-In-Switch
Selects between the input signals of the respective channel.
- Channel 3: Mic 1/USB A/USB B/Line
- Channel 1: USB A/Pono Line/USB B
- Channel 2: USB A/Phono Line/USB B
- Channel 4: Mic 2/USB A/USB B/Line
Selects between the input signals of the respective channel.
- Channel 3: Mic 1/USB A/USB B/Line
- Channel 1: USB A/Pono Line/USB B
- Channel 2: USB A/Phono Line/USB B
- Channel 4: Mic 2/USB A/USB B/Line
13. Gain Controls the channel volume Controls the channel volume
14. EQ High Controls the channel high Controls the channel high
15. EQ Mid Controls the channel mids Controls the channel mids
16. EQ Low Controls the channel bass Controls the channel bass
17. Filter Turn to the left for a low pass lter, turn to the right for a high pass lter.
(LED lights up when the channel lter is activated).
Turn to the left for a low pass lter, turn to the right for a high pass lter.
(LED lights up when the channel lter is activated).
18. PFL Cue
Routes the selected channel to the cue channel. (pre-listening channel).
- Hold SHIFT + press PFL Cue in time to the music,
to determine the BPM value.
Routes the selected channel to the cue channel. (pre-listening channel).
- Hold SHIFT + press the button in time to the music,
to determine the BPM value.
19. FX-Paddle
Activates the effects you have selected in the respective FX Unit.
(FX Unit 1 for Deck 3/1 and FX Unit 2 for Deck 2/4).
- Centre position: Effect is switched off.
- ON (engage effect toggle switch to the front): Effect is permanently activated.
- HOLD (pull back effect toggle switch):
Effect is activated activated temporarily.
Note! You can choose from the effects included in the software.
20. Channelfader Adjusts the channel volume. Adjusts the channel volume.
21. Crossfader Assignment-
Switch
Using the crossfader assignment switch, you can assign the desired channel
to a croosfader side or switch it off completely.
- A: Left crossfader side
- Centre position: Assignment deactivated
- B: Right crossfader side
Using the crossfader assignment switch, you can assign the desired channel to
a croosfader side or switch it off completely.
- A: Left crossfader side
- Centre position: Assignment deactivated
- B: Right crossfader side
22. Docking Station You can place your iOS device in the docking station. You can place your iOS device in the docking station.
23. Master Volume LED Bar Indicates the master volume by means of LED. Indicates the master volume by means of LED.
24. Channel Volume LED Bar Indicates the channel volume by means of LED. Indicates the channel volume by means of LED.
ENGLISH
ENGLISH

8
Serato DJ Pro djay Pro AI
FX SECTION:
25. Mic 1/2 ON
Arms the microphone on the respective channel (1/4).
Note! In order to activate the microphone channel, you must set the
signal-in switch (12.) of the desired channel to Mic.
- Channel 1: Mic 1
- Channel 4: Mic 2
Arms the microphone on the respective channel (1/4).
Note! In order to activate the microphone channel, you must set the
signal-in switch (12.) of the desired channel to Mic.
- Channel 1: Mic 1
- Channel 4: Mic 2
26. Mic 1/2 Talkover Enables/disables the talkover function for the selected microphone (1/2). Enables/disables the talkover function for the selected microphone (1/2).
27. FX 1-Encoder (FX Unit 1/2)
- Single FX Mode: Controls FX parameter (FX depth)
- SHIFT Single FX Mode: Selects effect for FX unit
- Multi FX Mode: Controls FX depth of FX / slot 1
- SHIFT Multi FX Mode: Selects effect for FX unit / slot 1
- Single FX Mode: N/A
- Multi FX Mode: Controls Dry/Wet value of FX Slot 1
- SHIFT: N/A
28. FX 1 Arm (FX Unit 1/2)
- Single FX Mode: De-/activates the effect
- Multi FX Mode: De-/activates effect 1
- SHIFT+FX 1 Arm: Toggles through the effect slot menus for FX Slot 1.
Enables/disables effect 1.
- SHIFT+FX 1 Arm: Switches through the effect slot menus for FX Slot 1.
29. FX 2-Encoder (FX Unit 1/2)
- Single FX Mode: Controls FX parameters
- SHIFT Single FX Mode: N/A
- Multi FX Mode: Controls FX depth of FX / slot 2
- SHIFT Multi FX Mode: Selects effect for FX unit / slot 2
- Single FX Mode: N/A
- Multi FX Mode: Controls Dry/Wet value of FX Slot 2
- SHIFT: N/A
30. FX 2 Arm (FX Unit 1/2)
- Single FX Mode: Enables/disables various parameters.
- Multi FX Mode: Enables/disables effect 2.
- SHIFT+FX 2 Arm: Toggles through the effect slot menus for FX Slot 2.
De-/Aktiviert Effekt 2.
- SHIFT+FX 2 Arm: Schaltet durch die Effekt Slot Menüs für FX Slot 2
31. FX 3-Encoder (FX Unit 1/2)
- Single FX Mode: Controls FX parameters
- SHIFT Single FX Mode: N/A
- Multi FX Mode: Controls FX depth of FX / slot 3
- SHIFT Multi FX Mode: Selects effect for FX unit / slot 3
- Single FX Mode: N/A
- Multi FX Mode: Controls Dry/Wet value of FX Slot 3.
- SHIFT: N/A
32. FX 3 Arm (FX Unit 1/2)
- Single FX Mode: Enables/disables various parameters.
- Multi FX Mode: Enables/disables effect 2.
- SHIFT+FX 3 Arm: Toggles through the effect slot menus for FX Slot 3.
Enables/disables effect 3.
- SHIFT+FX 3 Arm: Switches through the effect slot menus for FX Slot 3.
33. Beat/Param-Encoder
(FX Unit 1/2)
Turn controls the Beats Multiplier value for the software effects.
Pressing resets the Beats Multiplier to the value 1/1.
- SHIFT+Turn: Controls beats multiplier value for DJ FX
- SHIFT+Press: Resets the Beats Multiplier to the value 1/1
Turn adjusts parameter for FX slots 1-3.
Pressing sets the parameter of FX Slot 1-3 to its original value.
- SHIFT+Turn: N/A
- SHIFT+Press: N/A
34. Tap (FX Unit 1/2)
Manual setting of the FX tempo by pressing for FX unit.
Press and hold to reset the value.
- SHIFT+Tab: Toggles between Single or Multi FX modes control or display.
Activates FX Slot 1-3 as long as the key is pressed.
When the button is released, FX Slot 1-3 is deactivated.
- SHIFT+Tap: Toggles between FX and Neural Mix™ mode.
PLAYER SECTION:
35. Pitchfader
Adjusts the tempo of the track.
- SHIFT + pitch fader: You can change the position of the pitch fader while
maintaining the tempo of the track.
Adjusts the tempo of the track.
- SHIFT + pitch fader: You can change the position of the pitch fader while
maintaining the Tempo of the track.
36. Slip
Enables/disables slip mode. If the slip mode is active, the track starts at the
exact point, at which it would be if you had not performed any actions.
- SHIFT+Slip: Enables/disables the vinyl mode of the jog wheel.
Note! When Vinyl is activated, the jog wheel stops the playhead.
(or scratches it). Pitch bending is also possible by by moving the
edge of the jog wheel. If vinyl is deactivated, the jog wheel will only
perform only the pitch bend Function.
Enables/disables slip mode. If the slip mode is active, the track starts at the
exact point, at which it would be if you had not performed any actions.
- SHIFT+Slip: Enables/disables the vinyl mode of the jog wheel.
Note! When Vinyl is activated, the jog wheel stops the playhead.
(or scratches it). Pitch bending is also possible by by moving the edge
of the jog wheel. If vinyl is deactivated, the jog wheel will only per-
form only the pitch bend Function.
37. Time
Toggles between elapsed & remaining time. (elapsed/remaining)
- SHIFT+Time: Switches the playing direction of the
respective deck to reverse.
Toggles between elapsed & remaining time. (elapsed/remaining)
- SHIFT+Time: Switches the playing direction of the
respective deck to reverse.
38. Key Lock
Deactivates/activates Key Lock. If the button is held longer, the tempo will reset.
- SHIT+Key Lock: Enables/disables Key Sync*.
Deactivates/activates Key Lock. If the key is held longer, the tempo is reset.
- SHIT+Key Lock: Enables/disables Key Sync
39. Silent Cue
Mutes/unmutes the respective deck while the song continues to play in the back-
ground. The deck is reactivated at the selected cue point via the Hot Cue buttons.
- SHIFT+Censor: Changes the pitch range.
(+/-8, +/-16 and +/-50)
Mutes/unmutes the respective deck while the song continues to play in the back-
ground. The deck is reactivated at the selected cue point via the Hot Cue buttons.
- SHIFT+Censor: Changes the pitch range.
(+/-8, +/-10, +/-25, +/-50 and +/-75)
40. Auto Loop
Enables/disables the selected auto-loop length.
The loop length can be read via the loop LED bar.
- SHIFT+Auto Loop: De-/activates the selected saved loop.
Enables/disables the selected auto-loop length.
The loop length can be read via the loop LED bar.
- SHIFT+Auto Loop: De-/activates the selected saved loop.
ENGLISH

9
Serato DJ Pro djay Pro AI
41. Loop-LED-Bar
Displays the currently selected loop length:
- 1/32 LED 1 ashes
- 1/16 LED 2 ashes
- 1/8 LED 3 ashes
- 1/4 LED 4 ashes
- 1/1 LED 1 lights up constantly
- 2/1 LED 2 lights up constantly
- 4/1 LED 3 lights up constantly
- 8/1 LED 4 lights up constantly
- 16/1 LED 5 lights up constantly
- 32/1 LED 1-5 lights up constantly
42. 1/2x Loop Halves the length of the current loop. Halves the length of the current loop.
43. 2x Loop Doubles the length of the current loop. Doubles the length of the current loop.
44. Jogwheel
The jog wheel stops the playhead or scratches it
(Vinyl Mode On -> SHIFT+SLIP).
Pitch bending is also possible by moving the edge of the jog wheel.
Note! If the vinyl mode is deactivated, turning the jog wheel, will only
perform the pitch bend function.
- SHIFT+Turn Jog Wheel: Performs a needle search (fast forward) in the track.
45. Jogwheel Display
The jog wheel display shows information about the track currently loaded in
the deck. ( USB A/B, Deck 1/3 2/4, Time, BPM, Pitch, Pitchrange, continuous
LED display for the position in the track and rotating track marker).
The jog wheel display shows information about the track currently loaded in
the deck. ( USB A/B, Deck 1/3 2/4, Time, BPM, Pitch, Pitchrange, continuous
LED display for the position in the track and rotating track marker)
46. Param 1 <
Controls the parameter functions, depending on the active mode. (Decrease)
- SHIFT+Param 1<: Controls second level of parameter function,
Depending on the active mode. (Decrease)
Controls the parameter functions, depending on the active mode. (Decrease)
- SHIFT+Param 1<: Controls second level of parameter function,
Depending on the active mode. (Decrease)
47. Param 1 >
Controls the parameter function, depending on the active mode. (Increase)
- SHIFT+Param 1>: Controls second level of parameter function,
Depending on the active mode. (Increase)
Controls the parameter function, depending on the active mode. (Increase)
- SHIFT+Param 1>: Controls second level of parameter function,
Depending on the active mode. (Increase)
48. SHIFT Activates second level functions, according to the labelling of the unit. Activates second level functions, according to the labelling of the unit.
49. Deck Select (1/3 / 2/4)
Toggles between the decks on the respective player.
- Left player: Deck 1/3
- Right player: Deck 2/4
Toggles between the decks on the respective player.
- Left player: Deck 1/3
- Right player: Deck 2/4
50. SYNC
Activates the Sync function.
- SHIFT+Sync: Deactivates the Sync function.
Activates the Sync function.
- SHIFT+Sync: Deactivates the Sync function.
51. CUE
- During playback: The track returns to the temporary cue point and stops.
- In pause mode: Sets a new temporary cue point at the current position.
If the Cue button is pressed again, the temporary cue is
played as long as Cue is held.
- SHIFT+CUE: The playhead returns to the beginning of the track or loads the
previous track, if the button is pressed for more than one
second during playback.
- During playback: The track returns to the temporary cue point and stops.
- In pause mode: Sets a new temporary cue point at the current position.
If the Cue button is pressed again, the temporary cue is
played as long as Cue is held.
- SHIFT+CUE: The playhead returns to the beginning of the track or loads the
previous Track if the button is pressed for more than one second
during playback.
52. Play/Pause
Activates playback/pause
- SHIFT+CUE: Triggers the temporary cue and the playhead
will continue from that point.
Activates playback/pause
- SHIFT+CUE: Triggers the temporary cue and the playhead
will continue from that point.
ENGLISH

10
Serato DJ Pro djay Pro AI
PERFORMANCE SECTION:
53. Performance Pad Modes
(1-4)
Activates the pad mode (1-4) marked on the pads.
Note! Pressing again activates the second level pad modes (5-8).
Activates the pad mode (1-4) marked on the pads.
Note! Pressing again activates the second level pad modes (5-8).
1: Hot Cue:
Triggers the 8 available cue points per deck. The hot cue colours can
be customised in the software and the pads are and the pads will light up in
the corresponding colours.
Note! Parameter knobs perform flip functions****:
Play, Record, Loop, On/Off
- SHIFT+PAD: Deletes the current cue point.
1: Hot Cue:
Triggers the 8 available cue points per deck. The hot cue colours can be
customised in the software and the pads are and the pads will light up in the
corresponding colours
- SHIFT+PAD: Deletes the current cue point.
2. Loop Roll:
Pads 1-4 (de)activate a Loop Roll when the pad is held. Each pad is assigned
to a specic loop length from 1/32 - 4/1. The Loop Roll range can be shifted
via the Parameter 1 buttons. Pads 5-8 control the Beat Jump function.
2. Loop Roll:
Each pad de-/activates a loop roll when the pad is held each pad is assigned a
specic loop length from 1/32 – 4/1.
3. Saved Loops:
Up to 8 loops can be saved. Each pad represents one loop slot. To save a loop,
Set an auto loop and press a pad. Press it again to delete the loop.
- SHIFT+PAD: Triggers the loop.
3. Saved Loops:
Up to 8 loops can be saved. Each pad represents one loop slot. To save a loop,
Set an auto loop and press a pad. Press it again to delete the loop.
- SHIFT+PAD: Triggers the loop.
4. Sampler:
Pads 1-8 trigger the 8 available sample slots. Using the parameter buttons,
you can switch back and forth through banks A, B, C, D. The volume can be
adjusted with the Sampler (6.).
- SHIFT+PAD: Stops the sample.
Pad modes in the second level:
4. Sampler:
Pads 1-8 trigger the 16 available sample slots. Sampler mode on the left deck
controls samples 1-8, sampler mode on the right deck controls samples 9-16. If
the sampler mode button is pressed for 2 seconds, PAD VELOCITY and AFTER-
TOUCH are activated. The samples can now be played back at different volumes.
Note! Sampler View is only available in 2-deck view.
- SHIFT+PAD stops the sample.
Pad Modes in the second layer:
5. Pitch Play*:
In combination with Pitch n Time DJ, you can play back your cues in different
tones. There are 3 keys available. To switch between them, press the left
or right PARAM 1 button. The pad with the basic tone is always white
illuminated; here the cue point is played with the regular pitch. When you are
in Pitch Play mode, pressing the pads will play back your cue point At different
pitches.
- SHIFT+PAD: Selects a different Hot Cue Point for Pitch Play.
5. Pitch Play:
You can play your cues in different keys. There are 3 keys available. To switch
between them, press the left or right PARAM 1 button. The pad with
the root key is always lit in white; here the cue point is played with the regular
pitch. When you are in pitch play mode, pressing the pads will play your cue
point in different Pitches.
- SHIFT+PAD: Select a different Hot Cue Point for Pitch Play.
6. Saved Flip****:
Up to 8 saved ips can be displayed, pads 1-8 start your previously saved ips.
- SHIFT+PAD: Jumps directly to the respective ip and starts it.
6. Touch FX Mode:
The drum pads have different instant effects that are activated by pressing the
respective pad.
7. Slicer:
If the slicer is activated, a dened section is divided into eight equal parts.
These eight sliced sections are distributed to the corresponding performance
pads. When the playhead reaches the end of the section, it moves beyond the
section and forms a new section.
7. Slicer:
If the slicer is activated, a dened section is divided into eight equal parts.
These eight sliced sections are distributed to the corresponding performance
pads. When the playhead reaches the end of the section, it moves beyond the
section and forms a new section.
8. Scratch Bank:
In scratch bank mode, you can assign an audio le from your Serato DJ
Pro Library to each of the 8 performance pads. When a pad is pressed, the
respective le is loaded onto the deck. The pads on the left are loaded on
deck 1 and the pads on the right are loaded on deck 2. To set up your scratch
bank les, click on the on the scratch bank icon in the top bar of Serato DJ
Pro. There you will see the Scratch Bank panel. In this panel, you can load or
eject the audio les you want and dene your personal settings. The settings
include the start point, repeat on/off and key lock on/off. By clicking on the
button in the upper left corner of the of the scratch bank panel, you can toggle
between the expanded and simple view.
- SHIFT+PAD: Hold down the SHIFT and click on any Scratch Bank pad to
delete the currently loaded le and and reload the last track
loaded on that deck.
8. Neural Mix™:
In Neural Mix™ mode you can control the Algoriddim Neural Mix™ functions
via the drum pads. The drum pads are assigned as follows:
- PAD 1: Drum Solo On/Off = Mute Harmonic & Vocal
- PAD 2: Harmonic Solo On/Off = Mute Drum & Vocal
- PAD 3: Vocal Solo On/Off = Mute Drum & Harmonic
- PAD 4: Drum Swap On/Off (deactivates the drum stem of the selected
channel and activates solo for the drum stem of the other channel)
- PAD 5: Drum Solo Hold = Mute Harmonic & Vocal
- PAD 6: Harmonic Solo Hold = Mute Drum & Vocal
- PAD 7: Vocal Solo Hold = Mute Drum & Harmonic
- PAD 8: Drum Swap Hold (deactivates the drum stem of the selected channel
and activates solo for the drum stem of the other channel)
54. Performance Pads (1-8) Colour-coded, velocity-sensitive drum pad section, to controll the different
performance modes.
Colour-coded, velocity-sensitive drum pad section, to controll the different
performance modes.
FRONT SECTION:
55. Mic 2-In (TRS) Microphone input 2 (6.3 mm jack) Microphone input 2 (6.3 mm jack)
56. Crossfader Curve-Adjust Knob for adjusting the crossfader opening behaviour. Knob for adjusting the crossfader opening behaviour.
57. Headphone Connections
(3,5 mm / 6,3 mm)
Headphone output (3.5 mm / 6.3 mm jack connection) Headphone output (3.5 mm / 6.3 mm jack connection)
ENGLISH

11
Serato DJ Pro djay Pro AI
REAR SECTION:
58. Mic 1-In (XLR/TRS) Microphone input 1 combi jack (XLR / 6.3 mm jack connector) Microphone input 1 combi jack (XLR / 6.3 mm jack connector)
59. PSU-Power Connection Mains cable connection for external power supply. Mains cable connection for external power supply.
60. Power ON/OFF Power On/Off Power On/Off
61. USB-C Port (iOS) USB-C port for iOS USB-C port for iOS
62. USB-In-Switch Selection switch for use of the USB-C or USB-B B port. Selection switch for use of the USB-C or USB-B B port.
63. USB-B A-Port USB port 1 for PC/Mac USB port 1 for PC/Mac
64. USB-B B-Port USB port 2 for PC/Mac USB port 2 for PC/Mac
65. Line-In Channel 3 (RCA) Line input Channel 3 (RCA) Line input Channel 3 (RCA)
66. Phono/Line-In Channel
1 (RCA)
Phono/Line input Channel 1 (RCA)
Note! You can control Serato DJ Pro using Noisemap™
Control tone CDs or Vinyl**.
Phono/Line input Channel 1 (RCA)
67. Phono/Line-Switch
Channel 1
Signal-In selection switch for Channel 1. Signal-In selection switch for Channel 1.
68. Grounding-Screw (GND) Grounding screw Grounding screw
69. Phono/Line-Switch
Channel 2
Signal-In selection switch for Channel 2. Signal-In selection switch for Channel 2.
70. Phono/Line-In Channel
2 (RCA)
Phono/Line input Channel 2 (RCA)
Note! You can control Serato DJ Pro using Noisemap™
Control tone CDs or Vinyl**.
Phono/Line input Channel 2 (RCA)
71. Line-In Channel 4 (RCA) Line input Channel 4 (RCA) Line input Channel 4 (RCA)
72. Booth-Out (TRS) Booth output (2 x 6.3 mm jack) Booth output (2 x 6.3 mm jack)
73. Master-Out 2 (RCA) Master output 2 (RCA unbalanced) Master output 2 (RCA unbalanced)
74. Master-Out 1 (XLR) Master output 1 (XLR balanced) Master output 1 (XLR balanced)
75. Kensington Lock Theft protection Theft protection
* Requires the Serato Pitch'n Time Expansion Pack
** Requires the Serato DVS Expansion Pack. Not available for djay.
*** Requires a subscription to the desired streaming service: Tidal,
Soundcloud Go+, Beatport Link and Beatsource Link
**** Requires the Serato Flip Expansion Pack
***** Only available fordjay Pro AI (Mac Edition).
ENGLISH

ENGLISH
12
ENGLISH
MINIMUM SYSTEM REQUIREMENTS:
You can check the current Serato DJ Pro system requirements for Mac or Windows at serato.com.
You can check the current djay Pro AI system requirements for „iOS“/“iPadOS“, Mac or Windows at algoriddim.com.
iPhone, iPad, iPod touch, iTunes, Mac and Mac OS are registered trademarks of Apple Inc. in the U.S. and other countries.
App Store is a service mark of Apple Inc.
iOS is a trademark containing Cisco trademark signs in the U.S. and other countries.
Windows is a registered trademark of Microsoft Corporation in the United States and other countries.
Serato DJ Lite, Serato DJ Intro, Serato DJ Pro, Serato DJ and Scratch Live are registered trademarks of Serato Limited.
Beatport is a trademark of Beatport, LLC.
Soundcloud is a trademark of SoundCloud Limited.
djay is a registered trademark of Algoriddim GmbH.
Tidal is a trademark of Aspiro AB.
Beatsource is a trademark of Beatsource, LLC.
YouTube, Google Play and the Google Play logo are registered trademarks of Google Inc.
TECHNICAL SPECIFICATIONS
- In- & outputs: .......................................................... XLR Master-Output, 6.3 mm jack Booth-Output (TRS), RCA Master-Output, 2x RCA-Input
(Phono/Line), 2x RCA-Input (Line), 1x Combo-Mic-Input (XLR/jack (TRS), 1x Mic-Input 6.3 mm
jack (TRS), 1x USB-B, 1x USB-C/USB-B, 2x Headphones (6.3 mmm/3.5 mm jack)
- Dimensions: ............................................................. 657 x 68 x 391 mm
- Dimensions .............................................................. docking station: 320 x 9 mm
- Weight: ...................................................................... 5,7 kg
- Minimum system requirements: .......................... Please refer to the manufacturer‘s specications for the system requirements of your DJ software.
- Incl.: ........................................................................... Controller, manual, USB cable (USB-A to USB-B), power supply (12V/3A)
- When Line input : 0dBV
Master Out Balanced
Rating (volume @2o’clock): ..................................... 4dBu
Max. (THD>0.01%): ................................................... 14dBu
THD: ............................................................................. <0.01%
SNR: ............................................................................ <-85dB
Master Out Unbalanced
Rating (volume @2o’clock): ..................................... 6dBV
Max. (THD>0.01%): ................................................... 16dBV
THD: ............................................................................. <0.01%
SNR: ............................................................................ <-85dB
Booth Out
Rating (volume @2o’clock): ..................................... 4dBu
Max. (THD>0.01%): ................................................... 14dBu
THD: ............................................................................. <0.01%
SNR: ............................................................................ ∆85dB
SERVICE & SUPPORT:
For technical questions or issues, please check our FAQ or request a support ticket:
https://www.reloop.com/faqs/
Subject to alterations.
Illustrations similar to original Product.
Misprints excepted.
Reloop
Global Distribution GmbH & Co. KG
Schuckertstr. 28
48153 Münster / Germany
Fax: +49-251.6099368

13
ENGLISH
ENGLISH

DEUTSCH
14
ACHTUNG! Lesen Sie sich vor der ersten Inbetriebnahme zur eigenen Sicherheit diese Bedienungsanleitung sorgfältig durch! Alle Personen, die
mit der Aufstellung, Inbetriebnahme, Bedienung, Wartung und Instandhaltung dieses Gerätes zu tun haben, müssen entsprechend qualiziert sein
und diese Betriebsanleitung genau beachten. Dieses Produkt erfüllt die Anforderungen der geltenden europäischen und nationalen Richtlinien, die
Konformität wurde nachgewiesen, die entsprechenden Erklärungen und Unterlagen sind beim Hersteller hinterlegt.
Nehmen Sie den Mixon 8 Pro aus der Verpackung. Bitte überprüfen Sie vor der ersten Inbetriebnahme, ob kein offensichtlicher
Transportschaden vorliegt. Sollten Sie Schäden am Stromkabel oder am Gehäuse entdecken, nehmen Sie das Gerät nicht in Betrieb und setzen
Sie sich bitte mit Ihrem Fachhändler in Verbindung.
SICHERHEITSHINWEISE
ACHTUNG!
Seien Sie besonders vorsichtig beim Umgang mit der Netzspannung AC 100 - 240 V, 50/60Hz. Bei dieser Spannung können Sie einen
lebensgefährlichen, elektrischen Schlag erhalten! Bei Schäden, die durch Nichtbeachtung dieser Bedienungsanleitung verursacht werden,
erlischt jeder Gewährleistungsanspruch. Bei Sach- oder Personenschäden, die durch unsachgemäße Handhabung oder Nichtbeachtung der
Sicherheitshinweise verursacht werden, übernimmt der Hersteller keine Haftung.
WARNUNG! Um Feuer oder einen elektrischen Schock zu vermeiden, setzen Sie dieses Gerät nicht Wasser oder Flüssigkeiten aus!
Öffnen Sie niemals das Gehäuse!
- Dieses Gerät hat das Werk in einwandfreiem Zustand verlassen. Um diesen Zustand zu erhalten und einen gefahrlosen Betrieb sicherzustellen,
muss der Anwender unbedingt die Sicherheitshinweise und die Warnvermerke beachten, die in dieser Gebrauchsanleitung enthalten sind.
- Aus Sicherheits- und Zulassungsgründen (CE) ist das eigenmächtige Umbauen und/oder Verändern des Gerätes nicht gestattet. Beachten Sie
bitte, dass Schäden, die durch manuelle Veränderungen an diesem Gerät verursacht werden, nicht unter dem Gewährleistungsanspruch fallen.
- Im Geräteinneren benden sich keine zu wartenden Teile, ausgenommen die von außen austauschbaren Verschleißteile. Die Wartung darf nur von
fachkundigem Personal durchgeführt werden, ansonsten verfällt die Gewährleistung!
- Die Sicherung darf nur gegen Sicherungen des gleichen Typs, der gleichen Auslösecharakteristik und Nennstromstärke ausgetauscht werden.
- Stellen Sie sicher, dass die Stromversorgung erst nach dem Aufbau des Gerätes erfolgt.
- Benutzen Sie nur vorschriftsmäßige Kabel. Achten Sie darauf, dass alle Stecker und Buchsen fest angeschraubt und richtig angeschlossen sind.
Bei Fragen wenden Sie sich bitte an Ihren Händler.
- Stellen Sie sicher, dass beim Aufstellen des Produktes das Netzkabel nicht gequetscht oder durch scharfe Kanten beschädigt wird.
- Lassen Sie das Netzkabel nicht mit anderen Kabeln in Kontakt kommen! Seien Sie vorsichtig beim Umgang mit Netzkabeln und -anschlüssen.
Fassen Sie diese Teile nie mit nassen Händen an!
- Stecken Sie das Stromkabel nur in geeignete Schukosteckdosen ein. Als Spannungsquelle darf dabei nur eine ordnungsgemäße Netzsteckdose
des öffentlichen Versorgungsnetzes verwendet werden.
- Trennen Sie das Gerät bei Nichtbenutzung und vor jeder Reinigung vom Netz! Fassen Sie dazu den Netzstecker an der Griffäche an und ziehen
Sie niemals an der Netzleitung!
- Stellen Sie das Gerät auf einer horizontalen und stabilen, schwer entammbaren Unterlage auf.
- Vermeiden Sie Erschütterungen und jegliche Gewaltanwendung bei der Installation oder Inbetriebnahme des Gerätes.
- Achten Sie bei der Wahl des Installationsortes darauf, dass das Gerät nicht zu großer Hitze, Feuchtigkeit und Staub ausgesetzt wird. Vergewissern
Sie sich, dass keine Kabel frei herumliegen. Sie gefährden Ihre und die Sicherheit Dritter!
- Stellen Sie keine Flüssigkeitsbehälter, die leicht umfallen können, auf dem Gerät oder in dessen Nähe ab. Falls doch einmal Flüssigkeit in das
Geräteinnere gelangen sollte, sofort den Netzstecker ziehen. Lassen Sie das Gerät von einem qualizierten Servicetechniker prüfen, bevor es
erneut genutzt wird. Beschädigungen, die durch Flüssigkeiten im Gerät hervorgerufen wurden, sind von der Gewährleistung ausgeschlossen.
- Betreiben Sie das Gerät nicht in extrem heißen (über 35° C) oder extrem kalten (unter 5° C) Umgebungen. Halten Sie das Gerät von direktem
Sonnenlicht und von Wärmequellen wie Heizkörpern, Öfen, usw. (auch beim Transport in geschlossenen Wagen) fern. Verdecken Sie niemals
vorhandene Lüfter oder Lüftungsschlitze. Sorgen Sie immer für eine ausreichende Ventilation.
- Das Gerät darf nicht in Betrieb genommen werden, wenn es von einem kalten Raum in einen warmen Raum gebracht wurde. Das dabei entstehende
Kondenswasser kann unter Umständen Ihr Gerät zerstören. Lassen Sie das Gerät solange ausgeschaltet, bis es Zimmertemperatur erreicht hat!
- Regler und Schalter sollten niemals mit Sprühreinigungsmitteln und Schmiermitteln behandelt werden. Dieses Gerät sollte nur mit einem
feuchten Tuch gereinigt werden. Verwenden Sie niemals Lösungsmittel oder Waschbenzin zum Reinigen.
- Bei Umzügen sollte das Gerät im ursprünglichen Versandkarton transportiert werden.
- Zu Beginn müssen die Überblendregler und Lautstärkeregler Ihres Verstärkers auf Minimum eingestellt und die Lautsprecherschalter in
„OFF“-Position geschaltet sein. Vor dem Lauterstellen 8 bis 10 Sekunden warten, um Lautsprecherschäden zu vermeiden.
- Geräte, die an Netzspannung betrieben werden, gehören nicht in Kinderhände. Lassen Sie deshalb in Anwesenheit von Kindern besondere Vor-
sicht walten.
- In gewerblichen Einrichtungen sind die Unfallverhütungsvorschriften des Verbandes der gewerblichen Berufsgenossenschaft zu beachten.
- In Schulen, Ausbildungseinrichtungen, Hobby- oder Selbsthilfewerkstätten ist das Betreiben des Gerätes durch geschultes Personal
verantwortlich zu überwachen.
- Heben Sie diese Bedienungsanleitung für spätere Fragen und Probleme gut auf.
BESTIMMUNGSGEMÄSSE VERWENDUNG
- Bei diesem Gerät handelt es sich um eine 4-Kanal-DJ-Controller, mit dem sich Audiosignale regeln und mischen lassen. Das Gerät wird dabei mit
einem Computer oder Tablet und einer Audioendstufe bzw. aktiven Lautsprechern verbunden.
- Wird das Gerät anders verwendet, als in dieser Bedienungsanleitung beschrieben, kann dieses zu Schäden am Produkt führen und der
Gewährleistungsanspruch erlischt. Außerdem ist jede andere Verwendung mit Gefahren,
wie z.B. Kurzschluss, Brand, elektrischem Schlag, etc. verbunden.
- Die vom Hersteller festgelegte Seriennummer darf niemals entfernt werden, da ansonsten der Gewährleistungsanspruch erlischt
WARTUNG
- Überprüfen Sie regelmäßig die technische Sicherheit des Gerätes auf Beschädigungen des Netzkabels oder des Gehäuses, sowie auf die
Abnutzung von Verschleißteilen, wie Dreh- und Schiebereglern.
- Wenn anzunehmen ist, dass ein gefahrloser Betrieb nicht mehr möglich ist, so ist das Gerät außer Betrieb zu setzten und gegen unbeabsichtigten
Betrieb zu sichern. Netzstecker aus der Steckdose ziehen!
- Es ist anzunehmen, dass ein gefahrloser Betrieb nicht mehr möglich ist, wenn das Gerät sichtbare Beschädigungen aufweist, das Gerät nicht
mehr funktioniert, nach längerer Lagerung unter ungünstigen Verhältnissen oder nach schweren Transportbeanspruchungen.

15
DEUTSCH
BEDIENOBERFLÄCHE
VORDERSEITE
RÜCKSEITE
EINRICHTUNG UND ANSCHLUSS DES MIXON 8 PRO:
1. Verbinden Sie die Ausgabegeräte (Lautsprecher, Kopfhörer, etc.) mit dem Mixon 8 Pro.
Die Audioausgabe erfolgt über den Master-Ausgang (XLR und Chinch) und Booth-Ausgang (6,3 mm Klinke).
2. Verbinden Sie die Eingabegeräte (Mikrofone) mit dem Mixon 8 Pro. Die Ausgabe des jeweiligen Mikrofon-Eingangs, wird für Mikrofon 1 über
Kanal 3 und bei Mikrofon 2 über Kanal 4 gesteuert. Das entsprechende Eingangs-Signal ist zuvor am Kanal auszuwählen.
3. Stellen Sie sicher, dass der Mixon 8 Pro ausgeschaltet ist und der Master- und Booth-Regler auf „Min“ gestellt ist.
4. Schließen Sie alle Geräte an die Stromquelle an und schalten Sie die Geräte ein.
5. Wenn Sie den Mixon 8 Pro mit Serato DJ Pro betreiben wollen, so entnehmen Sie die weiteren Schritte der Installationsanweisung weiter unten. der Installationsanweisung weiter unten.
Wenn Sie sich für djay Pro AI entscheiden, so entnehmen Sie ebenfalls weitere Schritte weiter unten.
75 74 73 72 71 6570 64
69 63
68 62
67 61
66
60
59 58
55 56 57
1
2
4
7
3
10
11 25 26
33312927
28 30 32 34
11
22
24 2424 24
1111
12 1212 12
13 1313 13
14 1414
15 15 15 15
14
16 16
16
16
21
52 52
51 51
50 50
46 46
42 42
41 41
40 40
39 39
38 38
35 35
25
27
28 30 32 34
3736 36 37
29 31 33
26
45 45
49 49
44 44
43 43
47 4748 48
2121 21
17 1717 176
8
9
20 20 20 20
18 1818 18
19 19 19 19
5
23
54
53 53
54

DEUTSCH
16
SOFTWARE INSTALLATION & ANSCHLUSS:
Serato DJ Pro Installation für macOS
- Gehen Sie zu serato.com und wählen Sie unter Produkte „Serato DJ Pro Download“.
- Falls Sie nicht bereits bei serato.com angemeldet sind, erstellen Sie bitte Ihren Account.
- Nachdem Sie sich eingeloggt haben und auf Produkte ¬ Serato DJ Pro klicken, sehen Sie die neueste Version von Serato DJ Pro
und einen Download-Banner auf der rechten Seite.
- Klicken Sie auf Download um die Installationsdatei herunterzuladen.
- Sobald der Download abgeschlossen ist, können Sie mit der Installation beginnen.
- Lesen Sie die AGB und klicken Sie „Agree“, sobald Sie fertig sind.
- Folgen Sie den angegebenen Schritten bis zur fertigen Installation.
- Anschließend nden Sie Ihre Serato DJ Pro Software im Programme-Ordner.
HINWEIS!
Je nach der von Ihnen verwendeten Betriebssoftware, müssen Sie möglicherweise den Serato-Zugriff, in Ihren Sicherheitseinstellungen aktivieren.
Serato DJ Pro Installation für Windows
- Gehen Sie zu serato.com und wählen Sie unter Produkte „Serato DJ Pro Download“.
- Falls Sie nicht bereits bei serato.com angemeldet sind, erstellen Sie bitte Ihren Account.
- Nachdem Sie sich eingeloggt haben und auf Produkte ¬ Serato DJ Pro klicken, sehen Sie die neueste Version von Serato DJ Pro
und einen Download-Banner auf der rechten Seite.
- Klicken Sie auf Download, um die Installationsdatei herunterzuladen.
Der Windows Installer für Serato DJ Pro kommt als archivierte Zip Datei, welche mit dem Windows Explorer geöffnet werden kann.
Alternativ können Sie auch Ihren bevorzugten Archiv-Manager verwenden, wie z.B. Winzip or 7zip.
- Sobald der Download abgeschlossen ist, können Sie mit der Installation beginnen.
- Falls Sie die Windows Explorer Methode wählen, können Sie die heruntergeladene Datei doppel-klicken
und Sie werden das ausführbare Serato DJ Pro Programm sehen.
- Falls Sie einen Archiv-Manager eines Drittanbieters verwenden, wie z.B. Winzip or 7zip, können Sie per Rechtsklick das kontextsensitive Menü
aufrufen und „Extract Here“ wählen, wodurch die Serato DJ Pro Datei extrahiert und an die Stelle abgelegt wird, die Sie ausgewählt haben,
um die Originaldatei zu speichern.
- Doppelklicken Sie die sich hieraus ergebende Serato DJ Pro exe Datei aus dem Archiv, nachdem Sie das Archiv geöffnet oder extrahiert haben,
um die Einrichtung von Serato DJ Pro zu starten. Nun werden Sie die Lizenzbedingungen sehen. Klicken Sie das „I agree to the license terms
and conditions“ Kästchen und klicken Sie anschliessend „Install“.
HINWEIS!
Unter Windows ist es nötig, einen ASIO-Treiber zu installieren!
djay Pro AI iPad/iPhone Installation & Anschluss
Die djay Pro AI App können Sie im App Store herunterladen.
- Laden Sie die djay Pro AI App aus dem App Store.
- Stellen Sie den USB-Quellen-Schalter -62- auf “iOS“.
- Schließen Sie Ihr iOS USB-C-Ladekabel sowohl an den USB-“iOS“ Port -61- des Mixon 8 Pro, als auch an Ihr „iOS“-Gerät an.
- Öffnen Sie die zuvor heruntergeladene djay Pro AI App.
Ihr Mixon 8 Pro wird automatisch erkannt und kann nun bedient werden.

17
DEUTSCH
Serato DJ Pro djay Pro AI
MIXER SECTION:
1. Stereo/Mono-Switch Wählt zwischen der Stereo- oder Mono-Ausgabe des Master-Ausgang-Signals. Wählt zwischen der Stereo- oder Mono-Ausgabe des Master-Ausgang-Signals.
2. Volume (Master) Kontrolliert die Master-Ausgangs-Lautstärke Kontrolliert die Master-Ausgangs-Lautstärke
3. Booth Kontrolliert die Monitor Output Lautstärke Kontrolliert die Monitor Output Lautstärke
4. Cue Vol Reguliert die Kopfhörer Lautstärke Reguliert die Kopfhörer Lautstärke
5. Cue Mix Mischt das Cue- und Master-Signal zum Vorhören Mischt das Cue- und Master-Signal zum Vorhören
6. Sampler Reguliert die Lautstärke des Sampler Output Reguliert die Lautstärke des Sampler Output
7. Browse-Encoder
Der Browse Encoder navigiert durch Ihre Bibliotheken.
Durch Drücken des Browse Encoders bestätigen Sie Ihre Auswahl.
- SHIFT+Drehen Browse Encoder: Schnelles Browsen (Quick Search).
- SHIFT+Drücken Browse Encoder: Wechselt von Waveform- zu Library-Ansicht.
Der Browse Encoder navigiert durch Ihre Bibliotheken.
Durch Drücken des Browse Encoders bestätigen Sie Ihre Auswahl.
- SHIFT+Drehen Browse Encoder: Schnelles Browsen (Quick Search).
- SHIFT+Drücken Browse Encoder: N/A
8. Back
Mit der Back Taste können Sie in Ihrer Navigation, jeweils um einen
Menüpunkt zurückspringen.
- SHIFT+Back: Schaltet durch die verfügbaren Ansichten.
Mit der Back Taste können Sie in Ihrer Navigation, jeweils um einen
Menüpunkt zurückspringen.
- SHIFT+Back: Vergrößert die Playlisten-Ansicht.
9. Cue Split Trennt das Kophörer-Signal, auf beide Seiten, in Master- und ausgewähltes
Vorhör-Signal auf.
Trennt das Kophörer-Signal, auf beide Seiten, in Master- und ausgewähltes
Vorhör-Signal auf.
10. Crossfader
Blendet zwischen dem jeweils ausgewählten linken und rechten Kanal über.
Hinweis! Sie können über den Crossfader Assignment-Switch (21.),
den gewünschten Kanal, zu einer Seite zuordnen oder ganz ausschalten.
- A: Linke Seite
- Mittelstellung: Zuweisung deaktiviert
- B: Rechte Seite
Blendet zwischen dem jeweils ausgewählten linken und rechten Kanal über.
Hinweis! Sie können über den Crossfader Assignment-Switch (21.),
den gewünschten Kanal, zu einer Seite zuordnen oder ganz ausschalten.
- A: Linke Seite
- Mittelstellung: Zuweisung deaktiviert
- B: Rechte Seite
11. Load Channel (1-4)
Lädt den gewählten Track von der Library auf das Deck. Durch Doppelklick
wird der spielende Track beiden Decks zugewiesen (Instant Doubles).
- SHIFT+Load Channel 3: Läd den ausgewählten Track in den Prepare Ordner
- SHIFT+Load Channel 1: Öffnet den Prepare Ordner
- SHIFT+Load Channel 2: Wechselt zwischen den verfügbaren SDJ Fenstern
(FX, SP-6, Rec etc.)
- SHIFT+Load Channel 4: Wechselt durch die Oberächen
(Dateien, Browser, etc.)
Lädt den gewählten Track von der Library auf das Deck.
- SHIFT+Load Channel 3: Lädt den ausgewählten Track in die Queue-Liste*****
- SHIFT+Load Channel 1: Öffnet/schließt die Queue-Liste*****
- SHIFT+Load Channel 2: Wechselt zwischen den verschiedenen Deck-Views
- SHIFT+Load Channel 4: Wechselt zwischen den verschiedenen
Library-Quellen (iTunes/unterstützte Streaming-
Dienste/Video/History/Finder)***
12. Signal-In-Switch
Wählt zwischen den Eingangs-Signalen des jeweiligen Kanals.
- Channel 3: Mic 1/USB A/USB B/Line
- Channel 1: USB A/Pono-Line/USB B
- Channel 2: USB A/Phono-Line/USB B
- Channel 4: Mic 2/USB A/USB B/Line
Wählt zwischen den Eingangs-Signalen des jeweiligen Kanals.
- Channel 3: Mic 1/USB A/USB B/Line
- Channel 1: USB A/Pono-Line/USB B
- Channel 2: USB A/Phono-Line/USB B
- Channel 4: Mic 2/USB A/USB B/Line
13. Gain Reguliert die Kanallautstärke Reguliert die Kanallautstärke
14. EQ High Reguliert die Höhen pro Kanal Reguliert die Höhen pro Kanal
15. EQ Mid Reguliert die Mitten pro Kanal Reguliert die Mitten pro Kanal
16. EQ Low Reguliert die Bässe pro Kanal Reguliert die Bässe pro Kanal
17. Filter Nach links drehen für einen Low Pass Filter, nach rechts drehen für eine High
Pass Filter. (LED leuchtet, wenn der Kanallter aktiviert ist)
Nach links drehen für einen Low Pass Filter, nach rechts drehen für eine High
Pass Filter. (LED leuchtet, wenn der Kanallter aktiviert ist)
18. PFL Cue
Leitet den gewählten Kanal zum Cue-Kanal (Vorhörkanal).
- Halten Sie SHIFT + drücken Sie die Taste im Takt zur Musik,
um den BPM-Wert zu ermitteln.
Leitet den gewählten Kanal zum Cue-Kanal (Vorhörkanal).
- Halten Sie SHIFT + drücken Sie die Taste im Takt zur Musik,
um den BPM-Wert zu ermitteln
19. FX-Paddle
Aktiviert die von ihnen ausgewählten Effekte in der jeweiligen FX-Unit.
(FX Unit 1 für Deck 3/1 und FX Unit 2 für Deck 2/4)
- Mittelstellung: Effekt ist ausgeschaltet.
- ON (Effekt-Kippschalter nach vorne einrasten): Effekt ist dauerhaft aktiviert.
- HOLD (Effekt-Kippschalter zurückziehen): Effekt wird temporär aktiviert.
Hinweis! Es stehen Ihnen die in der Software enthaltenen
Effekte zur Auswahl.
20. Channelfader Reguliert die Kanal-Lautstärke. Reguliert die Kanal-Lautstärke.
21. Crossfader Assignment-
Switch
Über den Crossfader Assignment-Switch können Sie den gewünschten
Kanal, einer Crossfader-Seite zuordnen oder ganz ausschalten.
- A: Linke Crossfader-Seite
- Mittelstellung: Zuweisung deaktiviert
- B: Rechte Crossfader-Seite
Über den Crossfader Assignment-Switch können Sie den gewünschten
Kanal, einer Crossfader-Seite zuordnen oder ganz ausschalten.
- A: Linke Crossfader-Seite
- Mittelstellung: Zuweisung deaktiviert
- B: Rechte Crossfader-Seite
22. Docking Station In der Docking Station können Sie Ihr iOS Gerät platzieren. In der Docking Station können Sie Ihr iOS Gerät platzieren.
23. Master Volume LED Bar Zeigt die Master-Lautstärke mittels LED an. Zeigt die Master-Lautstärke mittels LED an.
24. Channel Volume LED Bar Zeigt die Kanallautstärke mittels LED an. Zeigt die Kanallautstärke mittels LED an.
BEDIENUNG

DEUTSCH
18
Serato DJ Pro djay Pro AI
FX SECTION:
25. Mic 1/2 ON
Schaltet das Mikrofon auf dem jeweiligen Kanal scharf (1/4).
Hinweis! Um den Mikrofon-Kanal zu aktivieren, müssen Sie den
Signal-In-Switch (12.) des gewünschten Kanals auf Mic stellen.
- Channel 1: Mic 1
- Channel 4: Mic 2
Schaltet das Mikrofon auf dem jeweiligen Kanal scharf (1/4).
Hinweis! Um den Mikrofon-Kanal zu aktivieren, müssen Sie den
Signal-In-Switch (12.) des gewünschten Kanals auf Mic stellen.
- Channel 1: Mic 1
- Channel 4: Mic 2
26. Mic 1/2 Talkover De-/Aktiviert die Talkover-Funktion für das jeweils ausgewählte Mikrofon (1/2). De-/Aktiviert die Talkover-Funktion für das jeweils ausgewählte Mikrofon (1/2).
27. FX 1-Encoder (FX Unit 1/2)
- Single FX Mode: Reguliert FX Parameter (FX Tiefe)
- SHIFT Single FX Mode: Selektiert Effekt für FX Einheit
- Multi FX Mode: Reguliert FX Tiefe des FX in Slot 1
- SHIFT Multi FX Mode: Selektiert Effekt für FX Einheit / Slot 1
- Single FX Mode: N/A
- Multi FX Mode: Reguliert Dry/Wet-Wert von FX Slot 1
- SHIFT: N/A
28. FX 1 Arm (FX Unit 1/2)
- Single FX Mode: De-/Aktiviert den Effekt
- Multi FX Mode: De-/Aktiviert Effekt 1
- SHIFT+FX 1 Arm: Schaltet durch die Effekt Slot Menüs für FX Slot 1
De-/Aktiviert Effekt 1.
- SHIFT+FX 1 Arm: Schaltet durch die Effekt Slot Menüs für FX Slot 1
29. FX 2-Encoder (FX Unit 1/2)
- Single FX Mode: Reguliert FX Parameter (FX Tiefe)
- SHIFT Single FX Mode: N/A
- Multi FX Mode: Reguliert FX Tiefe des FX in Slot 2
- SHIFT Multi FX Mode: Selektiert Effekt für FX Einheit / Slot 2
- Single FX Mode: N/A
- Multi FX Mode: Reguliert Dry/Wet-Wert von FX Slot 2
- SHIFT: N/A
30. FX 2 Arm (FX Unit 1/2)
- Single FX Mode: De-/Aktiviert verschiedene Parameter.
- Multi FX Mode: De-/Aktiviert Effekt 2.
- SHIFT+FX 2 Arm: Schaltet durch die Effekt Slot Menüs für FX Slot 2.
De-/Aktiviert Effekt 2.
- SHIFT+FX 2 Arm: Schaltet durch die Effekt Slot Menüs für FX Slot 2
31. FX 3-Encoder (FX Unit 1/2)
- Single FX Mode: Reguliert FX Parameter
- SHIFT Single FX Mode: N/A
- Multi FX Mode: Reguliert FX Tiefe des FX in Slot 3
- SHIFT Multi FX Mode: Selektiert Effekt für FX Einheit / Slot 3
- Single FX Mode: N/A
- Multi FX Mode: Reguliert Dry/Wet-Wert von FX Slot 3
- SHIFT: N/A
32. FX 3 Arm (FX Unit 1/2)
- Single FX Mode: De-/Aaktiviert verschiedene Parameter.
- Multi FX Mode: De-/Aaktiviert Effekt 2.
- SHIFT+FX 3 Arm: Schaltet durch die Effekt Slot Menüs für FX Slot 3.
De-/Aktiviert Effekt 3.
- SHIFT+FX 3 Arm: Schaltet durch die Effekt Slot Menüs für FX Slot 3
33. Beat/Param-Encoder (FX
Unit 1/2)
Drehen kontrolliert den Beats Multiplier-Wert für die Software-Effekte.
Drücken setzt den Beats Multiplier auf den Wert 1/1 zurück.
- SHIFT+Drehen: Kontrolliert Beats Multiplier-Wert für die DJ-FX
- SHIFT+Drücken: Setzt den Beats Multiplier auf den Wert 1/1 zurück
Drehen reguliert Parameter für FX Slots 1-3.
Drücken setzt den Parameter von FX Slot 1-3 auf den Ursprungswert.
- SHIFT+Drehen: N/A
- SHIFT+Drücken: N/A
34. Tap (FX Unit 1/2)
Manuelle Einstellung des FX Tempo durch Drücken für FX Einheit.
Durch Halten wird der Wert zurück gesetzt.
- SHIFT+Tab: Wechselt zwischen Single oder
Multi FX Modi Kontrolle bzw Anzeige
Aktiviert FX Slot 1-3 solange die Taste gedrückt wird.
Wird die Taste losgelassen, so wird FX Slot 1-3 deaktiviert.
- SHIFT+Tap: Wechselt zwischen FX- und Neural Mix™ Mode.
PLAYER SECTION:
35. Pitchfader
Regulliert das Tempo des Tracks.
- SHIFT + Pitchfader: Mann kann die Position des Pitchfaders verändern
während das Tempo des Tracks beibehalten wird.
Regulliert das Tempo des Tracks.
- SHIFT + Pitchfader: Mann kann die Position des Pitchfaders verändern
während das Tempo des Tracks beibehalten wird.
36. Slip
De-/Aktiviert Slip Modus. Ist der Slip Modus aktiv, so setzt der Track nach
diversen Aktionen (Cue Punkte oder Scratches) genau an der Stelle ein,
an der sich der Track benden würde, wenn Sie keine Aktionen ausgeführt hätten.
- SHIFT+Slip: De-/Aktiviert den Vinyl-Mode des Jog Wheel.
Hinweis! Ist Vinyl aktiviert, hält das Jog Wheel den Playhead an
(oder scratched diesen). Außerdem ist Pitch Bending durch bewegen
des Jog Wheel Rands möglich. Ist Vinyl deaktiviert, wird durch
Drehen des Jog Wheels, lediglich die Pitch Bend Funktion ausgeführt.
38. Key Lock
De-/aktiviert Key Lock.
Wird die Taste länger gehalten, wird das Tempo zurück gesetzt.
- SHIT+Key Lock: De-/Aktiviert Key Sync*.
De-/aktiviert Key Lock.
Wird die Taste länger gehalten, wird das Tempo zurück gesetzt.
- SHIT+Key Lock: De-/Aktiviert Key Sync
39. Silent Cue
De-/Aktiviert Stummschalten des jeweiligen Decks (Mute), während der Song
im Hintergrund weiterläuft – Über die Hot Cue Tasten wird das Deck,
am ausgewählten Cue Punkt, wieder aktiviert.
- SHIFT+Censor: Wechselt zwischen den Pitchbereichen.
(+/-8, +/-16 und +/-50)
De-/Aktiviert Stummschalten des jeweiligen Decks (Mute), während der Song
im Hintergrund weiterläuft – Über die Hot Cue Tasten wird das Deck,
am ausgewählten Cue Punkt, wieder aktiviert.
- SHIFT+Censor: Wechselt zwischen den Pitchbereichen.
(+/-8, +/-10, +/-25, +/-50 and +/-75)
40. Auto Loop
De-/Aktiviert die ausgewählte Auto-Loop-Länge.
Die Loop-Länge kann über die Loop-LED-Bar abgelesen werden.
- SHIFT+Auto Loop: De-/Aktiviert den ausgewählten gespeicherten Loop.
De-/Aktiviert die ausgewählte Auto-Loop-Länge.
Die Loop-Länge kann über die Loop-LED-Bar abgelesen werden.
- SHIFT+Auto Loop: De-/Aktiviert den ausgewählten gespeicherten Loop.

19
DEUTSCH
Serato DJ Pro djay Pro AI
41. Loop-LED-Bar
Zeigt die aktuell gewählte Loop Länge an:
- 1/32 LED 1 blinkt
- 1/16 LED 2 blinkt
- 1/8 LED 3 blinkt
- 1/4 LED 4 blinkt
- 1/1 LED 1 leuchtet dauerhaft
- 2/1 LED 2 leuchtet dauerhaft
- 4/1 LED 3 leuchtet dauerhaft
- 8/1 LED 4 leuchtet dauerhaft
- 16/1 LED 5 leuchtet dauerhaft
- 32/1 LED 1-5 leuchtet dauerhaft
42. 1/2x Loop Halbiert die Länge des aktuellen Loops. Halbiert die Länge des aktuellen Loops.
43. 2x Loop Verdoppelt die Länge des aktuellen Loops. Verdoppelt die Länge des aktuellen Loops.
44. Jogwheel
Das Jog Wheel hält den Playhead an oder scratched diesen
(Vinyl Mode On -> SHIFT+SLIP).
Außerdem ist Pitch Bending durch bewegen des Jog Wheel Rands möglich.
Hinweis! Ist der Vinyl Mode deaktiviert, wird durch Drehen des Jog
Wheel, lediglich die Pitch Bend Funktion ausgeführt.
- SHIFT+Jog Wheel drehen: Führt einen Needle Search
(schnelles Spulen) im Track aus.
45. Jogwheel Display
Das Jog Wheel Display gibt Informationen über den aktuell im Deck geladenen
Track wieder. (USB A/B, Deck 1/3 2/4, Time, BPM, Pitch, Pitchrange,
fortlaufende LED-Anzeige für Position im Track und rotierenden Track-Marker)
Das Jog Wheel Display gibt Informationen über den aktuell im Deck geladenen
Track wieder. (USB A/B, Deck 1/3 2/4, Time, BPM, Pitch, Pitchrange,
fortlaufende LED-Anzeige für Position im Track und rotierenden Track-Marker)
46. Param 1 <
Kontrolliert die Parameter-Funktionen, abhängig vom aktiven Modus.
(Verringerung)
- SHIFT+Param 1<: Kontrolliert zweite Ebene der Parameter Funktion,
abhängig vom aktiven Modus. (Verringerung)
Kontrolliert die Parameter-Funktionen, abhängig vom aktiven Modus.
(Verringerung)
- SHIFT+Param 1<: Kontrolliert zweite Ebene der Parameter Funktion,
abhängig vom aktiven Modus. (Verringerung)
47. Param 1 >
Kontrolliert die Parameter Funktion, abhängig vom aktiven Modus. (Zunahme)
- SHIFT+Param 1>: Kontrolliert zweite Ebene der Parameter
Funktion, abhängig vom aktiven Modus. (Zunahme)
Kontrolliert die Parameter Funktion, abhängig vom aktiven Modus. (Zunahme)
- SHIFT+Param 1>: Kontrolliert zweite Ebene der Parameter
Funktion, abhängig vom aktiven Modus. (Zunahme)
48. SHIFT Aktiviert Funktionen der zweiten Ebene, gemäß der Beschriftung des Gerätes. Aktiviert Funktionen der zweiten Ebene, gemäß der Beschriftung des Gerätes.
49. Deck Select (1/3 / 2/4)
Schaltet auf dem jewiligen Player zwischen den Decks um.
- Linker Player: Deck 1/3
- Rechter Player: Deck 2/4
Schaltet auf dem jewiligen Player zwischen den Decks um.
- Linker Player: Deck 1/3
- Rechter Player: Deck 2/4
50. SYNC
Aktiviert die Sync-Funktion.
- SHIFT+Sync: Deaktiviert die Sync-Funktion.
Aktiviert die Sync-Funktion.
- SHIFT+Sync: Deaktiviert die Sync-Funktion.
51. CUE
- Während der Wiedergabe: Der Track kehrt zum temporären Cue Punkt
zurück und stoppt.
- Im Pause Modus: Ein neuer temporärer Cue Punkt wird an der aktuellen
Stelle gesetzt. Wird die Cue Taste erneut gedrückt, wird der temporäre Cue
so lange wieder gegeben wie Cue gehalten wird.
- SHIFT+CUE: Der Playhead kehrt an den Anfang des Tracks zurück oder lädt
den vorherigen Track, wenn die Taste länger als eine Sekunde während der
Wiedergabe gedrückt wird.
- Während der Wiedergabe: Der Track kehrt zum temporären Cue Punkt
zurück und stoppt.
- Im Pause Modus: Ein neuer temporärer Cue Punkt wird an der aktuellen
Stelle gesetzt. Wird die Cue Taste erneut gedrückt, wird der temporäre Cue
so lange wieder gegeben wie Cue gehalten wird.
- SHIFT+CUE: Der Playhead kehrt an den Anfang des Titels zurück oder lädt den
vorherigen Track, wenn die Taste während der Wiedergabe länger als eine
Sekunde gedrückt wird.
52. Play/Pause
Aktiviert Wiedergabe/Pause
- SHIFT+Play/Pause: Triggert den temporären Cue Punkt und die Wiedergabe
wird ab der Stelle fortgesetzt.
Aktiviert Wiedergabe/Pause
- SHIFT+Play/Pause: Triggert den temporären Cue Punkt und die Wiedergabe
wird ab der Stelle fortgesetzt.

DEUTSCH
20
Serato DJ Pro djay Pro AI
PERFORMANCE SECTION:
53. Performance Pad Modes
(1-4)
Aktiviert den auf den Pads bezeichneten Pad Mode (1-4).
Hinweis! Erneutes Drücken aktiviert die Pad Modes der zweiten
Ebene (5-8).
Aktiviert, den auf den Pads, jeweilig bezeichneten Pad Mode (1-4).
Hinweis! Erneutes Drücken aktiviert die Pad Modes der zweiten
Ebene (5-8).
1. Hot Cue:
Triggert die 8 verfügbaren Cue-Punkte pro Deck. Die Hot Cue-Farben können
software-seitig individuell angepasst werden und die Pads leuchten in den
entsprechenden Farben.
Hinweis! Die Parameter-Knöpfe führen Flip Funktionen**** aus: Play,
Record, Loop, On/Off
- SHIFT+PAD: Löscht den aktuellen Cue Punkt.
1. Hot Cue:
Triggert die 8 verfügbaren Cue Punkte pro Deck.
Die Cue Punkt Farbe wird auf dem Pad wieder gegeben.
- SHIFT+Pad: Löscht den aktuellen Cue Punkt.
2. Loop Roll:
Die Pads 1-4 (de-)aktivieren einen Loop Roll, wenn das Pad gehalten wird.
Jedem Pad ist eine bestimmte Loop-Länge von 1/32 – 4/1 zugewiesen.
Über die Parameter 1 Tasten kann der Loop Roll-Bereich verschoben werden
Die Pads 5-8 steuern die Beat Jump-Funktionen.
2. Loop Roll:
Jedes Pad (de-)aktiviert einen Loop Roll, wenn das Pad gehalten wird.
Jedem Pad ist eine bestimmte Loop-Länge von 1/32 – 4/1 zugewiesen.
3. Saved Loops:
Es können bis zu 8 Loop sgespeichert werden.
Jedes Pad steht für einen Loop Slot. Um einen Loop zu speichern, setzen Sie
einen Auto Loop und drücken Sie ein Pad Slot. Durch erneutes Drücken
löschen Sie den Loop wieder.
- SHIFT+PAD: Triggert den Loop.
3. Saved Loops:
Es können bis zu 8 Loop sgespeichert werden.
Jedes Pad steht für einen Loop Slot. Um einen Loop zu speichern, setzen Sie
einen Auto Loop und drücken Sie ein Pad Slot. Durch erneutes Drücken
löschen Sie den Loop wieder.
- SHIFT+PAD: Triggert den Loop.
4. Sampler:
Pads 1-8 triggern die 8 verfügbaren Sample Slots. Mittels der Parameter-
knöpfe können Sie durch die Banken A, B, C und D hin und her schalten.
Die Lautstärke kann durch den Sampler (6.) eingestellt werden.
Hinweis! Wird der Sampler-Modus Knopf 2 Sekunden gedrückt,
werden PAD VELOCITY und AFTERTOUCH aktiviert. Die Samples kön-
nen mit verschiednen Lautstärken wiedergegeben werden, abhängig
davon, wie stark gedrückt wird.
- SHIFT+PAD: Stoppt das Sample.
Pad Modes in der zweiten Ebene:
4. Sampler:
Die Pads 1-8 triggern die 16 verfügbaren Sample Slots.
Sampler Modus auf dem linken Deck steuert Samples 1-8, Sampler Modus
auf dem rechten Deck steuert Samples 9-16. Wird der Sampler-Modus Knopf
2 Sekunden gedrückt, werden PAD VELOCITY und AFTERTOUCH aktiviert. Die
Samples können mit verschiedenen Lautstärken wiedergegeben werden.
Hinweis! Sampler View ist nur in der 2-Deck Ansicht verfügbar.
- SHIFT+PAD: Stoppt das Sample.
Pad Modes in der zweiten Ebene:
5. Pitch Play*:
In Kombination mit Pitch ‚n Time DJ, können Sie Ihre Cues in verschiedenen
Tonarten wiedergeben. Es stehen 3 Tonarten zur Verfügung. Um zwischen
diesen hin und her zu schalten, drücken Sie den linken oder rechten PARAM
1 Knopf. Das Pad mit dem Grundton ist immer weiss beleuchtet; hier wird
der Cue Point mit der regulären Tonhöhe abgespielt. Wenn Sie im Pitch Play
Modus sind, wird durch Drücken der Pads Ihr Cue Punkt in verschiedenen
Tonhöhen wieder gegeben.
- SHIFT+PAD: Wählt einen anderen Hot Cue Punkt für Pitch Play aus.
5. Pitch Play:
Sie können Ihre Cues in verschiedenen Tonarten wiedergeben. Es stehen 3
Tonarten zur Verfügung. Um zwischen diesen hin und her zu schalten, drücken
Sie den linken oder rechten PARAM 1 Knopf. Das Pad mit dem Grundton ist
immer weiss beleuchtet; hier wird der Cue Point mit der regulären Tonhöhe
abgespielt. Wenn Sie im Pitch Play Modus sind, wird durch Drücken der Pads
Ihr Cue Punkt in verschiedenen Tonhöhen wieder gegeben.
- SHIFT+PAD: Wählt einen anderen Hot Cue Punkt für Pitch Play.
6. Saved Flip****:
Es können bis zu 8 gespeicherte Flips angezeigt werden,
die Pads 1-8 starten Ihre zuvor abgespeicherten Flips.
- SHIFT+PAD: Springt direkt zum jeweiligen Flip und startet diesen.
6. Touch FX:
Die Drum Pads besitzen verschiedene Instant-Effects, die durch Betätigen des
jeweiligen Drum Pads aktiviert werden.
7. Slicer:
Ist der Slicer aktiviert, wird ein festgelegter Abschnitt in acht gleich große Teile
aufgeteilt. Diese acht geslicten Sektionen werden auf die entsprechenden
Performance Pads verteilt. Wenn der Playhead ans Ende des Abschnittes
gelangt, bewegt sich dieser über den Abschnitt hinaus und bildet einen neuen.
7. Slicer:
Ist der Slicer aktiviert, wird ein festgelegter Abschnitt in acht gleich große Teile
aufgeteilt. Diese acht geslicten Sektionen werden auf die entsprechenden Per-
formance Pads verteilt. Wenn der Playhead ans Ende des Abschnittes gelangt,
bewegt sich dieser über den Abschnitt hinaus und bildet einen neuen.
8. Scratch Bank:
Im Scratch-Bank-Modus können Sie jedem der 8 Performance Pads eine
Audiodatei aus Ihrer Serato DJ Pro-Bibliothek zuweisen.
Wenn ein Pad gedrückt wird, wird die jeweilige Datei auf das Deck geladen.
Die Pads auf der linken Seite werden auf Deck 1 und die Pads auf der rechten
Seite werden auf Deck 2 geladen. Um Ihre Scratch-Bank-Dateien
einzurichten, klicken Sie auf das Scratch-Bank-Symbol in der oberen Leiste
von Serato DJ Pro. Dort wird Ihnen das Scratch-Bank-Panel angezeigt.
In diesem Panel können Sie die gewünschten Audiodateien in die jeweiligen
Scratch-Bänke laden oder auswerfen und Ihre persönlichen Einstellungen
festlegen. Die Einstellungen umfassen den Startpunkt, Wiederholung an/aus
und Key-Lock an/aus. Durch Klicken auf die Schaltäche in der oberen linken
Ecke des Scratch-Bank-Panels können Sie zwischen der erweiterten und der
einfachen Ansicht umschalten.
- SHIFT+PAD: Halten Sie die SHIFT-Taste gedrückt und klicken Sie auf ein
Beliebiges Scratch-Bank-Pad, um die aktuell geladene Datei zu löschen
und den zuletzt auf dieses Deck geladenen Titel erneut zu laden.
8. Neural Mix™:
Im Neural Mix™-Pad-Modus steuern Sie die Algoriddim
Neural Mix™-Funktionen über die Drum Pads. Hierbei sind die Drum Pads
folgendermaßen Belegt:
- PAD 1: Drum Solo On/Off = Mute Harmonic & Vocal
- PAD 2: Harmonic Solo On/Off = Mute Drum & Vocal
- PAD 3: Vocal Solo On/Off = Mute Drum & Harmonic
- PAD 4: Drum Swap On/Off (deaktiviert die Drum-Spur des ausgewählten
Kanals und schaltet die Drum-Spur des anderen Kanals auf Solo)
- PAD 5: Drum Solo Hold = Mute Harmonic & Vocal
- PAD 6: Harmonic Solo Hold = Mute Drum & Vocal
- PAD 7: Vocal Solo Hold = Mute Drum & Harmonic
- PAD 8: Drum Swap Hold (deaktiviert die Drum-Spur des ausgewählten
Kanals und schaltet die Drum-Spur des anderen Kanals auf Solo)
54. Performance Pads (1-8) Farbcodierte, anschlagdynamische Drum Pad Sektion, zum Steuern der
verschiedenen Performance Modes.
Farbcodierte, anschlagdynamische Drum Pad Sektion, zum Steuern der
verschiedenen Performance Modes.
La page est en cours de chargement...
La page est en cours de chargement...
La page est en cours de chargement...
La page est en cours de chargement...
La page est en cours de chargement...
La page est en cours de chargement...
La page est en cours de chargement...
La page est en cours de chargement...
La page est en cours de chargement...
La page est en cours de chargement...
La page est en cours de chargement...
La page est en cours de chargement...
La page est en cours de chargement...
La page est en cours de chargement...
La page est en cours de chargement...
La page est en cours de chargement...
La page est en cours de chargement...
La page est en cours de chargement...
La page est en cours de chargement...
La page est en cours de chargement...
La page est en cours de chargement...
La page est en cours de chargement...
La page est en cours de chargement...
La page est en cours de chargement...
-
 1
1
-
 2
2
-
 3
3
-
 4
4
-
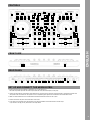 5
5
-
 6
6
-
 7
7
-
 8
8
-
 9
9
-
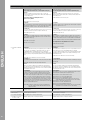 10
10
-
 11
11
-
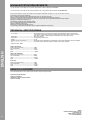 12
12
-
 13
13
-
 14
14
-
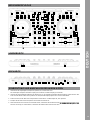 15
15
-
 16
16
-
 17
17
-
 18
18
-
 19
19
-
 20
20
-
 21
21
-
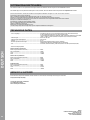 22
22
-
 23
23
-
 24
24
-
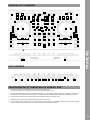 25
25
-
 26
26
-
 27
27
-
 28
28
-
 29
29
-
 30
30
-
 31
31
-
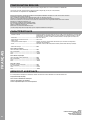 32
32
-
 33
33
-
 34
34
-
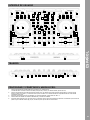 35
35
-
 36
36
-
 37
37
-
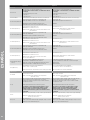 38
38
-
 39
39
-
 40
40
-
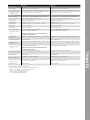 41
41
-
 42
42
-
 43
43
-
 44
44


Reloop Mixon 8 Pro Manuel utilisateur
- Catégorie
- Contrôleurs DJ
- Taper
- Manuel utilisateur
dans d''autres langues
- English: Reloop Mixon 8 Pro User manual
- español: Reloop Mixon 8 Pro Manual de usuario
- Deutsch: Reloop Mixon 8 Pro Benutzerhandbuch