
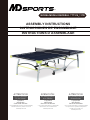
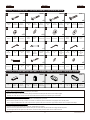
MODEL/MODELO/MODÈLE: TTT218_117D
ASSEMBLY INSTRUCTIONS
INSTRUCCIONES DE ENSAMBLAJE
INSTRUCTIONS D`ASSEMBLAGE
TM
ATTENTION
Contact
MD Sports
Customer Service
DO NOT RETURN
TO THE STORE
* For additional resources and Frequently
Asked Questions, please visit us at
themdsports.com
ATENCIÓN
Contacto
MD Sports
Servicio al Cliente
NO DEVOLVERLO
A LA TIENDA
* Por mayor información y Preguntas
Frecuentes, favor visitarnos en
themdsports.com
ATTENTION
Contactez
MD Sports
Service Clientèle
NE PAS RAPPORTER
EN MAGASIN
* Pour toute information complémentaire
ou réponse aux questions fréquentes
veuillez vous rendre sur
themdsports.com

www.themdsports.com
TTT218_117D
1
NOTICE!
¡AVISO!
GARANTÍA LIMITA DE 90 DIAS GARANTIE LIMITEE DE 90 JOURS
Este producto está cubierto por una garantía
efectiva de 90 días a partir de la fecha de su
compra. Durante el periódo límite de la garantía, si
una parte defectuosa o quebrada es encontrada,
nosotros ofreceremos una reparación o un
reemplazo de la partes sin ningún costo para ud,
nuestro cliente. Las únicas excepciones de la
garantía incluyen unidad principals, tableros de
mesa, superficies, pilas o herramientas.
La susodicha garantía no se aplicará en los casos
de daños y perjuicios debido al uso impropio, la
alteración, el mal uso, el abuso, el daño accidental
o la negligencia.
Esta garantía limitada le da a usted derechos
legales específicos, usted también puede tener
otros derechos que varían de un estado
(provincia) a otro.
EL RECIBO DE LA COMPRA (U otra prueba de
compra) sería requerida antes que cualquier
servicio de garantía fuera iniciada. Para todo
pedido por servicio de garantía, por favor siéntase
libre de ponerse en contacto con nuestro
Departamento de Servicio de Consumidor en:
WEBSITE: www.themdsports.com
Por favor tenga atención sobre el Límite de
Garantía de su producto de la política de
vuelta/reembolsa desde la tienda, Nosotros,
Medal Sports, no podemos manejar el producto
que está fuera del límite de garantía ya que
proporcionamos solamente partes disponibles.
¡Gracias!
POR FAVOR PÓNGASE EN CONTACTO
CON NOSOTROS ANTES DE DEVOLVER EL
PRODUCTO A LA TIENDA.
Ce produit est couvert par une garantie limitée
valable 90 jours à compter de la date d'achat. Si
pendant cette période une ièce est jugée
défectueuse ou se casse, nous la remplacerons
gratuitement. Les seules exceptions à la garantie
comprennent les armatures principales, les
dessus de table, les surfaces de jeu, les piles ou
les outils.
La garantie ci-dessus ne s’applique pas en cas de
dommages occasionnés par une mauvaise
utilisation, une altération du produit, de mauvais
traitements, des dommages accidentels ou des
négligences.
Cette garantie limitée vous accorde des droits
légaux spécifiques ainsi que d’autres droits variant
d’un état (province) à un autre.
UNE FACTURE D'ACHAT (ou toute autre preuve
d'achat) sera exigée avant toute intervention sous
garantie. Pour toute demande d'intervention sous
garantie, veuillez contacter notre Service à la
Clientèle au:
SITE WEB: www.themdsports.com
Comprenez notre garantie produit limitée en ce qui
concerne notre politique de retour/remboursement
depuis votre magasin. Ici à Medal Store, nous ne
pouvons prendre un compte un produit qui n’est
plus sous garantie puisque nous ne pouvons que
fournir les pièces disponibles. Remerciements!
VEUILLEZ NOUS CONTACTER AVANT DE
RETOURNER LE PRODUIT EN MAGASIN.
LIMITED 90 DAYS WARRANTY
This product is covered by a limited warranty
that is effective for 90 days from the date of
purchase. If, during the limited warranty period, a
part is found to be defective or breaks, we will
offer replacement parts at no cost to you, the
customer. The only exceptions to the warranty
include mainframes, table tops, playing surfaces,
batteries or tools.
The above warranty will not apply in cases of
damages due to improper usage, alteration,
misuse, abuse, accidental damage or neglect.
This Limited Warranty gives you specific legal
rights and you may also have other rights which
vary from one State (province) to another.
A PURCHASE RECEIPT (or other proof of
purchase) will be required before any warranty
service is initiated. For all requests for warranty
service, please feel free to contact our
Consumer Service Department at :
WEBSITE: www.themdsports.com
Please be aware of your product’s Limited
Warranty for the return/refund policy from the
store, We, at Medal Sports, can not handle the
product which is out of product’s limited warranty
since we only provide available parts. Thank
you!
PLEASE CONTACT US BEFORE
RETURNING THE PRODUCT TO THE STORE.
STAPLE YOUR RECEIPT HERE
FrançaisEspañol
English
GRAPA SU RECIBO AQU AGRAFEZ VOTRE REÇU ICI
1 - Please leave your name, address, phone
number, model number, parts needed on the
answering machine if there is no attendant.
Failure to do so will result in a delay in shipping
parts to you.
2 - Please review the replacement parts list and
make sure that you have all of your parts
before beginning assembly. For questions that
may arise or for missing/damaged parts,
please contact us.
3 - Since you build all tables upside down, please
inspect tabletops or playing surfaces right away
before putting together, all damaged table
tops/playing surfaces need to be returned to the
store. Please contact with retailer for their return
policy.
1 - Por favor deje su nombre, dirección, número
telefónico, número de modelo, partes
necesarios a la máquina contestadora si no
fuera atendido. El fracaso de hacer así le
causará un retraso del envío de partes.
2 - Por favor revise la lista de piezas de repuesto y
asegúrese de que tiene todas las piezas antes
de comenzar el montaje. Para preguntas o para
piezas que no se hayan incluidos/dañadas, por
favor pongase en contacto con nosotros.
3 - Ya que usted construye todas las mesas al
revés, por favor inspeccione las partes
superiores de mesa o superficies de juego
enseguida antes de poner juntos, que todo
tableros de mesa/superficies dañado tiene que
ser devuelto a la tienda. Por favor comunique
con el minorista por su política de devolución.
AVIS!
1 - Veuillez laisser votre nom, adresse, n° de
téléphone, n° de modèle et pièces demandées
sur notre répondeur si personne ne répond. Si
vous ne le faites pas, il en résultera des délais
dans l’acheminement des pièces jusqu’à votre
domicile.
2 - Veuillez consulter la liste des pièces et
assurez-vous que vous avez toutes les pièces
avant de commencer l'assemblage. Veuillez
nous contacter pour toute question ou toute
pièce manquante/endommagée.
3 - Puisque toutes les tables sont assemblées la
tête en bas, veuillez inspecter les dessus de
tables ou les surfaces de jeu avant de les
assembler. Les dessus de tables ou les surfaces
de jeu endommagés doivent être retournés au
magasin. Veuillez contacter votre vendeur pour
information sur le retour des pièces.

www.themdsports.com
TTT218_117D
2
FrançaisEspañol
English
ASSEMBLY TIPS
1 - This product is intended for INDOOR use only.
2 - Please do not sit, climb or lean on the product.
3 - Please do not drag the product when moving it
in order to avoid damaging the legs.
4 - Please only use spray furniture polish to clean
the exterior surfaces of the product.
5 - This is not a child's toy, adult supervision is
required for children playing this game.
1 - Please read the instructions carefully, and
follow all assembly, operation and safety
instructions properly in order to avoid damage
or injury. For the assembly, at least two adults
are required.
2 - Some figures or drawings may not look exactly
like your product. Please read and understand
the text before beginning each assembly step.
WARNING:
Adult Assembly Required.
WARNING:
CHOKING HAZARD - This item contains
small parts. Not suitable for children under
3 years.
ADVERTENCIA:
El ensamblaje debe ser realizado por un adulto.
ADVERTENCIA:
PELIGRO DE ASFIXIA - Este artículo contiene
piezas pequeñas. No apto para menores de 3
años.
ATTENTION:
Présence d’adultes nécessaire.
ATTENTION:
RISQUE DE SUFFOCATION - Cet article
contient de petites pièces. Ne convient pas à
des enfants de moins de 3 ans.
IMPORTANT NOTICE!
CONSEJOS PARA EL ENSAMBLADO
1 - Este producto está destinado únicamente para
el uso INTERIOR.
2 - NO se siente, suba o apoye sobre el producto.
3 - NO arrastre el producto cuando lo mueva para
evitar el daño a las patas.
4 - Solo use la cera espray de muebles para
limpiar las superficies exteriores del producto.
5 - Este producto no es un juguete de niños; la
supervisión de adultos es necesaria cuando los
niños hagan uso este juego.
1 - Lea las instrucciones detenidamente y siga
todas las instrucciones de ensamblaje,
funcionamiento y seguridad correctamente
para evitar daños o lesiones. Se necesitan por
lo menos dos adultos para realizar el
ensamblaje.
2 - Algunas figuras o dibujos podrían parecer
diferentes a su producto. Lea y entienda el
texto antes de iniciar cada paso del ensambla
je.
¡AVISO IMPORTANTE!
CONSEILS POUR L’ASSEMBLAGE
1 - Ce produit est conçu pour une utilisation en intéri
eur uniquement.
2 - Veuillez ne pas vous asseoir, grimper ou vous
appuyer sur la produit.
3 - Veuillez ne pas trainer ce produit quand vous le
déplacez pour éviter d’endommager les pieds.
4 - Veuillez n’utiliser que du poli à meubles en
aérosol pour nettoyer les surfaces extérieures
du produit.
5 - Ceci n’est pas un jeu d’enfant et la surveillance
d’adultes est requise pour les enfants jouant à
ce jeu.
1. Veuillez lire avec attention les instructions et
suivre à la lettre les instructions de montage et
de sécurité pour éviter dommages ou
blessures. L'assemblage nécessite au
minimum deux adultes.
2. Certaines images ou schémas peuvent différer
sensiblement de votre produit. Veuillez lire et
comprendre le texte avant de commencer
l’assemblage.
NOTE IMPORTANTE!
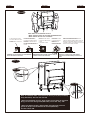
Phillips Screwdriver-Not Included
Standard (Flat Head Screwdriver)-Not Included
Wrench-Included
Allen Key-Included
CAUTION!
Electric Screwdrivers may be helpful during
assembly; however, please set a low torque and
use extreme caution.
¡PRECAUCIóN!
Los destornilladores eléctricos pueden ser de gran
ayuda durante el ensamblado; sin embargo, debe
ajustar el par de giro bajo y ser extremadamente
precavido.
CAUTION!
Un tournevis électrique peut être utile pour
l'assemblage; utilisez cependant une vitesse de
rotation lente et avec prudence.
TOOLS REQUIRED
Destornillador Phillips-No incluido
Destornillador de Cabeza Plana-No incluido
Llave Inglesa-Incluido
Llave Allen-Incluido
HERRAMIENTAS NECESARIAS
Tournevis cruciforme-Non inclus
Tournevis standard (Tête plate)-Non inclus
Clé anglaise-incluse
Clé hexagonale-incluse
OUTILS REQUIS
Rotation rapide
Trop serré
Outillage électrique
- Régler sur rotation lente
Alto par
excesivamente
tensado
Herramientas eléctricas
- Ajuste en par bajo
Power Tools
- Set Low Torque
High Torque
over tightened
X 4
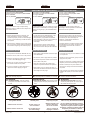
N’utilisez ni ne stockez ce produit en extérieur.
Uniquement pour utilisation en intérieur.
Pas de conditions humides
No usar o guardar el producto en el exterior.
Solo para uso en interior. No utilizar ni guardar
el producto en lugares humedos o mojados
Do not use or keep product outdoors. For
indoor use only. No wet/humid conditions.
Tenir les animaux de
compagnie à distance
Mantener alejados a los
animales domesticos
del area de ensamble
Keep away from pets
Pas d’enfants dans la
zone d’assemblage
No tener niños en el
area de ensamble
No Children in
Assembly Area
Adultos fuertes necesarios
Strong Adults Needed
Adultes robustes nécessaires

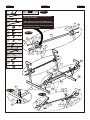
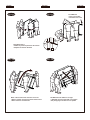
Table
Surface - 2
Leg
Caster Frame
Linkage
Tube - A
Plastic Corner
M10 Lock Nut
Caster with
Lock
Net
Net Post
Bottom
Support Tube
Tubo de
Soporte
del Fondo
Superficie de
Mesa - 1
Superficie de
Mesa - 2
Pierna
Marco de
Ruedecita
Linkage
Tube - B
Tubo de
Conexión - B
Support
Tube - Short
Tubo de
Soporte -
Corto
Support
Tube - Long
Tubo de
Soporte -
Largo
Tubo de
Conexión - A
Rincón
Plástico
Side Panel
Panel Lateral
End Panel
Panel Final
Tuerca de
cerradura M10
Ruedecita con
Cerradura
Red
Poste de
Red
Safety Strap -
Long
Correa de
Seguridad -
Larga
Linkage
Tube - C
Tubo de
Conexión - C
Safety Strap -
Short
Correa de
Seguridad -
Corta
Spacer - B Espaciador - B
Spacer - A Espaciador - A
Handle
Manija
M5x16mm
Screw
Tornillo
M5x16mm
M4x16mm
Screw
Tornillo
M4x16mm
M8x45mm
Bolt
Cerrojo
M8x45mm
M8x35mm
Bolt
Cerrojo
M8x35mm
“T” Washer Arandela “T”
Gravity Lock
Cerradura de
Gravedad
TTT218_117D PARTS LIST / LISTA DE PARTES / LISTE DES PIÈCES
www.themdsports.com
TTT218_117D
3
FrançaisEspañol
English
x1
FOR FIG. 1
1
Table
Surface - 1
Surface de
table - 1
x2
FOR FIG. 3
5
Tube de
support- Court
x2
FOR FIG. 6
9
Panneau
inférieur
x2
FOR FIG. 7
13
Serrure de
gravité
x1
FOR FIG. 13
17
Filet
x2
FOR FIG. 2
21
Bande de
Sécurité -
Courte
x19
FOR FIG. 2, 6
A1
Vis
M4x16mm
x1
FOR FIG. 1
2
Surface de
table - 2
x2
FOR FIG. 3
6
Tube de
support- Long
x4
FOR FIG. 6
10
Panneau
latéral
x4
FOR FIG. 10
14
Écrou de
verrouillage
M10
x2
FOR FIG. 13
18
Support filet
x2
FOR FIG. 5
22
Tube de
connexion-C
x86
FOR FIG. 3, 6
A2
Vis
M5x16mm
x4
FOR FIG. 4
3
Pied
x4
FOR FIG. 9
7
Tube de
connexion-A
x2
FOR FIG. 3
11
Poignée
x4
FOR FIG. 9
15
Rondelle - B
x2
FOR FIG. 7
19
Tube de
connexion-B
x4
FOR FIG. 9
23
Rondelle - B
x12
FOR FIG. 7, 9
A3
Boulon
M8x35mm
x2
FOR FIG. 7
4
Cadre moulé
x4
FOR FIG. 6
8
Coin plastique
x1
FOR FIG. 7
12
Tube de
Support de
Fond
x4
FOR FIG. 10
16
Roulette avec
verrou
x1
FOR FIG. 2
20
Bande de
Sécurité -
Longue
x2
FOR FIG. 7
24
Rondelle
“T”
x4
FOR FIG. 8
A4
Boulon
M8x45mm

M8x68mm
Bolt
Cerrojo
M8x68mm
M8x90mm
Bolt
Cerrojo
M8x90mm
M10x65mm
Bolt
Cerrojo
M10x65mm
M8x85mm
Bolt
Cerrojo
M8x85mm
10mm
Washer
Arandela
10mm
M5
Allen Key
Llave Allen
M5
M8-M10
Wrench
Llave
Inglesa
M8-M10
M6
Allen Key
Llave Allen
M6
M8 Nut
Tuerca
M8mm
M10 Nut
Tuerca M10
8mm
Washer
Arandela
8mm
M6 Nut
Tuerca M6
M4
Allen Key
Llave Allen
M4
M6 Wrench
Llave Inglesa
M6
6mm Washer
Arandela 6mm
M6x35mm
Bolt
Cerrojo
M6x35mm
Linkage Tube
Cap - A
Gorra del
Tubo de
Conexión - A
Linkage Tube
Cap - B
Gorra del
Tubo de
Conexión - B
Leg Cap
Gorra de
Pierna
Caster Frame
Cap
Gorra de
Marco de
Ruedecita
TTT218_117D PARTS LIST / LISTA DE PARTES / LISTE DES PIÈCES
www.themdsports.com
TTT218_117D
4
FrançaisEspañol
English
x4
FOR FIG. 7
A5
Boulon
M8x68mm
x32
FOR FIG. 4, 5, 7, 8, 9
A9
Ecrou M8
x1
A13
Clé
hexagonale
M5
x1
A17
Clé anglaise
M6
x8
FOR FIG. 5
A6
Boulon
M8x85mm
Boulon
M8x90mm
x64
FOR FIG. 4, 5, 7, 8, 9
A10
Rondelle 8mm
x1
A14
Clé anglaise
M8-M10
x2
FOR FIG. 7
A18
Boulon
M6x35mm
x4
FOR FIG. 4
A7
x4
FOR FIG. 9
A11
Ecrou M10
x1
A15
Clé
hexagonale
M6
x4
FOR FIG. 7
A19
Rondelle 6mm
x4
FOR FIG. 9
A8
Boulon
M10x65mm
x8
FOR FIG. 9
A12
Rondelle
10mm
x1
A16
Clé
hexagonale
M4
x2
FOR FIG. 7
A20
Ecrou M6
x4
FOR FIG. 10
P1
Capuchon
tube de
liaison-A
x8
FOR FIG. 7
P2
Capuchon
Cadre Moulé
x4
FOR FIG. 4
P3
Capuchon
Pied
x4
FOR FIG. 4
P4
Capuchon
tube de
liaison-B
TTT218_117D PRE-INSTALLED PARTS / PIEZAS PREINSTALADAS / LISTE DES PIÈCES
INSTRUCCIONES DE ENSAMBLAJE:
ASSEMBLY INSTRUCTIONS:
1. Encuentre un lugar limpio y nivelado para comenzar el ensamblaje de su producto.
2. Retire todas las piezas de la caja y verifique que cuente con todas las piezas enumeradas en las páginas de la Lista de piezas.
Corte o rasgue cuidadosamente las cuatro esquinas de la caja de modo que el fondo de la caja pueda ser usado como su superficie de trabajo.
INSTRUCTIONS D’ASSEMBLAGE:
1. Trouvez un endroit propre et plat pour commencer à assembler votre produit.
2. Enlevez toutes les pièces de la boîte et assurez-vous que vous avez toutes les pièces listés sur la page de liste des pièces.
Coupez soigneusement les quatre coins de la boîte; le fond de la boîte peut être utilisé comme surface de travail.
1. Find a clean, level place to begin the assembly of your Product.
2. Remove all the parts from the box and verify that you have all of the listed parts as shown on the Parts list pages.
Carefully cut or tear the four corners of the box so that the bottom of the box can be used as your work surface.

1 X 1
2 X 1
Player
/ Jugador
/ Joueur
Player
/ Jugador
/ Joueur
Center
/ Centro
/ Centre
Player
/ Jugador
/ Joueur
Player
/ Jugador
/ Joueur
Center
/ Centro
/ Centre
1
2
21
A1
20
A1
21
X 1
X 2
20
21
X 3
A1
1
2
FIG. 1
FIG. 2
FIG. 2A
FIG. 2B
www.themdsports.com
TTT218_117D
5
FrançaisEspañol
English
Note: Playfield graphic should be
face down when assembling.
/ Nota: El gráfico del campo de
juego debe quedar cara abajo para
el ensamblaje.
/ Note: Le graphique du terrain de
jeu doit être face vers le bas
pendant l’assemblage.

Player
/ Jugador
/ Joueur
Player
/ Jugador
/ Joueur
Center
/ Centro
/ Centre
Player
/ Jugador
/ Joueur
Player
/ Jugador
/ Joueur
Center
/ Centro
/ Centre
3
X 8
X 4
X 4
A9
X 1
A10
A13
X 1
A14
X 4
A7
X 4
P3
5
5
1
2
6
6
A2
A2
A2
11
11
A2
6
A2
A2
A2
5
5
6
X 2
X 2
X 56
A2
X 2
11
X 4
P4
FIG. 3
FIG. 4
FIG. 3A
FIG. 3B
FIG. 3C
P4
P3
P4
P4
3
1
2
A9
A7
P4
A10
www.themdsports.com
TTT218_117D
6
FrançaisEspañol
English

Player
/ Jugador
/ Joueur
Player
/ Jugador
/ Joueur
Player
/ Jugador
/ Joueur
Player
/ Jugador
/ Joueur
Center
/ Centro
/ Centre
Center
/ Centro
/ Centre
X 2
22
X 8
X 16
A9
A10
X 8
A6
8
1
2
A2
A2
A1
A6
A10
A10
3
A9
A6A10
A10
3
22
X 4
8
X 4
X 16
10
10
10
A1
X 2
9
9
X 30
A2
FIG. 5
FIG. 6
FIG. 6A
FIG. 5A
1
2
22
X 1
A13
X 1
A14
A9
www.themdsports.com
TTT218_117D
7
FrançaisEspañol
English
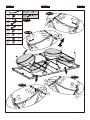
Note: Make sure all Aprons are inside the Plastic
Corners.
/ Nota: Asegúrese que todos los Delantales están
dentro de los Rincones Plástico.
/ Note: Assurez-vous que tous les tabliers sont à
l’intérieur des coins en plastique.

A5
A10
A10
19
4
4
12
A9
12
X 2
4
A9
A9
A9
A10
A10
A10
A10
A10
X 12
A16
X 1
X 4
A19
A19
A19
X 2
A20
A20
X 1
A17
A18
A18
X 2
X 2
13
13
19
X 2
24
24
A19
A19
A20
A18
24
A5
X 4
X 8
A3
A3
A3
A9
A9
A10
A10
A10
A10
A3
A3
X 1
12
X 2
X 24
P2
P2
P2
P2
FIG. 7
FIG. 7A
4
X 8
P2
X 4
A13
X 2
A14
www.themdsports.com
TTT218_117D
8
FrançaisEspañol
English
FIG. 7B
FIG. 7C
Note: Note the position of the Gravity Lock.
(See inset for details).
/ Nota: Observe la posición del Bloqueo de
Gravedad. (Vea la inserción para más detalles).
/ Note: Notez la position du Verrou de Gravité .
(Voir encart pour détails).
13

X 4
A4
X 8
X 4
A9
A10
A9
A10
A10
A4
4
FIG. 8
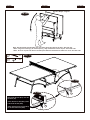
FIG. 7 Assembly
/ Ensamblaje FIG. 7
/ FIG. 7 Assemblage
FIG. 8A
Note: Turn over the pre-assembled
Caster Frame (See FIG. 7).
/ Nota: Coloque la superficie de mesa
al Marco de Ruedecita
(pre-instalado, Vea la FIG. 7).
/ Note: Retournez le Cadre Moulé
Pré-assemblé (Voir Fig7).
Note: At least three adults are required
to move the table halves for safety.
/ Nota: Por seguridad, se rquiere por lo
menos 3 adultos para voltear la mitad de
mesa.
/ Note: Un minimum de trois adultes est
requis pour déplacer les moitiés de table.
www.themdsports.com
TTT218_117D
9
FrançaisEspañol
English
Note: Please leave approximately 12-18mm
distance between table centers.
/ Nota: Por favor deje un espacio
aproximadamente de 12-18mm entre los
centros de mesa.
/ Note:Veuillez laisser environ 12-18mm de
distance entre les centres de table.

7
15
15
15
23
23
23
A3
A12
A12
A12
A12
A8
A9
A9
A9
A10
A10
A10
A10
A10
A11
A11
A11
A3
A3
A12
A15
X 4
X 4
X 4
X 4
X 4
X 4
X 8
X 8
X 4
X 1
A8
A8
4
7
3
15
15
23
23
A12
A12
A12
A12
A9
A9
A10
A10
A10
A10
A11
A11
A3
A3
A8
A8
7
3
3
FIG. 9
FIG. 9A
FIG. 9B
FIG. 9C
FIG. 9D
X 1
A14
www.themdsports.com
TTT218_117D
10
FrançaisEspañol
English
4
4
4
3

Turn table on its side
/ Voltee la mesa sobre su lado
/ Retournez la table sur son côté
X 4
X 4
X 4
16
16
16
14
14
14
P1
4
X 1
A17
FIG. 10
FIG. 10A
FIG. 11
FIG. 11A FIG. 11B
P1
P1
At least four adults
/ Por lo menos 4 adultos
/ Au moins quatre adultes
www.themdsports.com
TTT218_117D
11
FrançaisEspañol
English
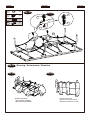
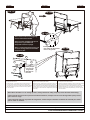
Warning / Advertencia / Attention
4

Fold table tops in
/ Doble las partes superiores de la mesa
/ Repliez les dessus de table
Lock Wheels
/ Cierre las ruedas
/ Vérouillez les roues
DO NOT lean the table on it's legs!
/ ¡NO dejar la mesa inclinada a sus patas!
/ Ne pas appuyer la table sur ses pieds!
Note: Lift off of the floor and turn in the air.
/ Nota: Levantar el piso para darle vuelta al aire.
/ Note: Soulevez et retournez
FIG. 11C FIG. 11D
FIG. 11E
FIG. 11F
20
21
www.themdsports.com
TTT218_117D
12
FrançaisEspañol
English

Note: Place on all 4 wheels at once.
/ Nota: Coloque sobre las 4 ruedas inmediatamente.
/ Note: Placez de suite sur 4 roulettes
Note: To unfold the table - First release the Gravity Lock (#13) and Safety
Strap (#20 & #21). See FIG. 12A and 12B.
/ Nota: Para desdoblar la mesa - Solte primero la Cerradura de Gravedad
(#13) y las Correas de Seguridad (#20 & #21). Vea la FIG. 12A y 12B.
/ Note: Pour déplier la table - Déverrouillez tout d’abord le Verrou de
gravité de (#13) et ôtez les Bandes de sécurité (#20 & #21).
Voir FIG. 12A et 12B.
FIG. 11G
FIG. 12
20
21
13
FIG. 12A
FIG. 12B
CAUTION: Four strong adults are recommended
to turn the table over as shown.
PRECAUCION: Recomienda voltear la mesa por
4 adultos fuertes como mostrado.
Attention: La présence de quatre adultes
robustes est recommandée pour retourner la
table.
A
B
C
D
E
A. TURN TABLE ON ITS SIDE.
A.VOLTEE LA MESA A SU LADO.
A. RETOURNEZ LA TABLE SUR
UN COTE.
B. FOLD LEGS AND TABLE
HALVES AND LOCK IN PLACE.
B. DOBLE LAS PIERNAS Y MITAD
DE LA MESA Y CERRADO EN SU
POSICIóN.
B. PLIEZ LES PIEDSET LES MOITIES
DE TABLE PUIS VERROUILLEZ
LETOUT.
C. LIFT TABLE AND TURN IN
THE AIR.
C. LEVANTE LA MESA E GIRE
AL AIRE.
C. SOULEVEZ LA TABLE.
D. DO NOT LEAN TABLE
ON ITS LEGS!
D. QUE NO APOYES LA
MESA SOBRE SUS
PIERNAS!
D. NE PAS APPUYER LA
TABLE SUR SES PIEDS!
E. SET TABLE DOWN EVENLY ON ALL
WHEELS, TO PREVENT DAMAGING THE LEGS.
E. DEJAR LA MESA EN PAREJO SOBRE TODAS LAS
RUEDAS PARA PREVENIR DAÑOS EN LAS PATAS.
E. PLACEZ LA TABLE A PLAT SUR SES 4 ROULETTES
POUR EVITER DE CASSER LES PIEDS.
www.themdsports.com
TTT218_117D
13
FrançaisEspañol
English

Note: Pull the handle and the table top, and slowly lower the table to the floor. See FIG. 12C.
/ Nota: Luego tire la manija y la mesa superior, y baje lentamente la mesa al piso. Vea la FIG. 12C.
/ Note: Tirez sur le pied et le dessus de table puis rabaissez doucement la table vers le sol. Voir FIG. 12C.
Handle / Manija / Poignée
X 1
X 2
17
18
FIG. 13
FIG. 12C
www.themdsports.com
TTT218_117D
14
FrançaisEspañol
English
18
17
18
Note: Slide the Net (#17) onto the
Net Post (18).
/ Nota: Deslice la Red (#17) sobre
el Poste de la Red (#18).
/ Note: Faites glisser le Filet (#17)
sur le Poteau de Filet (#18).
FIG. 15A
FIG. 15B

Note: When the table is in its storage position, always attach the safety strap to prevent the sides from falling.
/ Nota: Cuando la mesa esta en posicion de almace-namiento, siempre usar la correa de seguridad para prevenir
que la mesa se caiga.
/ Note: Quand la table est en position de rangement, veuillez toujours attacher les bandes de sécurité pour éviter
que les côtés ne tombent.
FIG.14
3. Engrane con la Cerradurqa de Ruedas.
4. Doblando la mesa - Doble primero el lado de la mesa sin el
poste de red. Mantenga la manija firmemente y levante la
mesa. Asegúrese que la Cerradura de Gravedad (#13) está
cerrado. Adjunte juntos las Correas de Seguridad (#20, #21)
para impedir la caída de los lados. Repita dichos pasos para
el otro lado.
FIG.14
3. Embrayez le Verrou des Roulettes.
4. Pliage de la table-Pliez d’abord le côté de la table sans support
filet. Tenez fermement l’extrémité puis soulevez la table.
Assurez-vous que le Verrou de gravité (#13) est bien verrouillé.
Répétez l’opération pour l’autre côté. Fixez les Bandes de
sécurité, Longues et Courtes (#20 & #21) pour éviter que les
côtés ne tombent.
FIG.14
3. Engage the Wheels Lock.
4. Folding the table - First fold the side of the table without the
net post. Hold the handle securely and lift the table. Make
sure the Gravity Lock (#13) is locked. Attach the Safety Straps
(#20, #21) together to prevent the sides from falling. Repeat
for the other side.
Reverse / Inversa / Retourner
Safety Straps
/ Correas de
Seguridad
/ Bandes de
sécurité
20
21
Gravity Lock
/ Cerradura de Gravedad
/ Verrou de gravité
13
FIG. 14
FIG. 14A
FIG. 14B
FIG. 14C
FIG. 14D
2
1
Note: Please make sure the gravity
lock is locked when folded.
Nota: Por favor asegúrese de que el
bloqueo de la gravedad está
bloqueado cuando se pliega.
Note: s'il vous plaît assurez-vous que
le verrou de la gravité est verrouillé
lorsqu'il est plié.
www.themdsports.com
TTT218_117D
15
FrançaisEspañol
English
YOU ARE NOW READY TO PLAY!
VOUS POUVEZ MAINTENANT COMMENCER A JOUER !
¡USTED ESTA AHORA LISTO PARA JUGAR!
-
 1
1
-
 2
2
-
 3
3
-
 4
4
-
 5
5
-
 6
6
-
 7
7
-
 8
8
-
 9
9
-
 10
10
-
 11
11
-
 12
12
-
 13
13
-
 14
14
-
 15
15
-
 16
16


dans d''autres langues
- English: Dunlop TTT218_117D User manual
- español: Dunlop TTT218_117D Manual de usuario
Autres documents
-
MD Sports TTT415_048M Mode d'emploi
-
PB Teen Haven Canopy Bed Assembly Instructions
-
Barrington ARC120_038B Manuel utilisateur
-
-
 ESPN BG132Y20016 Mode d'emploi
-
-
-
-
-
