Viking VDWU324SS Manuel utilisateur
- Catégorie
- Lave-vaisselle
- Taper
- Manuel utilisateur

VDWU524SS
VDWU524WSSS
FDWU524WS
FDWU524
VDWU324SS
FDWU324
3 & 5 SERIES
Use & Care
MANUAL

2USA
To prevent accidents, which could cause serious injury or death, as well as machine damage read these
instructions before installation and / or use.
INTRODUCTION
CONTENTS
1. IMPORTANT SAFETY INSTRUCTIONS 1
2. RECYCLING 4
3. GETTING TO KNOW YOUR DISHWASHER 5
4. LOADING THE DISHWASHER 6
4.1 UPPER RACK 8
4.2 LOWER RACK 9
4.3 PROPER AND IMPROPER LOADING OF DISHWARE 11
5. WHAT SHOULD NOT BE WASHED IN YOUR DISHWASHER 12
OPERATING THE PRODUCT 12
PROGRAM SELECTION / PROGRAMME CANCEL KEY 5 SERIES 13
FUNCTION KEYS 13
PREPARING THE MACHINE 13
PROGRAM SELECTION 13
PROGRAMME SELECTION / PROGRAMME CANCEL KEY 3 SERIES 14
FUNCTION KEYS 15
PREPARING THE MACHINE 15
PROGRAM SELECTION 15
6.4 AUXILIARY FUNCTIONS 19
6.5 SCHEDULING THE WASHING TIME 20
6.6 STARTING THE PROGRAM 20
6.7 CANCELLING THE PROGRAM 21
6.8 SALT INDICATOR ( ) 21
6.9 RINSE AID INDICATOR ( ) 21
6.10 END OF PROGRAM 21
6.11 WATER CUT-OFF WARNING 21
6.12 OVERFLOWING WARNING 21
7. DETERGENT 22
7.1 ADDING DETERGENT 22
7.2 TABLET DETERGENTS 22
7.3 RINSE AID 22
8. ADJUSTING THE WATER SOFTENING SYSTEM 23
9. FILLING THE DISHWASHER SALT DISPENSER 24
10. CARE AND MAINTENANCE 24
10.1 CARING FOR YOUR DISHWASHER EXTERIOR 25
10.2 CARING FOR YOUR DISHWASHER INTERIOR 25
10.3 CLEANING THE FILTERS 25
10.4 CLEANING THE HOSE FILTER 26
10.5 CLEANING THE WASH ARMS 26
11. TROUBLESHOOTING 27
12. TECHNICAL FEATURES 29
SERVICE INFORMATION 30
WARRANTY 31

3USA
Please read this user manual and particularly the safety
instructions completely and carefully. They will save you
time and effort and help to ensure optimum dishwasher
performance.
Be sure to observe all listed warnings and cautions. Look
particularly for the icons with exclamation marks inside.
The information icon will also provide important references.
AWARNING: Indicates a potentially
hazardous situation which, if not avoided,
could result in death or serious injury.
ACAUTION: Indicates a potentially
hazardous situation which, if not avoided,
may result in injury. It may also be used to
alert against unsafe practices.
CNOTICE: Indicates a potentially
hazardous situation which, if not avoided,
may result in damage to the dishwasher,
the dishware, the equipment or the
environment.
1. IMPORTANT SAFETY INSTRUCTIONS
AWARNING:When using the dishwasher,
follow basic precautions, including the
following:
Read all instructions before using the
dishwasher! Save these operating
instructions and pass them on to any
future user.
A“This device complies with Part 15 of the
FCC Rules. Operation is subject to the
following two conditions:
(1) this device may not cause harmful
interference, and
(2) this device must accept any
interference received, including
interference that may cause undesired
operation.”
“No changes shall be made to the
equipment without the manufacturer’s
permission as this may void the warranty”
•Use the dishwasher only for its intended purpose
as described in this user manual. This appliance is
intended for normal household use only.
•The manufacturer disclaims responsibility for
damage or injury caused by improper use of this
appliance.
•The information in this user manual must be followed
to minimize the risk of fire or explosion and to prevent
property damage, personal injury or loss of life.
•Do not operate your dishwasher unless all the
enclosure panels are properly in place.
•Do not tamper with the controls.
•Do not abuse, sit on, stand in or on the door or dish
rack of the dishwasher.
•The cup racks are designed to support cups, glasses
and kitchen utensils. When the cup racks are in the
dishwasher do not lean on or use the cup racks to
support your body weight.
•To reduce the risk of injury, do not allow children to
play in, on or near the dishwasher.
•Use only detergents or rinse aids recommended for
use in a household dishwasher and keep them in a
dry place out of the reach of children. Check that the
detergent dispenser is empty after the completion of
each wash program.
•Dishwasher detergents contain chemicals that can
cause sickness and may be if they are inhaled or
swallowed. Also, be careful when opening the door
due to hot steam that is produced during operation.
Consult a doctor immediately if detergent has been
swallowed or inhaled.
•if the hot water has not been used in several weeks,
we recommend running the hot water taps to remove
any built up hydrogen gases.
•Do not store or use flammable liquids or vapors in the
area of the dishwasher.
•When loading items to be washed, position sharp
items so that they are not likely to damage the door
seal and load sharp knives with the handles up to
reduce the risk of cut-type injuries.
•Do not wash plastic items unless they are marked
“dishwasher safe” or the equivalent. For plastic
items not so marked, check the manufacturer’s
recommendations.
•If a malfunction occurs, switch off the appliance and
turn off the water supply to the dishwasher.
•Please do not attempt to carry the dishwasher by
yourself in order to avoid potential injuries. Two or
more people are needed to move a dishwasher.
•Before cleaning or carrying out maintenance, switch
off the appliance, disconnect the power plug and turn
off the water supply.
•Repairs and technical modifications must be carried
out exclusively by an Authorized technician.
•If the dishwasher is not in use for an extended period
of time (i.e. vacation home), we recommend removing
all items from the dishwasher, leave the door cracked
open to allow air to circulate and turn off both the
power and water supply to the dishwasher.
•This appliance comes with a three prong NEMA 5-15P
15A power cord. It must be connected to a Grounded
and Polarized wall receptacle that has been installed
and tested by an licensed electrician and that it has
been installed based on all Local, State and Federal
Electrical codes.
AWARNING:Improper connection of the
equipment-grounding conductor can result in
a risk of electric shock. Check with a qualified
electrician or service representative if you are
in doubt whether the appliance is properly
grounded. Do not modify the plug provided
with the appliance, if it will not fit the outlet,
have a proper outlet installed by a qualified
electrician.
•This appliance produces ozone within the washing
compartment during normal operation. Long-term
exposure to ozone or exposure at elevated levels may
result in respiratory problems, especially for the elderly
and children.
•Chidren should not operate this machine without adult
supervision.
•Be careful to not leave the door fully open when not
being loaded or unloaded to prevent someone from

4USA
tripping on the unit.
AWARNING:If your dishwasher is equipped
with internal illumination, lamp should only
be replaced by the Authorized Service
Agent in case of failures that may occur on
the lamp.
AWARNING: This product can expose you
to chemicals including Nickel (Metallic)
which is known to the State of California to
cause cancer.
For more information go to www.
P65Warnings.ca.gov
Note: Nickel is a component in all stainless
steel and some other metal components.
SAVE THESE INSTRUCTIONS
•Service should be performed by a qualified installer.
Work by unqualified persons could be dangerous and
may void the warranty.
•Do not operate the appliance if damaged,
malfunctioning, partially disassembled or if it has
missing or broken parts.
•Before installation or service, disconnect the power
supply to the work area by unplugging the unit,
“tripping” the circuit breaker or removing the fuse.
•For safety reasons, dishwasher must be secured to
adjacent cabinetry using the brackets provided. Failure
to do this may cause damage to property or bodily
injury.
•Do not use any extension cord or portable outlet
device to connect the dishwasher to a power supply.
2. RECYCLING
•Remove the door to the washing compartment when
removing an old dishwasher from service or discarding
it. Ensure that the appliance presents no danger to
children while being stored for disposal.
•Remove the door lock or door of the washing
compartment before disposing dishwasher so that
children or small animals can not trapped inside.
•Old appliances may contain materials that can be
recycled. Please contact your local recycling authority
about the possibility of recycling these materials.
•Please check the water supply line periodically. It is
susceptible to breakage. It becomes less flexible as
time goes by.Replace it immediately when it is torn,
cut, swollen or there is water leakage.
•Please keep the dishwasher package out of the reach
of children after unpacking it.
AWARNING:Danger of suffocation! Ensure
that any plastic wrappings, bags, small
pieces etc. are disposed of safely and kept
out of the reach of children.

5USA
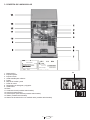
15
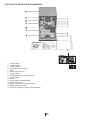
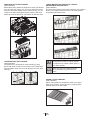
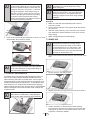
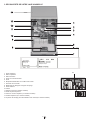
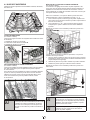
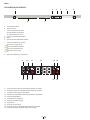
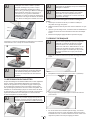
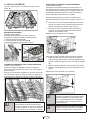
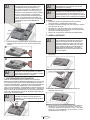
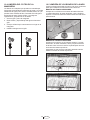
1. Upper basket
2. Upper impeller
3. Lower impeller
4. Removable cutlery basket
5. Door
6. Model and Serial Tag
7. Control panel
8. Detergent and rinse agent dispenser
9. Lower basket
10. Filters
11. Salt container (Select Models)
12. Upper basket rail
13. Upper cutlery basket (Select Models)
14. Tabletop (Select Models)
15. Turbo fan heat drying system (Select Models)
3. GETTING TO KNOW YOUR DISHWASHER

6USA
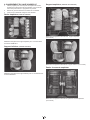
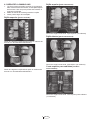
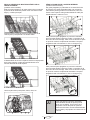
4. LOADING THE DISHWASHER
1. Pull the handle to open the door. If the door is opened
during operation, the dishwasher will stop running.
Once the door is closed the program will continue.
2. Remove coarse food leftovers from tableware.
3. Now you can load the dishwasher.
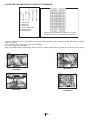
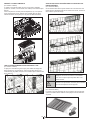
Upper rack (Standard Pattern)
Top rack load pattern for 12 place settings according to the
AHAM DW-1 Standards
Lower rack (Standard Pattern)
Bottom rack load pattern for 12 place settings according to
the AHAM DW-1 Standards
Upper rack (International Pattern)
International Loading Pattern – Top rack (12 place settings)
Lower rack (International Pattern)
International Loading Pattern – Bottom rack (12 place
settings)
Upper cutlery basket (Select Models)
International Loading Pattern – Upper cutlery basket (12

7USA
place settings)
Upper rack (Select Models)
Additional Loading Pattern – Top rack (10 place settings)
Lower rack (Select Models)
Additional Loading Pattern – Bottom rack (10 place
settings)
Upper cutlery basket (Select Models)
Upper cutlery basket (MODEL DEPENDING)
International Loading Pattern – Upper cutlery basket (10
place settings)
ACAUTION:Large knives and other
utensils with sharp tips and edges must
be placed horizontally into the upper rack
due to risk of injury. Other smaller knives
and sharp utensils should be placed with
sharp side down in the cutlery basket.
ACAUTION:Use extreme caution
when removing knives and other
sharp utensils from the dishwasher.
These items may have shifted
position during the wash program,
and may be wet or slippery.
ACAUTION:Hot steam can escape!
Danger of serious burns or other
injury.
CNOTICE: Lower basket should be
removed out of the dishwasher
during the tests according to AHAM
DW-1.
•Your dishwasher holds a maximum of 12 place
settings.
•Place all containers such as cups, glasses and
pots into the dishwasher with the opening facing
downwards (so that no water can collect).
•Small and light items can go into the upper rack.
•Long and narrow items are placed in the middle of the
racks.
•Place all large and very dirty items in the lower rack.
•Load dishes accordingly and be careful when loading
glasses so they do not hit each other during the wash
cycle. Also, make sure that both wash arms are not in
contact with any dishware.
•Do not overload your dishwasher and pay attention
to manufacturer instructions regarding dishes which
are appropriate for use in for a dishwasher. Only with
suitable dishes (mentioned in section 5) will you obtain
optimal washing results with a sensible use of energy.

8USA
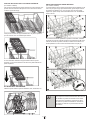
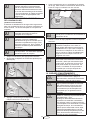
4.1 UPPER RACK
Load the upper rack with dessert plates, cups, glasses etc.
ADJUSTABLE SHELVES
(Select Models)
Depending on the size of the glasses and cups, the shelf
height setting may be adjusted.
1. Fold the shelf upwards A.
2. Positioning at the desired height B.
3. Fold the shelf again downwards C.
COLLAPSIBLE UPPER BASKET WIRES
(Select Models)
You can use collapsible wires when you need a larger
space for your dishes in the upper basket of your machine.
To bring the collapsible wires into horizontal position, grab
the wire from the middle position and push them in the
direction of arrow in the figure. Place your larger dishes
into the area created. To bring the wires back to vertical
position, just lift them up.
CBringing the wires to the horizontal
position by holding them from the tips
may cause them to bend. Therefore,
hold the wires from their stems while
bringing them to the horizontal or vertical
positions.
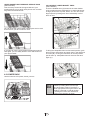
ADJUSTING THE HEIGHT OF THE UPPER BASKET
(Select Models)
The upper basket height adjustment mechanism has been
designed for you to create large spaces in the lower or
upper sections of your machine depending on your needs
by adjusting the height in the upper or lower direction while
your basket is empty or loaded.
Thanks to this mechanism, you can use your basket in
three different positions lower, middle and upper positions
(1, 2, 3).
1. To raise your basket, hold the upper basket wires
with both hands while the basket is in the lowermost
position and pull them up (A).
2. You will hear a "Click" from the right and left
mechanisms, indicating that the basket has reached
the next level. Release the basket.
Repeat the process if the height is not sufficient.
1
2
3
To lower the basket, while it is in the uppermost position;
1. Hold the upper basket wires with both hands, slightly
lift up the basket and simultaneously push and release
the latches shown in the figure (B).
2. Lower the basket from its current position to the lower
one.
3. Release the basket after it has reached one level
down.
Repeat the process if the height is not sufficient.
CThe movement mechanism may not
function properly if the upper basket is
overloaded or if the weight distribution is
not balanced. In heavier conditions, there
is the risk of falling one level down.
CMake sure that the adjustment mechanism
has the same positions on the right and
left sides of the upper basket.

9USA
UPPER BASKET MULTIPURPOSE SERVICE RACK
(Select Models)
This accessory located at the upper basket of your
machine allows you to easily wash pieces such as extra
long ladles and bread knives.
You can lift up the upper basket multipurpose service rack
to remove it if you do not want to use it.
If you want to use the upper basket multipurpose service
rack again, you can easily attach it to the side section of
your upper basket.
4.2 LOWER RACK
Use the lower rack for plates, bowls, pots etc.
COLLAPSIBLE LOWER BASKET TINES
(Select Models)
There are foldable tines (A) located in the lower basket
of the machine that are designed for an easier placement
of large pieces such as pans, bowls, etc. You can create
larger spaces by folding each tines individually or all of
them at once.
To bring the collapsible tines into horizontal position, grab
the tines from mid position and push them in the directions
of arrows (B). To bring the tines back to vertical position,
just lift them up. Collapsible tines will click into the latch
again (C).
CBringing the tines to the horizontal
position by holding them from the tips
may cause them to bend. Therefore, it
will be appropriate to bring the tines in the
middle to horizontal or vertical position
by holding them from their stems and
pushing in the direction of arrow.

10 USA
REMOVABLE CUTLERY BASKET
(Select Models)
Removable cutlery basket is designed to wash your dishes
such as knife, fork, spoon, etc. in a more efficient manner.
Since the silverware basket can be moved (A, B), you can
create more space while placing your dishes in the lower
basket and free up space for your dishes of different sizes.
LOWER BASKET BOTTLE WIRE
(Select Models)
The bottle wire is designed for easier washing of long
pieces with wide mouths. You may take out the bottle wire
from the basket when not in use by pulling it out from both
sides (H).
LOWER BASKET MULTIPURPOSE / HEIGHT
ADJUSTABLE SERVICE RACK
(Select Models)
This accessory located in the lower basket of your machine
allows you to easily wash pieces such as extra glasses,
long ladles and bread knives.
CYou may use the racks as required by
moving them to lower or upper position,
or close them to create a wider space in
your lower basket.
AMake sure that the impeller does not
touch the dishes you placed on the
racks.
UPPER CUTLERY BASKET
(Select Models)
Upper cutlery basket is designed to wash your cutlery
items such as forks, spoons and etc. by placing them
between the bars on the basket.

11 USA
6
5
5
4
444 44
33
3
3
3
3
222
2
2
2
2
2
22
2
2
2
2
2
2
2
2
2
2
22
1
1
1
1
1
111
1
1
1
1
44 44 4
32 4 3 2
3333
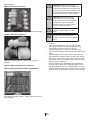
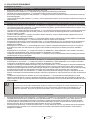
4.3 PROPER AND IMPROPER LOADING OF DISHWARE
1: Salad Fork
2: Teaspoon
3: Dinner fork
4: Knife-solid handle
5: Serving spoon
6: Serving fork
Sliding Cutlery Basket load pattern for 12 place
settings according to the AHAM DW-1 Standards
•Place all containers such as cups, glasses and pots into the dishwasher with the opening facing downwards (so that no
water can collect).
•The movement of the spray arms must not be hindered.
•Do not overload your dishwasher.
•Only with suitable dishes (mentioned in section 5) will you obtain optimal washing results with a sensible use of energy.
INCORRECT
INCORRECT INCORRECT
INCORRECT

12 USA
5. WHAT SHOULD NOT BE WASHED IN YOUR DISHWASHER
•Rust-sensitive steel parts like iron and cast iron that can rust and stain other utensils and damage the interior
stainless steel liner of the dishwasher and void the warranty. Do not wash copper, brass, pewter, bronze or tin.
•Cutlery with wooden or horn handles and cutlery with mother-of-pearl or porcelain handles will deteriorate over time if
put in the dishwasher.
•Plastics may lose their shape or color with hot water, please follow the instructions of plastic manufacturers. Be sure
that plastic items are marked “dishwasher safe”.
•Glued dishes or cutlery are not suitable for machine washing since certain adhesives may get soft or dissolve with
hot water.
•Aluminum may fade over time. Minerals in water and detergent may cause the aluminum to darken or spot.
•Sterling silver articles should not be washed in the dishwasher because they tend to discolor and become dull by
dishwasher detergent.
•Silverware and stainless steel items should not be in contact with each other. Mixing these items can cause staining.
Remove and hand dry these items immediately when the program ends.
•Decorated glasses, porcelain, fine china and china with gold rims are sensitive to machine washing. They may lose
their patterns and colors over time.
•Crystal and very fine glassware may become opaque (etch) losing their shine over time. You may prefer to wash
them by hand.
•Do not wash sponges or dish cloths in dishwasher.
•Do not wash art and craft articles in dishwasher.
•Disposable plastics and disposable aluminum cannot withstand high temperatures; do not wash them in the
dishwasher.
ACAUTION: If in doubt, wash by hand or follow the instructions from the manufacturer of utensils,
dishes, glasses or pots and pans.
Do not wash items soiled with cigarette ash, candle wax, varnish, paints or chemicals since they can
damage you dishwasher.
CNOTICE: We recommend when buying new dishware, try to choose ones that are suitable for
machine washing (marked as dishwasher safe).
CARING FOR YOUR DISHWARE
The combination of high temperatures and dishwasher detergent may cause damage to some items if they are washed
in the dishwasher. Remember, if there is any doubt about any aspect concerning items to be washed in the dishwasher,
follow the instructions from the manufacturer of the items, or wash the items by hand.
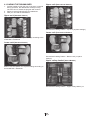
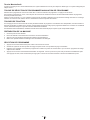
6. Start / Pause / Cancel Key
7. Function Selection Keys
F1
F2
F3
F4
8. Programme Selection Keys
1 2
7
8
3 4 5 6
1. On / Off Key
2. Menu Key
3. Time Delay Selection / Menu Direction Selection Keys
4. Selection / Confirmation Key
5. Display
OPERATING THE PRODUCT
IntenseWash Function
Express Function
Sanitize Function
High Gloss Function
5 SERIES

13 USA
9 10 11
15
12 13 14
16171819
9. Auto Door Open Indicator (depends on the model)
10. Filter Cleaning Function Indicator (depends on the model)
11. Function Indicator (depends on the model)
12. Delay Time / Program Time Indicator
13. Delayed Start Indicator
14. End of Program Indicator
15. Rinse Aid Indicator
16. Salt Indicator
17. Water Cut-off Indicator
18. Liquid Detergent Dosing Indicator (depends on the model)
19. Tablet Detergent Indicator (depends on the model)
On/Off Key
When you press the On/Off key, the indicator lights illuminate on the display for ON position. The lights turn off in OFF
position.
PROGRAM SELECTION / PROGRAM CANCEL KEY
Select the desired program using the “program selection keys” and press the button.
To cancel the running program, open the door of the machine and press and hold the Start/Pause/Cancel key for 3
seconds.
After the 3 - 2 - 1 countdown, 0:01 is displayed, close the door of the product and wait for the draining process complete.
Draining is completed in 2 minutes and the machine gives an audible warning when it is completed.
FUNCTION KEYS
If you press any of the Function keys during program selection or time delay selection, an affirmative key signal will be
heard provided that the relevant function is supported by the selected program. Function will be deemed selected when
the indicator of the selected function is lit.
To cancel the selected function, keep the function key pressed until the function indicator disappears.
PREPARING THE MACHINE
1. Open the door of the dishwasher.
2. Place the dishes in accordance with the instructions in the user manual.
3. Make sure that the upper and lower impellers rotate freely.
4. Put adequate amount of detergent into the detergent dispenser.
PROGRAM SELECTION
1. Press the On/Off button to turn on your machine.
2. Check the Salt and Rinse Aid indicators and add salt and/or rinse aid if needed.
3. Refer to the table of "Program data and average consumption values" to determine a washing program suitable for
your dishes.
4. Press flashing Start/Pause/Cancel key. Close the door. If the door is not closed immediately after pressing start, the
unit will not start. Push the Start button again and close the door immediately.

14 USA
8. Programme Selection Keys
9 10 11
15
12 13 14
16171819
9. Auto Door Open Indicator (depends on the model)
10. Filter Cleaning Function Indicator (depends on the model)
11. Function Indicator (depends on the model)
12. Delay Time / Program Time Indicator
13. Delayed Start Indicator
14. End of Program Indicator
15. Rinse Aid Indicator
16. Salt Indicator
17. Water Cut-off Indicator
18. Liquid Detergent Dosing Indicator (depends on the model)
19. Tablet Detergent Indicator (depends on the model)
1 2
7
8
3 4 5 6
1. On / Off Key
2. Menu Key
3. Time Delay Selection / Menu Direction Selection Keys
4. Selection / Confirmation Key
5. Display
6. Start / Pause / Cancel Key
7. Function Selection Keys
F1
F2
F3
F4
OPERATING THE PRODUCT
Half Load Function
3 SERIES
Express Function
Sanitize Function
High Gloss Function

15 USA
On/Off Key
When you press the On/Off key, the indicator lights illuminate on the display for ON position. The lights turn off in OFF
position.
PROGRAM SELECTION / PROGRAM CANCEL KEY
Select the desired program using the “program selection keys” and press the button.
To cancel the running program, open the door of the machine and press and hold the Start/Pause/Cancel key for 3
seconds.
After the 3 - 2 - 1 countdown, 0:01 is displayed, close the door of the product and wait for the draining process complete.
Draining is completed in 2 minutes and the machine gives an audible warning when it is completed.
FUNCTION KEYS
If you press any of the Function keys during program selection or time delay selection, an affirmative key signal will be
heard provided that the relevant function is supported by the selected program. Function will be deemed selected when
the indicator of the selected function is lit.
To cancel the selected function, keep the function key pressed until the function indicator disappears.
PREPARING THE MACHINE
1. Open the door of the dishwasher.
2. Place the dishes in accordance with the instructions in the user manual.
3. Make sure that the upper and lower impellers rotate freely.
4. Put adequate amount of detergent into the detergent dispenser.
PROGRAM SELECTION
1. Press the On/Off button to turn on your machine.
2. Check the Salt and Rinse Aid indicators and add salt and/or rinse aid if needed.
3. Refer to the table of "Program data and average consumption values" to determine a washing program suitable for
your dishes.
4. Press flashing Start/Pause/Cancel key. Close the door. If the door is not closed immediately after pressing start, the
unit will not start. Push the Start button again and close the door immediately.

16 USA
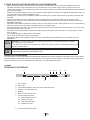
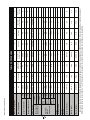
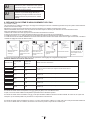
12345678
Auto Combi Clean Pots & Pans+ Regular Wash * GlassCare Hour Wash Quick Wash Rinse & Hold
(°C)
50-55 55 70 50-55 45 49 45 0
(°F)
142-157 131 158 122-131 113 120 113 0
(°C)
61-67 66 75 61-67 65 71 55 0
(°F)
122-131 151 167 142-157 149 160 131 0
Medium - High Medium High Medium /LJKW /LJKW - Medium /LJKW -
------+-
++++++- -
-+++-+- -
ml
25-40 40 40 25-40 25 25-40 15-25 -
tsp
5-88 85-855-83-5-
ml
15-40 40 40 25 15-25 25 15 -
tsp
3-8 8 8 5 3-5 5 3 -
ml
15-40 25-40 25-40 15-25 15 15-25 15 -
tsp
3-8 5-8 5-8 3-5 3 3-5 3 -
+++++- -+
+++++++-
++++++- -
+-++----
100-152 182 122 100-152 101 58 35 15
90-21 19220 114-23613610411642
28-555 52534 291-607 340 270 310 110
Wash Temperatures
Rinse Temperatures
Sanitize
Water (gallons)
Wash
Main wash
Dry
Duration (minutes)
Water (liters)
PROGRAM TABLE
The consumption values shown in the table were determined under standard conditions. For this reason, deviations are possible under practical conditions. * The
energy-usage label is based on this program.
15 ml
15-25 ml
+ 5 ml
Hard
water
Medium
water
Soft
water
Recommended
detergent
amount
Detergent in
dispenser
section
Program number
Program name
Degree of dirtiness
VDWU524WSSS / FDWU524WS

17 USA
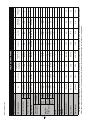
12345678
Auto Combi Clean Pots & Pans+ Regular Wash * GlassCare Hour Wash Quick Wash Rinse & Hold
(°C)
50-55 55 70 50-55 45 49 45 0
(°F)
142-157 131 158 122-131 113 120 113 0
(°C)
61-67 66 75 61-67 65 71 55 0
(°F)
122-131 151 167 142-157 149 160 131 0
Medium - High Medium High Medium /LJKW /LJKW - Medium /LJKW -
------+-
++++++- -
-+++-+- -
ml
25-40 40 40 25-40 25 25-40 15-25 -
tsp
5-88 85-855-83-5-
ml
15-40 40 40 25 15-25 25 15 -
tsp
3-8 8 8 5 3-5 5 3 -
ml
15-40 25-40 25-40 15-25 15 15-25 15 -
tsp
3-8 5-8 5-8 3-5 3 3-5 3 -
+++++- -+
+++++++-
++++++- -
+-++----
100-152 182 122 100-152 101 58 35 15
90-212
Wash Temperatures
Rinse Temperatures
Sanitize
Water (gallons)
Wash
Main wash
Dry
Duration (minutes)
Water (liters)
PROGRAM TABLE
The consumption values shown in the table were determined under standard conditions. For this reason, deviations are possible under practical conditions. * The
energy-usage label is based on this program.
15 ml
15-25 ml
+ 5 ml
Hard
water
Medium
water
Soft
water
Recommended
detergent
amount
Detergent in
dispenser
section
Program number
Program name
Degree of dirtiness
90-21 19220 13610411642
28-555 52534 291-607 340 270 310 110
FDWU524 / VDWU524SS

18 USA
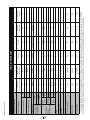
123456
Pots & Pans+ Regular Wash * &KLQD&U\VWDO Hour Wash Quick Wash Rinse & Hold
(°C)
70 50-55 48 47 45 0
(°F)
162 122-131 118 116,6 113 0
(°C)
72 61-67 65 71 55 0
(°F)
158 142-157 149 160 131 0
High Medium /LJKW /LJKW - Medium /LJKW -
----+-
++++- -
++-+- -
ml
40 25-40 25 25-40 15-25 -
tsp
85-855-83-5-
ml
40 25 15-25 25 15 -
tsp
853-553-
ml
25-40 15-25 15 15-25 15 -
tsp
5-83-533-53 -
+++- -+
+++++-
++++- -
++---0
122 100-135 65 58 35 15
20 88-21212 10411642
534 232-560 317 270 310 10
Wash Temperatures
Rinse Temperatures
Sanitize
Water (gallons)
Wash
Main wash
Dry
Duration (minutes)
Water (liters)
PROGRAM TABLE
The consumption values shown in the table were determined under standard conditions. For this reason, deviations are possible under practical conditions. *
The energy-usage label is based on this program.
15 ml
15-25 ml
+ 5 ml
Hard
water
Medium
water
Soft
water
Recommended
detergent
amount
Detergent in
dispenser
section
Program number
Program name
Degree of dirtiness
VDWU324SS / FDWU324

19 USA
6.4 AUXILIARY FUNCTIONS
Washing programs of your dishwasher are designed to
obtain the best cleaning effect, considering the type of the
soiling, soiling degree and properties of the dishes to be
washed.
Auxiliary functions allow you to save time, water and
power.
CAuxiliary functions may cause changes in
the program duration.
CAuxiliary functions are not suitable for all
washing programs. Indicator of the auxiliary
function that is not compatible with the
program will not be active.
IntenseWash Function
IntenseWash impeller located under the
lower impeller helps washing your
heavily soiled dishes places in the right
side of the lower basket. It will give
better results to place the most soiled
dish to the right front side.
CDo not try to remove the IntenseWash
impeller!
Express Function
It shortens the time of the washing cycle selected and
decreases water consumption by enabling washing under
higher pressure.
Sanitize Function
Sanitize function raises the water temperature in the
final rinse to meet the requirements of NSF/ANSI
STANDARD 184 for Residential Dishwashers. Certified
residential dishwashers are not intended for licensed food
establishments.
CAt the end of a succesfull
sanitization “ SAN“ is
displayed on the display.
“ SAN” is not displayed on
the display if the cycle is
interrupted or the water
could not be heated to the
required temperature.
CAvailable programs are
indicated on Program Table
chart.
High Gloss Function
It provides superior drying performance.
Half Load function
It is used to operate the machine without loading it
completely.
1. Load your dishes in the machine as you like. You can
use both upper and lower racks.
2. Turn the machine on with On/Off key.
3. Select the desired program and press the Half Load
key. The Half Load indicator will light on the display in
the Function Selected indicator.
4. Start the program by pressing Start / Pause / Cancel
key.
Interior Lighting
(Select Models)
Some models have interior lighting to illuminate the interior
when the door is opened.
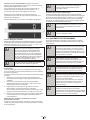
Changing the interior lighting setting
1. After switching on your machine, press the Menu key
for 1 second.
2. Press <- and +> to proceed to “L:” on the display.
Select the position you want with the Selection key.
Interior lighting is off in “L:0” position and on in “L:1”
position.
3. Press the Menu key to exit the settings menu. Your
setting will be saved automatically.
Changing Warning Sound Volume
1. After switching on your machine, press the Menu key
for 1 second.
2. Press <- and +> to proceed to “S:” on the display.
3. Each pressing on the Selection key will change the
warning sound volume as “S:0” off, “S:1” medium and
“S:2” high.
4. Press the Menu key to exit the settings menu. Your
setting will be saved automatically.
CFactory setting of your machine is "S:2".
Floor illumination
Illuminates to show program is still running.
(Select Models)
Your machine reflects a light to the floor during the washing
process. This light turns off after the washing process is
complete.
CFloor illumination cannot be cancelled by the
user.

20 USA
Functions Under the Settings Menu
(depends on the model)
Under the settings menu of your product, there are some
additional functions that depend on the model.
To access these functions, press and hold the Menu key
for 3 seconds. Use <- and +> to proceed to the desired
function or setting.
Use the selection key to change the desired function or
setting and press the Menu key to exit the Settings menu.
Detergent Tablet Function Off/On
Tablet detergent function
Allows to obtain a better drying performance from the multi-
purpose detergents called as all in one detergents such as
2in1, 3in1, 4in1, 5in1 and etc., depending on the hardness
level of the tap water.
CIf you have used the Tablet features during
the last washing programme you used, Tablet
function will remain active in the next washing
programme you will select. If you do not want
to use these functions in the new program you
have selected, press the Tablet Detergent key
until the indicator of the relevant function turns
off.
CTablet Detergent function may cause change
in the programme duration.
6.5 SCHEDULING THE WASHING TIME
Time Delay
If an economical electricity tariff is applied in your region,
you can use the Time Delay function to wash your dishes
during appropriate hours.
You can delay the start of the selected program until 24
hours.
1. Press the Time Delay function key after selecting the
washing program and other auxiliary functions.
2. Once you press the Time Delay key, Display
Information Line will show "0:30" and Time Delay
indicator will start flashing.
3. Set the desired time by pressing the Time Delay key.
Time will increase with increments of 30 minutes up
to 6 hours and after that in 1 hour increments up to 24
hours every time you press the key.
4. Close the door of your machine after setting the
Delayed Start. Once the delay time is over, the
selected program will start automatically.
Changing the settings while Time Delay function is
active
While the Time Delay function is activated, you cannot
make changes in the washing program, auxiliary functions
or the duration of delay time.
CProgram and auxiliary functions cannot be set/
changed after the program has started.
To cancel the Time Delay function
Open the door of the product Press and hold the Program
Selection / Program Cancel keys for 3 seconds. After the
3 - 2 - 1 countdown, 0:01 is displayed, close the door of
the product and wait for the draining process complete.
Draining is completed in 2 minutes and the machine gives
an audible warning when it is completed.
CYou can select and start a new program
following the cancellation of Time Delay
function.
CTime Delay function cannot be set after the
program starts.
6.6 STARTING THE PROGRAM
Press flashing Start/Pause/Cancel key. Close the door.
CSelect Models:
Your machine performs water softening
depending on the hardness level of the supply
water. Washing time can change while the
program is running depending on the ambient
temperature where your machine is installed,
temperature of the supply water and amount
of the dishes.
CPay attention not to open the door of the
machine when it is running. There may be
a rush of steam when you open the door of
your machine; be careful.
CThe machine will be switched off if no button
is pressed within 5 seconds after opening the
door while the machine is running.
CAfter the door has been opened, if any button
is pressed within 5 seconds and the door
is closed, the selected program resumes;
otherwise, the machine will be switched off.
Open the door after the machine has been
switched off, press On/Off button and close
the door within 5 seconds. The program will
resume washing.
CThe machine will remain silent in pause
mode for some time in order to remove the
water from the machine and on the dishes
completely and to have the water softener
cleaned, and then it will resume running in
drying mode.
La page charge ...
La page charge ...
La page charge ...
La page charge ...
La page charge ...
La page charge ...
La page charge ...
La page charge ...
La page charge ...
La page charge ...
La page charge ...
La page charge ...
La page charge ...
La page charge ...
La page charge ...
La page charge ...
La page charge ...
La page charge ...
La page charge ...
La page charge ...
La page charge ...
La page charge ...
La page charge ...
La page charge ...
La page charge ...
La page charge ...
La page charge ...
La page charge ...
La page charge ...
La page charge ...
La page charge ...
La page charge ...
La page charge ...
La page charge ...
La page charge ...
La page charge ...
La page charge ...
La page charge ...
La page charge ...
La page charge ...
La page charge ...
La page charge ...
La page charge ...
La page charge ...
La page charge ...
La page charge ...
La page charge ...
La page charge ...
La page charge ...
La page charge ...
La page charge ...
La page charge ...
La page charge ...
La page charge ...
La page charge ...
La page charge ...
La page charge ...
La page charge ...
La page charge ...
La page charge ...
La page charge ...
La page charge ...
La page charge ...
La page charge ...
La page charge ...
La page charge ...
La page charge ...
La page charge ...
La page charge ...
La page charge ...
La page charge ...
La page charge ...
La page charge ...
La page charge ...
La page charge ...
-
 1
1
-
 2
2
-
 3
3
-
 4
4
-
 5
5
-
 6
6
-
 7
7
-
 8
8
-
 9
9
-
 10
10
-
 11
11
-
 12
12
-
 13
13
-
 14
14
-
 15
15
-
 16
16
-
 17
17
-
 18
18
-
 19
19
-
 20
20
-
 21
21
-
 22
22
-
 23
23
-
 24
24
-
 25
25
-
 26
26
-
 27
27
-
 28
28
-
 29
29
-
 30
30
-
 31
31
-
 32
32
-
 33
33
-
 34
34
-
 35
35
-
 36
36
-
 37
37
-
 38
38
-
 39
39
-
 40
40
-
 41
41
-
 42
42
-
 43
43
-
 44
44
-
 45
45
-
 46
46
-
 47
47
-
 48
48
-
 49
49
-
 50
50
-
 51
51
-
 52
52
-
 53
53
-
 54
54
-
 55
55
-
 56
56
-
 57
57
-
 58
58
-
 59
59
-
 60
60
-
 61
61
-
 62
62
-
 63
63
-
 64
64
-
 65
65
-
 66
66
-
 67
67
-
 68
68
-
 69
69
-
 70
70
-
 71
71
-
 72
72
-
 73
73
-
 74
74
-
 75
75
-
 76
76
-
 77
77
-
 78
78
-
 79
79
-
 80
80
-
 81
81
-
 82
82
-
 83
83
-
 84
84
-
 85
85
-
 86
86
-
 87
87
-
 88
88
-
 89
89
-
 90
90
-
 91
91
-
 92
92
-
 93
93
-
 94
94
-
 95
95


Viking VDWU324SS Manuel utilisateur
- Catégorie
- Lave-vaisselle
- Taper
- Manuel utilisateur
dans d''autres langues
- English: Viking VDWU324SS User manual
- español: Viking VDWU324SS Manual de usuario