PROPOINT 9083577 Le manuel du propriétaire
- Catégorie
- Coupe-bordures
- Taper
- Le manuel du propriétaire

V1.0 9083577
Please read and understand all instructions before use. Retain this manual for future reference.
ELECTRIC DRAIN
CLEANER
POWER-FEED

9083577 Power-Feed Electric Drain Cleaner V1.0
2 For technical questions call 1-800-665-8685
SPECIFICATIONS
Voltage Rating 120V AC
Frequency Rating 60 Hz
Amperage 4.6A
Drum Capacity 1/2 in. x 50 ft
Drum Material Steel
Operating Speed 1,750 RPM
Drain Line Range 2 to 4 in.
Max. Run 50 ft
Power Cord Length 7 ft
Includes Boring bulb cutter, spade cutter, C-cutter
and arrow cutter
Certification CETL CUS 4004713
HAZARD DEFINITIONS
Please familiarize yourself with the hazard notices found in this manual.
A notice is an alert that there is a possibility of property damage, injury
or death if certain instructions are not followed.
DANGER! This notice indicates an immediate and specific hazard that
will result in severe personal injury or death if the proper
precautions are not taken.
WARNING! This notice indicates a specific hazard or unsafe practice
that could result in severe personal injury or death if the
proper precautions are not taken.
CAUTION! This notice indicates a potentially hazardous situation that
may result in minor or moderate injury if proper practices are
not taken.
NOTICE! This notice indicates that a specific hazard or unsafe
practice will result in equipment or property damage, but
not personal injury.

V1.0 Power-Feed Electric Drain Cleaner 9083577
Visit www.princessauto.com for more information 3
INTRODUCTION
This powerful and effective drain cleaner is ideal for clearing and
cleaning drains within a 2 to 4 in. range and to a maximum length of 50
ft. It features a 1/2 in. x 50 ft drum capacity, and a 4.6A motor with a
maximum operating speed of 1,750 RPM. It includes a convenient 7ft
power cord and 4 interchangeable cutting heads.
SAFETY
WARNING! Read and understand all instructions before using this
tool. The operator must follow basic precautions to reduce the risk of
personal injury and/or damage to the equipment.
Keep this manual for safety warnings, precautions, operating or
inspection and maintenance instructions.
WORK AREA
1. Operate in a safe work environment. Keep your work area clean,
well-lit and free of distractions. Place lights so you are not working
in a shadow.
2. Keep anyone not wearing the appropriate safety equipment away
from the work area.
3. Store tools properly in a safe and dry location. Keep tools out of
the reach of children.
4. Do not install or use in the presence of flammable gases, dust or
liquids.
5. Keep work area free from puddles, pools or standing water.
6. Place protective covers and barriers around work area as needed
to prevent damage or unnecessary mess.
7. Ensure there is enough space for proper operation. The drum
opening must be within 2 ft of the drain access. If enough room is
not available, use appropriate-sized pipes and fittings.
8. Only operate on a flat, level surface capable of supporting the tool.
PERSONAL SAFETY
WARNING! Wear personal protective equipment approved by the
Canadian Standards Association (CSA) or American National
Standards Institute (ANSI).

9083577 Power-Feed Electric Drain Cleaner V1.0
4 For technical questions call 1-800-665-8685
PERSONAL PROTECTIVE EQUIPMENT
1. Always wear impact safety goggles that provide front and side
protection for the eyes. Eye protection equipment should comply
with CSA Z94.3-07 or ANSI Z87.1 standards based on the type of
work performed.
2. Wear the appropriate type of full-face shield in addition to safety
googles
3. Wear gloves that provide protection based on the work materials or
to reduce the effects of tool vibration.
3.1 Do not wear gloves when operating a tool that can snag the
material and pull the hand into the tool.
3.2 Latex or rubber gloves are recommended to be worn under
work gloves to provide added protection.
4. Wear protective clothing designed for the work environment and tool.
5. Non-skid footwear is recommended to maintain footing and
balance in the work environment.
6. Wear the appropriate rated dust mask or respirator.
7. This tool can cause hearing damage. Wear hearing protection gear
with an appropriate Noise Reduction Rating to withstand the
decibel levels.
PERSONAL PRECAUTIONS
Control the tool, personal movement and the work environment to avoid
personal injury or damage to the tool.
1. Do not operate any tool when tired or under the influence of drugs,
alcohol or medications.
2. Avoid wearing clothes or jewelry that can become entangled with
the moving parts of a tool. Keep long hair covered or bound.
3. Do not overreach when operating the tool. Proper footing and
balance enables better control in unexpected situations.
4. Securely hold this tool using both hands. Using a tool with only one
hand can result in loss of control.
5. Individuals with pacemakers should consult their physician before
using this tool.
6. Wash hands after every operation.

V1.0 Power-Feed Electric Drain Cleaner 9083577
Visit www.princessauto.com for more information 5
SPECIFIC SAFETY PRECAUTIONS
WARNING! DO NOT let comfort or familiarity with product (gained
from repeated use) replace strict adherence to the tool safety rules. If
you use this tool unsafely or incorrectly, you can suffer serious
personal injury.
1. Use the correct tool for the job. This tool was designed for a
specific function. Do not modify or alter this tool or use it for an
unintended purpose.
2. Do not use the tool if any parts are damaged, broken or misplaced.
Repair or replace the parts.
3. Ensure the power supply matches the tool’s motor voltage (see
Specifications).
4. Always ensure the tool is turned off and disconnected from its
power source when not in use or when transporting.
5. Remove adjusting keys and wrenches before using the tool. The
tool may eject an attached wrench or a key and cause an injury to
you or a bystander.
6. Do not use any power tool with a malfunctioning power switch or
control. A power tool that fails to respond to the controls is
dangerous and can cause an injury. A qualified technician must
repair and verify the power tool is operating correctly, before it can
be used.
7. Never leave this tool unattended while it is running.
8. Do not allow the cutter to stop turning while the machine is
running. This may overstress the cable and cause damage.
9. During operation, ensure one gloved hand is controlling the cable
at all times to avoid damage.
10. Check the tightness and security of all bolts, nuts, screws and
components before each operation.
11. Do not operate if the belt guard has been removed.
12. During operation, one individual must be in charge of controlling
both the cable and the foot switch to prevent damage to the cable.
13. Reverse the motor only when pulling the cable out of a drain, pipe
or obstruction. Make sure the drum has stopped turning before
engaging.

9083577 Power-Feed Electric Drain Cleaner V1.0
6 For technical questions call 1-800-665-8685
14. Keep hands away from the drum when it is rotating and the
distributor tube.
15. Never force the tool. Excessive pressure could break the tool,
resulting in damage to your workpiece or serious personal injury.
Excessive pressure is the cause if your tool runs smoothly under
no load, but roughly under load.
16. Keep hands and fingers away from the work area. Any part of the
body contacting the tool’s working parts could result in an injury.
17. Check for damage to the cable before each operation.
18. Retract the cable fully after each use.
19. If operation includes potentially hazardous chemicals, contact the
manufacturer of said chemical to ensure proper safety precautions
are taken.
20. Only transport this tool if the handle is locked into the upright
position.
21. Never point the tool towards yourself.
22. Never touch the tool accessory or workpiece during or immediately
after use. They may be hot and could inflict a burn injury.
23. Take work breaks to prevent the tool's motor from overheating
and/or overloading.
24. Never use a tool with a cracked or worn tool accessory. Change
the tool accessory before using.
ELECTRICAL SAFETY
WARNING! Do not touch or handle a live tool with any part of your
body that is wet or damp. Wet skin reduces resistance to electrical
current, increasing the danger of a serious or fatal shock.
WARNING! To reduce risk of electric shock, be certain that the plug
is connected to a properly grounded receptacle.
WARNING! All wiring should be performed by a qualified electrician.
1. Disconnect the tool from the power supply before making any
adjustments, changing accessories, cleaning, servicing or when
storing. Such preventive safety measures reduce the risk of starting
the tool accidentally.

V1.0 Power-Feed Electric Drain Cleaner 9083577
Visit www.princessauto.com for more information 7
2. Protect yourself against electric shocks when working on electrical
equipment. Avoid body contact with grounded surfaces. There is
an increased chance of electrical shock if your body is grounded.
3. Do not expose the tool to rain, snow, frost or any other damp or
wet conditions. Water entering a tool will increase the risk of
electric shock.
4. Do not disconnect the power cord in place of using the power
switch. This will prevent an accidental start-up when the power cord
is plugged into the power supply.
4.1 In the event of a power failure, turn off the machine as soon as
the power is interrupted. The possibility of accidental injury
could occur if the power returns and the unit is not switched
off.
POWER CORD
WARNING! Always Check with a qualified electrician if you are in
doubt as to whether an outlet is grounded.
1. Insert the power cord plug directly to the power supply whenever
possible. Use extension cords or surge protectors only when the
tool's power cord cannot reach a power supply from the work area.
1.1 Use only with a grounded outlet.
2. Do not operate this tool if the power cord is frayed, damaged or
poorly spliced, as an electric shock may occur, resulting in
personal injury or property damage.
2.1 Inspect the tool's power cord for cracks, fraying or other faults
in the insulation or plug before each use.
2.2 Discontinue use if a power cord feels more than comfortably
warm while operating the tool.
3. Keep all connections dry and off the ground to reduce the risk of
electric shock. Do not touch the plug with wet hands.
4. Prevent damage to the power cord by observing the following:
4.1 Do not pull on the cord to disconnect the plug from an outlet.
4.2 Keep the cord away from heat, oil, sharp edges or moving
parts.

9083577 Power-Feed Electric Drain Cleaner V1.0
8 For technical questions call 1-800-665-8685
4.3 Never use the cord to carry the tool.
4.4 Place the electrical cord in a position that prevents it from
coming into contact with the tool and getting caught by the
workpiece. The cord should always stay behind the tool.
5. Do not allow people, mobile equipment or vehicles to pass over
unprotected power cords.
6. When operating a tool outside, use an outdoor extension cord
marked W-A or W. These cords are rated for outdoor use and
reduce the risk of electric shock.
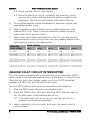
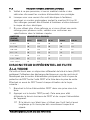
7. When using more than one extension cord, or if you are using a
single extension cord for more than one tool, please adhere to the
specifications found in the table below.
AMPERES
(FULL LOAD)
CORD LENGTH
25 FT
50 FT
75 FT
100 FT
150 FT
0–2.0 18 18 18 18 16
2.1–3.4 18 18 18 16 14
3.5–5.0 18 18 16 14 12
5.1–7.0 18 16 14 12 12
7.1–12.0 18 14 12 10 -
12.1–16.0 14 12 10 - -
16.1–20.0 12 10 - - -
GRAUND FAULT CIRCUIT INTERRUPTER
This tool comes equipped with a ground fault circuit interrupter (GFCI),
which protects the operator against shock in the event of a short circuit.
Note that the tool’s main power supply cord is not GFCI protected
between the GFCI unit and the plug in the outlet.
Test the GFCI before each use by accomplishing the following:
1. Plug the GFCI power plug into a grounded outlet.
2. Press the TEST button. This will cause the GFCI indicator light to
turn off and power to the machine will be cut.
2.1 If the light does not turn off, do not use the tool until it is
properly inspected and repaired.
3. Upon completion of a successful test, push the reset button to
restore power

V1.0 Power-Feed Electric Drain Cleaner 9083577
Visit www.princessauto.com for more information 9
3.1 If power is not restored to the tool, do not use until it is
properly inspected and repaired.
3.2 If you receive a mild shock from the tool, do not use until it is
properly inspected and repaired.
UNPACKING
WARNING! Do not operate the tool if any part is missing. Replace the
missing part before operating. Failure to do so could result in a
malfunction and personal injury.
Remove the parts and accessories from the packaging and inspect for
damage. Make sure that all items in the contents are included.
Contents:
• Drain cleaner
• Cutting tools (4)
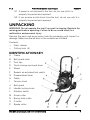
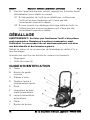
IDENTIFICATION KEY
A Frame
B Belt guard knob
C Tool tray
D Quick-change enclosed drum
E Wheel
F Sealed, air-activated foot switch
G Powered-feed lever
H Cable
I Tension knob
J Belt guard
K Handle locking knob
L Rotation switch
M Arrow cutter
N Boring bulb cutter
O C-cutter
P Spade cutter

9083577 Power-Feed Electric Drain Cleaner V1.0
10 For technical questions call 1-800-665-8685
ASSEMBLY & INSTALLATION
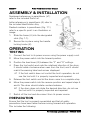
Numbered references in parenthesis (#1)
refer to the included Parts List.
Letter references in parenthesis (A) refer to
the included Identification Key.
Dashed numbers in parenthesis (Fig. 1-1)
refer to a specific point in an illustration or
image.
1. Slide the frame (A) into the designated
slots (Fig. 1-1).
2. Secure the in place using the handle
locking knobs (K).
OPERATION
TESTING
1. Connect the tool to its power source using the power supply cord.
2. Move the power switch into the forward position.
3. Position the feed lever (G) between the “F” and “R” settings.
4. Press the foot switch and note the rotational direction of the drum.
It should rotate clockwise when seen from the front, and it should
match the warning label and arrows displayed.
4.1 If the foot switch does not control the tool’s operation, do not
use the tool until it is properly inspected and repaired.
5. Release the foot switch and let the drum come to a complete stop.
6. Move the power switch into the reverse position and repeat steps 4
and 5. The drum should rotate counterclockwise.
6.1 If the drum does not rotate the desired direction, do not use
the tool until it is properly inspected and repaired.
7. Switch off the tool and disconnect from its power source.
PREPARATION
Ensure that the tool is properly assembled and that all safety
precautions have been taken before moving forward with operation.
This includes the following:
Fig. 1

V1.0 Power-Feed Electric Drain Cleaner 9083577
Visit www.princessauto.com for more information 11
• Checking the power supply cord, GFCI and tool thoroughly for
damage or wear, including sharpness of the cutting tools.
• Cleaning any debris, oil, dirt or grease from the tool handles and
controls.
• Verifying that the foot switch (F) is properly attached.
• Using your hands to rotate the drum (D), ensuring smooth and
proper function.
• Checking the cable (H) for any wear or damage or flattening.
• Inspecting the work area.
CLEANING THE DRAIN
1. Use the wheels (E) to position the tool appropriately.
1.1 The drum opening must be within 2 ft of the drain access. If
enough room is not available, use appropriate-sized pipes and
fittings.
1.2 Do not allow any kinks in the cable greater than 15°.
2. Inspect the area that is to be serviced.
2.1 If necessary, remove the fixture around the drain. Do not feed the
cable through a fixture before or during operation.
2.2 Choose the correct cable size for the job using the chart below.
CABLE SIZE PIPE SIZE TYPICAL APPLICATIONS
1/2 in. (included) 2 to 4 in. Roof stacks and small floor drains
(no roots)
3/8 in. 1-1/2 to 3 in. Roof stacks, laundry lines and
small drains (no roots)
3. Select the proper cutting tool using the chart below.
3.1 Different tools will have different ideal applications.
CUTTING TOOL APPLICATION
Arrow cutter (M)
Starting tool: ideal for cutting and scraping
Boring bulb cutter (N) Starting tool: ideal for removing loose objects
C-cutter (O) Finishing tool: ideal for grease stoppages and
cleaning walls of pipe
Spade cutter (P) Finishing tool: ideal for scraping the inside
edges of pipes.

9083577 Power-Feed Electric Drain Cleaner V1.0
12 For technical questions call 1-800-665-8685
4. Release all tension from the tension knob (I).
5. Grab the cable with both hands and push into the drain at least 1 ft
deep.
6. Re-tighten tension knob.
7. Ensure that the power switch is in the forward position.
8. Press the foot switch to begin feeding the cable farther into the drain.
8.1 Keep one handle on the cable at all times and ensure the
power switch and power feed lever are within reach.
9. Once the drain is clear, turn on the faucets or use a hose to flush
any debris out.
9.1 Pay attention to the water level as there could be blockages
further down the line.
10. Retrieve the cable by placing the power feed lever in the reverse
position. Make sure the power switch is still in the forward position.
10.1 Keep one hand on the cable while retrieving to prevent the
cable from catching.
11. Continue retrieving until cable until tool is just inside the drain
opening and then release the foot switch.
11.1 Do not pull the cable from the drain while it is still rotating.
12. Turn the power switch off and disconnect the tool from its power
source.
13. Release feed knob tension and feed the remaining cable by hand
into the tool.
14. If results are as desired, store tool. If necessary, change cutting
attachments and repeat operation.
LODGED CABLE
If during operation the cable becomes lodged in a narrow part of the
drain or in a drain trap, accomplish the following:
1. Place the power feed lever in the neutral position and allow the
cable to work itself past the obstruction.
2. If cable remains lodged, release the foot switch and use sharp
downward thrusts to free the cable.
3. Once the cable is free, place the power feed lever in the forward
position, press the foot switch and continue feeding.

V1.0 Power-Feed Electric Drain Cleaner 9083577
Visit www.princessauto.com for more information 13
BLOCKAGES
If during operation the cutting tool becomes lodged in a blockage,
accomplish the following:
1. Release the foot switch to prevent the cable from winding, twisting
or building up outside the drain.
2. Place the power feed lever in the reverse position to pull the cable
back and free the cutting tool from the blockage.
3. If the cable and cutting tool cannot be retrieved, release the foot
switch.
4. Allow the cable to stop spinning then grab the cable with both
hands and pull the cable free.
5. Once the cable and cutting tool are free, attach the boring bulb
cutter.
6. Press the foot switch and feed the cable and cutting tool slowly
towards the blockage.
7. Use the cutting tool to gently encounter the blockage and then
retrieve.
8. Examine the retrieved piece of blockage.
8.1 If blockage appears soft, attempt to use the smallest cutting
tool available to first pierce the blockage and allow water to
flow.
9. Use the appropriate cutting tool to clear the remaining blockage.
9.1 Do not force the cutting tool through the blockage as it may
become lodged again. Allow it to chew away gradually at the
blockage.
CARE & MAINTENANCE
1. Maintain the tool with care. A tool in good condition is efficient,
easier to control and will have fewer problems.
2. Inspect the tool fittings, alignment, hoses and power supply cord
periodically. Have damaged or worn components repaired or replaced
by an authorized technician. Only use identical replacement parts
when servicing.
3. Only use accessories intended for use with this tool.

9083577 Power-Feed Electric Drain Cleaner V1.0
14 For technical questions call 1-800-665-8685
4. Keep the tool clean, dry and free from oil/grease at all times.
5. Always ensure the tool is turned off and disconnected from its
power source before performing any inspections or maintenance.
6. Regularly inspect cutting tools to ensure their sharpness.
7. Inspect the switches and handles to ensure they move smoothly
and properly and that the bumpers at the bottom of the handle are
present and firmly attached.
8. Ensure the belt guard is in good working condition and fastened
securely.
9. Maintain the tool’s labels and name plates. These carry important
information. If unreadable or missing, contact Princess Auto Ltd. for
replacements.
WARNING! Only qualified service personnel should repair the tool. An
improperly repaired tool may present a hazard to the user and/or
others.
REMOVING AND INSTALLING BELT
1. Loosen the belt guard knob (B) and slide the belt guard (J) off
from the top of the tool’s motor (#30).
2. Use a screwdriver to slide the old belt (#35) off the back of the
drum.
3. Slide the new belt into the belt pulley (#33) above the drum.
4. Slide the new belt onto the rear of the drum until securely in place.
5. Replace the belt guard and tighten the belt guard knob (B) to lock
into place.
INSTALLING REPLACEMENT CABLE
1. Remove the old cable (#5) by pulling the cable completely out of
the tool.
2. Separate the old cable from the drum-connecting cable (#6).
3. Connect the new cable to the drum-connecting cable.
4. Feed new cable back into the tool.

V1.0 Power-Feed Electric Drain Cleaner 9083577
Visit www.princessauto.com for more information 15
CLEANING
WARNING! Do not allow water to enter the tool and motor while
cleaning.
Clean the tool using hot, soapy water and/or disinfectants. Clean
regularly and always before storing for extended periods of time.
CLEANING THE CABLE
1. Thoroughly flush the cables with water after each use to prevent
build up of any sediment or chemicals.
2. Once fully flushed, carefully tip the tool forward to empty out any
remaining debris.
3. Once the cable is clean and dry, pull completely from the drum.
4. Lubricate with oily rages as you feed back into the drum.
LUBRICATION
Inspect and lubricate the tool when required. Only use light oil to
lubricate the tool. Other lubricants may not be suitable and could
damage the tool or cause a malfunction during use.
When not in use for an extended period, apply a thin coat of lubricant to
the steel parts to avoid rust. Remove the lubricant before using the tool
again.
NOTICE! NEVER use a penetrating oil to lubricate the tool.
Penetrating oil may act as a solvent that will break down the grease
and cause the tool to seize up.
DISPOSAL
Recycle a tool damaged beyond repair at the appropriate facility.
Contact your local municipality for a list of disposal facilities or by-laws for
electronic devices, batteries, oil or other toxic liquids.
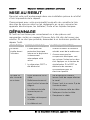
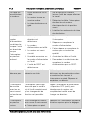
TROUBLESHOOTING
Visit a Princess Auto Ltd. location for a solution if the tool does not
function properly or parts are missing. If unable to do so, have a
qualified technician service the tool.

9083577 Power-Feed Electric Drain Cleaner V1.0
16 For technical questions call 1-800-665-8685
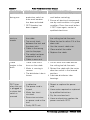
PROBLEM(S) POSSIBLE CAUSE(S) SUGGESTED SOLUTION(S)
Motor shuts of
during use
1. Internal thermal
protection switch or
auto reset breaker
has been activated.
2. GFCI breaker has
been tripped.
1. Turn the motor off and allow it to
cool before restarting.
2. Ensure all electrical components
are dry and insulation is in good
condition. Press the reset button.
If GFCI trips again, contact a
qualified electrician.
Cable kinks
twists or
breaks
1. Too much force on
the cable.
2. Too much slack
between the tool and
the drain inlet.
3. Cable is the wrong
size for the pipe.
4. The cable has been
exposed to acid.
5. Cable is worn out.
1. Do not force the cable and let
the cutting tool do the work.
2. Move the tool to within 2 ft of the
drain inlet.
3. Use the correct cable size.
4. Clean and oil the cable.
5. Replace the cable.
Cable
tangles in the
drum
1. There’s too much
force on the cable.
2. Motor is running in
reverse
3. The distributor tube is
frozen.
1. Do not force the cable and let
the cutting tool do the work.
2. Retract the cable with the motor
direction switch in the forward
position.
3. Lubricate distributor tube
bearings.
Power cord
GFCI trips
when the unit
is plugged in
or when foot
switch is
pressed
1.
Motor direction switch
is defective.
2. The power cord is
frayed.
3. Motor has short
circuited.
4. Excessive moisture
on power cord or the
tool.
5. Faulty GFCI unit.
1. Repair or replace the switch.
2. Repair or replace the power
cord
3. Have motor repaired or replaced
by qualified technician.
4. Dry the cord and unit.
5. Have an electrician replace the
power cord with GFCI.

V1.0 Power-Feed Electric Drain Cleaner 9083577
Visit www.princessauto.com for more information 17
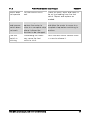
Motor does
not operate
The foot switch has a
leak.
Check for leaks, tears and holes in
the air line leading from the foot
switch. Repair and replace as
needed.
The forward
and reverse
switch does
not work
The centrifugal switch
requires the motor to
come to a complete stop
before it allows the
direction to be changed.
Move the switch to the off position
and allow the motor to come to a
complete stop before switching its
position.
The foot
switch is
sticking
Overloading the motor
may cause the foot
switch to stick.
Press the foot switch several times
in a row to release it.

9083577 Power-Feed Electric Drain Cleaner V1.0
18 For technical questions call 1-800-665-8685
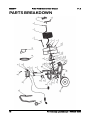
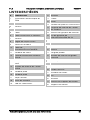
PARTS BREAKDOWN

V1.0 Power-Feed Electric Drain Cleaner 9083577
Visit www.princessauto.com for more information 19
PARTS LIST
# DESCRIPTION
1
Power cable feed
2 Front post
3
Bolts
4 Bolts
5
Cable
6 Drum-connecting cable
7
Bolts
8 Front hub bushing
9
Drum shell
10 Connecting cable/nut/washer
11
Fibre washer
12 Distributor tube/inner drum
13
Front shaft retaining ring
14 Rear shaft retaining ring
15
Flat washer
16 Flat washer
17
Rear hub
18 Drum shaft
19
Rubber foot
20 Bolts
21 Frame
22
Wheel
23 Rubber leg tip
24
Drum shaft retaining pin
25 Retaining pin spring
26
Retaining pin screw/screw set
27 Bolts
28
Tool holder
29 Bolts
30
Motor
31 Folding handle
32
Belt guard retaining knob
33 V-belt pulley
34
Bolts
35 V-belt A1118
36
Belt guard
37 Fibre washer
39
Screw
40 Bolts
41
Motor support spring
42 Motor support

V1,0 9083577
Vous devez lire et comprendre toutes les instructions avant d'utiliser l'appareil. Conservez ce
manuel afin de pouvoir le consulter plus tard.
DÉGORGEOIR
ÉLECTRIQUE
ALIMENTÉ À L’ÉCTRICITÉ
La page est en cours de chargement...
La page est en cours de chargement...
La page est en cours de chargement...
La page est en cours de chargement...
La page est en cours de chargement...
La page est en cours de chargement...
La page est en cours de chargement...
La page est en cours de chargement...
La page est en cours de chargement...
La page est en cours de chargement...
La page est en cours de chargement...
La page est en cours de chargement...
La page est en cours de chargement...
La page est en cours de chargement...
La page est en cours de chargement...
La page est en cours de chargement...
La page est en cours de chargement...
La page est en cours de chargement...
La page est en cours de chargement...
La page est en cours de chargement...
-
 1
1
-
 2
2
-
 3
3
-
 4
4
-
 5
5
-
 6
6
-
 7
7
-
 8
8
-
 9
9
-
 10
10
-
 11
11
-
 12
12
-
 13
13
-
 14
14
-
 15
15
-
 16
16
-
 17
17
-
 18
18
-
 19
19
-
 20
20
-
 21
21
-
 22
22
-
 23
23
-
 24
24
-
 25
25
-
 26
26
-
 27
27
-
 28
28
-
 29
29
-
 30
30
-
 31
31
-
 32
32
-
 33
33
-
 34
34
-
 35
35
-
 36
36
-
 37
37
-
 38
38
-
 39
39
-
 40
40


PROPOINT 9083577 Le manuel du propriétaire
- Catégorie
- Coupe-bordures
- Taper
- Le manuel du propriétaire
dans d''autres langues
- English: PROPOINT 9083577 Owner's manual
Documents connexes
Autres documents
-
Power Fist 8843658 Le manuel du propriétaire
-
-
Powerfist 9073925 Le manuel du propriétaire
-
-
-
-
-
 PRO POINT PRO-POINT 9113911 Laminate Floor Cutter Manuel utilisateur
