
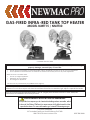
GAS-FIRED INFRA-RED TANK TOP HEATER
MODEL NMTT15 / NMTT30
853178B-1802H
PRO
NEWMAC
U.S. Stove Company
227 Industrial Park Road, South Pittsburg, TN 37380
1-800-750-2723 www.usstove.com
• Do not store or use gasoline or other ammable vapors and liquids in vicinity of this or any other appliance.
• An LP cylinder not connected for use shall not be stored in the vicinity of this or any other appliance.
WHAT TO DO IF YOU SMELL GAS:
• Do not try to light appliance.
• Extinguish any open ame.
• Shut off gas to appliance.
Service must be performed by a qualied service agency.
WARNING: If the information in this manual is not followed exactly, a re or explosion may result causing
property damage, personal injury or loss of life.
READ INSTRUCTIONS CAREFULLY: Read and follow all instructions. Place instructions in a safe place for future
reference. Do not allow anyone who has not read these instructions to assemble, light, adjust or operate the heater.
This is an unvented gas-red portable heater. It uses air (oxygen) from the area in which it is used. Adequate
combustion and ventilation air must be provided.
CYLINDER NOT INCLUDED
CALIFORNIA PROPOSITION 65 WARNING:
This product can expose you to chemicals including carbon monoxide, which
is know to the State of California to cause cancer, birth defects and/or other
reproductive harm. For more information, go to www.P65warnings.ca.gov
Ce produit peut vous exposer à des produits chimiques, y compris le
monoxyde de carbone, qui est connu dans l'État de Californie pour causer
le cancer, des malformations congénitales et / ou d'autres problèmes de
reproduction. Pour plus d'informations, visitez www.P65warnings.ca.gov

2
WARNING: YOUR SAFETY IS IMPORTANT TO YOU AND
TO OTHERS, SO PLEASE READ THESE INSTRUCTIONS
BEFORE YOU OPERATE THIS HEATER.
WARNING: NOT FOR HOME OR RECREATIONAL
VEHICLE USE.
The heater is designed and approved for us as, a construction heater and in accordance with ANSI Z83.7-CSA
2.14. Check with your local re safety authority if you have any questions about applications.
Other standards govern the use of fuel gases and heat-producing products and specic applications. Your
local authority can advise you about these standards.
WARNING
THE STATE OF CALIFORNIA REQUIRES THE
COMBUSTION BY-PRODUCTS PRODUCED WHEN
USING THIS PRODUCT CONTAIN CARBON
MONOXIDE, A CHEMICAL KNOWN TO THE STATE
OF CALIFORNIA TO CAUSE CANCER AND BIRTH
DEFECTS (OR OTHER REPRODUCTIVE HARM). THIS
PRODUCT CONTAINS CHEMICALS KNOWN TO THE
STATE OF CALIFORNIA TO CAUSE CANCER AND
BIRTH DEFECTS OR OTHER REPRODUCTIVE HARM.
WARNING
CARBON MONOXIDE CAN KILL YOU
USING A PORTABLE GAS CAMPING HEATER INSIDE A TENT,
RV, CAMPER, VEHICLE, SHELTER OR OTHER ENCLOSED
AREAS CAN PRODUCE DEADLY CARBON MONOXIDE
WARNING: FIRE, BURN, INHALATION, AND EXPLOSION
HAZARD. KEEP SOLID COMBUSTIBLES, SUCH AS
BUILDING MATERIALS, PAPER OR CARDBOARD,
A SAFE DISTANCE AWAY FROM THE HEATER AS
RECOMMENDED BY THE INSTRUCTIONS NEVER
USE THE HEATER IN SPACES WHICH DO OR MAY
CONTAIN VOLATILE OR AIRBORNE COMBUSTIBLES,
OR PRODUCTS SUCH AS GASOLINE, SOLVENTS, PAINT
THINNER, DUST PARTICLES OR UNKNOWN CHEMICALS.
GENERAL HAZARD WARNING:
• FAILURE TO COMPLY WITH THE PRECAUTIONS AND
INSTRUCTIONS PROVIDED WITH THIS HEATER, CAN
RESULT IN DEATH, SERIOUS BODILY INJURY AND
PROPERTY LOSS OR DAMAGE FROM HAZARDS OF
FIRE, EXPLOSION, BURN, ASPHYXIATION, CARBON
MONOXIDE POISONING, AND/OR ELECTRICAL
SHOCK.
• ONLY PERSONS WHO CAN UNDERSTAND AND
FOLLOW THE INSTRUCTIONS SHOULD USE OR
SERVICE THIS HEATER.
• IF YOU NEED ASSISTANCE OR HEATER INFORMATION
SUCH AS AN INSTRUCTIONS MANUAL, LABELS,
ETC. CONTACT THE MANUFACTURER.

3
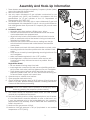
1. These heaters are packaged completely. Propane cylinders (tanks)
are not included with these heaters.
2. Remove heater from carton.
3. Use only vapor withdrawal LP gas cylinders constructed for use
with propane only (HD-5) and marked in accordance with the
specications for LP gas cylinders of the U.S. Department of
Transportation (DOT SPEC. 39).
4. This heater must be used only with a vapor withdrawal LP gas bulk
tank equipped with a standard POL valve – do not use this heater on
bulk tanks greater than 20 pounds LPG capacity (50 pounds water
capacity).
5. Dual Burner Model
• Assembly of this item requires a Phillps screw - driver.
• The tank collar bracket must be assembled before the heater
can be attached to the propane tank.
• Align bolt holes in tank collar bracket with bolt holes in center
plate on manifold such that the heater is facing outward once
attached to cylinder collar.
• Attached with screws removed above, making sure that tip
switch bracket is between tank collar bracket and manifold
center plate.
• Place heater onto tank with tank collar bracket over tank collar.
Mounting bolt knob should be positioned to the outside of tank
collar.
• Firmly secure to tank by hand-tightening mounting bolt knob. Do
not overtighten.
• Make sure heater regulator is in the “OFF” position.
• Insert regulator’s connector into tank’s valve and turn left
(counter clock-wise) with hand as much as possible. Do not
overtighten.
Single Burner Model
• Be sure heater is facing away from tank.
• Insert regulator connector into tank valve outlet tting and turn
left (counter clock-wise) until fully tightened. Do not overtighten.
• Place heater support around venturi and slide clip ends onto
propane cylinder collar. Use 1/4”-20 x 35mm screw and wing nut
to secure heater support onto venturi tube.
6. Operate only on a stable, level surface.
7. Open propane tank valve slowly.
8. Check all ttings for leaks. Apply a 50/50 mixture of liquid soap and
water to all joints. Bubbles forming indicate a leaking connection.
Correct all leaks before proceeding.
9. The heater should be inspected before each use and at least
annually by a qualied service person.
10. The hose assembly shall be visually inspected prior to use of heater.
If it is evident there is excessive abrasion or wear, or the hose is cut,
it must be replaced prior to the heater being put into operation.
Replacement hose assembly shall be REDSTONE hose assembly as
listed in the parts list.
11. Minimum inlet gas pressure is 20 psi.
12. Maximum inlet gas pressure is 120 psi (equivalent to an ambient
temperature of 75°F (24°C)).
WARNING: Never touch heater while in operation to avoid injury. Move
heater by grasping the propane cylinder carefully.
Assembly And Hook-Up Information

4
ODOR FADE WARNING
FUEL GAS ODOR
LP gas and natural gas have man-made odorants added specically for detection of fuel gas leaks. If a gas leak
occurs you should be able to smell the fuel gas. Since Propane (LP) is heavier than air you should smell for the gas
odor low to the oor. ANY GAS ODOR IS YOUR SIGNAL TO GO INTO IMMEDIATE ACTION!
• Do not take any action that could ignite the fuel gas. Do not operate any electrical switches. Do not pull
any power supply or extension cords. Do not light matches or any other source of ame. Do not use your
telephone.
• Get everyone out of the building and away from the area immediately.
• Close all propane (LP) gas tank or cylinder fuel supply valves, or the main fuel supply valve located at the
meter if you use natural gas.
• Propane (LP) gas is heavier than air and may settle in low areas. When you have reason to suspect a propane
leak, keep out of all low areas.
• Use your neighbor’s phone and call your fuel gas supplier and your re department. Do not re-enter the
building or area.
• Stay out of the building and away from the area until declared safe by the reghters and your fuel gas
supplier.
• FINALLY, let the fuel gas service person and the reghters check for escaped gas. Have them air out the
building and area before you return. Properly trained service people must repair any leaks, check for further
leakages, and then relight the appliance for you.
ODOR FADING - NO ODOR DETECTED
• Some people cannot smell well. Some people cannot smell the odor of the man-made chemical added to
propane (LP) or natural gas. You must determine if you can smell the odorant in these fuel gases.
• Learn to recognize the odor of propane (LP) gas and natural gas. Local propane (LP) gas dealers will be more
than happy to give you a scratch and sniff pamphlet. Use it to become familiar with the fuel gas odor.
• Smoking can decrease your ability to smell. Being around an odor for a period of time can affect your
sensitivity to that particular odor. Odors present in animal connement buildings can mask fuel gas odor.
• The odorant in propane (LP) gas and natural gas is colorless and the intensity of its odor can fade under some
circumstances.
• If there is an underground leak, the movement of gas through the soil can lter the odorant.
• Propane (LP) gas odor may differ in intensity at different levels. Since Propane (LP) gas is heavier than air, there
may be more odor at lower levels.
• Always be sensitive to the slightest gas odor. If you continue to detect any gas odor, no matter how small, treat
it as a serious leak. Immediately go into action as discussed previously.
ATTENTION - CRITICAL POINTS TO REMEMBER
• Propane (LP) gas has a distinctive odor. Learn to recognize these odors. (Reference Fuel Gas Odor and Odor
Fading sections to the left and above).
• Even if you are not property trained in the service and repair of the heater, ALWAYS be consciously aware of
the odors of propane (LP) gas and natural gas.
• If you have not been properly trained in repair and service of propane (LP) gas then do not attempt to light
heater, perform service or repairs, or make any adjustments to the heater on the propane (LP) gas fuel system.
• A periodic sniff test around the heater or at the heater’s joints; i.e. hose, connections, etc., is a good safety
practice under any conditions. If you smell even a small amount of gas, CONTACT YOUR FUEL GAS SUPPLIER
IMMEDIATELY. DO NOT WAIT!
WARNING
Asphyxiation Hazard
• Do not use this heater for heating human living quarters.
• Do not use in unventilated areas.
• The ow of combustion and ventilation air must not be obstructed.
• Proper ventilation air must be provided to support the combustion air requirements of the heater being
used.
• Refer to the specication section of the heater’s manual, heater dataplate, or contact the factory to
determine combustion air ventilation requirements of the heater.
• Lack of proper ventilation air will lead to improper combustion.
• Improper combustion can lead to carbon monoxide poisoning leading to serious injury or death. Symptom
of carbon monoxide poisoning can include headaches, dizziness and difculty in breathing.

5
FOR SAFE OPERATION
A. READ INSTRUCTIONS CAREFULLY: Read and adhere to these instructions. Do not allow anyone who has not
read the instructions to assemble, light, adjust or operate the heater.
B. Use only in accordance with local codes or, in the absence of local codes, with the standard for the Storage
and handling of Liqueed Petroleum Gases ANSI/NFPA 58 and CSA B 149.1, Natural Gas and Propane
Installation Code.
C. PROPANE IS VERY FLAMMABLE: In the event of a leak, propane will accumulate and the possibility of a re
is present. Propane gas is scented and its strong odor is readily detectable. Never strike a match or bring
any ame or create an electric spark in an enclosure when you smell propane gas. Ventilate the area
thoroughly, move the heater outside, nd and correct the source of the leak before attempting to light any
appliance. If you are unsure of these instructions evacuate immediately and call for help.
D. GAS LEAKAGE: If the leak cannot be corrected do not tamper with the heater, follow the shut down
instructions and return the heater to the dealer or address given on last page.
E. LEAK DETECTION: Before each use of the heater check all ttings and connections with a soap solution to be
sure there are no leaks. NEVER USE ANY FLAME FOR LEAK TEST.
F. CONNECTING HEATER TO PROPANE CYLINDER: Always connect the heater to the bulk cylinder in the outdoors
or in a well ventilated area. NEVER connect this heater to a cylinder near an open ame.
G. USE OF HEATER: Always operate the heater with the propane cylinder in an upright position on a level
noncombustible surface. NEVER place the cylinder on its side when operating the heater.
H. ATTEND HEATER: Do not leave heater unattended while it is in operation.
I. ALWAYS LIGHT HEATER WITH MATCH OR “SPARKLITE” IGNITER: NEVER attempt to light the heater with a spark
lighter.
J. DO NOT TAMPER: Should the heater not perform properly, such as little or no heat when operating in the “Hi”
position, or for any other reason, DO NOT ATTEMPT TO REPAIR OR TAMPER with the heater. Any tampering
could make the use of the heater unsafe and dangerous. Return the heater to the dealer or the address
given on last page for repair or replacement.
K. FOR STORAGE: The heater Hi-Med-Lo-Off regulating valve should always be turned to “off” when the heater
is not in use. Allow at least 15 minutes for cooling before handling and storing. Detach propane cylinder from
heater before storing. DO NOT store propane cylinders indoors or near open ame or heat.
L. DO NOT TRANSPORT OR MOVE APPLIANCE WHILE IN OPERATION. FOLLOW SHUTDOWN AND STORAGE
INSTRUCTIONS TO TRANSPORT OR MOVE THIS APPLIANCE.
WARNING: KEEP THE HEATER OUT OF THE REACH OF CHILDREN
WARNING: DO NOT USE THIS HEATER ON BULK TANKS OF GREATER CAPACITY THAN 20 POUNDS LPG (50
POUNDS WATER CAPACITY).
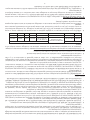
GENERAL INFORMATION
A. These units are high pressure propane appliances and are designed to be connected to a bulk propane
tank.
B. These heaters are equipped with an automatic Safety Shutoff Valve. The gas ow will automatically stop if
the heater fails to operate for any reason.
C. Maximum safety and convenience have been built into the Hi-Med-Lo-Off Control Valve/Regulator. The
following table lists the approximate BTU’s consumed and the operating hours you can reasonably expect
from bulk propane cylinders.
D. These heaters are for temporary heating of buildings under construction, alterations, or repair.
Model NMTT15 NMTT30
Valve Position BTU Input Hours w/20lb. Tank BTU Input Hours w/ 20lb. Tank
Hi 15,000 28 30,000 14
Med 12,000 36 24,000 18
Lo 10,000 43 10,000 43

6
VENTILATION
A. WARNING: This heater is an unvented appliance and MUST be used ONLY in a well ventilated area. NEVER
attempt to operate the heater inside any vehicle, camper or enclosure.
B. FOR NON-RESIDENTIAL INDOOR AND OUTDOOR USE. Any combustion process requires and consumes oxygen,
and will produce carbon monoxide. THIS HEATER MUST BE USED WITH ADEQUATE VENTILATION. Do not use
inside a house, camper, tent or any type of unvented or a tightly enclosed area.
C. WARNING: Provide ample ventilation. This heater consumes air (oxygen). Do not use this heater in unventilated
structures to avoid endangering your life. Provide additional ventilation for any additional fuel-burning
appliances and additional occupants.
D. Flow of combustion and ventilation air must not be obstructed.
MINIMUM CLEARANCE FROM COMBUSTIBLE MATERIALS
A. When operating, the heater surfaces are extremely hot. Keep sleeping bags, clothing, and all combustible
materials clear of the heater by at least the distances shown.
B. WARNING: To avoid injury or property damage never allow clothing, tents or other combustible materials
within 30” of the face of the heater. This heater must be located at least 24” above the oor level when in
use. Never operate the heater when sleeping.
C. WARNING: Never direct the heat output of this heater toward any propane tank within 20 feet.
LIGHTING INSTRUCTIONS
A. Before attempting to light the heater, check all ttings and connections with a soap solution. NEVER USE A
MATCH TO CHECK FOR LEAKS. Should a gas leak occur, do not attempt to repair or use heater. Return the
heater to your dealer or the address given on back page.
B. Fuel – This heater must be used only with a vapor withdrawal LP gas bulk cylinder. THE BULK TANK MUST BE
EQUIPPED WITH A STANDARD POL VALVE.
C. Turn the heater’s “Hi-Med-Lo-Off” regulator knob to “Med” (counterclockwise).
D. To light heater, place a lit match inside hole on rear reector marked “light here”. (See Figure 5) THEN push in
valve button on Safety Shutoff Valve. After the heater is lit, continue to hold valve button in for 30 seconds,
then release the button slowly. CAUTION: DO NOT PUSH IN VALVE BUTTON BEFORE INSERTING LIT MATCH.
NEVER STAND IN FRONT OF HEATER WHILE LIGHTING.
E. If burner does not light within 30 seconds, turn the heater’s regulator knob to “off” (clockwise) and allow at
least ve minutes for gas to dissipate before attempting to relight.
F. NOTE: Should the orice become clogged as indicated by low volume of gas when operating on “Hi” with
a full cylinder, or should the heater fail to operate properly for any reason, return the heater to the dealer or
the address given on back page for repair or replacement. DO NOT ATTEMPT TO REPAIR OR TAMPER WITH
HEATER.
G. Adjust heat output by turning knob to desired position.
H. DO NOT USE THIS HEATER FOR COOKING.
SHUTDOWN AND STORAGE INSTRUCTIONS
A. The bulk propane tank “on-off” valve should ALWAYS be completely turned “OFF” when the heater is not in
use.
B. When shutting off the heater, turn the regulator knob on the heater to “OFF” (clockwise).
C. CAUTION: After turning unit off, heater will remain extremely hot. Allow at least 15 minutes for cooling before
handling and storing. Detach heater from bulk tank before handling and storage. REMEMBER – POL tting is
a left-hand thread.
BTU/HR. Rating
Normal
Operating
Procedure
Clearances to Combustibles
Model Gas Propane
From C.L. OF
HTR. TO FLOOR
FRONT SIDES REAR CEILING
NMTT15 15,000 Vertical 24” 30” 30” 30” 30”
NMTT30 30,000 Vertical 24” 30” 30” 30” 36”
WARNING: USE HD.5 PROPANE GAS ONLY. DO NOT USE ANY OTHER TYPE FUEL. SEE YOUR PROPANE DEALER IF
YOU HAVE ANY QUESTIONS REGARDING FUEL.

7
D. HEATER STORAGE: Indoor storage of the heater is permissible only if the cylinder is disconnected and removed
from the heater. Cylinders must be stored outdoors out of the reach of children and must not be stored in
a building, garage or any other enclosed area. Store cylinders only in accordance with the Standard for
the Storage and Handling of Liqueed Petroleum Gases ANSI/NFPA 58 and CSA B149.1, Natural Gas and
Petroleum Installation Code.
E. See “Parts List” section of this manual.
MAINTENANCE
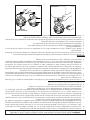
A. Remove thermocouple (3) retaining bracket screw from back of burner assembly (2). Remove bracket.
B. Note position of thermocouple (3) in retaining tabs on the back of the Burner assembly (2). Remove the
thermocouple.
C. Remove wing bolt (18) and ber washer (19) that attached the safety shut-off (6) to the burner Assembly (2).
D. Slide the safety shut-off (6) from burner assembly (2).
E. Remove burner orice (20) from the safety shut-off (6).
F. Clean burner orice with compressed air (80 psi max).
G. Direct compressed are through the burner(2) venturi tube toward the burner plenum so that dust collected
on the grid screen will be blown outward. Keep face away from the grid screen.
H. Reassemble heater in reverse order of disassembly.
NMTT15
LIGHT THIS
BURNER FIRST
NMTT30

8
Parts List
In order to maintain warranty, components must be replaced using original manufacturers parts purchased through
your dealer or directly from the appliance manufacturer. Use of third party components will void the warranty.
3
16 1
12
14
5
15
2
13
4
Key Description
NMTT15 NMTT30
Qty Qty
1 Regulator Assembly 1 1
2 Burner Assembly 1 2
3 Guard Assembly 1 2
4 Rear Guard Assembly 1 2
5 Safety Shut-Off Valve 1 2
6 Manifold - 1
7 Tank Collar Bracket - 1
8 Mounting Bolt Knob - 1
9 Gas Hose - 1
10 Burner Assembly with Guards 1 2
11 Label, Model/Opr. Instr. 1 1
12 Support Leg 1 -
13 Tip Switch 1 2
14 Thermocouple/Tip Switch Wire Assembly 1 2
15 Wing Bolt 1 2
16 Fiber Washer 1 2
17 Orice, Not sold separately 1 2

9
Parts List
In order to maintain warranty, components must be replaced using original manufacturers parts purchased through
your dealer or directly from the appliance manufacturer. Use of third party components will void the warranty.
3
10
15
16
14
9
1
7
5
6
8
2
4
13
Key Description
NMTT15 NMTT30
Qty Qty
1 Regulator Assembly 1 1
2 Burner Assembly 1 2
3 Guard Assembly 1 2
4 Rear Guard Assembly 1 2
5 Safety Shut-Off Valve 1 2
6 Manifold - 1
7 Tank Collar Bracket - 1
8 Mounting Bolt Knob - 1
9 Gas Hose - 1
10 Burner Assembly with Guards 1 2
11 Label, Model/Opr. Instr. 1 1
12 Support Leg 1 -
13 Tip Switch 1 2
14 Thermocouple/Tip Switch Wire Assembly 1 2
15 Wing Bolt 1 2
16 Fiber Washer 1 2
17 Orice, Not sold separately 1 2

10
Notes

11
Notes

12
Service 01 Date:________________________
Engineer Name:_____________________________________
Company:__________________________________________
Telephone No.:______________________________________
Unit Inspected:
Check Gas Lines For Wear Or Leaks
Check Integrity Of Orifice And Gas Ports
Items Replaced:____________________________________
It is recommended that this unit is serviced regularly and that the appropriate Service Interval Record is completed.
Service Provider:
Before completing the appropriate Service Record below, please ensure you have carried out the service as described in the
manufacturer’s instructions. Always use the manufacturer's specified spare part when replacement is necessary.
License No.:________________________________________
Service 03 Date:________________________
Engineer Name:_____________________________________
Company:__________________________________________
Telephone No.:______________________________________
Unit Inspected:
Check Gas Lines For Wear Or Leaks
Check Integrity Of Orifice And Gas Ports
Items Replaced:____________________________________
License No.:________________________________________
Service 05 Date:________________________
Engineer Name:_____________________________________
Company:__________________________________________
Telephone No.:______________________________________
Unit Inspected:
Check Gas Lines For Wear Or Leaks
Check Integrity Of Orifice And Gas Ports
Items Replaced:____________________________________
License No.:________________________________________
Service 02 Date:________________________
Engineer Name:_____________________________________
Company:__________________________________________
Telephone No.:______________________________________
Unit Inspected:
Check Gas Lines For Wear Or Leaks
Check Integrity Of Orifice And Gas Ports
Items Replaced:____________________________________
License No.:________________________________________
Service 04 Date:________________________
Engineer Name:_____________________________________
Company:__________________________________________
Telephone No.:______________________________________
Unit Inspected:
Check Gas Lines For Wear Or Leaks
Check Integrity Of Orifice And Gas Ports
Items Replaced:____________________________________
License No.:________________________________________
Service 06 Date:________________________
Engineer Name:_____________________________________
Company:__________________________________________
Telephone No.:______________________________________
Unit Inspected:
Check Gas Lines For Wear Or Leaks
Check Integrity Of Orifice And Gas Ports
Items Replaced:____________________________________
License No.:________________________________________
Service Record

13
LIMITEDWARRANTY
UnitedSta te sStoveCompany warrantsthisproduct,totheoriginalretailpurchaseronly ,tobefreefrom
defectsinmaterialandworkmanshipforaperiodofone(1)yearfromthedateoftheinitialpurchaseas
evidenced on an invoice, cancelled check, sales receipt, etc. In the event of a defect, this Limited
Warrantyshallbelimitedtotherepairorreplacementofparts,whichprovedefectiveundernormaluse
and service within the limited warranty period, and which United States Stove Company deems at its
reasonable discretion. THE LIMITED WARRANTY SET FORTH HEREIN IS THE SOLE WARRANTY
PROVIDED TO PURCHAS ER AND IS IN LIEU OF ALL OTHER WARRANTIES AND REPRESENTATIONS,
EXPRESS OR IMPLIED. UNITED STATES STOVE COMPANY MAKES NO REPRESENTATIONS OR
WARRANTIESWHATSOEVER,EXPRESSORIMPLIED,WITHRESPECTTOTHEPRODUCT,OTHERTHAN(i)
THELIMITEDWARRANTY ABOVE,AND(ii)ANYIMPLIEDWARRANTIES IMPOSED BYAPPLICABLELAW
WHICH CANNOT BE WAIVED OR DISC LAIMEDUNDERAPPLICABLE LAW. ALL OTHER WARRANTIES OF
ANY KIND, INCLUDING WITHOUT LIMITATION IMPLIED WARRANTIES OF MERCHANTABILITY AND
FITNESS FOR A PARTICULAR PURPOSE, ARE HEREBY DISCLAIMED AND EXCLUDED TO THE FULLEST
EXTENTNOTPROHIBITEDBYAPPLICABLELAW.ThisLimitedWarrantygivesthepurchaserspecificlegal
rights;
apurchasermayhaveotherrightsdependinguponwhereheorsheresides.Somestatesdonot
allowtheexclusionorlimitationofspecial,incidentalorconsequentialdamages,orstatelawmayaffect
thedurationoflimitations,sotheaboveexclusionandlimitationsmaynotbeapplicable.
OTHERLIMITATIONS:UnitedStatesStoveCompanydisclaimsallotherwarrantiesforproductsthatare
purchased from sellers other than author i zed retailers or distributors. This produc t must be properly
installed, maintained and operated in accordancewith the instructions provided herein. Furthermore,
United States Stove Company requires reasonable proof of the date of purchase from an authorized
retailerordistributor. ThisLimitedWarrantydoesnotcoveranyoperational failuresordifficultiesdue
to normal use and wear and tear, accident, abuse, misuse, alteration, misapplication, improper
installationorimpropermaintenanceorservicebyyouoranythirdparty.Failuretoperformnormaland
routinemaintenanceontheproduct,shippingdamage,damagerelatedtoanimals,anddamagedueto
weatherarenotcoveredunderthisLimitedWarra nty.Inaddition, thisLimitedWarrantydoesnotcover
damage to the finish on the product, such as scratches, dents, discoloration, rust or other weather
damage. This warranty does not
apply to products purchased for rental use.United States Stove
Company assumes no responsibility for any defects caused by third parties. United States Stove
Companydoesnotauthorizeanypersonorcompanytoassumeforitanyotherobligationorliabilityin
connectionwiththesale,installation,use,removal,return,orreplacementofits products,andnosuch
representationsarebindingonUnitedStatesStoveCompany.
CLAIMPROCEDURE:Alltransportationcostsforthereturnofthedamagedproductorpartswillbethe
responsibilityofthepurchaser.Uponreceiptoftheproduct,UnitedStatesStoveCompanywillexamine
itanddetermine if the product containsa defe ct. United States Stove Company will repairorreplace
and return the item, freight pre‐paid. If United States Stove Co mpany finds the item to be in normal
operating condition,ornotdefective, the item will be returned freightcoll ect. Purchaser shall specify
themodelnumber(s)andserialnumber(s)ofanyproduct(s)whenmakinganyclaimswithUnitedStates
StoveCompany.Pleaseusethefollowingtoidentifyyour product:
Model#:____________________
Serial#:_____________________

11
Garantie Limitée
L’entreprise United States Stove Company garantit ce produit, seulement à l'acheteur commercial original,
d’être sans défaut matériel ou manutentionnaire pour une période d’un (1) an, à partir de la date d’achat
initiale, tel que convenu sur la facture, sur le chèque annulé sur le reçu de l’achat, etc. En cas de défaut, cette
garantie limitée est limitée à la réparation ou au remplacement des pièces qui se prouvées défectueuses selon
l’usage normal et le service normal, convenu à l’intérieur de la garantie limitée, et qui est jugé convenable à
la discrétion de l’United States Stove Company. LA GARANTIE LIMITÉE DÉNOTÉE CI-JOINT EST LA SEULE GARANTIE
FOURNIE À L'ACHETEUR ET EST EN LIEU DE TOUT AUTRE GARANTIE OU REPRÉSENTATION, EXPRESSE OU IMPLICITE.
L’UNITED STATES STOVE COMPANY NE FAIT AUCUNE REPRÉSENTATION OU GARANTIE QUE CE SOIT, QU’ELLE SOIT
IMPLICITE OU EXPRESSE, EN RESPECT AU PRODUIT, AUTRE QUE (i) LA GARANTIE LIMITÉE MENTIONNÉE CI-DESSUS, ET
(ii) TOUTE GARANTIE IMPLICITE IMPOSÉE PAR LA LOI APPLICATION QUI NE PEUT ÊTRE ANNULÉE OU DÉCLINÉES SELON
LA LOI APPLICABLE. TOUTE AUTRE GARANTIE, DE TOUT GENRE, INCLUANT MAIS SANS S’Y LIMITER AUX GARANTIES
IMPLICITES DE QUALITÉ MARCHANDE OU D’APTITUDE POUR UN BUT PARTICULIER, SONT DONC DÉCLINÉES ET
EXCLUSES AU PLUS HAUT POINT SELON LA LOI APPLICABLE. Cette garantie limitée donne à l'acheteur des droits
légaux spéciques; un acheteur pourrait avoir des droits différents selon son lieu de résidence. Certains états
ne permettent pas l'exclusion ou la limitation de dommages spéciques, accessoires ou consécutifs, ou des lois
d’état qui peuvent affecter la durée des limitations; l’exclusion et les limitations précédentes pourraient ne pas
s’appliquer.
AUTRES LIMITATIONS: L’United States Stove Company décline toutes autres garanties pour les produits qui sont
achetés auprès d’autres vendeurs que ceux autorisés. Ce produit doit être proprement installé, entretenu et
doit fonctionner selon les instructions ci-jointes. De plus, l’United States Stove Company requiert une preuve
raisonnable de la date d'achat effectuée auprès du fournisseur ou du distributeur autorisé. Cette garantie limitée
ne couvre pas les échecs ou les difcultés opérationnelles dus à un usage régulier et à l’usure, aux accidents, aux
abus, à l’abus, aux altérations, à l’installation ou à l’entretien incorrects effectués par vous ou par une troisième
partie. Un échec d’effectuer l’entretien normal et routinier de ce produit, les dommages d’expédition, les
dommages effectués par des animaux, et ceux faits par les événements météorologiques ne sont pas couverts
dans cette garantie limitée. Également, cette garantie limitée ne couvre pas le dommage fait au ni de ce
produit, comme les égratignures, les bosses, la discoloration du produit, la rouille ou tout autres dommages faits
par les événements météorologiques. Cette garantie ne s’applique pas aux produits achetés pour la location.
L’United Stated Stove Company n’assume aucune responsabilité envers les défauts effectués par des troisièmes
parties. L’United States Stove Company n’autorise aucune personne ou aucune entreprise d’assumer pour elle-
même toute obligation ou toute forme de responsabilité pour la vente, l’installation, l’utilisateur, l’enlèvement, le
retour ou le remplacement de ses produits, et aucune de ces représentations ne permette de lier l’United States
Stove Company.
PROCÉDURE DE RÉCLAMATION: Tous les coûts de transport pour le retour d’un produit ou de pièces endommagés
seront de la responsabilité de l'acheteur. Au moment de la réception du produit, l’United States Stove Company
examinera et déterminera si le produit est défectueux ou non. L’United States Stove Company réparera ou
remplacement et retournera le produit, par transport prépayé. Si United States Stove Company trouve que le
produit fonctionne selon les normes de fonctionnement normales, et qu’il n'est pas défectueux, le produit sera
retourné par port dû. Les acheteurs devront spécier le numéro du mpdèle et le numéro de série de tout produit
lorsqu’ils feront les réclamations auprès d’United States Stove Company. Veuillez fournir les informations suivantes
an d’identier votre produit:
Modèle ____________________
No de série: _____________________

10
Il est recommandé que votre système de chauffage est desservi régulièrement et que le Service Interval enregistrement
approprié est terminée.
Fournisseur de services:
Avant de terminer l'enregistrement de service approprié ci-dessous, s'il vous plaît vous assurer que vous avez effectué le service tel
que décrit dans le les instructions du fabricant. Toujours utiliser pièce de rechange indiquée par le fabricant lors de remplacement
est nécessaire.
Service de 01 Date:__________________________
Ingénieur Nom:_______________________________________
Company:___________________________________________
N ° de téléphone.:_____________________________________
Unité inspectée:
Vérifiez gaz Lignes d'usure ou de fuites
Vérifier l'intégrité de l'orifice et du gaz Ports
Arcles Remplacé:____________________________________
Refustratuib No.:______________________________________
Service de 02 Date:__________________________
Ingénieur Nom:_______________________________________
Company:___________________________________________
N ° de téléphone.:_____________________________________
Unité inspectée:
Vérifiez gaz Lignes d'usure ou de fuites
Vérifier l'intégrité de l'orifice et du gaz Ports
Arcles Remplacé:____________________________________
Refustratuib No.:______________________________________
Service de 03 Date:__________________________
Ingénieur Nom:_______________________________________
Company:___________________________________________
N ° de téléphone.:_____________________________________
Unité inspectée:
Vérifiez gaz Lignes d'usure ou de fuites
Vérifier l'intégrité de l'orifice et du gaz Ports
Arcles Remplacé:____________________________________
Refustratuib No.:______________________________________
Service de 04 Date:__________________________
Ingénieur Nom:_______________________________________
Company:___________________________________________
N ° de téléphone.:_____________________________________
Unité inspectée:
Vérifiez gaz Lignes d'usure ou de fuites
Vérifier l'intégrité de l'orifice et du gaz Ports
Arcles Remplacé:____________________________________
Refustratuib No.:______________________________________
Service de 05 Date:_________________________
Ingénieur Nom:_______________________________________
Company:___________________________________________
N ° de téléphone.:_____________________________________
Unité inspectée:
Vérifiez gaz Lignes d'usure ou de fuites
Vérifier l'intégrité de l'orifice et du gaz Ports
Arcles Remplacé:____________________________________
Refustratuib No.:______________________________________
Service de 06 Date:__________________________
Ingénieur Nom:_______________________________________
Company:___________________________________________
N ° de téléphone.:_____________________________________
Unité inspectée:
Vérifiez gaz Lignes d'usure ou de fuites
Vérifier l'intégrité de l'orifice et du gaz Ports
Arcles Remplacé:____________________________________
Refustratuib No.:______________________________________
Enregistrement De Service

9
Liste Des Pièces
An de conserver la garantie, les composants doivent être remplacés à l’aide des pièces d’origine du
fabricant achetées auprès de votre revendeur ou directement auprès du fabricant de l’appareil. L’utilisation
de composants tiers annulera la garantie.
3
10
15
16
14
9
1
7
5
6
8
2
4
13
Clé Description
NMTT15 NMTT30
Qté Qté
1 Régulateur 1 1
2 Brûleur 1 2
3 Assemblée de garde 1 2
4 Assemblée de garde arrière 1 2
5 Vanne d'arrêt de sécurité 1 2
6 Collecteur - 1
7 Support de collier de réservoir - 1
8 Bouton de boulon de montage - 1
9 Tuyau de gaz - 1
10 Brûleur avec protections 1 2
11 Étiquette, modèle / Opr. Instr. 1 1
12 Jambe de soutien 1 -
13 Pointe basculante 1 2
14 Ensemble de ls de thermocouple / embout 1 2
15 Wing Bolt 1 2
16 Rondelle de bre 1 2
17 Orice, non vendu séparément 1 2

8
Liste Des Pièces
3
16 1
12
14
5
15
2
13
4
Clé Description
NMTT15 NMTT30
Qté Qté
1 Régulateur 1 1
2 Brûleur 1 2
3 Assemblée de garde 1 2
4 Assemblée de garde arrière 1 2
5 Vanne d'arrêt de sécurité 1 2
6 Collecteur - 1
7 Support de collier de réservoir - 1
8 Bouton de boulon de montage - 1
9 Tuyau de gaz - 1
10 Brûleur avec protections 1 2
11 Étiquette, modèle / Opr. Instr. 1 1
12 Jambe de soutien 1 -
13 Pointe basculante 1 2
14 Ensemble de ls de thermocouple / embout 1 2
15 Wing Bolt 1 2
16 Rondelle de bre 1 2
17 Orice, non vendu séparément 1 2
An de conserver la garantie, les composants doivent être remplacés à l’aide des pièces d’origine du
fabricant achetées auprès de votre revendeur ou directement auprès du fabricant de l’appareil. L’utilisation
de composants tiers annulera la garantie.

7
C. Tournez le bouton de réglage sur « moyen » (sens contraire des aiguilles d’une montre).
D. Pour allumer le chauffage, mettez une allumette dans le trou du réecteur arrière marqué « Light here »
(NDT: « allumer ici »). (Voir Figure 5) ENSUITE enfoncer le bouton sur *la valve de coupure de sécurité. Après
que le chauffage est allumé, maintenez le bouton enfoncé pendant 30 secondes puis relâchez doucement
le bouton. PRUDENCE: NE PAS ENFONCER LE BOUTON AVANT D’AVOIR INSÉRÉ L’ALLUMETTE ALLUMÉE. NE
JAMAIS RESTER EN FACE DU CHAUFFAGE PENDANT L’ALLUMAGE.
E. Si le brûleur ne s’allume pas dans les 30 secondes, tournez le bouton de réglage sur « off » (sens des aiguilles
d’une montre) et laissez au moins cinq minutes pour que le gaz se dissipe avant de recommencer.
F. REMARQUE: Si l’orice se bouche comme peut l’indiquer un faible débit de gaz en position « haute » avec
une bouteille pleine, ou si le chauffage ne fonctionne pas correctement pour n’importe quelle raison,
renvoyez le chauffage à votre fournisseur ou à l’adresse indiquée en dernière page pour réparation ou
remplacement. N’ESSAYEZ PAS DE RÉPARER OU DE TOUCHER LE CHAUFFAGE.
G. Ajustez la chaleur de sortie en tournant le bouton sur la position souhaitée.
H. NE PAS UTILISER CE CHAUFFAGE POUR CUISINER.
INSTRUCTIONS D’EXTINCTION ET DE RANGEMENT
A. La valve « on-off » de la bouteille de propane doit TOUJOURS être complètement tournée sur « OFF » quand
le chauffage n’est pas utilisé.
B. Lors de l’extinction du chauffage, tournez le bouton de réglage sur « OFF » (sens des aiguilles d’une montre).
C. PRUDENCE: après avoir éteint l’appareil, le chauffage reste extrêmement chaud. Laissez refroidir l’appareil au
moins 15 minutes avant de le manipuler et de le ranger. Enlevez la bouteille de propane avant manipulation
et rangement. RAPPEL: La pièce de xation standard POL comporte un pas à gauche.
D. RANGEMENT DU CHAUFFAGE: Le rangement à l’intérieur est autorisé seulement si la bouteille est déconnectée
et retirée du chauffage. Les recharges doivent être stockées à l’extérieur, hors de la portée des enfants et
ne doivent pas être stockées dans un bâtiment, dans un garage ou tout autre endroit clos. Stockez les
recharges toujours en accord avec les normes en vigueur pour le stockage et la manipulation des gaz à
pétrole liquéé ANSI/NFPA 58 et CSA B 149.1, code d’installation pour les appareils à gaz naturel et propane.
E. Reportez-vous à la page 7 pour la liste des pièces de rechange.
ENTRETIEN
A. Retirez le boulon qui retient le thermocouple (3) derrière l’ensemble de brûleurs (2).Retirez les écrous.
B. Notez la position du thermocouple (3) dans la plaque de support derrière l’ensemble de brûleurs (2). Enlevez le
thermocouple.
C. Retirez l’écrou papillon (18) et la rondelle en bre (19) qui retiennent la valve de coupure de sécurité (6) et
l’ensemble brûleur (2).
D. Faites glisser la valve de coupure de sécurité (6) hors de l’ensemble brûleur (2).
E. Séparez la buse de brûleur (20) de la valve de coupure de sécurité (6).
F. Nettoyez la buse à l’air comprimé (551.6 kPa (80 psi) maxi).
G. Dirigez l’air comprimé à travers la buse du brûleur (2) en direction de la chambre de répartition de l’air du brûleur
an d’expulser la poussière collectée sur la grille. Gardez le visage éloigné de la grille.
H. Assemblez de nouveau le chauffage dans l’ordre inverse de l’ordre de démontage.
ATTENTION: UTILISER DU PROPANE HD5 UNIQUEMENT. NE PAS UTILISER D’AUTRE TYPE DE COMBUSTIBLE.
CONTACTEZ VOTRE FOURNISSEUR DE PROPANE SI VOUS AVEZ UNE QUESTION CONCERNANT LE COMBUSTIBLE.
NMTT15
ALLUMER CE BRÛLEUR
EN PREMIER
NMTT30

6
F. RACCORDEMENT DE L’APPAREIL À LA BONBONNE DE PROPANE: raccordez toujours l’appareil de chauffage
à une bonbonne à l’extérieur ou dans un endroit bien aéré. Ne raccordez JAMAIS cet appareil de chauffage
à la bonbonne à proximité d’une amme nue.
G. UTILISATION DE L’APPAREIL DE CHAUFFAGE: faites toujours fonctionner l’appareil en plaçant la bonbonne
à la verticale sur une surface plane non combustible. Ne placez JAMAIS la bonbonne sur le côté lorsque
l’appareil fonctionne.
H. SURVEILLANCE DE L’APPAREIL DE CHAUFFAGE: ne laissez pas l’appareil fonctionner sans surveillance.
I. TOUJOURS ALLUMER L’APPAREIL DE CHAUFFAGE AVEC UNE ALLUMETTE OU UN ALLUMAGE « SPARKLITE »: NE
TENTEZ JAMAIS d’allumer l’appareil de chauffage avec un allumoir à pierre.
J. NE MODIFIEZ PAS L’APPAREIL: Si l’appareil n’offre pas un rendement adéquat, par exemple s’il produit peu
ou pas de chaleur lorsque la commande est en position élevée (Hi), ou pour toute autre raison, NE TENTEZ
PAS DE LE RÉPARER OU DE LE MODIFIER. Toute modication pourrait compromettre le fonctionnement
sécuritaire de l’appareil et pourrait constituer un danger. Renvoyez l’appareil de chauffage au revendeur
ou à l’adresse indiquée en dernière page pour le faire réparer ou remplacer.
K. ENTREPOSAGE: La valve de régulation Hi-Med-Lo-Off doit toujours être fermée lorsque l’appareil de
chauffage n’est pas utilisé. Laissez refroidir l’appareil au moins 15 minutes avant de le manipuler et de le
ranger. Démontez la bonbonne de propane de l’appareil de chauffage avant l’entreposage. N’entreposez
PAS les bonbonnes de propane à l’intérieur ou à proximité d’une amme nue ni d’une source de chaleur.
L. NE TRANSPORTEZ PAS ET NE DÉPLACEZ PAS LA BONBONNE PENDANT QU’ELLE ALIMENTE L’APPAREIL. OBSERVEZ
LES INSTRUCTIONS SUR L’ARRÊT ET L’ENTREPOSAGE DE L’APPAREIL POUR LE TRANSPORTER OU LE DÉPLACER.
VENTILATION
A. AVERTISSEMENT: Cet appareil de chauffage n’est pas ventilé et DOIT être utilisé UNIQUEMENT dans un endroit
bien aéré. NE TENTEZ JAMAIS de faire fonctionner l’appareil de chauffage dans un véhicule, une roulotte ou
un endroit fermé.
B. POUR UN USAGE NON RÉSIDENTIEL À L’INTÉRIEUR OU UN USAGE À L’EXTÉRIEUR. Tout processus de combustion
requiert et consomme de l’oxygène et produit du monoxyde de carbone. CET APPAREIL DE CHAUFFAGE
DOIT ÊTRE UTILISÉ DANS UN ENDROIT BIEN AÉRÉ. Ne l’utilisez pas dans une maison, r à l’intérieur d’une maison,
une roulotte, une tente ou dans n’importe quel endroit clos ou mal aéré.
C. ATTENTION: Prévoyez une ventilation adéquate. Cet appareil de chauffage consomme de l’air (oxygène).
N’utilisez pas cet appareil de chauffage dans un endroit non ventilé pour ne pas mettre votre vie en danger.
Prévoyez une ventilation supplémentaire si vous utilisez d’autres appareils à combustion et s’il y a des
occupants supplémentaires.
D. Les ux d’air de combustion et de ventilation ne doivent jamais être obstrués.
ÉCART MINIMAL ENTRE L’APPAREIL ET TOUTE MATIÈRE COMBUSTIBLE
A. En fonctionnement, les surfaces du chauffage sont extrêmement chaudes. Conservez les sacs de couchages,
vêtements et tout matériau inammable à une distance minimale du chauffage comme indiqué sur la
gure 4.
B. ATTENTION: pour éviter les blessures ou les dégâts matériels, ne laissez jamais de vêtement, tente, ou autre
matériau inammable à une distance de 75 cm (30”) devant le chauffage. Ce chauffage doit être situé
au moins à 60 cm (24”) du sol quand il fonctionne. Ne le laissez jamais en fonctionnement pendant votre
sommeil.
C. ATTENTION: ne jamais diriger la sortie de chaleur de ce chauffage en direction d’une bouteille de propane
dans un rayon de 6 mètres (20 feet).
INSTRUCTIONS D’ALLUMAGE
A. Avant d’essayer d’allumer le chauffage, vériez tous les raccordements et connexions avec une solution
savonneuse NE JAMAIS UTILISER D’ALLUMETTE POUR CHERCHER LES FUITES S’il y a une fuite, n’essayez pas de
réparer ou d’utiliser le chauffage. Renvoyez le chauffage chez votre fournisseur ou à l’adresse indiquée à
la dernière page.
B. Combustible – ce chauffage doit être utilisé uniquement avec des bouteilles de GPL à collecteur de vapeur.
LA BOUTEILLE DOIT ÊTRE ÉQUIPÉE AVEC UNE VALVE POL STANDARD.
BTU/Hr Taux
Procédure normal de
mise en marche
Zone de sécurité des combustibles
Modèle Gaz Propane
À partir de C.L.
De Htr. Au Sol
Devant Côtés Arrière Plafond
NMTT15 15,000 Vertical 24” 30” 30” 30” 30”
NMTT30 30,000 Vertical 24” 30” 30” 30” 36”

5
• L’odeur du propane (GPL) peut changer en intensité à différents niveaux. Comme le propane (GPL) est plus
lourd que l’air, il peut y avoir plus d’odeur dans les bas niveaux.
• Soyez toujours être attentif à la plus légère odeur de gaz. Si vous continuez à détecter une odeur de gaz,
même inme, une fuite importante menace. Agissez immédiatement comme indiqué précédemment.
ATTENTION: POINTS ESSENTIELS À MÉMORISER
• Le propane à une odeur distinctive. Apprenez à reconnaître ces odeurs. (Reportez-vous aux sections Odeur
des gaz combustibles et Dissipation d’odeur ci-contre et ci-dessus).
• Même si vous n’êtes pas correctement formé à l’utilisation et à la maintenance des chauffages, soyez
TOUJOURS conscient des odeurs de propane (GPL) et de gaz naturel.
• Si vous n’avez pas été correctement formé à l’utilisation et à la maintenance des installations utilisant le
propane (GPL), n’essayez pas d’allumer, de réparer ou de régler un chauffage avec un système alimenté
au gaz propane (GPL).
• Un test périodique autour du chauffage, ou des joints du chauffage ; c.-à-d. détendeurs, connexions, etc.,
est une bonne pratique de sécurité dans tous les cas. Si vous sentez même une petite quantité de gaz,
CONTACTEZ IMMÉDIATEMENT VOTRE FOURNISSEUR DE GAZ. N’ATTENDEZ PAS!
RENSEIGNEMENTS GÉNÉRAUX
A. Les modèles REDSTONE SRC15T et SRC30T sont des appareils au gaz propane haute pression conçus pour
être raccordés à une bonbonne de gaz propane.
B. Ces appareils de chauffage sont équipés d’une vanne de sûreté à fermeture automatique. L’alimentation
en gaz s’arrête automatiquement si l’appareil de chauffage ne fonctionne pas pour quelque raison que
ce soit.
C. Le manodétendeur, ou valve de régulation (Hi-Med-Lo), est pratique et offre un fonctionnement sécuritaire.
Le tableau suivant indique la puissance approximative de l’appareil en BTU et le nombre d’heures de
fonctionnement avec une bonbonne de gaz propane.
D. Ces chauffages sont pour le chauffage temporaire de bâtiments en construction, modications, ou
réparation.
POUR UN FONCTIONNEMENT SÉCURITAIRE
A. LISEZ ATTENTIVEMENT LES INSTRUCTIONS: lisez et observez ces instructions. Interdisez à quiconque n’ayant pas
lu les présentes instructions d’assembler, d’allumer, de régler ou de faire fonctionner l’appareil de chauffage.
B. L’utilisation de l’appareil doit respecter les codes du bâtiment de votre localité ; en l’absence de tels codes,
se conformer à la norme sur l’entreposage et la manutention des gaz pétroliers liquéés, ANSI/NFPA 58 et
CSA B 149.1, Code d’installation pour les appareils à gaz naturel et propane.
C. LE PROPANE EST EXTRÊMEMENT INFLAMMABLE: En cas de fuite, le propane s’accumule dans la pièce, ce qui
présente un risque d’incendie. Le propane dégage une forte odeur facile à déceler. N’allumez jamais une
allumette, ne vous éclairez pas avec une amme nue et ne produisez aucun arc électrique dans un endroit
fermé où des odeurs de gaz propane sont décelées. Ventilez complètement l’endroit, sortez l’appareil à
l’extérieur, puis repérez et corrigez l’origine de la fuite avant d’allumer tout appareil. Si vous avez des doutes
sur ces instructions, évacuez immédiatement les lieux et demandez de l’aide.
D. FUITE DE GAZ: Si la fuite ne peut être colmatée, ne modiez pas l’appareil de chauffage, observez plutôt les
instructions pour couper l’alimentation en gaz et renvoyez l’appareil au revendeur ou à l’adresse indiquée
sur la dernière page.
E. DÉTECTION DE FUITE: avant chaque utilisation, appliquez une solution d’eau savonneuse sur les raccords
pour déceler des fuites. N’UTILISEZ JAMAIS UNE FLAMME POUR DÉTECTER DES FUITES.
Modèle NMTT15 NMTT30
Position de la valve
Puissance
en BTU
Heures avec une
bonbonne de 9,07 kg (20 lb
Puissance
en BTU
Heures avec une bonbonne.
de 9,07 kg (20 lb)
Hi 15,000 28 30,000 14
Med 12,000 36 24,000 18
Lo 10,000 43 10,000 43
ATTENTION: GARDER LE CHAUFFAGE HORS DE LA PORTÉE DES ENFANTS
ATTENTION: N’UTILISEZ PAS CET APPAREIL DE CHAUFFAGE AVEC UNE BONBONNE DE GAZ LIQUÉFIÉ DE PLUS DE
9,07 KG (20 LB) (CAPACITÉ EN EAU DE 22,68 KG (50 LB)).
La page est en cours de chargement...
La page est en cours de chargement...
La page est en cours de chargement...
La page est en cours de chargement...
-
 1
1
-
 2
2
-
 3
3
-
 4
4
-
 5
5
-
 6
6
-
 7
7
-
 8
8
-
 9
9
-
 10
10
-
 11
11
-
 12
12
-
 13
13
-
 14
14
-
 15
15
-
 16
16
-
 17
17
-
 18
18
-
 19
19
-
 20
20
-
 21
21
-
 22
22
-
 23
23
-
 24
24


NewMac NMTT30 Mode d'emploi
- Taper
- Mode d'emploi
- Ce manuel convient également à
dans d''autres langues
- English: NewMac NMTT30 User guide
Autres documents
-
Mr. Heater F242655 Manuel utilisateur
-
USSC HCPHPRSS Manuel utilisateur
-
United States Stove Company HF15TT/HF30TT Le manuel du propriétaire
-
-
Mr. Heater MH15TS Manuel utilisateur
-
-
-
-
-