
MONITOR
IN
DVD
IN
DVD
IN
TV/SAT
IN
HDD/MD
OUT
HDD/MD
COAXIALOPTICAL
SURROUND CENTER
DVD DVDTV/SATVIDEO VIDEO
SUB WOOFER
SUB WOOFER
AUDIO
OUT
IN IN
INININOUT
FRONT
R
L
R
L
MULTI CH IN
DIGITAL SPEAKERS
IMPEDANCE USE 4-16 Ω
COAXIAL
75Ω
AM
FM
U
+–
SURROUND BACK
+–
SURROUND R
+–
SURROUND L
+–
CENTER
+–
FRONT R
+–
FRONT L
VIDEO
ANALOGANTENNA
L
R
MULTI CH OUT
FRONT
SURROUND
CENTER
SUB
WOOFER
INPUT
AUDIO
VIDEO
OUTPUT
COAXIAL
DITITAL OUT
VIDEO
INPUT
I
J
G
F
E
C
B
A
D
H
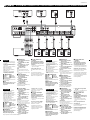
English
• Be sure to turn off the power of all
your components before making any
connections.
• Use the recommended cords (not
supplied) to connect each component
to the receiver.
(a) Audio cord (White (L)/Red (R))
(b) Coaxial digital cord
(c) Video cord (Yellow)
(d) Monaural audio cord (Black)
(e) Speaker cord
• Please also refer to the operating
instructions provided with the
components you want to connect.
A – G Speakers
A Front (L) B Front (R)
C Center D Sub woofer
E Surround (L) F Surround (R)
G Surround back
Refer to the other side of this sheet for
the speaker settings.
H TV
Switch the input selector on your
TV to see the video from each
component.
I DVD player*
1 Select “AUDIO SETUP” in the
setup display.
2 Set “AUDIO DRC” to “WIDE
RANGE”.
3 Set “DIGITAL OUT” to “ON”.
4 Set “DOLBY DIGITAL” to
“DOLBY DIGITAL”.
5 Set “DTS” to “ON”.
Note
Select the appropriate sound format
depending on the disc you want to play
back.
* The above setting is an example of Sony
DVD players.
I Play Station 2
1 Select “AUDIO SETTING” in
the setup display.
2 Select “AUDIO DIGITAL
OUTPUT”.
3 Set “OPTICAL DIGITAL
OUTPUT” to “ON”.
4 Set “DOLBY DIGITAL” to
“DOLBY DIGITAL”.
5 Set “DTS” to “ON”.
“Play Station 2” is a trademark of Sony
Computer Entertainment.
4-255-828-11(1)
STR-DB900
Installation Guide / Guide d’installation / Installationsanleitung / Installatie-handleiding
J Super Audio CD
player*
Select the appropriate playback
area (multi-channel or 2-channel)
depending on the disc you want
to listen to.
* The above setting is an example for Sony
Super Audio CD players.
If no sound comes out
Press INPUT MODE to select “AUTO
IN”.
This completes the preparations
necessary to use this unit. Please refer to
the provided operating instructions for
details on how to operate the unit.
Français
• Avant de raccorder les appareils
veillez à tous les éteindre.
• Utilisez les cordons recommandés
(non fournis) pour relier chaque
appareil à l’ampli-tuner.
(a)
Cordon audio (Blanc (G)/Rouge (D))
(b) Cordon numérique coaxial
(c) Cordon vidéo (Jaune)
(d) Cordon audio mono (Noir)
(e) Cordons d’enceintes
• Veuillez aussi vous reporter au mode
d’emploi fourni avec chaque appareil
pour les liaisons.
A – G Enceintes
A Avant (G) B Avant (D)
C Centre D
Caisson de grave
E Surround (G) F Surround (D)
G Surround arrière
Reportez-vous au verso de cette feuille
pour le réglage des enceintes.
H Téléviseur
Réglez le sélecteur d’entrée de
votre téléviseur pour voir
l’image de chaque appareil.
I Lecteur DVD*
1
Sélectionnez « AUDIO SETUP »
dans l’affichage de
configuration.
2 Réglez « AUDIO DRC » sur
« WIDE RANGE ».
3 Réglez « DIGITAL OUT » sur
« ON ».
4 Réglez « DOLBY DIGITAL »
sur « DOLBY DIGITAL ».
5 Réglez « DTS » sur « ON ».
Remarque
Sélectionnez le format sonore approprié
selon le disque que vous voulez lire.
* Les réglages ci-dessus s’appliquent à un
lecteur DVD Sony pris comme exemple.
I Play Station 2
1 Sélectionnez « AUDIO
SETTING » dans l’affichage
de configuration.
2 Sélectionnez « AUDIO
DIGITAL OUTPUT ».
3 Réglez « OPTICAL DIGITAL
OUTPUT » sur « ON ».
4 Réglez « DOLBY DIGITAL »
sur « DOLBY DIGITAL ».
5 Réglez « DTS » sur « ON ».
« Play Station 2 » est une marque de
fabrique de Sony Computer
Entertainment.
J Lecteur CD Super
Audio*
Sélectionnez la zone de lecture
appropriée (multicanaux ou 2
canaux) selon le disque que vous
voulez écouter.
* Exemple de lecteurs CD Super Audio de
marque Sony.
Si aucun son n’est audible
Appuyez sur INPUT MODE pour
sélectionner « AUTO IN ».
Les préparatifs sont terminés et
l’appareil peut être utilisé. Veuillez
vous reporter au mode d’emploi de
l’appareil pour le détail.
Deutsch
• Schalten Sie alle Geräte aus, bevor
Sie Anschlüsse vornehmen.
• Verwenden zum Anschließen der
einzelnen Geräte an den Receiver die
empfohlenen Kabel (nicht
mitgeliefert).
(a) Audiokabel (Weiß (L)/Rot (R))
(b) Koaxiales Digitalkabel
(c) Videokabel (Geib)
(d)
Monaurales Audiokabel (Schwarz)
(e) Lautsprecherkabel
• Lesen Sie bitte auch die
Bedienungsanleitungen der einzelnen
Geräte.
A – G Lautsprecher
A Front (L) B Front (R)
C Center D Subwoofer
E Surround (L) F Surround (R)
G Surround-Rück
Zu den Lautsprechereinstellungen siehe
Rückseite.
H Fernseher
Stellen Sie den Eingangswähler
Ihres Fernsehers so ein, dass die
Videosignale der Geräte
wiedergegeben werden.
I DVD-Player*
1 Wählen Sie im Setup-Menü
„AUDIO SETUP“.
2 Setzen Sie „AUDIO DRC“ auf
„WIDE RANGE“.
3 Setzen Sie „DIGITAL OUT“ auf
„ON“.
4 Setzen Sie „DOLBY DIGITAL“
auf „DOLBY DIGITAL“.
5 Setzen Sie „DTS“ auf „ON“.
Hinweise
Stellen Sie das Audioformat entsprechend
der wiederzugebenden Disc ein.
*
Bei den angegebenen Einstellungen handelt es
sich um ein Beispiel für einen Sony DVD-
Player.
I Play Station 2
1 Wählen Sie im Setup-Menü
„AUDIO SETTING“.
2 Wählen Sie „AUDIO DIGITAL
OUTPUT“.
3 Setzen Sie „OPTICAL DIGITAL
OUTPUT“ auf „ON“.
4 Setzen Sie „DOLBY DIGITAL“
auf „DOLBY DIGITAL“.
5 Setzen Sie „DTS“ auf „ON“.
„Play Station 2“ ist ein Warenzeichen
der Sony Computer Entertainment.
Nederlands
• Schakel vooral eerst de stroom van
alle betrokken apparaten uit, voordat
u enige aansluiting gaat maken.
• Gebruik de aanbevolen
aansluitsnoeren (niet bijgeleverd) om
uw apparatuur aan te sluiten op de
tuner/versterker.
(a)
Audio-aansluitsnoer (Wit (L)/Rood (R))
(b) Coaxiale digitaalkabel
(c) Videokabel (Geel)
(d) Mono audiosnoer (Zwart)
(e) Luidsprekersnoeren
• Zie voor het aansluiten tevens de
gebruiksaanwijzingen behorende bij
de aan te sluiten apparatuur.
A – G Luidsprekers
A Linksvoor B Rechtsvoor
C Midden D
Lagetonen-luidspreker
E Linksachter F Rechtsachter
G Middenachter
Zie voor de luidspreker-instellingen de
andere kant van dit vel.
H TV-toestel
Gebruik de ingangskeuzetoetsen
van uw TV-toestel om de beelden
van uw video-apparatuur op het
scherm te zien.
I DVD-speler*
1 Kies het onderdeel “AUDIO
SETUP” in het instelscherm.
2 Kies voor het punt “AUDIO
DRC” de stand “WIDE
RANGE”.
3 Zet de “DIGITAL OUT”
uitgangskeuze op “ON”.
4 Stel “DOLBY DIGITAL” in op
“DOLBY DIGITAL”.
5
Zet de “DTS” weergavestand
op “ON”.
Opmerkingen
Kies de geschikte geluidsinstellingen voor
het soort disc dat u wilt afspelen.
* Deze stappen geven de juiste instellingen
voor een Sony DVD-speler.
I Play Station 2
1 Kies het onderdeel “AUDIO
SETTING” in het instelscherm.
2 Kies voor “AUDIO DIGITAL
OUTPUT”.
3 Zet de “OPTICAL DIGITAL
OUTPUT” op “ON”.
4 Stel “DOLBY DIGITAL” in op
“DOLBY DIGITAL”.
5 Zet de “DTS” weergavestand
op “ON”.
“Play Station 2” is een handelsmerk van
Sony Computer Entertainment.
J Super Audio CD-
speler*
Kies het geschikte
weergaveformaat (meerkanaals of
2-kanaals geluid) voor de disc die
u wilt beluisteren.
* De bovenstaande instelling geldt als
voorbeeld voor Sony Super Audio CD-
spelers.
Als er geen geluid wordt
weergegeven
Druk op de INPUT MODE toets om te
kiezen voor “AUTO IN”.
Hiermee zijn de voorbereidingen voor
het gebruik van dit apparaat compleet.
Zie verder voor de bediening van het
apparaat de bijgeleverde
gebruiksaanwijzing.
J Super Audio CD-
Player*
Stellen Sie den
Wiedergabemodus (Mehrkanal
oder 2-Kanal) entsprechend der
wiederzugebenden Disc ein.
* Das obige Beispiel zeigt die Einstellung
für einen Sony Super Audio CD-Player.
Wenn kein Ton zu hören ist
Wählen Sie durch Drücken von INPUT
MODE die Option „AUTO IN“.
Die Vorbereitungen sind damit beendet,
und das Gerät kann verwendet werden.
Einzelheiten zur Bedienung entnehmen
Sie bitte der mitgelieferten
Bedienungsanleitung.
(a)
(d)
(e)
(d)(c)(c)(b) (e)
(e) (e)
(e)
(e)
Sony Corporation © 2004 Printed in Malaysia

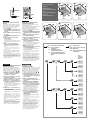
English
Quick setup guide for speaker
system
You can easily set up the speakers by selecting a
speaker pattern from the setup menu. The speaker
pattern depends on the number of speakers you
have. Refer to the front page for speaker
connections (A – G).
1 Use the illustration or flow chart on the
right to identify the speaker pattern you
are using.
2 Press POWER on the receiver to turn on
the system.
3 Press MAIN MENU repeatedly to select
“<SET UP>”.
4 Press F/f to select “SP PAT XXX”
(Speaker pattern).
The initial setting is “6-1”.
If “SP PAT XXX” does not appear, press F/f
to select “XXXX SET” and press G/g to select
“EASY”.*
5 Press G/g to select your speaker
pattern, then press ENTER/EXECUTE.
The speaker pattern switches cyclically as
follows:
6-1 y 6-0 y 5-1 y 5-0 y 3-1 y 3-0
y 5C-1 y 5C-0 y 4-1 y 4-0 y 2-1
y 2-0 y 6-1
* You can select “EASY” (automatic) or “NORM”
(manual) to set the speaker size and distance. The
initial setting is “EASY”.
If you want to change the speaker size or distance
setting, set “XXXX SET” to “NORM.SET” in the set
up menu. For further information about how to adjust
the size and distance settings for each speaker, see
“Setting up and adjusting the speakers” (page 12) in
the operating instructions.
Français
Guide de configuration rapide du
système acoustique
Vous pouvez facilement régler les enceintes en
sélectionnant une configuration dans le menu de
réglage. La configuration d’enceintes dépend du
nombre d’enceintes que vous possédez. Reportez-
vous au recto pour les raccordements (A – G).
1 Identifiez la configuration d’enceintes
que vous voulez utiliser à l’aide de
l’illustration ou du schéma.
2 Appuyez sur POWER sur l’ampli-tuner
pour allumer le système.
3 Appuyez à plusieurs reprises sur MAIN
MENU pour sélectionner « <SET UP> ».
4 Appuyez sur F/f pour sélectionner « SP
PAT XXX » (Configuration d’enceintes).
La configuration initiale est « 6-1 ».
Si « SP PAT XXX » n’apparaît pas, appuyez
sur F/f pour sélectionner « XXXX SET » et
appuyez sur G/g pour sélectionner
« EASY ».*
5 Appuyez sur G/g pour sélectionner la
configuration d’enceintes, puis appuyez
sur ENTER/EXECUTE.
La configuration d’enceintes change comme
suit:
6-1 y 6-0 y 5-1 y 5-0 y 3-1 y 3-0
y 5C-1 y 5C-0 y 4-1 y 4-0 y 2-1
y 2-0 y 6-1
* Vous pouvez sélectionner « EASY » (automatique)
ou « NORM » (manuel) pour spécifier la taille et la
distance des enceintes. Le réglage initial est
« EASY ».
Si vous voulez changer la taille ou la distance des
enceintes, réglez « XXXX SET » sur
« NORM.SET » dans le menu de réglage. Pour le
détail sur le réglage de la taille et de la distance de
chaque enceinte, voir « Configuration et réglage des
enceintes » (page 12) dans le mode d’emploi.
Deutsch
Übersicht zum Einrichten des
Lautsprechersystems
Sie können die Lautsprecher bequem einrichten,
indem Sie einfach eine der
Lautsprecherkonfigurationen aus dem Setup-Menü
wählen. Die Lautsprecherkonfigurationen
unterscheiden sich durch die Anzahl der
Lautsprecher. Zum Anschließen der Lautsprecher
siehe die Frontseite (A – G).
1
Ermitteln Sie Ihre Lautsprecherkonfiguration
aus der Abbildung oder dem Flußdiagramm
rechts.
2 Drücken Sie POWER am Receiver, um
die Anlage einzuschalten.
3 Drücken Sie wiederholt MAIN MENU, um
„<SET UP>“ zu wählen.
4 Drücken Sie F/f, um „SP PAT XXX“
(Lautsprecherkonfiguration) zu wählen.
Die Grundeinstellung ist „6-1“.
Wenn „SP PAT XXX“ nicht erscheint, drücken
Sie F/f, um „XXXX SET“ zu wählen, und
dann G/g, um „EASY“ zu wählen.*
5 Wählen Sie mit G/g Ihre
Lautsprecherkonfiguration, und drücken
Sie dann ENTER/EXECUTE.
Die Lautsprecherkonfiguration ändert sich in
der folgenden Reihenfolge:
6-1 y 6-0 y 5-1 y 5-0 y 3-1 y 3-0
y 5C-1 y 5C-0 y 4-1 y 4-0 y 2-1
y 2-0 y 6-1
*
Für die Lautsprechergrößen- und Abstandseinstellung
können Sie zwischen „EASY“ (automatisch) und „NORM“
(manuell) wählen. Die Grundeinstellung ist „EASY“.
Wenn Sie Lautsprechergröße und Abstand ändern wollen,
stellen Sie „XXXX SET“ im Setup-Menü auf
„NORM.SET” ein. Weitere Einzelheiten zur Einstellung
von Größe und Abstand der einzelnen Lautsprecher finden
Sie in der Bedienungsanleitung unter „Voreinstellen der
Lautsprecherparameter und -pegel“ (Seite 12).
Nederlands
Instelgids voor het
luidsprekersysteem
De instellingen voor de luidsprekers zijn eenvoudig
te maken via het instelmenu, door daaruit het meest
geschikte patroon te kiezen. Welk patroon dat is,
hangt af van het aantal luidsprekers waarover u
beschikt. Zie de aanwijzingen op de voorpagina
voor het aansluiten van de luidsprekers (A – G).
1 Gebruik de afbeeldingen of het
stroomschema rechts om uit te vinden
welk luidsprekerpatroon van toepassing
is op uw situatie.
2 Druk op de POWER toesten van de
tuner/versterker om uw apparatuur in te
schakelen.
3 Druk enkele malen op de MAIN MENU
toets om te kiezen voor “<SET UP>”.
4 Druk op de F/f toetsen om in te stellen
op “SP PAT XXX” (luidsprekerpatroon).
De oorspronkelijke instelling is type “6-1”.
Als de aanduiding “SP PAT XXX” niet
verschijnt, stelt u met de F/f toetsen in op
“XXXX SET” en dan drukt u op de G/g
toetsen om te kiezen voor “EASY”.*
5 Druk op de G/g toetsen om het patroon
voor uw luidsprekers te kiezen en
bevestig uw keuze met een druk op
ENTER/EXECUTE.
De luidsprekerpatronen worden kringsgewijze
doorlopen, als volgt:
6-1 y 6-0 y 5-1 y 5-0 y 3-1 y 3-0
y 5C-1 y 5C-0 y 4-1 y 4-0 y 2-1
y 2-0 y 6-1
*U kunt instellen op “EASY” (automatische
instellingen) of “NORM” (handmatige instellingen)
voor keuze van het luidsprekerformaat en de
afstanden. De oorspronkelijke instelling is “EASY”.
Als u het luidsprekerformaat of de afstand wilt
wijzigen, kiest u bij “XXXX SET” de stand
“NORM.SET” in het instelmenu. Nadere
aanwijzingen omtrent het kiezen van het formaat en
de afstand voor elk van uw luidsprekers vindt u
onder “De luidsprekers opstellen en afregelen”
(pagina 13) in de gebruiksaanwijzing.
5C-0
5C-1
3-0
3-1
5-0
5-1
6-0
6-1
2-0
2-1
4-0
4-1
D
D
D
D
D
D
G
G
F
FC
E
E
2
H
S
jJ
L
A
V M
EN
U
MUTING
DISPLAY
TV VOL TV CH
WIDE INPUT MODE
RETURN/EXIT
s
SUBTITLE
ENTER
TV/
VIDEO
TOPMENU/
GUIDE
MASTER
VOL
MAIN
MENU
l
ALT
DISC
D.TUNING
SHIFT
0/10
>10/11
12
ANT CLEAR
SEACH MODE
F
f
g
G
F
f
g
G
O
-
3
4,5
A
F
E
D
B
6-1
C
G
Set to
Réglez sur
Einstellen auf
Stel in op
C
A
F
E
D
B
5-1
A
F
E
B
4-0
C
A
B
3-0
A
B
2-0
Yes: if you have the speakers
Oui: si vous avez les
enceintes
Ja: wenn Sie solche
Lautsprecher besitzen
Ja: voor de luidsprekers die u
wel hebt of de onderbroken
pijlen
No: if you do not
Non: si vous ne les avez pas
Nein: falls nicht
Nee: voor de luidsprekers die
u niet hebt
and
et
und
en
and
et
und
en
What is your speaker
pattern ?
Quelle est votre
configuration d’enceintes ?
Die
Lautsprecherkonfigurationen
Wat is uw
luidsprekerpatroon ?
-
 1
1
-
 2
2


dans d''autres langues
- English: Sony STR-DB900 User manual
- Deutsch: Sony STR-DB900 Benutzerhandbuch
- Nederlands: Sony STR-DB900 Handleiding