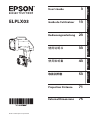
Epson ELPLX03 Ultra Short Throw Lens Mode d'emploi
- Catégorie
- Projecteurs
- Taper
- Mode d'emploi


3
EnglishFrançaisDeutschItalianoEspañol
( )
( )
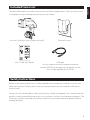
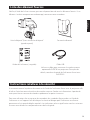
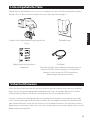
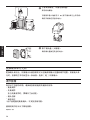
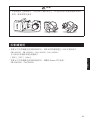
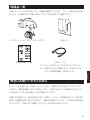
Included Items List
Check the following list to confirm that you have all of the supplied items. If by any chance there
is anything missing or damaged, please contact your dealer.
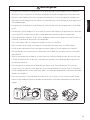
Lens unit (With lens covers (large and small)) Decorative cover
User's Guide (this guide) USB cable
Use this cable to connect the optional external
camera ELPEC01 to the projector. For details, see the
User's Guide supplied with ELPEC01.
Safety Instructions
Read this document and the User's Guide supplied with the projector carefully to use this unit
safely and correctly. To allow you to solve any unknown points quickly, keep this information
close to hand.
So that you can use the product safely and correctly, symbols are applied in this Guide and on the
product to indicate possible harm to the user or to others and the risk of damage to property. The
indications and their meaning are as follows. Make sure you understand them properly before
reading the guide.

4
EnglishFrançaisDeutschItalianoEspañol
( )
( )
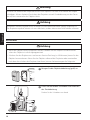
Warning
This symbol indicates information that, if ignored, could possibly
result in death or personal injury due to incorrect handling.
Caution
This symbol indicates information that, if ignored, could possibly re-
sult in personal injury or physical damage due to incorrect handling.
Warning
• Disconnect the power cord from the projector before attaching or removing this product.
Attaching or removing while the power cord is connected could cause an electric shock.
• When attaching the product to the projector, make sure that it is securely installed and that
it is locked in place. If this product is not attached correctly it may fall, resulting in personal
injury or an accident.
• When removing dirt and dust from the product, do not use a spray that contains flammable
gas. The high heat generated inside the projector may cause a fire.
Caution
• When projecting, remove the lens cover from the front of the lens unit. The cover may get
hot and may cause a malfunction.
• Before attaching the lens unit, check the projector's model number. If this lens unit is at-
tached to a projector other than the specified projector, the lens unit or the projector could
be damaged.
• Be careful not to trap your finger when attaching this product to the projector. This may
cause an injury.
• Do not disassemble or remodel.
• Do not use or store the projector in places where it might be subjected to high and low
extremes of temperature. Also, avoid any sudden changes in temperature.
• Do not use or store the projector in places where smoke from oil or cigarettes may be pres-
ent, as it can adversely affect the quality of the projected images.
• Do not get it wet.
• Do not drop it or subject it to impacts. When putting this product down, make sure you
place it on a flat, stable surface.
• When moving the projector, do not hold the lens unit and decorative cover. They may come
off and the projector may fall causing an injury.
• Remove the lens unit when transporting the projector. If the projector is transported with
the lens unit attached, the lens unit or the projector could be damaged.
• When carrying the lens unit, be sure to hold the handles on the lens unit.

5
EnglishFrançaisDeutschItalianoEspañol
( )
( )
Caution
• Do not attach the lens unit when the projector's lens insertion section is facing up. Dust or
dirt could enter the projector.
• Try not to touch the lens section with your hand or fingers. If fingerprints or oils are left on
the surface of the lens, projection quality deteriorates.
• To remove dust on the lens, blow it off using a blower.
• To clean any dirt on the lens, wipe it off gently with a soft cloth.
• Do not use any hard materials to clean the lens and do not subject the lens to any impacts.
• Do not touch or pull the connector part or the cable as this could cause a malfunction.
• When cleaning this product, do not use a wet cloth or solvents such as alcohol, benzene, or
thinner as this could cause an electric shock or a malfunction.
• Do not open or eat the desiccant that comes with the lens unit. If it gets into your eyes or
mouth, flush them immediately with water. If discomfort or vision problems continue after a
thorough flushing, see a doctor immediately.
• Attach the cover to the lens unit, and place it on its side on a stable surface. Failure to do so
may cause the lens unit to fall causing a malfunction or damage.
Projector Information
• When you use the lens unit with the following projector models, update the projector firmware
to V105 or later:
EB-L30002U, EB-L30000U, Pro L30002U, Pro L30000U
You can check the firmware version using the projector menu.
[Info] - [Version] - [Main]
• When you use the lens unit with the following projector models, contact Epson for help:
EB-L25000U, Pro 25000U

6
EnglishFrançaisDeutschItalianoEspañol
( )
( )
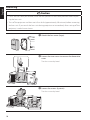
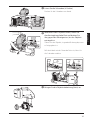
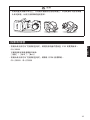
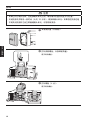
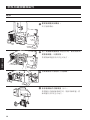
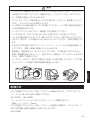
Removing and Attaching the Lens Unit
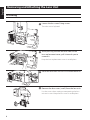
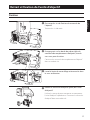
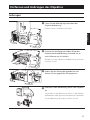
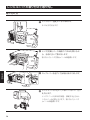
Attaching
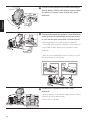
A
Loosen the lens cover fixing screws.
Turn the screws by hand.
B
While pressing the tabs on both sides of the
lens replacement cover, pull it towards you to
remove it.
Keep the lens replacement cover in a safe place.
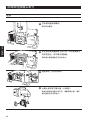
C
Raise the lock lever and turn it counterclockwise.
D
Remove the lens cover (small) from the lens unit.
Use the cover when storing or transporting the lens
unit on its own. Keep the lens cover in a safe place.

7
EnglishFrançaisDeutschItalianoEspañol
( )
( )
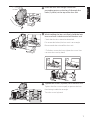
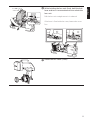
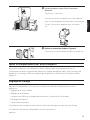
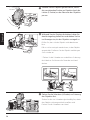
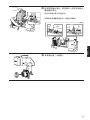
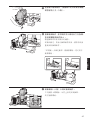
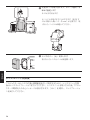
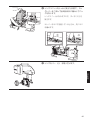
E
Insert the lens unit straight so that the
protruding points on the lens fit through the
holes (2 points) at the top of the lens unit.
F
While holding the lens unit firmly, hold the lock
lever and turn it clockwise to lock the lens unit.
Check that the lens cannot be detached.
If it cannot be locked, the lens unit is at an angle.
Remove and then reinstall the lens unit.
* To further secure the lever, tighten the screw. You
can turn the screw by hand.
G
Tighten the screws (4 points) to fix the lens unit.
Tighten the four screws equally to prevent the lens
from being installed at an angle.
Turn the screws by hand.

8
EnglishFrançaisDeutschItalianoEspañol
( )
( )
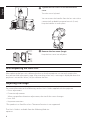
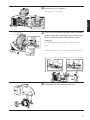
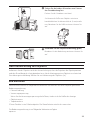
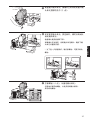
H
Tighten the two screws to fix the decorative
cover.
Turn the screws by hand.
You can remove the handles from the lens unit with a
commercially available hexagonal wrench (5 mm).
Keep the handles in a safe space.
I
Remove the lens cover (large).
Keep the lens cover in a safe place.
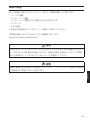
After Replacing the Lens Unit
After replacing the lens unit, calibrate the lens so that the projector can correctly acquire the
lens position and adjustment range. After attaching a lens unit, a message is displayed when the
projector is turned on. Select [Yes] to calibrate the lens.
Adjusting the Image
For more information on the following, see the User's Guide supplied with the projector.
• Focus adjustment
• Distortion adjustment
When you perform distortion adjustment, the size of the screen changes.
• Lens shift
• Keystone correction
*This product is a fixed focus lens. The zoom function is not supported.
The User's Guide is available from the following Web site.
epson.sn

9
EnglishFrançaisDeutschItalianoEspañol
( )
( )
Warning
Do not look into the lens while projecting. The powerful light emitted could cause damage
to eyesight. When turning on the projector at a distance using the remote control, make sure
there is no one looking into the lens.
Caution
Do not install the projector in a location that is subject to vibrations or shocks. Projection
quality deteriorates and it could cause a malfunction.

10
EnglishFrançaisDeutschItalianoEspañol
( )
( )
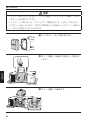
Removing
Caution
• If lens shift has been performed, move the lens position to the home position before replac-
ing the lens unit.
• Turn off the projector and then wait for a while (approximately 30 minutes) before removing
the lens unit. If you touch the lens unit during projection or immediately after turning off the
projector, it could cause a burn.
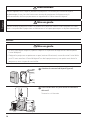
A
Attach the lens cover (large).
B
Loosen the two screws to remove the decorative
cover.
Turn the screws by hand.
C
Loosen the screws (4 points).
Turn the screws by hand.

11
EnglishFrançaisDeutschItalianoEspañol
( )
( )
D
While holding the lens unit firmly, hold the lock
lever and turn it counterclockwise to unlock the
lens unit.
Pull the lens unit straight out as it is released.
If the lever is fixed with the screw, loosen the screw
first.
E
Attach the lens cover (small).

12
EnglishFrançaisDeutschItalianoEspañol
( )
( )
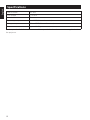
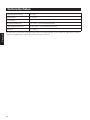
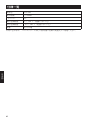
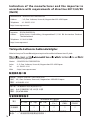
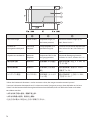
Specifications
Product name ELPLX03
Focal length 11.16 mm
F number 2.2
Operating temperature 0 to +50°C (No condensation)
Storage temperature -10 to +60 °C (No condensation)
Mass Approx. 13.0 kg
Contact your local dealer or the nearest address provided in the documentation supplied with
the projector.

13
EnglishFrançaisDeutschItalianoEspañol
( )
( )
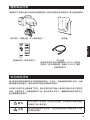
Liste des élément fournis
Vérifiez, à l'aide de la liste suivante, que vous disposez bien de tous les éléments fournis. Si un
élément s'avérait manquant ou endommagé, contactez votre revendeur.
Unité d'objectif (Avec couvercles d'objectif
(grand et petit))
Couvercle décoratif
Guide de l'utilisateur (ce guide) Câble USB
Utilisez ce câble pour connecter la caméra externe
optionnelle ELPEC01 au projecteur. Pour plus de
détails, consultez le guide de l'utilisateur fourni avec
la ELPEC01.
Instructions relatives à la sécurité
Lisez attentivement le présent document et le Guide de l'utilisateur fourni avec le projecteur afin
d'utiliser l'unité en toute sécurité et de manière correcte. Gardez ces informations à portée de
main pour être en mesure de résoudre rapidement les points inconnus.
Pour une utilisation sûre et correcte de ce produit, des symboles figurent dans ce Guide de
l'utilisateur et sur l'appareil afin d'indiquer un éventuel danger pour l'utilisateur ou d'autres
personnes et le risque de dégâts matériels. Les indications et leur signification sont les suivantes.
Assurez-vous de bien les comprendre avant de lire le guide.

14
EnglishFrançaisDeutschItalianoEspañol
( )
( )
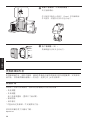
Avertissement
Ce symbole indique des informations dont le non-respect
risquent d'entraîner des blessures graves, voire mortelles, en
raison d'une manipulation incorrecte.
Mise en garde
Ce symbole indique des informations qui, si elles sont igno-
rées, peuvent entraîner des blessures corporelles ou des dom-
mages matériels en raison d'une manipulation incorrecte.
Avertissement
• Débranchez le cordon d'alimentation du projecteur avant d'installer ou de retirer ce produit.
L'installation ou le retrait du produit alors que le cordon d'alimentation est branché présente
un risque d'électrocution.
• En fixant le produit au projecteur, assurez-vous qu'il est solidement installé et qu'il est
verrouillé en place. Si ce produit n'est pas fixé correctement, il peut tomber, provoquant des
blessures ou un accident.
• Pour enlever la saleté et la poussière sur le produit, n'utilisez pas de vaporisateur contenant
un gaz inflammable. La chaleur élevée générée à l'intérieur du projecteur peut provoquer un
incendie.
Mise en garde
• Lors de la projection, retirez le couvercle de l'objectif de l'avant de l'objectif. Le couvercle
peut chauffer et provoquer un dysfonctionnement.
• Avant d'installer l'unité d'objectif, vérifiez le numéro de modèle du projecteur. Si cette unité
d'objectif est installée sur un projecteur autre que le projecteur indiqué, il est possible que
l'unité d'objectif ou le projecteur soit endommagé.
• Veillez à ne pas vous coincer les doigts lorsque vous fixez ce produit au projecteur. Vous
pourriez vous blesser.
• Ne démontez pas l'unité et n'y apportez pas de modifications.
• N'utilisez pas et ne rangez pas le projecteur dans des endroits où il pourrait être soumis à des
températures extrêmement élevées ou basses. Évitez également les changements brusques
de température.
• N'utilisez pas et ne rangez pas le projecteur dans des endroits où des vapeurs d'essence ou
de la fumée de cigarettes pourraient être présentes, car cela risquerait de nuire à la qualité
des images projetées.
• Veillez à ce qu'elle ne soit pas mouillée.
• Évitez de laisser tomber l'unité et de la cogner. Ne posez cette unité que sur une surface
plane et stable.

15
EnglishFrançaisDeutschItalianoEspañol
( )
( )
Mise en garde
• Lorsque vous déplacez le projecteur, ne le tenez pas par l'unité d'objectif et le couvercle
décoratif. Ceux-ci peuvent se détacher entrainant la chute du projecteur et des blessures.
• Retirez l'unité d'objectif lors du transport du projecteur. Si vous transportez le projecteur
alors que l'unité d'objectif est installée, il est possible que l'unité d'objectif ou le projecteur
soit endommagé.
• Lorsque vous transportez l'unité d'objectif, veillez à bien tenir les poignées de l'unité d'ob-
jectif.
• Ne fixez pas l'unité d'objectif si la section d'insertion de l'objectif du projecteur est tournée
vers le haut. De la poussière ou de la saleté pourraient pénétrer dans le projecteur.
• Évitez de toucher l'objectif. Si des traces de doigt ou des taches de graisse sont laissées sur
l'objectif, la qualité de projection sera dégradée.
• S'il y a de la poussière sur l'objectif, nettoyez-la avec un souffleur.
• Pour nettoyer de la saleté sur l'objectif, essuyez délicatement avec un chiffon doux.
• N'utilisez pas de produit concentré pour nettoyer l'objectif et ne cognez pas l'objectif.
• Ne touchez pas ou ne tirez pas le connecteur ou le câble car cela peut causer un dysfonc-
tionnement.
• Pour le nettoyage de ce produit, n'utilisez pas un chiffon humide ou des solvants tels que
l'alcool, le benzène ou un diluant : cela pourrait entraîner une décharge électrique ou un
dysfonctionnement.
• N'ouvrez pas et n'avalez pas le déshydratant fourni avec l'unité d'objectif. S'il entre en
contact avec vos yeux ou votre bouche, rincez immédiatement avec de l'eau. Si une gêne
ou des problèmes de vision subsistent après un nettoyage approfondi, consultez immédia-
tement un médecin.
• Fixez le couvercle à l'unité d'objectif et placez-le sur le côté, sur une surface stable. Autre-
ment l'unité d'objectif pourrait tomber et provoquer un dysfonctionnement ou des dom-
mages.

16
EnglishFrançaisDeutschItalianoEspañol
( )
( )
Informations sur le projecteur
• Lorsque vous utilisez l'unité d'objectif avec les modèles de projecteurs suivants, mettez à jour
le firmware du projecteur avec la version V105 ou une version ultérieure en premier :
EB-L30002U, EB-L30000U, Pro L30002U, Pro L30000U
Vous pouvez vérifier la version actuelle du firmware en utilisant le menu du projecteur.
[Information] - [Version] - [Main]
• Lorsque vous utilisez l'unité d'objectif avec les modèles de projecteurs suivants, contactez
Epson pour obtenir de l'aide :
EB-L25000U, Pro 25000U

17
EnglishFrançaisDeutschItalianoEspañol
( )
( )
Retrait et fixation de l'unité d'objectif
Fixation
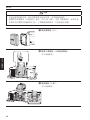
A
Desserrez les vis de fixation du couvercle de
l'objectif.
Tournez les vis à la main.
B
En appuyant sur les bords des deux côtés du
couvercle de remplacement d'objectif, tirez-le
vers vous pour le retirer.
Conservez le couvercle de remplacement d'objectif
dans un endroit sûr.
C
Levez le levier de verrouillage et tournez-le dans
le sens antihoraire.
D
Retirez le couvercle d'objectif (petit) de l'unité
d'objectif.
Utilisez le couvercle pour entreposer ou transporter
l'unité d'objectif séparément. Conservez le couvercle
d'objectif dans un endroit sûr.

18
EnglishFrançaisDeutschItalianoEspañol
( )
( )
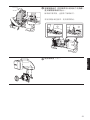
E
Insérez l'unité d'objectif de manière droite pour
que les points saillants de l'objectif rentrent dans
les orifices (2 points) situés en haut de l'unité
d'objectif.
F
Tout en maintenant fermement l'unité d'objectif,
tenez le levier de verrouillage et tournez-le dans
le sens horaire pour verrouiller l'unité d'objectif.
Vérifiez que l'objectif ne puisse pas être détaché.
S'il n'est pas correctement verrouillé, l'unité d'objectif
sera installé en biais. Retirez puis réinstallez l'unité
d'objectif.
* Pour sécuriser davantage le levier, serrez la vis. Vous
pouvez tourner la vis à la main.
G
Serrez les vis (4 points) pour fixer l'unité
d'objectif.
Serrez les quatre vis de manière égale pour éviter que
l'objectif ne soit installé en biais.
Tournez les vis à la main.

19
EnglishFrançaisDeutschItalianoEspañol
( )
( )
H
Serrez les deux vis pour fixer le couvercle
décoratif.
Tournez les vis à la main.
Vous pouvez retirer les poignées de l'unité d'objectif
avec une clé hexagonale disponible dans le commerce
(5 mm). Conservez les poignées dans un endroit
sûr.
I
Retirez le couvercle d'objectif (grand).
Conservez le couvercle d'objectif dans un endroit sûr.
Après le remplacement de l'unité d'objectif
Après avoir remplacé l'unité d'objectif, calibrez l'objectif pour que le projecteur puisse
correctement acquérir la position de l'objectif et la plage de réglage. Après avoir fixé une unité
d'objectif, un message s'affiche au démarrage du projecteur. Sélectionnez [Oui] pour calibrer
l'objectif.
Réglage de l'image
Pour plus d'informations sur ce qui suit, consultez le Guide de l'utilisateur fourni avec le
projecteur.
• Réglage de la mise au point
• Réglage de la distorsion
Lorsque vous effectuez le réglage de la distorsion, la taille de l'écran change.
• Décalage de l'objectif
• Correction du keystone
*Ce produit utilise un objectif à focale fixe. La fonction de zoom n'est pas prise en charge.
Le Guide de l'utilisateur est disponible sur le site web suivant.
epson.sn

20
EnglishFrançaisDeutschItalianoEspañol
( )
( )
Avertissement
Ne pas regarder dans l'objectif pendant la projection. La lumière puissante émise peut
endommager la vue. Lors de la mise sous tension du projecteur à distance avec la
télécommande, vérifiez que personne ne regarde dans la direction de l'objectif.
Mise en garde
Ne pas installer le projecteur dans un endroit où il peut être soumis à des vibrations ou à des
chocs. La qualité de la projection se détériorera et cela peut provoquer un dysfonctionnement.
Retrait
Mise en garde
• Si vous avez décalé l'objectif, replacez l'objectif à sa position d'origine avant de remplacer
l'unité d'objectif.
• Éteignez le projecteur et patientez un peu (environ 30 minutes) avant de retirer l'unité d'ob-
jectif. Si vous touchez à l'unité d'objectif lors de la projection ou juste après avoir éteint le
projecteur, vous risquez de vous brûler.
A
Attachez le couvercle d'objectif (grand).
B
Dévissez les deux vis pour retirer le couvercle
décoratif.
Tournez les vis à la main.
La page charge ...
La page charge ...
La page charge ...
La page charge ...
La page charge ...
La page charge ...
La page charge ...
La page charge ...
La page charge ...
La page charge ...
La page charge ...
La page charge ...
La page charge ...
La page charge ...
La page charge ...
La page charge ...
La page charge ...
La page charge ...
La page charge ...
La page charge ...
La page charge ...
La page charge ...
La page charge ...
La page charge ...
La page charge ...
La page charge ...
La page charge ...
La page charge ...
La page charge ...
La page charge ...
La page charge ...
La page charge ...
La page charge ...
La page charge ...
La page charge ...
La page charge ...
La page charge ...
La page charge ...
La page charge ...
La page charge ...
La page charge ...
La page charge ...
La page charge ...
La page charge ...
La page charge ...
La page charge ...
La page charge ...
La page charge ...
La page charge ...
La page charge ...
La page charge ...
La page charge ...
La page charge ...
La page charge ...
La page charge ...
La page charge ...
La page charge ...
La page charge ...
La page charge ...
La page charge ...
-
 1
1
-
 2
2
-
 3
3
-
 4
4
-
 5
5
-
 6
6
-
 7
7
-
 8
8
-
 9
9
-
 10
10
-
 11
11
-
 12
12
-
 13
13
-
 14
14
-
 15
15
-
 16
16
-
 17
17
-
 18
18
-
 19
19
-
 20
20
-
 21
21
-
 22
22
-
 23
23
-
 24
24
-
 25
25
-
 26
26
-
 27
27
-
 28
28
-
 29
29
-
 30
30
-
 31
31
-
 32
32
-
 33
33
-
 34
34
-
 35
35
-
 36
36
-
 37
37
-
 38
38
-
 39
39
-
 40
40
-
 41
41
-
 42
42
-
 43
43
-
 44
44
-
 45
45
-
 46
46
-
 47
47
-
 48
48
-
 49
49
-
 50
50
-
 51
51
-
 52
52
-
 53
53
-
 54
54
-
 55
55
-
 56
56
-
 57
57
-
 58
58
-
 59
59
-
 60
60
-
 61
61
-
 62
62
-
 63
63
-
 64
64
-
 65
65
-
 66
66
-
 67
67
-
 68
68
-
 69
69
-
 70
70
-
 71
71
-
 72
72
-
 73
73
-
 74
74
-
 75
75
-
 76
76
-
 77
77
-
 78
78
-
 79
79
-
 80
80


Epson ELPLX03 Ultra Short Throw Lens Mode d'emploi
- Catégorie
- Projecteurs
- Taper
- Mode d'emploi
dans d''autres langues
Documents connexes
-
Epson ELPLX02S Ultra Short Throw Lens Mode d'emploi
-
-
-
-
-
-
-
Epson PowerLite Pro Z11000W Mode d'emploi
-
Epson Руководство по установке устройства настенного крепления модели ELPMB24 Manuel utilisateur
-
Epson ELPAF64 Mode d'emploi