
VIORE TM
T EC H N O LO G Y & INNOVATION
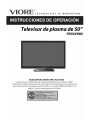
50" Plasma Television
PD5OVH80
AIR (TV)/CABLE MODE SELECTION
The Air/Cable menu option is set to the "CABLE" (Cable Television) mode at the factory.
If you want to use an antenna for the built - in TV tuner, this menu option must be set to the
"Air" mode. Please refer to"CHANNEL MENU"in page 19 of this manual for the details.

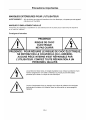
Important Precautions
OUTDOOR USER MARKING
WARNING: To reduce the risk of fire or electric shock hazard, do not expose this appliance to rain or
moisture.
WET LOCATION MARKING
"Apparatus shall not be exposed to dripping or splashing and no objects filled with liquids, such as vases, shall be
placed on the apparatus."
Service Instructions
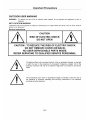
CAUTION
RISK OF ELECTRIC SHOCK
DO NOT OPEN
CAUTION • TO REDUCE THE RISK OF ELECTRIC SHOCK,
DO NOT REMOVE COVER (OR BACK)
NO USER-SERVICEABLE PARTS INSIDE.
REFER SERVICING TO QUALIFIED SERVICE PERSONNEL.
The lightning flash with arrowhead symbol, within an equilateral triangle, is intended
to alert the user to the presence of uninsulated "dangerous voltage" with-in the
product's enclosure that may be of sufficient magnitude to constitute a risk electric
shock.
The exclamation point within an equilateral triangle is intended to alert the user to
the presence of important operating and servicing instructions in the literature
accompanying the appliance.
GB-1

Please carefully study this manual and always keep it available. The following are some installation
and operation precautions, which you should be aware as a matter of safety,
Important Safety Instructions
1) Read these instructions.
2) Keep these instructions.
3) Heed all warnings.
4) Followed instructions.
5) Do not use this apparatus near water.
6) Clean only with dry cloth.
7) Do not block any ventilation openings. Install in accordance with the manufacturer's instructions.
8) Do not install near any heat sources such as radiators, heat registers, stoves, or other apparatus
(including amplifiers) that produce heat.
9) Do not defeat the safety purpose of the polarized or grounding-type plug. A polarized plug has two blades
with one wider than the other. A grounding type plug has two blades and a third grounding prong. The wide
blade or the third prong are provided for your safety. If the provided plug does not fit into your outlet,
consult an electrician for replacement of the obsolete outlet.
10) Protect the power cord from being walked on or pinched particularly at plugs, convenience receptacles,
and the point where they exit from the apparatus.
11) Only use attachments/accessories specified by the manufacturer.
12) Use only with the cart, stand, tripod, bracket, or table specified by the manufacturer, ors old with the
apparatus. When a cart is used, use caution when moving the cart/apparatus combination to avoid injury
from tip-over.
13) Unplug this apparatus during lightning storms or when unused for long periods of time.
14) Refer all servicing to qualified service personnel. Servicing is required when the apparatus has been
damaged in any way, such as power-supply cord or plug is damaged, liquid has been spilled or objects
have fallen into the apparatus, the apparatus has been exposed to rain or moisture, does not operate
normally, or has been dropped.
Warning
1) To reduce the risk of fire or electric shock, do not expose this apparatus to rain or moisture.
2) The apparatus shall not be expose d to dripping or splashing and that no objects filled with liquids, such as
vases, shall be placed on the apparatus.
3) The disconnect device (appliance power connecter) shall remain readily operable.
4) Changes or modifications to this unit not expressly approved by the party responsible for compliance
could void the user's authority to operate the equipment.
CAUTION:
This product satisfies FCC regulations when shielded cables and connectors are used to connect the unit to
other equipment. To prevent electromagnetic interference with electric appliances such as radios and
televisions, use shielded cables and connectors for connections.
DECLARATION:
This device complies with Part 15 of the FCC Rules. Operation is subject to the following two conditions:
(1) This device may not cause harmful interference, and
(2) this device must accept any interference received, including interference that may cause undesired
operation.
GB-2

INFORMATION:
ThisequipmenthasbeentestedandfoundtocomplywiththelimitsforaClassBdigitaldevice,pursuantto
Part 15 of the FCCRules.Theselimitsare designedto providereasonableprotectionagainstharmful
interferenceina residentialinstallation.Thisequipmentgenerates,usesandcanradiateradiofrequency
energyand,ifnotinstalledandusedinaccordancewiththeinstructions,maycauseharmfulinterferenceto
radiocommunications.However,there is no guaranteethat interferencewill not occurin a particular
installation.Ifthisequipmentdoescauseharmfulinterferencetoradioortelevisionreception,whichcanbe
determinedbyturningtheequipmentoffandon,theuserisencouragedtotryto correcttheinterferenceby
oneormoreofthefollowingmeasures:
Reorientorrelocatethereceivingantenna.
Increasetheseparationbetweentheequipmentandreceiver.
Connecttheequipmentintoanoutletonacircuitdifferentfromthattowhichthereceiverisconnected.
Consultthedealeroranexperiencedradio/TVtechnicianfor help.
Notes:
Wide screen format PDP Displays (16:9, the aspect ratio of the screen width to height) are primarily
designed to view wide screen format full-motion video. The images displayed on them should primarily be in
the wide screen 16:9 ratio format, or expanded to fill the screen if your model offers this feature and the
images are constantly moving. Displaying stationary graphics and images on screen, such as the dark
side-bars on no expanded standard format television video and programming, should be limited to no more
than 5% of the total television viewing per week.
Additionally, viewing other stationary images and text such as stock market reports, video game displays,
station Iogos, web sites or computer graphics and patterns, should be limited as described above.
Displaying stationary images that exceed the above guidelines can cause uneven aging of PDP Displays
that leave subtle, but permanent burned-in ghost images in the PDP picture. To avoid this, vary the
programming and images, and primarily display full screen moving images, not stationary patterns or dark
bars. Be careful in the selection and duration of television formats used for viewing. Uneven PDP aging as a
result of format selection and use, as well as burned-in images, are not covered by the warranty.
GB-3

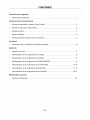
CONTENTS
Safety Precautions
• Important Precautions ....................................................................................................................... 1
User Guidance Information
• Names of each part (Front View)/Accessories .................................................................................. 5
• Names of each part (Back View) ....................................................................................................... 6
• Wall Mount ........................................................................................................................................ 7
• Remote control .................................................................................................................................. 8
• Precautions/How to use remote control ............................................................................................ 9
Basic Use
• Powering the TV/Selecting input source ......................................................................................... 10
Application
• Operating the Menu ........................................................................................................................ 11
• Customizing the PICTURE Settings .............................................................................................. 12
• Customizing the SOUND Settings ................................................................................................. 13
• Customizing the TIMER Settings ................................................................................................... 14
• Customizing the SETUP Settings .............................................................................................. 15~16
• Customizing the LOCK Settings ................................................................................................ 17~19
• Customizing the CHANNEL Settings ....................................................................................... 20~21
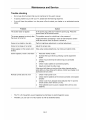
Maintenance and Service
• Troubleshooting ............................................................................................................................. 22
GB-4

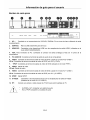
User Guidance Information
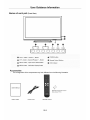
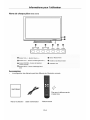
Names of each part (FrontView)
i
• @ 0 0 0
V_L- VOL+ CH- CH÷ _NPUT MENU POWER
O VOL+/- button - Volume +.- Button
CH+/- button - Channel/Program +.- Button
INPUT button - Input Source Select Button
O MENU button - OSD Menu Display Button
i_ POWER button
(_ Remote Control Window
O LED ndicator
Accessories
' The configuration of the components may look different from the following illustration.
User's Manual
Batteries for Remote Control
(Size AAAx2 PCS)
User's Guide Power Cord Remote Control
GB-5

User Guidance Information
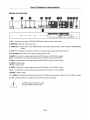
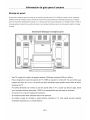
Names of each part
AC _- S_V_C_ H;D_t3 HDM2 IHDM1
Pb
SPOF RF
Pr L R S-VIOEO I AMY _put
1. AC ~ : Connect to an earth 100-240V, 50/60Hz AC outlet with the power cable.
2. SERVICE: USB Slot. (only for service )
3. HDMII/2/3: Connect them to the HDMI-devices with HDMI output sockets. (used in HDMI1/HDMI2/HDMI3
mode)
4. VGA: For PC display. Connect it to the D-Sub 15 pins analog output connector of the PC.
5. PC AUDIO IN: Connect it to the audio output terminal of PC.
6. VIDEO: Connect it to video output terminal of DVD.(used in AV2<CVBS> mode)
L/R in : Connect them to the audio output terminal of DVD.(with AV2 and YPbPr)
7.YPbPr: Connect them to the video output terminal of DVD.(used in YPbPr mode).
8. VIDEO: Video output.
L/R out : Audio output.
9. VIDEO: Connect it to video output terminal of DVD.(used in AVl<CVBS> mode)
L/R in : Connect them to the audio output terminal of DVD.(with AV1 and S-VIDEO)
10.SPDIF : SPDIF output.
11. S-VIDEO: Connect them to the AV devices with S-VIDEO output sockets. (used in AVI<S-VIDEO> mode)
12. RF: Connect antenna or cable 75 Ohm coaxial to receive TV signal.
* S-VIDEO and AVl share an audio.
* AV2 and YPbPr share an audio.
GB-6

User Guidance Information
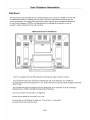
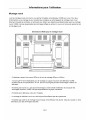
Wall Mount
The wall mount kit (not included) with your purchase allows you to mount your VIORE TV on the wall.
For detailed information on installing the wall mount, refer to the instructions provided by the wall
mount manufacturer. It is strongly recommended to contact a technician for professional assistance
for wall mount installation. VlORE is not responsible for any damage to the product or injury to
yourself or others resulting from the wall-mounting.
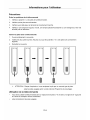
VESA Dimensions for Wall Mount
°i!ill!illiii!ill-°121!i!iili!i!i° !!!i!iii!ii oi!!i!I!i!°
This TV is compliant with the VESA Standard mounting hole pattern 500mm x 400mm.
4 pcs of type M7 screws are required for installing the wall mount bracket to your VlORE TV.
Do not use screws that are longer than 14 mm. Screws that are too long may cause damage to the inside
of the TV set.
Do not fasten the screws too tight for this may damage the TV or cause the TV to fall, resulting in
Personal injury. VIORE is not liable for these kinds of incidents.
Do not mount the TV at more than a 15 degree tilt.
Always use two people to mount the TV to a wall.
Do not install your Wall Mount Kit while your TV is turned on. It may result
in personal injury due to electric shock.
GB-7

User Guidance Information
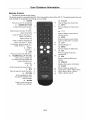
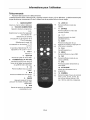
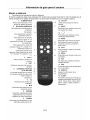
Remote Control
• Functions of remote control buttons
The remote control is using Infra-Red (IR). Point it towards the front of the LCD TV. The remote control may not
work correctly if it is operated out of range or out of angle.
1. POWER
Press to turn the TV on/standby
2. NUMBER BUTTONS
To select the program directly. 1
e.g.:
Select channel 5, press "5" button.
Select channel 62 2
press "6" button, and press "2"
button in 2 seconds.
Select channel 152
press "1" button, and press "5"
button, then press "2" button
in 2 seconds, select channel "5-1",
press "5" then "-/--" and "1".
3. VOL+/-
Volume +/- 3
4. EXIT
Press to exit form the OSD menu.
5. THU MBSTICK( A /T/_1/1_/OK) 4
Allows you to navigate the
on-screen menus and adjust the
system settings to your
preference. 5
6. CC
Press to display the closed caption.
7. MTS
Press to select the audio channels. 8
8. PICTURE 9
Press repeatedly to cycle
through the available video
picture modes.
9. SOUND
Press to cycle through the
different sound settings.
10. CH.LIST
10 Used to display the channel list.
11. INPUT
11 Press to display the input source
menu.
12.
Press to Return to the previous
channel viewed.
13. MUTE
Press to mute the sound. Press
again or press VOL+ to unmute.
12 14. CH+/-
13 Channel/Program +/-
15. MENU
Press to display the OSD menu.
I4
16. FAV
Press to display the favorite
channels list.
!5 17. EPG
Press to enter the EPG menu
directly.
18. DISPLAY
Displays the program information.
19. SLEEP
16 Press to setup the sleep time
17 among: 5min, 10min, 15min, 30min,
I8 45min, 60min, 90min, 120min,
19 180min, 240min and off.
GB-8

User Guidance Information
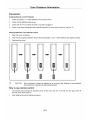
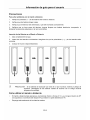
Precautions
Avoiding Remote Control Problems
1. Check the polarity (+,-) of the batteries in the remote control.
2. Check that the batteries have power.
3. Check that the TV is powered and that it is properly plugged in.
4. Check if any three-wavelength lamp, special fluorescent or neon sign is turned on near the TV.
Inserting Batteries in the Remote Control
1. Open the cover completely.
2. Insert the two supplied batteries. Ensure that the polarities (+ and -) of the batteries are aligned correctly.
3. Slide back the cover.
CAUTION • Risk of explosion if battery is replaced by an incorrect type. Dispose of used batteries
according to the national code (Recycling program).
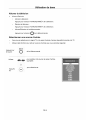
How to use remote control
The remote control should be operated within 30 feet (7m) and 30 ° to the left and the right of the IR
receiver at the front of the TV.
• Used batteries should be disposed properly.
GB-9

Basic Use
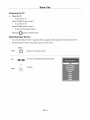
Powering the TV
• Power on/off
• To turn the TV on :
Press "POWER" button on the TV.
• To turn the TV off:
Press "POWER" button on the TV.
• To turn on/off by remote control:
Press the O button of remote control.
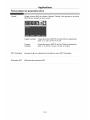
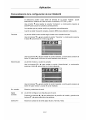
Selecting Input Source
• You can select between the TV signal and the input signal of other equipments connected to the TV.
• Use this function to switch to the input source you wish to view.
Press
INPUT
button on the remote control.
_iii i
Use to move to the desired input signal source.
Press
to select.
GB-IO

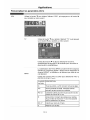
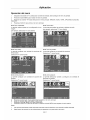
Application
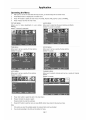
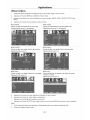
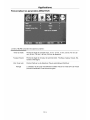
Operating the Menu
1. After you turn on the TV and select the input source, you should setup the on-screen menu.
2. Press MENU button to display the on-screen menu.
3. Press 4/ D,button to select the main menu: PICTURE, AUDIO, TIME, SETUP, LOCK, CHANNEL.
4. Press • button to enter the main menu.
PICTURE MENU: AUDIO MENU:
Allows you to make adjustments to your picture Allows you to customize the sound options and effects
settings. (Select TV source for example)
(select TV source for example)
TIME MENU: SETUP MENU:
Allows you to set up a variety of timer options. Allows you to set up a variety of setup options.
(Select TV source) (Select TV source)
LOCK MENU: CHANNEL MENU:
Allows you to set up a variety of lock options. Allows you to search channels and set up a variety of channel
(Select TV source o3tions.
Select TV source)
5. Press •/A button to select the item in the main menu.
6. Press4/ D,button to adjust or select;
Press I_ button to enter the submenu.
7. Press EXIT button to exit the menu or press MENU button to go back to the previous menu.
Note:
1. Only when you input the suitable signal, the relevant items can be activated.
2. You should according to the hints on the bottom of menu.
GB-11

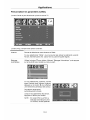
Application
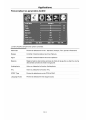
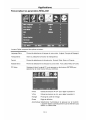
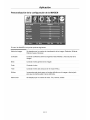
Customizing the PICTURE Settings
The PICTURE menu includes the following options •
Picture Mode Cycles among picture display modes: Standard, Vivid, Factory, Mild, Customer.
Contrast Controls the difference between the brightest and darkest regions of the picture.
Brightness Controls the overall brightness of the picture.
Saturation Controls the saturation.
Tint Controls the tint (only could be operated in NTSC mode).
Sharpness Increase this setting to see crisp edges in the picture; decrease it for soft edges.
Color Temp Cycles among color modes: Cool, Normal, Warm.
GB-12

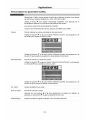
Application
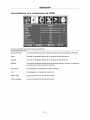
Customizing the AUDIO Settings
The AUDIO menu includes the following options •
Audio Mode Allows you to select among: Standard, Music, Movie, Sports and Customer.
Bass Controls the relative intensity of lower pitched sounds.
Treble Controls the relative intensity of higher pitched sounds
Balance To adjust the balance of the left and right sound track, or turn off the volume of
the left and right sound track.
Surround To turn on or off the Surround function.
AVL To turn on or off the AVL function.
SPDIF Type Allows you to select between PCM and RAW.
Audio Language Allows you to select audio languages among.
GB-13

Application
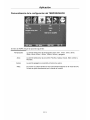
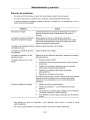
Customizing the TIMER Settings
Sleep Allows you to set up the sleep among: 5min, 10min, 15min, 30min, 45min,
60min, 90min, 120min, 180min, 240min and off.
Time Zone Allows you to set up the sleep timer among: Pacific, Alaska, Hawaii, Eastern,
Central and Mountain.
Daylight Saving Time Allows you to turn on or off the daylight saving time.
Data / Time
User can not change time manually during DTV mode, for time is from signal
source directly.
GB-14

Application
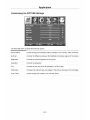
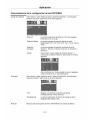
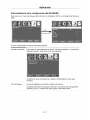
Customizing the SETUP Settings
includes the following options:
The SETUP menu
Menu Language Allows you to select menu language among: English, Fran£ais and EspaSol.
Menu Opacity Allows you to turn on or off the menu opacity function.
Zoom Mode Allows you to select the zoom mode among: Normal, Wide, Zoom, and Cinema.
DNR Allows you to select the DNR among: Off, Minimum, Medium and Maximum.
PC Input PC signal first, then press INPUT button to select VGA mode, press OK
button to confirm.
H-Position
V-Position
Clock
Phase
Auto
Allow you to use _ and • button to adjust the H Position.
Allow you to use _ and • button to adjust the V Position.
Allow you to prolong the image.
Allow you to adjust the definition.
Select "Auto" and press • button, the unit will
automatically adjust all items to achieve a best effect.
GB-15

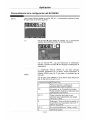
Application
Customizing the SETUP Settings
Closed Caption Use • button to highlight the Closed Caption item, then press • button to enter
into the following menu.
CC Mode
Basic Selection
Advanced Selection
Option
Allows you to select the CC Mode among: On, Off and CC
on Mute.
Allows you to select the basic selection among: Off, CC1,
CC2, CC3, CC4, Textl, Text2, Text3 and Text4.
Allows you to select the advanced selection among:
Service 1, Service 2, Serviced 3 Service 4, Service 5 and
Service 6.
Use • button to highlight the "Option" item, then press •
button to enter into the following menu.
Use • and • buttons to highlight the desired item, and
use .qand • buttons to select.
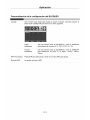
Advanced Use • button to highlight the Closed Caption item, then press • button to enter
into the following menu.
XVS Turn on/off the function to adjust the dynamic brightness
automatically.
Energy Saving Allows you to select the Energy Saving among: Off, Low,
Medium and High.
Restore Default Restores all settings in SETUP menu to factory settings.
GB-16

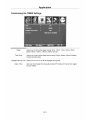
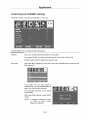
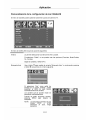
Application
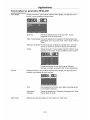
Customizing the LOCK Settings
You should enter the password to enter the Lock menu. NOTE: the factory password is 0000.
input
4-digital password
The LOCK menu includes the following options •
Change Password UseT button to select the "Change Password" item, then press • button to
enter into the following menu.
Input the new 4-digital password and input it again to confirm.
System Lock Allows you to turn on or off the system lock.
If you turn off the system lock, then the following items (US, Canada, RRT
Setting and Reset RRT) will unable to use.
GB-17

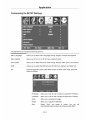
Application
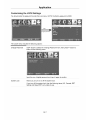
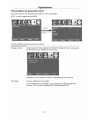
Customizing the LOCK Settings
US
Use • button to highlight the "US" item, then press • button to enter into the
following menu.
TV
Use • button to highlight the "TV" item, then press • button to
enter into the following menu.
Use • and • buttons to select the desired rating and press •
button to block or unblock rating.
MPAA
The Movie rating (MPAA) is used for original movies rated by
the Motion Picture Association of America (MPAA) as
broadcasted on cable TV and not edited for television.
Use UP or DOWN button to select N/A, G, PG, PG-13, R,
NC-17 or X.
RATING DESCRIPTION
G General Audiences. Movie is appropriate for all
ages.
PG Parental Guidance Suggested. May contain material
not suited for younger viewers.
PG-13 Contains content that may not be appropriate for
viewers under the age of 13.
R Restricted. Contains adult content, no one under 17
admitted without parent.
NC-17 No one 17 and under admitted.
X Adults only.
GB-18

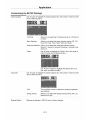
Application
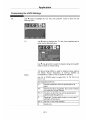
Customizing the LOCK Settings
Canada
Use Down button to highlight the "Canada" item, then press RIGHT button to enter
into the following menu.
Canada English Use LEFT and RIGHT buttons to select among: E, C, C8+, G,
PG, 14+ and 18+
Canada French
Use LEFT and RIGHT buttons to select among: E, G, 8ans+,
13ans+,16ans+ and 18ans+
RRT Setting Press • to select and enter the RRT setting menu.
Reset RRT Allows you to reset the RRT setting.
GB-19
La page charge ...
La page charge ...
La page charge ...
La page charge ...
La page charge ...
La page charge ...
La page charge ...
La page charge ...
La page charge ...
La page charge ...
La page charge ...
La page charge ...
La page charge ...
La page charge ...
La page charge ...
La page charge ...
La page charge ...
La page charge ...
La page charge ...
La page charge ...
La page charge ...
La page charge ...
La page charge ...
La page charge ...
La page charge ...
La page charge ...
La page charge ...
La page charge ...
La page charge ...
La page charge ...
La page charge ...
La page charge ...
La page charge ...
La page charge ...
La page charge ...
La page charge ...
La page charge ...
La page charge ...
La page charge ...
La page charge ...
La page charge ...
La page charge ...
La page charge ...
La page charge ...
La page charge ...
La page charge ...
La page charge ...
La page charge ...
La page charge ...
La page charge ...
La page charge ...
La page charge ...
-
 1
1
-
 2
2
-
 3
3
-
 4
4
-
 5
5
-
 6
6
-
 7
7
-
 8
8
-
 9
9
-
 10
10
-
 11
11
-
 12
12
-
 13
13
-
 14
14
-
 15
15
-
 16
16
-
 17
17
-
 18
18
-
 19
19
-
 20
20
-
 21
21
-
 22
22
-
 23
23
-
 24
24
-
 25
25
-
 26
26
-
 27
27
-
 28
28
-
 29
29
-
 30
30
-
 31
31
-
 32
32
-
 33
33
-
 34
34
-
 35
35
-
 36
36
-
 37
37
-
 38
38
-
 39
39
-
 40
40
-
 41
41
-
 42
42
-
 43
43
-
 44
44
-
 45
45
-
 46
46
-
 47
47
-
 48
48
-
 49
49
-
 50
50
-
 51
51
-
 52
52
-
 53
53
-
 54
54
-
 55
55
-
 56
56
-
 57
57
-
 58
58
-
 59
59
-
 60
60
-
 61
61
-
 62
62
-
 63
63
-
 64
64
-
 65
65
-
 66
66
-
 67
67
-
 68
68
-
 69
69
-
 70
70
-
 71
71
-
 72
72


VIORE PD50VH80 Operating Instructions Manual
- Taper
- Operating Instructions Manual
- Ce manuel convient également à
dans d''autres langues
- English: VIORE PD50VH80
- español: VIORE PD50VH80
Autres documents
-
ProScan PLDV321300-E Manuel utilisateur
-
Voyager JE4020 Manuel utilisateur
-
-
-
Audiovox JE1909 Le manuel du propriétaire
-
Seiki SE24FT11-D Manuel utilisateur
-
Voyager JE2608 Manuel utilisateur
-
-
-