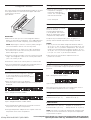
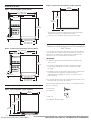
KitchenAid DVE55A7700V/A3 Le manuel du propriétaire
- Catégorie
- Frigos
- Taper
- Le manuel du propriétaire

For questions about features, operation/performance, parts, accessories, or service, call: 1-800-422-1230
or visit our website at... www.kitchenAid.com
In Canada, call: 1-800-807-6777, or visit our website at... www.KitchenAid.ca
DOUBLE DRAWERS
REFRIGERATOR/FREEZER
REFRIGERATOR/REFRIGERATOR
Models: KUDR204KSB, KUDR204KPA, KUDF204KSB,
KUDF204KPA
TABLE OF CONTENTS
DOUBLE DRAWERS SAFETY .........................................2
Proper Disposal of your Old Double Drawer ......................3
DESIGN SPECIFICATIONS ..............................................3
24” Drawer Models ............................................................. 3
INSTALLATION REQUIREMENTS ...................................3
Tools and Parts .................................................................3
Location Requirements .....................................................3
Product Dimension ...........................................................4
Custom Overlay Drawer Panels .........................................5
Electrical Requirements ....................................................6
INSTALLATION INSTRUCTIONS .....................................6
Unpack the Refrigerator Drawers ......................................6
Water Supply Requirements .............................................7
Connect Water Supply ......................................................7
Move the Refrigerator Drawers to Final Location ................8
Level the Refrigerator Drawers ..........................................8
Install Custom Overlay Panel .............................................9
Complete Installation .........................................................9
REFRIGERATOR DRAWERS USE ..................................9
Normal Sounds .................................................................9
Ensuring Proper Air Circulation .........................................9
Using the Controls ...........................................................10
Ice Maker and Water Filtration System……………… ......11
CARE AND CLEANING ..................................................12
Cleaning .........................................................................12
Removing Base Grille .....................................................13
Power Interruptions .........................................................13
Vacation Care .................................................................13
Moving Care ...................................................................13
TROUBLESHOOTING .................................................... 14
ASSISTANCE .................................................................16
In the U.S.A .....................................................................16
In Canada .......................................................................16
Accessories ....................................................................16
PRODUCT DATA SHEETS .............................................17
W11533205
Use and Care Guide and Installation Instruction
1
05-May-2021 10:43:59 EDT | RELEASED
In some European factories the letter "W" of the part code mentioned herein will be automatically
replaced by the number "4000" (e.g. "W12345678" becomes "400012345678")

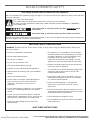
DOUBLE DRAWERS SAFETY
Your safety and the safety of others are very important.
We have provided many important safety messages in this manual and on your appliance. Always read and obey
all safety messages.
You can be killed or seriously injured if you don’t immediately follow
instructions.
You can be killed or seriously injured if you don’t follow instructions.
All safety messages will tell you what the potential hazard is, tell you how to reduce the chance of injury, and tell you
what can happen if the instructions are not followed.
IMPORTANT SAFETY INSTRUCTIONS
WARNING: To reduce the risk of fire, electric shock, or injury when using your double drawer, follow these
basic precautions:
This is the safety alert symbol.
This symbol alerts you to potential hazards that can kill or hurt you and others.
All safety messages will follow the safety alert symbol and either the word “DANGER” or “WARNING.”
These words mean:
Plug into a grounded 3 prong outlet.
Do not remove ground prong.
Do not use an adapter.
Do not use an extension cord.
Disconnect power before servicing.
Replace all parts and panels before operating.
Remove doors or drawer(s) from your old double
drawer.
Use non flammable cleaner.
Do not store or use petrol, flammable liquids or
gas in the vicinity of this or other electrical
appliances. The fumes can cause fires or
explosions.
Do not store explosive substances such as aerosol
cans with a flammable propellant in this double
drawer.
Do not use or place electrical devices inside the
double drawer compartments if they are not of the
type expressly authorized by the manufacturer.
Use two or more people to move and install
double drawer.
This appliance is not intended for use by persons
(including children) with reduced physical, sensory
or mental capabilities, or lack of experience and
knowledge, unless they have been given
supervision or instruction concerning use of the
appliance by a person responsible for their safety.
Children should be supervised to ensure that they
do not play with the appliance.
To avoid the risk of children becoming trapped and
suffocating, do not allow them to play or hide
inside the double drawer.
If the power supply cord is damaged, it must be
replaced by the manufacturer or its service agent
or a similarly qualified person.
Keep ventilation openings, in the appliance
enclosure or in the built-in structure, clear of
obstruction.
Do not use mechanical devices or other means to
accelerate the defrosting process, other than those
recommended by the manufacturer.
Do not damage the refrigerant circuit.
For the models with ice/water: Connect to potable
water supply only.
SAVE THESE INSTRUCTIONS
2
05-May-2021 10:43:59 EDT | RELEASED
In some European factories the letter "W" of the part code mentioned herein will be automatically
replaced by the number "4000" (e.g. "W12345678" becomes "400012345678")

Proper Disposal of your Old
Double Drawer
WARNING: Risk of child entrapment. Before you
throw away your old Double Drawer:
Take off the door or drawer(s).
Leave the shelves in place so
that children may not easily
climb inside.
Suffocation Hazard
Remove doors or drawers or lid from your old appliance.
Failure to do so can result in death or brain damage.
IMPORTANT: Child entrapment and suffocation are not
problems of the past. Junked or abandoned double drawers
are still dangerous – even if they will sit for “just a few days.”
If you are getting rid of your old double drawers, please follow
these instructions to help prevent accidents.
Important information to know about disposal of
refrigerants:
Dispose of refrigerator in accordance with Federal and Local
Regulations. Refrigerants must be evacuated by a licensed,
EPA certified refrigerant technician in accordance with
established procedures.
Refrigerator/Freezer Drawers (with ice maker and
water lter):
Upper refrigerator drawer and lower freezer drawer provide
additional storage options in the kitchen or other areas of the
home. Factory-installed ice maker in lower drawer ensures a
constant supply of ice on hand at all times.
INSTALLATION
REQUIREMENTS
Tools and Parts
Gather the required tools and parts before starting installation.
Tools and parts needed:
Phillips screwdriver.
Custom Overlay Door Panel - Refer “Custom Overlay Panel
Preparation”.
Custom handle and mounting hardware (optional).
Parts supplied:
M4 x 30 fl athead screws (8).
DESIGN SPECIFICATIONS
24” Drawer Models
Double Refrigerator Drawers:
Two refrigerator drawers provide additional storage options in
the kitchen or other areas of the home.
KUDR204KSB KUDR204KPA
Stainless Steel
Overlay - Custom Panels
and Handles Required
KUDF204KSB KUDF204KPA
Stainless Steel
Overlay - Custom Panels
and Handles Required
IMPORTANT: This appliance is intended to be used in
household and similar applications such as:
Staff kitchen areas in shops, offi ce and other working
environments;
Farm houses and by clients in hotels, motels and other
residential type environments;
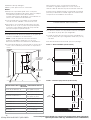
Location Requirements
Explosion Hazard
Keep flammable materials and vapors, such as
gasoline, away from refrigerator drawers.
Failure to do so can result in death, explosion, or fire.
3
05-May-2021 10:43:59 EDT | RELEASED
In some European factories the letter "W" of the part code mentioned herein will be automatically
replaced by the number "4000" (e.g. "W12345678" becomes "400012345678")

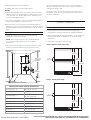
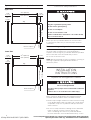
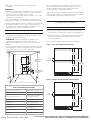
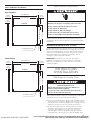
A
B
C
D
E
F
F
G
G
I
Recessed
receptacle
locations
Utility
opening
H
Opening and utility location dimensions
Opening width - A
24” (60.96 cm) min.
Opening depth - B
24” (60.96 cm) min.
Opening height - C
34
1
/2” (87.6 cm) min.
35” (88.9 cm) max.
Dimension - D
12
1
/16” (30.64 cm)
Dimension - E 21
3
/4” (55.24 cm)
Dimension - F 1
3
/4” (4.44 cm)
Dimension - G 3” (7.62 cm)
Dimension - H 4
1
/2” (11.43 cm)
Dimension - I 9
1
/4” (23.49 cm)
For flush installation, the power outlet can be installed in
adjacent cabinetry with a cutout on the power cord side for
routing of the power cord.
The power outlet can also be recessed on the back wall
behind the unit as per recommended receptacle locations in
the above illustration.
Bed and breakfast type environments;
Catering and similar non-retail applications.
NOTES:
For the double drawer to be fl ush with the front of the base
cabinets, remove any baseboards or moldings from the rear
of the opening. See “Product Dimensions” and later in this
section, “Opening Dimensions.”
It is recommended that you do not install the double drawer
near an oven, radiator, or other heat source.
Do not install in a location where the temperature will fall
below 55 °F (13 °C). For best performance, do not install the
refrigerator drawers behind a cabinet door or block the base
grille.
Opening dimensions:
Height dimensions are shown with the leveling legs
extended to the minimum height.
NOTE: When leveling legs are fully extended, add 5/8”
(1.5 cm) to the height dimensions. See “Product
Dimensions.”
If the fl oor of the opening is not level with the kitchen fl oor,
shim the opening to make it level with the kitchen fl oor.
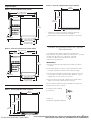
Product Dimension
Drawer height dimensions:
Height dimensions are shown with the leveling legs
extended to 1/4” (0.63 cm) below the refrigerator drawers.
When leveling legs are fully extended to 1” (2.54 cm) below
the refrigerator drawers, add 3/4” (1.9 cm) to the height
dimensions.
The power cord is 60” (152.4 cm) long.
Style 1- Stainless steel (front view)
Style 2 - Overlay (front view)
4
1/4"
(0.63 cm)
15"
(38.1 cm)
30
1
/8"
(76.6 cm)
15"
(38.1 cm)
34
1
/8"
(86.8 cm)
1/4"
(0.63 cm)
15"
(38.1 cm)
30
1
/8"
(76.6 cm)
15"
(38.1 cm)
34
1
/8"
(86.8 cm)
05-May-2021 10:43:59 EDT | RELEASED
In some European factories the letter "W" of the part code mentioned herein will be automatically
replaced by the number "4000" (e.g. "W12345678" becomes "400012345678")

Drawer depth dimensions:
Style 1 - Stainless steel (side view)
Drawer width dimensions
Style 1- Stainless steel (top view)
Style 2 - Overlay (side view)
Style 2- Overlay (top view)
Custom Overlay Drawer Panels
If you plan to install custom wood panels, you will need to
create the panels yourself or consult a qualifi ed cabinetmaker
or carpenter. See dimension drawings for panel specifi cations.
IMPORTANT:
The thickness of the overlay panels must be 3/4”
(1.9 cm).
To avoid damage to the drawers, each overlay panel must
not weigh more than 10 lb (4.54 kg).
Do not exceed the height dimension for the overlay panels.
Panels that exceed the height dimension may damage the
refrigerator drawers, cabinets or countertop.
The width of the overlay panels may vary according to the
width of the cabinet opening.
For the installation of the customer panel, you will need the
following parts:
8 Wood screws
8 Brackets
A- M4 x 32
B- Left and right brackets
5
*
Add 3/4” (1.9 cm) to the height dimension when leveling
legs are fully extended.
**
For custom panel models, this will vary.
21
5
/8"
(55 cm)
23
1
/16"
(58.6 cm)
23
7
/8"
(60.6 cm)
23
7
/8"
(60.6 cm)
21
5
/8"
(55 cm)
23
5
/8"
(60 cm)
25
7
/8"
(65.7 cm)**
34
1
/8"
(86.8 cm)*
4" (10.2 cm)*
16
7
/8"
(42.9 cm)
21
5
/8" (55 cm)
22
1
/4" (56.5 cm)
Without water filter
23
1
/3" (59.3 cm)
With water filter
38.5" (97.9 cm)
34
1
/8"
(86.8 cm)*
39
3
/32" (99.3 cm)
4" (10.2 cm)*
41
1
/2” (105.5 cm)**
17
7
/16"
(44.3 cm)
21
5
/8" (55 cm)
22
1
/4" (56.5 cm)
Without water filter
23
1
/3" (59.3 cm)
With water filter
A
B
05-May-2021 10:43:59 EDT | RELEASED
In some European factories the letter "W" of the part code mentioned herein will be automatically
replaced by the number "4000" (e.g. "W12345678" becomes "400012345678")

Top and bottom overlay drawer panel dimensions:
Electrical Requirements
Electrical Shock Hazard
Plug into a grounded 3 prong outlet.
Do not remove ground prong.
Do not use an adapter.
Do not use an extension cord.
Failure to follow these instructions can result in death,
fire, or electrical shock.
Before you move your double drawer into its fi nal location,
it is important to make sure you have the proper electrical
connection.
Recommended grounding method:
A 115 V, 60 Hz, AC only, 15 A or 20 A fused, grounded
electrical supply is required. It is recommended that a
separate circuit serving only your double drawer be provided.
Use an outlet that cannot be turned off by a switch.
Do not use an extension cord.
NOTE: Before performing any type of installation, cleaning, or
removing a light bulb, unplug the double drawer or
disconnect power.
INSTALLATION
INSTRUCTIONS
Unpack the Refrigerator Drawers
Excessive Weight Hazard
Use two or more people to move and install or uninstall
appliance.
Failure to do so can result in back or other injury.
Before using your double drawer, all packaging materials
should be removed and the interior should be cleaned.
Remove tape and glue residue from surfaces before turning
on the double drawer. With your fi ngers, rub a small amount
of liquid dish soap over any adhesive and wipe with warm
water to remove.
Do not use sharp instruments, rubbing alcohol, fl ammable
fl uids, or abrasive cleaners to remove tape or glue.
These can damage the surfaces of your double drawer.
For more information, refer “Double Drawer Safety” section.
6
Bottom
15” (38 cm)
13/16”
(2.05 cm)
11/16”
(1.75 cm)
Top
11/16”
(1.75 cm)
13
7
/16”” (34.2 cm)
11/16”
(1.75 cm)
Pilot hole 4 places
3/4”
(1.9 cm)
22
3
/8” (56.8 cm)
23
3
/4” (60.3 cm)
Bottom
15” (38 cm)
11/16”
(1.75 cm)
11/16”
(1.75 cm)
Top
11/16”
(1.75 cm)
12
13
/16” (32.6 cm)
1
7
/16”
(3.65 cm)
Pilot hole 4 places
3/4”
(1.9 cm)
22
3
/8” (56.8 cm)
23
3
/4” (60.3 cm)
Upper Door
Lower Door
05-May-2021 10:43:59 EDT | RELEASED
In some European factories the letter "W" of the part code mentioned herein will be automatically
replaced by the number "4000" (e.g. "W12345678" becomes "400012345678")

Dispose of and/or recycle all packaging materials.
After all packaging materials have been removed, clean the
inside of your double drawer the cleaning instructions in
“Cleaning” section.
Clean before using:
After you remove all of the package materials, clean the inside
of your refrigerator drawers before using them.
See “Cleaning.”
Water Supply Requirements
(Refrigerator/Freezer Drawers only)
Gather the required tools and parts before starting installation.
Read and follow the instructions provided with any tools listed
here.
IMPORTANT:
If you turn ON the refrigerator before the water line is
connected, turn OFF the ice maker.
All installations must meet local plumbing code requirements.
Use copper tubing and check for leaks. Install copper tubing
only in areas where the household temperatures will remain
above freezing.
Tools needed:
Flat-blade screwdriver, 7/16” and 1/2” open-end wrenches or
two adjustable wrenches, 1/4” nut driver and drill bit, cordless
drill.
NOTE: Your refrigerator dealer has a kit available with a 1/4”
(6.35 mm) saddle-type shutoff valve, a union, and copper
tubing. Before purchasing, make sure a saddle-type valve
complies with your local plumbing codes.
Do not use a piercing-type or 3/16” (4.76 mm) saddle valve
which reduces water flow and clogs more easily.
Water pressure:
A cold water supply with water pressure of between 30 and
120 psi (207 and 827 kPa) is required to operate ice maker.
If you have questions about your water pressure, call a
licensed, qualifi ed plumber.
Reverse osmosis water supply:
IMPORTANT:
The pressure of the water supply coming out of a reverse
osmosis system going to the water inlet valve of the
refrigerator needs to be between 30 and 120 psi (207 and
827 kPa).
If a reverse osmosis water fi ltration system is connected to
your cold water supply, the water pressure to the reverse
osmosis system needs to be a minimum of 40 to 60 psi
(276 to 414 kPa).
Check to see whether the sediment fi lter in the reverse
osmosis system is blocked. Replace the fi lter if necessary.
Allow the storage tank on the reverse osmosis system to refi ll
after heavy usage.
If you have questions about your water pressure, call a
licensed, qualifi ed plumber.
7
Connect to water line:
1. Unplug refrigerator or disconnect power.
2. Turn OFF main water supply. Turn ON nearest faucet long
enough to clear line of water.
3. Locate a 1
1
/2” to 1
1
/4” (3.81 cm to 3.18 cm) vertical cold
water pipe near the refrigerator.
IMPORTANT:
Connect to potable water supply only.
Make sure it is a cold water pipe.
Horizontal pipe will work, but drill on the top side of the
pipe, not the bottom. This will help keep water away from
the drill and normal sediment from collecting in the valve.
4. Determine the length of copper tubing you need. Measure
from the connection on the lower left rear of refrigerator to
the water pipe. Add 7 ft (2.1 m) to allow for cleaning.
Use 1/4” (0.63 cm) O.D. (outside diameter) copper tubing.
Be sure both ends of copper tubing are cut square.
5. Using a cordless drill, drill a 1/4” hole in the cold water
pipe you have selected.
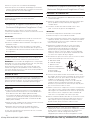
A
B
C
DEF
G
A- Cold water pipe
B- Pipe clamp
C- Copper tubing
D- Compression nut
E- Compression sleeve
F- Shutoff valve
G- Packing nut
6. Fasten the shutoff valve to the cold water pipe with the
pipe clamp. Be sure the outlet end is solidly in the 1/4”
drilled hole in the water pipe and that the washer is under
the pipe clamp. Tighten the packing nut.
Tighten the pipe clamp screws slowly and evenly so
washer makes a watertight seal. Do not overtighten or you
may crush the copper tubing.
7. Slip the compression sleeve and compression nut on the
copper tubing as shown. Insert the end of the tubing into
the outlet end squarely as far as it will go.
Screw compression nut onto outlet end with adjustable
wrench. Do not overtighten.
8. Place the free end of the tubing in a container or sink, and
turn ON the main water supply. Flush the tubing until water
is clear. Turn OFF the shutoff valve on the water pipe.
Coil the copper tubing.
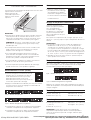
Connect to Refrigerator:
1. Attach the copper tubing to the valve inlet using a
compression nut and sleeve as shown.
Tighten the compression nut. Do not overtighten.
Use the tube clamp on the back of the refrigerator to
secure the tubing to the refrigerator, as shown.
This will help avoid damage to the tubing when the
refrigerator is pushed back against the wall.
Connect Water Supply
(Refrigerator/Freezer Drawers only)
05-May-2021 10:43:59 EDT | RELEASED
In some European factories the letter "W" of the part code mentioned herein will be automatically
replaced by the number "4000" (e.g. "W12345678" becomes "400012345678")

A
C
A- Plug with compression nut
C- Pex tubing
4. The ice maker is equipped with a built-in water strainer.
If your water conditions require a second water strainer,
install it in the 1/4” (0.63 cm) water line at either tube
connection. Obtain a water strainer from your nearest
appliance dealer.
5. Plug in refrigerator or reconnect power.
Move the Refrigerator Drawers
to Final Location
1. Place top of cardboard carton or plywood under the
appliance. Remove dolly.
2. Do not remove film or cover.
Electrical Shock Hazard
Plug into a grounded 3 prong outlet.
Do not remove ground prong.
Do not use an adapter.
Do not use an extension cord.
Failure to follow these instructions can result in death,
fire, or electrical shock.
2. Turn ON shutoff valve.
3. Check for leaks. Tighten any
connections (including
connections at the valve) or
nuts that leak.
3. Plug into a grounded 3 prong outlet.
Excessive Weight Hazard
Use two or more people to move and install or uninstall
appliance.
Failure to do so can result in back or other injury.
4. Move the refrigerator drawers straight back and evenly in
front of the opening.
Level the Refrigerator Drawers
IMPORTANT:
Overlay Model-Be sure to install the custom overlay drawer
panels before leveling the refrigerator drawers. See “Install
Custom Overlay Drawer Panels.”
Before installing the refrigerator drawers, be sure that the
countertop is level.
If the countertop is not level, adjust the refrigerator drawers’
leveling legs until the appliance is square with the
countertop. Be sure to maintain 3/8” (0.95 cm) minimum gap
between the top of the drawer and the countertop.
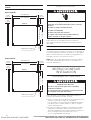
1. Open the top drawer and place the level across the top
drawer, as shown.
Check the level
from left to right.
A
A- Check the level
from left to right.
2. Turn the leveling legs (front and
back) until the top drawer
measures level from left to right.
3. Remove the level and close the top drawer. Check the gap
between the top of the drawer and the countertop. If the
gap measures less than 3/8” (0.95 cm) minimum, turn all
four leveling bolts equally to the left to raise the leveling
legs (this will lower the appliance). Recheck the level.
4. Open both drawers less than midway. Place the level on
the side flange beside the drawers as shown.
Turn the front leveling bolts together in order
to either raise or lower
the appliance until the
sides of the refrigerator
drawers are plumb.
A
A- Check the level
from front to back.
5. Remove the level and close the drawers. Recheck the gap
between the top of the drawer and the countertop.
If the gap measures less than 3/8” (0.95 cm), turn all four
leveling bolts equally to raise the leveling legs (this will
lower the appliance). Recheck the level.
NOTE: Be sure to recheck the horizontal level of the top
drawer.
6. Be sure all four levelers are on the floor and supporting the
full weight of the refrigerator drawers.
8
05-May-2021 10:43:59 EDT | RELEASED
In some European factories the letter "W" of the part code mentioned herein will be automatically
replaced by the number "4000" (e.g. "W12345678" becomes "400012345678")

Normal Sounds
Your new refrigerator drawers may make sounds that your old
refrigerator drawers didn’t. Because the sounds are new to
you, you might be concerned about them. Most of the new
sounds are normal. Hard surfaces, such as the fl oor, walls, and
cabinets, can make the sounds seem louder. The following
describes the kinds of sounds and what may be making them.
Your refrigerator drawers are designed to run more effi ciently
to keep your food items at the desired temperatures and to
minimize energy usage. The high effi ciency compressor and
fans may cause your refrigerator drawers to run longer than
your old ones. You may also hear a pulsating or high-pitched
sound from the compressor or fans adjusting to optimize
performance.
You may hear the evaporator fan motor circulating air through
the refrigerator drawers. The fan speed may increase as you
open the drawers or add warm food.
As each cycle ends, you may hear a gurgling sound due to
the refrigerant fl owing through the sealed system tubing.
Ensuring Proper Air Circulation
In order to ensure proper temperatures, you need to permit
airfl ow inside the drawers.
Do not block any airfl ow vents. If the vents are blocked, airfl ow
will be obstructed and temperature and moisture problems
may occur.
IMPORTANT:
To avoid odor transfer and drying out of food, wrap or cover
foods tightly.
9
REFRIGERATOR DRAWERS USE
Install Custom Overlay Panel
IMPORTANT:
Create a custom overlay panel according to the
specifi cations in “Custom Overlay Drawer Panels.”
KitchenAid is not responsible for the removal or addition of
molding or decorative panels that would not allow access to
the refrigerator for service.
Attach the overlay panel:
NOTE: If the custom panel is incorrectly placed, the panel
may interfere with optimal use of the drawers.
1. Attach the custom handle of your preference on the overlay
before attaching the overlay to the drawer of the refrigerator.
NOTE: Custom handles may vary in dimensions.
Holes must be made on the panel according the specific
dimensions of your handle.
2. Gently pull back the gasket from the corners of the door.
It is not necessary to remove the gasket.
3. Use the brackets (four per drawer, one in each corner of
the drawers).
4. Align the panel to the drawer and position the overlay
panel 5/64” (2 mm) higher than the door.
5. Using the self-tap wood screws (four per drawer; one in
each corner of the drawers), attach the panel to the drawer.
6. Once the overlay is securely attached to the drawer with the
four screws, put the gasket back in its place by pressing it
against the door until the gasket is even and firmly secured.
Complete Installation
1. Remove all boxes, parts packages and packing materials
from the interior of the refrigerator drawers.
2. Remove the film.
3. Clean the refrigerator drawers before use.
4. The controls are preset at the factory to the recommended
settings. Be sure that the compressor is operating properly
and that all the lights are working.
5. If construction will continue after the refrigerator drawers
have been installed, turn OFF the power for both drawers.
To get the most efficient use from your new refrigerator
drawers, read the “Refrigerator Drawers Use” section.
Contraction and expansion of the inside walls may cause a
popping noise.
You may hear air being forced over the condenser by the
condenser fan.
You may hear water running into the drain pan during the Off
cycle.
A- 4 wood screws
A
05-May-2021 10:43:59 EDT | RELEASED
In some European factories the letter "W" of the part code mentioned herein will be automatically
replaced by the number "4000" (e.g. "W12345678" becomes "400012345678")

IMPORTANT:
Wait 24 hours after you turn on the refrigerator drawers
before you put food into the drawers. If you add food before
the drawers have cooled completely, your food may spoil.
NOTE: Adjusting the controls to a lower (colder) setting in
one or both drawers will not cool them any faster.
If the temperature is too warm or too cold in the drawers,
fi rst check the air vents to be sure they are not blocked
before adjusting the controls.
The preset settings should be correct for normal household
usage. The refrigerator control is set correctly when milk or
juice is as cold as you like.
The freezer control is set correctly when ice cream is fi rm.
The actual temperature may differ from the display when a
drawer is open for an extended period of time.
Turning drawers On/Off:
The fi rst time that the refrigerator is plugged
in, the control will be in Cool Off mode.
Cool On and Cool Off will be the only options
that display.
Press COOL ON to turn on the drawers.
All menus and recommended temperature settings will be
displayed.
Style 1: Refrigerator drawer models
Style 2: Refrigerator/freezer combo models
The left temperature and presets touch pads control the
temperature of the upper compartment.
The right temperature and presets touch pads control the
temperature of the lower compartment.
Set to recommended temperatures:
When the refrigerator is turned
On for the fi rst time, a
recommended temperature
is set by default. The controls
adjust the temperature of both
compartments independently.
To adjust set point temperatures, press “+” (plus) or “
-
”
(minus) until the desired temperature setting is reached.
NOTES:
The set point for the double refrigerator drawers model is
37 °F (2.7 °C). The set point range for this model is 32° F to
42 °F (0 °C to 5.5 °C) for both compartments. The set point
range for the refrigerator/freezer drawers model is 32 °F to
42 °F (0 °C to 5.5 °C) for the refrigerator drawer and -8 °F to
6 °F (-22 °C to -14.4 °C) for the freezer drawer.
Wait at least 24 hours between adjustments for the
product to acclimate.
A
A. F/C touch pad
Using Presets:
For your convenience, each drawer also has controls that are
preset to recommended storage temperatures for specific
products.
Style 1: Refrigerator drawer models
Style 2: Refrigerator/freezer combo models
10
Using the Controls
The control panels for both double drawer models are located
in the upper drawer. To view and set the Upper and Lower
control panel, pull out the
upper drawer.
Freezer drawer:
Soft Serve: 6 °F (-14.4 °C)
Assorted: 0 °F (-17.7 °C)
NOTE: Soft Serve is a temporary temperature setting that will
only last for 4 hours and returns to the previous temperature
set point when complete.
Spirits: -2 °F (-18.8 °C)
Deep Freeze: -8 °F (-22 °C)
Pressing any preset option will set the temperature value to
recommended temperature for each category:
Refrigerator drawers:
Produce: 39 °F (3.8 °C)
Assorted: 37 °F (2.7 °C)
Beverage: 34 °F (1 °C)
Meat: 32 °F (0 °C)
Viewing Celsius temperatures:
Press the F/C touch pad to toggle between displaying the
temperature in degrees
Fahrenheit and degrees
Celsius. The corresponding
indicator will illuminate.
05-May-2021 10:43:59 EDT | RELEASED
In some European factories the letter "W" of the part code mentioned herein will be automatically
replaced by the number "4000" (e.g. "W12345678" becomes "400012345678")

shut off automatically when the temperature returns to normal.
To let you know an Over Temperature condition occurred, the
indicator light will continue to flash until the Reset Alarm touch
pad is pressed.
If the over temperature condition is still present when an Over
Temp reset is performed, the indicator light will continue to
reactivate every 4 hours until refrigerator and freezer
temperatures are below 45 °F (7 °C) and 15 °F (-9 °C),
respectively.
NOTE: These features will not appear on your control unless
your refrigerator is over temperature and the alarm requires a
reset.
Showroom Mode:
This mode is used only when the refrigerator is on display in a
retail store. If you unintentionally turn on Showroom Mode,
Cool Off will light up on the display, and the controls will
appear to work. Exit Showroom Mode by pressing and holding
COOL ON and SABBATH at the same time for 3 seconds.
Ice Maker and
Water Filtration System
(Refrigerator/Freezer Drawers only)
IMPORTANT:
After connecting the refrigerator to a water source or replacing
the water fi lter, fi ll and discard three full containers of ice to
prepare the water fi lter for use before using ice.
Turning the Ice Maker On/Off:
IMPORTANT:
Use the Icemaker touch pad on
the control panel to turn on or
off the ice maker. Do not adjust
the wire arm located on the ice
maker.
Press the ICEMAKER touch pad to turn on the ice maker.
The indicator light will illuminate when On.
Press the ICEMAKER touch pad to turn off the ice maker.
REMEMBER:
Allow 24 hours to produce the first batch of ice.
The quality of your ice will only be as good as the quality of
the water supplied to your ice maker.
Avoid connecting the ice maker to a softened water supply.
Water softener chemicals (such as salt) can damage parts
of the ice maker and lead to poor quality ice. If a softened
water supply cannot be avoided, make sure the water
softener is operating properly and is well maintained.
Do not store anything in the ice storage bin.
When the refrigerator is turned ON for the first time, ice
maker is turned OFF. (The ice maker indicator light will dim).
After confirming that water can be automatically supplied to
the ice maker (connecting the refrigerator to the water
source or replacing the water filter, press the ICEMAKER
touchpad to turn on the ice maker. (The indicator light will
iluminate). When the water cannot be supplied automatically
(not connecting to the water source, etc.) and the ice box is
not filled with ice, if the ice maker is turned ON, the ice
maker will continue to operate and the internal heater of ice
maker will operate frequently. This will heat up the
refrigerator, increasing the compressor running rate and
11
Max Cool:
The Max Cool feature assists with
periods of heavy usage, full grocery
loads or temporarily warm room
temperatures
Max Cool will reset the temperature for
the refrigerator drawer to 32 °F (0 °C) and -3 °F (-19.4 °C) for
the freezer drawer for a 24 hour period.
Press MAX COOL to activate Max Cool feature.
NOTE: The temperature display will remain at -3 °F (-19.4 °C)
and the indicator light will remain On for a 24-hour period
unless any of the following happens:
User adjusts any of the compartment temperatures.
Cool Off Mode is entered (activated by user).
Sabbath Mode is entered (activated by user).
After 24 hours, the temperature will automatically return to
the previous temperature set point and the indicator light
will turn Off.
NOTE: If the previous temperature set point was set to Soft
Serve in the freezer drawer, the temperature will return to
the recommended temperature 0 °F (-17.7 °C) instead when
Max Cool is complete.
Sabbath Mode:
Sabbath Mode is designed for the traveler
or for those whose religious observances
require turning off the lights.
By selecting this feature, the temperature
set points remain unchanged but the
control panel lights, interior lights, and
control audio turn off. For most effi cient
refrigerator drawers operation, it is recommended to exit the
Sabbath Mode when it is no longer required.
Press and hold SABBATH for 3 seconds to turn on the
feature. After the 3-second countdown, the feature will
activate and all other displays will turn Off.
Press and hold SABBATH for 3 seconds to turn off the
feature and turn on the display.
Drawer open:
If any drawer is open longer than 5 minutes, an alarm will
sound every 2 minutes until all drawers are closed or any
control is pressed.
Over Temp Alarm:
NOTE: If the Over Temp Alarm activates, your food may spoil.
See “Power Interruptions”. Minimize opening of drawers until
temperatures return to normal.
The Over Temperature feature is
designed to let you know when either the
refrigerator drawer temperature rises
above 45 °F (7 °C) or the freezer drawer
temperature rises above 6 °F (-14.4 °C)
for 4 hours or longer. The audio alarm will
05-May-2021 10:43:59 EDT | RELEASED
In some European factories the letter "W" of the part code mentioned herein will be automatically
replaced by the number "4000" (e.g. "W12345678" becomes "400012345678")

Changing the Water Filter:
The water filter is located through the base grille. You do not
have to remove the base grille in order to change the water
filter.
1. Locate the water filter cap in the front base grille. Rotate
the cap counterclockwise to a vertical position and pull the
cap and water filter out through the base grille.
NOTE: There will be water in the filter. Some spilling may
occur.
2. Remove the filter cap by sliding it off the end of the old
filter. The cap will slide to the left or right.
IMPORTANT:
Do not discard the cap.
It is part of your
refrigerator.
Keep the cap
to use with the
replacement
fi lter.
3. Take the new water filter
out of its packaging and
remove the cover from
the O-rings.
4. Slide the filter cap onto the new water filter.
See the illustration in Step 2.
Using the Ice Maker without the Water Filter:
You can run the ice maker without a water filter. Your water will
not be filtered.
Slide the filter cap off the end of the water filter. With the filter
cap in the horizontal position, insert the cap into the base
grille until it stops.
IMPORTANT:
Do not discard the cap. It is part of your refrigerator. Keep the
cap to use with a replacement fi lter.
CARE AND CLEANING
Cleaning
Explosion Hazard
Risk of fire or explosion.
Flammable refrigerant used.
Do not use mechanical devices to defrost refrigerator.
Do not puncture refrigerant tubing.
Clean the double drawer once a month to avoid buildup of
odors. Wipe up spills immediately.
To clean your Double Drawer:
1. Unplug double drawer or disconnect power.
2. Hand wash, rinse, and dry removable parts and interior
surfaces thoroughly. Use a clean sponge or soft cloth
and a mild detergent in warm water.
To avoid damaging wooden tines and trim pieces, wipe
them off with a clean sponge or soft cloth and warm
water.
Do not use abrasive or harsh cleaners such as window
sprays, scouring cleansers, fl ammable fl uids, cleaning
waxes, concentrated detergents, bleaches or cleansers
containing petroleum products on plastic parts, interior
and door liners or gaskets. Do not use paper towels,
scouring pads, or other harsh cleaning tools.
These can scratch or damage materials.
To help remove odors, you can wash interior walls with a
mixture of warm water and baking soda [2 tbs to 1 qt
(26 g to 0.95 L) of water].
12
Water Filter Indicator/Reset Filter:
The water filter indicator light
will help you know when to
change your water filter.
The indicator light will change
from dark to yellow when it is
time to order a new filter.
The indicator light will then
change from yellow to red when
it is time to replace the water
filter.
The disposable water filter
should be replaced at least
every 6 months. After replacing the water filter, reset the water
filter indicator.
Press and hold RESET FILTER for 3 seconds. The indicator
light will turn Off.
NOTE: These features will not appear on your control unless
you need to order or replace your filter.
Water Filtration System:
Do not use with water that is microbiologically unsafe or of
unknown quality without adequate disinfection before or
after the system.
With the filter cap in the
vertical position, insert the new
filter into the base grille until it
stops. Rotate the cartridge cap
clockwise to a horizontal
position.
power consumption. If you do not need the ice making
(including not automatically supplying water), you should turn
OFF the ice maker. (The indicator light will dim).
05-May-2021 10:43:59 EDT | RELEASED
In some European factories the letter "W" of the part code mentioned herein will be automatically
replaced by the number "4000" (e.g. "W12345678" becomes "400012345678")

3. Wash stainless steel and painted metal exteriors with a
clean sponge or soft cloth and a mild detergent in warm
water. Do not use abrasive or harsh cleaners, or cleaners
containing chlorine. These can scratch or damage
materials. Dry immediately with a soft, dry cloth to absorb
any remaining water.
NOTE: To keep your stainless steel drawers looking like
new and to remove minor scuffs or marks, it is
recommended that you use the manufacturer’s approved
Stainless Steel Cleaner and Polish. To order the cleaner,
refer “Accessories” section.
IMPORTANT:
This cleaner is for stainless steel parts only!
Do not allow the Stainless Steel Cleaner and Polish to come
into contact with any plastic parts such as the trim pieces,
dispenser covers or door gaskets. If unintentional contact
does occur, clean plastic part with a sponge and mild
detergent in warm water. Dry immediately with a soft, dry
cloth to absorb any remaining water.
Condenser cleaning:
1. Remove the base grille to access condenser for cleaning.
Refer “Removing Base Grille” section.
2. Clean the condenser coils regularly. They are located
behind the base grille. Coils may need to be cleaned as
often as every other month. This may help save energy.
Explosion Hazard
Risk of fire or explosion due to puncture of refrigerant
tubing.
Follow handling instructions carefully.
Flammable refrigerant used.
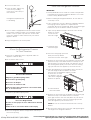
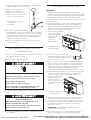
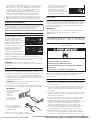
Removing Base Grille
You must remove the base grille to access the condenser
coils for cleaning.
To remove the base grille:
1. Open the double drawer door.
A. Screws
A
2. Using a Phillips screwdriver, remove the two screws.
3. Remove the base grille.
To replace the base grille:
1. Open the double drawer door.
2. Position the base grille so that both tabs align and the
base grille snaps into place. Replace two screws.
Tighten the screws.
Power Interruptions
If the power will be out for 24 hours or less, keep both
refrigerator drawers closed to help food stay cold.
If the power will be out for more than 24 hours, do one of the
following:
Place all perishable food in a food locker or cooler with dry
ice.
If neither a food locker or cooler is available, consume food
if still cold or throw away perishable food at once.
Vacation Care
If you choose to turn the refrigerator drawers off before you
leave, follow these steps:
1. Remove all from the double drawer.
2. Unplug the double drawer.
3. Clean the double drawer. Refer “Cleaning” section.
4. Tape a rubber or wood block to the top of the door to
prop it open far enough for air to get in. This stops odor
and mold from building.
Moving Care
When you are moving your double drawer to a new
home, follow these steps to prepare it for the move.
1. Remove all from the double drawer.
2. Unplug the double drawer.
3. Clean, wipe, and dry it thoroughly.
4. Take out all removable parts, wrap them well, and tape
them together so they don’t shift and rattle during the
move.
5. Tape the doors shut and tape the power cord to the
double drawer.
When you get to your new home, put everything back and
refer to the “Installation Instructions” received with the double
drawer.
13
05-May-2021 10:43:59 EDT | RELEASED
In some European factories the letter "W" of the part code mentioned herein will be automatically
replaced by the number "4000" (e.g. "W12345678" becomes "400012345678")

Electrical Shock Hazard
Plug into a grounded 3 prong outlet.
Do not remove ground prong.
Do not use an adapter.
Do not use an extension cord.
Failure to follow these instructions can result in death,
fire, or electrical shock.
TROUBLESHOOTING
Try the solutions suggested here first in order to avoid the cost of an unnecessary service call.
GENERAL OPERATION Possible Causes and/or Recommended Solutions
Double Drawer will not operate Power supply cord unplugged? Plug into a grounded 3 prong outlet.
Is outlet working? Plug in a lamp to see if the outlet is working.
Household fuse blown, or a circuit breaker tripped? Replace the fuse or reset the
circuit. If the problem continues, call an electrician.
Are controls on? Be sure that the refrigerator drawers controls are on.
Refer “Controls” section.
Is the refrigerator control set to the Cool Off setting? See “Using the Controls.”
Are the refrigerator drawers not cooling? Turn them off then on again to reset.
See “Using the Controls.” If this does not correct the problem, call for service.
The motor seems to run too much Is the temperature outside hotter than normal? Expect the motor will run longer
under warm conditions. At normal temperatures, expect your motor to run about 40 %
to 80 % of the time. Under warmer conditions, expect it to run even more of the time.
Has a large amount of food just been added to the refrigerator drawers? Adding a
large amount of food warms the refrigerator drawers. The motor normally will run longer
to cool the refrigerator drawers back down.
Are the drawers opened often? The motor will run longer when this occurs. Conserve
energy by getting all items out at one time, keeping food organized, and closing the
drawer as soon as possible.
Are the controls not set correctly for the surrounding conditions? Refer “Controls”
section.
Are the drawers not closed completely? Close the drawers fi rmly. If they do not close
completely, see “The drawers will not close completely” later in this section.
Are the drawer gaskets not sealed all the way around? Contact a technician or other
qualifi ed person.
14
05-May-2021 10:43:59 EDT | RELEASED
In some European factories the letter "W" of the part code mentioned herein will be automatically
replaced by the number "4000" (e.g. "W12345678" becomes "400012345678")

GENERAL OPERATION Possible Causes and/or Recommended Solutions
The refrigerator drawers seems to
make too much noise
The divider between the two
compartments is warm
The sounds may be normal for your refrigerator drawers.?
See “Normal Sounds.”
The warmth is probably due to normal operation of the automatic exterior
moisture control? If still concerned, call for service.
Temperature is too warm
There is interior moisture buildup
Are the air vents blocked in either compartment? This obstructs cold air movement
between the compartments. Remove any objects from in front of the air vents.
See “Ensuring Proper Air Circulation” for the location of air vents.
Are the drawers opened often? The refrigerator drawers will warm when this occurs.
Keep the refrigerator drawers cool by getting all items out at one time, keeping food
organized, and closing the door as soon as possible.
Has a large amount of food just been added to the refrigerator drawers? Adding a
large amount of food warms the refrigerator drawers. It can take several hours for the
refrigerator drawers to return to the normal temperature.
Are the controls set correctly for the surrounding conditions? See “Using the
Controls.”
Are the refrigerator drawers not cooling? Turn them off then on again to reset.
See “Using the Controls.” If this does not correct the problem, call for service.
Are ice maker operated? When ice maker is operated, the heat of ice maker is
added to the refrigerator. The motor normally will run longer in order to make the ice.
If the ice maker is turned ON when the water connot be supplied automatically
(not connecting to the water source, etc.), the heat of ice maker will be added to the
refrigerator, the motor will run longer and the energy consumption will increase.
See “Turning the Ice Maker ON/OFF”.
Are the air vents blocked in the refrigerator drawers? Remove any objects from in
front of the air vents. See “Ensuring Proper Air Circulation” for the location of air vents.
Are the drawers opened often? Avoid humidity buildup by getting all items out at one
time, keeping food organized, and closing the drawer as soon as possible.
Is the room humid? It is normal for moisture to build up inside the refrigerator
drawers when the room air is humid.
Is the food packaged correctly? Check that all food is securely wrapped.
Dry damp food containers before placing in the refrigerator drawers.
Are the controls set correctly for the surrounding conditions? See “Using the
Controls.”
The drawers will not close completely Are food packages blocking the drawer open? Rearrange containers so that they fi t
more tightly and take up less space.
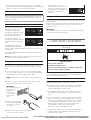
Explosion Hazard
Use nonflammable cleaner.
Failure to do so can result in death, explosion, or fire.
DRAWERS Possible Causes and/or Recommended Solutions
Are the gaskets dirty or sticky? Clean gaskets and the surface that they touch.
Rub a thin coat of paraffi n wax on the gaskets following cleaning.
The drawers are difficult to open
15
05-May-2021 10:43:59 EDT | RELEASED
In some European factories the letter "W" of the part code mentioned herein will be automatically
replaced by the number "4000" (e.g. "W12345678" becomes "400012345678")

If you need service:
Before calling for assistance or service, please check
“Troubleshooting.” It may save you the cost of a service call.
If you still need help, follow the instructions below.
When calling, please know the purchase date and the
complete model and serial number of your appliance.
This information will help us to better respond to your
request. Please refer to the warranty page in this manual
for more information on service.
If you need replacement parts:
Component parts should be replaced with like components
and servicing should be done by factory authorized service
personnel, so as to minimize the risk of possible ignition due
to incorrect parts or improper service.
In the U.S.A.
Call the KitchenAid Customer eXperience Center
toll free: 1-800-422-1230.
Our Consultants Provide Assistance With:
Features and specifi cations on our full line of appliances.
Installation information.
Use and maintenance procedures.
Accessory and repair parts sales.
Specialized customer assistance (Spanish speaking,
hearing impaired, limited vision, etc.).
Referrals to local dealers, repair parts distributors, and
service companies. KitchenAid designated service
technicians are trained to fulfi ll the product warranty and
provide after-warranty service, anywhere in the United
States.
To locate the KitchenAid designated service company in
your area, you can also look in your telephone directory
Yellow Pages.
For Further Assistance
If you need further assistance, you can write to KitchenAid
with any questions or concerns at:
KitchenAid Brand Home Appliances
Customer eXperience Center
553 Benson Road
Benton Harbor, MI 49022-2692
Please include a daytime phone number in your
correspondence.
In Canada
Call the KitchenAid Canada Customer eXperience Centre toll
free: 1-800-807-6777.
Our Consultants Provide Assistance With:
Features and specifi cations on our full line of appliances.
Use and maintenance procedures.
Accessory and repair parts sales.
Referrals to local dealers, repair parts distributors, and
services companies. KitchenAid Canada designated service
technicians are trained to fulfi ll the product warranty and
provide after-warranty service, anywhere in Canada.
For Further Assistance
If you need further assistance, you can write to KitchenAid
Canada with any questions or concerns at:
KitchenAid Canada
Customer eXperience Centre
200 – 6750 Century Ave.
Mississauga, Ontario L5N 0B7
Please include a daytime phone number in your
correspondence.
Accessories
The following accessories are available for your refrigerator
drawer.
To order an accessory, contact us and ask for the Part
Number.
In the U.S.A., visit our webpage
www.kitchenaid.com/accessories
or call 1-800-442-9991.
In Canada, visit our webpage www.whirlpoolparts.ca
or call 1-800-807-6777.
Stainless Steel Cleaner and Polish
Order Part #4396095
Base Grille Water Filter
NOTE: Do not use with water that is microbiologically unsafe
or of unknown quality without adequate disinfection before
or after the system.
Replacement lter
Order Part #4396702 (L200V / NL120V)
ASSISTANCE
16
05-May-2021 10:43:59 EDT | RELEASED
In some European factories the letter "W" of the part code mentioned herein will be automatically
replaced by the number "4000" (e.g. "W12345678" becomes "400012345678")

PRODUCT DATA SHEETS
Application Guidelines/Water Supply Parameters
It is essential that operational, maintenance, and fi lter
replacement requirements be carried out for the product to
perform as advertised.
Model WF-L200V: The fi lter monitor system measures the
amount of water that passes through the fi lter and alerts
you to replace the fi lter. When 90 % of the fi lter’s rated life is
used, the fi lter indicator light changes from green to yellow.
When 100 % of the fi lter’s rated life is used, the fi lter indicator
light changes from yellow to red, and it is recommended
that you replace the fi lter. Use replacement cartridge L200V
/ NL120V, part #4396702. 2014 suggested retail price of
$32.99 U.S.A./ $49.99 Canada. Prices are subject to change
without notice.
Model WF-NL120V: Change the water fi lter cartridge every
6-9 months. Use replacement cartridge L200V / NL120V,
part #4396702. 2014 suggested retail price of $32.99 U.S.A./
$49.99 Canada. Prices are subject to change without notice.
The product is for cold water use only.
Do not use with water that is microbiologically unsafe or of
unknown quality without adequate disinfection before or after
the system.
Refer to the front cover or “Accessories” section for the
Manufacturer’s name, address and telephone number.
Refer to the “Warranty” section for the Manufacturer’s limited
warranty.
Base Grille Water Filtration System
Model WF-L200V capacity 200 gallons (757 liters)
Model WF-NL120V capacity 120 gallons (454 liters)
Tested and certified by NSF International against
ANSI/NSF Standard 42 for the reduction of Chlorine,
Taste and Odor, Particulate Class lll*; and against
ANSI/NSF Standard 53 for the reduction of Lead,
Mercury, Benzene, and p-dichlorobenzene.
This system has been tested according to ANSI/NSF 42/53 for the reduction of the substances listed below. The concentration of
the indicated substances in water entering the system was reduced to a concentration less than or equal to the permissible limit
for water leaving the system, as specified in ANSI/NSF 42/53.
Chlorine Taste/Odor
Particulate Class
III*
≥ 50 %
≥ 85 %
1.9 mg/L
49,333/mL
2.0 mg/L ± 10 %
At least 10,000
particles/mL
0.07 mg/L
640 mg/L**
0.06 mg/L
312 mg/L
>75.0 %
98.7 %
>75.0 %
99 %
Lead: @ pH 6.5
Lead: @ pH 8.5
Mercury: @ pH 6.5
Mercury: @ pH 8.5
Benzene
p-dichlorobenzene
0.01 mg/L
0.01 mg/L
0.002 mg/L
0.002 mg/L
0.0050 mg/L
0.075 mg/L
0.14 mg/L***
0.15 mg/L***
0.0059 mg/L
0.0054 mg/L
0.0157 mg/L
0.210 mg/L
0.15 mg/L ± 10 %
0.15 mg/L ± 10 %
0.006 mg/L ± 10 %
0.006 mg/L ± 10 %
0.015 ± 10 %
0.225 ± 10 %
0.0014 mg/L
0.0069 mg/L
0.0009 mg/L
0.0007 mg/L
0.002 mg/L
0.0005 mg/L
0.0011 mg/L
0.0042 mg/L
0.0004 mg/L
0.00043 mg/L
0.00083 mg/L
0.0005 mg/L
99.0 %
95.4 %
84.74 %
87.03 %
87.26 %
99.76 %
99.21 %
97.08 %
92.47 %
91.93 %
87.26 %
99.76 %
Substance
Reduction Aesthetic
Effects
Contaminant
Reduction
NSF Reduction
Requirements
NSF Reduction
Requirements
Average
In uent
Average
In uent
In uent
Challenge
Concentration
In uent
Challenge
Concentration
Maximum
Effluent
Maximum
Effluent
Average
Effluent
Average
Effluent
Minimum %
Reduction
Minimum %
Reduction
Average %
Reduction
Average %
Reduction
Test Parameters: pH = 7.5 ± 0.5 unless otherwise noted. Flow = 0.5 gpm (1.9 Lpm). Pressure = 60 psig (413.7 kPa).
Temp. = 63 °F (17.2 °C).
Water Supply City or Well
Water Pressure 30 - 120 psi (207 - 827 kPa)
Water Temperature 33 °F - 100 °F (0.6 °C - 37.8 °C)
Service Flow Rate 0.5 GPM (1.89 L/min.) @ 60 psi. (413.7 kPa)
Class III particle size: >5 to <15 um
**Test requirement is at least 10,000 particles/mL of AC Fine Test Dust.
***These contaminants are not necessarily in your water supply. Performance may vary based on local water conditions.
®NSF is a registered trademark of NSF International.
Contaminant NSF Reduction Average Influent Challenge Maximum Average Minimum % Average % Reduction Requirements
Influent Concentration Effluent Effluent Reduction Reduction.
17
05-May-2021 10:43:59 EDT | RELEASED
In some European factories the letter "W" of the part code mentioned herein will be automatically
replaced by the number "4000" (e.g. "W12345678" becomes "400012345678")

Pour des questions sur les fonctionnalités, fonctionnement/performance, pièces, accessoires ou service, appelez le: 1-800-422-1230
ou visitez notre site Web à... www.kitchenAid.com
Au Canada, pour assistance, installation ou service, composez le: 1-800-807-6777, ou visitez notre site web à... www.KitchenAid.ca
TABLE DES MATIÈRES
SÉCURITÉ DU DOUBLE TIROIR ...................................19
Mise au Rebut de Votre Vieux Double Tiroir ................. 20
SPÉCIFICATIONS DU DESIGN ......................................20
Modèles de Tiroirs 24” ................................................. 20
EXIGENCES D’INSTALLATION .....................................20
Outils et Pièces .............................................................20
Exigences d’Emplacement ...........................................20
Dimensions du Produit ..................................................21
Panneaux de Superposition Personnalisés des Tiroirs ...22
Spécifi cations Électriques.............................................23
INSTRUCTIONS D’INSTALLATION ...............................23
Déballage du Double Tiroir ............................................ 23
Exigences d’Approvisionnement en Eau ......................24
Connexion d’Approvisionnement en Eau ......................24
Déplacement du Double Tiroir à sa
Localisation Finale ......................................................... 25
Nivellement du Double Tiroir ..........................................25
Installation du Panneau de Superposition
Personnalisé .................................................................. 26
Achèvement de l’Installation ..........................................26
UTILISATION DU DOUBLE TIROIR ..............................26
Bruits Normaux .............................................................26
Comment Assurer la Circulation Appropriée de l’Air.....26
Utilisation des Commandes ...........................................27
La Machine à Glaçons (Ice Maker) et le Système
de Filtration de l’Eau……………… ................................28
ENTRETIEN ET NETTOYAGE ........................................29
Nettoyage .....................................................................29
Enlever la Grille de la Base ...........................................30
Courpures de Courant ..................................................30
Soins de Vacances .......................................................30
Précautions à Prendre Avant un Déménagement .........30
DÉPANNAGE ..................................................................31
ASSISTANCE .................................................................33
Aux États-Unis. .............................................................33
Au Canada ....................................................................33
Accessoires ..................................................................33
FICHES TECHNIQUES DU PRODUIT ............................34
18
DOUBLE TIROIR
RÉFRIGÉRATEUR/CONGÉLATEUR
RÉFRIGÉRATEUR/RÉFRIGÉRATEUR
Modèles: KUDR204KSB, KUDR204KPA, KUDF204KSB,
KUDF204KPA
Guide d’Utilisation et d’Entretien et Instructions d’Installation
05-May-2021 10:43:59 EDT | RELEASED
In some European factories the letter "W" of the part code mentioned herein will be automatically
replaced by the number "4000" (e.g. "W12345678" becomes "400012345678")

SECURITÉ DU DOUBLE TIROIR
Votre sécurité et celle des autres est très importante.
Nous donnons de nombreux messages de sécurité importants dans ce manuel et sur votre appareil ménager.
Assurez-vous de toujours lire tous les messages de sécurité et de vous y conformer.
Risque possible de décès ou de blessure grave si vous ne suivez pas
immédiatement les instructions.
Risque possible de décès ou de blessure grave si vous ne suivez pas
les instructions.
Tous les messages de sécurité vous diront quel est le danger potentiel et vous disent comment réduire le risque de
blessure et ce qui peut se produire en cas de non-respect des instructions.
IMPORTANTES INSTRUCTIONS DE SÉCURITÉ
AVERTISSEMENT: Pour réduire les risques d’incendie, de décharge électrique ou de blessures lors de
l’utilisation du double tiroir, prendre quelques précautions fondamentales, y compris les uivantes:
Voici le symbole d’alerte de sécurité.
Ce symbole d’alerte de sécurité vous signale les dangers potentiels de décès et de blessures graves à
vous et à d’autres. Tous les messages de sécurité suivront le symbole d’alerte de sécurité et le mot
“DANGER” ou “AVERTISSEMENT”. Ces mots signifient:
Brancher sur une prise de courant à 3 alvéoles,
reliée à la terre.
Ne pas enlever la prise de liaison à la terre.
Ne pas utiliser d’adaptateur.
Ne pas utiliser de rallonge.
Déconnecter la source de courant électrique avant
l’entretien.
Replacer pièces et panneaux avant de faire la mise
en marche.
Enlever les portes de votre ancien double tiroir.
Utiliser un produit de nettoyage ininflammable.
Ne pas utiliser ou conserver d’essence ni de
liquides ou gaz inflammables à proximité de cet ou
d’autres appareils électriques. Les fumées peuvent
causer des incendies ou des explosions.
Ne pas conserver de substances explosives, par
exemple des bombes aérosols contenant un agent
propulseur, dans ce double tiroir.
Ne pas utiliser ni placer dans les compartiments du
double tiroir des dispositifs électriques d’un type
autre que celui expressément autorisé par le
fabricant.
Utiliser deux personnes ou plus pour déplacer et
installer le double tiroir.
Cet appareil ne convient pas à une utilisation par
des personnes (y compris des enfants) à capacités
physiques, sensorielles ou mentales réduites, ou
possédant un manque d’expérience et de
connaissances, à moins qu’elles ne soient placées
sous supervision ou qu’elles aient reçu des
instructions concernant l’utilisation de l’appareil par
une personne responsable de leur sécurité.
Les enfants doivent être placés sous surveillance
afin de s’assurer qu’ils ne jouent pas avec l’appareil.
Pour éviter le risque que des enfants restent
enfermés à l’intérieur et s’asphyxient, ne pas les
laisser jouer ou se cacher dans le double tiroir.
Si le cordon d’alimentation est endommagé, il doit
être remplacé par le fabricant ou son technicien
d’entretien ou une personne possédant une
qualification similaire.
Les prises d’air de l’enceinte de l’appareil ou de la
structure encastré doivent être dégagées en tout
temps.
Ne pas utiliser d’appareils mécaniques ou d’autres
moyens pour accélérer le dégivrage que ceux
recommandés par le fabricant.
Ne pas endommager le circuit frigorigène.
Pour les modèles avec glace/eau: Connectez
uniquement à l’alimentation en eau potable.
CONSERVER CES INSTRUCTIONS
19
05-May-2021 10:43:59 EDT | RELEASED
In some European factories the letter "W" of the part code mentioned herein will be automatically
replaced by the number "4000" (e.g. "W12345678" becomes "400012345678")

Mise au Rebut de votre Vieux
Double Tiroir
AVERTISSEMENT: Risque de coincement de
l’enfant. Avant de jeter votre ancien Double Tiroir:
Enlevez les portes.
Laissez les étagères en place
afin que les enfants ne
puissent pas facilement
grimper à l’intérieur.
Risque de Suffoquer
Enlevez les portes, les tiroirs ou le couvercle de votre
ancien appareil.
Le non-respect de cette instruction peut causer un
décès ou des lésions cérébrales.
IMPORTANT: Le risque qu’un enfant puisse se retrouver
coincé et suffoquer n’est pas chose du passé.
Les réfrigérateurs jetés ou abandonnés restent dangereux,
même s’ils ne restent à l’extérieur que pour
“quelques jours seulement”. Si l’ancien double tiroir doit être
mis au rebut, suivre les instructions suivantes afin d’éviter les
accidents.
Renseignements importants à propos de la mise
au rebut des uides réfrigérants:
Mettre le réfrigérateur au rebut conformément à la
réglementation fédérale et locale. Les fluides réfrigérants
doivent être évacués par un technicien certifié et agréé
par l’EPA conformément aux procédures établies.
Réfrigérateur/Congélateur à Tiroir (avec machine à
glaçons et ltre à eau):
Le tiroir de réfrigération supérieur et le tiroir de congélation
inférieur fournissent des options de stockage additionnelles
dans votre cuisine ou dans autres pièces de la maison.
La machine à glaçons installée en usine dans le tiroir inférieur
assure un approvisionnement constant et immédiat de
glaçons tout le temps.
EXIGENCES
D’INSTALLATION
Outils et Pièces
Rassembler les outils et pièces nécessaires avant
d’entreprendre l’installation.
Outils et pièces nécessaires:
Tournevis à tête cruciforme.
Panneau de Porte Décoratif Personnalisé – voir la section
“
Panneaux de Superposition Personnalisés des Tiroirs”.
Poignée personnalisée et matériel de fi xation (facultatif).
Pièces fournies:
8 vis fraisées de M4 x 30.
SPÉCIFICATIONS DU DESIGN
Modèles de Tiroirs 24”
Réfrigérateur à Double Tiroirs:
Un réfrigérateur à double tiroirs fournit des options de
stockage additionnelles dans la cuisine et dans autres pièces
de la maison.
KUDR204KSB KUDR204KPA
Acier Inoxydable
Panneau de Superposition
- Panneaux et Poignées
Personnalisés Nécessaires
KUDF204KSB KUDF204KPA
Acier Inoxydable
Panneau de Superposition
- Panneaux et Poignées
Personnalisés Nécessaires
IMPORTANT: Cet appareil est destiné à un usage domestique
et à d’autres usages similaires comme:
Espace de cuisine pour personnel de boutiques, bureaux et
autres environnements professionnels.
Fermes et par les clients des hôtels, motels et autres
environnements de type résidentiel.
Environnements de type chambres d’hôtes.
Exigences d’Emplacement
Risque d’Explosion
Garder les matériaux et les vapeurs inflammables, telle
que l’essence, loin la double tiroir.
Le non-respect de cette instruction peut causer
un décès, une explosion ou un incendie.
20
05-May-2021 10:43:59 EDT | RELEASED
In some European factories the letter "W" of the part code mentioned herein will be automatically
replaced by the number "4000" (e.g. "W12345678" becomes "400012345678")
La page est en cours de chargement...
La page est en cours de chargement...
La page est en cours de chargement...
La page est en cours de chargement...
La page est en cours de chargement...
La page est en cours de chargement...
La page est en cours de chargement...
La page est en cours de chargement...
La page est en cours de chargement...
La page est en cours de chargement...
La page est en cours de chargement...
La page est en cours de chargement...
La page est en cours de chargement...
La page est en cours de chargement...
La page est en cours de chargement...
La page est en cours de chargement...
La page est en cours de chargement...
La page est en cours de chargement...
La page est en cours de chargement...
La page est en cours de chargement...
La page est en cours de chargement...
La page est en cours de chargement...
La page est en cours de chargement...
La page est en cours de chargement...
La page est en cours de chargement...
La page est en cours de chargement...
La page est en cours de chargement...
La page est en cours de chargement...
La page est en cours de chargement...
La page est en cours de chargement...
La page est en cours de chargement...
La page est en cours de chargement...
-
 1
1
-
 2
2
-
 3
3
-
 4
4
-
 5
5
-
 6
6
-
 7
7
-
 8
8
-
 9
9
-
 10
10
-
 11
11
-
 12
12
-
 13
13
-
 14
14
-
 15
15
-
 16
16
-
 17
17
-
 18
18
-
 19
19
-
 20
20
-
 21
21
-
 22
22
-
 23
23
-
 24
24
-
 25
25
-
 26
26
-
 27
27
-
 28
28
-
 29
29
-
 30
30
-
 31
31
-
 32
32
-
 33
33
-
 34
34
-
 35
35
-
 36
36
-
 37
37
-
 38
38
-
 39
39
-
 40
40
-
 41
41
-
 42
42
-
 43
43
-
 44
44
-
 45
45
-
 46
46
-
 47
47
-
 48
48
-
 49
49
-
 50
50
-
 51
51
-
 52
52


KitchenAid DVE55A7700V/A3 Le manuel du propriétaire
- Catégorie
- Frigos
- Taper
- Le manuel du propriétaire
dans d''autres langues
Documents connexes
Autres documents
-
JennAir JUCFP242HL11 Manuel utilisateur
-
Whirlpool WUI75X15HB Le manuel du propriétaire
-
Whirlpool WUI75X15HB Mode d'emploi
-
-
-
Whirlpool WRB533CZJB Guide d'installation
-
Jenn-Air JBBFX24NHX Guide d'installation
-
JennAir JBBFX24NHX Guide d'installation
-
-
Maytag MSS25N4MKZ Mode d'emploi